
NU2 - Microphone Chord - Free user manual and instructions
Find the device manual for free NU2 Chord in PDF.


| Product Type | Dynamic Microphone |
| Polar Pattern | Cardioid |
| Frequency Response | 50 Hz - 15 kHz |
| Impedance | 600 ohms |
| Connector | XLR 3-pin male |
| Weight | 300 g (approx) |
| Dimensions | 170 mm x 50 mm (L x D) |
| Power Requirement | None (passive) |
| Main Functions | Vocal and instrument recording, live performance |
| Care and Cleaning | Wipe grill with damp cloth; avoid moisture |
| Safety Precautions | Keep away from liquids, do not disassemble |
| Spare Parts and Repairability | Contact Chord or authorized dealers |
| General Information | Designed for studio and stage use |
Frequently Asked Questions - NU2 Chord
User questions about NU2 Chord
0 question about this device. Answer the ones you know or ask your own.
Ask a new question about this device
Download the instructions for your Microphone in PDF format for free! Find your manual NU2 - Chord and take your electronic device back in hand. On this page are published all the documents necessary for the use of your device. NU2 by Chord.
USER MANUAL NU2 Chord
Dual UHF Wireless System
Item ref: 171.934UK, 171.935UK, 171.936UK, 171.937UK,
171.974UK, 171.975UK, 171.976UK, 171.977UK
User Manual

natural_image
Black wireless router with external earphones and two external microphones (no visible text or labels)Version 2.0

Caution: Please read this manual carefully before operating
Damage caused by misuse is not covered by the warranty
Introduction
Thank you for choosing the Chord NU2 wireless system. This professional wireless set provides 2 high quality microphones with UHF radio system for freedom of movement without loss of audio quality. Please read this manual before using this equipment in order to avoid damage through incorrect operation and to get the best performance from your purchase.
Please note: Channel 38 versions (606 - 614MHz) will require a license for legal operation.
Package Contents
• NU2 dual UHF wireless receiver
- 19" rack ears
- 2 x UHF aerials
- 2 x BNC antenna cables (for front panel mounting)
• 2 transmitters (NU2-H handhelds or NU2-N bodypacks)
- 2 x neckband and 2 x lavalier microphones (NU2-N only)
- Mains power adapter
- 6.3mm mono jack lead
- 4 x 1.5V AA battery
If you find any accessory is missing or the product has arrived with any problems, contact your retailer. These products contain no user-serviceable parts inside. Do not attempt to try to fix or modify these items yourself as this will invalidate the warranty. We recommend you keep the original package and proof of purchase for any possible replacement or returned demand.
Warning
To prevent the risk of fire or electric shock, do not expose any of the components to rain or moisture. If liquids are spilled on any component, stop using immediately, allow unit to dry out and have checked by qualified personnel before further use.
Avoid impact or heavy vibration to any of the components, dropping the microphone can cause capsule failure. No user serviceable parts inside transmitter or receiver - refer servicing to qualified service personnel.
Safety
- Ensure that the correct power adaptor is used with adequate current rating (350mA minimum) and that the mains voltage is as stated on the adapter.
- Avoid ingress of water or particles into the transmitters or receiver
• Use alkaline or NiMH batteries in the transmitters and remove if unused for long periods. - Observe the correct polarity when replacing batteries
Placement
- Keep all components out of direct sunlight and away from heat sources.
- Do not place heavy objects on top of the receiver or transmitters
- If rack-mounting, use rack ears provided and do not place heavy equipment above the receiver.
- Keep the transmitters and receiver away from damp or dusty environments.
Cleaning
- Use a soft cloth with a neutral detergent to clean the body of the handheld transmitter and receiver.
• Lightly damp sterile wipes may be used on the microphone grille for hygiene purposes - To avoid damage, do not use solvents to clean the components
Receiver Front Panel

- VOLUME control - Channel A
- RF carrier signal indicator - Channel A
- AF audio signal indicator - Channel A
-
RF carrier signal indicator - Channel B
-
AF audio signal indicator - Channel B
- VOLUME control - Channel B
- Power on/off switch
Receiver Rear Panel

- Power on/off switch
- BNC antenna connector - Channel B
-
Balanced XLRM output - Channel B
-
Unbalanced 6.3mm jack mix output
- Balanced XLRM output - Channel A
- Po BNC antenna connector - Channel A
Transmitters
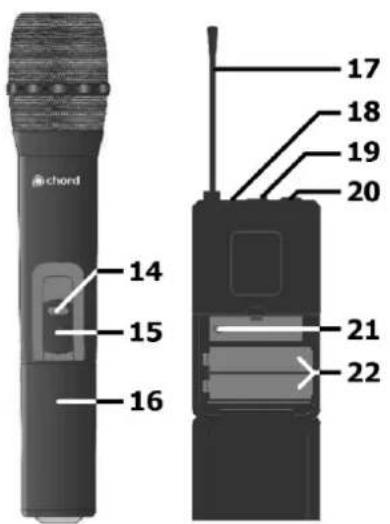
- On indicator (handheld)
- Off - Mute - On switch (handheld)
- Battery compartment (handheld)
- Antenna
- On indicator (bodypack)
- On/off switch (bodypack)
- 3.5mm threaded jack socket
- Gain control
Note: If replacement transmitters are required, these must be genuine Chord branded transmitters which transmit the correct pilot tone to match with the receiver. Transmitters which have the same carrier frequency but not the correct pilot tone will not work with NU-series receivers.
Setting Up
Insert the supplied AA batteries into the handheld transmitters by carefully unscrewing the base to reveal the battery compartment inside the microphone body, connect the batteries (ensure + and - are the correct way around for each cell) and carefully screw the base back on. For bodypack transmitters, squeeze and flip forward the front cover to reveal the battery compartment and insert AA batteries, observing correct polarity. Connect the 3.5mm jack connector from the neckband or lavalier microphone to the input on top of the bodypack transmitter and rotate to secure the thread.
Position the receiver within the best available line of sight to the transmitters and connect the DC jack of the supplied power adapter to the receiver and the plug-top to the mains outlet. Connect both antennas to the BNC connectors on the rear panel or alternatively, attach to the rack ears, connecting via the BNC extension leads supplied. Turn mic levels down on the receiver.
A choice of mixed output of both microphones on 6.3mm jack or individual balanced XLR outputs is available on the rear panel of the receiver. Connect jack or XLR (optional) leads to the relative output connector(s), turn down the volume of any equipment (mixer, amplifier etc.) that the signal will be fed into and then connect the jack or XLRs to the equipment.
Warning! - take care not to point microphones towards speakers – this can cause damaging feedback (loud whistle or howling noise) – try to aim microphones away from the speaker cabinets.
Operation
Switch on power to the receiver unit.
Move the switch on the handheld transmitter to the first notch (MUTE) – the LED should light momentarily. Move on another notch (Fully ON) and gradually increase the microphone level on the receiver (for bodypack transmitters, just switch "ON"), then increase the volume on the mixer or amplifier until the sound from each microphone can be heard through the equipment. (Note: if output is low from the neckband or lavalier microphone, it may be necessary to adjust Gain control inside the bodypack unit).
During use, it may be useful for the reception of the microphone to be muted for a short period of time (e.g. to avoid feedback when walking across the front of a speaker or avoid handling noise when placing the microphone down momentarily or adjusting a neckband microphone). In these circumstances, it may be better to move the transmitter switch to the "MUTE" position, which maintains the radio frequency carrier signal but mutes the microphone input. When this switch is moved back to the "ON" position, the sound will be immediately restored without waiting for the radio signal to be reinstated.
If the wireless system is not to be used for more than a few seconds, it is preferable to slide the transmitter switch to the "OFF" position, which mutes and deactivates the radio signal and powers down the transmitter. Turn down the volume of the mixer or amp and then switch off the receiver.
Unplug signal leads from the receiver and mixer or amplifier when moving or packing away. If the system is not to be used for long periods of time, remove the batteries from the transmitters and unplug the power adapter from the receiver and the mains outlet. Folding away or removing the antennae can also help avoid damage when the system is not in use.
Specifications
| Power supply (receiver) | 12 - 18Vdc 500mA adaptor (supplied) |
| Batteries (transmitters) | 4 x AA (2 per transmitter - included) |
| Carrier frequency (171.974UK, 171.976UK) | 863.3MHz + 864.3MHz (channel 70 - license free) |
| Carrier frequency (171.975UK, 171.977UK) | 863.8MHz + 864.8MHz (channel 70 - license free) |
| Carrier frequency (171.934UK, 171.936UK) | 608.050MHz + 606.175MHz (channel 38) |
| Carrier frequency (171.935UK, 171.937UK) | 611.775MHz + 613.825MHz (channel 38) |
| Stability | 10PPM |
| S/N ratio | >96dB |
| THD | <0.1% @ 1kHz |
| Image rejection | >85dB |
| Range | 60m (max) |
| Output impedance | 2.2kΩ |
| Output level | 400mv (balanced), 200mv (unbalanced) |
| Connectors | DC in, 2 x XLRM, 6.3mm jack, 2 x BNC antenna |
| Dimensions - handheld transmitter | 243 x 48mm∅ |
| Dimensions - bodypack transmitter | 205 x 68 x 25mm |
| Dimensions - receiver | 409 x 190 x 44mm |
| Weight - handheld transmitter | 238g (no battery) |
| Weight - bodypack transmitter | 76g (no battery) |
| Weight - receiver | 1.37kg |
Troubleshooting
| "POWER" LED does not light on receiver | Ensure power adapter is connected to mains and working properly |
| Ensure receiver is switched on | |
| "POWER" LED is lit but no "RF" or "AF" LEDs | Ensure transmitter is switched on |
| Check that transmitter is not out of reception range | |
| Check that transmitter batteries are good/charged | |
| "POWER" and "RF" LEDs are lit but no "AF" and no sound | Check that transmitter switch is not in "MUTE" position |
| Ensure transmitter has good/charged batteries | |
| Ensure there is no other nearby transmitter with the same frequency | |
| All LEDs lit but no sound from mic | Make sure receiver is connected to mixer/amplifier |
| Ensure that receiver and amplifier/mixer channel volumes are turned up | |
| Microphone output is very loud or distorted | Turn down VOLUME on receiver |
| Turn down gain on bodypack transmitter | |
| Reduce gain on mixer/amplifier | |
| Ensure that an XLR output is not fed to a line input | |
| Microphone output is very low | Turn up VOLUME on receiver |
| Turn up gain on bodypack transmitter | |
| Increase gain of mixer/amplifier input | |
| Ensure that a jack output is not fed to a mic input | |
| Check transmitter batteries |


Brand : Chord
Model : NU2
Category : Microphone