
copia 9017 - Photocopier OLIVETTI - Free user manual and instructions
Find the device manual for free copia 9017 OLIVETTI in PDF.


| Product Type | Plain paper photocopier |
| Brand | Olivetti |
| Model | copia 9017 |
| Dimensions (W x H x D) | 610 mm x 416 mm x 617 mm |
| Weight | 46.2 kg |
| Power Supply | 230 V, 15 A, 50 Hz |
| Maximum Power Consumption | 1.5 kW |
| Warm-up Time | Max. 25 s (at 20 °C) |
| First Copy Time (A4, 1:1) | 9.5 s |
| Copy Speed (A4) | 17 copies/min |
| Copy Speed (A3) | 9 copies/min |
| Copy Ratios | 50% to 200% zoom, 5 fixed ratios |
| Paper Feed | 500-sheet cassette + 50-sheet stack bypass |
| Maximum Original Size | A3 |
| Copy Sizes | A3, A4, A4R, A5R (cassette); A3 to A6 (bypass) |
| Multiple Copies | 1 to 99 |
| Exposure Control | Automatic and manual |
| Optional Units | Automatic Document Feeder (ADF), 10-bin sorter, stapler sorter, control card/printer unit |
| Routine Cleaning | Clean platen glass, cover, corona assembly, and stack charge eliminator weekly |
| Safety Features | Auto power-off after 30 min, auto clear after 2 min, paper jam detection |
| Consumables | Specific toner cartridge and copy paper (recommended) |
| Spare Parts / Repairability | Contact authorized dealers or Technical Assistance Service |
Frequently Asked Questions - copia 9017 OLIVETTI
User questions about copia 9017 OLIVETTI
0 question about this device. Answer the ones you know or ask your own.
Ask a new question about this device
Download the instructions for your Photocopier in PDF format for free! Find your manual copia 9017 - OLIVETTI and take your electronic device back in hand. On this page are published all the documents necessary for the use of your device. copia 9017 by OLIVETTI.
USER MANUAL copia 9017 OLIVETTI
PUBLICATION ISSUED BY:
Olivetti Lexikon, S.p.A.
Documentazione
77, Via Jervis - 10015 Ivrea (Italy)
Copyright © 1999 by Olivetti
All rights reserved
Publishing Department:
Olivetti Lexikon, S.p.A.
P.B.U. Ink Jet
ENERGY STAR is a U.S. registered mark.
The manufacturer reserves the right to carry out modifications to the product described in this manual at any time and without any notice.
The C mark affixed to the product certifies that the product satisfies the basic quality requirements.

Your attention is drawn to the following actions that could compromise the characteristics of the product:
- incorrect electrical supply;
- incorrect installation; incorrect or improper use, or, in any case, not in accordance with the warnings given in the User Manual supplied with the product;
- replacement of original components or accessories with others of a type not approved by the manufacturer, or carried out by unauthorized personnel.
CONTENTSCONTENTS
Page
Notes on using the Instruction Book 2
Installation and operating Precautions 2
General Features 3
Basic Configuration 3
Control Panel 4
Automatic Document Feeder - ADF 4
Sorter 5
Stapler Sorter 5
Control Card / Printer Unit 5
COPYINGCOPYING
Start-up 6
Placement of the Original 6
Setting the Number of Copies 7
Starting and stopping a Copying Job 7
Auto Clear 7
Auto Power-off 7
Adjusting Copy Exposure 7
Using the Stack Bypass 8
Reductions and Enlargements 8
Copying Adjacent Pages on Separate Sheets 9
Copying on Special Media 10
Making Two-sided Copies 10
PAPER AND TONER
Loading Copy Paper 11
Adding Toner 12
MESSAGES
When a Paper Jam Occurs 13
When the Paper Runs out 15
When the Toner Runs out 15
Self-diagnostic Messages 15
Control Card 15
Operator Troubleshooting 16
CLEANING AND CONSUMABLESCLEANING AND CONSUMABLES
Routine Cleaning 17
Consumables 18
Control Card / Printer Unit 30
Index
Thank you for purchasing our photocopier. This instruction manual describes the machine's functions and system for use, the precautions to be taken to ensure safe operation, and the basic maintenance operations.
Read the manual carefully before starting to use the machine, so as to familiarize yourself with its many functions and get the best use out of them. You are advised to keep the manual for further consultation while using the photocopier.
INTRODUCTION INTRODUCTION
1. The right choice
This desktop photocopier with fixed platen through its high performance promptly proves itself the right choice for those who require optimum quality and reliability from their copier.
2. Simple and easy to use
Keys and display indicators are designed ergonomically to make use simple and effective.
3. Ideal versatility
- Paper is fed both automatically by front cassette which holds 500 sheets or by multi bypass which holds 50 sheets, particularly useful for loading of special media or non-standard formats.
- Exposure setting: both automatic and manual.
- Reductions/enlargements: Zoom ranging from 50% to 200%, 5 fixed ratios, reproduction ratio is selected automatically for copiers with ADF.
- Reproduction of three dimensional documents and objects on any media: headed and coloured paper, transparencies and adhesive labels.
- It is possible to copy automatically adjacent book pages on separate sheets and produce front-rear copies manually.
• Automatic Auto Power-off
4. Optional Units
The wide choice of optional units:
• automatic document feeder
- sorter with or without stapler
• control card for the recording/printing of the number of copies made
establish this machine as a photocopier with the ability to match its production capacity with the increase in user demands: rapid copy production, excellent quality, pages sorted and stapled to become professional documents.
1. Graphics and text layout
The illustrations are included in the text. On the inside cover you will find drawings (A-F) of the control panel, the machine configuration and the optional units.
Important information is printed in bold face and is preceded by the ! symbol.
The ☐ symbol indicates a reference to another section associated with the current topic.
At the end of the English section there is an Index which will enable you to locate topics quickly.
2. Keys and other parts of the control panel
In the instructions, the names of the keys and other elements are always followed by a letter and a number: the letter identifies the drawing and the number identifies the element.
example: START key (A28)
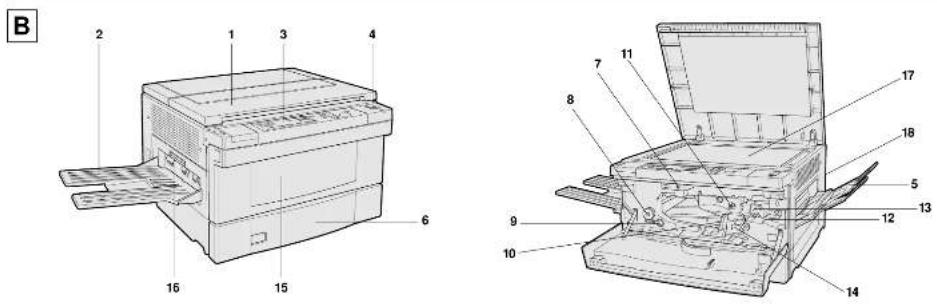
3. Components
The main title under which the parts are grouped is followed by the letter that identifies the drawing. Each part is preceded by the reference number that identifies it in the drawing on the inside cover.
example: BASIC CONFIGURATION (section B on the inside cover)
- Cover
4. Indicators
- Indicate to the user where the problem lies ( «Control panel», p. 4; «Messages», p. 13); indicate function in action or mode chosen ( «Control panel», p. 4).
INSTALLATION AND OPERATION PRECAUTIONING PRECAUTIONS
To ensure that the photocopier works efficiently, observe the following precautions when selecting a site to install the photocopier.
- Place the copier on a level surface.
• Make sure there is enough room around the copier to allow air circulation and easy access. - Do not expose the photocopier to direct sunlight, avoid humid, dusty environments and do not expose the photocopier to rapid changes in temperature and humidity.
- Do not install the photocopier near computers, televisions, radios or other similar electronic equipment (risk of interference).
- The wall socket should be earthed and used only for the copier.
- Do not place objects on top of the copier and do not press on the platen.
- Keep the platen glass and the cover clean.
- Remove carefully staples and clips from originals to prevent them falling into the copier.
• Take great care when operating in the fusing area, which may be very hot.
- Do not switch the machine off or open it while copying is in progress as this may cause the paper to jam.
- Do not use aerosol sprays near the copier.
- Unplug the power cable from wall socket to completely disconnect the copier, or if the copier is not to be used for more than one week.
- When the copier fails to function properly, refer to the chapter on Operator Troubleshooting (p. 16). In most cases, you will be able to resolve the problem yourself. If you cannot, switch off the copier, disconnect the power cord and call the Technical Assistance Service.
! Connect the photocopier to a 220/240 V AC outlet rated for a minimum current of 15 A.
GENERAL FEAGENESRARESEA
| Type: | Plain paper photocopier |
| Glass platen: | Fixed |
| Photoconductor: | OPC cartridge |
| Toner: | Black mono-component cartridge |
| Paper feed: | Cassette (500 sheets)Multi bypass (approx. 50 sheets) |
| Originals: | Printed sheets, books and three-dimensional objects (up to 2 kg) |
| Maximum size of original: | A3 |
| Copy sizes: | A3, A4, A4R, A5R (cassette feeding)A3 - A6 (manual feeding) |
| Warm-up time: | Max. 25 s (20 °C) |
| Time for first copy: | 9.5 s (A4 size, 1:1 copying, manual exposure control) |
| Copy speed (100%): | A3 = 9 copies/min; A4 = 17 copies/min; A4R = 12 copies/min |
| Copying ratios: | Direct: 100% (1:1)Fixed reductions: 70.7%; 50 %Fixed enlargements: 141.4%; 200%Zoom: 50 - 200% (increments 1%)Automatic selection (with ADF) |
| Multicopies: | 1 - 99 |
| Power supply voltage: | 230 V, 15 A, 50 Hz |
| Maximum power consumption: | 1.5 kW |
| Dimensions (mm): | Width 610, Height 416, Length 617 |
| Weight: | 46.2 kg |
BASIC CONFIGURATION ONERGURANT (ISO# SPWR)
- Platen cover
- Copy tray
- Control panel
- Power switch
- Stack bypass
- Paper cassette
- Setting device
- Fuse area knob
- Small brush
- Transport area release lever
- Corona assembly cleaner
- Developing unit release lever
- Developing unit (toner)
- Stack charge eliminator
- Front door
- Left door release handle
- Platen glass
- Serial number plate
CONTROL PANEL (INSIDE CONTROPE PANEL INSIDE A
- Sort indicator
Indicates sort mode - Group indicator
Indicates group mode - Sorter key
Selects sort/group modes - Two-page separation key
Selects copying of original on two separate sheets - Separation mode indicator
Indicates selection of separation mode - Fixed reproduction ratio indicators
Indicate copy ratio - Paper jam location/paper supply indicator
Indicate location of paper jam and type of feeder - Paper jam indicator
Indicates sheet jammed - Control card indicator
Indicates that card is not inserted - Toner out indicator
Indicates there is no toner - Paper out indicator
Indicates there is no paper - Display
Displays number of copies or reproduction ratio - Reset key
Returns copier to original state - Stop key
Stops copying - Exposure lever
Makes copies darker or lighter - Automatic exposure key
Makes copies darker or lighter automatically - Automatic exposure indicator
Indicates selection of automatic exposure mode - Fixed reductions key
Selects fixed reductions - 1:1 copy key
Selects copy ratio 1:1 - Fixed enlargements key
Selects fixed enlargements - Feeder selector key
Selects cassette or multi bypass - Automatic copy ratio indicator
Indicates automatic selection of copy ratio - Automatic reproduction ratio selection key
Automatically selects reductions/enlargements (only for copiers with ADF) - Zoom - key
Selects reductions up to 50% - Zoom key indicator
Indicates zoom mode selection - Zoom + key
Selects enlargements up to 200% - Reproduction ratio display key
Shows copy ratio value - Start key
Starts copying - Numerical keys
Used to set number of copies - Clear key
Clears setting
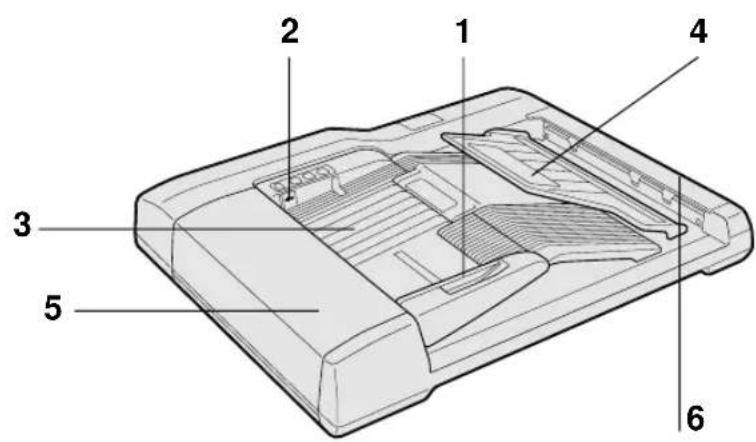
AUTOMADO DOCUMENT FEEDER TIAD DOCUMENT FEEDER
- Slide guide
- Original set indicator
- Original tray
- Original delivery tray
- Top cover
- Inside cover
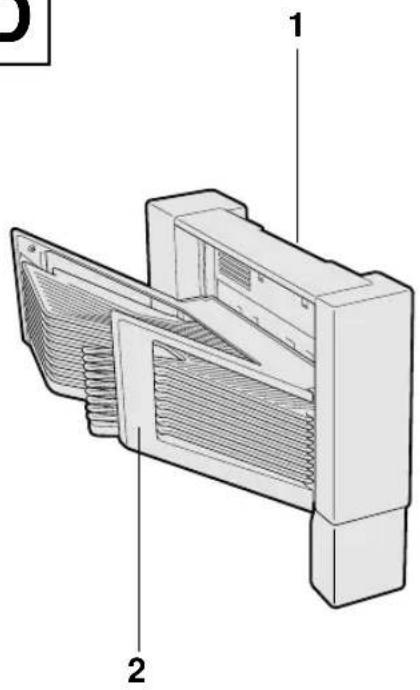
SORTER (SOPPEROVERINSIDE)
- Pull handle
- Copy output bins
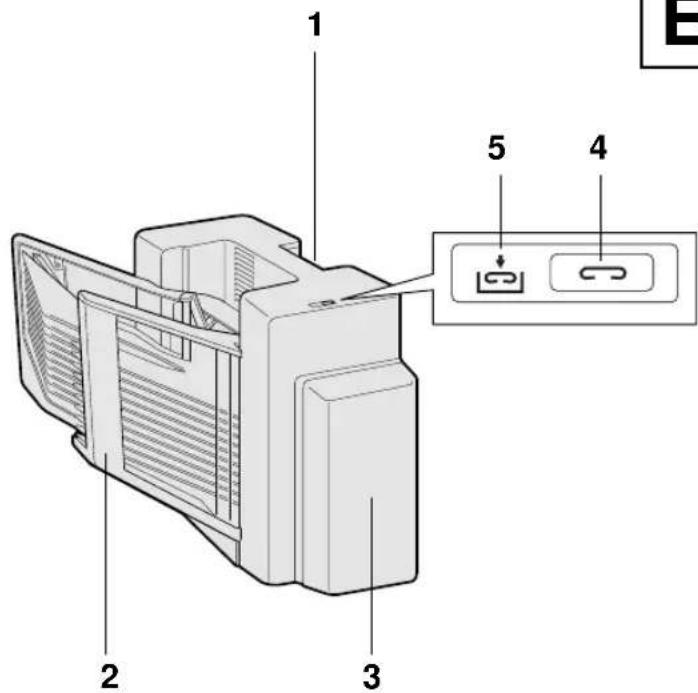
STAPLER SORTER (APLER SORTER)
- Pull handle
- Bins
- Stapler cover
- Stapler key
- Add staples indicator
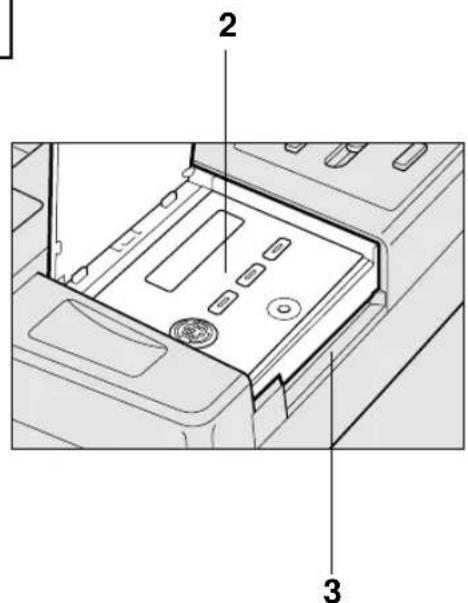
CONTROL CARD / PRINTER UNIT CONTROL CARD / PRINTER UNIT
- Printer
- Control card reader
- Slot for the control card
COPYINGCOPYING
The operating procedure is very simple. The name of the keys and their reference numbers are listed in «Control panel», p. 4. The control panel figure is found on inside of the cover.
When an operation is in process or a mode is selected, the indicator lights up.
Vice versa it is switched off when the function is deactivated.
STARTARTUP
! Make sure that the power plug is correctly inserted in the mains socket.

natural_image
Diagram of a device with a blue tool emitting light beams, showing no text or symbols.Set the POWER SWITCH (B4) in the position I (ON). The LED of the power switch lights up and the LED of the START key (A28) flashes (green). The copier is ready for settings and the print command.
Once the warm-up is over, the LED of the START key (A28) remains lit (green) and the copy procedure is automatically carried out.
Standard setting
| Start key: | Activated |
| Exposure: | Automatic |
| Copy ratio: | Direct (100%) |
| Paper feed: | Automatic from cassette |
| Number of copies: | 1 |
PLACEMENT OF THE ORIGINAL PLACEMENT OF THE ORIGINAL

natural_image
Illustration of a hand pressing down on a printer's screen with blue arrows indicating motion (no text or symbols)Lift the cover and place the original face down on the platen glass. Make sure that the top left-hand corner of the document lying face down corresponds with the V symbol marked on the top left-hand corner of the glass.
Gently lower the glass platen cover.
- If the copier does not contain the required size, use the stack bypass (p. 8) or adjust the cassette to the desired paper size («Adapting the cassette to a different paper size»), p. 11.
SETTING THE NUMBER OF COPIESSETTING THE NUMBER OF COPIES
Before starting to copy, the desired number of copies can be set (1-99) by pressing the NUMERIC keys (A29). To change the number of copies set previously or to correct a typing error, press the CLEAR key (A30).
STARTING AND STARTING AND COPYING JOBOPPING A COPYING JOB
Press the START key (A28) to start the copy cycle.
To stop the photocopier before the end of the copy cycle, press the STOP key (A14); to reset the number of copies to be made to 1, press the CLEAR key (A30).
Once copying is finished, to return the copier to the standard mode, press the RESET key (A13).
AUTO CLEAR AUTO CLEAR
When the photocopier is switched on, if no key is pressed for 2 minutes, the standard copy settings are restored automatically.
AUTO POWER-OFF AUTO POWER-OFF
When the photocopier is switched on, if no key is pressed for 30 minutes, the POWER SWITCH (B4) is automatically turned off.
To switch the machine back on, use the POWER SWITCH (B4) again.
- The Auto Power-off function setting can be changed by your Technical Service.
ADJUSTING COPY EXPOSURE ADJUSTING COPY EXPOSURE
There are two ways of adjusting the copy exposure:
1. Automatic Control
This is enabled when the copier is switched on and the LED is lit. When manual exposure control is activated, to return to automatic mode press the AUTOMATIC EXPOSURE key (A16).
2. Manual Control
Cancel the automatic exposure mode by pressing the AUTOMATIC EXPOSURE key (A16) (LED goes out) and use the EXPOSURE LEVER (A15).
To make copies darker move the slide to the right (dark half-moon).
To make copies lighter move the slide to the left (light half-moon).
- To adjust the exposure, should the copies not correspond to the original, ☐ «If the copies are too light or too dark», p. 16.
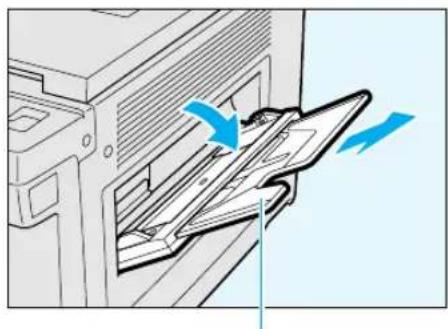
The stack bypass, located on the right-hand side of the photocopier (B5), holds up to 50 sheets (weight from 60 to 128 g/m ^2 ) up to a depth of 5 mm. The thickness must not exceed the maximum level indicated.
! Use the stack bypass when you want to copy onto special paper, such as transparencies, card, headed paper, labels or paper which does not fit the cassette.
Place the original on the platen glass and set the stack bypass by pressing the FEEDER SELECTOR key (A21).
natural_image
Diagram of a computer tower with an open door and a partially inserted slot, showing a blue arrow indicating direction (no text or symbols present)Auxiliary tray
natural_image
Illustration of a hand holding a tool with blue arrows indicating direction (no text or symbols)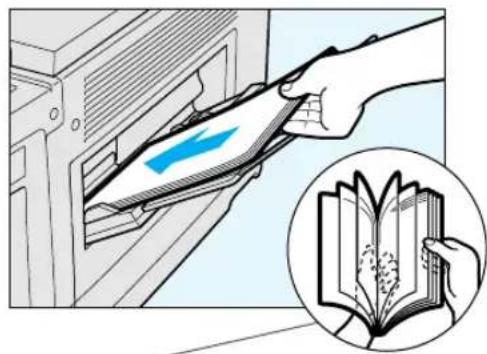
natural_image
Illustration of a hand inserting a card into a computer drive, with an inset showing the open book (no text or symbols present)Leaf through sheets before inserting
Open the stack bypass and remove the auxiliary tray.
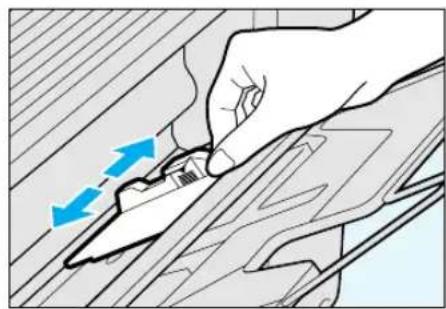
Adjust the paper guides to fit the desired size.
Insert the sheets by placing them on the stack bypass tray with the side on which you want the copy to appear facing up.
Set the copy mode (number of copies, copy exposure, copy ratio) and start copying by pressing the START key (A28).
Once copying is over, to return to the cassette feeder press the FEEDER SELECTOR key (A21).
REDUCTIONS AND ENLARGEMENTS REDUCTIONS AND ENLARGEMENTS
To reduce or enlarge copies, the user can choose from three different possibilities: with fixed ratios, with zoom and automatically. This last possibility is only for photocopiers fitted with an ADF unit.
The reproduction ratio represents the percentage value by which copies are reduced or enlarged.
1. Preset reductions/enlargements
This feature allows the operator to copy a standard original onto a larger or smaller standard size paper.
The preset copy ratios are:
Reduction:
50%
70% (A3 > A4) 200%
Enlargement:
141% (A4 > A3)
Press the FIXED ENLARGEMENTS key (A20) to make copies on a larger size.
Press the FIXED REDUCTIONS key (A18) to make copies on a smaller size.
The operator can see the ratio selected by the corresponding indicator on the control panel.
- When reducing a document from A3 to A4, select the A4R paper size.
2. Reductions/Enlargements with zoom
Using the zoom you may produce reduced or enlarged copies, with a reproduction ratio variable between 50 and 200% with 1% increments.
Press the ZOOM+ key (A26) to increase the value.
Press the ZOOM-key (A24) to decrease the value.
- The reproduction ratio value will be displayed for two seconds.
To see the value again, press the REPRODUCTION RATIO DISPLAY key (A27).
3. Reductions/enlargements in automatic mode (for ADF fitted photocopiers)
The reproduction ratio value is fixed automatically according to the size of the original and the size of the copy.
Press the AUTOMATIC REPRODUCTION RATIO SELECTION key (A23) for the automatic selection of the reproduction ratio.
- This function is only possible with the cassette feeding mode.
COPYING ADJACENT PAGPSYING AERIAGE/NEESESTE SHEETS
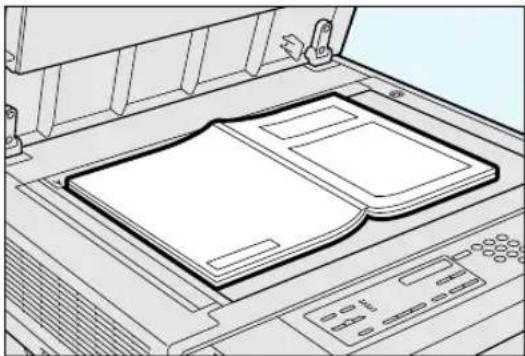
This procedure is used to copy adjacent pages of books or newspapers on separate sheets. It can also be used to speed up copying by copying two A4 documents at the same time.
• To use this feature the cassette feeder must be selected.
Press the TWO-PAGE SEPARATION key (A4).
natural_image
Line drawing of an open printer with two blank pages, no text or symbols presentPlace the original on the platen glass with the page with the highest number on the left, so that the pages will be copied in correct order.
Lower the cover and press the START key (A28).
Press the TWO-PAGE SEPARATION key (A4) once copying is complete to deactivate the mode.
- If multiple copies of each page are to be made, all the copies of the left-hand page will be made first, and then all the copies of the right-hand page.
It is possible to make copies on special media such as transparencies, cards, headed paper and adhesive labels. For the procedure 3 «Using the stack bypass», p. 8.
- For the feeding direction of the special media, follow the instructions on their packaging.
MAKING TWO-SIDED COPIESMAKING TWO-SIDED COPIES
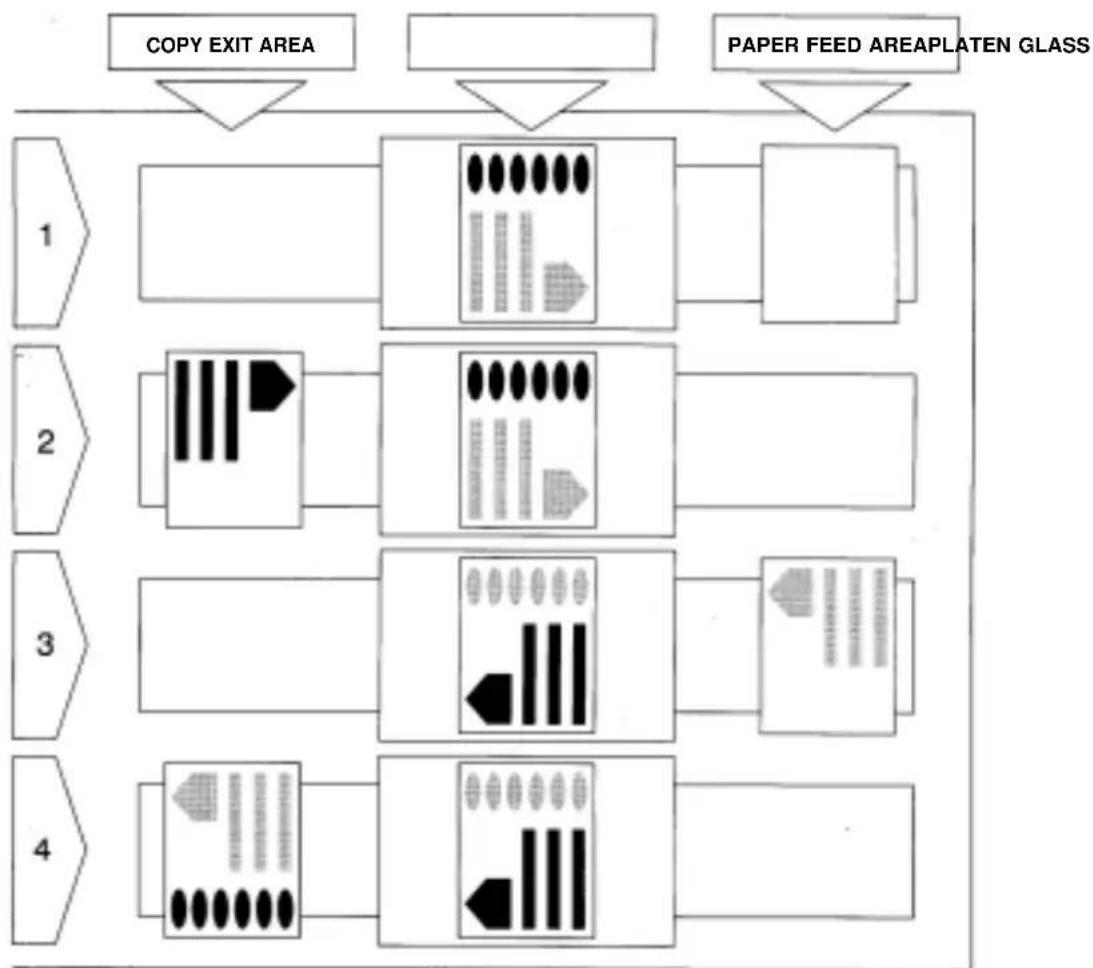
Copying in two-sided mode means making copies which bear two pages of original, one on each side. Follow the procedure shown in the drawing below.
-
Position the first original on the platen glass and proceed with copying in the normal way.
-
Make the copy of the first original.
-
Place the second original as shown in the figure (still with the side to be copied facing downwards, but with the top margin the opposite way round to the first). Position the copy of the first original in the stack bypass (B5) with the copied side facing downwards and the top margin facing outwards.
-
Copy the second original from the manual feed ( «Using the stack bypass», p. 8), thus obtaining a two-sided copy.
flowchart
graph TD
    A["1 COPY EXIT AREA"] --> B["2 PAPER FEED AREAPLATEN GLASS"]
    B --> C["3"]
    C --> D["4"]
    style A fill:#f9f,stroke:#333
    style B fill:#ccf,stroke:#333
    style C fill:#cfc,stroke:#333
    style D fill:#fcc,stroke:#333
! For this type of copying, the weight of the paper must be between 60 and 128 ~g / m^2 inclusive.
PAPER AND TAPHERANIER T
LOADING COPY PAPIDARERCOPY P
Loading paper into the cassette
natural_image
Illustration of a hand pressing down an electronic device with blue arrows indicating motion or force (no text or symbols present)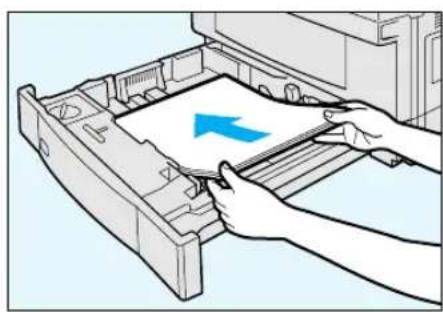
natural_image
Illustration of hands inserting a device into a printer case with a blue arrow indicating the process (no text or symbols present)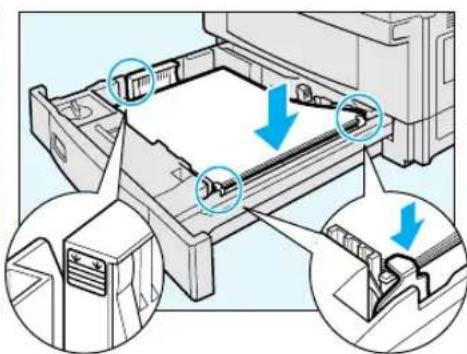
natural_image
Technical illustration of a mechanical assembly with blue arrows indicating direction of movement or force (no text or symbols present)Max fill indicator
Retaining tabs
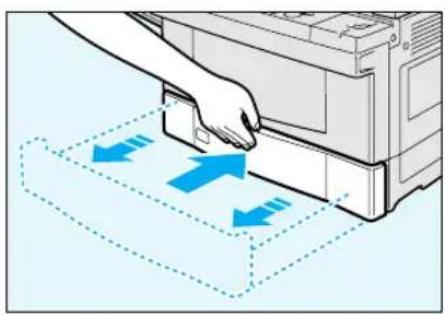
Press on the cassette at the indicated location.
Open a pack of copy paper and take out a stack of paper; turn the paper stack over and place it in the cassette against the right wall. Adjust the sheets so that the corner tabs rest on top of the paper. Make sure that the paper does not exceed the maximum level indicated. Push the cassette back in until it locks into position.
Adjusting the cassette to a different paper size
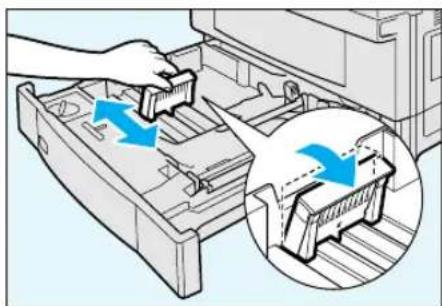
The photocopier has a cassette which can be adjusted directly by the user to hold the following standard paper sizes: A3, A4, A4R e A5R.
If you want to change the paper size of the cassette, proceed as follows.
natural_image
Illustration of a hand using a tool to remove or adjust a plastic component into an open drawer, with a magnified inset showing the process (no text or symbols present)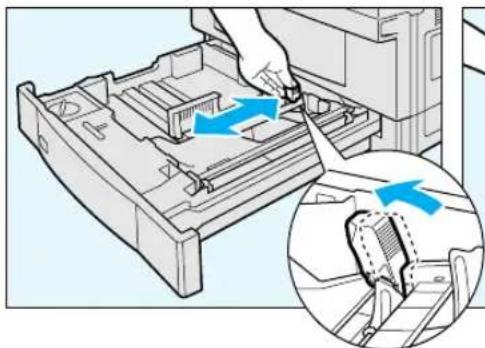
natural_image
Diagram showing a hand inserting a component into a device, with an inset close-up of the mechanical component (no text or symbols visible)
Adjustment guide releasing
Press on the cassette at the indicated location and then let go: the cassette will open automatically. Press the length adjustment guide to the right. Still pressing it, slide the guide up to the symbol for the desired size.
Press the width adjustment guide to the left. Still pressing it, slide the guide up to the symbol for the desired size. After adjusting the cassette, load the copy paper as shown in the above section and turn the paper size dial on the right of the cassette to the paper size loaded in the cassette.
Slowly push the cassette back in until it stops.
• Moreover it is possible to set a universal paper size: contact the nearest Technical Service for the details.
ADDING TONERADDING TONER
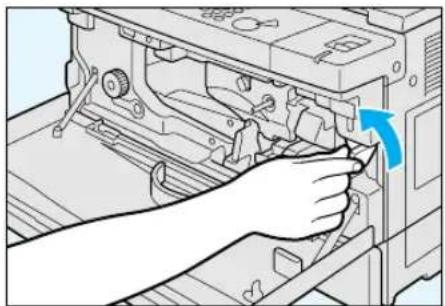
Take a new toner cartridge and follow the procedure described below.
natural_image
Illustration of a hand inserting a component into a machine (no text or symbols visible)Open the front panel and move the developer unit lever anticlockwise.
natural_image
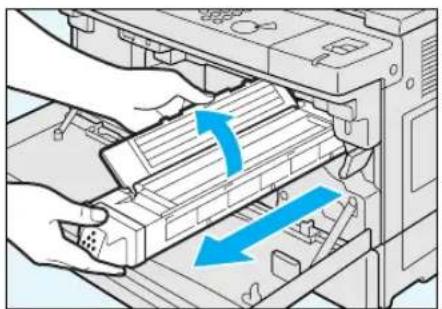
Illustration of a printer's internal structure with blue arrows indicating motion or movement (no text or symbols present)Pull the developer unit out until it stops. Open the cover.
natural_image
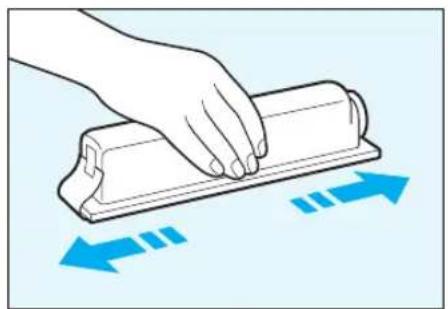
Illustration of a hand rolling a rolled document with blue directional arrows indicating movement (no text or symbols)Shake the new toner cartridge. Fit the edge of the cartridge in the developer unit groove, and insert the prong on the cartridge in the hole in the developer unit.
natural_image
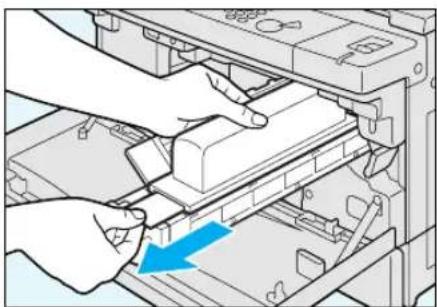
Illustration of hands operating a mechanical device with a blue arrow indicating a specific component (no text or symbols present)Press on the toner cartridge, making sure it is inserted correctly. Pressing the cartridge, remove the sealing tape from it. Tap the cartridge until all the toner has gone on.
natural_image
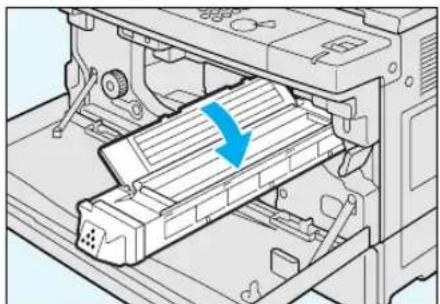
Diagram of a printer's internal structure showing a blue arrow indicating a component (no text or symbols present)Remove the empty cartridge from the unit; close the cover and push the developer unit back in.
natural_image
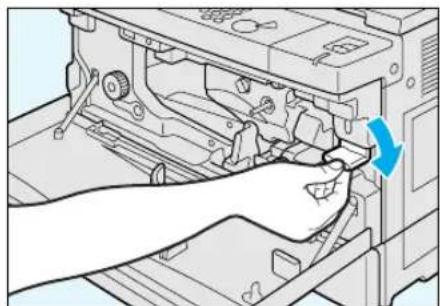
Diagram of a hand operating a computer motherboard with a blue arrow indicating a component (no text or symbols present)Bring the lever back to its original position and close the front panel.
MESSAGESMESSAGES
WHEN A PAPER JAM OCCURS WHEN A PAPER JAM OCCURS
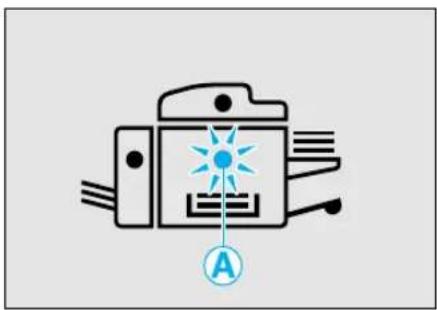
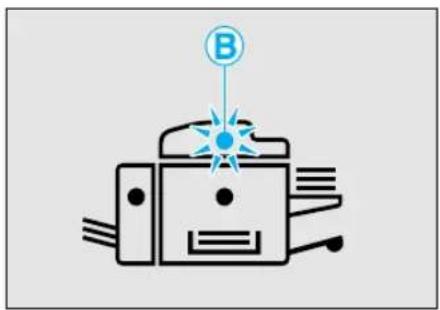
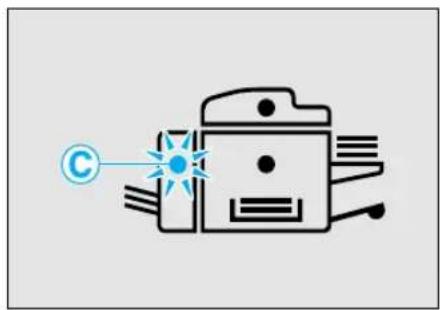
If paper gets jammed, the PAPER JAM indicator (A8) flashes and the point at which the paper jam has occurred is indicated by the PAPER JAM LOCATION indicator (A7).
Potential paper jam areas
The drawings below show the potential jam areas.
natural_image
Pure electrical circuit lines without any symbolsArea A Main unit
natural_image
Simple line drawing of a robot with a labeled point B above it, no text or symbols present.Area B ADF
natural_image
Simple line drawing of a device emitting sparks, no text or symbols presentArea Ⓒ Sorter
Occasionally jams may occur (for example two sheets) in two different areas of the photocopier at the same time; The user still has all the necessary indications available since the PAPER JAM LOCATION indicator (A7) indicates both jammed areas.
To remove the jammed paper follow the procedures described below.
Paper jam in area A
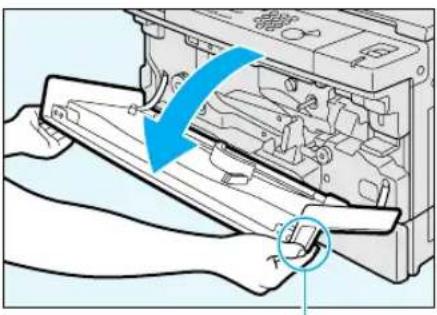
Copier front side (transport area)
natural_image
Illustration of a printer's internal structure with a blue arrow indicating the process (no text or symbols present)Handle
natural_image
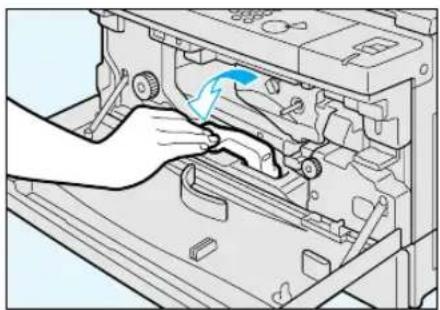
Illustration of a hand operating a mechanical device with a blue arrow indicating rotation (no text or symbols present)Turn the release lever (green) to the left.
natural_image
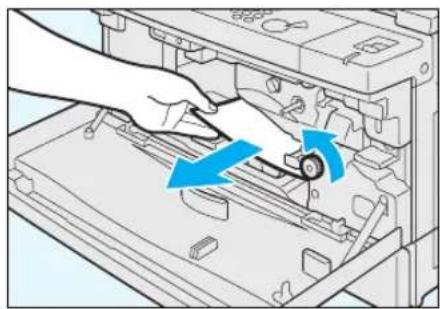
Illustration of a hand operating a computer drive with blue arrows indicating motion (no text or symbols)Turn the green knob in the direction of the arrow and remove any jammed paper. If the paper does tear, be sure to remove any remaining pieces.
Grip the handles on both side of the front door and open the front door.
! Do not touch the cylinder inside the photocopier to avoid damages on the copy.
Copier left side (delivery area)
natural_image
Illustration of a hand using a computer to press or adjust a device, showing a blue arrow indicating the process (no text or symbols present)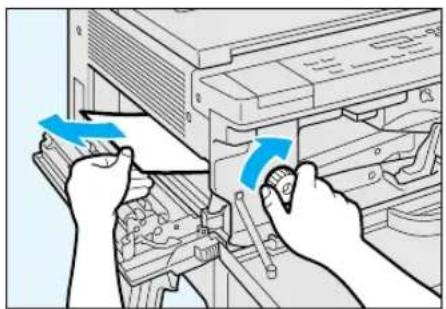
natural_image
Illustration of hands operating a computer tower with blue arrows indicating rotation or move (no text or symbols present)
natural_image
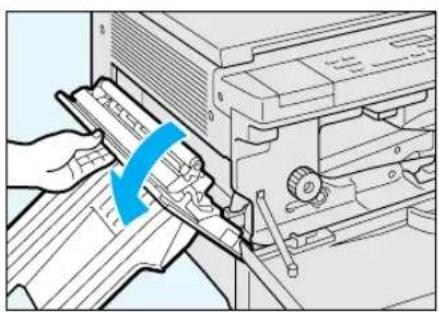
Illustration of a hand using a computer to press or adjust a device, with no visible text or symbols.Remove all paper from the copy output tray. Grip the release handle and carefully open the left door.
Turn the green knob clockwise and pull the paper out from the left side.
Firmly close the left door.
! This area inside the copier becomes very hot: DO NOT TOUCH.
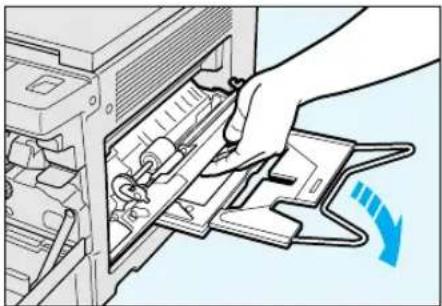
Copier right side (feeding area)
natural_image
Illustration of a hand inserting a device into a computer tower, showing internal components and a blue arrow indicating rotation (no text or symbols present)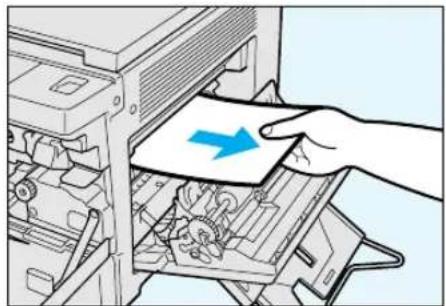
natural_image
Illustration of a hand inserting a card into a computer tower, with a blue arrow indicating the card's direction (no text or symbols present)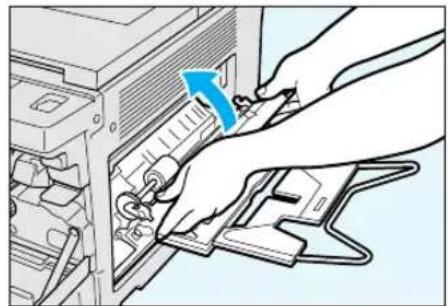
natural_image
Illustration of hands inserting a device into a computer tower (no text or symbols visible)Remove all paper from the stack bypass. Grip the release handle and carefully open the right door.
Carefully remove the jammed paper.
Grip the stack bypass tray from below and firmly close the right door.
After removing the jammed paper in the area A, return the lever to its original position and close the front door.
• To remove jammed paper in area B ○ p. 20.
• To remove jammed paper in area C, pp. 23 and 29.
If paper jams occur frequently
If paper often gets jammed, clean the STACK CHARGE ELIMINATOR (B14). To clean the stack charge eliminator follow the procedure described in the section «Cleaning and consumables», p. 18.
WHEN THE PAXIEN RUNS POUT APER RUNS OUT
When the paper runs out, the PAPER OUT indicator (A11) flashes on the control panel.
To load paper in the cassette ☐ «Loading copy paper», p. 11.
- The same indication is also given when the cassette is not correctly inserted, the stack bypass cover is open or the paper is out in the stack bypass.
WHEN THE TONER RUNS OUT WHEN THE TONER RUNS OUT
When the toner runs out, the TONER OUT indicator (A10) flashes on the control panel and the START key (A28) is deactivated.
To add toner 《Adding toner》, p. 12.
SELF-DIAGNOSTIC MESSAGES SELF-DIAGNOSTIC MESSAGES
If the machine malfunctions for any reason other than the paper or toner running out or paper jamming, the display (A12) will show a message formed by a letter E and a number blinking alternately.
In this case try to switch the machine off and on again. If the photocopier continues to malfunction, unplug the machine and call the Technical Assistance Service, notifying them of the error code.
CONTROL CARD CONTROL CARD
If the photocopier has the optional unit for the control card, the control card indicator can blink. In this case check that the control card is inserted correctly.
If the indicator continues blinking contact the Technical Assistance Service.
Faults not caused by the machine malfunctioning may occur, particularly during the initial phase. The following guidelines will help you to solve certain problems and to avoid wasting time.
The machine does not make copies
Check that:
- The power cable is plugged into the socket correctly (both the mains socket and the socket on the machine)
• The POWER SWITCH (B4) is in the I position (ON)
• The FRONT COVER (B15) is closed properly.
The copies are completely blank
Check that:
• The original is on the platen glass
- The photocopier is not indicating operating faults.
If paper jams occur frequently
Clean the stack charge eliminator (☐ p. 18).
If copies are marked in the same place
If marks occur in the same place on all copies, clean the platen glass and the cover (p. 17).
If copies are too light or too dark
If, having checked that the EXPOSURE LEVER (A15) is set to the right (darker copies) or to the left (lighter copies), the copies are still too light or dark, this is probably due to an incorrect exposure system adjustment.

natural_image
Pure electrical circuit lines without any symbolsTo adjust exposure, open the front panel, turn the SETTING DEVICE (C7) anticlockwise to obtain darker copies, clockwise to obtain lighter copies.
CLEANING AND CONSUMABLESCLEANING AND CONSUMABI
ROUTINE CLEANINGROUTINE CLEANING
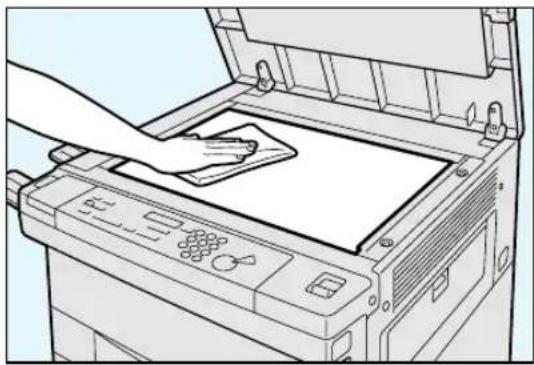
The following items should be cleaned weekly or if copies result marked or unclear.
natural_image
Line drawing of a printer with a hand inserting a paper into the cover (no text or symbols)Platen glass
Clean the platen glass with a cloth dampened with water or a neutral detergent, then wipe dry carefully.
natural_image
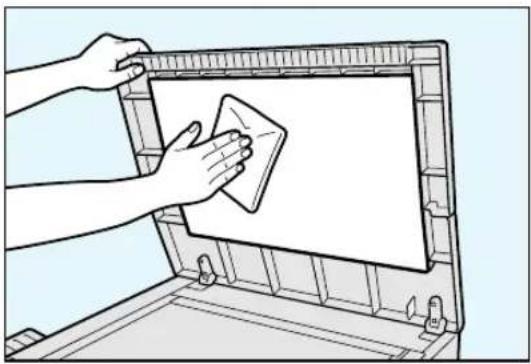
Illustration of hands cleaning a wall-mounted device with a cloth (no text or symbols)Platen cover
Clean the platen cover with a cloth dampened with water or a neutral detergent, then wipe dry carefully.
natural_image
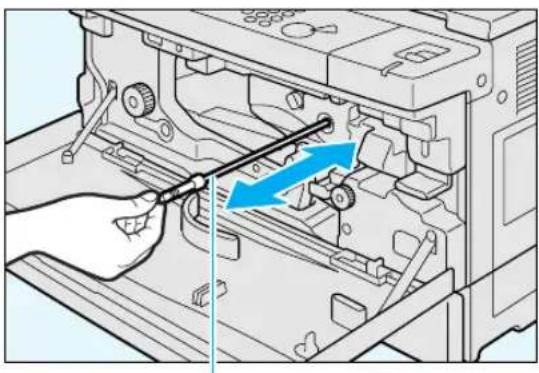
Mechanical assembly diagram showing a hand operating a device with a blue directional arrow indicating motion (no text or symbols present)Corona assembly
Switch off the copier and open the front cover (B15). Pull out the corona assembly cleaner (B11) and then push it back in.
Repeat the operation several times, then replace the corona assembly cleaner in the original position.
Corona assembly cleaner
Stack charge eliminator
natural_image
Illustration of a hand inserting a device into a computer case with blue arrows indicating motion (no text or symbols)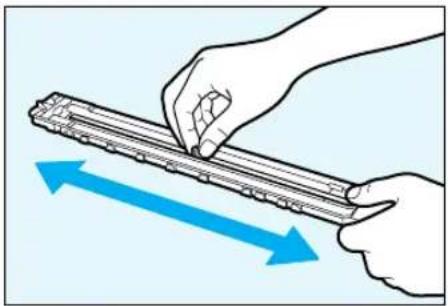
natural_image
Illustration of two hands holding a cylindrical object with blue directional arrows indicating movement or force (no text or symbols)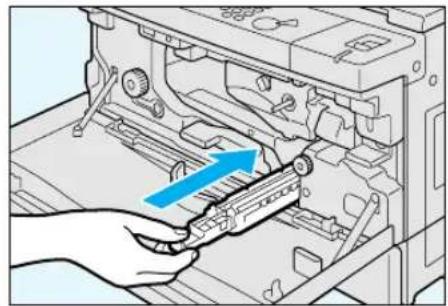
natural_image
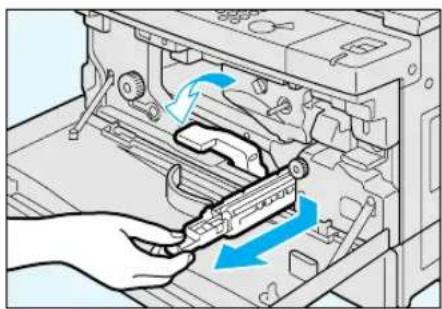
Illustration of a hand inserting a device into a computer chassis, with a blue arrow indicating the direction (no text or symbols present)Open the front cover. Move the green lever to the left. Slightly press on the stack charge eliminator and remove it.
Turn the stack charge eliminator over and move the cursor from one end to the other several time.
Using the small brush (B9) clean the orange grooving of the stack charge eliminator.
Put it back into the copier; move the lever to the right and close the front cover.
For this photocopier we recommend you the use of the consumables indicated below, which are available from the authorized dealers.
Copy paper
In addition to standard size copy paper, transparencies, labels and other types of paper are available. Contact your local dealer.
• To obtain high-quality copies, use only recommended paper.
• To prevent the paper getting damp, keep it wrapped in its original packaging.
Toner
When the toner runs out, the TONER OUT indicator (A10) starts blinking and the START key (A28) is deactivated. Use the specific toner for this photocopier which is available from the authorized dealers.
- Keep the toner in a cool place out of direct sunlight: maximum temperature 35 °C, humidity 80%.
(inside cover sect C) inside cover sect C)
This optional device automatically places documents on the platen glass. At the end of the copying cycle, the documents are placed in the tray.
To locate the parts of this device, ☐ p. 4.
Acceptable Originals
Weight: from 50 to 105 g/m
2
Original size: A3, A4
Original tray capacity: A3 15 sheets
A4 30 sheets
! Do not place the following kinds of original in the ADF:
- Originals that are torn or have large punched binding holes
• Excessively crumpled or rolled-up originals
• Originals held together with paper clips or staples
• Carbon paper or other originals that cannot be transported easily
• Transparencies or other highly transparent originals
Using the ADF
Slide guide
natural_image
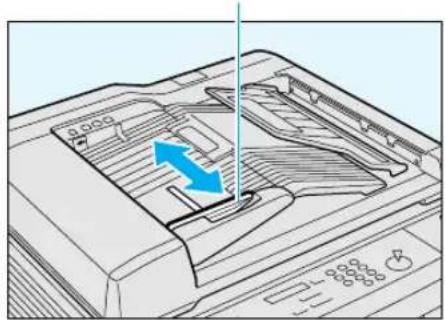
Diagram of a printer internal structure with blue arrows indicating a directional flow (no text or symbols)Adapt the paper guide (C1) to the size of the originals.
natural_image
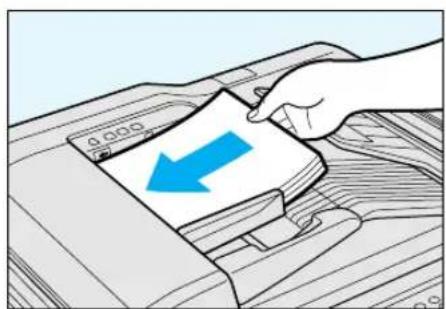
Illustration of a hand inserting a card into a printer (no text or symbols visible)Place the originals in the document tray (C3) with the side to be copied facing upwards.
natural_image
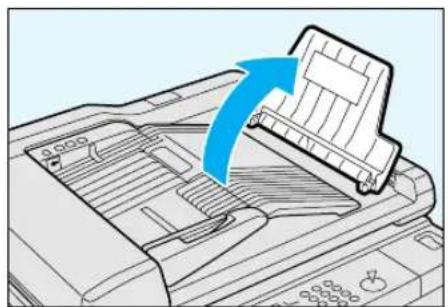
Diagram of a printer printer with a blue arrow indicating the process (no text or symbols present)When placing A3 or A4-size originals horizontally, flip open the original delivery tray.
Enter the required number of copies and press the START key (A28).
To stop copying press the STOP key (A14).
- If an original is placed on the ADF while another is on the platen glass, the PAPER JAM (A8) and PAPER JAM LOCATION (A7) indicators will blink until the original on the platen glass is removed.
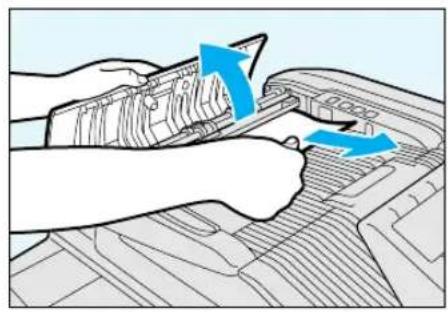
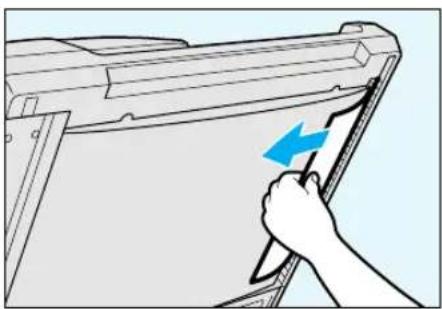
Removing jammed originals
If paper gets jammed in the ADF, the PAPER JAM indicator (A8) and the PAPER JAM LOCATION indicator (A7) blink at the same time, the latter indicating area B (「When a paper jam occurs», p. 13).
To remove jammed originals, follow the procedure described below.
natural_image
Illustration of hands using a tool to adjust or install a mechanical component, with blue arrows indicating direction (no text or symbols present)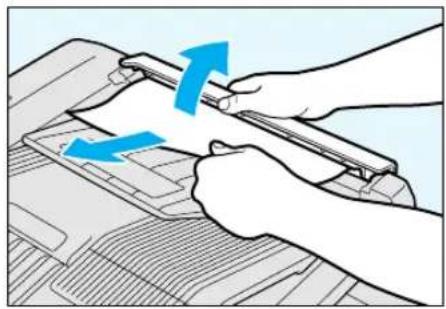
natural_image
Illustration of hands using a tool to adjust or install a component, with blue arrows indicating motion (no text or symbols)
Handle
Open the top cover (C5) and remove any jammed originals.
Open the inside cover (C6) and remove any jammed originals.
Raise the ADF; open the top cover ① then open cover ② by pressing the handle shown in the illustration. Remove any jammed originals.
natural_image
Illustration of a hand holding a pen with a blue arrow indicating compression or disassembly (no text or symbols present)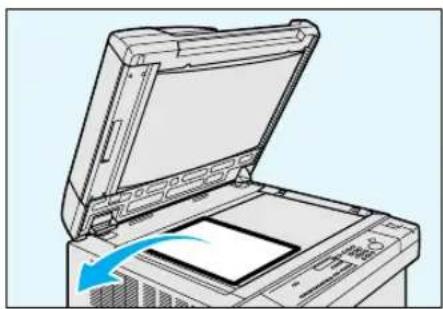
natural_image
Illustration of an open printer with a blue arrow indicating print direction (no text or symbols)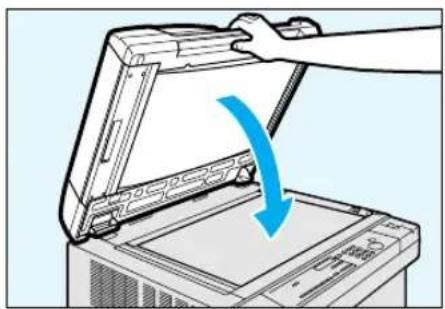
natural_image
Illustration of a hand using a tool to press down an open computer case with a blue arrow indicating the process (no text or symbols present)Remove any jammed original from the bottom right side of the ADF.
Remove any original from the platen glass.
Lower the ADF.
Technical Characteristics
Maximum power consumption:
Dimensions (mm):
Weight:
60 W
Length 610, Width 510, Height 100
10.2 kg
The automatic identification of sheets not copied
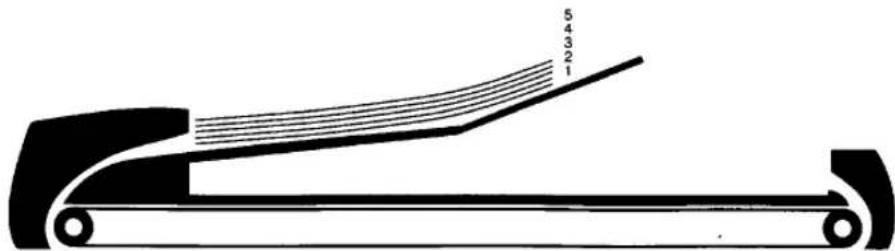
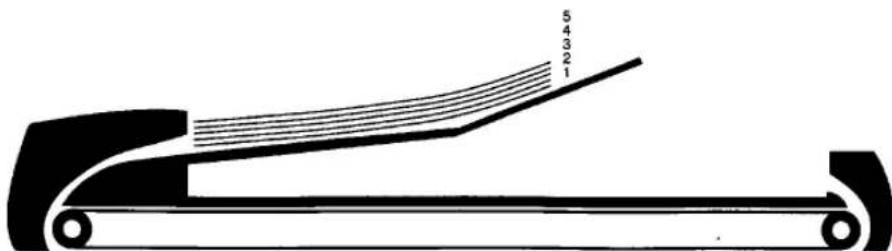
This feature is particularly useful when a jam occurs within the copier during copying with the ADF.
In this case the user must remove the jammed sheet, collect the originals from the original tray taking care when stacking to follow the original sequence and start up the copying again.
The photocopier is able to count the sheets and identify the first sheet not copied, from where it will begin anew the copy sequence.
Example:
Place the originals.
natural_image
Diagram of a conveyor belt system with numbered guide lines (1-5), no text or symbols presentRoute taken by the original and its return to the tray.

Jam indication.

After removing the jammed paper, collect the originals from the tray.

Re-place the originals and re-start copying.
natural_image
Diagram of a conveyor belt system with numbered sections (1, 2, 3, 4) and no visible text or symbolsSORTER 10 SORTER over sect D inside cover sect D
The sorter enables you to arrange multiple copies into ordered sets.
To locate the parts of this device, p. 5.
Sorter functions
- Sorter mode
With this option enabled, when you copy a multipage document, the copies are automatically sorted into sets arranged in page order.
The sorter has 10 bins. If you try to make more than 10 sets of copies in sorter mode, the photocopier automatically changes the number of sets requested to 10.

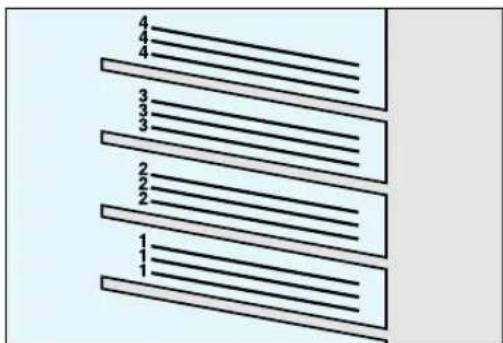
- Group mode
When you copy a multipage document, all the copies of the same page are grouped together in one bin. The copies are therefore fed out into the bins in groups of the same page.
The sorter has 10 bins. If you try to copy more than 10 pages, the copying cycle stops after the tenth page. To continue copying, remove the copies from the bins and press the START key (A28).
• If you do not activate sorter or group mode, the copies will be fed out into the top tray without being sorted.
Using the sorter
Place the originals on the platen glass or in the ADF and press the SORTER key (A3). The Sort mode is selected when this key is pressed once; the Group mode is activated if it is pressed twice; if it is pressed once again the sort in mode is deactivated.
Sort mode: indicator lights up
Group mode: indicator lights up
After selecting the desired mode, input the number of copies and start copying.
Removing jammed copy paper
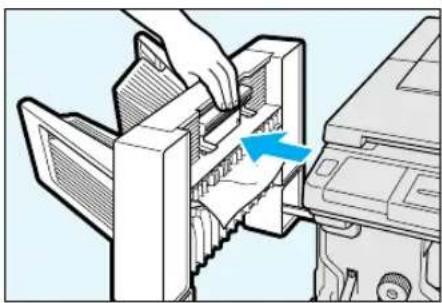
If paper gets jammed in the Sorter, the PAPER JAM indicator (A8) and the PAPER JAM LOCATION indicator (A7) blink at the same time, the latter indicating area © (「▼ «When a paper jam occurs», p. 13).
To remove jammed sheets, follow the procedure described below.
natural_image
Illustration of a hand inserting a computer into a device, showing the next component (no text or symbols present)
natural_image
Illustration of a hand inserting a paper into an open printer (no text or symbols visible)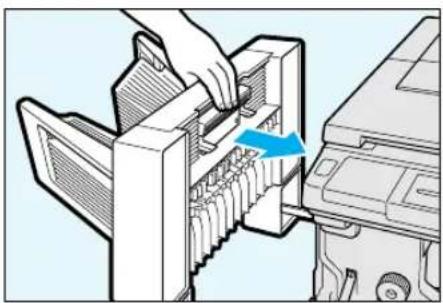
natural_image
Illustration of a hand inserting into a computer into a rack, with a blue arrow indicating the process (no text or symbols present)Having opened the front door, disconnect the sorter from the copier by pressing on the handle as shown in the figure.
Remove the jammed sheet. Return the sorter to its original position and close the front door.
- If the sorter is not connected to the copier correctly, the PAPER JAM indicator (A8) and the PAPER JAM LOCATION indicator (A7) will start blinking.
Technical Characteristics
Paper: From 60 to 80 g/m
2
Capacity per bin:
• Non-sort mode Top tray all sizes 100 sheets
- Sort mode From 1st to 10th bin A4 or A5 30 sheets
• Group mode From 1st to 10th bin A4 or A5 20 sheets
A3 10 sheets
A3 10 sheets
Max. power consumption: 70 W
Dimensions (mm): Length 310, Width 493, Height 295
Weight:
5.2 kg
STAPLER SORTER APLER(SORTER)
As well as sorting multipage copies into sets, the stapler sorter also staples the sets of copies made. To locate the parts of this device, ☐ p. 5.
Stapler sorter functions
- Sorter mode
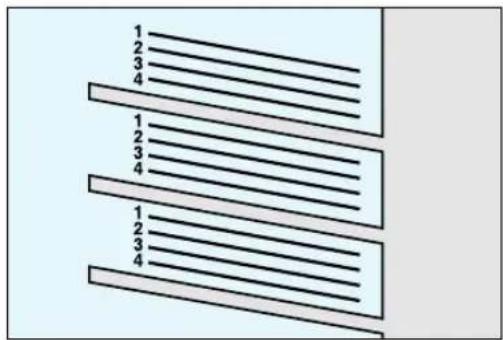
With this option set, when you copy a multipage document, the copies are automatically sorted into sets arranged in page order.
The stapler sorter has 10 bins. If you try to make more than 10 sets of copies in sorter mode, the photocopier automatically changes the number of sets requested to 10.
- Group mode
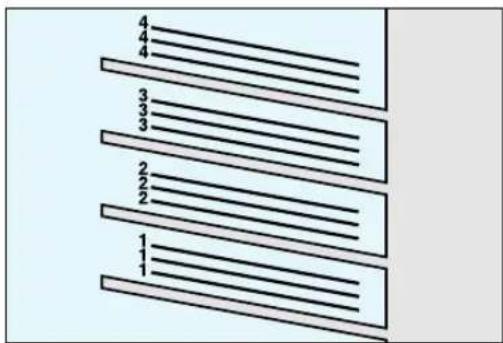
When you copy a multipage document, all the copies of the same page are grouped together in one bin. The copies are therefore fed out into the bins in groups of the same page.
The stapler sorter has 10 bins. If you try to copy more than 10 pages, the copying cycle stops after the tenth page. To continue copying, remove the copies from the bins and press the START key (A28).
- Stapling mode
This function is possible after completion of copies made in Sort mode or in Non-sort mode; it is not possible in the Group mode.
• If you do not activate sorter or group mode, the copies will be fed out into the top tray without being sorted.
Using the Stapler sorter
Place the originals on the platen glass or in the ADF and press the SORTER key (A3). The Sort mode is selected when this key is pressed once; the Group mode is activated if it is pressed twice; if it is pressed once again the sort in mode is deactivated.
Sort mode: indicator lights up
Group mode: indicator lights up
After selecting the desired mode, input the number of copies and start copying.
With the functions Non-sort mode and Sort mode, after copying the STAPLE key (E4) lights up (green): press the key to staple the sets of copies in each bin.
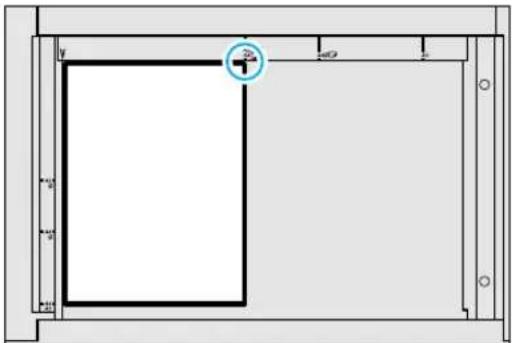
If you place the originals directly on the platen glass, make sure that the side you want to copy is facing downwards and that the corner to be stapled is in the top right-hand corner.

If you place the originals in the ADF, make sure that the corner to be stapled is in the top left-hand corner of the original tray.
- The stapler can staple up to 20 A4 and 10 A3-size sheets per bin. To avoid jamming do not exceed this figure.
• If the STAPLE key (E4) flashes (green), it indicates a jam within the stapler.
Remove it as described on p. 28.
• If the ADD STAPLES indicator (E5) flashes (red), replace the staple cartridge as described on p. 27.
Manual insert stapling
This function enables you to manually insert the documents in the stapler sorter for stapling. Up to 20 A4 and 10 A3-size sheets may be stapled together.

natural_image
Technical drawing of a mechanical part with dashed lines indicating hidden edges (no text or symbols)The staple will be inserted at this position
Align the edges of the sheets to be stapled and place the sheets in the bin below the top tray.
Position the copies as indicated in the diagram and ensure that the edges of the copies are aligned with the edges of the bin. The staple will be placed in the corner marked with a circle.
natural_image
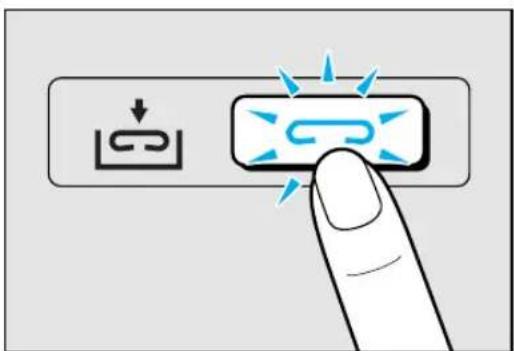
Hand pointing at a button with a finger icon and blue starburst effect (no text or symbols)The STAPLE key (E4) lights. Press it and the copies will be stapled.
- If the STAPLE key (E4) flashes (green), it indicates a jam within the stapler. Remove it as described on p. 28.
• If the ADD STAPLES indicator (E5) flashes (red), replace the staple cartridge as described on p. 27.
Replacing the Staple Cartridge
When there are no staples left in the stapler, the ADD STAPLES indicator (E5) lights up.
To replace the used staple cartridge, follow the procedure described below.
natural_image
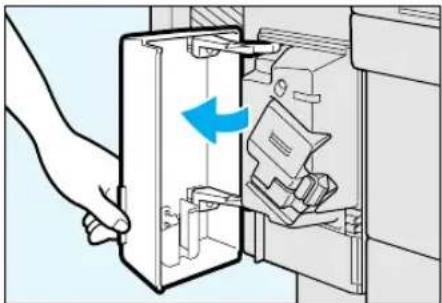
Illustration of a hand inserting a card into a printer (no text or symbols visible)Open the stapler cover (E3) (there is a compartment for two spare cartridges inside it).
natural_image
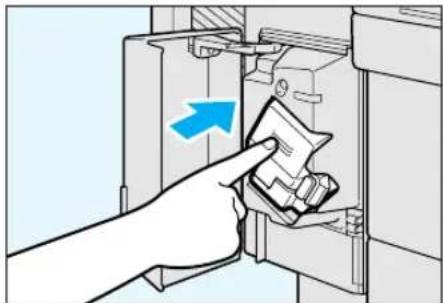
Hand inserting a card into a device (no text or symbols visible)Press the stapler unit inwards and remove your hand.
natural_image
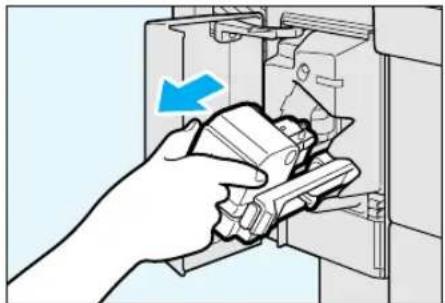
Hand holding a tool inside an open device, with a blue arrow indicating the direction (no text or symbols present)The stapler unit slides out. Remove it.

natural_image
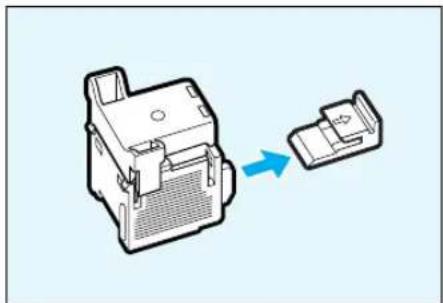
Hand inserting a component into a device (no text or symbols visible)Remove the empty cartridge. Remove the black cover from the new cartridge.
natural_image
Diagram showing a device with two connectors, one being inserted and the other exiting (no text or symbols present)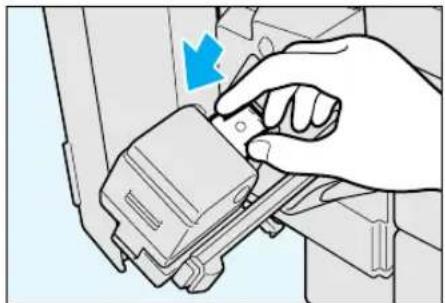
natural_image
Hand inserting a component into a device (no text or symbols visible)Insert the new cartridge and push the stapler unit until it locks into position. Close the stapler cover (E3).
Removing Jammed Staples
If staples get jammed, the STAPLE key (E4) blinks.
To remove the jam, follow the procedure described below.
natural_image
Hand cleaning a mechanical component with a blue arrow indicating the process (no text or symbols present)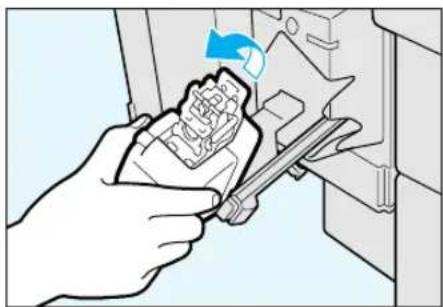
natural_image
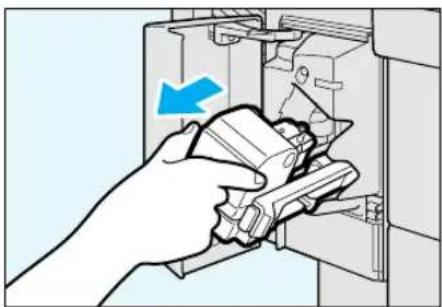
Illustration of a hand using a tool to adjust or install electronic components (no text or symbols visible)Remove the stapler unit as described previously in the section «Replacing the staple cartridge», p. 27.
Grip the stapler unit and lift it.

With your thumb, push catch ① down and, with your index finger, pull metal plate ② out until it locks.
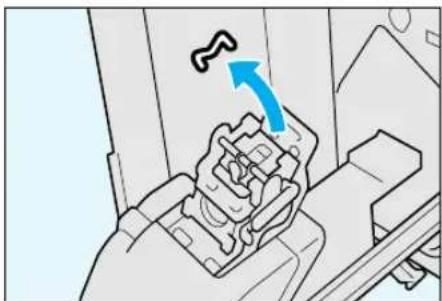
natural_image
Diagram of a mechanical component with a blue arrow indicating direction (no text or symbols present)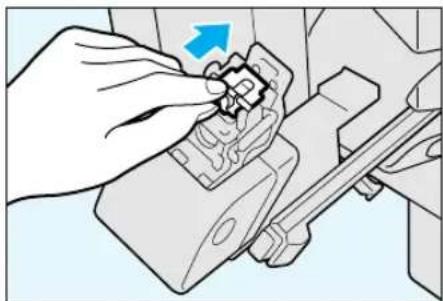
natural_image
Illustration of a hand turning a gear into a mechanical component (no text or symbols visible)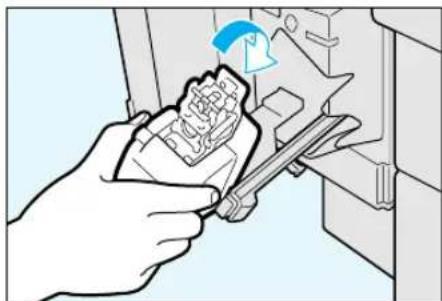
natural_image
Illustration of a hand using a tool to adjust or install electronic components, no text or symbols visibleRemove any jammed staples. Return
the metal plate to its original position, making sure that is held in place by the catch.
Close the stapler unit carefully, push it into position and close the cover.
Removing jammed copy paper
If paper gets jammed in the stapler sorter, the PAPER JAM indicator (A8) and the PAPER JAM LOCATION indicator (A7) blink at the same time, the latter indicating area © (☐ «When a paper jam occurs», p. 13).
To remove jammed originals, follow the procedure described below.

natural_image
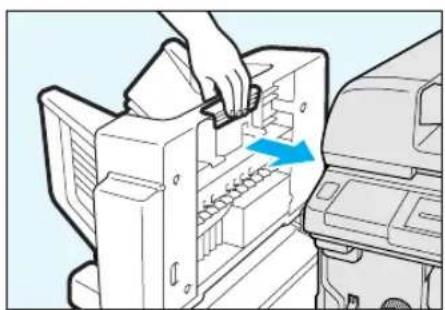
Illustration of a printer's internal structure being inserted, showing paper being placed into the case (no text or symbols present)After opening the front cover, disconnect the stapler sorter.

natural_image
Illustration of a printer's internal structure with a hand inserting a paper into the machine (no text or symbols visible)Remove the jammed sheets, checking that there are no more sheets jammed inside the photocopier.
natural_image
Illustration of a printer's internal structure with a hand inserting a component (no text or symbols visible)Return the stapler sorter to its original position and close the front door.
Technical Characteristics
Paper. From 60 to 80 g/m
Capacity per bin:
• Non-sort mode Top tray all sizes 100 sheets
- Sort mode From 1st to 10th bin A4 or A5 30 sheets
• Group mode From 1st to 10th bin A4 or A5 20 sheets
• Staple-sort mode From 1st to 10th bin A4 20 sheets
Max. power consumption: less than 40 W
Dimensions (mm): Length 333, Width 576, Height 358
Weight: approximately 9 kg
2
B4 25 sheets
A3 10 sheets
A3 10 sheets
A3 10 sheets
CONTROL CARD / PRINTER UNIT CONTROL CARD / PRINTER UNIT
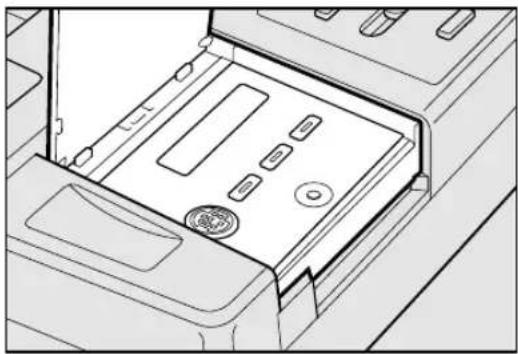
The control card enables you to manage the use of the photocopier more efficiently, by restricting access to authorized personnel only, and allowing you to check the number of copies made by each card holder and the total number of copies made.
natural_image
Line drawing of an open refrigerator with a slot and door, showing internal compartments and a coin slot (no text or symbols)Using the control card
If the 100 blinks when the photocopier is switched on, insert the control card in the slot in order to use the photocopier ( «Control card», p. 15).
natural_image
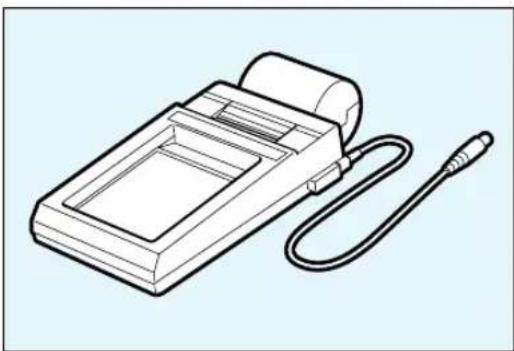
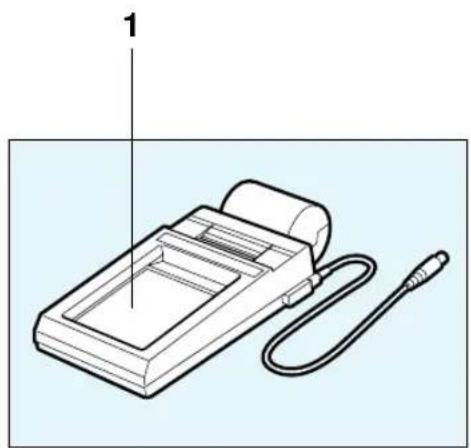
Line drawing of a medical device with a coiled cable and rectangular tray (no text or symbols)Printer Unit
By connecting the printer unit to the control card reader, you can keep a record of photocopier use for administrative purposes, such as cost per copy, cost per user, billing and inventory.
INDEXINDEX
Auto clear 7
Auto power-off 7
Automatic document feeder - ADF 19-21
B
Basic configuration 3
Book copying 9
Bypass See Stack bypass
C amr
Cleaning 17
Consumables 18
Control card 5, 15, 30
Control panel 4
Copy exposure 7
Copy paper 11, 15, 18
Copying on special media 10
Copying ratio (selection) 8
D
Display 4, 15
G
Group mode 22, 24
Identification of originals not copied 21 Installation 2
J
Jammed staples 28
Jams 13-14, 20, 23, 28, 29
M
Manual insert stapling 26
N
Number of copies 7
P
Paper cassette 11
Paper loading 8, 11
Power supply 3
Precautions 2
Printer Unit 30
R
Reductions/enlargements (automatic) 9
Reductions/enlargements (preset) 8
Reductions/enlargements (zoom) 9
Reductions/enlargements in automatic mode 9
S
Sorter 5, 22-23
Sorting modes 22, 24
Stack bypass 6, 8, 10
Standard copy sizes 3
Standard setting 6
Staple cartridge 25, 26, 27
Stapler sorter 5, 24-29
Staples (positioning) 25, 26
Stapling 24, 25
T
Toner 12, 15
Transparencies 8, 10
Troubleshooting 16
Two sided copying 10
Z
Zoom 9

C
D
E
F
natural_image
Line drawing of a handheld electronic device with a cable and a tray, labeled with number 1 (no text or symbols on the device itself)
- Publishing Department:
- CONTENTSCONTENTS
- COPYINGCOPYING
- PAPER AND TONER
- MESSAGES
- CLEANING AND CONSUMABLESCLEANING AND CONSUMABLES
- INTRODUCTION INTRODUCTION
- The right choice
- Simple and easy to use
- Ideal versatility
- Optional Units
- Graphics and text layout
- Keys and other parts of the control panel
- Components
- Indicators
- INSTALLATION AND OPERATION PRECAUTIONING PRECAUTIONS
- BASIC CONFIGURATION ONERGURANT (ISO# SPWR)
- CONTROL PANEL (INSIDE CONTROPE PANEL INSIDE A
- AUTOMADO DOCUMENT FEEDER TIAD DOCUMENT FEEDER
- SORTER (SOPPEROVERINSIDE)
- STAPLER SORTER (APLER SORTER)
- CONTROL CARD / PRINTER UNIT CONTROL CARD / PRINTER UNIT
- STARTARTUP
- Standard setting
- PLACEMENT OF THE ORIGINAL PLACEMENT OF THE ORIGINAL
- SETTING THE NUMBER OF COPIESSETTING THE NUMBER OF COPIES
- STARTING AND STARTING AND COPYING JOBOPPING A COPYING JOB
- AUTO CLEAR AUTO CLEAR
- AUTO POWER-OFF AUTO POWER-OFF
- ADJUSTING COPY EXPOSURE ADJUSTING COPY EXPOSURE
- Automatic Control
- Manual Control
- REDUCTIONS AND ENLARGEMENTS REDUCTIONS AND ENLARGEMENTS
- Preset reductions/enlargements
- Reductions/Enlargements with zoom
- Reductions/enlargements in automatic mode (for ADF fitted photocopiers)
- COPYING ADJACENT PAGPSYING AERIAGE/NEESESTE SHEETS
- MAKING TWO-SIDED COPIESMAKING TWO-SIDED COPIES
- PAPER AND TAPHERANIER T
- LOADING COPY PAPIDARERCOPY P
- Loading paper into the cassette
- Adjusting the cassette to a different paper size
- ADDING TONERADDING TONER
- MESSAGESMESSAGES
- WHEN A PAPER JAM OCCURS WHEN A PAPER JAM OCCURS
- Potential paper jam areas
- Paper jam in area A
- Copier front side (transport area)
- Copier left side (delivery area)
- Copier right side (feeding area)
- If paper jams occur frequently
- WHEN THE PAXIEN RUNS POUT APER RUNS OUT
- WHEN THE TONER RUNS OUT WHEN THE TONER RUNS OUT
- SELF-DIAGNOSTIC MESSAGES SELF-DIAGNOSTIC MESSAGES
- CONTROL CARD CONTROL CARD
- The machine does not make copies
- Check that:
- The copies are completely blank
- If copies are marked in the same place
- If copies are too light or too dark
- CLEANING AND CONSUMABLESCLEANING AND CONSUMABI
- ROUTINE CLEANINGROUTINE CLEANING
- Platen glass
- Platen cover
- Corona assembly
- Stack charge eliminator
- Copy paper
- Toner
- Acceptable Originals
- ! Do not place the following kinds of original in the ADF:
- Using the ADF
- Removing jammed originals
- Technical Characteristics
- The automatic identification of sheets not copied
- SORTER 10 SORTER over sect D inside cover sect D
- Sorter functions
- - Sorter mode
- - Group mode
- Using the sorter
- Removing jammed copy paper
- STAPLER SORTER APLER(SORTER)
- Stapler sorter functions
- - Stapling mode
- Using the Stapler sorter
- Manual insert stapling
- Replacing the Staple Cartridge
- Removing Jammed Staples
- Using the control card
- Printer Unit
- INDEXINDEX
Brand : OLIVETTI
Model : copia 9017
Category : Photocopier