
VSC-MP1 - Sound synthesizer ROLAND - Free user manual and instructions
Find the device manual for free VSC-MP1 ROLAND in PDF.


| Product Type | Sound Module |
| Model | VSC-MP1 |
| Brand | Roland |
| Dimensions (W x H x D) | 200 x 45 x 150 mm |
| Weight | 0.6 kg |
| Power Supply | 9V DC (center positive) |
| Power Consumption | 5 W |
| Audio Outputs | Stereo 1/4" TRS (L/R) |
| Headphone Output | 1/4" TRS stereo |
| MIDI Connectors | In, Out, Thru (5-pin DIN) |
| USB Port | Type B (MIDI over USB) |
| Sound Engine | Virtual Sound Canvas (128 voices, multitimbral) |
| Effects | Reverb, Chorus, Delay, EQ |
| Control Interface | Buttons and LCD display |
| Maintenance & Cleaning | Wipe exterior with a soft, dry cloth; avoid solvents |
| Safety Precautions | Do not expose to moisture; use only the supplied power adapter |
| Spare Parts | Power adapter (PSA series), replacement knobs |
| Repairability | Repairs should be performed by qualified service personnel |
| Operating Temperature | 5°C to 40°C |
| Included Accessories | Power adapter, USB cable, quick start guide |
Frequently Asked Questions - VSC-MP1 ROLAND
User questions about VSC-MP1 ROLAND
0 question about this device. Answer the ones you know or ask your own.
Ask a new question about this device
Download the instructions for your Sound synthesizer in PDF format for free! Find your manual VSC-MP1 - ROLAND and take your electronic device back in hand. On this page are published all the documents necessary for the use of your device. VSC-MP1 by ROLAND.
USER MANUAL VSC-MP1 ROLAND
Multi-instrument Software Synthesizer
Owner's Manual
WARNING
DO NOT play a CD-ROM disc on a conventional audio CD player.
The resulting sound may be of a level that could cause permanent hearing loss. Damage to speakers or other system components may result.

Å°IMPORTANT NOTES
ÀúUnfortunately, it may be impossible to restore the contents of data that was stored device (e.g., hard disk) and / or in another MIDI device (e.g., a sequencer) once it has been lost. Roland Corporation assumes no liability concerning such loss of data.
ÁúTo avoid disturbing your neighbors, try to keep the unit's volume at reasonable levels. You may prefer to use headphones, so you do not need to be concerned about those around you (especially when it is late at night).
ÁúAvoid touching or scratching the shiny underside (encoded surface) of the disc. Damaged or dirty CD-ROM discs may not be read properly. Keep your discs clean using a commercially available CD cleaner.
ÁúUnauthorized duplication, reproduction, hiring, and lending prohibited.
ÁúBefore you open the included CD-ROM, you must read the "license agreement." Opening the CD-ROM will be taken to mean your acceptance of the license agreement.
ÁúUse of the song data of the CD-ROM supplied with this product for any purpose other than private, personal enjoyment without the permission of the copyright holder is prohibited by law. Additionally, this data must not be copied, nor used in a secondary copyrighted work without the permission of the copyright holder.
GM 2 / General MIDI 2

The upwardly compatible General MIDI 2 (MIDI2) Recommendations pick up where the original General MIDI left off, offering enhanced expressive capabilities, and even greater compatibility.
Issues that were not covered by the original General MIDI recommendations, such as how sounds are to be edited, and how effects should be handled, have now been precisely defined. Moreover, the available sounds have been expanded.
General MIDI 2 compliant sound generators are capable of reliably playing back music files that carry either the General MIDI or General MIDI 2 logo.
In some cases, the conventional form of General MIDI, which does not include the new enhancements, is referred to as "General MIDI 1" as a way of distinguishing it from General MIDI 2.
GS format

The GS Format ( ) Roland's set of specifications for standardizing the performance of sound generating devices. In addition to including support for everything defined by the General MIDI, the highly compatible GS Format additionally offers an expanded number of sounds, provides for the editing of sounds, and spells out many details for a wide range of extra features, including effects such as reverb and chorus.
Designed with the future in mind, the GS Format can readily include new sounds and support new hardware features when they arrive.
* GS () is a registered trademark of Roland Corporation.
* Microsoft, Windows, DirectX and DirectSound are registered trademarks of Microsoft Corporation.
* Windows® Me is known officially as: "Microsoft® Windows® Millennium Edition operating system."
* Windows® 98 is known officially as: "Microsoft® Windows® 98 operating system."
* Windows 2000® is known officially as: "Microsoft® Windows 2000® operating system."
* DirectX® is known officially as: "Microsoft® DirectX® application programming interface."
* DirectSound® is known officially as: "Microsoft t® DirectSound® application programming interface."
* Screen shots reprinted with permission from Microsoft Corporation.
* Apple and Macintosh are registered trademarks of Apple Computer, Inc.
* Mac OS is a registered trademark of Apple Computer, Inc.
* MIDI Manager is a trademark of Apple Computer, Inc.
* OMS is a registered trademark of Opcode Systems, Inc.
* Studio Vision Pro and Vision are trademarks of Opcode Systems, Inc.
* FreeMIDI is a trademark of Mark of the Unicorn, Inc.
* VST is a trademark of Steinberg Soft- und Hardware GmbH.
* All product names mentioned in this document are trademarks or registered trademarks of their respective owners.
* In the interest of product improvement, the specifications and/or contents of this package are subject to change without prior notice.
Introduction
Thank you for purchasing the Virtual Sound Canvas Multi-Pack (subsequently referred to as the VSC multi-pack).
The VSC multi-pack is a package containing software synthesizers that run on Windows Me/2000/98 and on MacOS 8.5/8.6/9 series. Since the package contains both a stand-alone version with MIDI data playback functionality, and a plug-in version that features enhanced compatibility with sequencer software, you can use this software for a wide range of purposes, ranging from creating songs to listening to MIDI data.
This manual explains the information you need to know in order to install and use the VSC multi-pack. Please be sure to read it.
 | Explanations of terms, etc. |
 | Points you need to be aware of |

The screen shots printed in this manual are taken from Windows Me and MacOS 9.1, but the software will also run correctly on Windows 98/2000 and MacOS 8.5/8.6/9 series.
Copyright © 2001 ROLAND CORPORATION
All rights reserved. No part of this publication may be reproduced in any form without the written permission of ROLAND CORPORATION.
Contents
Windows Users.... 6
Software installation....7
Installing the software....7
Uninstalling the software....14
Using the stand-alone version.... 15
Listening to the demo songs....15
Converting song data to an audio file....16
Operations in each window 18
Using VSC as a sound generator from within other software ....24
Using the plug-in version (DXi/VST Instruments)......26
VSC Panel....26
Settings window....27
Macintosh Users.... 29
Software installation....30
Installing the software....30
Using the stand-alone version.... 32
Listening to the demo songs....32
Converting song data to an audio file....33
Make settings for the audio file that will be saved 34
Operations in each window 36
Using VSC as a sound generator from within other software 42
Using the plug-in version (VST Instruments)......46
VSC Panel....46
Settings window....47
Troubleshooting 49
Troubleshooting for the stand-alone version (Windows) .. 50
Troubleshooting for the stand-alone version (Macintosh) 53
Troubleshooting for the plug-in version (Windows/Macintosh)... 58
Features of the VSC multi-pack
The VSC multi-pack includes the following software.
Stand-alone version
■ Virtual Sound Canvas 3 (Windows/Macintosh)
This is a "software synthesizer" that allows you to play back MIDI data using only your personal computer. You can use a broad range of 256 sounds + 9 drum sets in GM2 mode, and 902 sounds + 26 drum sets in GS mode. In addition, this software supports 16 parts and a maximum of 128 voices, for MIDI performances of all styles of music.
The stand-alone version provides convenient functions like the following:

- Audio File Conversion function that lets you convert a MIDI file into an audio file (Windows: WAV/Macintosh: AIFF). (p. 16, p. 33)
- A Player window that not only lets you play MIDI data, but also allows you to modify the tempo and key. You can also create and save lists of your favorite songs.
- The software can be used as a MIDI sound generator even from a MIDI application that does not support DXi or VST. (p. 24, p. 42)
Plug-in version
■ Virtual Sound Canvas DXi (Windows)
■ Virtual Sound Canvas VST Instruments
(Windows / Macintosh)
This is a plug-in type software synthesizer that is based on Virtual Sound Canvas 3, and supports DirectX Instruments (DXi/Windows) and VST Instruments (Windows/Macintosh). It operates seamlessly with any host application that supports DXi or VST Instruments.


In order to use Virtual Sound Canvas DXi, you will need software (a host application) that supports DXi.

In order to use Virtual Sound Canvas VST, you will need software (a host application) that supports VST Instruments.
Windows Users
Software installation....7
Installing the software....7
Uninstalling the software....14
Using the stand-alone version.... 15
Listening to the demo songs....15
Converting song data to an audio file....16
Operations in each window 18
Using VSC as a sound generator from within other software 24
Using the plug-in version (DXi/VST Instruments)......26
VSC Panel....26
Settings window....27
Software installation
This chapter explains how to install the software included in the VSC multi-pack. You will need the VSC multi-pack CD-ROM, so be sure you have it ready.
Before you install the software, you must read the license agreement. A license agreement may be displayed while you are installing the software; please be sure to read it.

Before installing Virtual Sound Canvas DXi / VST, you must install a host application that supports DXi/VST Instruments.
Installing the software
Note for Windows 2000 users
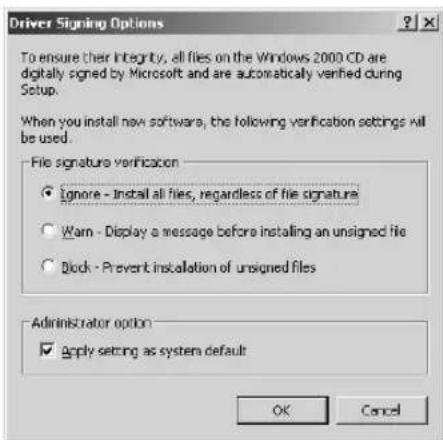
If you are using Windows 2000, you must log on as Administrator when installing the VSC multi-pack. In addition, you must use the following procedure to check the Driver Signing Options settings.
- Start up Windows and log on as Administrator.
- Click the Start button of Windows, point to Settings, and click Control Panel. The Control Panel will open.
-
In the Control Panel, double-click System. The System Properties dialog box will appear.
-
Click the Hardware tab, and click the Driver Signing button. The Driver Signing Options dialog box will appear.
-
Verify that the File signature verification is set to "Ignore." If not, change it to "Ignore."
-
Click [OK].

The license agreement is the contract under which Roland allows you to use the software.

If you change the File signature verification, you must restore the original setting after you have finished installing the VSC multi-pack and have restarted Windows. (To change the setting, you will need to log on as Administrator.)
1
Determine the name of your CD-ROM drive.
On the Windows desktop, double-click the My Computer icon. In the window that appears, check the name of the CD-ROM drive (in the example shown at the right, this is Q).

Compact Disc (Q:)
2
Exit all software (applications) that may be running, and close all windows.
3
Prepare the VSC multi-pack CD-ROM.
Insert the VSC multi-pack CD-ROM into the CD-ROM drive of your computer.
4
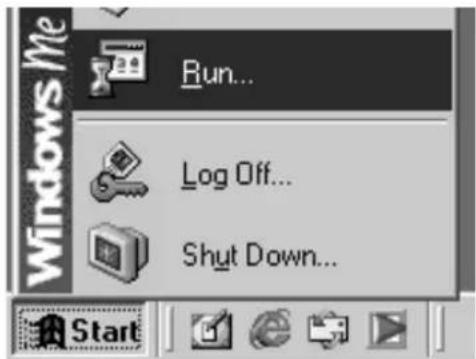
Open the "Run..." dialog box.
Click the Start button of Windows. From the menu that appears, select "Run...".
5
Specify the filename to execute.

In the Open field, type "(drivename):\Setup.exe".
For (drivename), type the name (a single alphabetical character) of the CD-ROM drive you determined in step 1. For example if your CD-ROM drive is Q:, you would type Q:\Setup.exe.
Then click [OK].
6
When the Welcome screen appears, click [Next].
A dialog box will appear, allowing you to Select the software that you want to install.

If you are using Windows 2000, you must log on as a user that has administrative privileges (such as Administrator) before installing the software.

If you are using anti-virus software, you must disable it before installing this software.
7
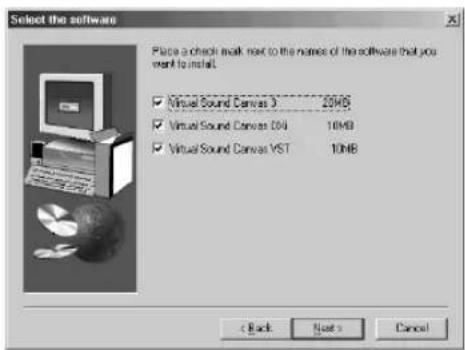
Select the software that you want to install.
The software that you will be installing and the required hard disk space will be displayed. Place a check mark beside each software title that you want to install. After you have selected the software to install, click [Next].
8
The Confirmation of installation dialog box will appear.
Verify the contents, and click [Next].
If you decide to change the software that will be installed, click [Back].
9
Installation of the software you selected in step 7 will begin.
Follow the on-screen directions to perform the installation. The installation procedure for each item of software is described on the following pages:
- Virtual Sound Canvas 3......(p. 10)
- Virtual Sound Canvas DXi......(p. 11)
- Virtual Sound Canvas VST......(p. 12)
10
After all software has been installed, a dialog box will indicate that installation has been completed.
Click [OK].
11
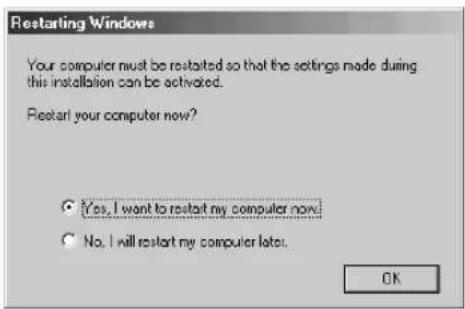
A dialog box will recommend that you restart Windows. Select "Yes, I want to restart my computer now," and click [OK].
Windows will restart.
MEMO
The software sizes displayed in the Select the software dialog box may differ from the actual display on your computer.
NOTE
An application (host application) that supports DXi is required in order to use Virtual Sound Canvas DXi.
NOTE
An application (host application) that supports VST Instruments is required in order to use Virtual Sound Canvas VST.
■ Installing Virtual Sound Canvas 3
1
The installer will start, and the "Welcome" screen will appear. Click [Next].
2
You will be asked whether you consent to the terms of the license agreement. Read the license agreement, and click [Yes] if you agree. If you click [No], the installation will be halted.

3
The following dialog box will appear. Check this selection if you want to associate filenames with an extension of .mid with Virtual Sound Canvas 3 in Windows "Explorer." Normally, you should leave this checked, and click [Next].

4
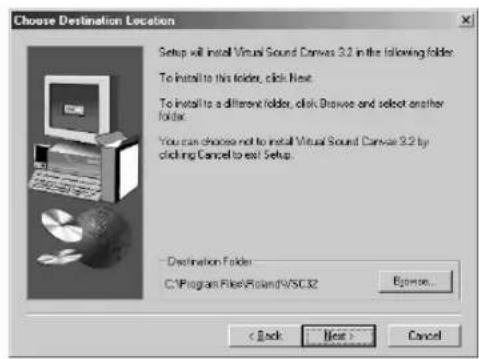
A dialog box will appear, allowing you to select the installation location. To accept the suggested location, click [Next]. If you want to change the installation folder, click [Browse] and specify the desired folder.
5
A dialog box will ask you to confirm the installation.
If the content that is displayed is correct, click [Next]. Installation will begin.
![Question Are you sure you want to install the program? Click Next to begin copying files Click Cancel to quit installing the program. Current Settings: Association of MIDI files [mid] with VSC 3.2 Associate MIDI files [mid] to VSC 3.2 Destination Directory: C:\Program Files\Robotic\VSC32 < Back Next > Cancel](/content/2026/05/976659/images/9a82658fe5c6b71df0cb72c93135e375b01401cf19a502d9aec9bb4755e8580a.jpg)
This completes installation of Virtual Sound Canvas 3.
■ Installing Virtual Sound Canvas DXi
1
The installer will start, and the "Welcome to the InstallShield Wizard for Virtual Sound Canvas DXi" screen will appear. Click [Next].
2
You will be asked whether you consent to the terms of the license agreement. Read the license agreement, and click [Yes] if you agree. If you click [No], the installation will be halted.

3
A dialog box will appear, allowing you to select the installation location. To accept the suggested location, click [Next]. If you want to change the installation folder, click [Browse] and specify the desired folder.

4
Verify the current settings of the Confirmation of installation screen.
After verifying the settings, click [Next]. If you want to re-specify the installation location, click [Back].
![InstallShield Wizard Confirmation of installation Do you want to start installation? Click (Next) to continue installation. To quit installation click [Cancel] to quit installation. Current Settings: Destination: C:\Program Files\Roland\Virtual Sound Canvas D4 c Back Next > Cancel](/content/2026/05/976659/images/abba687e1c9ad195c61075aa991bba273228d96cb79d1ccb82d52ea21bd3cb0c.jpg)
5
When the files have been copied, the InstallShield Wizard Complete screen will appear.
Click [Finish].
This completes installation of Virtual Sound Canvas DXi.
■ Installing Virtual Sound Canvas VST
* If you simply want to copy the plug-in module, refer to Adding or removing the plug-in module (p. 13).
1
The installer will start, and the "Welcome to the InstallShield Wizard for Virtual Sound Canvas VST" screen will appear. Click [Next].
2
You will be asked whether you consent to the terms of the license agreement. Read the license agreement, and click [Yes] if you agree. If you click [No], the installation will be halted.
3
A dialog box will appear, allowing you to select the installation location.
Here you can select the location in which the data used by Virtual Sound Canvas VST and the online help files are to be installed. Verify the installation folder, and click [Next].
4
Verify the current settings of the Confirmation of installation screen.
After verifying the settings, click [Next]. If you want to re-specify the installation location, click [Back].
5
When the files have been copied, a screen will appear in which you can specify the copy destination(s) for the VSC plugin module.
Here you can select the folder(s) into which the Virtual Sound Canvas VST plug-in module will be installed.

![InstallShield Wizard Select the installation destination Specify the installation destination for the data used by Virtual Sound Canvas VST and the online help. Select the folder into which the files will be installed. To install into this folder, click the [Next] button. To install into a different folder, click the [Browse] button and specify the folder. - Destination Folder C:\Program Files\VieLand\Virtual Sound Canvas VST Options... OK Next > Cancel](/content/2026/05/976659/images/3ae07ef0abe6f05f6cbac3c0984141db3902cd2831a348baf8a36c3519162fce.jpg)
![InstallShield Wizard Confirmation of installation Do you want to start installation? Click (None) to continue installation To quit installation click [Cancel] to quit installation. Current Settings: Destination CPU/Program Files/Roland/Virtual Sound Canvas VST OK Next > Cancel](/content/2026/05/976659/images/a949871b025f589bc806e4cb4ce01d71804753fd729c5b2d6e8b54935c6dfcfe.jpg)
NOTE
If you have not yet installed a host application, you must first install your host application before continuing.
MEMO
If you want to change the installation folder, click [Browse] and specify the desired folder.
MEMO
A plug-in module is a file that allows your application to use Virtual Sound Canvas VST. For each application, you must copy the plug-in to the folder it uses (the plug-in folder). For the location of the plug-in folder, refer to the manual for the host application from which you will be using Virtual Sound Canvas VST.
[If the list does not contain the desired folder]
Click [Add copy destination to list], and specify the folder into which the plug-in module is to be copied.
[If the list contains an unwanted folder]
In the list, select the folder into which you do not want to copy the plug-in module, or from which you want to delete it, and click [Remove selected items from list].
6
After you have specified the folder(s), click [Next].
The plug-in modules will be copied.
7
When the InstallShield Wizard closing screen appears, click [Finish].
This completes installation of Virtual Sound Canvas VST.
Adding or removing the plug-in module
If you install a new host application after installing Virtual Sound Canvas VST, or if you decide that you want to use Virtual Sound Canvas VST with another host application, you simply need to copy the plug-in module into the plug-in folder of the host application.
Conversely, if you decide that you no longer want to use Virtual Sound Canvas VST with a host application, all you need to do is delete the plug-in module from that application's plug-in folder.
-
Click the Windows Start button, and select [Programs]-[Virtual Sound Canvas VST]-[Copy or delete Plug-in module].
-
The "Select copy destination for plug-in module" screen will appear. Refer to the manual of your host application(s) that uses Virtual Sound Canvas VST to find its plug-in folder, and make sure that only the desired folders are shown in the list.
[If a desired folder is not in the list]
Click [Add copy destination to list], and specify the folder into which the plug-in module is to be copied.
[If an unwanted folder is in the list]
In the list, select the folder into which you do not want to copy the plug-in module, or the folder that you want to remove from the list, and click [Remove selected items from list].
- After you have specified the desired folder(s), click [Next].
- The plug-in module will be copied/deleted.
MEMO
The plug-in module can be added or removed even after installation is finished.
Uninstalling the software
To uninstall the software, use the following procedure.
1 2
Click the Windows Start button, and click [Settings]-[Control Panel].
Double-click the "Add/Remove Programs" icon. The "Add/Remove Programs Properties" (for Windows 2000, "Add/Remove Programs") dialog box will appear.
3 4
Click the "Install/Uninstall" tab (for Windows 2000, the [Change or Remove Programs] icon).
In the list, click the software that you want to remove.
5 6
Click "Add/Remove" (for Windows 2000, [Change/Remove]).
If you are removing Virtual Sound Canvas VST, the "Modify or Uninstall" screen will appear. Add a check mark next to "Remove," and click [Next].
7
A screen will inform you that the uninstallation has been completed. Click [OK].
* If you uninstalled Virtual Sound Canvas 3 (stand-alone version), you will need to restart your computer. Click the [Start] button, select [Shut Down], and restart Windows.


If you simply want to delete the plug-in module, refer to Adding or removing the plug-in module (p. 13).

If you are using Windows 2000, you must log on as a user with administrative privileges (such as Administrator) before you uninstall the software.
Using the stand-alone version
Listening to the demo songs
Try starting up VSC Panel and listening to the demo songs.
■ Starting VSC Panel
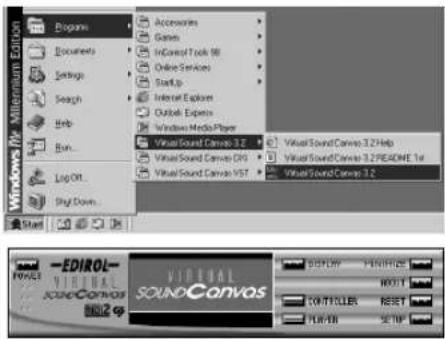
Click the Windows [Start] button, and from the [Programs] menu select the [Virtual Sound Canvas 3.2] group and click [Virtual Sound Canvas 3.2].
VSC Panel will start up, and the main window will appear.
■ Loading song data
1
In the VSC main window, click the [PLAYER] button.
The Player window will appear.
2
In the Player window, click the [SONG] button.
A dialog box will appear, allowing you to select song data (Standard MIDI Files).
3
Move to the [SMF] folder located in the folder in which VSC was installed, select a song from the displayed list of demo songs, and click the [Open] button.
The selected file will be loaded. Click the button in the Player window to begin playback. To stop playback, click the button.
About the included song data
The [Songs] folder on the VSC multi-pack CD-ROM contains data for more than 100 songs in addition to the demo songs that are installed with VSC 3. You can use VSC to listen to these songs with the CD-ROM inserted, or you can copy them to your hard disk for use. To copy the songs to your hard disk, simply drag the [Songs] folder from the CD-ROM onto your hard disk. For a list of the filenames, song names, and copyrights for this data, refer to the Songlist_e file in the [Songs] folder of the CD-ROM.

Other easy ways to start up VSC Panel are by selecting [VSC Panel] from the "VSC Helper Icon" menu in the Windows taskbar, or by double-clicking the icon.

Song data can also be loaded by dragging and dropping the song data file into one of the VSC windows.

Using the song data included with this product for purposes other than personal enjoyment without permission from the copyright owner is prohibited by law. You may not duplicate this data or use it to create derivative works without the permission of the copyright owner.
Converting song data to an audio file
VSC is able to "virtually" play a song that is loaded into the player, and save the result of the performance as an audio file (a standard Windows WAV file). An audio file that's been saved in this way can be played back on your computer, used as material for software that handles audio, or even used to create your own audio CD.
* In order to create an audio CD you will need a CD-R drive and writing software that supports your computer.
■ Load the song data for conversion
1
Start up VSC Panel, and in the Main window click the [PLAYER] button.
The Player window will appear.
2
In the Player window, click the [SONG] button.
A dialog box will appear, allowing you select the desired song data (Standard MIDI File).
3
Select the song data file that you want to convert into an audio file, and click the [Open] button. The selected file will be loaded.
■ Make settings for the audio file that will be saved
1
With playback stopped, click the [AUDIO CONV] button of the Player window.
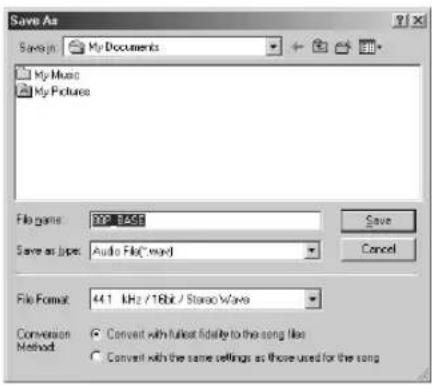
A dialog box will appear, allowing you to specify the audio file that will be saved.
2
In the [File Format] field, specify the sampling frequency, number of bits, etc., of the audio file that will be output.
3
Select one of the following [Conversion Method].
- Convert with fullest fidelity to the song files
VSC will be used to its full potential, in order to perform the highest-quality conversion. Any changes in Tempo and Key settings that may have been made in the Player window, and the settings of the Controller window and Settings window will be ignored.
- Convert with the same settings as those used for the song
The Tempo and Key settings of the Player window and the settings of the Controller window and Settings window will all be applied, producing an audio file that will sound identical to when the data is played back by the Player.
4
Specify the save location and filename for the audio file, and click the [Save] button. Conversion will begin.
Consecutively converting data for multiple songs
By using the Song List window you can consecutively convert the data of multiple songs into audio files.
- In the Player window, click the [SONG LIST] button. The Song List window will appear.
- In the Song List window, click the [SONG ADD] button. A dialog box will appear, allowing you to select the song data (Standard MIDI File).
-
Select the song data file that you wish to convert into an audio file, and click the [Open] button.
The selected file will be added to the song list. In the same way, add to the song list all of the song data that you want to convert to audio files. -
With playback stopped, click the [AUDIO CONV ALL] button in the Song List window. A dialog box will appear, allowing you to specify the folder in which the audio files will be saved.

-
In the [File Format] field, specify the sampling frequency, number of bits, etc., for the audio files that will be output.
-
Specify the folder in which the audio files will be saved, and click the [OK] button. All of the song data registered in the song list will be consecutively converted into audio files.

If you are consecutively converting multiple songs, the [Conversion Method] will be [Convert with fullest fidelity to the song files].

The saved audio file will automatically have the same name as the song data file, with the filename extension changed to ".WAV".
Operations in each window
■ Main window
1. POWER
Exits VSC Panel.
2. DISPLAY
Switches the central display between "Part level display" and "CPU usage ratio graph."

3. CONTROLLER
Displays the Controller window. (For details refer to p. 20.)
4. PLAYER
Displays the Player window. (For details refer to "Player window" on this page.)
5. MINIMIZE
Minimizes all VSC Panel windows.
6. ABOUT
Displays information about VSC.
7. RESET
Displays the Transmit Reset Message dialog box.
- GS Reset
Sets the sound generator mode to GS and initializes the sound generator.
• GM System On
Sets the sound generator mode to GM2 and initializes the sound generator. - Reset All Controllers
Initializes the controller data.

8. SETUP
Displays the VSC Settings window. (For details refer to p. 21.)
■ Player window
In the Player window you can load and play back song data (Standard MIDI Files). You can also adjust the tempo or key settings for playback, or convert the loaded song data into an audio file.
1. CLOSE
Closes the Player window.
2. SONG
Displays a dialog box where you can select the song data to be loaded into the player.

MEMO
If a dialog box asking you to enter a Song List Name appears when you exit VSC, input the desired song list name and click [Save].
3. AUDIO CONV
Converts the song data loaded into the player into an audio file. (For details refer to p. 16.)
4. TEMPO/KEY
Drag the slider knobs to set the tempo/key.
The tempo can be set in a range of 50% - 200% of the tempo specified by the song data. (The upper limit of the tempo is 250.) The key can be set in a range of -12 - +12 semitones (+/-1 octave).
The current value is displayed at the left of each slider.
If you want to restore the original settings, click the triangular button below the slider.
5. SONG LIST
Displays the Song List window. (For details refer to the following page.)
6. REPEAT
When this button is lit, repeat playback mode is selected. If multiple songs are registered in the song list, the songs in the list will play back successively.
7. OPTION
Displays the VSC Player Settings dialog box.
■ VSC Player settings
1. Start playback immediately after selecting (or changing) song
Check this if you want playback to begin automatically as soon as the file has been loaded.
2. Update MIDI messages when starting playback
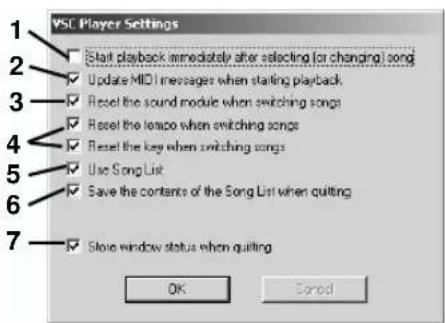
Check this if you want playback to use the correct sounds and volume when you begin playback from the middle of the song.
3. Reset the sound module when switching songs
Check this if you want the sound generator to automatically be reset when you change the song, or when the Repeat function changes the song.
4. Reset the tempo when switching songs / Reset the key when switching songs
Check these when you want tempo or key settings that have been altered to be reset when the song changes.
5. Use Song List
Uncheck this if you do not want to use the Song List function.
6. Save the contents of the Song List when quitting
Check this if you want the contents of the song list to be remembered the next time you start up the program.

If [Use song list] is unchecked in the VSC Player Settings dialog box, song information will be displayed.
7. Store window status when quitting
Check this if you want the program to start up with the same window layout as when you exited the program.
■ Song List window
In the Song List window you can register data for multiple songs to make them play back successively. You can also double-click a song in the list to change the song being played, or right-click the mouse on a song to access a list editing menu.
1. CLOSE
Closes the Song List window.
2. SONG ADD
Displays a dialog box in which you can select song data to add to the song list.
3. SONG DELETE
Deletes a song (that you highlighted by clicking it) from the song list.

4. AUDIO CONV ALL
Consecutively converts all songs in the song list into audio files. (For details refer to p. 17.)
5. SONG LIST OPEN
Loads a song list.
6. SONG LIST SAVE
Lets you assign a name to the song list and save it.
Displays a dialog box in which you can delete a previously saved song list or change its name.
■ Controller window
In the Controller window you can make mute settings, sound selections, volume settings, and effect settings for each part.
1. CLOSE
Closes the Controller window.
2. PART
When you click this to make it go dark, that part will be muted (silenced).
3. SOLO/PREV
Click SOLO when you want to hear only that part play back.
Click PREV when you want to preview (audition) the sound.

MEMO
The SOLO/PREV buttons function only while you hold them down.
4. INSTRUMENT
Displays the program number, variation number, and sound name for the sound of each part. When you click here, a menu list will appear, allowing you to change the sound.
5. FADER
By operating these faders you can control the function selected by [FADER FUNCTION].
6. ALL PLAY/ALL MUTE
Changes the mute settings of all parts.
7. MASTER LEVEL/MASTER VOLUME
Adjusts the master volume and displays the level.
8. FADER FUNCTION
Selects the function that will be controlled by the FADER of each part.
9. MODE
Switches the sound generator mode between "GM2 mode" and "GS mode."
10. SETUP
Opens the VSC Settings window.
■ VSC Settings window
In the VSC Settings window you can adjust VSC's performance and make settings for various functions. The Settings window consists of several

pages. To switch pages, click the tabs located in the upper part of the window. To get the changed settings to take effect, click [OK] or [Apply].
Performance settings
1. Preset
Three preset performance settings are provided, allowing you to change the settings with one click.
2. Sampling Rate
You can specify the audio quality by selecting the sampling frequency.
- 44.1 kHz (highest audio quality)
- 22.05 kHz (high audio quality)
- 11.025 kHz (low CPU load)
3. Maximum polyphony
Specifies the number of voices that can sound simultaneously.
4. CPU Load Limit
Specifies the upper limit of the load the VSC will place on the CPU.


The number of sounds that can be selected will depend on the type of sound set you are using and on the sound generator mode setting.

The sound generator will be reset when you change the sound generator mode.
5. Volume
Adjusts the volume of VSC. Adjust the volume to a level that will not cause distortion when the MASTER VOLUME of the Controller window is raised to the maximum.
6. Response
Adjusts the speed at which notes will respond. If you are playing from a MIDI keyboard, set this to a lower value.
7. Effects/Filter
Specifies whether effects and filter will be used.
- Reverb: Reverberation effect
- Chorus: An effect that adds spaciousness
- Delay: An echo effect
- TVF: Applies natural tonal changes for richer expressiveness
Selecting the sound set
1. Sound Set
Switches the sound set that will be used.
2. Secure memory at all times
The sound set will be left loaded into memory even when VSC is not in use, so that playback can be started immediately.
3. Secure memory only when playing

The sound set will be loaded into memory only when VSC is in use, so that more memory will be free when not playing.
Receive Events settings
For each part you can specify whether various types of MIDI messages will be received. If you uncheck an item, the corresponding MIDI message will not be received except from the Controller window. This is convenient when you do not want the parts to be affected by performance data from the player, or by MIDI messages from outside (e.g., in situations when you want to control each part from the Controller window).
1. Receive All
When you click this, all boxes will be checked.
2. All Off
When you click this, all boxes will be unchecked.

MEMO
If the device setting is set to "DirectSound On," it is not possible to adjust the response speed.
NOTE
Reverb, chorus, and delay will have no effect unless they are used by the music data.
NOTE
It is not possible to use more than one sound set at once. Also, the sound generator will be reset when you switch sound sets.
3. Select "Receive All" when reset the sound module
Uncheck this if you do not want the Received Events settings to change when the sound generator is reset.
Device settings
1. DirectSound Off
Select this if you want to use VSC from software that does not use DirectSound. You must also specify the audio device that you want to use as the audio output destination of VSC.
2. DirectSound On
Select this if you want to use VSC from software that supports
DirectSound. You must also specify the audio device that you want to use as the audio output destination of VSC.

3. Open Multimedia Property
Opens the Sounds and Multimedia Properties window of the Windows Control Panel. For details on these settings, refer to Using VSC as a sound generator from within other software (p. 24).
Other settings
1. Show the Helper icon in the Taskbar
2. Show the volume control in the Taskbar
If these items are unchecked, the helper icon and volume control will not be displayed in the Windows taskbar.

Detailed explanations of operations and buttons are also provided in VSC Help.
You can view Help in either of the following ways:
- Click the [Start] button, and click [Programs]-[Virtual Sound Canvas 3.2]-[Virtual Sound Canvas 3.2 Help].
- In the taskbar, click the "VSC helper icon," and select [Help] from the menu.
Using VSC as a sound generator from within other software
■ Software that uses Windows multimedia functionality
In order to use Virtual Sound Canvas 3 as a sound generator from software that uses Windows multimedia functionality, you must set the Windows multimedia setting to Roland VSC. Use the following procedure to make Windows multimedia settings.
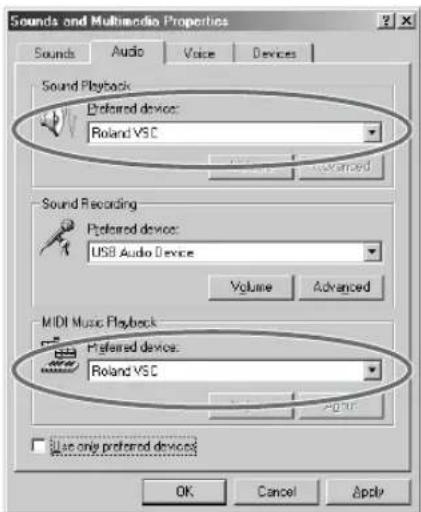
Windows Me users
1 Open the Windows [Control Panel]-[Sounds and Multimedia].
2 Click the Audio tab, and for [Sound Playback], set [Preferred device] to [Roland VSC].
3 For [MIDI Music Playback], set [Preferred device] to [Roland VSC].
4 Click [OK].
Windows 2000 users
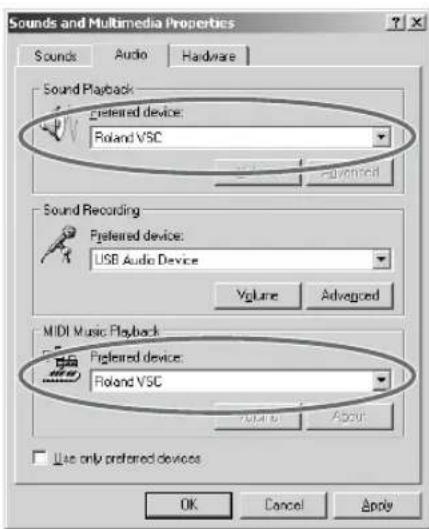
1 Open the Windows [Control Panel]-[Sounds and Multimedia].
2 Click the Audio tab, and for [Sound playback], set [Preferred device] to [Roland VSC].
3 For [MIDI Music Playback], set [Preferred device] to [Roland VSC].
4 Click [OK].
MEMO
If you cannot find the Sounds and Multimedia icon, click "view all
Control Panel options" displayed at the left edge of the Control Panel.
MEMO
If you cannot find the Sounds and Multimedia icon, click "view all
Control Panel options" displayed at the left edge of the Control Panel.
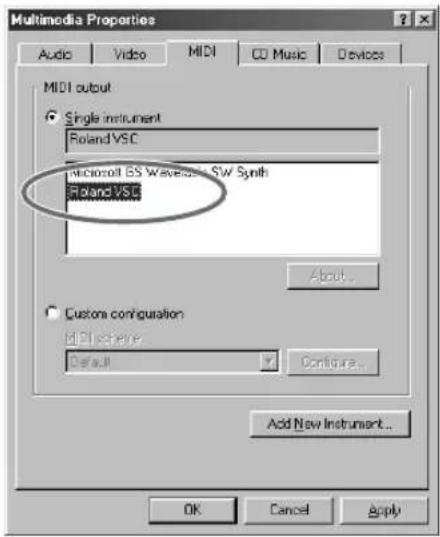
Windows 98 users
1
Open the Windows [Control Panel]-[Multimedia].
2
Click the Audio tab, and for [Playback], set [Preferred device] to [Roland VSC].

3
Click the MIDI tab, and with [Single device] selected in [MIDI output], click [Roland VSC] to highlight it.
4
Click [OK].
■ Software that directly specifies the MIDI output device
If you want to use VSC as the sound generator for software that directly specifies the MIDI output device instead of using Windows multimedia functionality, you must set the MIDI output device of your software to "Roland VSC." (If your software also has audio functionality, set the audio output device to "Roland VSC" as well.)
For details on making these settings, refer to the manual of the software you are using.
Using the plug-in version (DXi/ VST Instruments)
This chapter explains how to use DXi/VST Instruments.
For details on using a DXi/VST Instruments plug-in, refer to the manual for your host application.
* An application that supports DirectX Instruments (DXi) is required in order to use Virtual Sound Canvas DXi.
* An application that supports VST Instruments is required in order to use Virtual Sound Canvas VST.
If you have installed the stand-alone version
If you have installed the stand-alone version, make sure that the audio output and MIDI output of your host application are not set to "Roland VSC." If they are, an error dialog may appear, or there may be no sound from the Virtual Sound Canvas DXi/VST.
VSC Panel
VSC Panel lets you change the sound, volume, and effects of each part.
1. PART
Displays the volume of each part.
2. PREV
You can click this to audition the sound of that part.
3. INSTRUMENT
Displays the program number, variation number, and sound name of the sound selected for each part. You can click here to view a sound list menu and select a different sound.

4. FADER
By operating these sliders you can control the function selected by [FADER FUNCTION].
5. MASTER LEVEL/MASTER VOLUME
Adjusts the master volume and displays the level.
6. POLYPHONY
Displays the current polyphony (NOW) and the maximum polyphony up to this point (PEAK).
7. FADER FUNCTION
Selects the function controlled by the FADER of each part.
MEMO
Roland can make no guarantees regarding the operation of a host application manufactured by another company. Any questions about your host application should be directed to the relevant company.
MEMO
The illustration shows the DXi screen, but this can also be used for VST Instruments.
NOTE
The number of sounds that can be selected will depend on the sound generator mode you are using.
MEMO
The peak polyphony will be reset when you double-click within the display frame.
8. MACRO
Allows you to select macro settings for each effect (REVERB, CHORUS, DELAY).
9. RESET
Resets the sound generator to its initial state.
10. HELP
Displays help.
11. SETUP
Displays the "Settings window."
12. GM2/GS
Displays the current sound generator mode.
Settings window
In the Settings window you can make settings for various functions of VSC. The settings window consists of three pages: [Performance], [Receive Events], and [Version Info]. To switch pages, click the tabs located in the upper part of the window. To apply the changes you've made, click [OK].
■ Performance
1. Maximum polyphony
Specifies the maximum number of voices that can be sounded simultaneously.
2. Volume
Adjusts the volume of the VSC. Adjust the volume so that distortion does not occur when the MASTER VOLUME of the VSC Panel is set to the maximum.

3. Effects/Filter
Specifies whether the effects and filter will be used.
- Reverb: Reverberation
- Chorus: An effect that adds spaciousness to the sound
- Delay: An echo effect
- TVF: Applies natural tonal changes for richer expressiveness
4. Generator Mode
Specifies the start-up sound generator mode. The setting will take effect when you click [OK] to close the dialog box. The sound generator will be reset when you switch the sound generator mode.

Reverb, chorus, and delay will have no effect unless they are used within the music data.
Using the plug-in version (DXi/VST Instruments)
■ Receive Events
For each part, you can specify whether each of the MIDI messages listed below will be received. If you uncheck an item, the corresponding MIDI message will not be received. This is convenient when you do not want the parts to be affected by operations or music data from the host application (e.g., in situations when you want to control each part from VSC Panel).
1. MIDI messages
You can switch MIDI message reception on/off for each of the following parameters:
- Program change
- Volume
- Panpot
- Expression
- Reverb Send Level
- Chorus Send Level
- Delay Send Level

2. Receive sound module reset messages
Specifies whether GM1/GM2 System On or GS Reset messages will be received.
3. Receive All
When you click this, all boxes will be checked.
4. All Off
When you click this, all boxes will be unchecked.
5. Select "Receive All" when reset the sound module
Uncheck this if you do not want the Received Events settings to change when the sound generator is reset.
■ Version Info
This displays the software version number of this product.


In accordance with the specifications for VST Instruments, Virtual Sound Canvas VST cannot receive system exclusive messages.
Macintosh Users
Software installation....30
Installing the software....30
Using the stand-alone version.... 32
Listening to the demo songs....32
Converting song data to an audio file....33
Make settings for the audio file that will be saved 34
Operations in each window 36
Using VSC as a sound generator from within other software 42
Using the plug-in version (VST Instruments)......46
VSC Panel....46
Settings window....47
Software installation
This chapter explains how to install the software included in the VSC multi-pack. You will need the VSC multi-pack CD-ROM, so be sure you have it ready.
Before you install the software, you must read the license agreement. A license agreement may be displayed while you are installing the software; please be sure to read it.

Before installing Virtual Sound Canvas VST, you must install a host application that supports VST Instruments.
Installing the software
1
Start up your Macintosh.
2
Exit all software that may be running.
3
In the VSC multi-pack CD-ROM, double-click [VSC Installer-E].
4
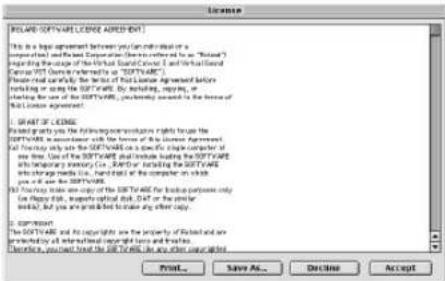
The license dialog box will appear. This message asks whether you consent to the terms of the license agreement. Read the license agreement, and click [Accept] if you agree. If you click [Decline], the installation will be halted.
5
The Custom Install dialog box will appear.
Uncheck any software that you do not want to install.
Select the installation location, and click [Install].

VSC Installer-E

* Virtual Sound Canvas VST will be installed both in the VstPlugIns folder of your VST Instruments -compatible sequencer, and in the Virtual Sound Canvas VST folder.

The license agreement is the contract under which Roland allows you to use the software.

The screen shots printed in this manual are taken from Mac OS 9.1. The screens you actually see on your computer may differ depending on the version of your operating system.

If you are using anti-virus or similar software, you must disable it before installing this software.

If you check "Virtual Sound Canvas 3" in the dialog box shown at left, the lower part of the window will not display a message informing you that "Virtual Sound
Canvas 3" will be installed; however, it will be correctly installed in the selected installation destination.
■ Select Folder dialog box appears
If you check Virtual Sound Canvas VST, a Select Folder dialog box like the one shown at right may appear during the installation. In this dialog box you can select the folder into which Virtual Sound Canvas VST will be installed. The necessary files will be copied to the selected folder.

■ If a dialog box like the following appears
If a dialog box like the one shown at right appears, it is possible that the host application does not provide the required VstPlugIns folder. Refer to the manual of your host application,

6
When all of the software has been installed, a dialog box will inform you that installation has been completed.
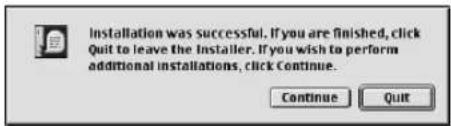
Normally you will click [Quit]. If you want to install into another folder, click [Continue].
This completes installation of Virtual Sound Canvas VST and Virtual Sound Canvas 3.
MEMO
The dialog box shown at left will appear if there are two or more VstPlugins folders into which Virtual Sound Canvas VST can be installed.
MEMO
If you want to install Virtual Sound Canvas VST manually, copy the VST(E) file from the "Virtual Sound Canvas VST" folder into the VstPlugins folder of the host application you are using, and copy the VSCContents folder into the folder of the host application.
Using the stand-alone version
Listening to the demo songs
Try starting up VSC and listening to the demo songs.
Adjust the sound and volume before you begin listening
From the Apple menu of your Macintosh, select the Control Panel, and open Sound or Monitors & Sound.
If you opened Sound, select the highest possible frequency as the Rate in the Sound Out window. Then adjust the volume in the Volumes window.
If you opened Monitors & Sound, click the Sound button, and select the highest frequency for Sound Output Quality. In the same window, adjust the volume.
■ Starting VSC
* Before you start VST, turn off Virtual Memory for the Mac OS.
Double-click the VSC icon in the folder into which you installed VSC.

VSC will start up, and the main window will appear.
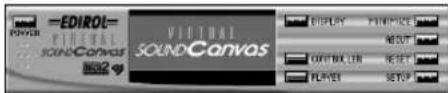
■ Loading song data
1
In the VSC main window, click the [PLAYER] button.
The Player window will appear.
2
In the Player window, click the [SONG] button.
A dialog box will appear, allowing you to select song data (Standard MIDI Files).
3
Move to the [SMF] folder located in the folder in which VSC was installed, select the desired file, and click the [Open] button.
The selected file will be loaded. Click the button in the Player window to begin playback. To stop playback, click the button.

Depending on your OS, there may not be a sampling frequency setting.

In some cases, a dialog box with a message of "Virtual memory switch is now set to ON. ---" may be displayed. If this message appears, from the Apple menu, open the "Memory" Control Panel and turn off Virtual Memory. Then restart MacOS.
About the included song data
The [Songs] folder on the VSC multi-pack CD-ROM contains data for more than 100 songs in addition to the demo songs that are installed with VSC 3. You can use VSC to listen to these songs with the CD-ROM inserted, or you can copy them to your hard disk for use. To copy the songs to your hard disk, simply drag the [Songs] folder from the CD-ROM onto your hard disk. For a list of the filenames, song names, and copyrights for this data, refer to the Songlist-E file in the [Songs] folder of the CD-ROM.

Using the song data included with this product for purposes other than personal enjoyment without permission from the copyright owner is prohibited by law.
Converting song data to an audio file
VSC is able to "virtually" play a song that is loaded into the player, and save the result of the performance as an audio file (Apple AIFF). An audio file that's been saved in this way can be played back on your computer, used as material for software that handles audio, or even used to create your own audio CD.
* In order to create an audio CD you will need a CD-R drive and writing software that supports your computer.
■ Load the song data for conversion
1
Start up VSC, and in the Main window click the [PLAYER] button.
The Player window will appear.
2
In the Player window, click the [SONG] button.
A dialog box will appear, allowing you select the desired song data (Standard MIDI File).
3
Select the song data file that you want to convert into an audio file, and click the [Open] button. The selected file will be loaded.
Make settings for the audio file that will be saved
1
With playback stopped, click the [AUDIO CONV] button of the Player window.
A dialog box will appear, allowing you to specify the audio file that will be saved.

2
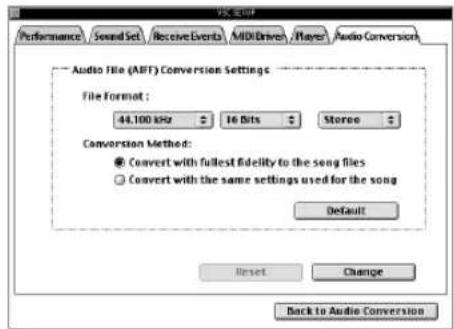
Click [Conversion Settings ...] to display the audio conversion settings of the Settings window.
3
In the [File Format] field, specify the sampling frequency, number of bits, etc., of the audio file that will be output.
4
Select one of the following [Conversion Method].
- Convert with fullest fidelity to the song files
VSC will be used to its full potential, in order to perform the highest-quality conversion. However, the sampling frequency will be as you specify in [File Format]. Also, the Tempo and Key settings, the settings of the Controller window, and the settings of the Settings window will be ignored.
- Convert with the same settings used for the song
The Tempo and Key settings, the settings of the Controller window, and the settings of the Settings window will all be applied, producing an audio file that will sound identical to when the data is played back by the Player. However, the sampling frequency will be as you specify in [File Format].
5
Click [Change] to apply the settings, and then click [Back to Audio Conversion] to close the Settings window.
6
Specify the save location and filename for the audio file, and click the [Save] button. Conversion will begin.
Consecutively converting data for multiple songs
By using the Song List window you can consecutively convert the data of multiple songs into audio files.
- In the Player window, click the [SONG LIST] button. The Song List window will appear.
- In the Song List window, click the [SONG ADD] button. A dialog box will appear, allowing you to select the song data (Standard MIDI File).
-
Select the song data file that you wish to convert into an audio file, and click the [Open] button. The selected file will be added to the song list. In the same way, add to the song list all of the song data that you want to convert to audio files.
-
With playback stopped, click the [AUDIO CONV ALL] button in the Song List window.
A dialog box will appear, allowing you to specify the folder in which the audio files will be saved.

- Click [Conversion Settings ...]
to display the Audio Conversion settings of the Settings window.
-
In the [File Format] field, specify the sampling frequency, number of bits, etc., for the audio files that will be output.
-
Click [Change] to apply the settings, and then click [Return to audio conversion] to close the Settings window.
-
Specify the folder in which the audio files will be saved, and click the [OK] button. All of the song data registered in the song list will be consecutively converted into audio files.

The saved audio file will automatically have the same name as the song data file, with the filename extension changed to ".AIFF".

If you are consecutively converting multiple songs, the [Conversion Setting] will be [Convert with fullest fidelity to the song files].
Operations in each window
■ Main window
1. POWER
Exits VSC.
2. DISPLAY
Switches the central display between "Part level display" and "CPU usage ratio graph."

3. CONTROLLER
Displays the Controller window. (For details refer to p. 38.)
4. PLAYER
Displays the Player window. (For details refer to "Player window" on this page.)
5. MINIMIZE
Minimizes all VSC windows. To restore the windows to their previous size, click [RESTORE].
6. ABOUT
Displays information about VSC.
7. RESET
Displays the Transmit Reset Message dialog box.
- GS Reset
Sets the sound generator mode to GS and initializes the sound generator.
- GM System On

Sets the sound generator mode to GM2 and initializes the sound generator.
- Reset Controllers
Initializes the controller data.
8. SETUP
Displays the Settings window. (For details refer to p. 38.)
■ Player window
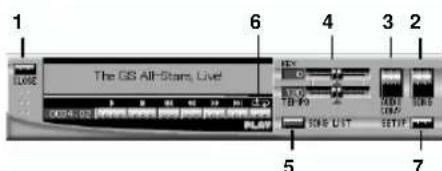
In the Player window you can load and play back song data (Standard MIDI Files). You can also adjust the tempo or key settings for playback, or convert the loaded song data into an audio file.
1. CLOSE
Closes the Player window.
2. SONG
Displays a dialog box where you can select the song data to be loaded into the player.
MEMO
If a dialog box asking you to enter a Song List Name appears when you exit VSC, input the desired song list name and click [Save].
3. AUDIO CONV
Converts the song data loaded into the player into an audio file. (For details refer to p. 33.)
4. TEMPO/KEY
Drag the slider knobs to set the tempo/key.
The tempo can be set in a range of 50%--200% of the tempo specified by the song data. (The upper limit of the tempo is 250.) The key can be set in a range of -12--+12 semitones (+/-1 octave).
The current value is displayed at the left of each slider.
If you want to restore the original settings, click the triangular button below the slider.
5. SONG LIST
Displays the Song List window.
6. REPEAT
When this button is lit, repeat playback mode is selected. If multiple songs are registered in the song list, the songs in the list will play back successively.
7. SET UP
Displays the Settings window. (For details refer to p. 38)
■ Song List window
In the Song List window you can register data for multiple songs to make them play back successively. You can also click the icon for a song in the list to change the song being played, or drag the song name to change the order of the songs.
1. CLOSE
Closes the Song List window.
2. SONG ADD
Displays a dialog box in which you can select song data to add to the song list.
3. SONG DELETE
Deletes a song (that you highlighted by clicking it) from the song list.
4. SONG LIST NEW
Creates a new song list.
5. SONG LIST OPEN
Loads a song list.
6. SONG LIST SAVE
Lets you assign a name to the song list and save it.
7. AUDIO CONV ALL
Consecutively converts all songs in the song list into audio files. (For details refer to p. 35.)


If [Use Song List] is unchecked in the Player Settings of the Settings window, song information will be displayed.
■ Controller window
In the Controller window you can make mute settings, sound selections, volume settings, and effect settings for each part.
1. CLOSE
Closes the Controller window.
2. PART
When you click this to make it go dark, that part will be muted (silenced).
3. SOLO/PREV
Click SOLO when you want to hear only that part play back.
Click PREV when you want to preview (audition) the sound.

4. INSTRUMENT
Displays the program number, variation number, and sound name for the sound of each part. When you click here, a menu list will appear, allowing you to change the sound.
5. FADER
By operating these faders you can control the function selected by [FADER FUNCTION].
6. ALL PLAY/ALL MUTE
Changes the mute settings of all parts.
7. MASTER LEVEL/MASTER VOLUME
Adjusts the master volume and displays the level.
8. FADER FUNCTION
Selects the function that will be controlled by the FADER of each part.
9. MODE
Switches the sound generator mode between "GM2 mode" and "GS mode."
■ Settings window
In the Settings window you can adjust VSC's performance and make settings for various functions. The

Settings window consists of several pages. To switch pages, click the tabs located in the upper part of the window. To get the changed settings to take effect, click [Change].

The SOLO/PREV buttons function only while you hold them down.

The number of sounds that can be selected will depend on the type of sound set you are using and on the sound generator mode setting.

The sound generator will be reset when you change the sound generator mode.
Performance settings
1. Preset
Three preset performance settings are provided, allowing you to change the settings with one click.
2. Sampling Rate
You can specify the audio quality by selecting the sampling frequency.
- 44.1 kHz (highest audio quality)
- 22.05 kHz (high audio quality)
- 11.025 kHz (low CPU load)
3. Maximum polyphony
Specifies the number of voices that can sound simultaneously.
4. CPU Load Limit
Specifies the upper limit of the load the VSC will place on the CPU.
5. Volume
Adjusts the volume of VSC. Adjust the volume to a level that will not cause distortion when the MASTER VOLUME of the Controller window is raised to the maximum.
6. Expression Mode
Select either [Response Priority] or [Polyphony Priority]. If you are playing VSC from a MIDI keyboard or in synchronization with the audio tracks of other software, select [Response Priority].
7. Effects/Filter
Specifies whether effects and filter will be used.
- Reverb: Reverberation effect
- Chorus: An effect that adds spaciousness
- Delay: An echo effect
- TVF: Applies natural tonal changes for richer expressiveness
Selecting the sound set
1. Sound set
Switches the sound set that will be used.

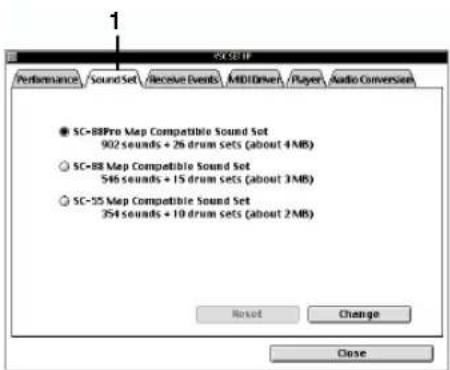

Reverb, chorus, and delay will have no effect unless they are used by the music data.

It is not possible to use more than one sound set at once. Also, the sound generator will be reset when you switch sound sets.
Receive Events settings
For each part you can specify whether various types of MIDI messages will be received. If you uncheck an item, the corresponding MIDI message will not be received except from the Controller window. This is convenient when you do not want the parts to be affected by performance data from the player, or by MIDI messages from outside (e.g., in situations when you want to control each part from the Controller window).
1. Receive All
When you click this, all boxes will be checked.
2. All Off
When you click this, all boxes will be unchecked.
3. Set "Receive All" when reset the sound module
Uncheck this if you do not want the Received Events settings to change when the sound generator is reset.

MIDI driver settings
Since VSC supports OMS, FreeMIDI, and MIDI Manager, it can be used as a sound generator from other software. In this window you can specify the type of MIDI driver that your software uses.
The settings required in order to allow other software to use VSC as a sound generator will depend on the driver used by the software. For details refer to the explanations for each driver in "Using VSC as a sound generator from within other software."
- Software that uses OMS: p. 42
- Software that uses FreeMIDI: p. 45

VSC Player settings
1. Start playback immediately after selecting (or changing) song
Check this if you want playback to begin automatically as soon as the file has been loaded.
2. Update MIDI messages when starting playback
Check this if you want playback to use the correct sounds and volume when you begin playback from the middle of the song.


If you are using MIDI Manager, please refer to the online help.
3. Reset the sound module when switching songs
Check this if you want the sound generator to automatically be reset when you change the song, or when the Repeat function changes the song.
4. Reset the tempo when switching songs / Reset the key when switching songs
Check these when you want tempo or key settings that have been altered to be reset when the song changes.
5. Use Song List
Uncheck this if you do not want to use the Song List function.
6. Save the contents of the Song List automatically
Check this if you want the contents of the song list to be remembered the next time you start up the program.
7. Allow all files when selecting songs
Check this if you want to select files with a file creator other than Standard MIDI File.
8. Change the File Type of the loaded SMF
If this is checked, loading a file of a file type other than Standard MIDI File will cause a dialog box to appear, asking you if you wish to change the file type.
Audio Conversion settings
Specify the format and conversion method that will be used when a song loaded into the player is converted into an audio file. (For details refer to p. 33.)

Detailed explanations of operations and buttons are also provided in VSC Help.
You can view Help in either of the following ways:
- With VSC running, select VSC Help from the Help menu or from the [?] menu (guide menu).
- Double-click VSC Help.htm in the folder in which VSC was installed.
Using VSC as a sound generator from within other software
■ Software that uses OMS
In order to use VSC with OMS-compatible software, the following conditions must be met:
- You must have OMS version 2.0 or later
- The IAC Driver must be installed.
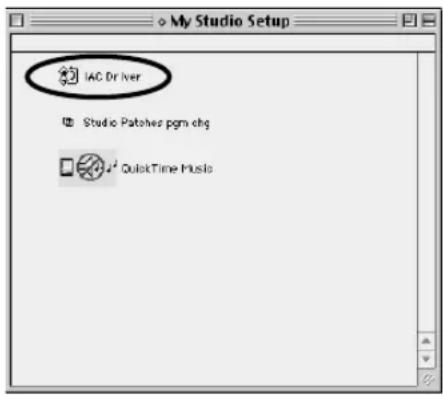
Checking the IAC Driver
Start up [OMS Setup], and verify that [IAC Driver] is displayed. [IAC Driver] is a MIDI driver used to transfer MIDI data between software programs. Is [IAC Driver] displayed?
- You have not yet installed OMS -> proceed to "Installing the IAC Driver"
- It is not displayed -> proceed to "Installing the IAC Driver"
-It is displayed -> proceed to "OMS Setup settings"
Installing the IAC Driver
1
If OMS Setup is running, you must first exit [OMS Setup].
2
Install OMS once again. (In some cases, OMS may be included with the software you are using, or the installer for your software may install OMS along with the software).
If you have the OMS installer, change the [Easy Install] menu to [Custom Install], check [IAC Driver], and install it.
If you want to use the installer for your software to install OMS, use that installer to perform a Custom installation, and install the OMS IAC
Driver. For details refer to the manual of the software you are using.

3
After installation, start up [OMS Setup]. If the currently used "Studio Setup" file is displayed, close its window.
MEMO
If you are installing OMS for the first time, you should also check [Basic OMS].
4
From the File menu, select New Setup, and then perform the setup. IAC Driver should be displayed.
5
As directed by the screen, click [OK], and a dialog box will appear, allowing you to save the "Studio Setup." Click [Save]. If a dialog box asking "Replace existing "My Studio Setup"?" appears, click [Replace]. After saving, proceed to step 2 of "OMS Setup settings" on this page.


If this is not displayed even when you try it again, it is possible that you are using an old version of OMS. Please use OMS version 2.0 or later.
OMS Setup settings
1
Start up [OMS Setup], which is located in the folder into which OMS was installed.

OMS Setup
2
Double-click the "IAC Driver" icon area in Studio Setup.

3
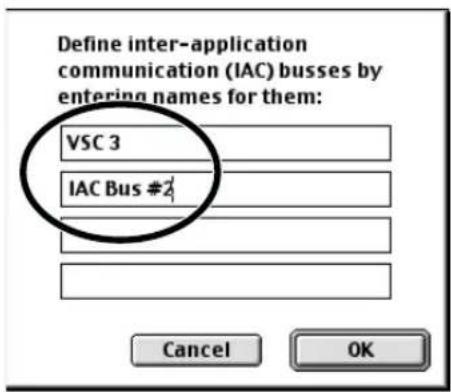
In the areas shown in the illustration, type "VSC 3" and "IAC Bus #2," and click [OK].
4
From the Edit menu, select OMS MIDI Setup, check Run MIDI in Background, and finally click [OK].

5
From the File menu, select Quit. (If a dialog box suggests that you save, save the file.)

VSC settings
1
In the Main window of VSC, click the [SETUP] to display the Settings window.
2
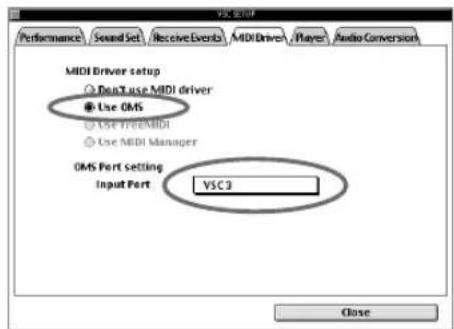
In MIDI Driver Settings, check [Use OMS], and set [Input Port] to [VSC 3].
3
If you will be using VSC simultaneously with the audio tracks of other software, set the Performance setting [Expression Method] to [Response Priority].
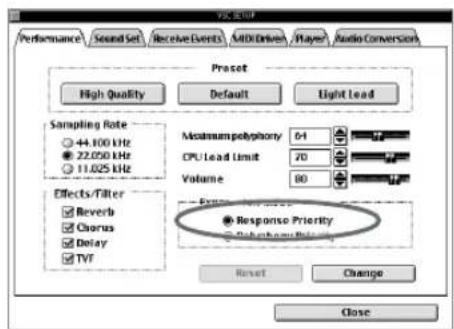
4
Click [Change], and then click [Close] to close the Settings window.
Settings for the software that uses OMS
In the software that uses OMS, set the MIDI output port to "VSC 3."
MEMO
For details on this setting, refer to the manual for the software you are using.
■ Software that uses FreeMIDI
If you want to use VSC to play sounds from software that uses FreeMIDI as its MIDI driver, make the following settings.
1
FreeMIDI settings
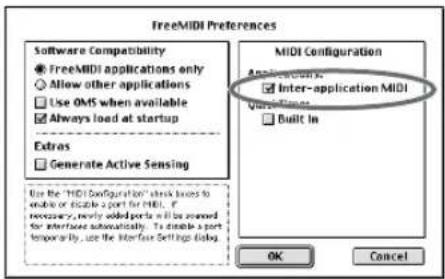
Open the FreeMIDI Configuration file, and from the File menu choose FreeMIDI Preferences. In the MIDI Configuration area of the Preferences window, check Inter-application MIDI.
For the Software Compatibility setting, select FreeMIDI applications only. Then exit FreeMIDI.
2
Start up the software
Start up the software that uses FreeMIDI, and start up VSC.
3
VSC settings
In the main window of VSC, click the [SETUP] button to display the Settings window. In the MIDI driver settings, check [Use FreeMIDI]. If you will be using VSC simultaneously with the audio tracks of your software, set the Performance setting [Expression Method] to [Response Priority]. Finally, click [Change], and then click [Close] to close the Settings window.
4
Settings for the software that uses FreeMIDI
In the software that uses FreeMIDI, set the OUTPUT device for each track to [VSC 3].
When you begin playback on the software, the VSC will produce sound.

If your software does not show [VSC 3] as an output device, it does not support [Inter-application MIDI], and VSC cannot be used as a sound generator for that software.

FreeStyle cannot use VSC as a sound generator.
Using the plug-in version (VST Instruments)
This chapter explains how to use VST Instruments.
For details on using a VST Instruments plug-in, refer to the manual for your host application.
* An application that supports VST Instruments is required in order to use Virtual Sound Canvas VST.
* In accordance with the specifications for VST Instruments, Virtual Sound Canvas VST cannot use system exclusive messages.
VSC Panel
VSC Panel lets you change the sound, volume, and effects of each part.
1. PART
Displays the volume of each part.
2. PREV
You can click this to audition the sound of that part.
3. INSTRUMENT
Displays the program number, variation number, and sound name of the sound selected for each part.
You can click here to view a sound list menu and select a different sound.
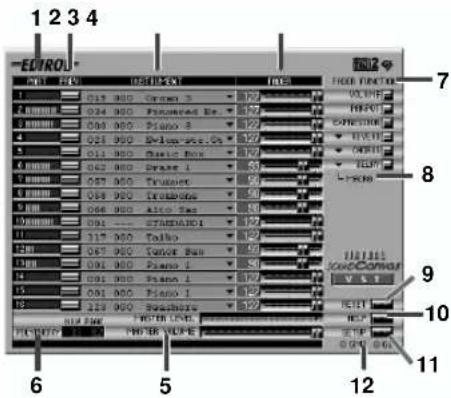
4. FADER
By operating these sliders you can control the function selected by [FADER FUNCTION].
5. MASTER LEVEL/MASTER VOLUME
Adjusts the master volume and displays the level.
6. POLYPHONY
Displays the current polyphony (NOW) and the maximum polyphony up to this point (PEAK).
7. FADER FUNCTION
Selects the function controlled by the FADER of each part.
8. MACRO
Allows you to select macro settings for each effect (REVERB, CHORUS, DELAY).
9. RESET
Resets the sound generator to its initial state.
10. HELP
Displays help.
MEMO
Roland can make no guarantees regarding the operation of a host application manufactured by another company. Any questions about your host application should be directed to the relevant company.
NOTE
The number of sounds that can be selected will depend on the sound generator mode you are using.
MEMO
The peak polyphony will be reset when you double-click within the display frame.
11. SETUP
Displays the Settings window.
12. GM2/GS
Displays the sound generator mode.
Settings window
In the Settings window you can make settings for various functions of VSC. The settings window consists of three pages: [Performance], [Received Events], and [Version]. To switch pages, click the tabs located in the upper part of the window. To apply the changes you've made, click [Change].
■ Performance
1. Maximum
Specifies the maximum number of voices that can be sounded simultaneously.
2. Volume
Adjusts the volume of the VSC. Adjust the volume so that distortion does not occur when the MASTER VOLUME of the VSC Panel is set to the maximum.

3. Effects/Filter
Specifies whether the effects and filter will be used.
- Reverb: Reverberation
- Chorus: An effect that adds spaciousness to the sound
- Delay: An echo effect
- TVF: Applies natural tonal changes for richer expressiveness
4. Generator
Specifies the start-up sound generator mode. The sound generator will be reset when you switch the sound generator mode.

Reverb, chorus, and delay will have no effect unless they are used within the music data.
Using the plug-in version (VST Instruments)
■ Received Events
For each part, you can specify whether each of the MIDI messages listed below will be received. If you uncheck an item, the corresponding MIDI message will not be received. This is convenient when you do not want the parts to be affected by operations or music data from the host application (e.g., in situations when you want to control each part from VSC Panel).
1. MIDI messages
You can switch MIDI message reception on/off for each of the following parameters. If you uncheck an item, the corresponding MIDI message will not be received. MIDI message reception can be switched on/off for the following parameters:
- Program Change
- Volume
- Pan
- Expression
- Reverb Send Level
- Chorus Send Level
- Delay Send Level
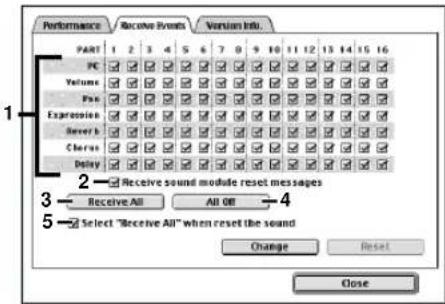
2. Receive sound module reset messages
Specifies whether GM1/GM2 System On or GS Reset messages will be received.
3. Receive All
When you click this, all boxes will be checked.
4. All Off
When you click this, all boxes will be unchecked.
5. Select "Receive All" when reset the sound
Uncheck this if you do not want the Received Events settings to change when the sound generator is reset.
■ Version
This displays the software version number of this product.


In accordance with the specifications for VST Instruments, Virtual Sound Canvas VST cannot receive system exclusive messages.
Troubleshooting
Troubleshooting for the stand-alone version (Windows) ..50
No sound....50
Sound is too loud/too soft 50
Sound is delayed....50
Sound is interrupted or the same phrase is played repeatedly ....50
Polyphony is too low 51
Playback tempo is irregular ....51
Sound is distorted....52
Can't start up VSC Panel....52
An error dialog box is displayed....52
Song List window is not displayed....52
Troubleshooting for the stand-alone version (Macintosh) 53
No sound....53
Sound is too loud/too soft 53
Sound is delayed....53
Sound quality is poor....53
Sound is interrupted 54
Polyphony is too low 54
Playback tempo is irregular ....55
Sound is distorted....55
Noise is audible....55
Can't use VSC from other software as a sound generator....56
The sound stops when you switch software 56
Can't adjust the volume balance with other software....56
Can't synchronize to the audio tracks of other software 56
Stuck notes or hang-ups occur on OMS-compatible software....57
Hangs up when used with Studio Vision Pro or Vision with audio functionality ....57
Troubleshooting for the plug-in version (Windows/Macintosh)..58
Can't find the desired folder for installation ....58
Can't plug-in (can't select) DXi/VST Instruments....58
Two copies of VSC appear in the plug-in list (Macintosh)....58
Plug-in fails....58
Sound is too loud/too soft/not heard....59
Sound is interrupted/Playback tempo is irregular/
Playback stops mid-way....59
Notes are delayed....60
Polyphony is insufficient/Notes are omitted....60
Sound is distorted....60
Playback does not use the specified sounds or part settings ....61
Settings in the VSC panel change on their own 61
Effects (Reverb/Chorus/Delay) are not applied to the drum part......61
An error dialog box is displayed....62
Troubleshooting for the stand-alone version (Windows)
■ No sound
◆ In the VSC Performance settings, the volume may have been lowered. In the VSC main window, click the [SETUP] button to open the Settings window, and make sure that in the Performance settings, [Volume] is raised.
◆ The Windows volume control slider may have been lowered.
In the Windows taskbar, click the "Volume Control" icon, and a volume adjustment slider will appear. Make sure that the slider is raised.
◆ Are the Windows multimedia settings set to [Roland VSC]? Set the Windows multimedia settings to [Roland VSC]. For details refer to Using VSC as a sound generator from within other software (p. 24).
■ Sound is too loud/too soft
There are several ways to adjust the volume. Use the method most appropriate for your system or purpose.
◆ VSC setting
In the VSC main window, click the [SETUP] button to open the Settings window, and change the Performance setting [Volume] to adjust the volume.
◆ Windows volume control
In the Windows taskbar, click the "Volume Control" icon to display the volume slider. You can drag this slider to adjust the volume.
◆ Volume adjustment on your computer
If your computer (hardware) has a volume control function, you can use it to adjust the volume.
■ Sound is delayed
In cases such as when you are using VSC from other software as a sound generator, the sound of the VSC will be heard later than the display. This is due to the characteristics of a software synthesizer. In the Settings window, you may be able to set the Performance setting [Response] to a lower value to minimize this delay. If you are using software that supports DXi/VST Instruments, you may be able to obtain faster response by using the plug-in version.
■ Sound is interrupted or the same phrase is played repeatedly
◆ Is power management active?
If power management (electrical power management performed by your computer) is active, the sound may be interrupted frequently. In this occurs, disable power management on your computer.
◆ Are you starting or exiting other software during playback?
The sound may be interrupted if you start or exit other software during playback.
◆ Is the floppy disk or CD-ROM drive being accessed during playback?
The sound may be interrupted if the floppy disk or CD-ROM drive is accessed.
◆ Are you running many applications?
If other software is placing demands on the computer, it may not be possible to obtain the necessary polyphony, which may cause some notes to be interrupted. Try exiting software you are not using.
◆ You may be able to improve matters by changing the performance settings in the Settings window.
- Try increasing [Maximum polyphony] and [CPU Load Limit].
- Try turning off any or all of [Reverb], [Chorus], [Delay], and [TVF].
- Try setting [Sampling Rate] to a lower setting.
- Try increasing the [Response] setting.
◆ If the VSC device setting DirectSound is ON, it is more likely that the sound will be interrupted or the same phrase will loop.
Try setting "DirectSound OFF" for the Device settings in the Settings window. However this will not necessarily work if the MIDI data being played significantly exceeds the capabilities of your computer to sound the notes.
It is also possible that the interrupted sound is due to other aspects of your computer system (other drivers or software).
■ Polyphony is too low
◆ Are you running many applications?
If other software is placing demands on the computer, it may not be possible to obtain the necessary polyphony. Try exiting software you are not using.
◆ You may be able to improve matters by changing the performance settings in the Settings window.
- Try increasing [Maximum polyphony] and [CPU Load Limit].
- Try turning off any or all of [Reverb], [Chorus], [Delay], and [TVF].
- Try setting [Sampling Rate] to a lower setting.
It is also possible that the insufficient polyphony is due to other aspects of your computer system (other drivers or software).
■ Playback tempo is irregular
◆ Are you running many applications?
The irregular tempo may be because other software is placing demands on the computer. Try exiting software you are not using.
◆ You may be able to improve matters by changing the performance settings in the Settings window.
- Try decreasing [Maximum polyphony] and [CPU Load Limit].
- Try turning off any or all of [Reverb], [Chorus], [Delay], and [TVF].
- Try setting [Sampling Rate] to a lower setting.
- If the VSC device is set to DirectSound, there is a greater possibility that irregular tempo may occur.
Try turning [DirectSound Off] for the device settings in the Settings window.
- If you are simultaneously using audio and MIDI in a game or similar software, the timing of the audio and VSC may drift. You may be able to resolve this by setting [Control Panel]-[Sounds and Multimedia] ([Multimedia] in the case of Windows 98) -[Audio]-[Sound Playback] ([Playback] in the case of Windows 98) to "Roland VSC."
It is also possible that the irregular playback tempo is due to other aspects of your computer system (other drivers or software).
■ Sound is distorted
In the VSC main window, click the [SETUP] button to access the VSC Settings window, and in the Performance settings, lower the [Volume] value.
■ Can't start up VSC Panel
In some cases if you upgrade Windows with VSC installed, you will become unable to start up VSC Panel. In this case, delete (uninstall) the previously installed VSC, and re-install it. (p. 7)
■ An error dialog box is displayed
◆ An error dialog box of "Set4chMode Fail!" is displayed while using Cubase/Cubasis
◆ The ASIO multimedia settings indicate "Device could not be opened."
Depending on the version of Cubase or Cubasis, selecting Virtual Sound Canvas 3 (device name: Roland VSC) as the audio output port may cause an error to be displayed or the audio (including the output of the software synthesizer) to fail to sound.
In such cases, do not select Roland VSC as the output port setting for ASIO multimedia Setup in Cubase or Cubasis.
■ Song List window is not displayed
If you lower the display resolution, the Song List window may be displayed outside the screen, and will not be visible. If this occurs, drag the Song List window into the center of the screen before you change the display resolution.
MEMO
If you cannot find the Sounds and Multimedia icon, click the text "view all Control Panel options," displayed in the left side of the Control Panel.
Troubleshooting for the stand-alone version (Macintosh)
■ No sound
◆ On your Macintosh, are "Virtual Memory" or "RAM Disk" turned on?
Open the "Memory" Control Panel, and check the Virtual Memory and RAM Disk settings. If there is no sound with these turned on, turn off Virtual Memory and RAM Disk, and restart your Macintosh.
■ Sound is too loud/too soft
There are several ways to adjust the volume. Use the method most appropriate for your system or purpose.
◆ VSC setting
In the VSC main window, click the [SETUP] button to open the Settings window, and change the Performance setting [Volume] to adjust the volume.
◆ Control Panel setting
In the Macintosh Control Panel, open the Sound or Monitors & Sound window and adjust the volume.
◆ Volume adjustment on your computer
If your computer (hardware) has a volume control function, you can use it to adjust the volume.
■ Sound is delayed
In cases such as when you are using VSC from other software as a sound generator, the sound of the VSC will be heard later than the display. This is due to the characteristics of a software synthesizer. You may be able to minimize this delay by selecting the Performance setting [Response Priority] in the Settings window.
If you are using software that supports VST Instruments, you may be able to obtain faster response by using the plug-in version.
■ Sound quality is poor
◆ Is the sampling frequency set to a low setting?
- From the Apple menu, select the Control Panel, and open Sound or Monitors & Sound.
If you opened Sound, set the Rate in the Sound Out screen to the highest available frequency.
If you opened Monitors & Sound, click the Sound button, and set the Sound Output Quality to the highest available frequency.
If you specify 11.025 kHz for this setting, 11.025 kHz sound will be output even if you specify 44.1 kHz on the VSC.
- In the VSC Settings window, set the Performance setting [Sampling Rate] to a high value.
MEMO
If you are using speakers, we recommend that you set the "Control Panel" volume to the maximum, and adjust the desired volume on your speaker system. This will maximize the audio quality.
NOTE
Depending on the OS you are using, there may not be a sampling frequency setting.
■ Sound is interrupted
◆ On your Macintosh, are "Virtual Memory" or "RAM Disk" turned on? Open the "Memory" Control Panel, and check the Virtual Memory and RAM Disk settings. If there is no sound with these turned on, turn off Virtual Memory and RAM Disk, and restart MacOS.
◆ Are you also running another program that uses a large amount of memory?
The sound may be interrupted if you are also running other software that uses large amounts of memory, or if you start up other software during playback.
◆ Is the floppy disk or CD-ROM drive being accessed during playback?
The sound may be interrupted if the floppy disk or CD-ROM drive is accessed.
◆ You may be able to improve matters by changing the performance settings in the Settings window.
It is possible that there is not enough polyphony for the music that you are attempting to play. You may be able to obtain an improvement by changing the Performance settings in the Settings window.
- Try increasing [Maximum polyphony] - Try adjusting the [CPU Load Limit] setting. Notes may be interrupted if the CPU load limit is too low. Also, software other than the VSC may become unstable if you are using other software and the CPU load limit setting is too high, and this may cause notes to be interrupted.
- Try turning off any or all of [Reverb], [Chorus], [Delay], and [TVF].
- Try setting [Sampling Rate] to a lower setting.
It is also possible that the irregular playback tempo is due to other aspects of your computer system (other system extensions or software).
■ Polyphony is too low
◆ Are you running many applications?
If other software is placing demands on the computer, it may not be possible to obtain the necessary polyphony. Try exiting software you are not using.
◆ You may be able to improve matters by changing the performance settings in the Settings window.
It is possible that there is not enough polyphony for the music that you are attempting to play. You may be able to obtain an improvement by changing the Performance settings in the Settings window.
• Try increasing [Maximum polyphony]
- Try adjusting the [CPU Load Limit] setting. Notes may be interrupted if the CPU load limit is too low. Also, software other than the VSC may become unstable if you are using other software and the CPU load limit setting is too high, and this may cause notes to be interrupted.
- Try turning off any or all of [Reverb], [Chorus], [Delay], and [TVF].
- Try setting [Sampling Rate] to a lower setting.
It is also possible that the irregular playback tempo is due to other aspects of your computer system (other system extensions or software).
■ Playback tempo is irregular
◆ Are you running many applications?
The irregular tempo may be because other software is placing demands on the computer. Try exiting software you are not using.
◆ You may be able to improve matters by changing the performance settings in the Settings window.
It is possible that there is not enough polyphony for the music that you are attempting to play. You may be able to obtain an improvement by changing the Performance settings in the Settings window.
• Try increasing [Maximum polyphony]
- Try adjusting the [CPU Load Limit] setting. Notes may be interrupted if the CPU load limit is too low. Also, software other than the VSC may become unstable if you are using other software and the CPU load limit setting is too high, and this may cause notes to be interrupted.
- Try turning off any or all of [Reverb], [Chorus], [Delay], and [TVF].
- Try setting [Sampling Rate] to a lower setting.
It is also possible that the irregular playback tempo is due to other aspects of your computer system (other system extensions or software).
■ Sound is distorted
In the VSC main window, click the [SETUP] button to access the Settings window, and in the Performance settings, lower the [Volume] value.
■ Noise is audible
In the Control Panel section Sound or Monitors & Sound, set the volume to maximum, and then lower the volume value of the Performance settings in the Settings window.
■ Can't use VSC from other software as a sound generator
In the MIDI driver settings in the VSC Settings window, select the MIDI driver that you want to use. You will also need to make settings on the VSC and on your software.
For details refer to Using VSC as a sound generator from within other software (p. 42).
- If your software uses OMS, you must have OMS 2.0 or later.
• FreeStyle cannot use VSC as a sound generator. - If you are using Studio Vision Pro or a version of Vision with audio functionality, problems may occur when this software is used simultaneously with VSC. As a workaround, please read the explanation for Hangs up when used with Studio Vision Pro or Vision with audio functionality (p. 57).
■ The sound stops when you switch software
- If you are using OMS as the MIDI driver, you need to make OMS settings. Start up [OMS Setup], select OMS MIDI Setup from the Edit menu, and check [Run MIDI in the background].
- If you are using FreeMIDI as the MIDI driver, you need to make FreeMIDI settings. Open the file of FreeMIDI settings (FreeMIDI Configuration), and select FreeMIDI Preferences from the File menu. For the FreeMIDI Preferences item [Software Compatibility], select [FreeMIDI applications only]. For details refer to Software that uses FreeMIDI (p. 45).
■ Can't adjust the volume balance with other software
Some other audio-using software (such as sequencers or games) automatically sets the volume to maximum when the software becomes active. If there is a discrepancy with the volume played by the VSC, make the following settings.
- Make VSC or the Finder active, and in the Sound or Monitors & Sound Control Panel, set the volume to the maximum level.
- Next, click the [SETUP] button in the VSC main window to open the Setup window, and lower the Performance setting [Volume] to adjust the volume.
■ Can't synchronize to the audio tracks of other software
In the Performance settings of the Setup window, select [Response Priority]. If problems occur with the playback of the audio tracks, click the [Low Load] button in the Performance settings of the Setup window. Also, if you are using software that supports VST Instruments, you will be able to improve the timing accuracy by using the plug-in version.
■ Stuck notes or hang-ups occur on OMS-compatible software
When making OMS settings, [IAC Driver] will be the only driver if you make a new setup without connecting anything to the port.
In this case, if the MIDI input (input device) of the OMS-compatible software is set to [IAC Bus], a MIDI loop will occur, and notes will stick or the program may hang up. For this reason, please not use [IAC Bus] as the setting for MIDI input (input device).
If you can select only [IAC Bus] as the MIDI input (input device) setting, change the input setting as follows.
- In your OMS-compatible software, turn the MIDI input (input device) setting off (not used).
- If you are unable to turn off the MIDI input setting on your OMS-compatible software, restart OMS Setup. In the Studio Setup window, double-click the [IAC Driver] icon to open a dialog box allowing you to register four buses. In the second line, register a suitable name such as [IAC Driver #2], and click [OK] to exit the OMS Setup software. In your OMS-compatible software, set the MIDI input (input device) setting to [IAC Driver #2] and these problems will stop occurring.
■ Hangs up when used with Studio Vision Pro or Vision with audio functionality
If VSC or QuickTime sound generator are used simultaneously with a version of Vision that has audio functionality, hang-ups or other problems may occur. In this case, you can use the following procedure to use VSC or QuickTime sound generator.
- In the Audio System of Vision's Audio menu, select "MIDI only," so that the audio functionality of Vision will not be used. Then start up VSC, and you will be able to use Vision and VSC simultaneously.
Troubleshooting for the plug-in version (Windows/ Macintosh)
■ Can't find the desired folder for installation
◆ Does your host application have a VstPlugins folder?
Some host applications do not provide a VstPlugIns folder. This is why the folder of the host application into which you are installing may not appear in the Select copy destination for plug-in module window (on the Macintosh, the Select Folder) when you install Virtual Sound Canvas VST. In this case, refer to the manual of your host application, create a VstPlugIns folder, and re-install VSC.
■ Can't plug-in (can't select) DXi/VST Instruments
◆ Was Virtual Sound Canvas DXi/VST installed correctly?
If you are using Windows, follow the procedure Software installation (p. 7) to re-install VSC. If you are using Macintosh, refer to the note on p. 31, and install VSC manually.
■ Two copies of VSC appear in the plug-in list (Macintosh)
◆ Did you install both Japanese and English versions of VSC?
Delete VSC(E) and VSC(J) from the VSCContents folder and VstPlugins folder of your host application, and reinstall VSC.
■ Plug-in fails
Check the following points:
- Virtual Sound Canvas VST and Virtual Sound Canvas DXi can be used only with the following audio formats. Check the audio format of your host application.
| Sampling Rate [kHz] 11.025, 22.05, 44.1, 48, 96 | |
| Number of channels 2 | |
- It is possible that your computer does not have enough memory. Try exiting other applications that you are not using. If you are frequently unable to use plug-ins because of insufficient memory, we recommend that you install additional memory in your computer.
◆ Was Virtual Sound Canvas VST installed correctly? (Macintosh)
When you are using your host application and attempt to plug-in VSC, a dialog box of "Sound set file is not found in the specified folder,..." may be displayed. If this occurs, re-install VSC as directed in Software installation (p. 30).
◆ Does your host application support DXi/VST Instruments?
Refer to the manual for your host application, and verify that it does support DXi/VST Instruments.
■ Sound is too loud/too soft/not heard
◆ Are the VSC panel settings correct?
Check the following points:
- In the Setup window, select Performance and check the [Volume].
- In the VSC panel, check the [MASTER VOLUME] setting.
◆ If the level meters for each part are not moving in the VSC panel, it is possible that MIDI messages are not being input to the VSC.
Check the following settings of your host application.
- Make sure that the plugged-in VSC is selected as the output destination for the MIDI tracks that are playing.
- Check the MIDI channel, volume, and mute settings of the MIDI tracks that are playing.
◆ If the [MASTER LEVEL] meter is moving in the VSC panel, it is possible that there is a problem with the audio output settings.
Check the following points:
- Check the audio volume of the host application. Also make sure that the audio device is selected correctly.
- Check the volume and other settings of the audio device you are using.
- Check the connection and volume of your audio system (amp and speaker).
◆ Is a heavy load being placed on your computer?
If a heavy load is being placed on your computer, the host application may halt audio processing, so that no sound will be heard. Check the section
"Sound is interrupted/Playback tempo is irregular/Playback stops midway."
■ Sound is interrupted/Playback tempo is irregular/Playback stops mid-way
Check the following points:
- If your host application lets you change the size of the audio buffer, try increasing it.
- In some cases, correct playback may not be possible if other software is placing a load on your computer. Exit any software you are not using.
- Refer to the troubleshooting sections for your host application or audio device. If there are listings on problems with audio playback, the solutions may apply to this problem as well.
- In the Setup window, set the Performance setting [Maximum polyphony] to a lower value, or try turning off any or all of [Reverb], [Chorus], [Delay], or [TVF].

Increasing the buffer size will increase the latency (the delay before notes are heard).
Troubleshooting for the plug-in version (Windows/Macintosh)
■ Notes are delayed
Check the following points:
- If your host application or audio device lets you change the size of the audio buffer, try decreasing it.
- If the manuals for your host application or audio device contain sections on how to alleviate delays, refer to these explanations.
In order to use the plug-in version of VSC for realtime performance, you will need an audio device that has low latency. For details refer to the manual of your audio device, and to the manual of your host application.
■ Polyphony is insufficient/Notes are omitted
It is possible that the maximum polyphony setting is limiting the polyphony. In the Setup window, check the Performance [Maximum polyphony] setting.
◆ You may be able to improve the situation by adjusting the ASIO buffer size. (Macintosh)
If you are using Cubase VST/Cubasis VST, you may be able to improve the polyphony by increasing or decreasing the ASIO buffer size. As an example, here's the procedure when using the SC-D70 ASIO driver on Cubase VST.
-
In Cubase VST, select Options menu -> Audio Setup ... -> System. The Audio System Setup dialog box will open.
-
In the Audio I/O section, click the ASIO Device Control Panel button.
-
In the ASIO Control Panel, decrease the Buffer Size.

■ Sound is distorted
Check the following points:
- In the Setup window Performance settings, try lowering the [Volume] value.
- In the VSC panel, try lowering the [MASTER VOLUME].

Excessively decreasing the buffer size may cause notes to be interrupted, or produce silence. Set the buffer size as appropriate for the performance of your computer and audio device.

The VSC panel [POLYPHONY] setting indicates the actual polyphony.

Set the buffer size as appropriate for the performance of your computer and audio device.
■ Playback does not use the specified sounds or part settings
If the playback does not use the sounds or part settings that you specified within the music data, check the following points.
◆ Make sure that the correct sound generator mode (GS/GM2) is selected.
The current sound generator mode is displayed in the lower right of the VSC panel.
You can change the sound generator mode in either of the following ways.
- At the beginning of the music data, add a message (GS Reset or GM2 System On) that switches the sound generator mode (DXi only).
- Change the sound generator mode setting located in the Performance section of the Setup window.
◆ Make sure that reception is enabled for the desired events.
In the Receive Events settings of the Setup window, events that are not checked will not be played. Check all events that are necessary for the song you are playing, so that they will be received.
■ Settings in the VSC panel change on their own
As the result of setup data contained within the music data, part settings you've made in the VSC panel could get changed.
If you want the part settings you've made in the VSC panel to be used, carry out the following procedure.
- Open the Setup window, and select the Receive Events tab.
- Uncheck [Receive sound module reset messages].
- Uncheck the parameters or parts that you want to set from the panel.
- Click [OK] to close the Setup window.
With these settings, the setup data within the music data will not be applied. Make the desired settings from the VSC panel.
■ Effects (Reverb/Chorus/Delay) are not applied to the drum part
The drum part allows you to set the effect send amount (send level) individually for each drum instrument.
Even if you set the send level of the drum part from the VSC panel or from within the music data, no effect will be applied if the send level of each instrument is low.
In the music data, you must also specify the send level of the instruments to which you intend to apply the effect.

In accordance with the specifications for VST Instruments, Virtual Sound Canvas VST cannot receive system exclusive messages. This means that music data containing system exclusive messages cannot be played back correctly by Virtual Sound Canvas VST.

Settings you make in the VSC panel are temporary. For details on saving the settings made in the panel, refer to the manual for your host application.

For details on effect send level settings for drum instruments, refer to the MIDI Implementation section of the on-line help.
Troubleshooting for the plug-in version (Windows/Macintosh)
■ An error dialog box is displayed
◆ While using Cubase/Cubasis, an error dialog box of "Set4chMode Fail!" is displayed
◆ The ASIO multimedia settings indicate "Device could not be opened."
Depending on the version of Cubase or Cubasis, an error may be displayed when you select Virtual Sound Canvas 3 (device name: Roland VSC) as the audio output port, and the audio (including the output of the software synthesizer) may fail to sound.
In this case, do not select Roland VSC as the output setting in the ASIO Multimedia Setup of Cubase or Cubasis.
EDIROL
EUROPE
EDIROL (Europe) Ltd.
Studio 3.4 114 Power Road
London W4 5PY
U.K.
TEL: +44 (0)20 8747 5949
FAX:+44 (0)20 8747 5948
http://www.edirol.com/europe
Deutschland
TEL: 0700 33 47 65 20
France
TEL: 0810 000 371
Italia
TEL: 02 93778329
Roland
NORTH AMERICA
CANADA
Roland Canada Music Ltd.
(Head Office)
5480 Parkwood Way Richmond
B. C., V6V 2M4 CANADA
TEL: (604) 270 6626
Roland Canada Music Ltd.
(Toronto Office)
170 Admiral Boulevard
Mississauga On L5T 2N6
CANADA
TEL: (905) 362 9707
U. S. A.
Roland Corporation U.S.
5100 S. Eastern Avenue
Los Angeles, CA 90040-2938,
U.S.A.
TEL: (323) 890 3700
AFRICA
EGYPT
Al Fanny Trading Office
9, EBN Hagar A1 Askalany
Street,
ARD E1 Golf, Heliopolis,
Cairo 11341, EGYPT
TEL: 20-2-417-1828
REUNIÓN
Royal Cape Park, Unit 24
Londonderry Road, Ottery 7800
Cape Town, SOUTH AFRICA
TEL: (021) 799 4900
ASIA
CHINA
Roland Shanghai Electronics
Co., Ltd.
5F. No.1500 Pingliang Road
Shanghai 200090, CHINA
TEL: (021) 5580-0800
Roland Shanghai Electronics
Co,Ltd.
(BEIJING OFFICE)
10F. No.18 3 Section Anhuaxili
Chaoyang District Beijing
100011 CHINA
TEL: (010) 6426-5050
Roland Shanghai Electronics
Co., Ltd.
(GUANGZHOU OFFICE)
2/F., No.30 Si You Nan Er Jie
Yi Xiang, Wu Yang Xin Cheng
Guangzhou 510600, CHIN
TEL: (020) 8736-0428
HONG KONG
Parsons Music Ltd.
8th Floor, Railway Plaza, 39
Chatham Road South, T.S.T,
Kowloon, HONG KONG
TEL: 2333 1863
INDIA
Rivera Digitec (India) Pvt. Ltd.
409, Nirman Kendra
Mahalaxmi Flats Compound
Off. Dr. Edwin Moses Road,
Mumbai-400011, INDIA
TEL: (022) 2493 9051
INDONESIA
PT Citra IntiRama
J1. Cideng Timur No. 15J-150
Jakarta Pusat
INDONESIA
TEL: (021) 6324170
KOREA
Cosmos Corporation
1461-9, Seocho-Dong,
Scocho Ku, Seoul, KOREA
TEL: (02) 3486-8855
MALAYSIA/
SINGAPORE
Roland Asia Pacific Sdn. Bhd.
45-1, Block C2, Jalan PJU 1/39,
Dataran Prima, 47301 Petaling
Jaya, Selangor, MALAYSIA
TEL: (03) 7805-3263
PHILIPPINES
G.A. Yupangco & Co. Inc.
339 Gil J. Puyat Avenue
Makati, Metro Manila 1200,
PHILIPPINES
TEL: (02) 899 9801
TAIWAN
ROLAND TAIWAN
ENTERPRISE CO., LTD.
Room 5, 9fl. No. 112 Chung
Shan N.Road Sec.2, Taipei,
TAIWAN, R.O.C.
TEL: (02) 2561 3339
THAILAND
Theera Music Co., Ltd.
330 Soi Verng NakornKasem,
New Road, Sumpantawongse,
Bangkok 10100, THAILAND
TEL: (02) 224-8821
VIETNAM
SAIGON MUSIC
DISTRIBUTOR
(TAN DINH MUSIC)
138 Tran Quang Khai Street
Dist. 1, Ho Chi Minh City
VIETNAM
TEL: (08) 848-4068
AUSTRALIA/ NEW ZEALAND
AUSTRALIA/
NEW ZEALAND
Roland Corporation
Australia Pty., Ltd.
38 Campbell Avenue
Dee Why West. NSW 2099
AUSTRALIA
For Australia
Tel: (02) 9982 8266
For New Zealand
Tel: (09) 3098 715
CENTRAL/LATIN AMERICA
ARGENTINA
Instrumentos Musicales S.A.
Av.Santa Fe 2055
(1123) Buenos Aires
ARGENTINA
TEL: (011) 4508-2700
BARBADOS
A&B Music Supplies LTD
12 Webster Industrial Park
Wildey, St.Michael, Barbados
TEL:(246)430-1100
BRAZIL
Roland Brasil Ltda.
Rua San Jose, 780 Sala B
Parque Industrial San Jose
Cotia - Sao Paulo - SP, BRAZIL
TEL: (011) 4615 5666
CHILE
Comercial Fancy II S.A.
Rut.: 96.919.420-1
Nataniel Cox #739, 4th Floor
Santiago - Centro, CHILE
TEL: (02) 688-9540
COLOMBIA
Centro Musical Ltda.
Cra 43 B No 25 A 41 Bododega 9
Medellin, Colombia
TEL: (574)3812529
CURACAO
Zeelandia Music Center Inc.
Orionweg 30
Curacao, Netherland Antilles
TEL:(305)5926866
DOMINICAN REPUBLIC
Instrumentos Fernando Giraldez
155, New National Road
Patras 26442, GREECE
TEL: 2610 435400
HUNGARY
Roland East Europe Ltd.
Warehouse Area 'DEPO' Pf.83
H-2046 Torokbalint,

natural_image
Blank white image with no visible content, text, or symbols- WARNING
- Å°IMPORTANT NOTES
- GM 2 / General MIDI 2
- GS format
- Introduction
- Contents
- Windows Users.... 6
- Software installation....7
- Using the stand-alone version.... 15
- Using the plug-in version (DXi/VST Instruments)......26
- Macintosh Users.... 29
- Software installation....30
- Using the stand-alone version.... 32
- Using the plug-in version (VST Instruments)......46
- Troubleshooting 49
- Troubleshooting for the stand-alone version (Windows) .. 50
- Troubleshooting for the stand-alone version (Macintosh) 53
- Troubleshooting for the plug-in version (Windows/Macintosh)... 58
- Features of the VSC multi-pack
- Stand-alone version
- ■ Virtual Sound Canvas 3 (Windows/Macintosh)
- Plug-in version
- ■ Virtual Sound Canvas DXi (Windows)
- ■ Virtual Sound Canvas VST Instruments
- (Windows / Macintosh)
- Windows Users
- Software installation
- Installing the software
- Note for Windows 2000 users
- 1
- Determine the name of your CD-ROM drive.
- 2
- 3
- 4
- 5
- 6
- 7
- Select the software that you want to install.
- 8
- 9
- Installation of the software you selected in step 7 will begin.
- 10
- 11
- MEMO
- NOTE
- ■ Installing Virtual Sound Canvas 3
- A dialog box will ask you to confirm the installation.
- ■ Installing Virtual Sound Canvas DXi
- ■ Installing Virtual Sound Canvas VST
- [If the list does not contain the desired folder]
- [If the list contains an unwanted folder]
- Adding or removing the plug-in module
- [If a desired folder is not in the list]
- [If an unwanted folder is in the list]
- Uninstalling the software
- 2
- 4
- 6
- Using the stand-alone version
- Listening to the demo songs
- ■ Starting VSC Panel
- ■ Loading song data
- About the included song data
- Converting song data to an audio file
- ■ Load the song data for conversion
- ■ Make settings for the audio file that will be saved
- Consecutively converting data for multiple songs
- Operations in each window
- ■ Main window
- POWER
- DISPLAY
- CONTROLLER
- PLAYER
- MINIMIZE
- ABOUT
- RESET
- SETUP
- ■ Player window
- CLOSE
- SONG
- AUDIO CONV
- TEMPO/KEY
- SONG LIST
- REPEAT
- OPTION
- ■ VSC Player settings
- Start playback immediately after selecting (or changing) song
- Update MIDI messages when starting playback
- Reset the sound module when switching songs
- Reset the tempo when switching songs / Reset the key when switching songs
- Use Song List
- Save the contents of the Song List when quitting
- Store window status when quitting
- ■ Song List window
- SONG ADD
- SONG DELETE
- AUDIO CONV ALL
- SONG LIST OPEN
- SONG LIST SAVE
- ■ Controller window
- PART
- SOLO/PREV
- INSTRUMENT
- FADER
- ALL PLAY/ALL MUTE
- MASTER LEVEL/MASTER VOLUME
- FADER FUNCTION
- MODE
- SETUP
- ■ VSC Settings window
- Performance settings
- Preset
- Sampling Rate
- Maximum polyphony
- CPU Load Limit
- Volume
- Response
- Effects/Filter
- Selecting the sound set
- Sound Set
- Secure memory at all times
- Secure memory only when playing
- Receive Events settings
- Receive All
- All Off
- Select "Receive All" when reset the sound module
- Device settings
- DirectSound Off
- DirectSound On
- Open Multimedia Property
- Other settings
- Show the Helper icon in the Taskbar
- Show the volume control in the Taskbar
- Using VSC as a sound generator from within other software
- ■ Software that uses Windows multimedia functionality
- Windows Me users
- Windows 2000 users
- Windows 98 users
- ■ Software that directly specifies the MIDI output device
- Using the plug-in version (DXi/ VST Instruments)
- If you have installed the stand-alone version
- VSC Panel
- PART
- PREV
- INSTRUMENT
- FADER
- MASTER LEVEL/MASTER VOLUME
- POLYPHONY
- FADER FUNCTION
- MACRO
- RESET
- HELP
- SETUP
- GM2/GS
- Settings window
- ■ Performance
- Maximum polyphony
- Volume
- Effects/Filter
- Generator Mode
- ■ Receive Events
- MIDI messages
- Receive sound module reset messages
- Receive All
- All Off
- Select "Receive All" when reset the sound module
- ■ Version Info
- Macintosh Users
- ■ Select Folder dialog box appears
- ■ If a dialog box like the following appears
- Adjust the sound and volume before you begin listening
- ■ Starting VSC
- Make settings for the audio file that will be saved
- SET UP
- SONG LIST NEW
- AUDIO CONV ALL
- ■ Settings window
- Expression Mode
- Set "Receive All" when reset the sound module
- MIDI driver settings
- VSC Player settings
- Save the contents of the Song List automatically
- Allow all files when selecting songs
- Change the File Type of the loaded SMF
- Audio Conversion settings
- ■ Software that uses OMS
- Checking the IAC Driver
- Installing the IAC Driver
- OMS Setup settings
- VSC settings
- Settings for the software that uses OMS
- ■ Software that uses FreeMIDI
- FreeMIDI settings
- Start up the software
- Settings for the software that uses FreeMIDI
- Using the plug-in version (VST Instruments)
- Maximum
- Generator
- ■ Received Events
- Select "Receive All" when reset the sound
- ■ Version
- Troubleshooting
- Troubleshooting for the stand-alone version (Windows) ..50
- Troubleshooting for the plug-in version (Windows/Macintosh)..58
- Troubleshooting for the stand-alone version (Windows)
- ■ No sound
- ■ Sound is too loud/too soft
- ◆ VSC setting
- ◆ Windows volume control
- ◆ Volume adjustment on your computer
- ■ Sound is delayed
- ■ Sound is interrupted or the same phrase is played repeatedly
- ◆ Is power management active?
- ■ Polyphony is too low
- ■ Playback tempo is irregular
- ■ Sound is distorted
- ■ Can't start up VSC Panel
- ■ An error dialog box is displayed
- ■ Song List window is not displayed
- Troubleshooting for the stand-alone version (Macintosh)
- ■ Sound quality is poor
- ■ Sound is interrupted
- ◆ You may be able to improve matters by changing the performance settings in the Settings window.
- ◆ Are you running many applications?
- ■ Noise is audible
- ■ Can't use VSC from other software as a sound generator
- ■ The sound stops when you switch software
- ■ Can't adjust the volume balance with other software
- ■ Can't synchronize to the audio tracks of other software
- ■ Stuck notes or hang-ups occur on OMS-compatible software
- ■ Hangs up when used with Studio Vision Pro or Vision with audio functionality
- Troubleshooting for the plug-in version (Windows/ Macintosh)
- ■ Can't find the desired folder for installation
- ◆ Does your host application have a VstPlugins folder?
- ■ Can't plug-in (can't select) DXi/VST Instruments
- ◆ Was Virtual Sound Canvas DXi/VST installed correctly?
- ■ Two copies of VSC appear in the plug-in list (Macintosh)
- ◆ Did you install both Japanese and English versions of VSC?
- ■ Plug-in fails
- ◆ Was Virtual Sound Canvas VST installed correctly? (Macintosh)
- ◆ Does your host application support DXi/VST Instruments?
- ■ Sound is too loud/too soft/not heard
- ◆ Are the VSC panel settings correct?
- ◆ If the level meters for each part are not moving in the VSC panel, it is possible that MIDI messages are not being input to the VSC.
- ◆ If the [MASTER LEVEL] meter is moving in the VSC panel, it is possible that there is a problem with the audio output settings.
- ◆ Is a heavy load being placed on your computer?
- ■ Sound is interrupted/Playback tempo is irregular/Playback stops mid-way
- ■ Notes are delayed
- ■ Polyphony is insufficient/Notes are omitted
- ◆ You may be able to improve the situation by adjusting the ASIO buffer size. (Macintosh)
- ■ Playback does not use the specified sounds or part settings
- ◆ Make sure that the correct sound generator mode (GS/GM2) is selected.
- ◆ Make sure that reception is enabled for the desired events.
- ■ Settings in the VSC panel change on their own
- ■ Effects (Reverb/Chorus/Delay) are not applied to the drum part
- EDIROL
- EUROPE
- Roland
- NORTH AMERICA
- CANADA
- S. A.
- AFRICA
- EGYPT
- REUNIÓN
- ASIA
- CHINA
- HONG KONG
- INDIA
- INDONESIA
- KOREA
- MALAYSIA/
- SINGAPORE
- PHILIPPINES
- TAIWAN
- THAILAND
- VIETNAM
- AUSTRALIA/ NEW ZEALAND
- AUSTRALIA/
- NEW ZEALAND
- CENTRAL/LATIN AMERICA
- ARGENTINA
- BARBADOS
- BRAZIL
- CHILE
- COLOMBIA
- CURACAO
- DOMINICAN REPUBLIC
- HUNGARY
Brand : ROLAND
Model : VSC-MP1
Category : Sound synthesizer