
Horizon - Radio BUSH - Free user manual and instructions
Find the device manual for free Horizon BUSH in PDF.


| Product Type | Portable DAB+/FM Radio |
| Brand | Bush |
| Model | Horizon |
| Dimensions (W x H x D) | 180 x 120 x 70 mm |
| Weight | 0.5 kg (including batteries) |
| Power Supply | 4 x AA batteries (not included) or AC adapter (5V, 1A) |
| Tuning Bands | DAB+ (Band III) and FM (87.5-108 MHz) |
| Preset Stations | 20 (10 DAB+ and 10 FM) |
| Display | LCD with backlight |
| Speaker | Mono, 3 W output |
| Audio Output | 3.5 mm headphone jack |
| Clock & Alarm | Dual alarm with snooze, sleep timer |
| Antenna | FM telescopic antenna, DAB+ internal antenna |
| Battery Life | Approx. 20 hours (alkaline batteries, moderate volume) |
| Special Features | Auto scan, manual tuning, EQ presets, remote control (optional) |
| Cleaning Instructions | Wipe with a dry, soft cloth. Do not use liquids or abrasive cleaners. |
| Safety Notes | Keep away from moisture and heat sources. Use only specified power adapter. |
| Spare Parts & Repairability | Contact Bush customer service for spare parts. Repairs should be done by qualified personnel. |
Frequently Asked Questions - Horizon BUSH
User questions about Horizon BUSH
0 question about this device. Answer the ones you know or ask your own.
Ask a new question about this device
Download the instructions for your Radio in PDF format for free! Find your manual Horizon - BUSH and take your electronic device back in hand. On this page are published all the documents necessary for the use of your device. Horizon by BUSH.
USER MANUAL Horizon BUSH
DAB+ Digital Alarm Clock Radio
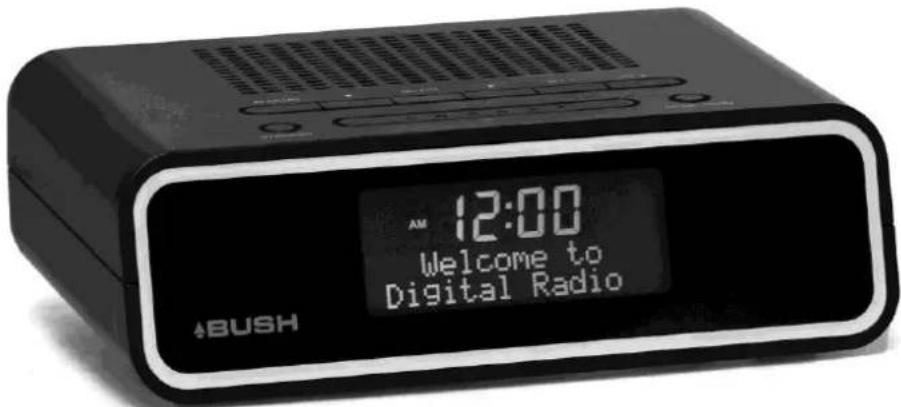
HORIZON
www.bushaustralia.com.au
HSNAi
Introduction and Contents
Thank you for buying this Bush product, which is designed to give you many years of trouble-free service.
You may already be familiar with using a similar unit, but please take time to read these instructions.
They are designed to familiarise you with the unit's many features and to ensure you get the very best from your purchase.
Safety is important
Your safety and the safety of others are important.
Please therefore, ensure you read the "Safety Instructions" before you operate this unit.
Warranty
In the unlikely event that your product fails to work normally, please call the below free phone number to discuss the problem with one of our qualified service engineers.
Bush Warranty: 1300 055 518
Contents
Introduction and Contents 2
Safety Instructions 3
Your DAB+ Radio 4
What is DAB+.... 5
Getting Started 6-7
Using DAB+ Radio.... 8
Using Presets.... 9
Using FM Radio 10
System Settings.... 11-12
Troubleshooting and Technical Specification.... 13
Warranty.... 14
Safety Instructions
Ensure that you read all of the safety instructions before using this unit.
Safety Considerations
■ Position the power cable and other connected cables so that they are not likely to be walked on, pinched or where items can be placed on or against them.
■ Do not use the unit in humid or damp conditions.
■ Do not allow the unit to get wet.
■ Never allow children to insert foreign objects into holes or slots on the unit.
■ Do not cover the ventilation with items such as tablecloths, curtains, etc. This may cause overheating.
■ No naked flame sources, such as lit candles, should be placed on or near the unit.
- Do not expose the unit to dripping or splashing water, and no objects filled with liquids, such as vases, should be placed on or near the apparatus.
■ Do not place the unit in closed cabinet without proper ventilation.
Cleaning
■ Disconnect the unit from the mains supply before cleaning.
■ Do not use any liquids or aerosol cleaners, as this may damage the unit. Use a soft, dust free cloth.
Servicing
There are no user serviceable parts in the unit. When servicing, refer to qualified service professional.
- Consult your retailer if you are ever in doubt about the installation / operation / safety of the product.
Your DAB+ Radio
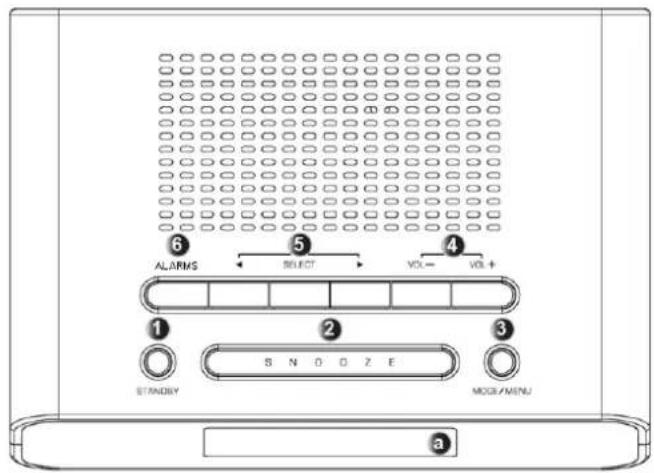

| 1. | STANDBY Button | 4. | - VOL + Button | 7. | DC Jack |
| 2. | SNOOZE Button | 5. | ◀ SELECT ▶ Button | 8. | Headphone Jack |
| 3. | MODE/ MENU Button | 6. | ALARMS Button | 9. | Aerial |
| a. | LCD Display |
| Control | DAB+ and FM |
 STANDBY STANDBY | Press the STANDBY Button to turn the radio on or off.When the alarm sounds, press this button to turn the alarm off |
 | a. When the alarm is sounding, press the SNOOZE Button to delay the alarm.b. When the alarm is not sounding, press the SNOOZE Button to set the radio sleep time.c. When in Standby mode, press the SNOOZE Button to set the display backlight |
 MODE/MENU MODE/MENU | a. Press and hold the MODE/MENU Button to enter the Main menu.b. Press the MODE/MENU Button to switch between DAB+ and FM modes. |
 | Press the VOL- or VOL+ Button to adjust the volume level. |
 | DAB+ and FM mode:Press the ▶ Button to navigate between different options.Press the SELECT Button to confirm the selected option.FM mode, when frequency displayed:Press the ▶ Button to manually search for FM Stations.Press and hold the ▶ Button to auto search for FM Stations. |
ALARMS | Press to enter the alarm settings. |
What is DAB+
DAB+ uses digital compression techniques to transform the source material, i.e. music and speech, into better quality audio.
Interference free reception
Analogue systems suffer from an effect called “multipath distortion”. This is caused because waves do not behave in an orderly fashion, but bounce and reflect off buildings etc. DAB+ sees this as an advantage and uses the direct and reflected signals to actually reinforce the end result, allowing for better service most of the time.
Scolling text
Broadcasters can transmit text to your radio. This way you can read the name of the DJ, artist, song title or any other information that is broadcast.
DAB+ coverage
Check your local coverage at www.digitalradioplus.com.au, or alternatively text 0409-DRPLUS (0409 377 587) to receive an SMS confirming whether you reside in a DAB+ broadcast area.
Getting Started
Carefully remove your DAB+ Radio from the box. You may wish to store the packaging for future use.
In the Box
Inside the box you will find:
■ DAB+ Radio (Main Unit)
■ Power Adapter
■ User Guide
Positioning your DAB+ Radio
Place your DAB+ Receiver on a flat / stable surface that is not subject to vibrations.
Avoid the following locations:
■ Where the radio will be exposed to direct sunlight.
■ Where the radio will be close to heat radiating sources.
■ Where the humidity is high and ventilation is poor.
■ Where it is dusty.
■ Where it is damp or there is a possibility of water dripping or splashing onto unit.
Adjusting the Aerial
The aerial should be extended to ensure you receive the best reception possible in both DAB+ and FM radio modes. It may be necessary to alter the position of the DAB+ Radio and /or aerial to achieve the best signal.
Using Headphones
You will require headphones fitted with a 3.5 mm diameter stereo plug. The headphone jack is located on the back of this unit. Headphones are not supplied with this DAB+ Radio.
Turning the Unit On/Off
Connect the power adapter to the DC Jack on the back of the unit. Then insert the power adapter into the wall outlet. Turn the mains power on and then press the STANDBY Button to turn on the unit, when you want to turn the unit off, simple press the STANDBY Button again.
[Non-Text]
12:00 ^DAB
Welcome to
Digital Radio
When you turn on your radio for the first time you will be presented with the above image. Your radio will then enter into standby mode. Simply press the STANDBY Button to have your radio turn on in DAB+ mode. It will immediately begin scanning for stations.
Getting Started
Note: It is recommended every few months to run a new scan to pick up any new DAB+ that may have begun broadcasting after purchasing your DAB+ radio.
Upon first use, your radio will conduct a full scan for all DAB+ radio stations.
If you wish to select a scan when operating the unit: Press and hold the MODE/MENU Button to access the menu → Press the ◀ or ▶ Button to select Full Scan →Press the SELECT Button to confirm.
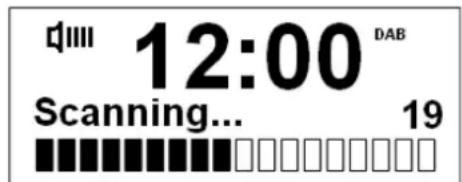
The Full Scan may take 1-2 minutes to complete, your radio will then access the first station in its storage list.
Note: a. The DAB+ stations will be displayed and stored in alphanumeric order.
b. If no DAB+ signal is found, it may be necessary for you to relocate your radio.
Change to another Station
- While playing a DAB+ station, you can shift to another program by pressing the ◀ or ▶ Button to browse through the station list.
- Press the SELECT Button to select the station that you wish to listen to.
Volume Control
Adjust the radio volume by pressing the VOL -or VOL Button.
View Station Information
Note: there is a variety of station information transmitted by broadcasters. This radio offers a convenient way for you to view this information. To view information of the station currently playing, follow these steps:
- Press and hold the MODE/MENU Button until it goes into main menu setting mode.
- Press the ▶ Button twice to the 'Display' option, then press the SELECT Button.
- Press the ◀ or ▶ Button to select from the available station information available. Press the SELECT Button to confirm the option you want your radio to display, such as Program Type, Signal Strength, Signal Quality, Scrolling text, Time and Date.
Using DAB+ Radio
Display the Signal Strength
Note: Stations with signal strength below the minimum signal level will not provide a steady stream of audio.
- Refer to the 'View Station Information' outlined on the previous page to view 'Signal Strength'. A signal bar will be displayed as shown below.

The indicator on the signal bar shows the minimum acceptable signal level.
DRC (Dynamic Range Control)
You can set the level of the compression of stations to eliminate the differences in dynamic range or sound level between radio stations.
Note: Set DRC to off indicates no compression, set DRC to low indicates little compression, and set DRC to high shows maximum compression.
- Press and hold the MODE/MENU Button→Press the ◀ or ▶ Button to the DRC menu → Press the SELECT Button.
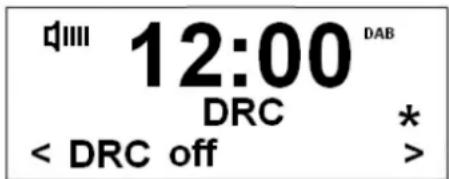
- Press the ◀ or ▶ Buttons to select the ideal DRC Mode. Press the SELECT Button to confirm.
Prune
Note: Performing a prune will remove inactive stations from the station list.
- Press and hold the MODE/MENU Button→Press the ◀ or ▶ Button to the Prune menu → Press the SELECT Button.
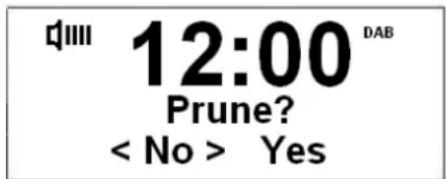
- Press the ▶ Button to select Yes, and then press the SELECT Button to confirm.
Using Presets
Setting Station Presets

Note: Preset functionality is the same for DAB+ and FM Radio stations.
Your radio can store 10 DAB+ & 10 FM station presets. The way of storing the current station playing as a preset is as follows:
- Press and hold the MODE/MENU Button until it says 'Preset Recall'→Press the ▶Button to select the Preset Store option, then press the SELECT Button to confirm.
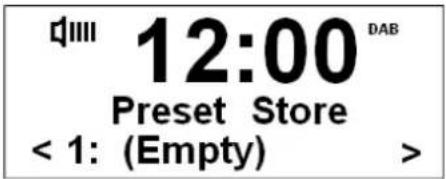
- Press the ◀ or ▶ Button to cycle through the preset stations store numbers 1-10.
- Select your preferred preset station number and then press the SELECT Button, it would say 'Preset # stored'.
Playing a Preset Station
To select a stored station:
- Press the MODE/MENU Button to select the mode you wish to play.
- Press and hold the MODE/MENU Button to enter 'Preset Recall' setting.
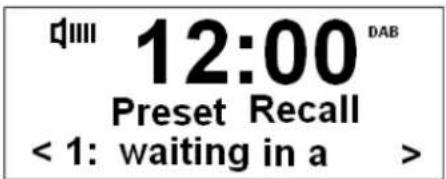
- Press the ◀ or ▶ Buttons to select your preset number and then press the SELECT Button to confirm.
Using FM Radio
- Press the MODE/MENU Button to switch to FM Mode from DAB+ Mode.
- Once in FM mode, it will start at the beginning of the FM frequency range (87.50MHz) or will play the last FM station you were listening to.
![12:00 FM 87.50MHz [No RadioText]](/content/2026/05/974035/images/9883361288086eb450e6105c50c7034ff36093abb66c19e1af1764a912d040bf.jpg)
-
Manually change the FM frequency, make sure no other order/system setting is being accessed, then press the ◀ or ▶ button to change the frequency by 0.05MHz.
-
Auto-scanning, before performing this, please refer to the below 'Scan Setting' to make this function more effective.
Auto-scanning can be performed by following these steps: press and hold the ◀ or ▶ Button while FM frequency shows up, your radio will skip forwards or backwards until it reached the next available station.
Note: The display will show the frequency changing until it stops on the next station.
Scan Setting
☑ By default, FM scans stop at any available station. This may result in a poor signal-to-noise ratio (hiss) from weak stations.
☑ To change the scan settings to stop only at stations with good signal strength, press and hold the MODE/MENU Button → < Scan setting > → Strong stations only → press the SELECT Button to confirm.
Audio Setting
☑ By default, all stereo stations are reproduced in stereo. For weak stations, this may result in a poor signal-to-noise ratio (hiss).
To play weak stations in mono, press and hold the MODE/MENU Button → < Audio setting > → Forced mono → press the SELECT Button to confirm.
View Station Information
Note: there is a variety of station information transmitted by broadcasters, and this radio offers a convenient way for you to view this information.
To view currently playing station information, follow this process:
-
Press and hold the MODE/MENU Button until the display accesses the main menu setting mode.
-
Press the ▶ Button twice to select the 'Display' option, then press the SELECT Button.
-
Press the ◀ or ▶ Button to select from the available station information available. Press the SELECT Button to confirm the option you want your radio to display, such as Program Type, Signal Strength, Signal Quality, Scrolling text, Time and Date.
-
Press and hold the MODE/MENU Button until the display accesses the main menu setting mode.
- Press the ▶ Button twice to select the 'Display' option, then press the SELECT Button.
- Press the ◀ or ▶ Button to select from the available station information available. Press the SELECT Button to confirm the option you want your radio to display, such as Program Type, Signal Strength, Signal Quality, Scrolling text, Time and Date.
System Settings
Set Time
- Press and hold the MODE/MENU Button, then press the ◀ Button repeatedly to display the Time menu, press the SELECT Button and then press the ◀ or ▶ Button to view the options as outlined below:
☑
☑
☑
☑
- Then set the time according to your personal preference.
Set Sleep Time
- Press and hold the MODE/MENU Button, then press ◀ or ▶ Button to select the Sleep menu.
- Press the SELECT Button to confirm, the display will show - "Set sleep time → Sleep off", the sleep icon ⏻ will be twinkling simultaneously.
- Press ◀ or ▶ Button to select the Sleep time on and the amount of time before you wish the radio to automatically switch off. You can select - Sleep Off, 15, 30, 45, 60 or 90 minutes.
- Press the SELECT Button to confirm.
- To view the set sleep time, redo steps 1-2.
- Your radio will automatically turn to Standby mode after the set time has elapsed.
Set Backlight Brightness
This feature enables you set the backlight brightness of both power on and standby modes with 11 different brightness settings. Make sure that no alarm is about to sound when setting the backlight.
For Power-on mode:
While the unit is powered on please press the SNOOZE Button repeatedly to change the brightness and stop at your desired level. The radio will remember the setting for each time the unit is powered on.
For Standby mode:
While the unit is in standby mode please press the SNOOZE Button repeatedly to change the brightness and stop at your desired level. The radio will remember the setting for each time the unit is in standby.
Factory Reset
A factory reset clears all user settings to default values, so station settings, time/date and presets are lost.
It can beset via pressing and holding the MODE/MENU Button →< Factory Reset >→ Factory Reset?
System Settings
Set Alarm
The procedure to set the alarm is:
- Press the ALARMS Button, the radio will display 'Alarm 1 Setup', to set alarm2, simply need press the ALARMS Button again, and the relevant alarm icon will flash.
- Using 'set alarm 1' as an example, when your radio says 'Alarm 1 Setup' → Press the SELECT Button, your radio will run into 'Alarm 1 Wizard', follow your radio's instructions to configure the following parameters:
* Alarm state: Off/ On, press the ◀ or ▶ Button to 'On' to turn the alarm on, press the SELECT Button to confirm. If 'Off' is selected, the alarm will be turned off immediately and you will exit the alarm settings.
* On time: 00:00 (alarm sounding time). Modify using the ◀ or ▶ Buttons and the SELECT Button to confirm the alarm time.
* Duration time: 15/30/45/60/90minutes (alarm sounding lasting time). Modify using the ◀ or ▶ Buttons and the SELECT Button to confirm the setting.
* Source: Buzzer/DAB/FM. Modify using the ◀ or ▶ Buttons and the SELECT Button to confirm the setting.
* Alarm sounds frequency: Daily, Once, Weekends or Weekdays. Modify using the ◀ or ▶ Buttons and the SELECT Button to confirm the setting.
* Alarm volume: press the ◀ or ▶ Button to your favor alarm volume, and then press the SELECT Button to confirm the volume, your radio will say 'Alarm Saved'.
To Operate SNOOZE
* When the Alarm sounds and you wish to activate the snooze, press the SNOOZE Button repeatedly to navigate between 5/10/15/30 minute snooze settings. Setting snooze will delay the time that the alarm sounds once again by the set amount of time.
* The radio will go into Standby mode and start to count down the defined snooze time.
* The Alarm will sound again after the snooze time has elapsed, by then, if you press the SNOOZE Button again and it will count down for the set snooze time, or you also can press the STANDBY button to stop snooze, and to have your radio play again.
To Turn Off the Alarm

Note: a. To turn the alarm off while the alarm is sounding, press the STANDBY button.
Refer to the above steps 1-2 in "Set Alarm", when the ON/OFF options appear for Alarm state, press the ◀ or ▶ Button to select 'Off', press the SELECT Button to confirm, 'Alarm Saved' will be displayed and the alarm will be cancelled.
Get SW Version
- The path is: Press and hold the MODE/MENU Button, and then press the ◀Button to SW version menu setting.
- Press the SELECT Button to confirm. You will now be able to view the software information of this radio.
Troubleshooting and Technical Specification
Troubleshooting
If a fault occurs, first check the points listed below before taking the set for repair.
If you are unable to remedy a problem by following these hints, consult you retailer or service professional.
WARNING: Under no circumstances should you try to repair the set yourself, as this will invalidate the warranty and may cause injury or death.
| PROBLEM | POSSIBLE CAUSE | REMEDY |
| No sound | Headphones may be connectedVolume not adjustedPower cord is not correctly connected | Disconnect the headphonesAdjust the VolumeConnect the power cord properly |
| Unit Buttons are not working | Electrostatic discharge | Turn off the unit, disconnect the mains plug, and reconnect after a few seconds |
| Radio poor reception | Weak radio aerial signal.Interference caused by the vicinity of electrical equipment like TVs, Video Recorders, Computer, Thermostats, Fluorescent Lamps (TL) engines etc. | Aim the aerial for best reception, and ensure it is fully extended.Keep the unit away from other electrical equipment |
Technical Specification
Specifications ...... DAB+ and FM radio
Speaker Power.... 1 W
Frequency Range FM: 87.5-108MHz
DAB+: 174 - 240MHz
LCD Display .... High resolution display
Power Supply AC/DC Adaptor: DC 6V, 500mA
Max Power Consumption.... 3W
Dimension 172mm x 122mm x 54mm
Warranty
Please keep your receipt as proof of purchase. This product is warranted for any defect in materials or workmanship for 12 months years after the original date of purchase. This product is for normal domestic and office use only.
This warranty does not cover damage from misuse or neglect, accidental damage, vermin infestation, excessive voltages such as lightning or power surges or any alternation that affects the performance or reliability of the product.
Our goods come with guarantees that cannot be excluded under the Australian Consumer Law. You are entitled to a replacement or refund for a major failure and for compensation for any other reasonably foreseeable loss or damage. You are also entitled to have the goods repaired or replaced if the goods fail to be of acceptable quality and the failure does not amount to a major failure.
In the unlikely event that your product fails to work normally, please contact Bush Warranty on 1300 055 518 & have your receipt of purchase on hand.
This guarantee is subject to the following provisions:
- It is only valid within boundaries of the country of purchase
- The product must be correctly assembled & operated in accordance with the instructions contained in the manual
- This product must be used solely for domestic purposes
- The guarantee does not cover accidental damage
- The guarantee will be rendered invalid if the product is resold or has been damaged by inexpert repair
- The manufacturer disclaims any liability for incidental or consequential damaged
This guarantee is in addition to, & does not diminish, your statutory or legal rights.
PO BOX 6287
Silverwater NSW 1811
www.bushaustralia.com.au
Bush Warranty: 1300 055 518
PO BOX 6287
Silverwater NSW 1811
www.bushaustralia.com.au

- DAB+ Digital Alarm Clock Radio
- HSNAi
- Introduction and Contents
- Safety is important
- Warranty
- Contents
- Safety Instructions
- Safety Considerations
- Cleaning
- Servicing
- Your DAB+ Radio
- What is DAB+
- Interference free reception
- Scolling text
- DAB+ coverage
- Getting Started
- In the Box
- Positioning your DAB+ Radio
- Avoid the following locations:
- Adjusting the Aerial
- Using Headphones
- Turning the Unit On/Off
- Change to another Station
- Volume Control
- View Station Information
- Using DAB+ Radio
- Display the Signal Strength
- DRC (Dynamic Range Control)
- Prune
- Using Presets
- Setting Station Presets
- Playing a Preset Station
- To select a stored station:
- Using FM Radio
- Scan Setting
- Audio Setting
- System Settings
- Set Time
- Set Sleep Time
- Set Backlight Brightness
- For Power-on mode:
- For Standby mode:
- Factory Reset
- Set Alarm
- To Operate SNOOZE
- To Turn Off the Alarm
- Get SW Version
- Troubleshooting and Technical Specification
- Troubleshooting
- Technical Specification
- This guarantee is subject to the following provisions:
Brand : BUSH
Model : Horizon
Category : Radio