
C-1VL - CD Player ONKYO - Free user manual and instructions
Find the device manual for free C-1VL ONKYO in PDF.


| Product Type | CD Player |
| Brand | Onkyo |
| Model | C-1VL |
| Dimensions (W x H x D) | 435 mm x 82 mm x 356 mm |
| Weight | 6.8 kg |
| Power Supply | AC 230-240 V, 50 Hz |
| Power Consumption | 9 W |
| Frequency Response | 5 Hz - 20 kHz |
| Signal-to-Noise Ratio | 110 dB |
| Dynamic Range | 96 dB |
| Total Harmonic Distortion | 0.002 % |
| Analog Audio Output | 2.0 V rms / 320 Ω |
| Digital Audio Output (Optical) | -22.5 dBm |
| Digital Audio Output (Coaxial) | 0.5 Vp-p / 75 Ω |
| Playable Discs | Audio CD, CD-R/RW (8 cm or 12 cm) |
| Key Audio Technology | VLSC (Vector Linear Shaping Circuitry) |
| D/A Converter | High-Grade Wolfson |
| Circuit Design | Direct Digital Path |
| Transformer | Toroidal with low magnetic flux leakage |
| Digital Servo | Yes, optimizes servo for each disc |
| Digital Outputs | 3 (2 Optical, 1 Coaxial) |
| Chassis Construction | Rugged chassis to prevent vibrations |
| Insulators and Pin Jacks | Brass insulators, gold-plated pin jacks |
| Supplied Accessories | Remote controller RC-544C, batteries (AA/R6), audio cable, power cord |
Frequently Asked Questions - C-1VL ONKYO
User questions about C-1VL ONKYO
0 question about this device. Answer the ones you know or ask your own.
Ask a new question about this device
Download the instructions for your CD Player in PDF format for free! Find your manual C-1VL - ONKYO and take your electronic device back in hand. On this page are published all the documents necessary for the use of your device. C-1VL by ONKYO.
USER MANUAL C-1VL ONKYO
Thank you for purchasing an Onkyo CD Player. Please read this manual thoroughly before making connections and plugging in the unit.
Following the instructions in this manual will enable you to obtain optimum performance and listening enjoyment from your new CD Player.
Please retain this manual for future reference.
Troubleshooting...... 17
Specifications 18
WARNING:
TO REDUCE THE RISK OF FIRE OR ELECTRIC SHOCK, DO NOT EXPOSE THIS APPARATUS TO RAIN OR MOISTURE.
CAUTION:
TO REDUCE THE RISK OF ELECTRIC SHOCK, DO NOT REMOVE COVER (OR BACK). NO USER-SERVICEABLE PARTS INSIDE. REFER SERVICING TO QUALIFIED SERVICE PERSONNEL.

WARNING
RISK OF ELECTRIC SHOCK DO NOT OPEN


The lightning flash with arrowhead symbol, within an equilateral triangle, is intended to alert the user to the presence of uninsulated “dangerous voltage” within the product’s enclosure that may be of sufficient magnitude to constitute a risk of electric shock to persons.

The exclamation point within an equilateral triangle is intended to alert the user to the presence of important operating and maintenance (servicing) instructions in the literature accompanying the appliance.
Important Safety Instructions
- Read these instructions.
- Keep these instructions.
- Heed all warnings.
- Follow all instructions.
-
Do not use this apparatus near water.
-
Clean only with dry cloth.
-
Do not block any ventilation openings. Install in accordance with the manufacturer's instructions.
-
Do not install near any heat sources such as radiators, heat registers, stoves, or other apparatus (including amplifiers) that produce heat.
-
Do not defeat the safety purpose of the polarized or grounding-type plug. A polarized plug has two blades with one wider than the other. A grounding type plug has two blades and a third grounding prong. The wide blade or the third prong are provided for your safety. If the provided plug does not fit into your outlet, consult an electrician for replacement of the obsolete outlet.
-
Protect the power cord from being walked on or pinched particularly at plugs, convenience receptacles, and the point where they exit from the apparatus.
-
Only use attachments/accessories specified by the manufacturer.
-
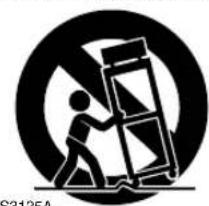
Use only with the cart, stand, tripod, bracket, or table specified by the manufacturer, or sold with the apparatus. When a cart is used, use caution when moving the cart/ apparatus combination to avoid injury from tip-over.
PORTABLE CART WARNING
natural_image
Silhouette of a person pushing a large object inside a circular frame (no text or symbols)- Unplug this apparatus during lightning storms or when unused for long periods of time.
-
Refer all servicing to qualified service personnel. Servicing is required when the apparatus has been damaged in any way, such as power-supply cord or plug is damaged, liquid has been spilled or objects have fallen into the apparatus, the apparatus has been exposed to rain or moisture, does not operate normally, or has been dropped.
-
Damage Requiring Service
Unplug the apparatus from the wall outlet and refer servicing to qualified service personnel under the following conditions:
A. When the power-supply cord or plug is damaged,
B. If liquid has been spilled, or objects have fallen into the apparatus,
C. If the apparatus has been exposed to rain or water,
D. If the apparatus does not operate normally by following the operating instructions. Adjust only those controls that are covered by the operating instructions as an improper adjustment of other controls may result in damage and will often require extensive work by a qualified technician to restore the apparatus to its normal operation,
E. If the apparatus has been dropped or damaged in any way, and
F. When the apparatus exhibits a distinct change in performance this indicates a need for service.
- Object and Liquid Entry
Never push objects of any kind into the apparatus through openings as they may touch dangerous voltage points or short-out parts that could result in a fire or electric shock.
The apparatus shall not be exposed to dripping or splashing and no objects filled with liquids, such as vases shall be placed on the apparatus.
Don't put candles or other burning objects on top of this unit.
- Batteries
Always consider the environmental issues and follow local regulations when disposing of batteries.
- If you install the apparatus in a built-in installation, such as a bookcase or rack, ensure that there is adequate ventilation.
Leave 20 cm (8") of free space at the top and sides and 10 cm (4") at the rear. The rear edge of the shelf or board above the apparatus shall be set 10 cm (4") away from the rear panel or wall, creating a flue-like gap for warm air to escape.
1. Recording Copyright
Unless it's for personal use only, recording copyrighted material is illegal without the permission of the copyright holder.
2. AC Fuse
The AC fuse inside the C-1VL is not user serviceable. If you cannot turn on the C-1VL, contact your Onkyo dealer.
3. Care
Occasionally you should dust the C-1VL all over with a soft cloth. For stubborn stains, use a soft cloth dampened with a weak solution of mild detergent and water. Dry the C-1VL immediately afterwards with a clean cloth. Don't use abrasive cloths, thinners, alcohol, or other chemical solvents, because they may damage the finish or remove the panel lettering.
4. Power
WARNING
BEFORE PLUGGING IN THE UNIT FOR THE FIRST TIME, READ THE FOLLOWING SECTION CAREFULLY.
AC outlet voltages vary from country to country. Make sure that the voltage in your area meets the voltage requirements printed on the C-1VL's rear panel (AC230-240 V, 50 Hz).
5. Never Touch This Unit with Wet Hands
Never handle this unit or its power cord while your hands are wet or damp. If water or any other liquid gets inside this unit, have it checked by your Onkyo dealer.
6. Installing This Unit
• Install this unit in a well-ventilated location.
- Ensure that there's adequate ventilation all around this unit, especially if it's installed in an audio rack. If the ventilation is inadequate, the unit may overheat, leading to malfunction.
- Do not expose this unit to direct sunlight or heat sources, because its internal temperature may rise, shortening the life of the optical pickup.
- Avoid damp and dusty places, and places subject to vibrations from loudspeakers. Never put the unit on top of, or directly above a loudspeaker.
- Install this unit horizontally. Never use it on its side or on a sloping surface, because it may cause a malfunction.
- If you install this unit near a TV, radio, or VCR, the sound quality may be affected. If this occurs, move this unit away from the TV, radio, or VCR.
7. Moisture Condensation
Moisture condensation may damage this unit.
Read the following carefully:
When you take a glass containing a cold drink outside on a summer's day, drops of water, called condensation, form on the outside of the glass. Similarly, moisture may condense on the lens of the optical pickup, one of the most important parts inside this unit.
— The unit is moved from a cold place to a warm place.
— A heater is turned on, or cold air from an air conditioner is hitting the unit.
— In the summer, when this unit is moved from an air conditioned room to a hot and humid place.
— The unit is used in a humid place.
- Do not use this unit when there's the possibility of moisture condensation occurring. Doing so may damage
your discs and certain parts inside this unit.
If condensation does occur, remove all discs and leave this unit turned on for two to three hours. By that time, the unit will have warmed up and any condensation will have evaporated. To reduce the risk of condensation, keep this unit connected to a wall outlet.
For British models
Replacement and mounting of an AC plug on the power supply cord of this unit should be performed only by qualified service personnel.
IMPORTANT
The wires in the mains lead are coloured in accordance with the following code:
Blue: Neutral
Brown: Live
As the colours of the wires in the mains lead of this apparatus may not correspond with the coloured markings identifying the terminals in your plug, proceed as follows:
The wire which is coloured blue must be connected to the terminal which is marked with the letter N or coloured black. The wire which is coloured brown must be connected to the terminal which is marked with the letter L or coloured red.
IMPORTANT
A 5 ampere fuse is fitted in this plug. Should the fuse need to be replaced, please ensure that the replacement fuse has a rating of 5 amperes and that it is approved by ASTA or BSI to BS1362. Check for the ASTA mark or the BSI mark on the body of the fuse.
IF THE FITTED MOULDED PLUG IS UNSUITABLE FOR THE SOCKET OUTLET IN YOUR HOME THEN THE FUSE SHOULD BE REMOVED AND THE PLUG CUT OFF AND DISPOSED OF SAFELY. THERE IS A DANGER OF SEVERE ELECTRICAL SHOCK IF THE CUT OFF PLUG IS INSERTED INTO ANY 13 AMPERE SOCKET.
If in any doubt, consult a qualified electrician.
This unit contains a semiconductor laser system and is classified as a "CLASS 1 LASER PRODUCT." So, to use this model properly, read this Instruction Manual carefully. In case of any trouble, please contact the store where you purchased the unit. To prevent exposure to the laser beam, do not try to open the enclosure.
DANGER:
VISIBLE AND INVISIBLE LASER RADIATION WHEN OPEN AND INTERLOCK FAILED OR DEFEATED. DO NOT STARE INTO BEAM.
CAUTION:
THIS PRODUCT UTILIZES A LASER. USE OF CONTROLS OR ADJUSTMENTS OR PERFORMANCE OF PROCEDURES OTHER THAN THOSE SPECIFIED HEREIN MAY RESULT IN HAZARDOUS RADIATION EXPOSURE.

This label is located on the rear panel. It indicates that:
-
This unit is a CLASS 1 LASER PRODUCT and employs a laser inside the cabinet.
-
To prevent the laser from being exposed, do not remove the cover. Refer servicing to qualified personnel.
Declaration of Conformity
Wc, ONKYO EUROPE ELECTRONICS GmbH LIEGNITZERSTRASSE 6, 82194 GROEBENZELL, GERMANY

declare in own responsibility, that the ONKYO product described in this instruction manual is in compliance with the corresponding technical standards such as EN60065, EN55013, EN55020 and EN61000-3-2, -3-3.
GROEBENZELL, GERMANY

ONKYO EUROPE ELECTRONICS GmbH
About CDs
Important notes on handling CDs
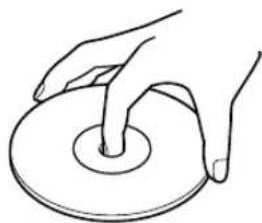
- Carefully lift the disc from the disc case, making sure to hold the disc by its edges or the hole in the middle.
natural_image
Line drawing of a hand pressing down on a circular object (no text or symbols)- You can use a soft, dry cloth to wipe dust and fingerprints off the surface of CDs. Do not use volatile agents, such as thinner or benzene, on discs.
Also, do not use conventional record cleaner or anti-static agents.

natural_image
Diagram of a hand holding a device over a circular wheel, with no visible text or symbolsNotes:
- Do not place CDs in direct sunlight or in locations subject to high humidity or low temperature.
- Do not store a CD in the unit's disc tray for a long period of time.
playable discs
This unit can play the following types of discs.
| Disc mark Contents Disc size | |||
| Audio CDs | Audio | 12 cm | |
| 8 cm (CD single) | |||
You cannot play discs other than those listed above.


Avoid using heart-shaped or octagonal discs. Playing irregularly-shaped discs may damage the internal mechanism of the unit.
Do not use discs that carry a residue from adhesive tape, rental discs that have peeling labels, or discs that have custom labels or stickers. Otherwise, you may not be able to eject the discs, or the unit may become inoperative.
About playing copy-controlled CDs
Some copy-controlled CDs may not conform to official CD standards. They are special discs and may not play on the C-1VL.
Do not use discs that are not audio discs (i.e., CD-ROMs designed for use with personal computers), as these could damage the speakers and amplifier.
Introduction
Important Safety Instructions ....2
Precautions....3
About CDs....4
Features 6
Supplied Accessories....6
Front & Rear Panels....7
Remote Controller....8
Remote Controller (RC-544C) 8
Inserting the Batteries....9
Using the Remote Controller 9
Connections
Cables and Connectors....10
Before Making Any Connections....10
Connections 11
Making Analog Connections to Amplifier and Recorder.... 11
Making Digital Connections to Amplifier and Recorder 11
Operation
Turning On the C-1VL 12
Connecting the Supplied Power Cord.... 12
Turning On the C-1VL 12
Enabling the Digital Signal Output 12
Playing CDs....13
Playing CDs 13
Selecting Tracks by Number 14
Displaying the Remaining Time 14
Random Playback....15
Repeat Playback....15
Memory Playback....16
Others
Troubleshooting....17
Specifications....18
Features
■ The new VLSC (Vector Linear Shaping Circuitry) generates pure analog signal from digital signal, improving the sound quality substantially.
■ Features Onkyo's proprietary Direct Digital Path circuit design. The Direct Digital Path minimizes the effect on the sound quality improvement circuits caused by digital signals from the digital input, making the sound image clearer and the sound quality more refined.
■ High-Grade Wolfson D/A Converters
The C-1VL's Digital Output can be turned off to minimize the effect from digital signal and improve the analog sound quality.
■ Toroidal transformer with lower magnetic flux leakage and better regulation
■ Incorporates a Digital Servo that detects the optimum servo amount for each disc
■ 3Digital Outputs (2 Optical/1 Coaxial)
■ Rugged Chassis to Prevent Vibrations
■ Brass Insulators and Pinjacks
■ Shaved and gold-plated pin jacks with enough space between L and R terminals, allowing you to use thick and heavy pin cables more easily.
■ High-Grade Pin Cable included
Supplied Accessories
Remote Controller (RC-544C) & Two batteries (AA/R6)

Audio Cable [1]

natural_image
Line drawing of a coiled cable with three connectors (no text or symbols)Power Cord [1]

natural_image
Line drawing of a coiled electrical plug with a terminal outlet (no text or symbols)In catalogs and on packaging, the letter added to the end of the product name indicates the color of the C-1VL. Specifications and operation are the same regardless of color.
Front Panel & Display

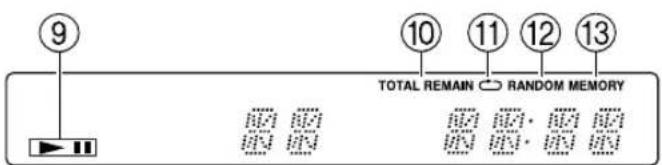
Display
① POWER button
Press to turn on and off the C-1VL.
② DISPLAY button
Press to change the displayed information.
③ Open [▲button
Press to open and close the disc tray.
④ Pause [ɪ] button
Press to pause the playback
⑤ Stop [button]
Press to stop the playback.
⑥ Play [button
Press to start playback.
⑦ [4] button
Press to select the previous or next track.
Press and hold to fast reverse and fast forward when playing CDs.
⑧ DIGITAL OUTPUT button
Press to turn on/off the digital output on the C-1VL.
⑨ Play/Pause indicators
Illuminate in play or pause mode.
⑩ TOTAL/REMAIN indicator
Illuminates when the remaining time is shown.
⑪ Repeat indicator
Illuminates during repeat playback.
⑫ RANDOM indicator
Illuminates during random playback.
⑬ MEMORY indicator
Illuminates during memory playback.
Rear Panel

① AUDIO OUTPUT ANALOG
With the supplied audio cable, the terminal is used for connecting to the analog input terminals on the devices such as amplifier.
② AUDIO OUTPUT DIGITAL OPTICAL/COAXIAL
With the digital optical/coaxial cable, the terminals are used for connecting to the digital input terminals
on the devices such as amplifier. These three terminals output the sound signal with equal quality.
When using the digital connection, you have to turn on the digital output by pressing the DIGITAL OUTPUT button on the C-1VL.
③ AC INLET
Plug the supplied power cord into this AC INLET and then into the Power outlet on the wall.
Remote Controller (RC-544C)

① Number buttons
Use these buttons to enter a track number.
② Pause [button] Press to pause the playback.
③ Stop [button]
Press to stop the playback.
④ [A] buttons
Press and hold to fast reverse and fast forward when playing CDs.
⑤ OPEN/CLOSE [▲button
Press to open and close the disc tray.
⑥ REPEAT button
During playback, press to repeat playback.
⑦ RANDOM button
Press to start random playback.
⑧ MEMORY button
Press to make a memory program while stopped.
⑨ CLEAR button
Press to remove the last track in the program.
⑩ PLAY [button]
Press to start playback.
⑪ [√] buttons
Press to select the previous or next track.

flowchart
graph TD
    A["CD"] --> B["PLAY"]
    B --> C["AMP"]
    C --> D["PLAY"]
    D --> E["AMP"]
    E --> F["PLAY"]
    style A fill:#f9f,stroke:#333
    style B fill:#ccf,stroke:#333
    style C fill:#cfc,stroke:#333
    style D fill:#fcc,stroke:#333
    style E fill:#cff,stroke:#333
RC-573A
The RC-573A remote controller, which is supplied with the Onkyo's Integrated Stereo Amplifier A-1VL, can be used to operate the C-1VL.
PLAY [ ] button
Stop [ ] button
Pause [i] button
[4] buttons
[4] buttons
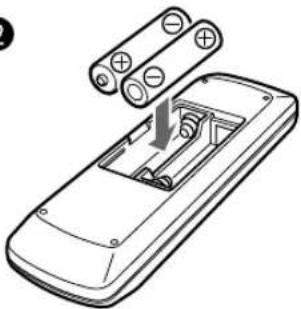
Inserting the Batteries Using the Remote Controller
1

natural_image
Line drawing of a mobile phone casing with a scroll wheel (no text or symbols)Detach the battery cover.
2
natural_image
Diagram of a remote control device with two batteries and an open battery cover (no text or symbols)Insert the two R6 (size AA) batteries.
Be sure to match the + and - ends of the batteries to the diagram inside the battery compartment.
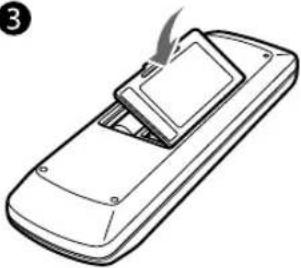
3
natural_image
Line drawing of a remote control device with a scroll wheel (no text or symbols)Attach the battery cover.
Notes:
- Do not mix new batteries with old batteries. Do not mix different kinds of batteries.
- To avoid corrosion, remove the batteries if the remote controller is not to be used for a long period of time.
- Remove dead batteries immediately to avoid damage from corrosion. If the remote controller does not operate smoothly, replace both batteries at the same time.
- The life of the batteries supplied is about six months but will vary depending on usage.
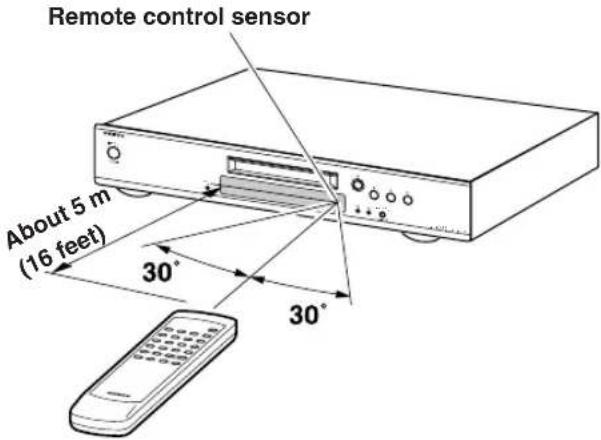
Point the remote controller toward the remote control sensor.
Notes:
- Place the unit away from strong light such as direct sunlight or inverted fluorescent light, which can prevent proper operation of the remote controller.
- Using another remote controller of the same type in the same room or using the unit near equipment that uses infrared rays may cause operational interference.
- Do not put any object, such as a book, on the remote controller. The buttons of the remote controller may accidentally be pressed and drain the batteries.
- Make sure the audio rack doors do not have colored glass. Placing the unit behind such doors may prevent proper remote controller operation.
- If there is an obstacle between the remote controller and the remote control sensor, the remote controller will not operate.
Before Making Any Connections
• Always refer to the instructions that came with the component that you are connecting.
- Do not plug in the power cord until all connections have been properly made.
Optical Digital Terminals
The optical digital terminals are provided with protection caps. Before you connect a cable to a terminal, remove the cap and keep it safely. If you disconnect the cable, put the cap back on the terminal.

RCA Audio Connection Color Coding
- Red connector is used for the right channel and white connector is used for the left channel.

- Insert all plugs and connectors securely. Improper connections can result in noise, poor performance, or damage to the equipment.

- Do not bind audio connection cables with power cords and speaker cables. Doing so may adversely affect the sound quality.
Cables are shown in the connection diagrams as follows.
| Types of audio connection cables and terminals | |||
| Cable names Cable forms Terminal shapes Description | |||
| Audio connection cable (Supplied) |  |  | This connection carries analog audio signals. |
| Optical cable |  |  | The audio quality is same as for coaxial.You can connect a DAT or CD recorder with a digital input to the C-1VL for digital dubbing. |
| Coaxial cable |  | [9X26] | The audio quality is same as for optical.You can connect a DAT or CD recorder with a digital input to the C-1VL for digital dubbing. |
The C-1VL is equipped with three types of output terminals: AUDIO OUTPUT ANALOG, AUDIO OUTPUT DIGITAL (OPTICAL), and AUDIO OUTPUT DIGITAL (COAXIAL). Make appropriate connections according to your audio devices such as amplifier and recorder.
Making Analog Connections to Amplifier and Recorder
When you enjoy analog audio sound or perform analog recording, make analog connection.
When making analog connection, connect the AUDIO OUTPUT ANALOG terminal on the C-1VL to analog audio input terminal on the amplifier or recorder.
Example for connecting the amplifier

Example for connecting the Cassette recorder

Making Digital Connections to Amplifier and Recorder
When you enjoy digital audio sound or perform digital recording, make digital connection.
The C-1VL is equipped with both optical and coaxial digital terminals, and you can use either of these terminals to make digital connection.
When making digital connection, connect the AUDIO OUTPUT DIGITAL terminal on the C-1VL to digital audio input terminal on the amplifier or recorder.
Note:
When you enjoy the audio signal from digital output, turn on the Digital Output function to enable digital signal output.
Example for connecting Onkyo's receiver

Example for connecting the Mini Disc recorder

Connecting the Supplied Power Cord
Plug the supplied power cord into this AC INLET.
- Before you plug in the C-1VL, confirm that all connections have been made properly.
- Turning on the power may cause a momentary power surge, which might interfere with other electrical equipment on the same circuit, such as computers. If this happens, use a wall outlet on a different circuit.
- Do not use a power cord other than the one supplied with the C-1VL. The power cord supplied is designed for use with the C-1VL and should not be used with any other device.
- Never have the power cord disconnected from the C-1VL while the other end is plugged into the wall outlet. Doing so may cause an electric shock. Always connect by plugging into the wall outlet last and disconnect by unplugging from the wall outlet first.

Turning On the C-1VL
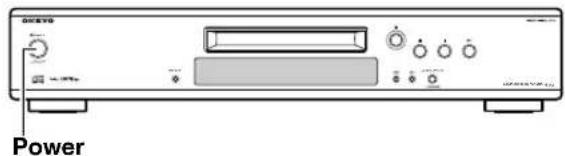
Press POWER button to turn on the C-1VL (✗)
■To turn off the C-1VL, press POWER button again (■).
Tip:
In general, turning on the playing component (C-1VL) before turning on the amplifier will lower the load to the speakers. On the other hand, when you turn off the component and amplifier, turning off the amplifier before turning off the playing component is recommended.
Enabling the Digital Signal Output
In the C-1VL, the digital audio output is turned off by default to get better analog audio signal quality. When connecting to digital recorder like MD recorder and performing digital recording, press the DIGITAL OUTPUT button to enable the digital audio output.


Pressing the DIGITAL OUTPUT button toggles the digital audio output function between on (✗) and off (■).
ON: Outputs digital audio signal.
When you listen to the digital output or record the audio signal from the C-1VL digitally on a digital recorder, enable the digital audio output.
OFF: Disable the digital audio signal output.
Turning off the digital audio signal output reduces the effect from digital signal on the analog signal circuit, producing better quality sound.

Playing CDs
1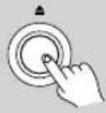 | Press the [▲button to open the disc tray. | |
| 2 | Put the CD on the tray with the label-side facing up.Be sure to put 8-cm discs in the center of the tray. | Label side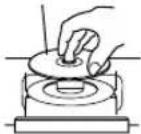 |
3 | Press the [▲button again to close the tray. | |
4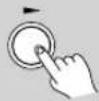 | Press the Play [▲button to start play-back.Playback starts and the Play indicator appears on the display.Note:With CDs that contain many tracks, playback may take a while to start. | |
■To Stop Playback
Press the Stop [■button.
■To Pause Playback
Press the Pause [■] button. The Pause indicator appears.
To resume playback, press the Play [■] button or [ ] button again.
■To Fast Forward or Fast Reverse
Using remote controller:
During playback or while playback is paused, press and hold the [▶button to fast forward, or the [ ] button to fast reverse.
Using the buttons on the C-1VL:
During playback or while playback is paused, press and hold the [▶] button to fast forward, or the [ ] button to fast reverse.
■To Select Tracks
Press the [▶] button to select the next track, or the [▶] button to select the previous track.
- If you press the [] button during playback or while play-back is paused, the beginning of the current track is selected.
- If you select a track while playback is stopped, press the Play [ ] button to start playback.
Selecting Tracks by Number
You can use the number buttons to select specific tracks.

1 Use the number buttons to enter a track number.
Use the [>10] button to enter track numbers above 10.
For example, to enter track number 10, press [10/0].
To enter track number 12, press [>10], [1], and [2].
Displaying the Remaining Time

1

During playback, press the [DISPLAY] button on the C-1VL repeatedly to display the informations. Elapsed track time:

Remaining track time:

Remaining disc time:

If you're using the Memory function to play a custom selection of tracks, the remaining memory playback time is displayed, instead of the remaining disc time.
Note:
If the total playing time of your custom selection exceeds 99 minutes and 59 seconds,
“--:--” is displayed.
Random Playback
With the Random function you can play tracks in random order.
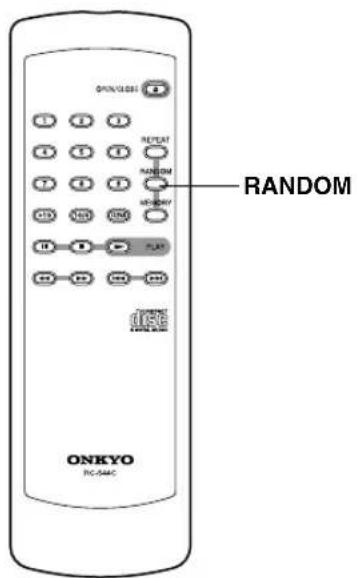
1

Press the [RANDOM] button.
The RANDOM indicator appears on the display and random playback starts.
2

To cancel random playback, stop playback, or press the [RAN-DOM] button so that the RAN-DOM indicator disappears.
Note:
During random playback, pressing the [▶button will not move to the previous track.
Repeat Playback
With the Repeat function you can play all tracks repeatedly.

1

During playback, press the remote controller's [REPEAT] button.
The REPEAT indicator appears on the display and all tracks are played repeatedly.
2

To cancel Repeat playback, press the [REPEAT] button again. The REPEAT indicator disappears.
Repeat Memory Playback
If you press the [REPEAT] button during memory playback, your custom program will play repeatedly.
Repeat Random Playback
If you press the [REPEAT] button during random playback, tracks will be played in random order repeatedly.
Memory Playback
With the Memory function you can make a custom program of your favorite tracks.
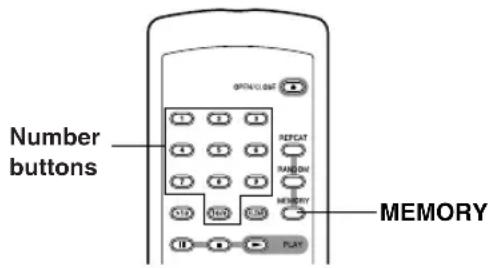
| 1 | While stopped, press the [MEMORY] button.The MEMORY indicator appears on the display. |
| 2 | To add a track to your program, use the number buttons.You can add up to 25 tracks to your program.For example, to add track number 10, press [10/0]. To add track 13, press [>10], [1], [3].Tracks can also be added by using the [ ][buttons]. Select a track and press the [MEMORY] button.While stopped, you can check which tracks you’ve added to the program by using the [ ][buttons. |
| 3 | To start memory playback, press the Play [button.Memory playback stops automatically when all the tracks in the program have been played. |
Notes:
- If you try to add more than 25 tracks to your program, the message “FULL” appears on the display.
- If the total playing time of your program exceeds 99 minutes and 59 seconds, “--:--” is displayed. (This does not affect program playback.)
- The program is deleted when the disc tray is opened.
■To Stop Memory Playback
Press the Stop [■button.
■To Remove the Last Track in the Program
While memory playback is stopped, press the [CLEAR] button. Each time you press it the last track in the program is removed.
■To Cancel Memory Playback
Press the [MEMORY] button so that the MEMORY indicator disappears. The entire program will be deleted.
Tips:
- During normal playback, you can add playing track to your program by pressing MEMORY button.
- During memory playback, you can add tracks to your program by using number buttons.
If you have any trouble using your C-1VL, check the following table for possible causes and remedies. If you still can't resolve the issue yourself, please contact your Onkyo dealer.
| Trouble Possible | Cause Remedy | |
| No power. The power cord | is not connected properly. | Connect the power cord properly to a suitable wall outlet (page 12). |
| The remote controller does not work. | The batteries are flat. Replace with new batteries | (page 8). |
| The batteries are installed incorrectly. | Check the batteries and correct as necessary (page 8). | |
| You're not pointing the remote controller at the C-1VL's remote sensor. | Point the remote controller at the C-1VL's remote sensor (page 8). | |
| You're too far away from the C-1VL. | Use the remote controller closer to the C-1VL (page 8). The remote controller has a range of approximately 5 meters (16 ft.). | |
| A strong light source is interfering with the C-1VL's remote sensor. | Make sure that the C-1VL is not subjected to direct sunshine or inverter-type fluorescent lights.Relocate if necessary. | |
| If the C-1VL is installed in a cabinet with colored glass doors, the remote controller may not work reliably when the doors are closed. | Open the doors, or use a cabinet without colored glass. | |
| Can not play a CD. | The disc is upside down. | Load the disc with the label-side facing up (page 13). |
| The disc is dirty. Remove the disc and clean it (page 4). | ||
| Condensation has formed inside the C-1VL. | Remove your discs and leave the C-1VL turned on for several hours until the condensation has evaporated. | |
| The disc is nonstandard. See “About CDs” on page 4. | ||
| There is no sound. | The C-1VL is not connected properly. Check all connections and correct as necessary. | |
| The wrong input source is selected on your amp. | Check your amp's input source setting. Refer to your amp's manual. | |
| The digital output on the C-1VL is turned off. | Press the DIGITAL OUTPUT button on the C-1VL to turn on the digital output. | |
| CD playback skips. | The C-1VL is subject to vibration. Install the C-1VL somewhere free of vibration. | |
| The disc is dirty. Remove the disc and clean it (page 4). | ||
| The disc is very scratched. Buy a new disc. | ||
| Can not enter track numbers for memory playback. | The track number entered doesn't exist on the disc. | Enter the correct track number (page 14). |
| Can not start and stop memory playback. | Random playback is activated. | Press the RANDOM button to disable random playback before starting and stopping the memory playback. |
| It takes a long time to locate certain tracks. | The disc is dirty. Remove the disc and clean it (page 4). | |
| The disc is very scratched. Buy a new disc. | ||
The C-1VL contains a microcomputer for signal processing and control functions. In very rare situations, severe interference, noise from an external source, or static electricity may cause it to lockup. In the unlikely event that this should happen, turn off the C-1VL, wait at least five seconds, and then turn it back on again.
Onkyo is not responsible for damages (such as CD rental fees) due to unsuccessful recordings caused by the unit's malfunction. Before you record important data, make sure that the material will be recorded correctly.
| Power Supply | AC 230-240 V, 50 Hz |
| Power Consumption | 9 W |
| Dimensions (W × H × D) | 435 W × 82 H × 356 D mm |
| Weight | 6.8 kg |
| Operation Condition | |
| Temperature/Humidity | 5 ~ 35 °C / 5 ~ 85 % (no condensation) |
| Frequency Response | 5 Hz ~ 20 kHz |
| SN Ratio | 110 dB |
| Audio Dynamic Range | 96 dB |
| THD (Total Harmonic Distortion) | 0.002 % |
| Audio Output | |
| Digital Optical | -22.5 dBm |
| Digital Coaxial | 0.5 Vp-p / 75 Ω |
| Analog | 2.0 V (rms) / 320 Ω |
Specifications and external appearance are subject to change without notice as a result of product improvement.
ONKYO CORPORATION
Sales & Product Planning Div.: 2-1, Nisshin-cho, Neyagawa-shi, OSAKA 572-8540, JAPAN Tel: 072-831-8023 Fax: 072-831-8124
Printed in Japan D0404-1

- WARNING:
- CAUTION:
- Important Safety Instructions
- Recording Copyright
- AC Fuse
- Care
- Power
- WARNING
- Never Touch This Unit with Wet Hands
- Installing This Unit
- Moisture Condensation
- Moisture condensation may damage this unit.
- For British models
- IMPORTANT
- DANGER:
- Declaration of Conformity
- About CDs
- Important notes on handling CDs
- Notes:
- playable discs
- About playing copy-controlled CDs
- Introduction
- Connections
- Operation
- Others
- Features
- Supplied Accessories
- Inserting the Batteries Using the Remote Controller
- Before Making Any Connections
- Optical Digital Terminals
- RCA Audio Connection Color Coding
- Making Analog Connections to Amplifier and Recorder
- Making Digital Connections to Amplifier and Recorder
- Note:
- Connecting the Supplied Power Cord
- Tip:
- Enabling the Digital Signal Output
- ■To Stop Playback
- ■To Pause Playback
- ■To Fast Forward or Fast Reverse
- Using remote controller:
- Using the buttons on the C-1VL:
- ■To Select Tracks
- Selecting Tracks by Number
- Use the number buttons to enter a track number.
- Displaying the Remaining Time
- 1
- Random Playback
- Repeat Playback
- Repeat Memory Playback
- Repeat Random Playback
- Memory Playback
- ■To Stop Memory Playback
- ■To Remove the Last Track in the Program
- ■To Cancel Memory Playback
- Tips:
- ONKYO CORPORATION
Brand : ONKYO
Model : C-1VL
Category : CD Player