
TTA05USB - Turntable AKAI - Free user manual and instructions
Find the device manual for free TTA05USB AKAI in PDF.


| Product Type | Turntable with USB output |
| Brand | AKAI |
| Model | TTA05USB |
| Drive System | Belt drive |
| Speeds | 33 1/3, 45 RPM |
| Platter Material | Aluminum |
| Cartridge Type | Moving Magnet (MM) |
| Stylus | Diamond tip |
| Built-in Preamp | Yes (switchable) |
| USB Output | Yes (USB-B) |
| Phono Output | RCA (Line/Phono) |
| Dimensions (W x D x H) | 420 x 360 x 120 mm |
| Weight | 4.5 kg |
| Power Supply | AC 100-240V, 50/60 Hz |
| Power Consumption | 5 W |
| Material | MDF plinth with wood grain finish |
| Dust Cover | Included (hinged) |
| Anti-Skating | Adjustable |
| Tone arm Type | Straight, gimbal-mounted |
| Cleaning | Use anti-static cloth; avoid liquids |
| Maintenance | Replace stylus every 500 hours |
| Repairability | Replaceable belt, cartridge, stylus |
| Warranty | 1 year |
Frequently Asked Questions - TTA05USB AKAI
User questions about TTA05USB AKAI
0 question about this device. Answer the ones you know or ask your own.
Ask a new question about this device
Download the instructions for your Turntable in PDF format for free! Find your manual TTA05USB - AKAI and take your electronic device back in hand. On this page are published all the documents necessary for the use of your device. TTA05USB by AKAI.
USER MANUAL TTA05USB AKAI
natural_image
Close-up of a mechanical component with circular features and a central hub (no text or symbols visible)Note:
Amplificator/Receptor
L (ALB) Canal stanga
R (ROSU) Canal dreapta
- Conectati PC-ul via USB.

OPERATII
-
Selectati tabul Audio I/O din stanga sus.
-
Sub meniul Playback, Device, selectati placa dumneavoastra de sunet.
- Sub meniul Recording, Device, selectati USB Audio CODEC.
- Sub meniul Recording,Channels, selectati 2 (Stereo).
- Bifati casuta in care scrie Play other tracks while recording new one.
• Bifati casuta in care scrie Software Playthrough.

Inregistrarea albumelor cu programul Audacity.
2. Cum inregistrati.
Control Pitch +/- 10%
Timpul de start Mai putin de 1 sec la 33^1/3
Timpul de oprire Mai putin de 1 sec la 33^1/3
Timp pentru schimbarea Mai putin de 1 sec de la 313 la 45 rpm
vitezei Mai putin de 1 sec de la 45 la 33/3 rpm
Toleranta de viteza=0 Intre +3%/-2%
Functia USB USB
A/D, D/A 16BIT 44.1KHz or 48KHz USB SELECTABLE
Interfata calculator USB 1.1 compliant, WINDOWS XP sau MAC OSX
Bratul de sunet:
Tip Brat de sunet static in forma de S cu cap detasabil
High of cue(first track) 8\~10.5mm
Descend of cue 1\~3sec
EQ AMP
Iesire 150mV +/-4dB (IN: 2.5 mV 1KHz)
RIAA 20Hz\~20KHz +1/-3dB (IN: 1.5 mV 1KHz)
ELIMINARE
IMPORTANT SAFETY INSTRUCTIONS
- Read Instructions – All the safety and operating instructions should be read before this product is operated.
- Retain Instructions — The safety and operating instructions should be retained for future reference.
- Heed Warnings — All warnings on the appliance and in the operating instructions should be adhered to.
- Follow Instructions — All operating and use instructions should be followed.
- Water and Moisture—The appliance should not be used near water - for example, near a bathtub, washbowl, kitchen sink, laundry tub, in a wet basement, or near a swimming pool, and the like.
- Carts and Stands—The appliance should be used only with a cart or stand that is recommended by the manufacturer.
An appliance and cart combination should be moved with care. Quick stops, excessive force, and uneven surfaces may cause the appliance and cart combination to overturn.

- Wall or Ceiling Mounting — The product should not be mounted to a wall or ceiling.
- Heat — The appliance should be situated away from heat sources such as radiators, heat registers, stoves, or other appliances (including amplifiers) that produce heat.
- Power Sources – This product should be operated only from the type of power source indicated on the rating label. If you are not sure of the type of power supply to your home, consult your product dealer or local power company. For products intended to operate from battery power, or other sources, refer the operating instructions.
- Grounding or Polarization – This product may be equipped with a polarized alternation-current line plug (a plug having one blade wider than the other). This plug will fit into the power outlet only one way. This is a safety feature. If you are unable to insert the plug fully into the outlet, try reversing the plug. If the plug should still fail to fit, contact your electrician to replace your obsolete outlet. Do not defeat the safety purpose of the polarized plug.
- Power-Cord Protection — Power-supply cords should be routed so that they are not likely to be walked on or pinched by items placed upon or against them, paying particular attention to the cord in correspondence of plugs, convenience receptacles, and the point where they exit from the appliance.
- Cleaning - The appliance should be cleaned only as recommended by the manufacturer. Clean by wiping with a cloth slightly damp with water. Avoid getting water inside the appliance.
-
For AC line powered units - Before returning repaired unit to user, use an ohm-meter to measure from both AC plug blades to all exposed metallic parts. The resistance should be more than 100,000 ohms.
-
Non-use Periods — The power cord of the appliance should be unplugged from the outlet when left unused for a long period of time.
- Object and Liquid Entry—Care should be taken so that objects do not fall and liquids are not spilled into the enclosure through openings.
- Damage Requiring Service—The appliance should be serviced by qualified service personnel when:
A. The power-supply cord or the plug has been damaged; or
B. Objects have fallen, or liquid has been spilled into the appliance; or
C. The appliance has been exposed to rain; or
D. The appliance does not appear to operate normally or exhibits a marked change in performance; or
E. The appliance has been dropped, or the enclosure damaged.
- Servicing — The user should not attempt any service to the appliance beyond that described in the operating instructions. All other servicing should be referred to qualified service personnel.
- Ventilation – Slots and openings in the cabinet are provided for ventilation and to ensure reliable operation of the product and to protect it from overheating, and these openings must not be blocked or covered. The openings should never be blocked by placing the product on a bed, sofa, rug, or other similar surface. This product should not be placed in a built-in installation such as a bookcase or rack unless proper ventilation is the manufacturer's instructions have been adhered to.
- Attachments - do not use attachments not recommended by the product manufacturer as they may cause hazards.
- Accessories – Do not place this product on an unstable cart, stand, tripod, bracket, or table. The product may fall, causing serious injury to a child or adult, and serious damage to the product. Use only with a cart, stand, tripod, bracket, or table recommended by the manufacturer, or sold with the product. Any mounting of the product should follow the manufacturer's instructions, and should use a mounting accessory recommended by the manufacturer.
- Lightning – For added protection for this product during a lightning storm, or when it is left unattended and unused for long periods of time, unplug it from the wall outlet and disconnect the antenna or cable system. This will prevent damage to the product due to lightning and power-line surges.
- Replacement Parts – When replacement parts are required, be sure the service technician has used replacement parts specified by the manufacturer or have the same characteristics as the original part. Unauthorized substitutions may result in fire, electric shock, or other hazards.
- Safety Check – Upon completion of any service or repairs to this product, ask the service technician to perform safety checks to determine that the product is in proper operating condition.
IMPORTANT SAFETY INSTRUCTIONS

CAUTION
DO NOT OPEN RISK OF ELECTRIC SHOCK

CAUTION: To reduce the risk of electric shock, do not remove any cover. No user-serviceable parts inside. Refer servicing to qualified service personnel only.

The lightning flash with arrowhead symbol within the equilateral triangle is intended to alert the use to the presence of un-insulated “dangerous voltage” within the product’s enclosure that may be of sufficient magnitude to constitute a risk of electric shock.

The exclamation point within the equilateral triangle is intended to alert the user to the presence of important operation and maintenance (servicing) instructions in the literature accompanying this appliance.
CAUTION
To prevent electric shock, do not use this polarized plug with an extension cord, receptacle or other outlet unless the blades can be fully inserted to prevent blade exposure.
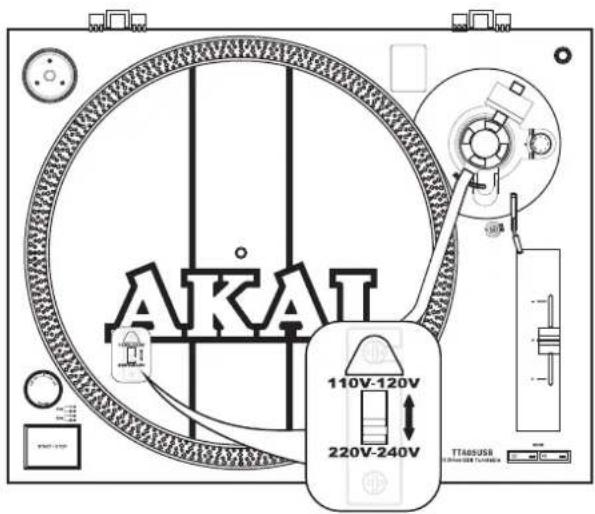
\*LINE VOLTAGE SELECTION
Just for dual voltage mode only!
Because power supplies vary from location to location we have incorporated a selectable power supply.
- The desired voltage may be set with the VOLTAGE SELECTOR switch located under the platter. (use a flat head screw driver).
- Do not force the VOLTAGE SELECTOR switch as this may cause damage.
- If the VOLTAGE SELECTOR switch does not move smoothly, please contact a qualified service technician.
BEFORE USE
* Check for the following parts included in the package with the main unit:
- Platter
- Cartridge
- RCA cable
• Disc
- Slipmat
- USB cable
- Counter weight
- Dust cover
- Headshell
- 45 rpm adaptor
- Instruction manual
\* VERY IMPORTANT!!
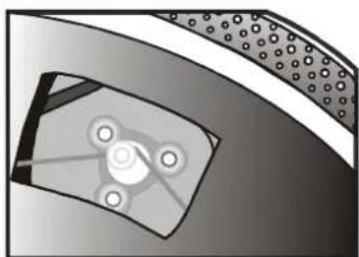
Do not forget to attach rubber belt to motor for correct operation. After placing the Turntable Platter onto the turntable through the Center Spindle, move one of the large windows on the Platter to top right corner. Attach rubber belt around motor. (Rubber belt is already attached to the underside of the Turntable Platter.)
natural_image
Close-up of a mechanical component with circular features and a central hub (no text or symbols visible)\* Notes:
1) Do not connect the AC power plug before assembly has been completed.
2) Before turning the power on, make sure once again all the connections and power voltage settings are correct. Always turn off the power when connecting or disconnecting.
3) Read this manual carefully before using the unit .Be sure to store the manual in a safe place for future reference.
ASSEMBLY
- Remove the main unit with the packing from the box and remove the packing.
- Set the 45-rpm adaptor on the main unit.
- Set the turntable platter onto the center spindle.
- Set the slip mat on the platter.
- Installation of cartridge:
When installing a cartridge, refer to the operating instructions of that cartridge.
During installation, attach the stylus protector to guard the stylus tip from damage.
(a) Connect the lead wires to the cartridge terminals. The terminals of most cartridges are color-coded.
Connect each lead wire to the terminal of the same color.
White (L+).... Left channel+
Blue (L-) ...... Left channel-
Red (R+) Right channel+
Green (R-) Right channel-
(b) Install the cartridge to the headshell and tighten it with screws provided with the cartridge.
- Insert the headshell into the front end of the tone arm, then turn the lock nut counterclockwise with the headshell firmly held horizontally.
- Slide counterweight onto tone arm. Twist it lightly and it will screw onto the rear shaft of the tone arm.
- Adjustment of horizontal "zero" balance and stylus pressure:
(a) Remove the stylus protector from the headshell, do not touch the stylus tip during the adjustment.
(b) Set the cueing lever to the lowered position.
(c) Release the tone arm clamp and lift the tone arm from the arm rest to free it.
(d) Rotate the counterweight until the tone arm is approximately balanced horizontally (floats freely).
(e) Refasten the tone arm with the tone arm clamp.
(f) Hold the counterweight stationary with one hand and rotate only the stylus-pressure ring to bring the number "0" of the ring into alignment with the center line on the tone arm rear shaft.
(g) Rotate the counterweight including the stylus-pressure ring counterclockwise until the scale shows the value corresponding to the pressure of the stylus used. Should you use a separate Stylus, please follow the manufacturer's instructions.
-
Set the anti-skating control knob to the same value as the stylus pressure.
-
Install the dust cover to the main unit's dust cover hinges.
PLACEMENT
- Do not place the unit in a location where it will be exposed to direct sunlight or near a heating appliance.
- Do not place the unit in a location where there is high humidity or a lot of dust.
- Cartridge may pick up slight sound pressures or vibrations of the speakers coming along the floor or through the air resulting in feedback or “howling” sound. Find a location which is very stable and vibration free.
- The legs have functions for adjusting the height of the unit itself. Adjust the legs to stabilize the main body horizontally.
CONNECTIONS
Before connecting the unit it is advised that you also consult your current equipment instruction manual.
IMPORTANT : Be sure to turn off the equipment before you make changes to the different connections.
-
Connect the power cord to an AC outlet.
-
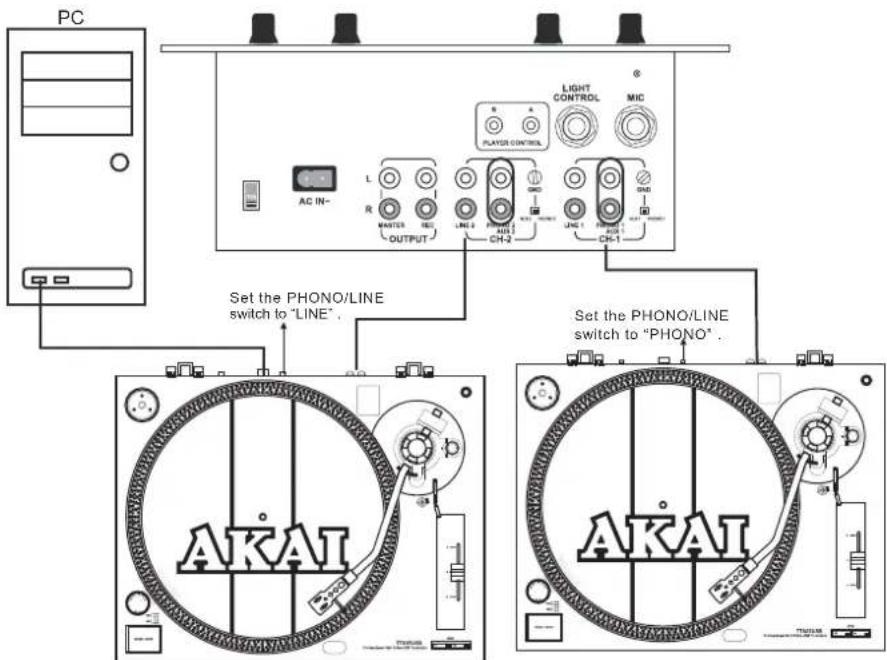
Connect the RCA cable to the PHONO input of your AMPLIFIER when you set the PHONO/ LINE switch to PHONO position. You can also use a line input by setting the PHONO/ LINE switch at the rear of the turntable to LINE.
Output terminals Amplifier (Receiver)
L (White) L Channel
R (Red) R Channel
- Connect PC via USB cord.
OPERATIONS
-
Turn the On/Off Switch clockwise to turn on the power, the speed indicator and the strobe-illuminator, which is located beneath the On/Off switch, will light up.
-
Place a record on the slip mat. When playing a 45-rpm record with a large center hole, place the 45-rpm adapter on the center spindle.
-
Set the speed to match the record.
-
Remove the stylus protector from the Headshell Stylus and then release the Tone arm clamp.
-
Set the cueing lever to the up position.
-
Press the Start/Stop Button; the turntable platter will start to rotate.
-
Move the tone arm over the desired groove.
-
Set the cueing lever to the down position, the tone arm will descend slowly onto the record and begin playing.
-
When play is finished, raise the cueing lever, move the tone arm onto the Tone arm clamp.
-
Press the Start/Stop Button to stop the platter from rotating. Turn the On/Off Switch counterclockwise to turn off the power.
\*SUSPEND PLAY
Set the cueing lever to "UP" position during play, the stylus tip of the cartridge will be lifted from the record.
CHANGING THE SPEED
- As long as the pitch control is in center "detent" click position, the turntable is operated at selected speed.
- The speed can be increased or decreased by 10% by the pitch control.
- An incorrect adjustment done on purpose can also be used to have the turntable rotate extremely slow or fast.
- The strobe dots at the edge of the turntable are used for speed monitoring.
MAINTENANCE
- Clean the stylus periodically with a soft brush to prevent the accumulation of dust.
- When sound becomes distorted or noisy, check the stylus. If the stylus is worn out, replace it with a new one.
• From time to time, the dust cover and turntable cabinet should be wiped down with a soft, dry cloth. - Volatile materials should not be used, such as: alcohol, thinner, benzine etc. They may remove the paint or damage the luster.
CONTROLS OVERVIEW

1. 45-rpm Adaptor
This adapter allows you to play standard 7" EP vinyl records with large center holes. Place the adapter on the CENTER SPINDLE 7" records.
2. Turntable Platter
This platter connects directly to the center spindle. The platter and center spindle holds a vinyl record perfectly center. The platter also spins the record at a consistent speed.
3. Strobe Indicators
The PLATTER has four rows of indicators. These indicators are used to visually detail various stages of pitch. The indicators are illuminated by the STROBE INDICATOR PILOT LAMP. Each row may appear to stand still at different pitch levels.
Note: The use of heavy fluorescent lighting directly above the turntable will defeat the STROBE LAMP PILOT LAMP affect indicator accuracy.
4. Center Spindle
This spindle holds the turntable PLATTER records stable and centered.
5. Strobe Indicators Pilot Lamp
This is lamp specially designed to pulse a beam of light at the STROBE INDICATORS on the turntable PLATTER. This will give the illusion that indicators are not spinning at certain speeds.
6. Power Switch
This is a rotary power switch. To turn main power on turn the switch in a clockwise direction. To turn main power off turn the switch in counterclockwise direction.
7. Start/Stop Button
This over sized push button controls platter motion. When the unit is turned on the platter will not automatically begin to spin. Pressing the button once will engage the high torque motor and spin the platter, pressing this again will stop the platter.
8. Headshell
The included HEADSHELL is used to connect your stylus with the tone arm.
9. Headshell Locking Nut
After attaching the headshell to the tone arm, this locking nut will securely hold the headshell to the tone arm.
10. S-Shaped Tone Arm
The tone arm is the mechanism that holds the HEAD-SHELL and stylus allowing it to glide across a record.
11. 33-RPM Speed Select Button
Engaging this button will rotate the platter at 33 revolutions per a minute (RPMs). A function LED will glow when this function is activated.
12. 45- RPM Speed Select Button
Engaging this button will rotate the platter at 45 RPMs. A function LED will glow when this function is activated.
13. Pitch Control Slider
This slider is used to adjust the playback pitch percentage (platter speed).
14. Tone Arm Lever
This lever is used to safely elevate the tone arm above a record surface without endangering a records surface.
15. Tone Arm Clamp and Rest
Use this rest to safely hold the tone arm in position during non-use and transportation.
16. Anti-skate Knob
The anti-skate applies inward force to the tone arm to prevent outward skipping across the record due to the centrifugal force cause by platter rotation. The anti-skate value should be equally to that of the stylus counterweight pressure.
* The counterweight scale must face toward the DJ.
18. Extra Stylus Holder
This cut out has been designed to safely store an extra stylus headshell.
19. Counterweight
Use the counterweight to balance the tone arm and to adjust the stylus pressure.
20. Hinge For Dust Cover
21. USB Socket (USB cable limit within 3m)
After connecting the Turntable to the computer via USB, you can record your vinyl to hard disc using the software.
22. Phono/Line Selector
This switch is used to change the mode of phono output or line output.
23. RCA output Jacks
The output is able to switch to PHONO output or LINE output. For example: These jacks are used to send a low voltage "phono" level output signal to a mixers "phono" input jacks. Turntables should be connected to "Phono" inputs on a mixer. The red colored RCA jack represents the right channel input and the white represents the left channel input.
AUDACITY SOFTWARE OVERVIEW
Audacity is free software, licensed under the GNU General Public License (GPL). More information as well as open source code can be found on the CD included or on the web at http://audacity.sourceforge.net/
* Please ensure you have installed the software before starting.
Setting up your PC to work with Audacity
- Connect an input source to the unit.
- Connect the USB lead to your computer.
- Install the Audacity recording software.
- Open the Audacity program.
- Select Preference from the Edit tab in the Audacity Menu.

- Select Audio I/O tab at the top left.
• Under Playback, Device, select your internal sound card.
• Under Recording, Device, select USB Audio CODEC.
• Under Recording, Channels, select 2 (Stereo).
- Check the box marked Play other tracks while recording new one.
- Check the box marked Software Playthrough.

Recording Albums with Audacity
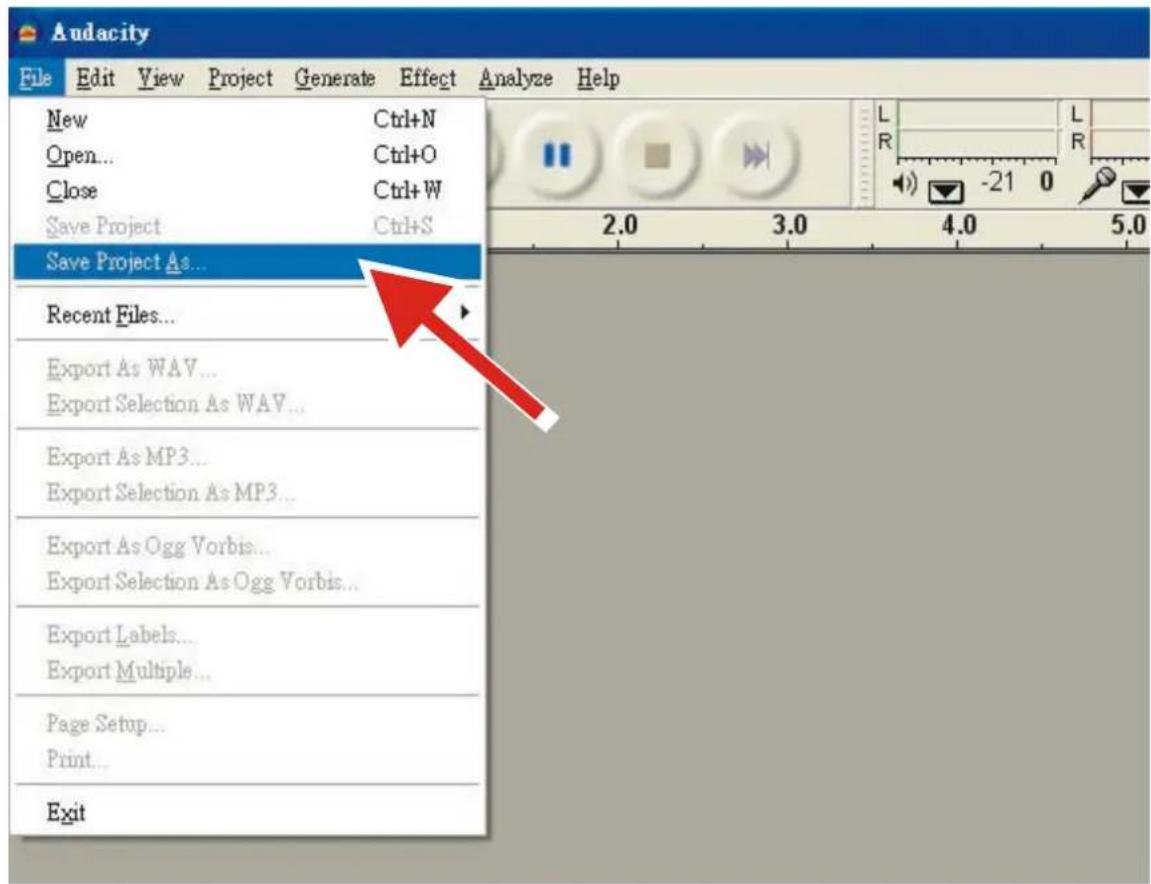
1. Saving a project
- Audacity writes all the changed and recorded audio to a directory called Projectname_data, which is located right where you saved the project file itself.
- Thus, select Save project as from your Audacity File tab and choose a location and filename for your project.
- Please note that when you startup Audacity fresh, only the "Save As..." menu option is available.
2. How to record
- Set your USB turntable up to play the song or album you want to record.
- Click on the red Record button to begin recording.
- Lower tone arm on USB turntable onto album and track you want to record.
- Click on the blue Pause button to pause the recording. Press it again to continue.
- Click on the yellow Stop button.
That's it. You can now play around with your recording and explore the editing capabilities of Audacity. Remember that you can use the Undo function almost without limits while the project is open.
NOTE: CD's cannot be burned directly from the Audacity application. Other CD burning applications should be used.
SPECIFICATION
GENERAL
Model: TTA05USB Professional Belt Drive USB Turntable
Dimensions: 450(W) x 350(D) x 145(H)mm
Weight: 4.4Kg (Aluminum platter)
Power supply: Dual Voltage: AC 115V\~60Hz/230V\~50Hz, User Selectable
Power consumption: 8W
Standard test condition: Ambient Temperature: 23 +/- 2 degC
Relative Humidity: 65% +/- 5%
NOTE: Measurements can be carried out between 5 degC to 35 degC and 45% to 85% relative humidity.
TURNTABLE SECTION:
| Type | 2-speed | full | manual |
| Motor | DC | motor | |
| Driving Method Belt drive | |||
| Turntable Platter (Plastic) 332mm dia. | |||
| Speeds | 33^1/3 and 45rpm | ||
| Wow and Flutter Less than 0.25% | WRMS (JIS WTD) with 33 | ^1/_3 rpm | |
| S/N Ratio More than 50dB (DIN-B) | |||
| Pitch Controls +/- 10% | |||
| Starting Time | Less than 1 sec with 33^1/3 | ||
| Braking Time | Less than 1 sec. with 33^1/3 | ||
| Time for Speed Change | Less than 1 sec. from 33^1/3 to 45 rpm | ||
| Less than 1 sec. from 45 to 33 | ^1/_3 rpm | ||
| Speed tolerance at pitch=0 | Within +3%/-2% | ||
| USB Function | USB rec. Function | ||
| A/D, D/A | 16BIT 44.1KHz or 48KHz USB SELECTABLE | ||
| Computer interface | USB 1.1 compliant, WINDOWS XP or MAC OSX |
TONE ARM SECTION:
| Type | Static balanced S-shaped tone arm with detachable headshell |
| Effective Arm Length | 220 mm |
| Tracking Error Angle | Less than 3 degree |
| Applicable Cartridge Weight | 3.5~8.5g |
| Anti-skating Range | 0-4g |
| Phono Output Level | 1.5~3.6 mV at 1KHz 5cm/sec (HP-4005) |
| Line Output Level | 90~216mV at 1KHz 5cm/sec (HP-4005) |
| Frequency Response | 20Hz-20KHz |
| Channel Separation | More than 15dB |
| Channel Balance | Within 2.5dB at 1KHz |
| Tracking Force adjustment Range | 3~4g |
| High of cue(first track) | 8~10.5mm |
| Descend of cue | 1~3sec |
| EQ AMP | |
| Output | 150mV +/-4dB (IN: 2.5 mV 1KHz) |
| RIAA | 20Hz~20KHz +1/-3dB (IN: 1.5 mV 1KHz) |
DISPOSAL
Disposal of Used Electrical & Electronic Equipment

The meaning of the symbol on the product, its accessory or packaging indicates that this product shall not be treated as household waste. Please, dispose of this equipment at your applicable collection point for the recycling of electrical & electronic equipments waste. In the European Union and Other European countries which there are separate collection systems for used electrical and electronic product. By ensuring the correct disposal of this product, you will help prevent potentially hazardous to the environment and to human health, which could otherwise be caused by unsuitable waste handling of this product. The recycling of materials will help conserve natural resources. Please do not therefore dispose
of your old electrical and electronic equipment with your household waste. For more detailed information about recycling of this product, please contact your local city office, your household waste disposal service or the shop where you purchased the product.

3
7


natural_image
Diagram showing two circular components with internal holes and a downward arrow pointing to a small object (no text or symbols)B
4

natural_image
Technical line drawing of a CD or DVD disc assembly with labeled component B (no text or symbols beyond label)natural_image
Two-step diagram showing cable installation process: one with a switch, the other with a plug inserted (no text or symbols)natural_image
Close-up of a mechanical component with a circular feature and mounting holes (no text or symbols visible)ΣΥΝΑΡΜΟΛΟΓΗΣΗ



- Note:
- Amplificator/Receptor
- OPERATII
- Inregistrarea albumelor cu programul Audacity.
- Cum inregistrati.
- Bratul de sunet:
- EQ AMP
- ELIMINARE
- IMPORTANT SAFETY INSTRUCTIONS
- CAUTION
- \*LINE VOLTAGE SELECTION
- BEFORE USE
- \* VERY IMPORTANT!!
- \* Notes:
- ASSEMBLY
- PLACEMENT
- CONNECTIONS
- OPERATIONS
- \*SUSPEND PLAY
- CHANGING THE SPEED
- MAINTENANCE
- CONTROLS OVERVIEW
- 45-rpm Adaptor
- Turntable Platter
- Strobe Indicators
- Center Spindle
- Strobe Indicators Pilot Lamp
- Power Switch
- Start/Stop Button
- Headshell
- Headshell Locking Nut
- S-Shaped Tone Arm
- 33-RPM Speed Select Button
- 45- RPM Speed Select Button
- Pitch Control Slider
- Tone Arm Lever
- Tone Arm Clamp and Rest
- Anti-skate Knob
- Extra Stylus Holder
- Counterweight
- Hinge For Dust Cover
- USB Socket (USB cable limit within 3m)
- Phono/Line Selector
- RCA output Jacks
- AUDACITY SOFTWARE OVERVIEW
- Setting up your PC to work with Audacity
- Recording Albums with Audacity
- Saving a project
- How to record
- SPECIFICATION
- GENERAL
- DISPOSAL
- Disposal of Used Electrical & Electronic Equipment
- ΣΥΝΑΡΜΟΛΟΓΗΣΗ
Brand : AKAI
Model : TTA05USB
Category : Turntable