BIRDY XS2 - Effects machine Karma - Free user manual and instructions
Find the device manual for free BIRDY XS2 Karma in PDF.


| Product type | Effects machine (multi-effects for guitar) |
| Brand | Karma |
| Model | BIRDY XS2 |
| Dimensions | 15 x 10 x 5 cm |
| Weight | 0.5 kg |
| Power supply | 9V DC (AC adapter included) |
| Power consumption | 5 W max |
| Main functions | Reverb, Delay, Chorus, Flanger, Distortion, Overdrive, Wah, Phaser, Tremolo, Filter |
| Number of presets | 30 factory presets and 30 user presets |
| Inputs | 1 x 6.35mm jack input (instrument) |
| Outputs | 1 x 6.35mm jack output (amp or interface) |
| Auxiliary input | Yes (3.5mm mini-jack) |
| Headphone output | Yes (3.5mm mini-jack) |
| MIDI | No |
| USB | Yes (mini-USB for updates and PC settings) |
| Expression pedal | Input for expression pedal (TRS jack) |
| Bypass | True bypass |
| Display | Backlit LCD screen |
| Battery power | 6 AA batteries (not included) |
| Care and cleaning | Clean with a soft, dry cloth. Do not use solvents. |
Frequently Asked Questions - BIRDY XS2 Karma
User questions about BIRDY XS2 Karma
0 question about this device. Answer the ones you know or ask your own.
Ask a new question about this device
Download the instructions for your Effects machine in PDF format for free! Find your manual BIRDY XS2 - Karma and take your electronic device back in hand. On this page are published all the documents necessary for the use of your device. BIRDY XS2 by Karma.
USER MANUAL BIRDY XS2 Karma
natural_image
Exterior view of a black industrial lighting fixture with control panel (no visible text or symbols)BIRDY XS
natural_image
Black industrial lighting fixture with adjustable lens and control panel (no visible text or symbols)BIRDY XS
User Guide
Please read carefully the instruction, which includes important information about the installation, usage and maintenance.
Please keep this User Guide for future consultation. If you sell the unit to another user, be sure that they also receive this instruction manual.
Important:
Damages caused by the disregard of this user manual are not subject to warranty. The dealer will not accept liability for any resulting defects or problems.
- Unpack and check carefully that there is no transportation damage before using the unit.
- The unit is for indoor use only. Use only in a dry location.
• DO install and operate by qualified operator. - DO NOT allow children to operate the fixture.
• Use safety chain when fixing the unit. Handle the unit by carrying its base instead of head only.
• The unit must be installed in a location with adequate ventilation, at least 50cm from adjacent surfaces. - Be sure that no ventilation slots are blocked, otherwise the unit will be overheated.
• Before operating, ensure that the voltage and frequency of power supply match the power requirements of the unit.
It's important to ground the yellow/green conductor to earth in order to avoid electric shock.
• Maximum ambient temperature Ta: 40°C. DO NOT operate it when the temperature is higher. - DO NOT connect the device to any dimmer pack.
- During initial start-up some smoke or smell may arise. This is a normal process and does not necessarily mean that the device is defective, and it will decrease gradually within 15 minutes.
• Make sure there are no flammable materials close to the unit while operating to avoid fire hazard. - Examine the power wires carefully, replace them immediately if there is any damage.
- Unit's surface temperature may reach up to 85°C. DO NOT touch the housing bare-handed during its operation, and allow about 15 minutes for cooling the unit down before replacing bulb or maintenance as it could be very hot.
- Avoid any inflammable liquids, water or metal objects entering the unit. Once it happens, cut off the mains power immediately.
• DO NOT operate in dirty or dusty environment, do clean fixtures regularly.
• DO NOT touch any wire during operation as there might be a hazard of electric shock. - Avoid power wires together twist other cables.
• The minimum distance between light output and the illuminated surface must be more than 12 meters. - Disconnect mains power before fuse/lamp replacement or servicing.
- Replace fuse/lamp only with the same type.
• In the event of serious operating problem, stop using the unit immediately. - Never turn on and off the unit time after time.
• The housing, the lenses, or the ultraviolet filter must be replaced if they are visibly damaged.
• DO NOT open the unit as there are no user serviceable parts inside. - Never try to repair the unit by yourself. Repairs carried out by unskilled people can lead to damage or malfunction. Please contact the nearest authorized technical assistance center if needed.
- Disconnect the mains power if the fixture is has not been used for a long time.
• DO use the original packing materials before transporting it again.
Caution :
• To prevent or reduce the risk of electrical shock or fire, do not expose the unit to rain or moisture.
• Hot lamp explosion hazard. Do not open the unit within 15 minutes after switching off.
- DO replace the bulb once it is damaged, deformed or life-expired.
- DO NOT look directly at the light while the bulb is on.
- Never touch bulb with bare fingers, as it is very hot after using.
• DO NOT start on the unit without bulb enclosure or when housing is damaged.
Installation :
The unit should be mounted by its screw holes on the bracket. Always ensure that the unit is firmly fixed to avoid vibration and slipping while operating. The structure to which you are attaching the unit should be able to support 10 times the weight of the unit. Also always use a safety cable that can hold 12 times the weight of the unit when installing the fixture.
The equipment must be fixed by professionals.
2.TECHNICAL SPECIFICATIONS
COMPACT SPOT MOVING HEAD 35W WITH 2 WHEELS
* Light Sources : 35W LED
* DMX Channels : 9, 11
* Operation Modes : DMX, Master/Slave, Sound active
* Lumen : 2400 lux@5m
* Beam Angle : 12°
* Pan/Tilt : 540°/230°
* LCD Display
* Voltage : AC 100-240V, 50/60Hz
* Consumption : 60W
* Dimension : 194 x 151 x 285 mm
* Weight : 3.4kg
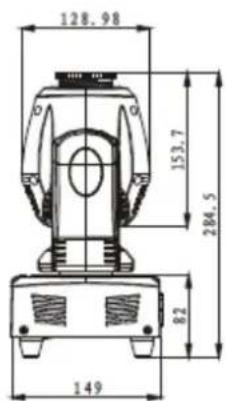
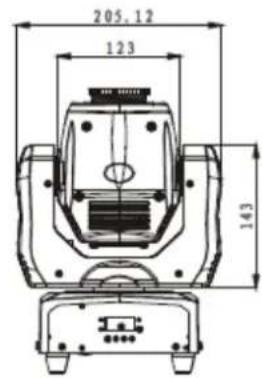
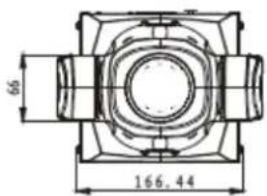
3. DESCRIPTION
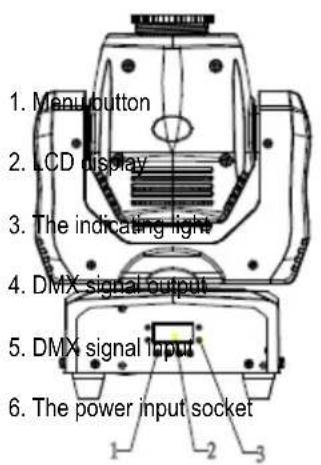
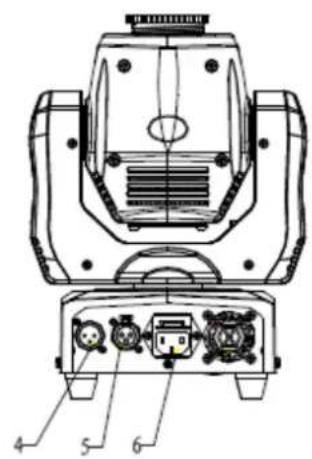
MAIN FUNCTIONS
Turn on the unit, press MENU button into menu mode, press UP and DOWN button until the required function is shown on the monitor. Select the function by ENTER button. Use UP and DOWN button to choose the submenu, press the ENTER button to store and automatically return to the last menu. Press MENU button or let the unit idle one minute to exit menu mode.
In the event of disconnecting with mains power, press UP button for one minute to enter into menu mode. Press MENU button or let the unit idle one minute to exit.
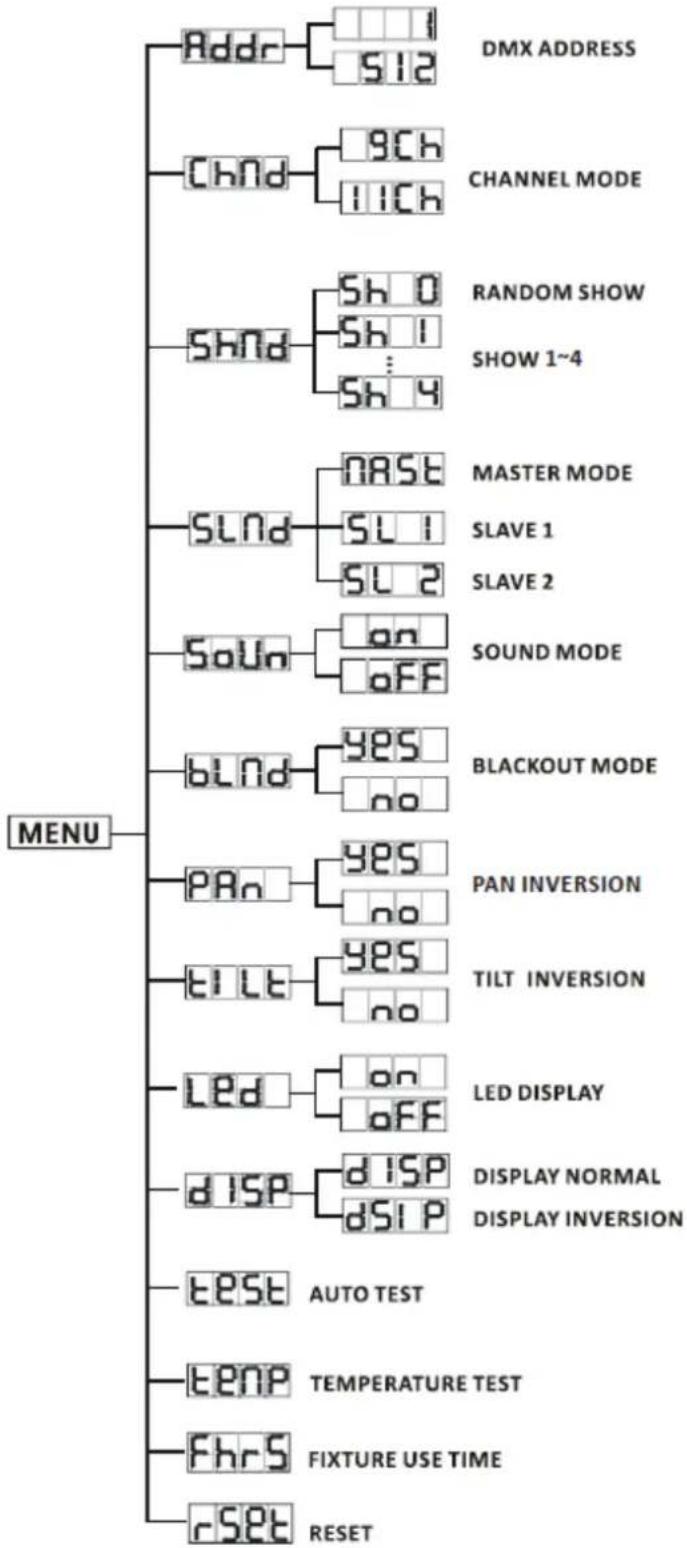
flowchart
graph TD
    A["Menu"] --> B["Addr"]
    A --> C["Chnd"]
    A --> D["SHnd"]
    A --> E["SLnd"]
    A --> F["SoUn"]
    A --> G["BLnd"]
    A --> H["PAn"]
    A --> I["tilt"]
    A --> J["Led"]
    A --> K["disp"]
    A --> L["TEST"]
    A --> M["tenp"]
    A --> N["FhrS"]
    A --> O["rSET"]

    B --> P["DMX ADDRESS"]
    B --> Q["512"]
    C --> R["9Ch"]
    C --> S["11Ch"]

    D --> T["Random Show"]
    D --> U["SHOW 1~4"]

    E --> V["QAST"]
    E --> W["SL1"]
    E --> X["SL2"]

    F --> Y["Sound MODE"]
    F --> Z["BLACKOUT MODE"]

    G --> AA["YES"]
    G --> AB["no"]

    H --> AC["YES"]
    H --> AD["no"]

    I --> AE["YES"]
    I --> AF["no"]

    J --> AG["an"]
    J --> AH["off"]

    K --> AI["dISP"]
    K --> AJ["dSIP"]

    L --> AK["AUTO TEST"]

    M --> AL["TEMPERATURE TEST"]

    N --> AM["FIXTURE USE TIME"]

    O --> AN["RESET"]
• DMX ADDRESS - DMX512 address setting
Select Addr, press ENTER button to confirm, the present address will blink on the display, use UP and DOWN button to adjust the address from 1 to 512, press ENTER button to store. Press MENU button back to the last menu or let the unit idle one minute to exit menu mode.
- CHANNEL MODE
Select ChMd, press ENTER to confirm, present channel mode will blink on the display. Use UP and DOWN button to select 1, 6 or 12, press ENTER button to store. Press MENU button back to the last menu or let the unit idle one minute to exit menu mode.
- SLAVE MODE
Select SLMd, press ENTER to confirm. Use UP and DOWN button to select Master, Slave 1 or Slave 2 modes. Press ENTER button to store. Press MENU button back to the last menu or let the unit idle one minute to exit menu mode.
- SHOW MODE
Select ShMd, press ENTER to confirm. Use UP and DOWN button to select Show 1 (Sh1), Show 2 (Sh 2)... Show 8 (Sh 8), or Show 0 (Sh 0) = random show. Press ENTER button to store. Press MENU button back to the last menu or let the unit idle one minute to exit menu mode.
- SOUND STATE
Select SoUn, press ENTER to confirm. Use UP and DOWN button to select ON (sound on) or OFF (sound off). Press ENTER button to store. Press MENU button back to the last menu or let the unit idle one minute to exit menu mode.
- BLACKOUT
Select BLMd, press ENTER to confirm. Use UP and DOWN button to select YES (blackout) or NO (normal). Press ENTER button to store. Press MENU button back to the last menu or let the unit idle one minute to exit menu mode.
- BACKLIGHT
Select LId, press ENTER to confirm. Use UP and DOWN button to select ON (LED on) or OFF (LED off). Press ENTER button to store. Press MENU button back to the last menu or let the unit idle one minute to exit menu mode.
- DISPLAY INVERSE
Select DISP, press ENTER to confirm. Use UP and DOWN button to select DISP (normal) or DSIP (inversion). Press ENTER button to store. Press MENU button back to the last menu or let the unit idle one minute to exit menu mode.
• TILT 1 INVERSE
Select ItlL, press ENTER to confirm. Use UP and DOWN button to select YES (tilt 1 inversion) or NO (normal). Press ENTER button to store. Press MENU button back to the last menu or let the unit idle one minute to exit menu mode.
• TILT 2 INVERSE
Select 2tIL, press ENTER to confirm. Use UP and DOWN button to select YES (tilt 2 inversion) or NO (normal). Press ENTER button to store. Press MENU button back to the last menu or let the unit idle one minute to exit menu mode.
- LAMP INVERSE
Select rEv, press ENTER to confirm. Use UP and DOWN button to select YES (the LED will light up from right to left) or NO (the LED will light up from left to right). Press ENTER button to store. Press MENU button back to the last menu or let the unit idle one minute to exit menu mode.
- AUTO TEST
Select Auto Test, press ENTER to confirm. The unit will run a self-test. To cancel, press MENU button back to the last menu or let the unit idle one minute to exit menu mode.
• TEMPERATURE
Select Temp., press ENTER to confirm. The temperature of the unit will show on display. Press MENU button back to the last menu or let the unit idle one minute to exit menu mode.
• FIXTURE HOURS
Select FhrS, press ENTER to confirm. The display will show the number of working hours of the unit. Press MENU button back to the last menu or let the unit idle one minute to exit menu mode.
- SOFTWARE VERSION
Select ulr, press ENTER to confirm. The display will show the version of the unit. Press MENU button back to the last menu or let the unit idle one minute to exit menu mode.
- RESET
Select rSlt, press ENTER to confirm. All channels of the unit will return to their standard position.
- DMX 512 – Configuration
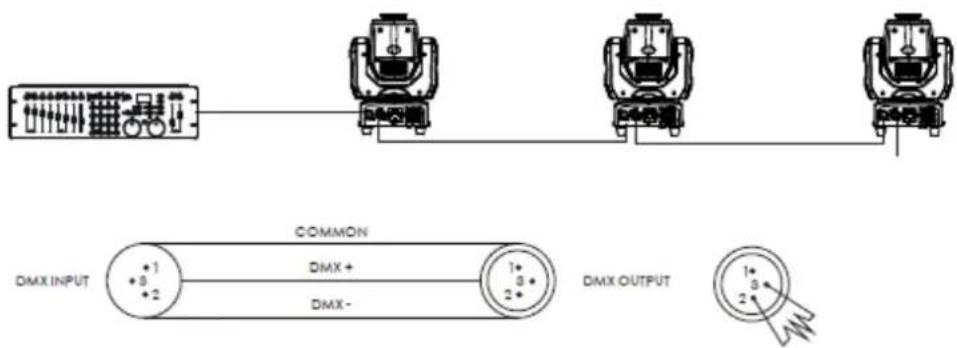
- MODE - 9 CHANNELS
| 1 CH | 2 CH | 3 CH | 4 CH | 5 CH | 6 CH | 7 CH | 8 CH | 9 CH |
| PAN | TILT | PAN/ TILT Speed | Dimmer | Strobe | color | gobo | Sound | Speed |
 |  |  |  |
- MODE - 11 CHANNELS
| 1 CH | 2 CH | 3 CH | 4 CH | 5 CH | 6 CH | 7 CH | 8 CH | 9 CH | 10 CH | 11 CH |
| PAN | PAN Fine | TILT | TILT Fine | PAN/ TILT Speed | Dimmer | Strobe | color | gobo | Sound | Speed |
 |  |  |  |  |  |  |  |  |  |  |
6.TROUBLESHOOTING
Following are a few common problems that may occur during operation. Here are some suggestions for easy troubleshooting:
A. The fixture does not work, no light
a) Check the connexion of power and main fuse.
b) Measure the mains voltage on the main connector.
B. Not responding to DMX controller
a) DMX LED should be on. If not, check DMX connectors, cables to see if link properly.
b) If the DMX LED is on and no response to the channel, check the address settings and DMX polarity.
c) If you have intermittent DMX signal problems, check the pins on connectors or on PCB of the fixture or the previous one.
d) Try to use another DMX controller.
e) Check if the DMX cables run near or run alongside to high voltage cables that may cause damage or interference to DMX interface circuit.
C. Some fixtures don't respond to the easy controller
a) You may have a break in the DMX cabling.
b) Check the LED for the response of the master/slave mode signal.
D. No response to the sound
a) Make sure the fixture does not receive DMX signal.
b) Check microphone to see if it is good by tapping the microphone.
E. One of the channels is not working well
a) The stepper motor might be damaged or the cable connected to the PCB is broken.
b) The motor's drive IC on the PCB might be out of condition.
7. MAINTENANCE AND CLEANING
The cleaning of internal and external optical lenses and/or mirrors must be carried out periodically to optimize light output. Cleaning frequency depends on the environment in which the fixture operates: damp, smoky or particularly dirty surrounding can cause greater accumulation of dirt on the unit's optics.
- Clean with soft cloth and use normal glass to clean fluid.
• Always dry the parts carefully. - Clean the external optics at least every 20 days. Clean the internal optics at least every 30/60 days.
Brand : Karma
Model : BIRDY XS2
Category : Effects machine