
DVX-262D - Portable DVD Player MAJESTIC - Free user manual and instructions
Find the device manual for free DVX-262D MAJESTIC in PDF.


| Product Type | Portable DVD Player |
| Brand | Majestic |
| Model | DVX-262D |
| Dimensions (Approx.) | 7.7 x 5.7 x 1.4 in (19.5 x 14.5 x 3.5 cm) |
| Weight (Approx.) | 1.1 lbs (0.5 kg) |
| Power Supply | AC 100-240V ~ 0.5A, DC 9V 2A |
| Battery | Rechargeable Li-ion, up to 3 hours playback |
| Display | 7-inch TFT LCD, 480x234 pixels |
| Playback Formats | DVD, DVD±R/RW, CD, CD-R/RW, MP3, JPEG, DivX |
| Media Inputs | SD/MMC card slot, USB 2.0 port |
| Outputs | AV output (composite), headphone jack 3.5mm |
| Audio | Built-in stereo speakers, 2 x 1W |
| Remote Control | Infrared remote included |
| Region Code | Region 1 (can be modified, see manual) |
| Maintenance & Cleaning | Clean with soft dry cloth. Do not use liquids or solvents. |
| Safety Instructions | Avoid moisture, direct sunlight, and sharp objects. Do not disassemble. |
| Spare Parts & Repairability | Use only manufacturer-specified parts. Refer to manual for service. |
| Package Contents | DVD player, remote control, AC adapter, car adapter, AV cable, user manual |
Frequently Asked Questions - DVX-262D MAJESTIC
User questions about DVX-262D MAJESTIC
0 question about this device. Answer the ones you know or ask your own.
Ask a new question about this device
Download the instructions for your Portable DVD Player in PDF format for free! Find your manual DVX-262D - MAJESTIC and take your electronic device back in hand. On this page are published all the documents necessary for the use of your device. DVX-262D by MAJESTIC.
USER MANUAL DVX-262D MAJESTIC
natural_image
Technical line drawing of a laptop with a 30-degree angle measurement on the front panel (no text or symbols beyond basic geometry)
flowchart
graph LR
    A["▶2x"] --> B["▶4x"] --> C["▶8x"] --> D["▶16x"] --> E["▶32x"] --> F["▶"]
    G["◀2x"] --> H["◀4x"] --> I["◀8x"] --> J["◀16x"] --> K["◀32x"] --> L["▶"]
flowchart
graph LR
    A["Chapter 1 Bicycle Icon"] --> B["Chapter 2 Flag Icon"]
    B --> C["Chapter 1 Bubble Icon"]
    C --> D["Chapter 2 Airplane Icon"]
    D --> E["Chapter 3 Star Icon"]
DVD Video Disc
flowchart
graph TD
    A["Current Title"] --> B["Title Elapsed"]
    B --> C["Title Remain"]
    C --> D["Chapter Elapsed"]
    D --> E["Chapter Remain"]
    E --> F["Display Off"]
    B --> G["Current Chapter"]
    B --> H["Playing time"]
    B --> I["Total Chapter"]
    B --> J["Total Title"]
    C --> K["TT 01/12 CH 06/10 0:18:50"]
    D --> L["TT 01/12 CH 06/10 0:03:50"]
    E --> M["TT 01/12 CH 06/10 0:10:40"]
    F --> N["Press the INFO during playback to turn on the ON SCREEN DISPLAY\nPress it again to turn it off."]
Nitidezza
(a) Modifica programma
bar
| Metric | Value | | ------------ | ----- | | Frequency (MHz) | 474.0 | | Bandwidth | 8M | | Strength | 62% | | Quality | 100% |(a) Lingua OSD
Imported by: New Majestic SPA via Rossi Martini 41, 26013 Crema (CR) www.newmajestic.com MADE IN CHINA


Table of Contents
Safety Precautions 2
Introduction 2
Location of Controls 3
Remote Control 3
Quick Starting Guide 4
Connecting the Earphone....5
Connecting To Optional Equipment 5
Playing Back a Disc....6
Playback a CD with multimedia files (JPEG/MP3/AVI) 7
Locating a Specific Title, Chapter or Track 7
Playing Repeatedly 7
Playing In Favorite Order 8
Using the On-Screen Display 9
Selecting the Camera Angle 9
Settings menu 12
TV function (DVB-T/T2)....14
First Time Installation 14
Basic Operation....14
(1). Program Manage Settings 14
(2). Picture Setting....17
(3). Channel Search....18
(4). Time Setting....19
(5). Option 20
(6). System Setting....20
(7). USB....21
Trouble Shooting Guide 25
Specifications 26
Safety Precautions

The lightning flash with an arrowhead symbol within an equilateral triangle is intended to alert the user of the presence of uninsulated "dangerous voltage" within the product's enclosure that may be of sufficient magnitude to constitute a risk of electric shock to persons.
Warning: Risk of electric shock, do not open the battery cover, the back battery cover for your safety.

The exclamation point within an equilateral triangle is intended to alert the user of the presence of important operating and maintenance (servicing) instructions in the literature accompanying the appliance.

Operation is subject to the following two conditions:
(1) This device may not cause harmful interference,
(2) This device must accept any interference received.
Including interference that may cause undesired operation.
Warning: Do not expose this appliance to rain or moisture, due to the high risk of fire or electric shock. And do not open the cabinet for dangerous high voltages are present inside the enclosure. Only qualified service personnel should attempt this.
Caution: During playback, the disc spins at high speed, so do not lift or move the player, doing so may damage the disc.
CAUTION: This Digital Video Disc Player employs a Laser System. There are no user serviceable parts therefore refer all servicing to qualified personnel. Visible laser radiation when open and interlocks defeated. Use of controls or adjustments or performance of procedures other than those specified herein may result in hazardous radiation exposure.
DO NOT STARE INTO BEAM.
Introduction
This new portable DVD player is designed for enjoyment of all forms of disc media. And it has USB and SD/MMC port automatic identification, compatible with various formats of AV files. It's slim shape allows it to be easily carried.
This player incorporates the latest digital audio/video (AV) technologies to give you the ultimate in listening and viewing pleasure.
This new player also supports CD, and JPEG. This player also has several unique features, large LCD screen, multi-angle and multi-language, Parental Control (to prevent children from viewing inappropriate content), and Kodak Picture CD compatibility.
Location of Controls
The main screen
Front face
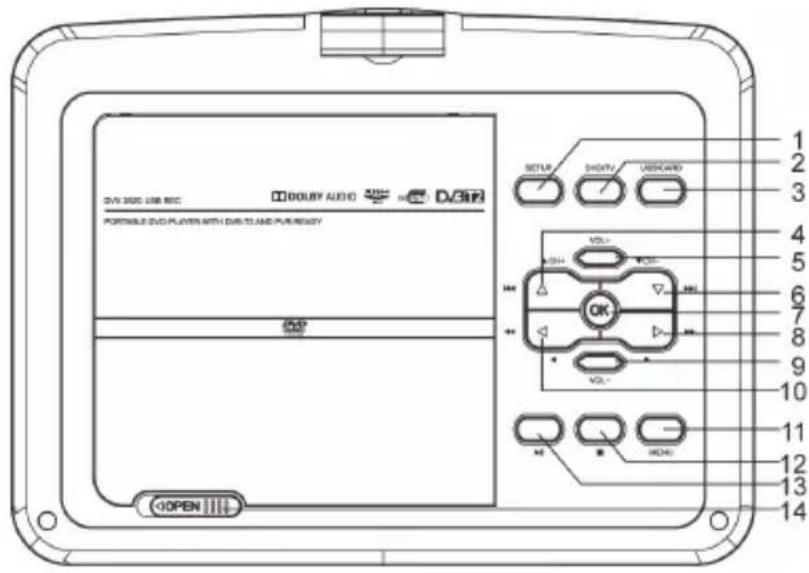
- SETUP
- DVD/TV
- USB/CARD
- UP/CH+/PREVIOUS
- VOL+
- DOWN/CH-/NEXT
- OK
- RIGHT/ FAST FORWARD
- VOL-
- LEFT/ FAST REVERSE
- MENU
- STOP
- PLAY/PAUSE
- OPEN
Right side Left side


- DVD USB 2. SD/MMC socket 3. PHONE socket
- AV OUT 5. OFF/ON 6. DC IN 12V
- TV USB 8. DVB-T2 9. HDMI
Remote Control
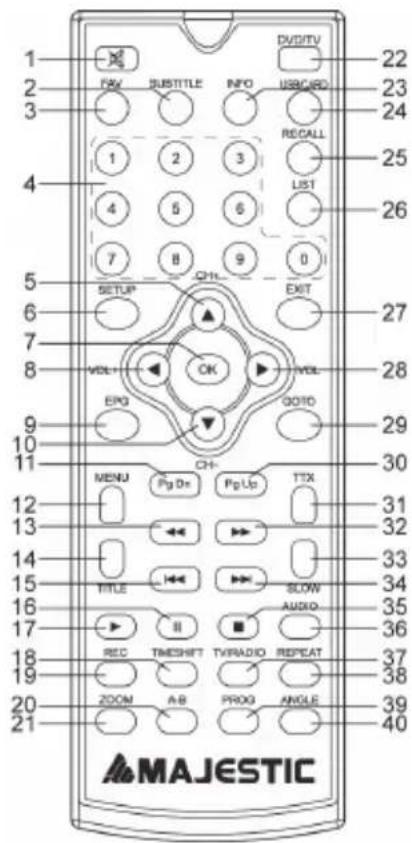
The remote control
- Mute 2. Subtitle 3.
4.Numbers(0-9) 5.Up/Channel+ 6.Setup - OK 8. Left/Volume+ 9. EPG
- Down/Channel- 11. Page Down 12. Menu
- Fast Reverse 14. Title 15. Previous
- Pause 17. Play 18. Timeshift
- REC 20. A-B (Green) 21. Zoom (Red)
- DVD/TV 23. Info 24. USB/CARD
- Recall 26. Recording List 27. Exit
- Right/Volume- 29. Goto 30. Page Up
- TTX 32. Fast forward 33. Slow
- Next 35. Stop 36. Audio
- TV/Radio 38. Repeat
- Program (Yellow) 40. Angle (Blue)
Operating with the remote control
- The remote control must point at the remote sensor, in order for the DVD player to function correctly.
- The remote works best at a distance less than 3 meters and at an angle of up to 60^ toward the front of the unit.
- Obstacles should not remain in between the remote control and the remote sensor on the main unit.

natural_image
Line drawing of a laptop with a 30-degree angle indicator on the front panel (no text or symbols on the device itself)Quick Starting Guide
- Connect the power adapter (supplied with the player) to the side input plug and to a wall outlet. Do not use any other device otherwise specified by your dealer.
- The screen panel of the portable DVD opens to a maximum 180°. And it can rotate 270°.
- Push the OPEN button to open the disc cover.
- Insert a DVD disc with label side facing upward.
Align the center of the DVD disc with the center of the disc guide. Press gently down on the DVD to snap the disc into place, and then close the disc cover. - Slide the power switch on the right side of the unit to power it on.

- Press the OK or PLAY/PAUSE button on the unit to start playback.
The DVD player will immediately start rendering the DVD program.
When you want to stop, press the STOP button, it will return to the power-on logo.
The player can be recharged while playback.

USB drive & SD/MMC card playback
- Insert a USB drive into the USB port. Press USB/CARD on the unit or USB/CARD on the remote to play the readable files in it.
- Insert a SD/MMC Card into the SD/MMC Card port. Press USB/CARD on the unit USB/CARD on the remote to play the readable files in it.
NOTE: If there is not any U drive or memory card being inserted in the player, it will return to DVD mode.
Connecting the Earphone
Connecting earphone
- Connect the earphone. earphone with a 3.5 mm stereo plug can be connected.
- Adjust the volume by pressing the VOL+/VOL- buttons on the remote control.
The right side of the portable


Avoid listening to sound at levels which may be harmful to your ears.
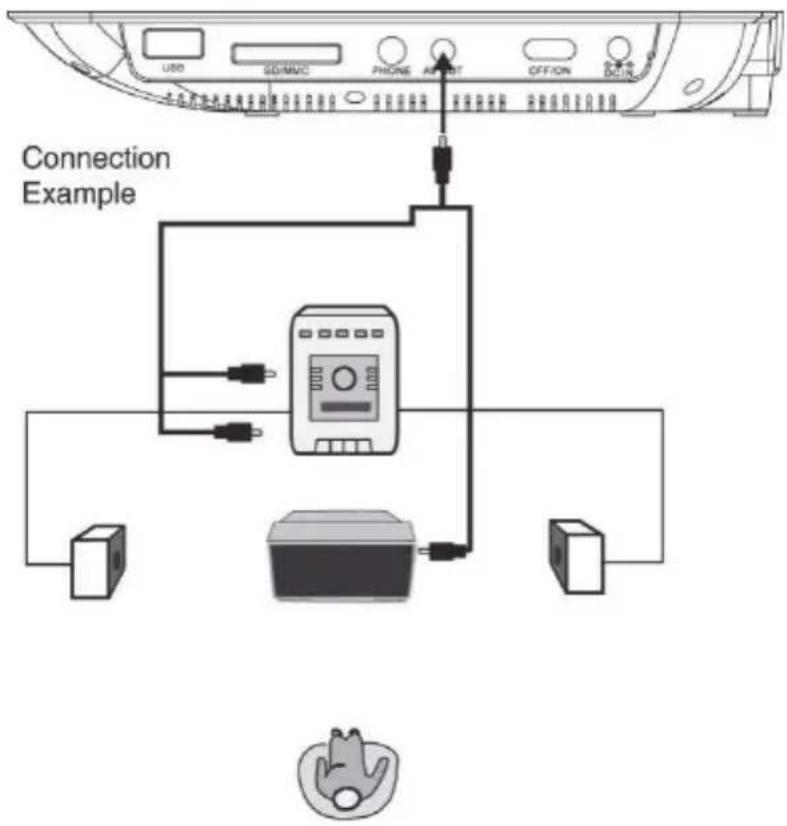
AV output
it is possible to connect an external audio/video system by using the RCA cables supplied with the unit.
Playing Back a Disc
After inserting a DVD disc
- Press TITLE/MENU to access the menu screen.
- Press DIRECTION keys to select the title.
- Press the OK button.
The DVD video player will start playback from the title selected.

Fast forward & rewind
You can playback a disc at 2x, 4x, 8x, 16x or 32x the normal speed for fast forward or rewind.

flowchart
graph LR
    A["2x"] --> B["4x"]
    B --> C["8x"]
    C --> D["16x"]
    D --> E["32x"]
    E --> F["▶"]
    G["2x"] --> H["4x"]
    H --> I["8x"]
    I --> J["16x"]
    J --> K["32x"]
    K --> L["▶"]
Press the REV or FWD button during playback.
The playback speed becomes double the normal speed.
The playback speed changes, each time you press the REV or FWD button.
Note:
The function is invalid on some DVD discs.
Playing in slow-motion
A disc can also be played back in slow motion.
Press the SLOW button during playback.
TV SCREEN

flowchart
graph LR
    A["▶1/2"] --> B["▶1/4"]
    B --> C["▶1/8"]
    C --> D["▶1/16"]
    D --> E["◀1/2"]
    F["→"] --> G["◀1/4"]
    G --> H["◀1/8"]
    H --> I["◀1/16"]
    I --> J["▶"]
The playback speed becomes 1/2, 1/4, 1/8, or 1/16 of the normal speed each time you press the SLOW button.

During REV, FWD and slow-motion playback, the sound is muted.
The function is invalid on some DVD discs.
Playback a CD with multimedia files (JPEG/MP3/AVI)
- When a data CD is loaded, it will start playback automatically.
- Select a folder or a file. Press UP or DOWN to select a folder, and press OK to view folder contents.
- You can use the button REPEAT to select one playback mode Press UP or DOWN to choose the file you want to play, then press REPEAT button.
- Press OK to enjoy the selected files.
- Use the STOP or MENU button to view the contents.
- During pictures playback, press the ZOOM button on the remote control, Zoom 100%→Zoom 125%→Zoom 150%→Zoom 200%→Zoom 75%→Zoom 50%→Zoom 100% (normal size).
Locating a Specific Title, Chapter or Track
DVD discs are normally divided into titles which are sub-divided into chapters. moreover, cds are divided into tracks.
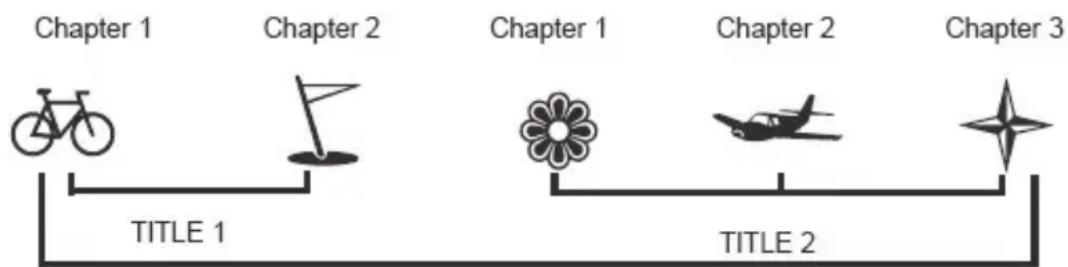
flowchart
graph LR
    A["Chapter 1"] --> B["TITLE 1"]
    B --> C["Chapter 2"]
    C --> D["TITLE 2"]
    D --> E["Chapter 1"]
    E --> F["TITLE 2"]
    F --> G["Chapter 2"]
    G --> H["TITLE 3"]
DVD Video Disc
Locating a title using the title menu
You can locate a specific title using the title menu function, if a DVD video disc contains a title menu.
- Press the TITLE button
On the screen, the title menu will appear. - Press the DIRECTION keys to select the title you want.
You can also directly locate a specific title by pressing its assigned number with the number buttons. - Press the OK button
This will cause the DVD video player to start playback from chapter 1 of the title selected.
You also can use skip buttons to select a title or track desired: Press ◀◀ or ▶▶ button repeatedly till the one displays.
Playing Repeatedly
This DVD video player allows you to playback a specific TITLE, CHAPTER, TRACK, or SEGMENT REPEATEDLY. (TITLE REPEAT, CHAPTER/TRACK REPEAT, A-B REPEAT)
How to repeat a title, chapter, or disc
During normal playback, press the REPEAT button.
The repeat mode changes, each time you press the REPEAT button.
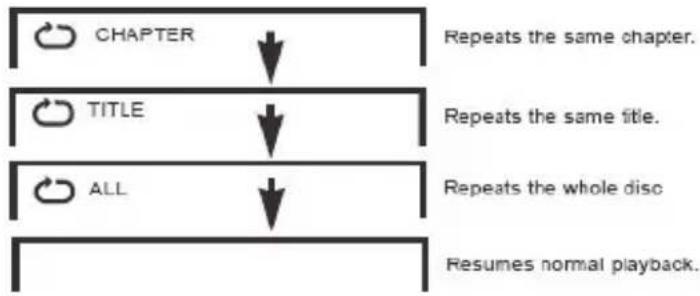
flowchart
graph TD
    A["CHAPTER"] --> B["Repeats the same chapter."]
    C["TITLE"] --> D["Repeats the same title."]
    E["ALL"] --> F["Repeats the whole disc"]
    G["Resumes normal playback."] --> H["End"]
How to repeat a specific segment
- Press the A-B button at the beginning of the segment in which you want to repeat playback (point A).
- Press the A-B button again at the end of the segment (point B)
The DVD video player will automatically return to point A and start to repeat playback of the selected segment (A-B). - Press the A-B button to cancel the A-B repeat function
The DVD video player will resume to normal playback.

flowchart
graph TD
    A["A"] -->|↓| SetPointA["Set point A"]
    B["AB"] -->|↓| SetPointB["Set point B"]
    End[" "] --> ResumesNormalPlayback["Resumes normal playback"]
Playing In Favorite Order
How to set titles, chapters, or tracks in a favorite order
- Press the PROGRAM button.
PROGRAM MENU displays on the screen.

- Using the numbered button, select the items you want in the order you want them programmed in.
The number of the item selected will be input into the PROGRAM volume. - Highlight START and press OK to start program playback.
- To clear the programmed, move the cursor to STOP and then press OK to confirm it.

Using the On-Screen Display
This unit allows you to view the operational status and disc information on your TV screen.
Checking the operational status
With this function you can view on your TV the following: Current title -Track number -Total playing time.

flowchart
graph TD
    A["Current Title"] --> B["Title Elapsed"]
    B --> C["Title Remain"]
    C --> D["Chapter Elapsed"]
    D --> E["Chapter Remain"]
    E --> F["Display Off"]

    B --> G["Current Chapter"]
    B --> H["Playing time"]
    B --> I["Total Chapter"]
    B --> J["Total Title"]

    C --> K["TT 01/12 CH 06/10 0:18:50"]
    D --> L["TT 01/12 CH 06/10 0:03:50"]
    E --> M["TT 01/12 CH 06/10 0:10:40"]

    F --> N["Press the INFO during playback to turn on the ON SCREEN DISPLAY\nPress it again to turn it off."]
Selecting the Camera Angle
This DVD video player allows you to select from several different angles.

Selecting the camera angle
How to change the camera angle
If the DVD video disc was recorded with multiple angles, you have the option to change the camera angle of the scene you are watching.
When you play back a scene recorded with multiple angles, press ANGLE button, then select the number button.
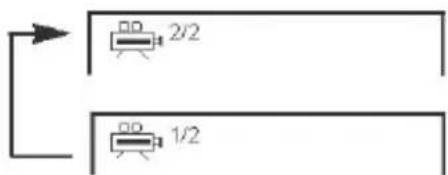

The angle function will not work on DVD video discs that does not contain recorded with multiple angles.
Settings menu
This unit allows you to customize the performance to your personal preference.
- Press SETUP.
- Press DIRECTION keys to select category (highlight), then press OK.
- Press SETUP to quit the menu.
General Setup
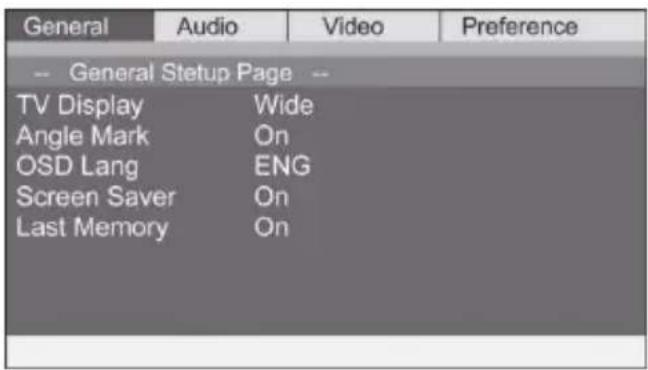
TV display: Choose a setting between
• 4:3/PS (pan and scan) • 4:3/LB (letter box)
- Wide (widescreen).
Angle Mark: select display angle, when playing multi-angle DVD disc.
OSD language: choose the desired OSD language.
Screen saver: in ON mode a screen saver is activated, after some time
Last memory: This function memorizes the end of the last playback and will resume from that point if the function is enabled.
Audio Setup

Press DIRECTION keys to choice according to confirm the menu.
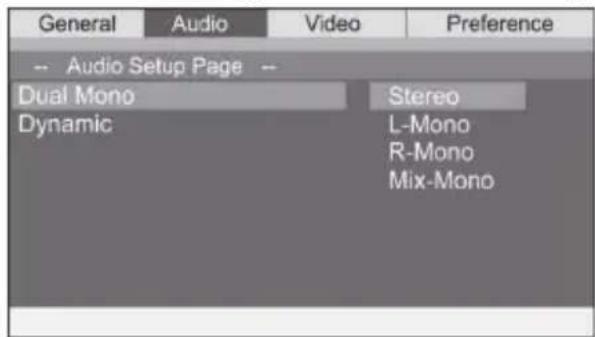
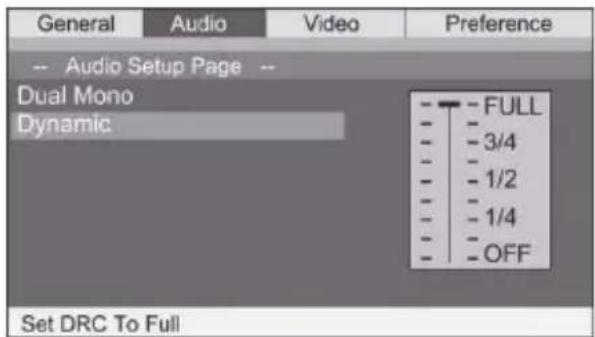
DUAL MONO:
• STEREO: The audio frequency on the Left & Right channels will be output respectively from the Left & Right speakers.
- LEFT-MONO: The audio frequency on the Left & Right channels will be output only from the Left speaker.
- RIGHT-MONO: The audio frequency on the Left & Right channels will be output only from the Right speaker.
- MIX-MONO: The audio frequency on the Left & Right channels will be merged together and output from both Left & Right speakers.
Dynamic
When watching a disc with high dynamic audio at low volumes you can increase the dynamic range to reduce the loss of sound details.
Video Setup
| General | Audio | Video | Preference |
| - Video Stetup Page | |||
| Sharpness | Mid | ||
| Brightness | 00 | ||
| Contrast | 00 | ||
Sharpness
Set the video sharpness level. Select from:-
- Low
- Medium
- High
Brightness
Set the video brightness level. Use the 🔊 buttons to increase or decrease from -20 to +20. Press the OK button to complete the setting.
Contrast
Set the video contrast level. Use the 🔔 buttons to increase or decrease from -16 to +16. Press the OK button to complete the setting.
Preference
| General | Audio | Video | Preference |
| -- Preference Page -- | |||
| TV Type | PAL | ||
| Audio | ENG | ||
| Subtitle | ENG | ||
| Disc Menu | ENG | ||
| Parental | |||
| Password | |||
| Default | |||
DVD type
Set this option to whatever type of disc you are watching. NTSC, PAL or MULTI (to set automatically).
Audio
Choose the default audio setting. This means the Portable DVD Player will automatically select this language as the audio track (if available).
Subtitle
Select the default subtitle language.
Disc menu
This option sets the default DVD menu language. Once set if the DVD you are watching contains a menu with your specified language that is used by default.
Parental lock
DVD video discs equipped with the parental lock function are rated according to their content. The contents allowed by a parental lock level and the way a DVD video disc can be controlled may vary from disc to disc. For example, if the disc allowed, you could edit out violent scenes unsuitable for children and replace them with more suitable scenes, or lock out playback of the disc all together.
- Press SETUP, the SETUP MENU appears on the screen.
- Select Preference Page, press DIRECTION keys
-
Select Parental, press OK.
-
Select ratings, press OK.

- Enter your password then press OK. The pre-set password is 123456.
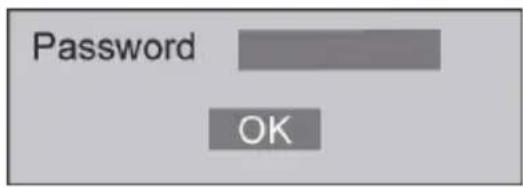
- Press SETUP to exit setup.
Password
- Select Password/Change and confirm with OK button.
- Enter old password. (pre-set password is 123456)
- Enter new password.

- Re-enter to confirm your new password.
- Press OK.
- Press SETUP to exit.
Note: in case you forget your password, it is possible to repair it by using the master password for unlocking which is "136900".
Default
Activating this option resets every setting to the factory default.
TV function (DVB-T/T2) First Time Installation
Please set the power switch to ON to turn on the unit.
Connect the TV antenna to the supplied adaptor.
In case you want to use the device outdoor, you have to connect external antenna supplied in the package. (NOTE: portable antenna available in the accessories should be used only outdoor, in areas without obstacles which can interfere in the reception. External antenna cannot be compared to home antenna, it's normal that it can receive less channels.)
If you are using the DVB-T2 system for the first time or have restored the unit to factory default, the installation guide menu will appear on your screen.
Press 'OK' to start to do channel searching.
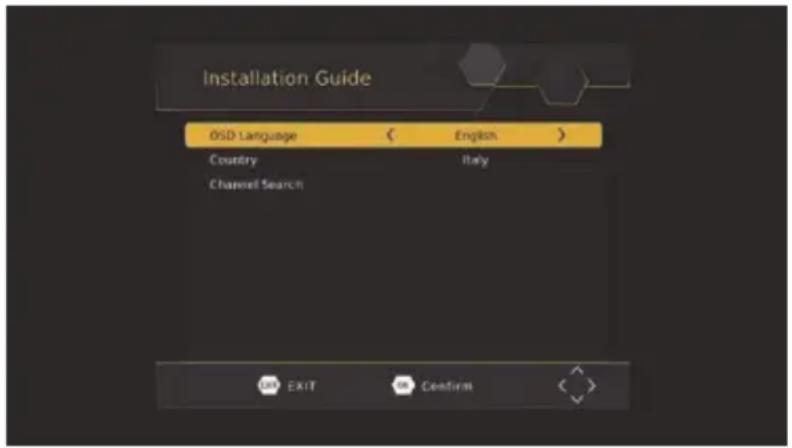
(1) [OSD Language] press RIGHT/LEFT key to select a language.
(2) [Country] press RIGHT/ LEFT key to select your country of residence.
(3) Once channel tuning is complete, you can start watching TV programs.
Basic Operation
(1). Program Manage Settings
To access the Menu, press the SETUP button and select [Program], using the RIGHT/LEFT keys to navigate through the menu.
The Menu provides option to adjust the Program Manage Settings. Select an option and press OK or RIGHT to adjust that setting. Press the EXIT button to exit the Menu.

(a) Program Edit
To edit your program preferences (lock, skip, favorite, move or delete), you will need to enter the Program Edit Menu. This Menu requires a password to access. Enter the default password '000000'. The master unlock password is '888888'.

Set Favorite Channels
You can create a shortlist of favorite programs that you can easily access.
Set Favorite TV or Radio program:
- Select your desired channel then press the FAVOURITE button.
Choose a category to assign the channel and confirm with OK button. - Repeat the previous step to select more Favorite channels.
- To confirm and exit the Menu, press the EXIT key.
Disable Favorite TV or Radio Channel:
Select the Favorite channel and select "disable" to cancel.
View Favorite Channel
- While in normal viewing mode, press favorite button and the favorite Menu will appear.
- Press UP/DOWN to browse through your Favorite Channels.
- Press OK to select your favorite channel.
Delete a TV or Radio Program
- Select the Program and then press the BLUE button. A warning message will appear. Press OK to delete the channel.
- Repeat the previous step to select more to channels delete.
Skip TV or Radio Channel
- Select the channel you would like to skip and press the GREEN button. A skip symbol is displayed. The channel is marked as a skip.
- Repeat the previous step to skip more channels.
- To save your settings and exit the menu, press EXIT key.
Disable the Skip Channel function:
Select the Skip channel and press the GREEN button on the remote control to cancel.
Move a TV or Radio Program
- Select the preferred channel then press the RED button. A move symbol will appear.
- Press UP/DOWN to move the channel.
- Press OK to confirm.
- Repeat the above steps to move more channels.
Lock Program
You can lock selected programs for restricted viewing.
Lock a TV or Radio channel:
- Select the preferred channel then press the YELLOW button. A lock-shaped symbol is displayed. The channel is now marked as locked.
- Repeat the previous step to select more channels.
- To confirm your settings and exit the menu, press the EXIT button.
- Press the YELLOW button to disable the locked
- To view the locked channel, you will be required to enter either the default password '000000' or your last set password. The master unlock password is '888888'.
(b) EPG (Electronic program guide)
This feature shows the TV program listings for each channel for the following 7 days. By default, when the EPG is opened, the current channel's listings are shown. To view listings for other channels, press the LEFT and RIGHT arrow keys. The display shows the buttons to press to go forward or backward in the programs listing.

Note: Please see section (d) "Scheduling" to learn how to schedule program recordings and channel preview.
Timer display
To set the receiver to change to a channel at a specific time (e.g. at the start of your favorite program) while you are watching another channel, please follow these steps:
- Press EPG to open the full listings.
- Select the TV channel using the LEFT / RIGHT arrow keys.
- Select the TV program you want to watch later.
- Press OK. On the window that pops up, you are able to modify the channel, date and time,
as well as optionally selecting to repeat this action on a regular basis.
- Select "View" in the "Mode" option.
- Press EXIT
A few seconds before changing channels, a warning message with a count-down is displayed screen, which will change to the programmed channel when the count-down ends.
(c) Sort
Sort your channels from the following options:
[By LCN] - Sort the channels in ascending order.
[By Service Name] - Sort the channels in alphabetical order.
[By Service ID] - Sort the channels according to the station.
[By ONID] - Sort the channels according to ONID.
Set LCN on or off (suggested as ON).
(2). Picture Setting
To access the Menu, press SETUP then select [Picture] using the RIGHT/LEFT key. The Menu provides options to adjust the video settings. Press UP/DOWN to select an option and press RIGHT/LEFT to adjust that setting. Press EXIT to exit the menu.
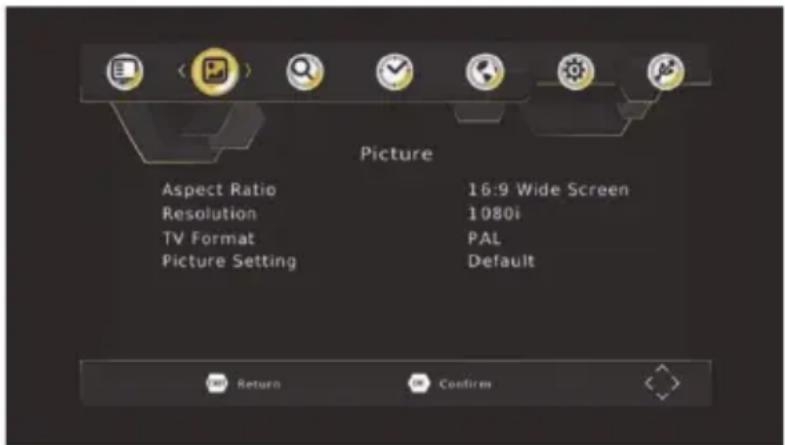
(a) Aspect Ratio
Change the aspect ratio of Video.[Auto], [16:9 PillarBox], [16:9 Pan&Scan], [4:3 LetterBox], [4:3 Pan&Scan], [4:3 Full], [16:9 WideScreen]
(b) HDMI Resolution
Set the correct video resolution supported by the TV.
[480P]: for NTSC TV system.
[480i]: for NTSC TV system
[576P]: for PAL TV system.
[576i]: for PAL TV system.
[720P]: for NTSC or PAL TV system.
[1080i]: for NTSC or PAL TV system.
[1080P(50HZ)]: for NTSC or PAL TV system.
[1080P(60HZ)]: for NTSC system.
(c) TV Format
If the picture does not appear to be correct you can change this setting.
This should match the most common setting for TVs in your country.
[NTSC]: for NTSC system TV.
[PAL]: for PAL system TV.
(d) Picture Setting
Set the picture is Default or Users. Select "Users" and press OK to modify the value of saturation, contrast, brightness, hue, sharpness.
(3). Channel Search
To access the menu, press SETUP select [Search Channel] using the RIGHT/LEFT keys.
This Menu provides options to adjust the Search Channel settings.
Press UP/DOWN to select an option and press RIGHT/LEFT to adjust the setting.
Press EXIT to exit the Menu.
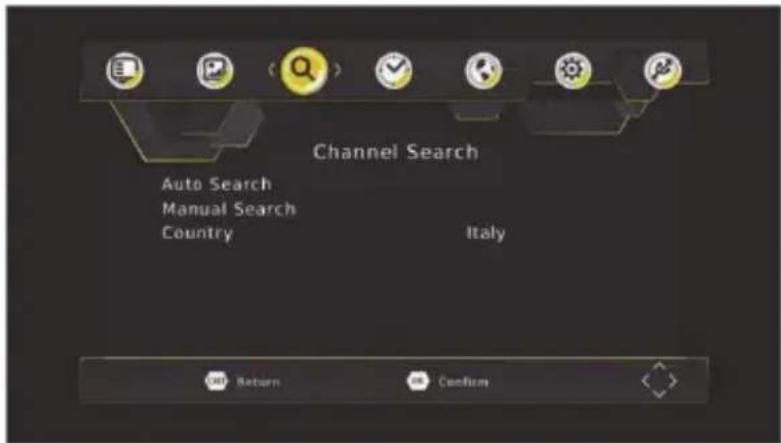
(a) Auto Search
This option will automatically search for channels and save them once the scanning is complete. All previously saved channels and settings will be deleted.
-
Select [Auto Search] and press OK or RIGHT to start channel search.
-
To cancel channel search, press EXIT. Any channels that have been found will be saved.
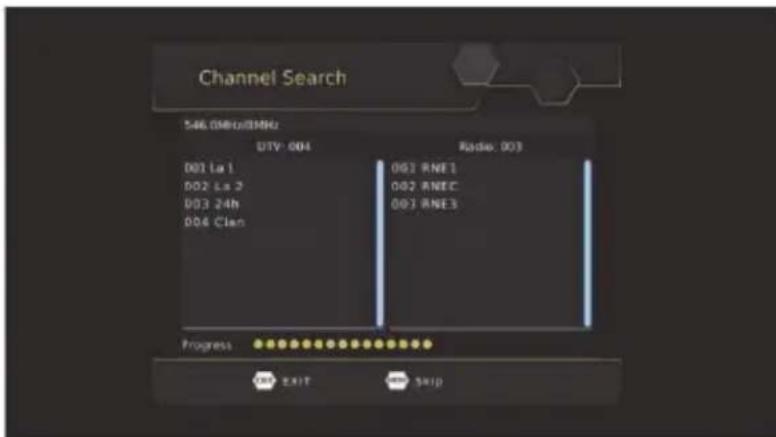
(b) Manual Search
This option allows you to scan for new channels without deleting previously saved channels and settings.
- Select [Manual Search] then press OK or RIGHT.

bar
Manual Search | Category | Value | |---|---| | Frequency channel | 21 | | Frequency(MHz) | 474.0 | | Bandwidth: | 8M | | Strength | 62% | | Quality | 100% | EXIT EXIT OK Confirm < >-
Press the RIGHT/LEFT key to select the channel frequency.
-
Press OK to start searching channels.
If a channel is found, it is saved and added to the channels list. If channels can not be found during searching, the unit will exit automatically.
(c) Country
Select your country of residence.
(4).Time Setting
To access the Menu, press SETUP then select [Program] using the
RIGHT/LEFT keys. The Menu provides options to adjust the time settings.
Press UP/DOWN to select an option and press RIGHT/LEFT to adjust the settings. Press EXIT to exit the menu.
(a) Time offset
Select auto or manual for GMT offset adjustments.
(b) Country Region
Select the Country Region when [Time Offset] is set to Auto.
(c) Time Zone
Select the Time Zone Offset when [Time Offset] is set to Manual.
(5). Option
To access the Menu, press SETUP and select [Option] using the RIGHT/LEFT keys. The menu provides options to adjust the OSD Language, Subtitle Language and Audio Language.
Select an option and press RIGHT/LEFT to adjust the setting. Press EXIT to exit the Menu

(a) OSD (On Screen Display) Language
Select an OSD language.
(b) Subtitle Language
Select the preferred subtitle language (if available - depends on broadcasting)
(c) Audio Language
Select the preferred audio language for watching TV channels.
If the language is not available, the default program language will be used.
(d) Digital Audio
Select the type of digital audio between [PCM], [RAW HDMI ON], [RAW HDMI OFF], [OFF]
(e) Audio Description
Set audio description volume (if available-depends on broadcasting)
(6). System Setting
To access the Menu, press SETUP and select [System] using the RIGHT/LEFT keys. The menu provides options to adjust the system settings.
Press the UP/DOWN key to select an option and press RIGHT/LEFT to adjust the setting. Press EXIT to exit the Menu.

(a) Parental control
When DVB-T box is used by children it is possible to block certain programs, which are for adults.
NOTE: this function must be supported by the channel.
(b) Set Password
Set or change the password for locked programs. Enter your old password or the default password '000000'. You will then be asked to enter your new password. Press OK button to confirm your new password.
Once it is confirmed, press EXIT to exit the Menu. The master unlock password is '888888'.
(c) Restore Factory Default
Reset your Set Top Box to the Default Factory Settings.
In Main Menu select [Restore Factory Default] using the RIGHT/LEFT keys and press OK or RIGHT to select. Enter your password or the default password '000000' and press OK to confirm. This option will delete all preset channels and settings. The master unlock password is '888888'.
(d) Information
View model, hardware and software information.
(e) software update
Whenever in future there will be available updates on our web site, use this function to proceed with upgrade.
(7). USB
To access the Menu, press the SETUP button and select [USB] using the RIGHT/LEFT keys. The menu provides options to playback Music, Photo and Multimedia files. It can support AVI, MP3, WMA, JPEG and BMP formats.
The unit will support USB device with FAT32/NTFS file system.
To access the Menu, press the MENU button and select [USB] using the RIGHT/LEFT keys. The menu provides options to playback Multimedia files. Here is the list of supported formats: Video Codec: MPEG-2/4 (H.264) / VC-1 / AVS / AVS+ / VP8 / HEVC (H.265)
Audio Codec: MPEG-1 / MPEG-2 layer/II / MP3 / WMA / WMA / Dolby Digital/Dolby Digital Plus /IEC958 SPDIF
Container: TS / MPG / MP4 / AVI / MKV / FLV / DIVX
Resolution:1080p / 1080i / 720p / 576p / 576i / 480p / 480i
Frame: MPEG-2/4 1080p@30fps (H.264) / 1080p@60fps / VC-1 2048*1024p@30fps / AVS
/AVS+ 1080p@60fps / VP8 1080p@30fps / HEVC 1080p@60fps
The unit will only support USB device with FAT32 I NTFS file system.
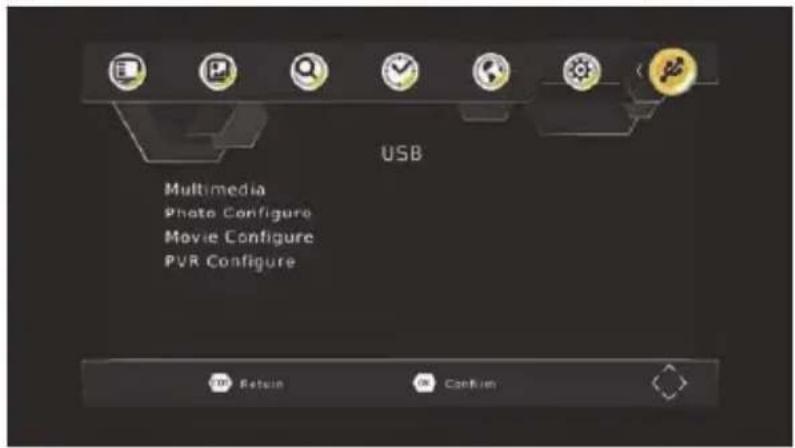
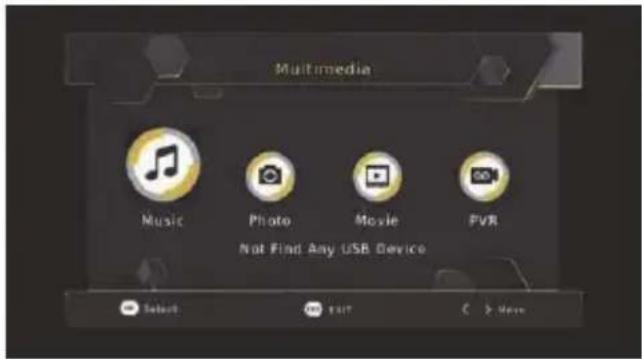
(a) Multimedia:
When a USB device is attached you can select from the Music, Photo, Movie, or REC options in this menu (DVB-T/T2 recording) using the RIGHT/LEFT keys and OK to select. If a USB device is not connected, the warning message "No USB device is Found" will appear.
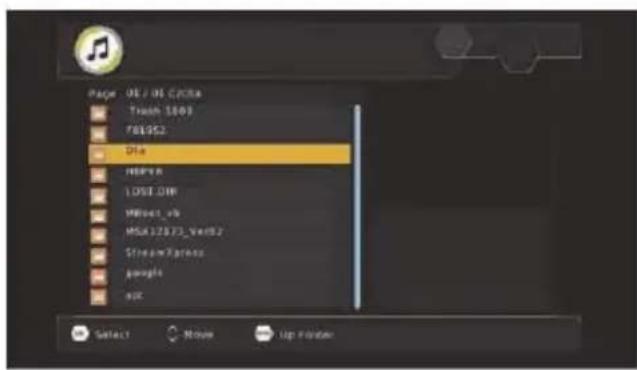

(b) Photo configure:
-Slide Time: adjust slide show interval to 1\~8 seconds.
-Slide Mode: adjust slide show effect as mode 0\~59 or random.
-Aspect Ratio:
[Keep]: Play picture in its original aspect.
[Discard]: Play picture in full screen mode.
(c) Movie Configure:
- Subtitle Specific:
[Small]: Displays the subtitle as small mode.
[Normal]: Displays the subtitle as normal mode.
[Big]: Displays the subtitle as big mode.
- Subtitle BG:
[White]: Displays the subtitle in white background.
[Transparent]: Displays the subtitle in transparent background.
[Grey]: Displays the subtitle in grey background.
[Yellowgreen]: Displays the subtitle in yellowgreen background.
- Subtitle Font Color:
[Red]: Displays Subtitle in red font.
[Blue]: Displays Subtitle in blue font.
[Green]: Displays Subtitle in green font.
[White]: Displays subtitle in white font
[Black]: Displays subtitle in black font
(d). USB Recording
This function is available only when a USB storage device is connected to the receiver.
Instant recording:
If you want to start recording alive show, which is currently being broadcast, go to the desired channel and press the REC button. Press again to stop recording. Schedule a Recording:
To schedule a recording before broadcast (e.g. record your favorite show while you're out), follow these steps:
- Press EPG to open the full listings.
- Select the TV channel using the LEFT/RIGHT arrow keys.
- Select the TV show you want to record.
- Press OK. On the window that pops up, you are able to modify the channel, date, recording start -time and recording end-time, as well as optionally selecting to repeat this action on a regular basis.

- Select "OTHER RECORDING" in the "Mode" option.
- Press EXIT.
A few seconds before starting to record, a warning message with a count-down is displayed on screen, which will change to the programmed channel when the count-down ends. Once the recording has finished, a confirmation message appears on screen.
To view the scheduled events, press the blue button.
To delete a scheduled event, select the event and press the blue button.
When recording is finished, both manual or program, it is possible to play it by pressing LIST button of remote control or browsing USB device contents by using REC menu (Menu/USB/Multimedia/REC). The recording files can be deleted on this unit, you can go to the PVR, and press yellow button to delete it. It is also possible to rename the recording by using green button on remote.
Note: contents management is possible only if window preview playback is not started (OK button on remote).
TV program is recorded in PVR format (.mts), which can be played from this product, or from a computer with the appropriate software (for ex, VLC), but it cannot be played by a normal DVD player. For recording the high definition TV programs, the version of usb device should be 2.0HIGH SPEED or above, otherwise the unit may can not record the hd programs correctly.
Note:
Scheduled recording only works when the unit power is on, it can not work when the unit is standby.
Note:
- We cannot guarantee compatibility (operation and/or bus power) with all USB mass storage devices and assume no responsibility for any loss of data that may occur when connected to this unit.
- With large amounts of data, it may take longer for the system to read the contents of a USB device.
- Some USB devices may not be properly recognized.
- Even when they are in a supported format, some files may not play or display depending on the content,
(e) Timeshift
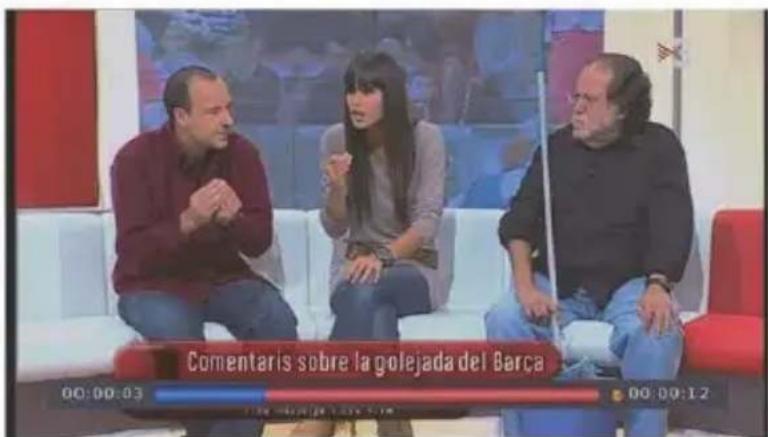
When you are playing the program, you can insert the USB, and at any time you can press the [Time shift] button, the frame will be paused, and you may press the [PLAY] button after a second, it will start to timeshift now. Press [Info] key to see time shift information as below:
| INFO | |
| PVR Mode | RECORD |
| Total Disk Space | 3.60 GB |
| Disk Free Space | 1.68 GB |
| File System | FAT32 |
| Cluster Size | 4 KB |
| File Name | timeshift.ts |
| Max Record Size | 1.73 GB |
| Max Record Time | 00:53:56 |
| Record Bitrate | 559 KB/S |
| Cur Play Size | 0 KB |
| Cur Record Size | 43.72 MB |
- You can press [fast forward]/[fast back] to move in the current recording.
Press [Stop] button to end the timeshift, and it will back to the normal playing of the program
Trouble Shooting Guide
| Symptom | Correction |
| No power | Check if the AC adapter of power plug is connected securely.If powered with the battery, check if it is exhausted. |
| No picture/sound | Make sure the connection is in good condition; volume is not too low; audio receiver or TV work normally; audio setting is proper. |
| The player does not start playback | The DVD+-RW you played should be finalized, and not be an empty disc.Place the disc with the graphics side up and make sure it's inside the guide.Make sure the disc is free from scratches & fingerprints.Insert a playable disc. (Check the disc type and color system).Do not playback a disc which region code is different from that of your player.Clean the disc.Cancel the parental lock function or change the parental lock level. (The Pre-set password is 123456.)Reset the player. |


Specifications
DVD/USB/SD/MMC
Playback Disc: DVD / DVD+RW/DVD+R/DVD-RW/DVD-R/CD / CD-R / CD-RW Video Codec: MPEG-1(VCD)/MPEG-2(SVCD/DVD)/MPEG-4 version 3.11 /4 /5 / XVID Audio Codec: MP3/WMA/WAV/Digital /Dolby Container: MPG / AVI Resolution: up to 576@30fps
DVB-T /DVB-T2
Video codec: MPEG4 AVC / H.264 HP@L4 / MPEG2 MP@ML.HL / H.265 (HEVC) Audio codec: MPEG-1/MPEG-2/layer I/II/AAC-LC/ HE-AAC/Dolby Digital / Dolby Digital Plus Bind width: 7/8MHz Frequency: VHF: 177.5 - 226.5MHz / UHF: 474 - 858 MHz USB Port: USB 2.0 HIGH SPEED (5V)
Display: LCD TFT 9" AC/DC adaptor: AC 100 - 240V-50/60Hz 0.5A / DC 12.0V-1.5A Max Consumption: Max 14W Lithium battery : 7.4V/1800mA AV input/output: CVBS Earphones output: STEREO (3.5mm jack) HDMI digital output (DVB-T/T2 only up to 1080p) Dimensions: 250(L) x 186 (D) x 42(H) mm Unit Weight: 880g
Accessories:
Power adaptor x 1, Remote control x1, AAA battery x 2 Car Charger x1, Antenna x 1, Antenna adaptor x 1 RCA cable x1, Earphone x 1
Manufactured under license from Dolby Laboratories. Dolby, Dolby Audio and the double-D symbol are trademarks of Dolby Laboratories.

ENERG
енергия · everуела


MAJESTIC
DVX 262D USB REC

bar
| Level | Value | |---|---| | A++ | 1 | | A+ | 2 | | A | 3 | | B | 4 | | C | 5 | | D | 6 | | E | 7 |A ^++
ENERGIA · ЕНЕРГИЯ
ENEPTEIA · ENERGIJA
ENERGY·ENERGIE
ENERGI


5
Watt
7
kWh/annum
22.7
cm

9
inch
2010/1062 - 2017
- Nitidezza
- Modifica programma
- Lingua OSD
- Table of Contents
- Safety Precautions
- Introduction
- Location of Controls
- The main screen
- Remote Control
- The remote control
- Operating with the remote control
- Quick Starting Guide
- USB drive & SD/MMC card playback
- Connecting the Earphone
- Connecting earphone
- AV output
- Playing Back a Disc
- After inserting a DVD disc
- Fast forward & rewind
- Playing in slow-motion
- Playback a CD with multimedia files (JPEG/MP3/AVI)
- Locating a Specific Title, Chapter or Track
- Locating a title using the title menu
- Playing Repeatedly
- How to repeat a title, chapter, or disc
- How to repeat a specific segment
- Playing In Favorite Order
- How to set titles, chapters, or tracks in a favorite order
- Using the On-Screen Display
- Checking the operational status
- Selecting the Camera Angle
- How to change the camera angle
- Settings menu
- General Setup
- Audio Setup
- DUAL MONO:
- Dynamic
- Video Setup
- Sharpness
- Brightness
- Contrast
- Preference
- DVD type
- Audio
- Subtitle
- Disc menu
- Parental lock
- Password
- Default
- TV function (DVB-T/T2) First Time Installation
- Basic Operation
- (1). Program Manage Settings
- Program Edit
- Set Favorite Channels
- Disable Favorite TV or Radio Channel:
- View Favorite Channel
- Delete a TV or Radio Program
- Skip TV or Radio Channel
- Disable the Skip Channel function:
- Move a TV or Radio Program
- Lock Program
- Lock a TV or Radio channel:
- EPG (Electronic program guide)
- Timer display
- Sort
- (2). Picture Setting
- Aspect Ratio
- HDMI Resolution
- TV Format
- Picture Setting
- (3). Channel Search
- Auto Search
- Manual Search
- Country
- (4).Time Setting
- Time offset
- Country Region
- Time Zone
- (5). Option
- OSD (On Screen Display) Language
- Subtitle Language
- Audio Language
- Digital Audio
- Audio Description
- (6). System Setting
- Parental control
- Set Password
- Restore Factory Default
- Information
- software update
- (7). USB
- Multimedia:
- Photo configure:
- -Aspect Ratio:
- Movie Configure:
- - Subtitle Specific:
- - Subtitle BG:
- - Subtitle Font Color:
- (d). USB Recording
- Note:
- Timeshift
- Specifications
- DVD/USB/SD/MMC
- DVB-T /DVB-T2
- Accessories:
Brand : MAJESTIC
Model : DVX-262D
Category : Portable DVD Player