
RS-137 - Alarm Clock MAJESTIC - Free user manual and instructions
Find the device manual for free RS-137 MAJESTIC in PDF.


| Brand | Majestic |
| Model | RS-137 |
| Category | Alarm clock radio |
| Power Source | AC 230V ~ 50Hz, 5W |
| Battery Backup | 1 x 3V CR2032 lithium battery (not included) |
| Frequency Range | FM 87.5 – 108 MHz |
| Projection Distance | ≤ approx. 90 to 270 cm |
| Alarm | Dual alarm with buzzer or radio modes |
| Snooze Duration | Approximately 9 minutes |
| Sleep Timer | 10 to 90 minutes (adjustable in 10-minute increments) |
| Display Dimmer Levels | High, medium, low |
| Radio Presets | 10 stations |
| Projection Features | Time projection on ceiling/wall with 180° flip and focus adjustment |
| Antenna | External FM wire antenna |
| Reset Method | Disconnect AC and remove battery, wait 3 minutes |
| Cleaning Instructions | Mild non-abrasive detergent solution and soft cloth |
| Safety Warnings | No naked flames, ensure proper ventilation, do not expose to liquids |
| Certifications | CE compliant (Low Voltage, EMC, ErP, RoHS) |
| Manufacturer | New Majestic S.p.A., Via Rossi Martini,41 – 26013 Crema (CR) Italy |
Frequently Asked Questions - RS-137 MAJESTIC
User questions about RS-137 MAJESTIC
0 question about this device. Answer the ones you know or ask your own.
Ask a new question about this device
Download the instructions for your Alarm Clock in PDF format for free! Find your manual RS-137 - MAJESTIC and take your electronic device back in hand. On this page are published all the documents necessary for the use of your device. RS-137 by MAJESTIC.
USER MANUAL RS-137 MAJESTIC
- This product operates on AC230V\~ 50Hz power supply. Plug the AC power cord into a household outlet AC source.
- Clock display will flash 0:00 until set to correct time.
INSTALLING/REPLACING THE BACK-UP BATTERY
This unit is equipped with a battery back-up system, requiring one DC3V CR2032 lithium battery (not included) to maintain the time settings and radio presets during AC power outage.
- Unscrew and remove the BATTERY COMPARTMENT COVER.
- Install one fresh CR2032 lithium battery into the battery compartment following the polarity diagram on the BATTERY COMPARTMENT COVER. Use only the specified size and type of battery.
- Replace the BATTERY COMPARTMENT COVER and tighten its screw.
Note: The unit will operate without a battery installed but your time & alarm setting and radio presets will be lost and will have to be reset in the event of power interruption or failure.
IMPORTANT:
Be sure that the battery is installed correctly. Wrong polarity may damage the unit and void the warranty. For best performance and longer operating time, we recommend the use of good quality battery.
BATTERY CARE:
- Use only the size and type of battery specified.
- If the unit is not to be used for an extended period of time, remove the battery. Old or leaking battery can cause damage to the unit and may void the warranty.
- Do not try to recharge battery not intended to be recharged; they can overheat and rupture (Follow battery manufacturer's directions).
- Do not dispose of battery in fire, battery may leak or explode.
WARNING
DO NOT INGEST BATTERY, CHEMICAL BURN HAZARD
This product contains a coin/button cell battery. If the coin/button cell battery is swallowed, it can cause severe internal burns in just 2 hours and can lead to death.
Keep new and used batteries away from children. If the battery compartment does not close securely, stop using the product and keep it away from children.
POWER ON/STANDBY
- In standby mode, tap the POWER ON-OFF button once to turn on the unit.
- Press the POWER ON-OFF button once to return the unit to standby mode.
TIME MANUAL SETTING
- Press and hold the CLK.ADJ button, the time will start to flash.
- Press the << TUNE DOWN / HOUR button to increase the HOUR.
- Press the >> TUNE UP / MIN button to increase the MINUTES.
- Once time is set correctly, press the CLK.ADJ button.
NOTE:
- Press the >> TUNE UP / MIN or << TUNE DOWN / HOUR button once to increase one number at a time.
- Press and hold the >> TUNE UP / MIN or << TUNE DOWN / HOUR button to quickly increase the numbers.
ALARM SETTING
You can preset and store two separate alarm settings. It allows you to set an alarm for yourself and a second as a backup, or use the second independently timed alarm for a partner.
SETTING ALARM 1
- Please ensure the radio is OFF.
- Press and hold the VOLUME DOWN / ALARM 1 ON-OFF SET button to set ALARM. The alarm time will flash on the display.
-
Press the << TUNE DOWN / HOUR button to increase the HOUR.
-
Press the >> TUNE UP / MIN button to increase the MINUTES.
- Press VOLUME DOWN/ALARM 1 ON-OFF SET button to save the set up.
-
To toggle between Buzzer and Radio alarm mode, press the VOLUME DOWN / ALARM 1 ON-OFF SET button until the desired option is highlighted on the LED display.
-
Radio Alarm 1
- Buzzer Alarm 1
ALARM 1 BUZZER INDICATION ALARM 1 RADIO INDICATION
7:15
- Once alarm is set, press the ON-OFF/ALARM OFF button once to stop the alarm.
SETTING ALARM 2
- Please ensure the radio is OFF.
-
Press and hold the VOLUME UP / ALARM 2 ON-OFF SET button to set ALARM 2. The alarm time will flash on the display.
-
Press the << TUNE DOWN / HOUR button to increase the HOUR.
-
Press the >> TUNE UP / MIN button to increase the MINUTES.
-
Press VOLUME DOWN/ALARM 1 ON-OFF SET button to save the set up.
-
To toggle between Buzzer and Radio alarm mode, press the VOLUME UP / ALARM 2 ON-OFF SET button until the desired option is highlighted on the LED display.
- Radio Alarm 2
- Buzzer Alarm 2
8:15
ALARM 2 BUZZER INDICATION ALARM 2 RADIO INDICATION
- Once alarm is set, press the ON-OFF/ALARM OFF button once to stop the alarm.
SNOOZE FUNCTION
-
When the alarm (buzzer or radio) is triggered, press the SNOOZE/SLEEP/DIMMER button. The alarm will turn off for approximately 9 minutes.
-
To cancel the SNOOZE function, press the POWER ON - OFF / ALARM OFF button.
LISTENING TO THE RADIO HINTS FOR BEST RECEPTION
FM - To insure maximum FM tuner reception, unwrap and fully extend the EXTERNAL FM WIRE ANTENNA for best FM radio reception.
- Press the POWER ON - OFF / ALARM OFF button once to turn radio ON.
- Press the VOLUME DOWN / ALARM 1 ON-OFF SET button to decrease the volume.
- Press the VOLUME UP / ALARM 2 ON-OFF SET button to increase the volume.
- Press the << TUNE DOWN / HOUR button to decrease the FM frequency.
- Press the >> TUNE UP / MIN button to increase the FM frequency.
- Press the POWER ON - OFF / ALARM OFF button once to turn radio OFF.
TO SET / RECALL THE RADIO PRESETS
You can preset and store the frequency of 10 radio stations in the memory.
- Press the POWER ON - OFF / ALARM OFF button once to turn the radio ON.
- Set radio to desired station.
- Press and hold the CLK.ADJ./MEMORY / M+ button and PO1 will flash on the screen.
- Press the CLK.ADJ./ MEMORY / M+ button to confirm setting to PO1 or wait 5 seconds for flashing to stop.
- Repeat the steps above to preset more radio stations, changing the number of programs using <
>TUNE UP buttons. - To recall a preset station, press the CLK.ADJ./MEMORY / M+ button to toggle through the current preset radio stations.
The sleep timer allows you to play music for a preset amount of time ranging from 90 minutes to 10 minutes. It is commonly used by people who prefer to go to sleep to music.
- In radio mode, Press the SNOOZE/SLEEP/DIMMER button. The display will show 90 minutes, your clock radio will turn off in 90 minutes.
- To change the number of minutes for the SLEEP timer, press the SNOOZE/SLEEP/DIMMER button until you see the desired number of minutes. The SLEEP timer decreases in increments of 10.
- To cancel the SLEEP timer, press and the SNOOZE/SLEEP/ DIMMER button then press again until you see OFF in the display or press the POWER ON - OFF / ALARM OFF button.
DIMMER CONTROL
In radio off mode, Tap the DIMMER button to set the brightness of the LED display to high, medium or low according to your ambient light conditions.
Remark:
- Clock display with dimmer low" is the default setting.
- It will consume more power if you set the clock display with dimmer high.
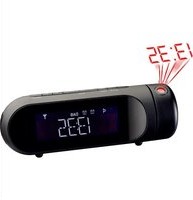
PROJECTION FUNCTION
Notes:
- This appliance is featured with a projection function and can be used in either clock or radio mode. You can use this appliance to project time on the ceiling or wall.
- Optimal projection distance ranges from ca. 90 to 270cm.
- Press PROJECTION ON/OFF button to illuminate the projection lens. Time is projected on the ceiling or wall.
- Use angle/sharpness controller to achieve optimal projection sharpness and angle.
- Press PROJECTION 180° FLIP button to flip the projected image.
- To deactivate projection function, simply press PROJECTION ON/OFF button. The projection lens goes off.
RESETTING THE UNIT
If the system does not respond or exhibits erratic or intermittent operation, you may have experienced an electrostatic discharge (ESD) or a power surge that triggered the internal microcontroller to shut down automatically. If this occurs, disconnect the AC POWER CORD from the wall and remove the backup battery from the compartment. Wait at least 3 minutes, and reinsert the battery for the back-up, and reattach the AC Cord to the wall. The unit is now reset, so you will need to setup the unit time and alarms again.
SPECIFICATIONS
Frequency : FM 87.5 – 108 MHz
Battery backup : 1 x 3V CR2032 flat lithium battery (not included)
Power source : AC 230V \~ 50Hz, 5W
Projection distance: ≤ approx. 90 to 270cm
WARNING
- No naked flame sources, such as lighted candles, should be placed on the apparatus.
- Do not place the product in closed bookcases or racks without proper ventilation.
- The mains plug is used as the disconnect device, the disconnect device shall remain readily operable.
- The ventilation should not be impeded by covering the ventilation openings with items, such as newspapers, tablecloths, curtains, etc.
- It shall not be exposed to dripping or splashing and that no objects filled with liquids, such as vases, shall be placed on the apparatus.
- Do not connect FM antenna to outside antenna.
- The unit should not be exposed to direct sunlight, very high or low temperature, moisture, vibrations or placed in dusty environment.
- Do not use abrasive, benzene, thinner or other solvents to clean the surface of the unit. To clean, wipe it will mild non-abrasive detergent solution and clean soft cloth.
- Never attempt to insert wires, pins or other such objects into the vents or opening of the unit.
- Batteries shall not be exposed to excessive heat such as sunshine, fire or the like.
- Attention should be drawn to the environmental aspects of battery disposal.
- Do not dispose this product into usual household garbage at the end of its lifecycle; hand it over to a collection center for recycling the electrical and electronic appliances.
CAUTION
Danger of explosion if battery is incorrectly replaced Replace only with the same or equivalent type
CE
“CE” marking states that the product is compliant to European Directives: 2014/35/EU Low Voltage Directive
2014/30/EU EMC Directive
2009/125/EC ErP Directive Regulation (EC) n° 1275/2008
2011/65/EU RoHS Directive
It is possible to request a full copy of Declaration of compliance to: New Majestic S.p.A. Via Rossi Martini,41 – 26013 Crema (CR) Italy

- INSTALLING/REPLACING THE BACK-UP BATTERY
- IMPORTANT:
- BATTERY CARE:
- WARNING
- DO NOT INGEST BATTERY, CHEMICAL BURN HAZARD
- POWER ON/STANDBY
- TIME MANUAL SETTING
- NOTE:
- ALARM SETTING
- SETTING ALARM 1
- SETTING ALARM 2
- SNOOZE FUNCTION
- LISTENING TO THE RADIO HINTS FOR BEST RECEPTION
- TO SET / RECALL THE RADIO PRESETS
- DIMMER CONTROL
- Remark:
- PROJECTION FUNCTION
- Notes:
- RESETTING THE UNIT
- SPECIFICATIONS
- CAUTION
- CE
Brand : MAJESTIC
Model : RS-137
Category : Alarm Clock