
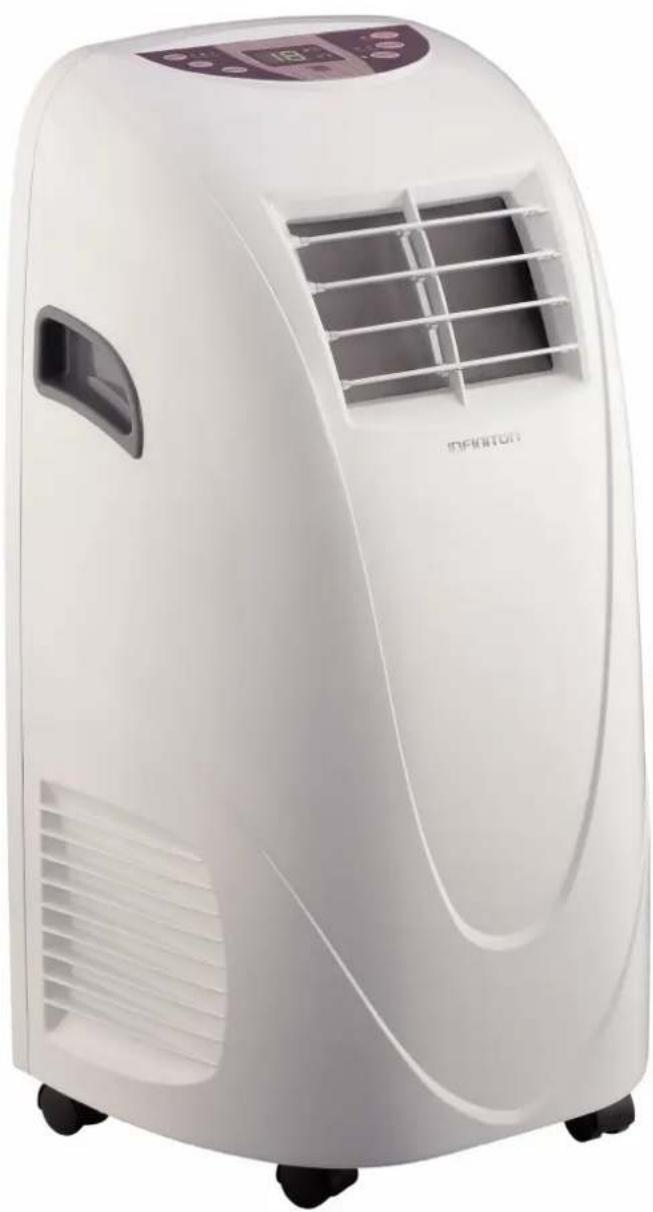
PAC-93CB - Air-conditioner Infiniton - Free user manual and instructions
Find the device manual for free PAC-93CB Infiniton in PDF.


| Product Type | Portable Air Conditioner |
| Model | PAC-93CB |
| Brand | Infiniton |
| Cooling Capacity (BTU) | 9000 BTU |
| Cooling Power (Watts) | 1050 W |
| Air Flow (CFM) | 300 CFM |
| Energy Efficiency Ratio (EER) | 2.6 |
| Refrigerant Type | R410A |
| Operating Modes | Cool, Fan, Dehumidify |
| Fan Speeds | 3 (Low, Medium, High) |
| Timer | 24-hour on/off timer |
| Remote Control | Yes (included) |
| Thermostat | Adjustable, digital display |
| Noise Level (dB) | 52 dB (high fan) |
| Dimensions (W x D x H) | 31.5 x 36.5 x 66 cm |
| Weight (Net) | 22 kg |
| Power Supply | 220-240 V ~ 50 Hz |
| Current Draw | 4.8 A |
| Exhaust Hose Length | 1.5 m |
| Dehumidification Capacity | 1.2 L/h |
| Water Tank Capacity | 1 L |
| Air Filter | Washable mesh filter |
| Maintenance | Clean filter every 2 weeks |
| Safety Features | Auto restart, overheat protection |
| Warranty | 1 year |
Frequently Asked Questions - PAC-93CB Infiniton
User questions about PAC-93CB Infiniton
0 question about this device. Answer the ones you know or ask your own.
Ask a new question about this device
Download the instructions for your Air-conditioner in PDF format for free! Find your manual PAC-93CB - Infiniton and take your electronic device back in hand. On this page are published all the documents necessary for the use of your device. PAC-93CB by Infiniton.
USER MANUAL PAC-93CB Infiniton
natural_image
White modular air conditioner with digital display and control panel (no visible text or symbols)CONTENT
SAFETY 3,4
INSTALLATION....4,5
PART NAME....5,6
CONTROL PANEL....7
REMOTE CONTROL....8
OPERATION METHODS....9
WATER DRAINAGE....10
MAINTENANCE....10,11
TROUBLESHOOTING....11
SAFETY
PLEASE READ ALL THESE INSTRUCTIONS CAREFULLY BEFORE USING THIS APPLIANCE.
- Only use this appliance for domestic purposes and in the way indicated in these instructions. Never use for any other purposes.
- Do not use the appliance outside and always place it in a dry environment.
- From time to time, check the cord. Never use the cord, the plug or the appliance when they show any sign of damage. The cord length of this product has been selected to reduce the possibility of being injured. Do not use your appliance with an extension cord unless it has been checked and tested by a qualified electrician or electrical supplier.
- Keep the appliance away from hot sources and direct sunlight.
• Always switch off the appliance before unplugging it.
- Unplug the appliance before cleaning or changing any parts of the appliance or when it's not in use.
- Clean the appliance accord to manual.
- Make sure that the voltage rating on the type plate corresponds to your main voltage. Any error in connecting the appliance invalidates the guarantee.
- Prevent your children from this danger.
- Never leave the appliance unsupervised when in use. Switch off the appliance if you have to go away for even a short time.
- Never pull the cord to unplug or move the appliance.
- Never immerse the appliance in water or any other liquid for any reason.
- Keep the appliance away from water or oil splashes.
- Respect the instructions for cleaning.
- Do not insert sharp metallic objects or fingers in the air swinging fins of the appliance.
- Never repair the appliance yourself. All interventions made by a non-qualified person can be dangerous. As well any changing of the cord must be done by a qualified electrician.
- Never use accessories non-delivered by the supplier. This could be dangerous and could damage the appliance.
Special recommendations:
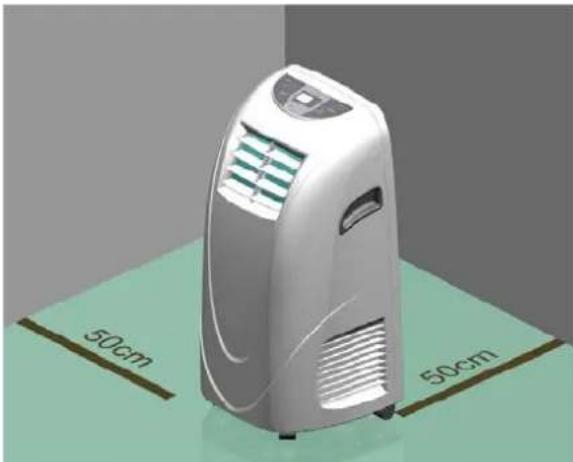
- Install the portable air conditioner on a flat location with a large space, without obstacles. Leave a 50cm minimum space between the unit and the wall.
- The plug shall be always accessible after its installation.
- Always place the appliance in a vertical position, in order to maintain the compressor in good working condition.
- Do not use the appliance near gas or other inflammable liquids.
- Do not block the air outlet and inlet ventilation.
- Do not use spray (insecticides, painting) or any other inflammable products near the appliance as the plastic case may be deformed. The unit may sustain electrical damage.
- Power sources
- The plug has to be well fixed and should not be damaged.
- Do not plug in the appliance with an adaptor.
- Plug into the wall socket before switching on the appliance then press on the ON/OFF button.
THE MANUFACTURER WILL NOT ASSUME ANY RESPONSIBILITY IN CASE OF NON ADHERENCE TO THESE INSTRUCTIONS. KEEP THIS USER MANUAL CAREFULLY.
INSTALLATION
Selection of installation location
Keep the unit on a flat surface and dry place.
Leave at least 50cm space all around the unit.
natural_image
3D rendering of a white air purifier device with ventilation slots, placed on a green surface with measurement annotations (50cm) at both sides.Installation
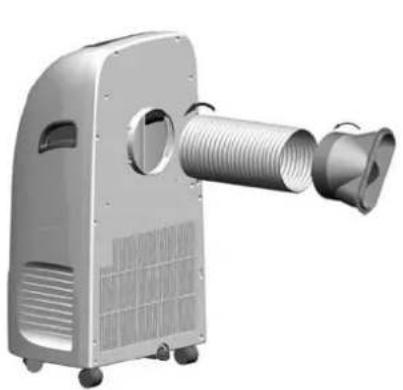
Fix the exhaust pipe into the adapter, and then fix the other side of the exhaust pipe into the air outlet vent of the unit. (anti-clockwise)
Fix the adapter into the window slider kit, and then half open the window to meet the width of the window slider kit. The length of the window slider kit is adjustable.
natural_image
3D rendering of a white industrial air conditioner unit with coiled tubing and ventilation slots (no text or symbols visible)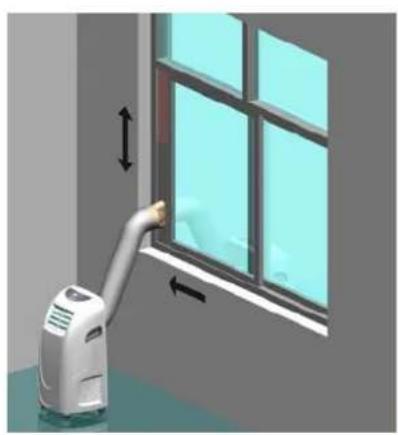
natural_image
Illustration of a medical or disinfection device near a window with directional arrows indicating movement (no text or symbols present)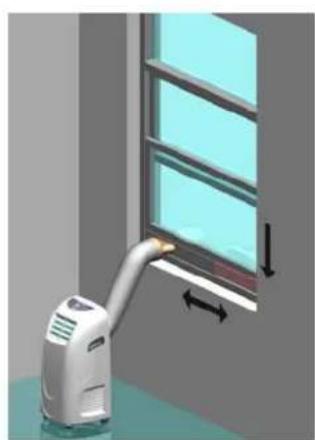
natural_image
3D rendering of a spray gun cleaning a window with arrows indicating airflow direction (no text or symbols)Incorrect mounting
natural_image
White industrial air purifier next to a large gray pipe bundle (no text or symbols visible)
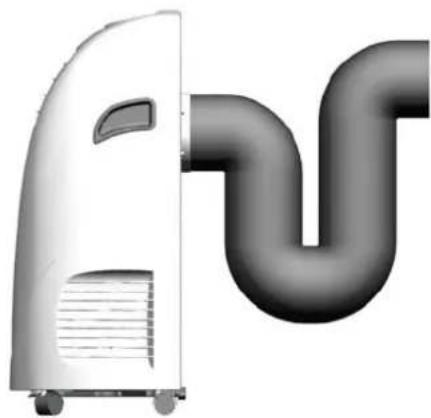
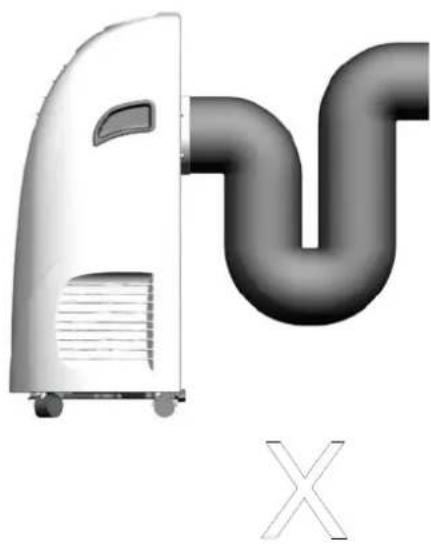
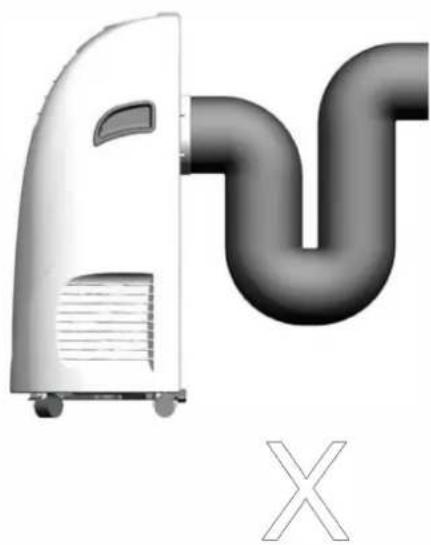
The bend of the exhaust pipe is very important. Incorrect mounting can prevent the machine from working correctly.
Take care to prevent any sharp bows or bends of the exhaust pipe.
The exhaust air must flow freely.
WARNING
The length of the exhaust pipe is specially designed according to the specification of this product. Do not replace or prolong it with your own private hose as this could cause mal-function.
BE CAREFUL: Maximum developed length of the exhaust pipe is 1500mm. Use the shortest possible length. When mounting, we advise to keep the exhaust pipe in a horizontal position.
Front
- Control panel
- Display
- Button
- Remote control receiver
- Air outlet vent
- Louver
- Castor
- Remote Control
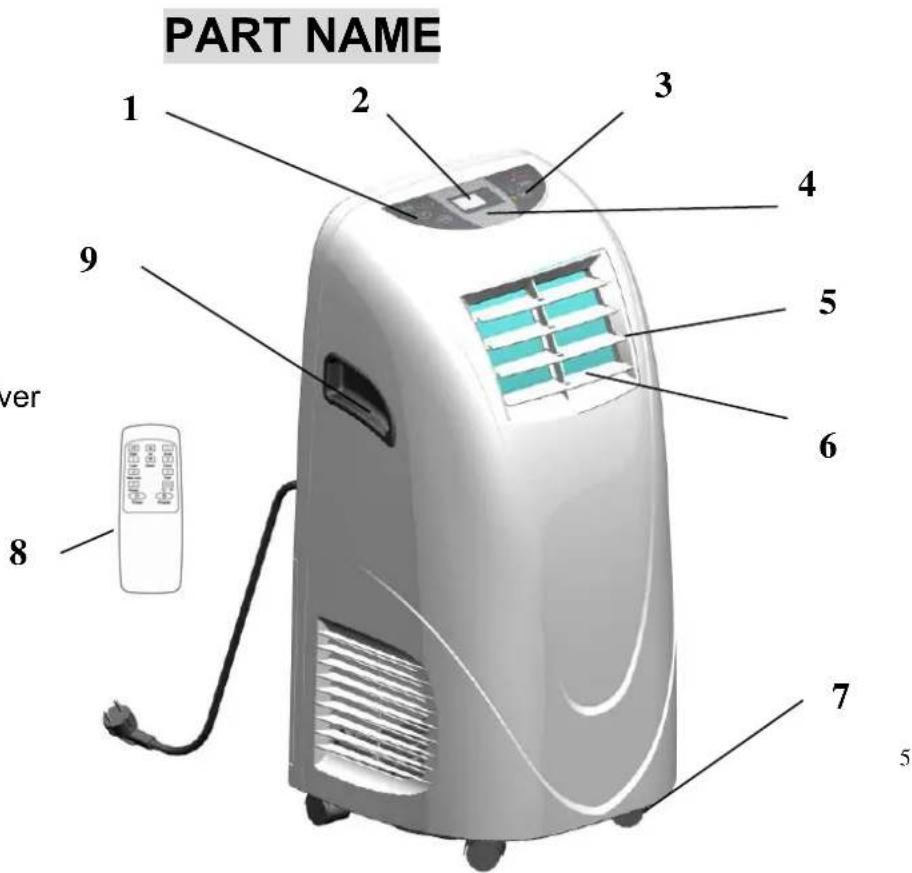
- Handle
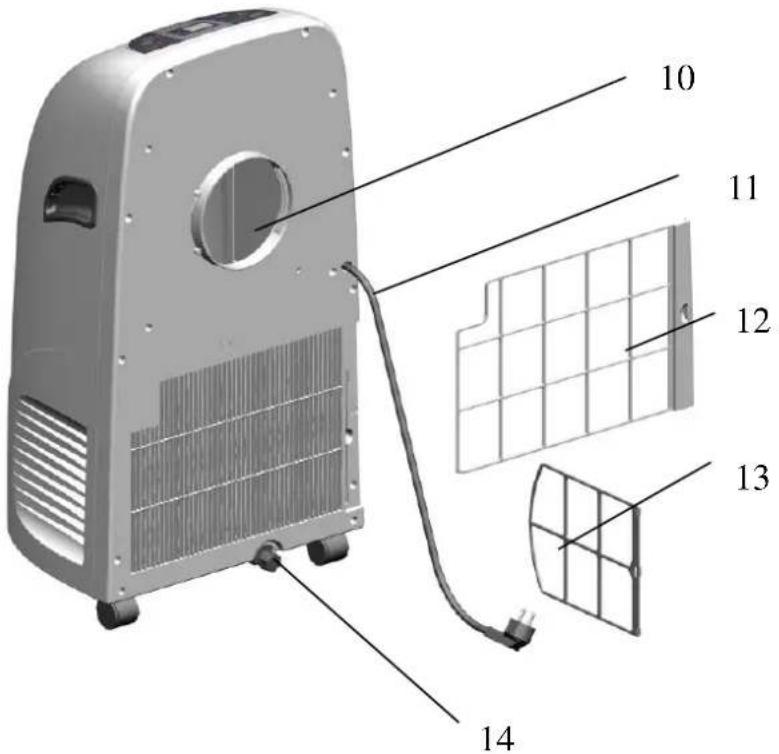
Back
- Exhaust air outlet vent
- Power cord
- Big filter
- Small filter
- Draining hole
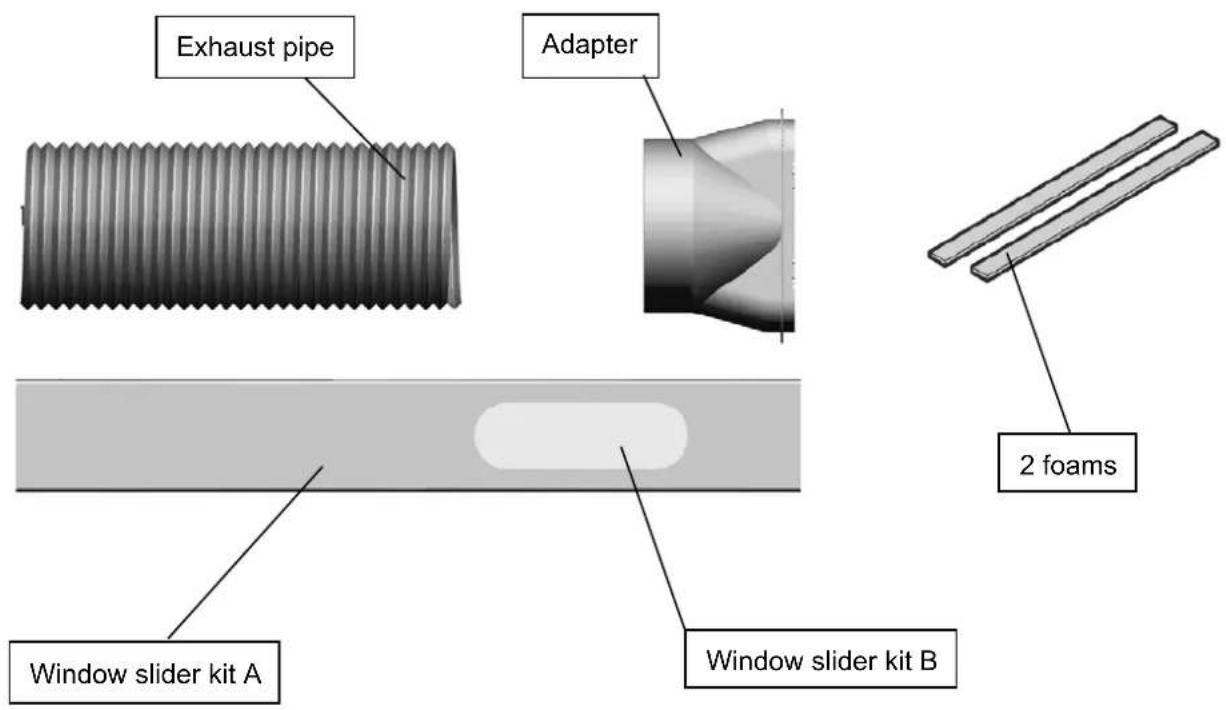
Check all the accessories included in the package and please refer to the installation instructions for their usage.
Accessories
CONTROL PANEL
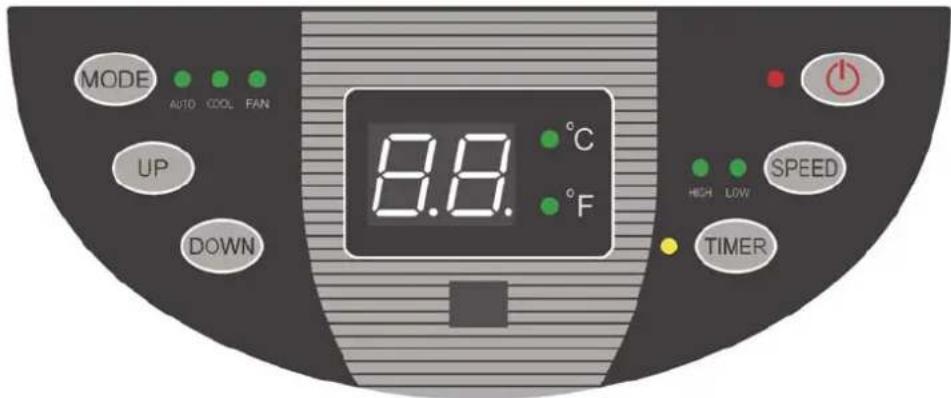
- POWER button: press this button to turn on/off the unit.
- MODE button: press this button to select Cooling, Automatic adjusting mode or Fan mode
- SPEED button: press this button to select high, low fan speed
- Timer: when stand-by time press this key to set automatic time on; when running time press this key to set automatic time off.
- UP button: press this button to set the temperature higher when cooling; press this button to adjust time longer when timing; to exchange Fahrenheit and Celsius when press both UP and Down button
- DOWN button: press this button to set the temperature lower or higher when cooling; press this button to adjust time shorter or longer when timing; to exchange Fahrenheit and Celsius when press both UP and Down button.
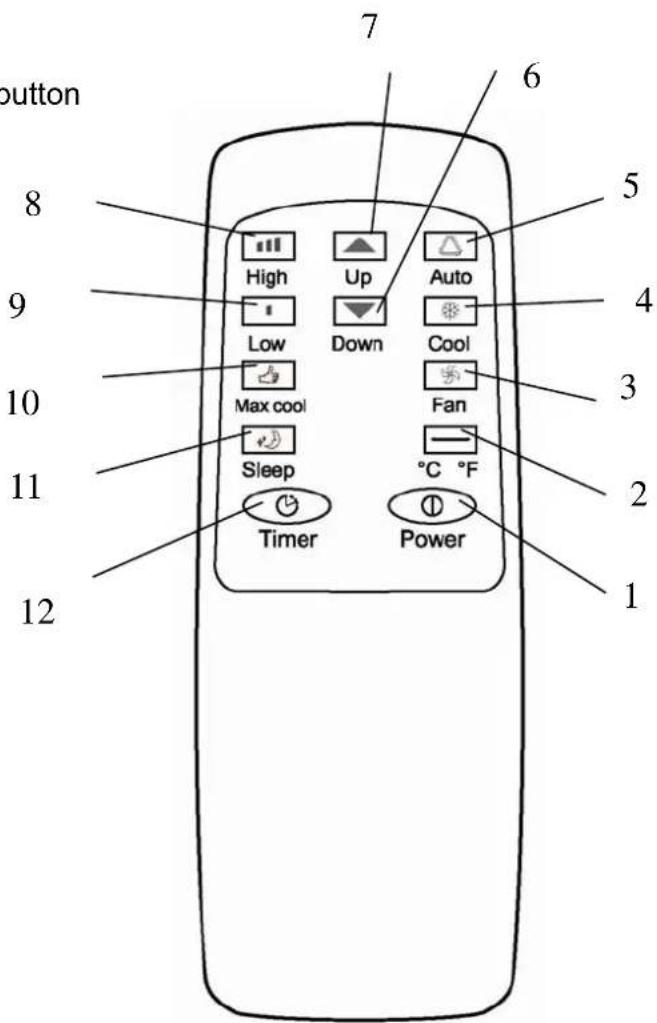
REMOTE CONTROL
- Power
- Celsius and Fahrenheit exchange button
- Fan button
- Cool Mode Button
- Auto mode button
- Down button
- Up button
- High fan speed button
- Low fan speed button
- Max cool button
- Sleep Mode
- Timer button
OPERATION METHODS
Cooling mode
Default Cool mode after operating the machine or press Mode button to choose Cool mode, the Cool mode indicator will flash.
- Press UP or DOWN button to set room temperature between 17°C to 30°C.
- Press FAN SPEED button (or High/Low button) to select high, low fan speed.
Fan mode
- Press Fan button to choose Fan mode, the Fan mode indicator will flash.
- Select the fan speed by press SPEED button or press High / Low button directly.
·The temperature can not be set.
Automatic adjusting mode
- Press Mode button to choose the automatic mode. Automatic mode indicator will flash. After choosing the automatic mode, the running state will depend on room temperature. When room temperature is higher than 25^ , it will come into cool mode. On the contrary, it will be fan mode.
Sleep Mode (Optional Function)
Press this button to activate or cancel sleep function in cooling mode
The unit will run at the low fan speed as default with lower noise. The setting temperature will increase 1 degree per 2 hours running time, and it will not change after increasing 2 degrees
Max cool Mode (Optional Function)
Press this button to activate the Max cool mode.
The unit runs cool but is not restricted by the temperature under the Max cool mode
The unit is forced to be in high fan speed under the Max cool mode and the fan speed cant be set.
Timer mode
.When the appliance is switch off, press Timer button to set timer-on.
- Press Up or Down button to adjust time from 0 to 24 hours. The Timer on indicator will flash. When the appliance is running, press Timer button to set timer-off.
Press Up or Down button to adjust time from 0 to 24 hours. The Time off indicator will flash.
WATER DRAINAGE
This product has a self-evaporative system. The condensing water will be recycled to cool the condenser. This can not only improve cooling efficiency, but also save energy for you.
- If the inside water is full, the display panel will display "FL", and the compressor will stop running.
- Please turn the machine off and move the machine to the place where can drain water, and then unplug the water-draining hole. After drainage, you can power it on and the machine will run again.
MAINTENANCE
Note: Turn off the unit and unplug it before any maintenance or repair begins to avoid electric shock.
Cleaning
- Unplug the unit before any cleaning.
- Clean the housing with a soft moisture cloth. Do not use chemical solvent (such as benzene, alcohol, gasoline). The surface may be damaged or even the whole case may be deformed.
·Do not sprinkle water on the unit.
Air filter
natural_image
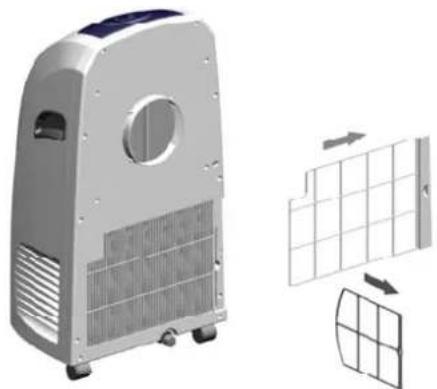
3D rendering of a portable air conditioner unit with internal ventilation grilles and a grid layout diagram (no text or symbols)- Clean the air filter every 2 weeks. If the air filter is blocked with dust, the efficiency will reduce.
- Open the air filter cover upwards, and then take out the air filter.
- Wash the air filter by immersing it gently into warm (about 40 ) water with a neutral detergent, rinse it and °C dry it thoroughly in a shaded place.
End of season
- Please drain the water.
- Keep the unit running in Fan mode for two hours until the inside of the unit is dry.
·Turn off the unit and unplug it.
·Clean the air filter and after dry it thoroughly, reinstall it.
- Remove the exhaust pipes and keep them carefully.
·Wrap the unit with the plastic bag and keep it in a dry place.
TROUBLE SHOOTING
Before contacting professional service, check it first yourself referring to the followings:
| Problem | Cause | Solution |
| The air conditioner does not function. | No power supply. | Connect to power supply outlet and switch on. |
| “FL” flashes on the display screen | Drain water. | |
| Timer-off is running. | You can turn on the unit three minutes later. | |
| The air conditioner restart frequently | In direct sunlight. Close curtains. | |
| Windows or doors open, many people or a heat source in the room. | Close doors and windows, remove the heat source. | |
| Dirty filter. Clean or replace the filter(s). | ||
| Air inlet or air outlet blocked. Remove the blockage. | ||
| The unit is too noisy | Unit stands uneven. | Place on an even, solid surface (less vibration). |
| No work of compressor | Self protect of compressor | Wait for 3 minute and restart again after the descend of temperature |

Cautions: Switch off the unit and unplug it immediately if anything abnormal happens. Then contact a qualified electrician.
Above data without advance notice for product improvement.
Manual de usuario
INFINITON
PAC- 93CB
natural_image
White modular air conditioner with digital display and control panel (no visible text or symbols)ÍNDICE
SEGURIDAD.... 3,4
natural_image
3D rendering of a white air purifier device with ventilation slots, placed on a green surface with measurement annotations (50cm) at both ends.Instalación
natural_image
3D rendering of a portable air conditioner unit with coiled tube and ventilation slots (no text or symbols visible)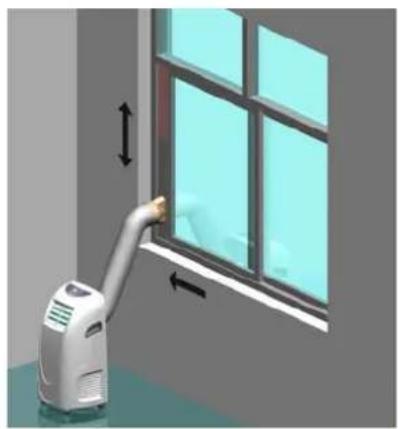
natural_image
3D rendering of a hair dryer with a lever extending to the window, showing airflow direction (no text or symbols)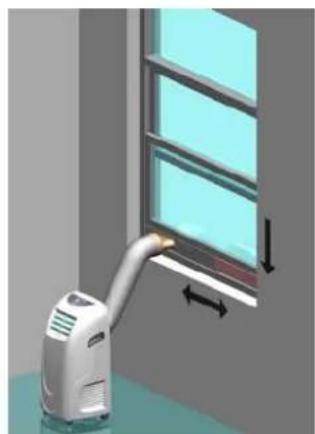
natural_image
3D rendering of a robotic vacuum cleaner next to a window with blue panels, showing airflow direction (no text or symbols)Montaje incorrecto
natural_image
Illustration of a white industrial machine next to a large black pipe with a 'X' symbol below (no text or labels on the diagram itself)natural_image
3D rendering of a portable air conditioner unit with internal panel and grid layout (no text or symbols)Limpieza periódica
natural_image
White modular air conditioner with digital display and control panel (no visible text or symbols)ÍNDICE
SEGURANÇA....3,4
INSTALAÇÃO 4,5
PEÇAS....5,6
PAINEL DE CONTROLE....7
CONTROLE REMOTO....8
USO E OPERAÇÕES......9
DRENAGEM DE ÁGUA....10
MANUTENÇÃO....10,11
natural_image
3D rendering of a white air purifier device with ventilation slots, placed on a green surface with measurement annotations (50cm) at both ends.Instalação
natural_image
3D rendering of a portable air conditioner unit with coiled tube and ventilation slots (no text or symbols visible)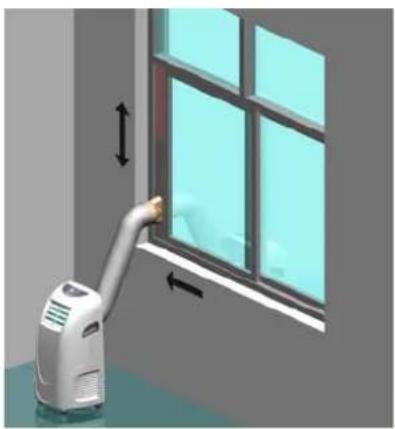
natural_image
3D rendering of a robotic vacuum cleaner next to a window with light blue walls, showing airflow direction (no text or symbols)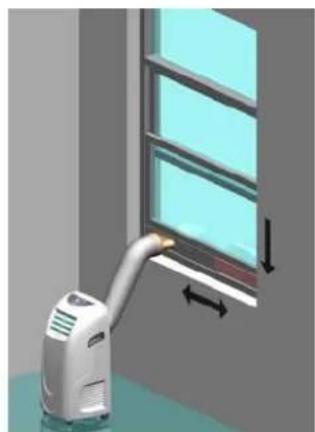
natural_image
3D rendering of a robotic arm holding a window with arrows indicating direction (no text or symbols)Montagem incorreta
natural_image
Illustration of a white air purifier next to a large black pipe with an 'X' symbol below (no text or labels on the diagram itself)natural_image
3D rendering of a portable air conditioner unit with internal panel structure and grid layout (no text or symbols)Limpieza periódica
- CONTENT
- SAFETY
- PLEASE READ ALL THESE INSTRUCTIONS CAREFULLY BEFORE USING THIS APPLIANCE.
- Special recommendations:
- INSTALLATION
- Selection of installation location
- Incorrect mounting
- WARNING
- Front
- Back
- CONTROL PANEL
- REMOTE CONTROL
- OPERATION METHODS
- Cooling mode
- Fan mode
- Automatic adjusting mode
- Sleep Mode (Optional Function)
- Max cool Mode (Optional Function)
- Timer mode
- WATER DRAINAGE
- MAINTENANCE
- Cleaning
- Air filter
- End of season
- TROUBLE SHOOTING
- Manual de usuario
- INFINITON
- ÍNDICE
- Instalación
- Montaje incorrecto
- Limpieza periódica
- Instalação
- Montagem incorreta
Brand : Infiniton
Model : PAC-93CB
Category : Air-conditioner