
Gourmet KPEXTA - Food processor KITCHENAID - Free user manual and instructions
Find the device manual for free Gourmet KPEXTA KITCHENAID in PDF.


| Product Type | Stand Mixer |
| Brand | KitchenAid |
| Model | Gourmet KPEXTA |
| Dimensions (W x D x H) | 35 x 20 x 35 cm |
| Weight | 10 kg |
| Power Supply | 220-240 V, 50 Hz, 300 W |
| Bowl Capacity | 4.8 L |
| Bowl Material | Stainless Steel |
| Speeds | 10 speeds + pulse |
| Main Functions | Mix, knead, whisk, beat |
| Included Accessories | Whisk, dough hook, flat beater |
| Safety | Automatic shut-off in case of overload |
| Bowl and Accessories Maintenance | Dishwasher recommended |
| Motor Unit Cleaning | Wipe with a damp cloth |
| Repairability | Spare parts available |
| Warranty | 2 years |
| Usage | Domestic |
| Control Type | Mechanical speed variator |
| Tilt-Head | Yes |
| Optional Accessory Port | Yes (meat grinder, grater, etc.) |
Frequently Asked Questions - Gourmet KPEXTA KITCHENAID
User questions about Gourmet KPEXTA KITCHENAID
0 question about this device. Answer the ones you know or ask your own.
Ask a new question about this device
Download the instructions for your Food processor in PDF format for free! Find your manual Gourmet KPEXTA - KITCHENAID and take your electronic device back in hand. On this page are published all the documents necessary for the use of your device. Gourmet KPEXTA by KITCHENAID.
USER MANUAL Gourmet KPEXTA KITCHENAID
natural_image
Close-up of a kitchen electrician with a grater and handle, no visible text or symbols on the device itself.SSA
This attachment has been approved for use with all KitchenAid ^® household stand mixers.
Use with Food Grinder (FGA), sold separately.
KitchenAid.com
KitchenAid.ca
Proof of Purchase
Always keep a copy of the sales receipt showing the date of purchase of your Stand Mixer Attachment. Proof of purchase will assure you of in-warranty service.
Please complete the following for your personal records:
Model Number
Date Purchased
Store Name and Location
Preuve d'achat
Proof of Purchase ....... Inside Front Cover
Stand Mixer Attachment Safety....2
Important Safeguards 2
FEATURES AND OPERATION
To Attach Stand Mixer Attachment....3
Before Attaching Stand Mixer Attachment....3
Food Grinder* Attachment .... 3
To Assemble Food Grinder Attachment....3
To Use Food Grinder Attachment....4
To Clean Food Grinder Attachment....4
Sausage Stuffer Attachment ....5
To Assemble Sausage Stuffer Attachment....5
To Use Sausage Stuffer Attachment....5
To Form Smaller Links....6
To Clean Sausage Stuffer Attachment....6
RECIPE
Mild Breakfast Sausage....6
WARRANTY AND SERVICE INFORMATION
KitchenAid ^® Stand Mixer Attachment Warranty....7
Hassle-Free Replacement Warranty – 50 United States and District of Columbia ......8
Hassle-Free Replacement Warranty – Canada 8
How to Arrange for Warranty Service in Puerto Rico 8
How to Arrange for Service after the Warranty Expires – All Locations ....9
How to Arrange for Service Outside these Locations ....9
How to Order Accessories and Replacement Parts 9
Your safety and the safety of others are very important.
We have provided many important safety messages in this manual and on your appliance. Always read and obey all safety messages.

This is the safety alert symbol.
This symbol alerts you to potential hazards that can kill or hurt you and others.
All safety messages will follow the safety alert symbol and either the word "DANGER" or "WARNING." These words mean:
!DANGER
You can be killed or seriously injured if you don't immediately follow instructions.
WARNING
You can be killed or seriously injured if you don't follow instructions.
All safety messages will tell you what the potential hazard is, tell you how to reduce the chance of injury, and tell you what can happen if the instructions are not followed.
IMPORTANT SAFEGUARDS
When using electrical appliances, basic safety precautions should always be followed including the following:
- Read all instructions.
- To protect against risk of electrical shock, do not put mixer in water or other liquid.
- Close supervision is necessary when any appliance is used by or near children.
- Unplug from outlet when not in use, before putting on or taking off parts, and before cleaning.
-
Avoid contacting moving parts. Keep fingers out of discharge opening.
-
Do not operate the mixer with a damaged cord or plug or after the mixer malfunctions, or is dropped or damaged in any manner. Return the mixer to the nearest Authorized Service Center for examination, repair or electrical or mechanical adjustment.
-
The use of attachments not recommended or sold by KitchenAid may cause fire, electric shock or injury.
-
Do not use the mixer outdoors.
-
Do not let the cord hang over the edge of table or counter.
-
Never feed food by hand. Always use combination food pusher/wrench.
-
Blades are sharp. Handle carefully.
-
This product is designed for household use only.
SAVE THESE INSTRUCTIONS
To Attach Stand Mixer Attachment
Before Attaching Stand Mixer Attachment
- Turn Stand Mixer speed control to OFF.
- Unplug mixer or disconnect power.
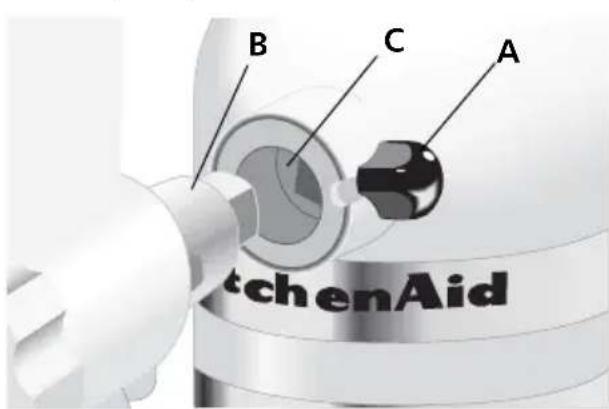
- Loosen the attachment knob (A) by turning it counterclockwise.
- Remove the attachment hub cover or flip up hub cover.
- Insert the attachment shaft housing (B) into the attachment hub (C) making certain that attachment power shaft fits into square hub socket.
-
It may be necessary to rotate the attachment back and forth. When the attachment is in proper position, the pin on the attachment housing will fit into the notch on the hub rim.
-
Tighten the attachment knob by turning it clockwise until the attachment is completely secured to mixer.
ENGLISH
Food Grinder\* Attachment
To Assemble Food Grinder Attachment
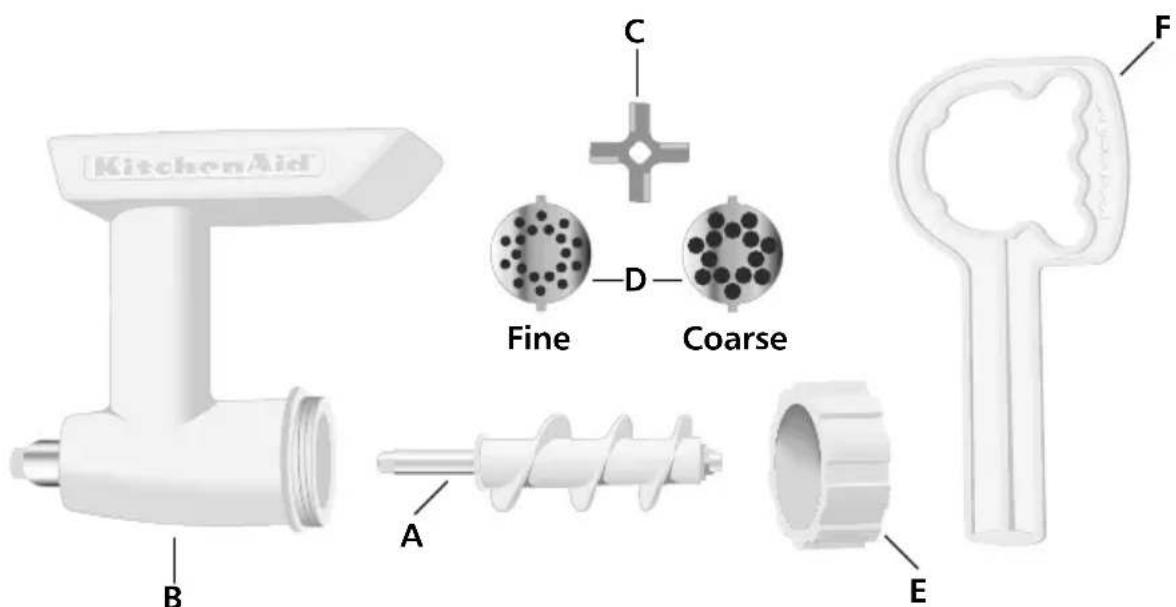
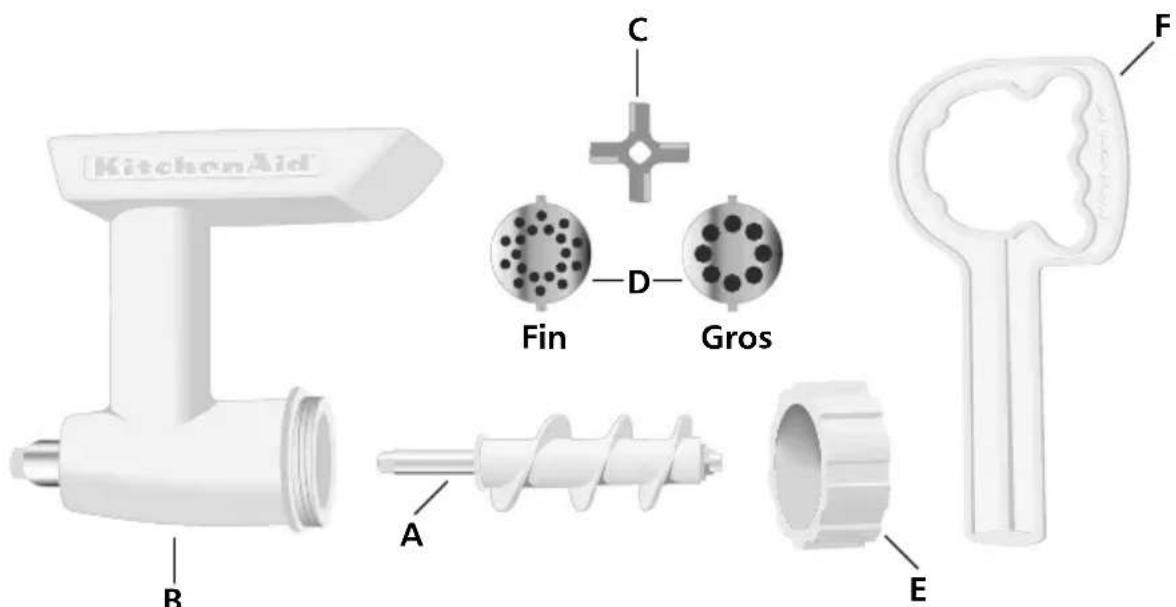
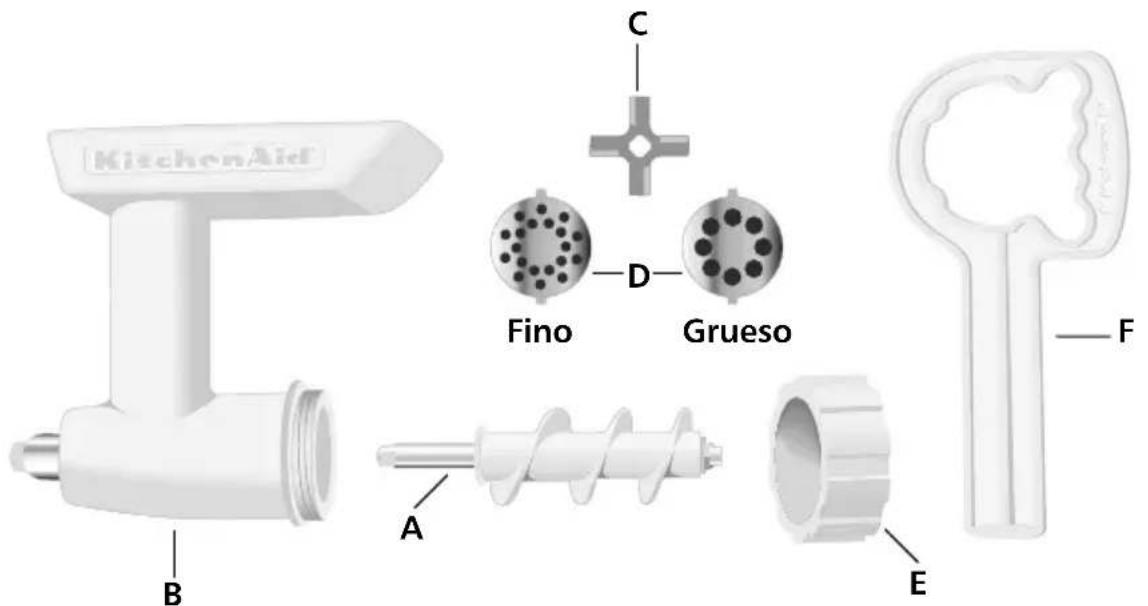
- Insert the grind worm (A) into the grinder body (B).
- Place the knife (C) over the square shank at the exposed end of the grind worm.
- Place grinding plate (D) over the knife, matching the tabs of the plate with the notches of the grinder body.
- Place ring (E) on grinder body, turning by hand until secured but not tightened.
NOTE: The combination food pusher/wrench (F) is used for removal of ring (E) only. Do not use it to tighten ring (E).
NOTE: Use Sausage Stuffer (model SSA) with Food Grinder (model FGA).
Food Grinder\* Attachment
To Use Food Grinder Attachment
WARNING

Rotating Blade Hazard Always use food pusher. Keep fingers out of openings. Keep away from children. Failure to do so can result in amputation or cuts.
- Cut food into small strips or pieces and feed them into hopper. Meat should be cut into long narrow strips.
- Turn mixer to Speed 4 and feed food into hopper using combination food pusher/wrench.
NOTE: Liquid may appear in hopper when processing large amounts of high moisture foods such as tomatoes or grapes. To drain liquid, continue to operate mixer. To avoid damage to mixer, do not process additional food until liquid has drained from hopper.
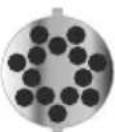
Coarse Plate – Use for grinding raw or cooked meats, firm vegetables, dried fruits and cheese.
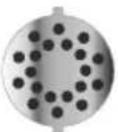
Fine Plate – Use for grinding raw meat, cooked meats for spreads and breadcrumbs.
Grinding Meat – For better mix and more tender results, grind beef twice. Best texture results from grinding very cold or partially frozen meat. Fatty meats should be ground only once.
Grinding Bread – To grind bread for crumbs, be sure that bread is either oven dried thoroughly to remove all moisture, or not dried at all. Partially dried bread may jam the Food Grinder.
NOTE: Very hard, dense foods such as totally dried homemade bread should not be ground in the Food Grinder. Homemade bread should be ground fresh and then oven or air-dried.
To Loosen Ring – If ring is too tight to remove by hand, slip the combination food pusher/wrench over the grooves and turn counterclockwise.
NOTE: To avoid damage to the food grinder attachment, do not use combination food pusher/wrench to tighten ring to grinder body.
To Clean Food Grinder Attachment
First completely disassemble food grinder attachment.
The following parts are dishwasher safe:
- Grinder body
- Grinder worm
- Ring
- Combination food pusher/wrench The following parts should be hand washed in warm, sudsy water and dried thoroughly:
- Knife
- Grinding plate
Sausage Stuffer Attachment
ENGLISH
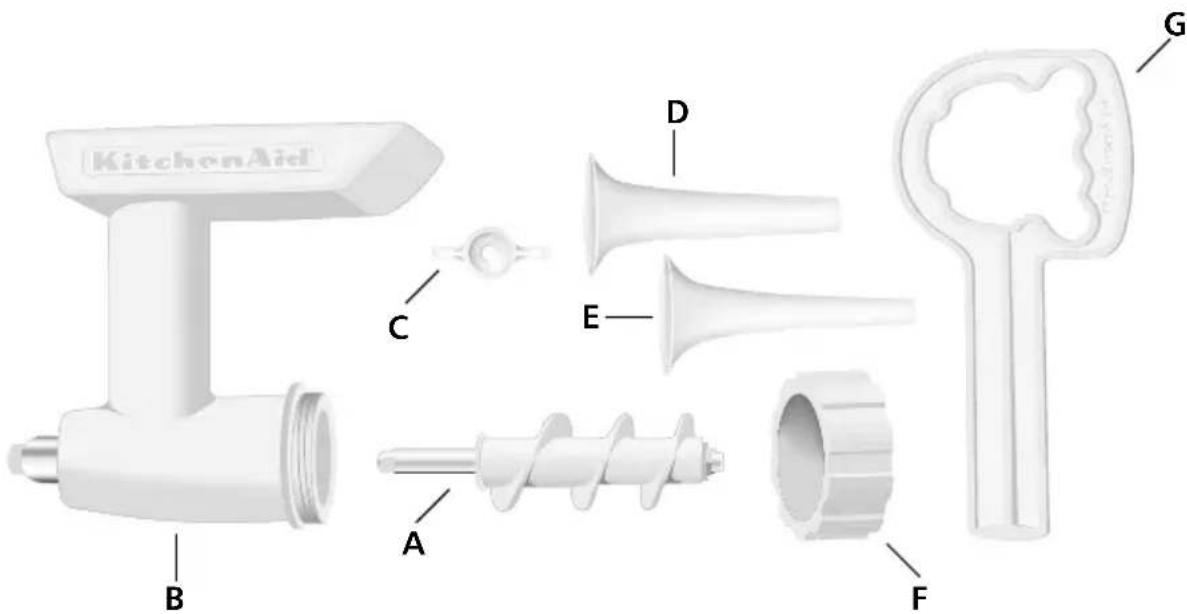
To Assemble Sausage Stuffer Attachment:
- Insert grind worm (A) into the grinder body (B).
- Place the retainer bar (C) over the square shank at the exposed end of the grind worm.
- Insert desired Sausage Stuffer tube (D) or (E) in ring (F) and then screw onto grinder body, turning by hand until finger tight, but not over tightened.
NOTE: The combination food pusher/wrench (G) is used for removal of ring (F) only. Do not use it to tighten ring (F).
NOTE: Use Sausage Stuffer (model SSA) with Food Grinder (model FGA).
To Use Sausage Stuffer Attachment
WARNING

Rotating Blade Hazard Always use food pusher. Keep fingers out of openings. Keep away from children. Failure to do so can result in amputation or cuts.
Use the small Sausage Stuffer tube (E) to make breakfast sausage with casings and the large Sausage Stuffer tube (D) to prepare Bratwurst, Italian or Polish sausage with casings or breakfast sausage without casings.
- If using natural casings, it's recommended to first soak them in cold water for 30 minutes to remove excess salt, then rinse several times by running cold water through the entire length of casing.
- Grease stuffer tube with shortening and slide, 3 to 4 feet (91 to 122 cm) of casing onto stuffer tube.
- Tie the end of the casing with string to seal.
- Turn mixer to Speed 4 and slowly feed ground meat mixture into hopper using the combination food pusher/wrench.
- Hold the tied end of the casing in one hand and guide meat mixture as it fills casing.
NOTE: Do not pack meat mixture too tightly into casing; allow enough room to twist sausage into smaller links and for expansion during cooking. If an air pocket develops, pierce with a toothpick or skewer. To complete a recipe using several pounds of meat, it may be necessary to repack the Sausage Stuffer with casing several times to use all of the ground meat mixture.
Sausage Stuffer Attachment
To Form Smaller Links
Toform smaller links, lay the entire length of sausage on a flat surface and twist filled casing several times at regular intervals. Fresh sausage may be stored 1 to 2 days in the refrigerator or up to 1 month in the freezer.
To Clean Sausage Stuffer Attachment
First completely disassemble sausage stuffer attachment.
The following parts are dishwasher safe:
- Retainer bar
- Sausage Stuffer tubes
- Grinder body
- Grinder worm
- Ring
- Combination food pusher/wrench
Mild Breakfast Sausage
3 pounds (1.5 kg) pork shoulder cut into 1-inch (2.5-cm) strips
^1/_4 cup (60 ml) minced onion
4 teaspoons (20 ml) sage ^1/_2 teaspoon (2 ml) savory
3 teaspoons (15 ml) salt 1 teaspoon (5 ml) pepper
1 cup (235 ml) chopped parsley ^1/2 teaspoon (2 ml) chervil ^1/8 teaspoon (0.5 ml) marjoram
Dash allspice
2 tablespoons (30 ml) water
1 egg, beaten
1 tablespoon (15 ml) shortening
Natural or synthetic casings
Place pork on metal baking sheet and freeze 20 minutes. Combine onion, sage, savory, salt, pepper, parsley, chervil, marjoram, and allspice. Sprinkle mixture over pork.
Assemble and attach Food Grinder using coarse grinding plate. Turn to Speed 4 and grind pork into bowl. Add water and egg. Attach bowl and flat beater. Turn to Stir Speed and mix 1 minute.
Remove knife and coarse grinding plate from Food Grinder. Assemble and attach Sausage Stuffer. Grease Stuffer with shortening and slide casing on tightly. Tie off end of casing. Turn to Speed 4 and stuff pork mixture into casings. Twist sausage into smaller links and refrigerate or freeze until ready to use.
Yield: 3 pounds (1.5 kg) sausage.
KitchenAid® Stand Mixer Attachment Warranty
| Length of Warranty: | KitchenAidWill Pay For: | KitchenAidWill Not Pay For: |
| 50 United States, the District of Columbia, Canada, and Puerto Rico:One-year limited warranty from date of purchase. | 50 United States, the District of Columbia and Canada:Hassle-free replacement of your Stand Mixer Attachment. See the following page for details on how to arrange for replacement.ORIn Puerto Rico:The replacement parts and repair labor costs to correct defects in materials and workmanship. Service must be provided by an Authorized KitchenAid Service Center. To arrange for service, follow the instructions on page 8. | A. Repairs when Stand Mixer Attachment are used in other than normal single family home use.B. Damage resulting from accident, alteration, misuse or abuse or use with products not approved by KitchenAid.C. Replacement parts or repair labor costs for Stand Mixer Attachment when operated outside the country of purchase. |
DISCLAIMER OF IMPLIED WARRANTIES; LIMITATION OF REMEDIES IMPLIED WARRANTIES, INCLUDING TO THE EXTENT APPLICABLE WARRANTIES OF MERCHANTABILITY OR FITNESS FOR A PARTICULAR PURPOSE, ARE EXCLUDED TO THE EXTENT LEGALLY PERMISSIBLE. ANY IMPLIED WARRANTIES THAT MAY BE IMPOSED BY LAW ARE LIMITED TO ONE YEAR, OR THE SHORTEST PERIOD ALLOWED BY LAW. SOME STATES AND PROVINCES DO NOT ALLOW LIMITATIONS OR EXCLUSIONS ON HOW LONG AN IMPLIED WARRANTY OF MERCHANTABILITY OR FITNESS LASTS, SO THE ABOVE LIMITATIONS OR EXCLUSIONS MAY NOT APPLY TO YOU.
IF THIS PRODUCT FAILS TO WORK AS WARRANTED, CUSTOMER'S SOLE AND EXCLUSIVE REMEDY SHALL BE REPAIR OR REPLACEMENT ACCORDING TO THE TERMS OF THIS LIMITED WARRANTY. KITCHENAID AND KITCHENAID CANADA DO NOT ASSUME ANY RESPONSIBILITY FOR INCIDENTAL OR CONSEQUENTIAL DAMAGES. This warranty gives you specific legal rights and you may also have other rights which vary from state to state or province to province.
Hassle-Free Replacement Warranty – 50 United States and District of Columbia
We're so confident the quality of our products meets the exacting standards of KitchenAid that, if your Stand Mixer Attachment should fail within the first year of ownership, KitchenAid will arrange to deliver an identical or comparable replacement to your door free of charge and arrange to have your original Stand Mixer Attachment returned to us. Your replacement unit will also be covered by our one year limited warranty. Please follow these instructions to receive this quality service.
If your Stand Mixer Attachment should fail within the first year of ownership, simply call our toll-free Customer Satisfaction Center at 1-800-541-6390 Monday through Friday, 8 a.m. to 8 p.m. (Eastern Time), or Saturday, 10 a.m. to 5 p.m. Give the consultant your complete shipping address. (No P.O. Box numbers, please.)
When you receive your replacement Stand Mixer Attachment, use the carton and packing materials to pack up your original Stand Mixer Attachment(s). In the carton, include your name and address on a sheet of paper along with a copy of the proof of purchase (register receipt, credit card slip, etc.).
Hassle-Free Replacement Warranty – Canada
We're so confident the quality of our products meets the exacting standards of the KitchenAid brand that, if your Stand Mixer Attachment should fail within the first year of ownership, KitchenAid Canada will replace your Stand Mixer Attachment with an identical or comparable replacement. Your replacement unit will also be covered by our one year limited warranty. Please follow these instructions to receive this quality service.
If your Stand Mixer Attachment should fail within the first year of ownership, take the Stand Mixer Attachment or ship collect to an Authorized KitchenAid Canada Service Centre. In the carton include your name and complete shipping address along with a copy of the proof of purchase (register receipt, credit card slip, etc.). Your replacement Stand Mixer Attachment will be returned prepaid and insured. If you are unable to obtain satisfactory service in this manner call our toll-free Customer Interaction Centre at 1-800-807-6777. Or write to us at:
Customer Interaction Centre
KitchenAid Canada
1901 Minnesota Court
Mississauga, ON L5N 3A7
How to Arrange for Warranty Service in Puerto Rico
Your Stand Mixer Attachment(s) is covered by a one-year limited warranty from the date of purchase. KitchenAid will pay for replacement parts and labor costs to correct defects in materials and workmanship. Service must be provided by an Authorized KitchenAid Service Center.
Take the Stand Mixer Attachment or ship prepaid and insured to an Authorized KitchenAid Service Center. Your repaired Stand Mixer Attachment will be returned prepaid and insured. If you are unable to obtain satisfactory service in this manner, call toll-free 1-800-541-6390 to learn the location of a Service Center near you.
How to Arrange for Service after the Warranty Expires – All Locations
For service information in the 50 United States, District of Columbia, and Puerto Rico,
call toll-free 1-800-541-6390.
Or write to:
Customer Satisfaction Center
KitchenAid Portable Appliances
P.O. Box 218
St. Joseph, MI 49085-0218
Or contact an Authorized Service Center near you.
For service information in Canada, call toll-free 1-800-807-6777.
Or write to:
Customer Interaction Centre
KitchenAid Canada
1901 Minnesota Court
Mississauga, ON L5N 3A7
How to Arrange for Service Outside these Locations
Consult your local KitchenAid dealer or the store where you purchased the Stand Mixer Attachment for information on how to obtain service.
For service information in Mexico, call toll-free
01-800-024-17-17
(JV Distribuciones)
Or
01-800-902-31-00
(Industrias Birtman)
How to Order Accessories and Replacement Parts
To order accessories or replacement parts for your Sausage Stuffer Attachment in the 50 United States, District of Columbia, and Puerto Rico,
call toll-free 1-800-541-6390 Monday through Friday, 8 a.m. to 8 p.m. (Eastern Time), or Saturday, 10 a.m. to 5 p.m.
Or write to:
Customer Satisfaction Center
KitchenAid Portable Appliances
P.O. Box 218
St. Joseph, MI 49085-0218
To order accessories or replacement parts for your Sausage Stuffer Attachment in Canada,
call toll-free 1-800-807-6777.
Or write to:
Customer Interaction Centre
KitchenAid Canada
1901 Minnesota Court
Mississauga, ON L5N 3A7
To order accessories or replacement parts for your Sausage Stuffer Attachment in Mexico,
call toll-free
01-800-024-17-17
(JV Distribuciones)
Or
01-800-902-31-00
(Industrias Birtman)
Table des matières
INTRODUCTION
Accessoire hachoir\*
Accessoire hachoir\*
Plaque de coupe fine –
1901 Minnesota Court
Mississauga, ON L5N 3A7
Aditamento molino de alimentos\*
Customer Interaction Centre KitchenAid Canada 1901 Minnesota Court Mississauga, ON L5N 3A7
Customer Satisfaction Center
KitchenAid Portable Appliances
P.O. Box 218
St. Joseph, MI 49085-0218
Customer Interaction Centre
KitchenAid Canada
1901 Minnesota Court
Mississauga, ON L5N 3A7
Customer Satisfaction Center
KitchenAid Portable Appliances
P.O. Box 218
St. Joseph, MI 49085-0218
Customer Interaction Centre
KitchenAid Canada
1901 Minnesota Court
Mississauga, ON L5N 3A7
(5246dZw606)
- SSA
- Proof of Purchase
- Preuve d'achat
- FEATURES AND OPERATION
- RECIPE
- WARRANTY AND SERVICE INFORMATION
- Your safety and the safety of others are very important.
- IMPORTANT SAFEGUARDS
- SAVE THESE INSTRUCTIONS
- To Attach Stand Mixer Attachment
- Before Attaching Stand Mixer Attachment
- Food Grinder\* Attachment
- To Assemble Food Grinder Attachment
- To Use Food Grinder Attachment
- WARNING
- To Clean Food Grinder Attachment
- Sausage Stuffer Attachment
- To Assemble Sausage Stuffer Attachment:
- To Use Sausage Stuffer Attachment
- To Form Smaller Links
- To Clean Sausage Stuffer Attachment
- Mild Breakfast Sausage
- KitchenAid® Stand Mixer Attachment Warranty
- Hassle-Free Replacement Warranty – 50 United States and District of Columbia
- Hassle-Free Replacement Warranty – Canada
- How to Arrange for Warranty Service in Puerto Rico
- How to Arrange for Service after the Warranty Expires – All Locations
- How to Arrange for Service Outside these Locations
- How to Order Accessories and Replacement Parts
- Table des matières
- INTRODUCTION
- Accessoire hachoir\*
- Plaque de coupe fine –
- Aditamento molino de alimentos\*
Brand : KITCHENAID
Model : Gourmet KPEXTA
Category : Food processor