EQL - Hi-Fi System AudioControl - Free user manual and instructions
Find the device manual for free EQL AudioControl in PDF.


| Product Type | 31-band 1/3 Octave Graphic Equalizer |
| Dimensions (W x H x D) | 19 x 1.75 x 6 inches (standard rackmount) |
| Weight | 5 lbs (2.27 kg) |
| Power Supply | 120V AC, 60 Hz, 10W |
| Frequency Response | 20 Hz to 20 kHz ±0.5 dB |
| Number of Bands | 31 bands, ISO center frequencies |
| Boost/Cut Range | ±12 dB per band |
| Input Impedance | 100 kOhms |
| Output Impedance | 600 Ohms |
| Total Harmonic Distortion | <0.01% |
| Signal-to-Noise Ratio | >90 dB |
| Bypass Switch | Yes, hardwired bypass |
| Output Level Control | Adjustable, front panel |
| Construction | Steel chassis, aluminum front panel |
| Mounting | Standard 19-inch rackmount, 1U |
| Operating Temperature | 32°F to 104°F (0°C to 40°C) |
| Spare Parts Available | Fuses, knobs, sliders (contact AudioControl) |
| Repair Service | Authorized service centers; user-replaceable fuses |
| Recommended Use | Home audio, studio, and sound reinforcement |
| Cleaning Instructions | Wipe with dry cloth; avoid solvents |
| Safety Precautions | Avoid moisture; do not block ventilation; use grounded outlet |
Frequently Asked Questions - EQL AudioControl
User questions about EQL AudioControl
0 question about this device. Answer the ones you know or ask your own.
Ask a new question about this device
Download the instructions for your Hi-Fi System in PDF format for free! Find your manual EQL - AudioControl and take your electronic device back in hand. On this page are published all the documents necessary for the use of your device. EQL by AudioControl.
USER MANUAL EQL AudioControl
making good stereo sound better
22410 70th Ave. W., Mountlake Terrace, WA 98043
Phone 425-775-8461 • Fax 425-778-3166
www.audiocontrol.com

Concert Series Owner's Manual
Quick Installation Info
Refer to Figures 4, 5, and 6 (on pages 9, 10, and 11) when installing the EQL Equalizer.
The unit is shipped from our factory with the Programmable Frequency Match filter module set at 30 Hz (see page 18 to change this).
For information on other system applications or related topics, please read further.
Table of Contents
Introduction ...... 1
Description 4
Installation 8
Upgrading A Factory (OEM) System ....16
Making Your Own Programmable Frequency Match Modules ....18
Troubleshooting 20
Warranty 22
Specifications 24
Introduction
Congratulations!
You have purchased one of the most exciting and innovative audio products available for your car stereo system – the AudioControl EQL Equalizer/Level Matcher.
The EQL can make any system sound better. Even if you have followed the true path of enlightenment and are having your new EQL professionally installed, it doesn't hurt to read this manual. There's nothing but reruns on the tube anyway!
The EQL carries on a great tradition started back in 1985, when we introduced the original EQL. Since then, AudioControl has gone on to win numerous awards and collect many glowing reviews for its innovative autosound products. We have learned a great deal about cars, stereos, and acoustics over the years. All of this has been poured into the new EQL to give you the tools to make your car stereo the envy of all your pals.
We design, test, and build each EQL Equalizer right here in the misty rain forests ^1 of the Pacific Northwest. When you look inside the rugged two-piece steel chassis, you'll find we use only premium electronic parts and gold-plated RCA jacks.
It all adds up to a product that will provide you with many years of listening enjoyment and will literally outlast your vehicle.

Concert Series Owner's Manual
☒ Dual Bandwidth Equalizer – 13 bands
The dual bandwidth design of the EQL concentrates more control in the lower bass frequencies where the interior of an automobile causes problems. The higher frequency controls are spaced on octave centers to give you complete control up to 16,000 Hz. No simple dash-mount equalizer gives you this kind of flexibility.
☒ Level Matching
True standards in car stereo are hard to find. Every manufacturer has a slightly different interpretation of things. The input and output level controls on the EQL bring everything together. Now any head unit can be connected to any amplifier and the will system sound great.
☒ Balanced Input
The EQL takes noise rejection a step further than the average by incorporating balanced differential input circuitry. By looking at the output from your source unit in a different way the EQL can reject up to 60 dB of radiated noise.
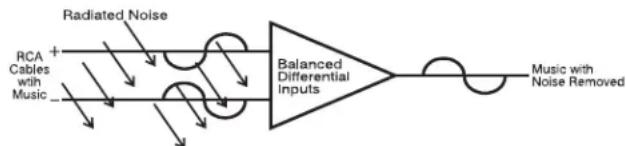
flowchart
graph LR
    A["RCA + Cables with Music"] --> B["Radiated Noise"]
    B --> C["Balanced Differential Inputs"]
    C --> D["Music with Noise Removed"]
Programmable Frequency Match Filter
Our exclusive Programmable Frequency Match (PFM) filter system brings out the best in any system. A modular programmable low-cut frequency filter allows the system installer to easily customize the bass roll-off to match any speaker design. Unruly subwoofer boxes can finally be brought under control.
☒ High Level Inputs
The EQL is so flexible that you don't even need to have pre-amp outputs on your deck to enjoy the benefits of total control. Speaker level signals can be run directly into the EQL, equalized and level-matched to use any aftermarket amplifier or crossover with your system. There are no limits.
IMPORTANT
For maximum product performance, nothing is better than a professional system installation. Your AudioControl dealer has the training and tools to take care of the job quickly and without the anxiety of drilling holes in your car. If you are just a dyed-in-the-wool do-it-yourselfer, then this manual should provide all the info you need to successfully make music with the EQL.
The Most Important Instruction Of All
FILL OUT AND SEND IN THE WARRANTY CARD! Also, save the invoice or sales slip as proof of purchase. These actions will protect your investment and allow us to better help you with any service-related questions.

Concert Series Owner's Manual
Figure 1. Top panel
layout for EQL
Equalizer/Level Matcher.
Description
Description
We've created the EQL Equalizer/Level Matcher to make any system sound better. This Performance Match™ Component ^2 features straightforward connections and easy-to-adjust equalizer and level controls. To learn more, read on.
Equalizer and Input/Output Level Controls and Indicators
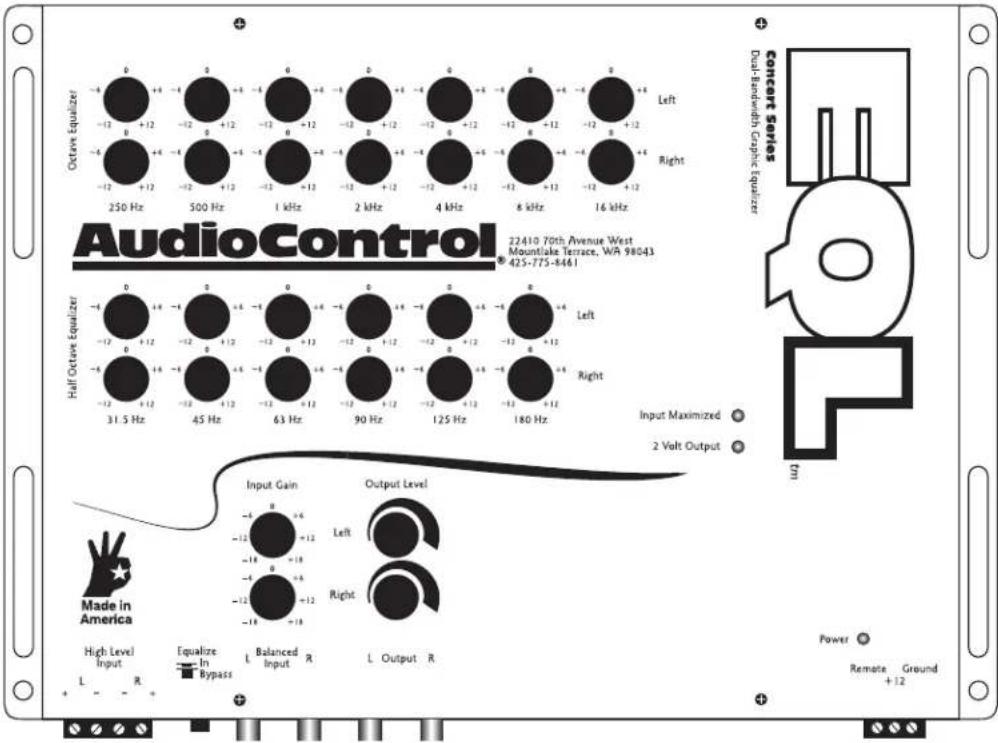
The top panel contains all equalizer controls, input/output controls, and system indicators. The equalizer controls are grouped by channels in ascending frequencies from left to right, as shown in Figure 1 on the previous page.
Each equalizer control provides 12 dB of boost or cut for each channel. The Input Gain controls allow you to adjust the Left or Right Input gain over a range of ±18 dB. Output attenuators provide up to 30 dB of gain trim. The top panel
^2 Our line of Performance Match Components takes the guess-work out of creating the best-sounding system by "matching" autosound components to your vehicle. For more information, see page 21.
also includes several indicators to confirm power and help set output levels.
☐ HALF OCTAVE BASS EQUALIZER – six half-octave bass equalizer controls for each channel with frequency centers at 31.5, 45, 63, 90, 125, and 180 Hz.
☒ OCTAVE EQUALIZER – seven full octave equalizer controls with frequency centers at 250 and 500 Hz; and 1, 2, 4, 8, and 16 kHz.
☑INPUT GAIN – variable gain controls to adjust Left and Right Input levels.
☒ OUTPUT LEVEL CONTROLS – output attenuators for Left and Right Outputs.
☑INPUT MAXIMIZED – indicator for setting the proper input gain. When this light flickers you have just the right amount of input gain.
☒ 2 VOLT OUTPUT – indicator for monitoring output level to detect and set a 2 volt level.
☒ POWER – indicator confirms power is reaching the EQL.

Concert Series Owner's Manual
Figure 2. Front panel layout for EQL Equalizer/Level Matcher.

Connections and Equalizer Bypass
The front panel contains power and input/output connections, as well as an equalizer bypass button, as shown in Figure 2 (above.)
HIGH LEVEL INPUT – Our handy plug for connection of speaker outputs from a deck or factory stereo.
☒ EQUALIZE IN/OUT – Press in to engage the equalizer settings on your EQL.
LINE LEVEL INPUT – RCA jacks for connection of low-level stereo signals from a head unit.
☒ OUTPUT – RCA jacks for connection of EQL outputs to the inputs of an amplifier.
☑ REMOTE/+12/GROUND - Another handy plug for power connections of your Remote Turn-On lead, +12 Volts, and Power Ground.
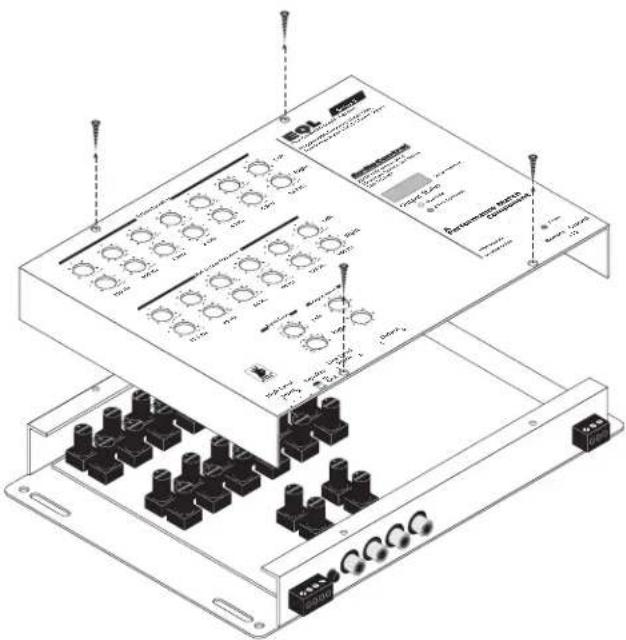
Figure 3. Removing the four top screws and lifting the top panel provides access to the Programmable Frequency Match filter module and Ground Isolation Selector.
Programmable Frequency Match Filter Module (Inside)
The Programmable Frequency Match filter module is internal and can be accessed by removing the four top screws and lifting the top panel off the base, as shown in Figure 3 (also see Figure 8 on page 19). Be sure to turn off the power before you open the EQL.
We ship each EQL with the Programmable Frequency Match filter set at 33 Hz. Refer to page 18 for information on how to create your own custom PFM module.

Concert Series Owner's Manual
Installation
We strongly suggest you have the EQL professionally installed, but if you are doing it solo this section lists the procedures you'll need to install the EQL in your vehicle. Before you begin we suggest you read the next few sections to plan the type of system you want.
System Applications
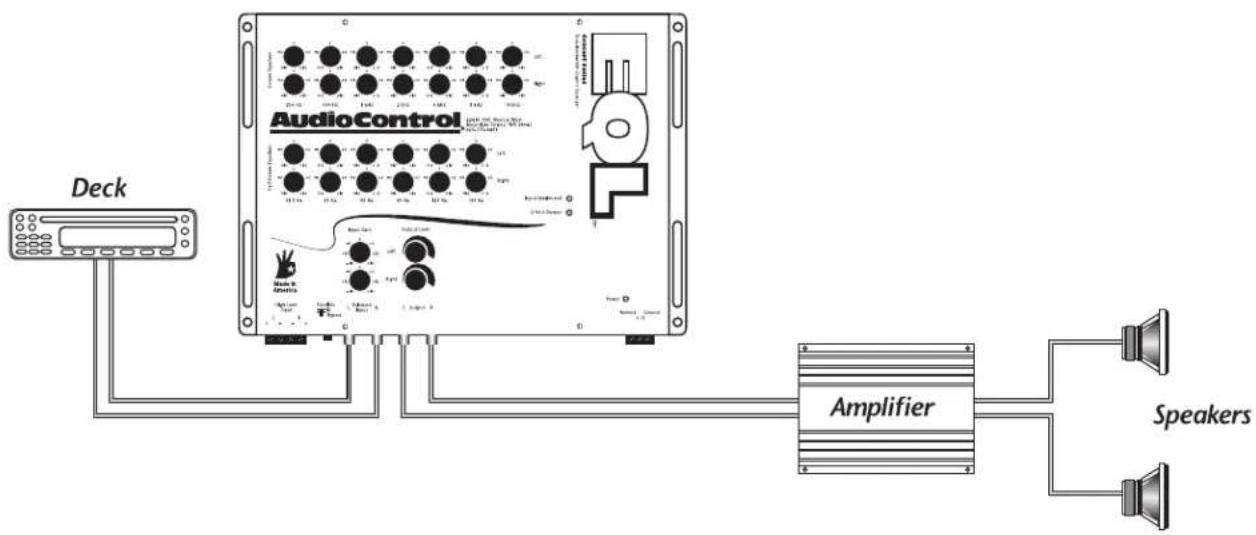
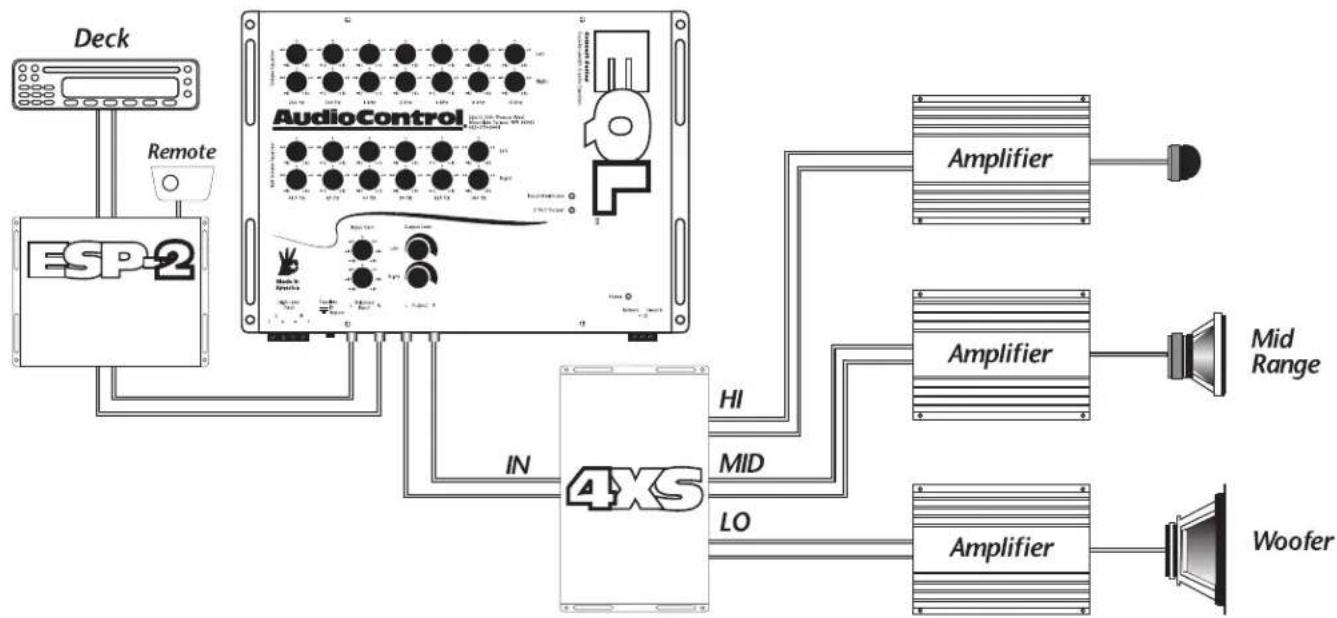
The EQL Equalizer/Level Matcher is quite versatile. Use it to put together a simple single-amplifier system, as shown in Figure 4 on page 9. Or better yet, add a couple of our other fine components, and you are on your way to building a great 2-way or 3-way system, as shown in Figures 5 and 6 (on pages 10 and 11).
Installation Precautions
Do not mount the EQL Equalizer/Level Matcher where it will be exposed to outside elements or extreme temperatures. Avoid areas that are subject to extreme road vibration or shock. The front bumper is definitely out-of-bounds.
☒ Select an installation site that provides short cable runs for minimum pick-up of engine noise and RFI (radio frequency interference). Keep RCA cables together, away from speaker wires or power cables.
☒ At the proposed installation site, make sure the holes you plan to drill will not hit the fuel tank, fuel lines, brake lines (under chassis), or go through any electrical wiring.
☒ Use high-quality, fully-shielded RCA cables.
☐ Plan on a single-point grounding scheme that is common to grounded parts of the system. Use no less than 16-gauge stranded copper wire for the ground connection.
Installation
flowchart
graph TD
    A["Deck"] --> B["AudioControl"]
    B --> C["Amplifier"]
    C --> D["Speakers"]
    B --> E["Speaker 1"]
    B --> F["Speaker 2"]
    B --> G["Speaker 3"]
    B --> H["Speaker 4"]
    B --> I["Speaker 5"]
    B --> J["Speaker 6"]
    B --> K["Speaker 7"]
    B --> L["Speaker 8"]
    B --> M["Speaker 9"]
    B --> N["Speaker 10"]
    B --> O["Speaker 11"]
    B --> P["Speaker 12"]
    B --> Q["Speaker 13"]
    B --> R["Speaker 14"]
    B --> S["Speaker 15"]
    B --> T["Speaker 16"]
    B --> U["Speaker 17"]
    B --> V["Speaker 18"]
    B --> W["Speaker 19"]
    B --> X["Speaker 20"]
Figure 4. Wiring diagram for EQL Series II in a single amplifier system.

Concert Series Owner's Manual
flowchart
graph TD
    A["Deck"] --> B["Remote"]
    B --> C["ESP-2"]
    C --> D["AudioControl"]
    D --> E["Amplifier"]
    D --> F["Amplifier"]
    D --> G["Amplifier"]
    D --> H["Woofer"]
    D --> I["4XS"]
    I --> J["HI"]
    I --> K["MID"]
    I --> L["LO"]
    I --> M["IN"]
    M --> N["4XS"]
    style A fill:#f9f,stroke:#333
    style B fill:#ccf,stroke:#333
    style C fill:#cfc,stroke:#333
    style D fill:#fcc,stroke:#333
    style E fill:#ffc,stroke:#333
    style F fill:#ffc,stroke:#333
    style G fill:#ffc,stroke:#333
    style H fill:#ffc,stroke:#333
    style I fill:#cfc,stroke:#333
    style J fill:#fcc,stroke:#333
    style K fill:#fcc,stroke:#333
    style L fill:#fcc,stroke:#333
    style M fill:#fcc,stroke:#333
    style N fill:#ffc,stroke:#333
Figure 5. this wiring diagram shows a 3-way system that uses an EQL with an ESP-2 Spatial Restoration Processor and a 4XS used as a 3-way Crossover.
Installation
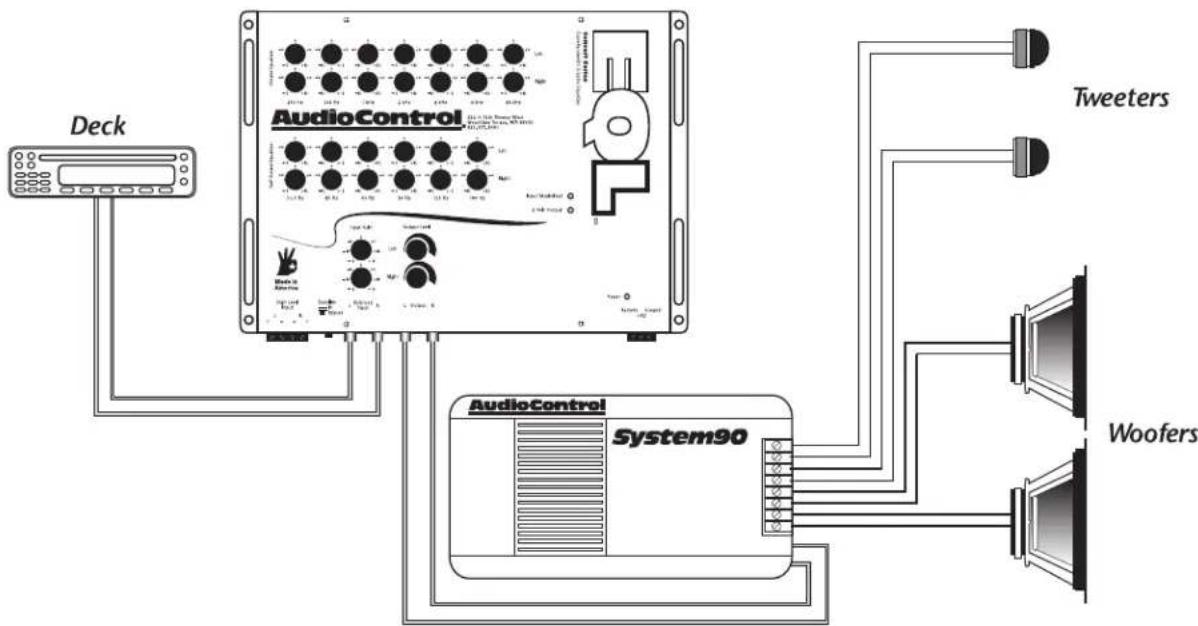
Figure 6. Wiring diagram shows an EQL with an AudioControl System90 Powered Signal Processor in Bi-Amp Mode.

Concert Series Owner's Manual
WARNING
Before installation, turn off the power to the head unit or radio and disconnect the negative (-) lead of your vehicle's battery.
Mounting the EQL
- Select a permanent mounting site for the EQL. Make sure you observe the Installation Precautions listed on page 8.
- Position the unit and use either a felt-tip pen or spring-loaded center punch tool to mark locations for the four mounting holes.
- Drill a small pilot hole at each marked location.
- Secure the EQL with self-tapping screws.
Connecting the EQL
- Connect +12 Vdc and Ground from the vehicle's electrical system to the corresponding +12 and GROUND terminals on the EQL. Also connect the Remote turn-on signal from the head unit to the REMOTE terminal.
- Connect a set of RCA cables from the head unit Left and Right outputs to the LINE LEVEL INPUT (LEFT and RIGHT) on the EQL.
DO NOT CONNECT OUTPUTS AT THIS TIME!
NOTE: For high-level signals, splice speaker cable onto the radio's speaker wires and connect to the HIGH LEVEL INPUT (Left and Right). - On the EQL, set all equalizer controls to the flat (i.e., "0") position. Set the INPUT GAIN controls for minimum gain
Installation
(i.e.,"-18"). Set all OUTPUT LEVEL controls for maximum attenuation (i.e.,"-□"). Press the EQUALIZE button IN.
- Reconnect the vehicle's negative (-) battery lead and proceed to the next section.
Adjusting the EQL
- Turn on the head unit or radio. On the EQL, you should see the (red) POWER indicator illuminate. If not, check the power connections, and try again. A test light or digital multi-meter works great for this.
- Play a favorite tape or CD with consistent music and turn up the volume control or the head unit or radio to maximum level
NOTE: Since the outputs are not connected, you won't hear any sound at this point.
-
Adjust the INPUT GAIN control until the yellow INPUT MAXIMIZED starts to flicker. Now back the control off until the LED goes out.
-
Next, start the trackoverso that you are referencing the same musical information as in step 3. Adjust the OUTPUT LEVEL until the 2 Volt Output light is flickering steadily. If you find that you have turned the OUTPUT LEVEL all the way up without the 2 Volt Output light coming on, you may leave this control at "0" (or its fully clockwise position.)
-
Turn down the volume and power off the head unit or radio.
-
Connect the EQL outputs according to your system plan.

Concert Series Owner's Manual
Adjusting the EQL (cont'd)
NOTE: Consult the amplifier owner's manual for information on setting its input sensitivity. If adjustable, set each amplifier to accept a signal between 1.0 and 2.0 volts (1000 and 2000 mV). This may be a minimum setting on your amp. Don't worry, the EQL can still drive it to full volume. If your Amp cannot accept 2V you may need to turn the output level down a bit.
- Play the same tape or CD (preferably one containing a variety of acoustic instruments).
- With the deck's volume set to a normal to half-way listening position (i.e., about one-third on), adjust the OUTPUT LEVEL controls, if necessary, to get the system playing at a comfortable level.
- A third-octave real time audio analyzer is the ultimate tool for getting the best sound quality from your new EQL. If you
are in a real hurry, you can set the equalizer by ear.
- Listen to the vocals and instruments, and trying cutting the frequencies in the mid-bass (90 to 250 Hz) and mid-range (2 to 4 kHz) spectrum. The mid-bass response is usually a problem area due to standing waves caused by sound resonating in the passenger compartment. The mid-range frequencies are most sensitive to the ear and usually need to be brought down a bit.
- Continue listening and try boosting the low bass frequencies in the 31.5 to 63 Hz area. Usually this area needs help due to design limitations of smaller woofers and loss of bass in cassettes.
Installation
NOTE: If the (yellow) OVERLOAD indicator comes on, something is boosted too much. Either bring down the suspect frequency control or adjust the INPUT GAIN controls to reduce the overall gain.
- As a final check, press the EQUALIZE switch OUT and IN to compare the sound with and without equalization. Try different program sources and make any final adjustments.
Using a Real Time Audio Analyzer (RTA)
For a really well-balanced system, we highly recommend using a Real Time Analyzer (like the AudioControl SA-3055) to adjust your vehicle's sound system. This tool is especially helpful in performing the initial adjustments for multi-amplifier installations.
Balancing a system "by ear" should be performed as fine-tuning after using a Real Time Analyzer, since our ears adapt very quickly to any new frequency adjustments.
In fact, if you listen to a badly-adjusted system long enough, it will actually start sounding pretty good. Only later, when your hearing “refreshes” and your buddies come to audition your new system, will you realize how far off the mark Def Leppard really is!
Now. . . do yourself a big favor and ask an authorized AudioControl dealer about this professional sound-balancing option.
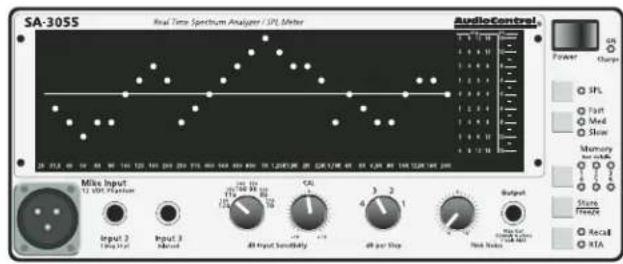
AudioControl SA-3055 Third-Octave Real Time Audio Analyzer

Concert Series Owner's Manual
Upgrading A Factory (OEM) System
Replacing a factory (OEM ^3 ) radio gets harder each model year. Besides the non-standard sizes, new models even feature volume and tuning controls imbedded right in the steering wheel! It's great for convenience, but tough on the knuckles. It seems the boys in Detroit and Japan want to make sure you don't throw out the original radio and replace it with some better model.
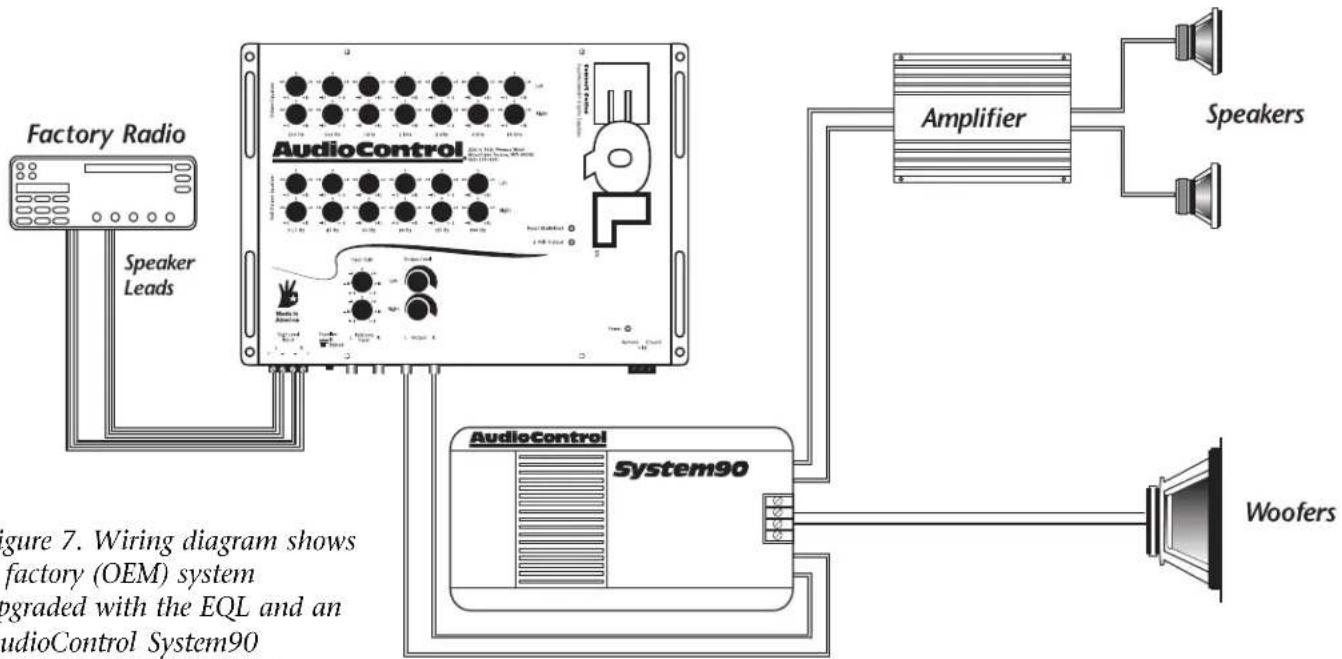
In all fairness, today's crop of factory radios is better. So rather than lose those nice steering wheel volume controls, we've come up with a way of improving your sound system by using the High Level Inputs on the EQL and the speaker leads from your factory radio, as shown in Figure 7 on page 17.
^3 OEM stands for Original Equipment Manufacturer, which used to mean that a car manufacturer actually built and installed each radio. Nowadays, a factory radio is made by an aftermarket company for installation by the car manufacturer.
It's as simple as moving the wires from the speakers to the EQL. Don't worry, the EQL is designed to effortlessly handle the higher signal levels coming from the factory radio, without a trace of overload or added distortion.
Upgrading Factory Systems
flowchart
graph TD
    A["Factory Radio"] -->|Speaker Leads| B["AudioControl"]
    B --> C["Amplifier"]
    C --> D["Speakers"]
    B --> E["AudioControl System90"]
    E --> F["Woofers"]
    style A fill:#f9f,stroke:#333
    style B fill:#ccf,stroke:#333
    style C fill:#cfc,stroke:#333
    style D fill:#fcc,stroke:#333
    style E fill:#cff,stroke:#333
    style F fill:#ffc,stroke:#333
Figure 7. Wiring diagram shows a factory (OEM) system upgraded with the EQL and an AudioControl System90 Powered Signal Processor to create a superlative 2-way system.

Concert Series Owner's Manual
Making Your Own Programmable Frequency Match Modules
The EQL comes with an 18 dB per octave Programmable Frequency Match low-cut filter module already set to 33 Hz. This will act as a subsonic filter, protecting your woofers. If you have large woofers (i.e., 12" or 15"), you may want a lower frequency module. With smaller woofers (i.e., 6" or 8"), use a higher frequency Programmable Frequency Match module.
Additional modules with pre-set frequencies are available from an authorized AudioControl dealer, or you can create a custom low cut filter module by using the following formula ^4 :
^4 For more details, read our — (HEY! Not another #%*&% plug disguised as a #%*&% footnote!) — ok, OK, OKAY! — We'll make a deal with you. Send us ten bucks, and we'll send you the whole set of Tech Papers and Tech Notes (which includes our Technical Note #1005 Crossovers Modules ). And you won't have to read another tiny footnote — unless you want to.
$$ \frac {7 2 0 0}{\text { Frequency (in Hz) }} = \text { Resistor Value (in kohms) } $$
EXAMPLE – For a 25 Hz filter, the formula yields a resistor with a value of
$$ \frac {7 2 0 0}{2 5} = 2 8 8 \mathrm{kohms} $$
NOTE: Use only resistors having a tolerance of five percent or better (i.e., 5%, 2%, etc.).
WARNING
TURN OFF THE SYSTEM BEFORE CHANGING THE MODULE, OR ELSE SOMETHING IN YOUR SYSTEM WILL BE DAMAGED!
CAUTION: The Programmable Frequency Match Module must always be installed, even if you are not using the filter. Failure to do so may damage the EQL.
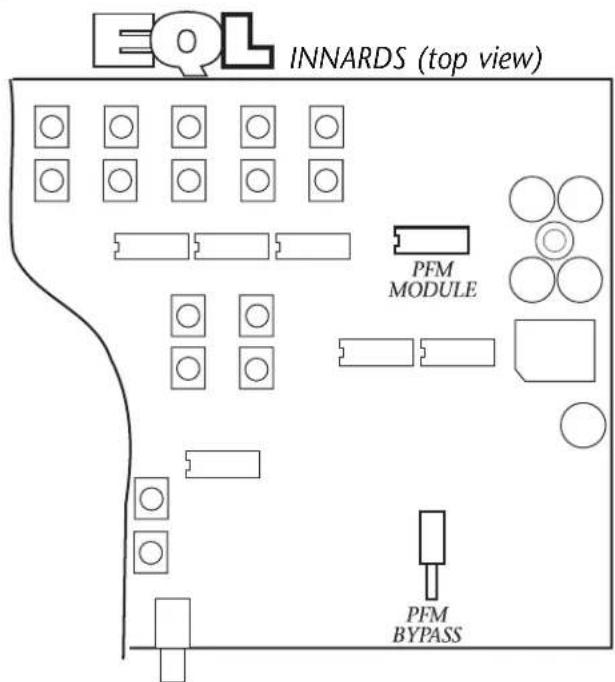
Figure 8. Removing the top panel lets you access the internal Programmable Frequency Match module and Bypass Switch.
Doing The Deed
- Turn the system power off.
- Remove the top panel and locate the Programmable Frequency Match module, as shown in Figure 8.
- Change the module.
- Replace the top panel and tighten the screws.
- Turn the system power on.

Concert Series Owner's Manual
Troubleshooting
Problem Try This
No Sound Make certain the PFM module is installed. See page 19.
Are the input and output level controls adjusted? See page 13.
No Power Check the +12 volt, ground, and remote turn-on leads.
Hiss Turn down the input levels on the amplifier. Use the output controls on the EQL to bring the volume back up. See page 13.
Problem Try This
Whine or Buzz
Check your ground connection. Ensure you are using a common ground direct to the vehicle battery.
Headache Turn down the volume.
Bragging!
Unabashed Plug!
In addition to the EQL, we manufacture a unique line of high-quality Performance Match Components, all designed to work together to give you the best-sounding system, regardless of the type of vehicle you own. These components have won so many awards, the walls in our lobby are SAGGING!
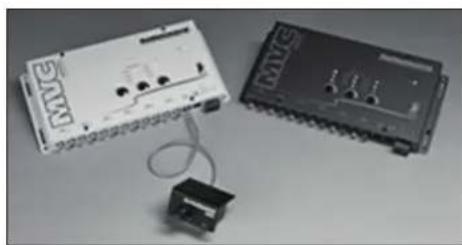
The Master Volume Control (MVC) is the ultimate in high Signal-to-Noise design. With your source unit all the way up it is at its maximum S/N ratio, not to mention approaching its highest voltage out. Pipe this hot clean signal down the line and control it with the MVC just prior to the signal's entry into the amps.
natural_image
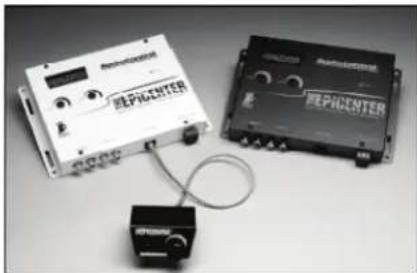
Two electronic devices with connected cables, one labeled 'MTC' and the other showing internal components (no readable text or symbols)The Epicenter ^™ is our patented bass restoration solution that will dramatically add impact or depth to your sound system, so you can really feel the bass.
The ESP-2 ^TM restores
natural_image
Three electronic devices: a white and black device labeled 'REPLICANTER', a black device with a cable, and a small black device (no visible text or symbols on the devices themselves)spaciousness to recordings to fill your vehicle with concert hall sound.
So visit an authorized AudioControl dealer and ask a salesperson about them.
AudioControl specializes in making good stereo sound better™!

Concert Series Owner's Manual
Warranty
People are scared of warranties. Lots of fine print. Lots of noncooperation. Months of waiting around. Well, don't be scared of this warranty. It's designed to make you rave about us to your friends. It's a warranty that looks out for you and helps you resist the temptation to have your friend "who's good with electronics" try to repair your Audio-Control EQL. So go ahead and read this warranty, then enjoy your new component for a few days before sending in the warranty card and comments.
"Conditional" doesn't mean anything ominous. The Federal Trade Commission tells all manufacturers to use the term to indicate that certain conditions have to be met before they'll honor the warranty. If you honor these conditions, we will warrant all materials and workmanship on your EQL for Five Years from the date you bought it, if installed by an authorized AudioControl dealer, and will fix or replace it, at our option, during that time. For you do-it-yourselfers we will warrant your EQL for One year.
Here are the conditions that make this warranty conditional:
- You have to fill out the warranty card and send it to us within 15 days after you purchase your EQL.
- You must keep your sales slip or receipt so you have proof when and from whom you bought your EQL. We're not the only company to require this, so it's a good habit to be in with any stereo purchase.
-
Your EQL has to have been originally purchased from an authorized AudioControl dealer. You do not have to be the original owner to take advantage of the warranty, but the date of purchase is still important, so be sure to get a copy of the sales slip from the original owner.
-
You cannot let anybody who isn't: (a) the AudioControl Factory; (b) an authorized service center; or (c) someone authorized in writing by AudioControl service your EQL. If anyone other than (a), (b) or (c) messes with your EQL Series II, that voids the warranty.
-
The warranty is also void if the serial number has been altered or removed, or if the AudioControl EQL is used improperly. Now, that sounds like a big loophole, but here is all we mean by it.
Unwarranted abuse is: (a) physical damage (our mobile products are not meant to be used as jack stands for your car); (b) improper connection (we have done the best we can to protect the inputs, however, 120 volts into the jacks can fry the innards of the poor beauty); (c) sadistic things.
This is the best mobile product we know how to manufacture, but if you use it for
the front bumper of your Baja bug and get it full of water and dirt, things will go wrong.
Assuming you conform to numbers 1 through 5, and it isn't all that hard to do, we get the option of deciding whether to fix your old unit or replace it with a new one.
Legalese Section
This is the only warranty given by AudioControl. This warranty gives you specific legal rights which vary from state to state.
Promises of how well your EQL will work are not implied by this warranty. Other than what we've covered in this warranty, we have no obligation, express or implied. Also, we will not be obligated for direct or indirect consequential damage to your system caused by hooking up the AudioControl EQL.
Failure to send in a properly-completed warranty card negates any service claims.

Concert Series Owner's Manual
Block Diagram
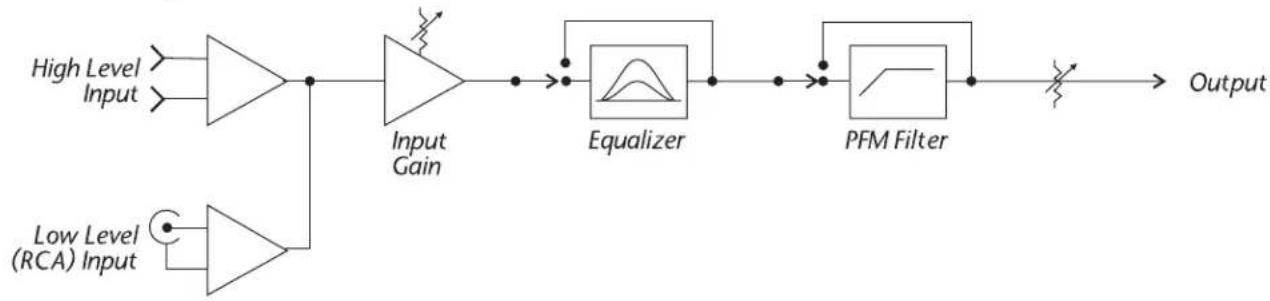
flowchart
graph LR
    A["High Level Input"] --> B["Input"]
    C["Low Level (RCA) Input"] --> D["Input"]
    B --> E["Input Gain"]
    D --> F["Low Level (RCA) Input"]
    E --> G["Equalizer"]
    F --> G
    G --> H["PFM Filter"]
    H --> I["Output"]
Figure 9. Block diagram of the EQL Equalizer/Level Matcher.
Specifications
All specifications are measured at 14.4 Vdc (standard automotive voltage).
Frequency Response: 10 Hz to 20 kHz ± 1 dB
Total Harmonic Distortion (THD): 0.005%
Signal to Noise Ratio (SNR): 110 dB at full output
Maximum Output Level: 7.5 volts rms
Input Gain: ±18 dB
PFM Filter Slope: 18 dB per octave
PFM Frequency: Programmable 15 to 100 Hz Factory Shipped @ 33Hz
Power Supply: Variable isolation. Transformer switching supply
Fuse Rating: 2 amps
Size: 1.25"h x 8.9"w x 6d"
Weight: 3 lbs
Balanced Input Yes
Country of origin: USA
© AudioControl 1998. AudioControl is a division of Electronic Engineering and Manufacturing, Inc. All rights are reserved.
AudioControl, AudioControl Industrial, Performance Match, Making Good Stereo Sound Better, EQX, ESP-2, MVC, ESP-3, System90, and The Epicenter are all trademarks of Electronic Engineering and Manufacturing, Inc.
This manual is written, designed, printed, folded and stuffed into a box in the U.S.A. on yet another rainy day.
Uh-oh! The roof is starting to leak...
Specifications are subject to change - just like our Pacific Northwet weather.
natural_image
Abstract grayscale illustration of a wavy, textured shape with floating bubbles (no text or symbols)
Concert Series Owner's Manual
Doodle Here!
- Concert Series Owner's Manual
- Quick Installation Info
- Table of Contents
- Introduction
- Congratulations!
- ☒ Dual Bandwidth Equalizer – 13 bands
- ☒ Level Matching
- ☒ Balanced Input
- Programmable Frequency Match Filter
- ☒ High Level Inputs
- IMPORTANT
- The Most Important Instruction Of All
- Description
- Equalizer and Input/Output Level Controls and Indicators
- Connections and Equalizer Bypass
- Programmable Frequency Match Filter Module (Inside)
- Installation
- System Applications
- Installation Precautions
- WARNING
- Mounting the EQL
- Connecting the EQL
- Adjusting the EQL
- Adjusting the EQL (cont'd)
- Using a Real Time Audio Analyzer (RTA)
- Upgrading A Factory (OEM) System
- Upgrading Factory Systems
- Making Your Own Programmable Frequency Match Modules
- Doing The Deed
- Troubleshooting
- Problem Try This
- Bragging!
- Unabashed Plug!
- Warranty
- Legalese Section
- Block Diagram
- Specifications
- Doodle Here!
Brand : AudioControl
Model : EQL
Category : Hi-Fi System