6XS - Hi-Fi System AudioControl - Free user manual and instructions
Find the device manual for free 6XS AudioControl in PDF.


| Product Type | Hi-Fi System |
| Brand | AudioControl |
| Model | 6XS |
| Channels | 6 |
| Dimensions (W x H x D) | 17 x 2.5 x 6 inches |
| Weight | 5 lbs (2.3 kg) |
| Power Supply | AC 100-240V, 50/60Hz |
| Power Consumption | 15W |
| Frequency Response | 10Hz - 20kHz ±0.5dB |
| Signal-to-Noise Ratio | >100dB |
| Total Harmonic Distortion | <0.01% |
| Inputs | 6x RCA, 6x Speaker Level |
| Outputs | 6x RCA, 6x Speaker Level |
| Crossover Type | Adjustable Low-Pass, High-Pass, Band-Pass |
| Crossover Slope | 12 dB/octave |
| Equalization | Parametric EQ, 5 bands per channel |
| Signal Sensing | Auto turn-on via DC offset or signal |
| Remote Control | Infrared remote included |
| Maintenance | Clean with a soft, dry cloth. Do not use liquids. |
| Safety | Keep away from moisture and heat sources. Disconnect power before cleaning. |
| Spare Parts & Repairability | Contact AudioControl support for spare parts. Repairs should be carried out by qualified personnel. |
| General Information | Designed for high-fidelity audio in home or car systems. Reliable and versatile. |
Frequently Asked Questions - 6XS AudioControl
User questions about 6XS AudioControl
0 question about this device. Answer the ones you know or ask your own.
Ask a new question about this device
Download the instructions for your Hi-Fi System in PDF format for free! Find your manual 6XS - AudioControl and take your electronic device back in hand. On this page are published all the documents necessary for the use of your device. 6XS by AudioControl.
USER MANUAL 6XS AudioControl
Six Channel Electronic Crossover Owners Enjoyment Manual
Congratulations on your purchase of the 6XS, the world's first six channel, 24 dB/octave crossover with subwoofer level control. Whether this is your first product from the rainforest dwellers of AudioControl or you are already a firm believer, you will definitely enjoy the 6XS, as it quite honestly may be the last electronic crossover you will ever need to buy. All of this comes from AudioControl, the experts at designing and manufacturing performance autosound crossovers, equalizers and measurement tools.
Now before you start salivating too much just thinking about what the 6XS can do for your system, take a few minutes to sit back, have a cold beverage, and read through this manual. It contains lots of useful facts and information (and besides, we spent a lot of time writing it)!
FEATURES AND HIGHLIGHTS OF 6XS
Here are some of the cool features that make your 6XS crossover so special:
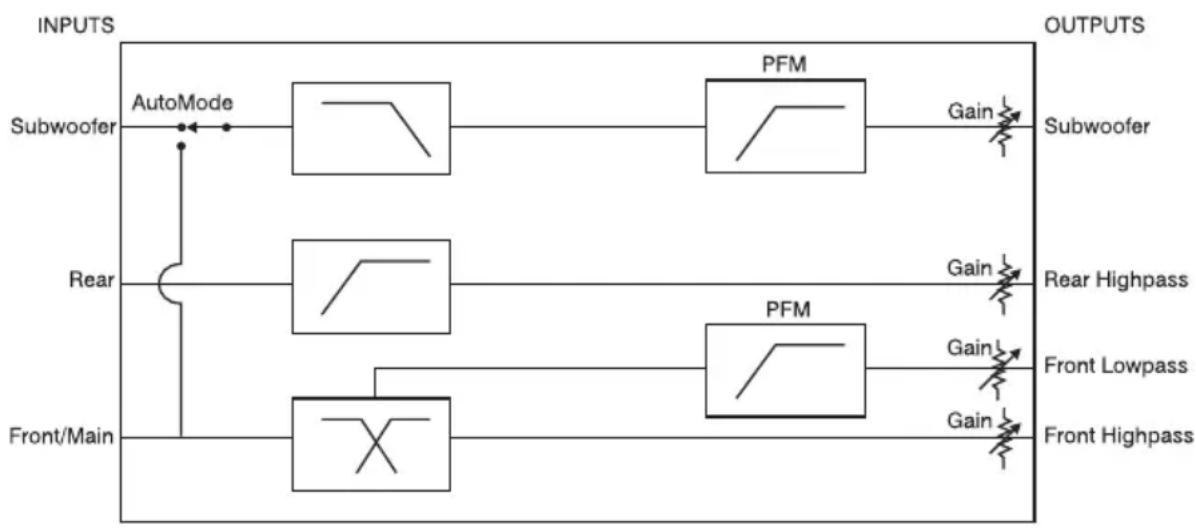
AutoMode ^™ Inputs: Whether your source unit has two, four, or six outputs, the 6XS will automatically switch the inputs to match.
24 dB/Octave Linkwitz-Riley Alignment Crossover: The programmable 24 dB/Octave audiophile caliber crossover in the 6XS is the same topology as in many other award winning Audio-Control components. Needless to say, it is a far cry from the wimpy crossovers that find their way into many amplifiers these days. What is the benefit of fine tuning your system if you cannot accurately route the proper frequencies to the proper amplifier channels?
Remote Mounted Subwoofer Level Control: Need a little more bass to impress your buddies? Or maybe you want to tone it down to not scare off your date. Whatever the case, the 6XS has a subwoofer output level control that allows you to control the amount of signal that goes to your subwoofer outputs. In addition, you have the ability to mount the chassis of the 6XS in the rear of the car (we recommend staying away from the bumper), and mount the dash control in some easily accessible location. The dashboard of your car comes to mind.
13 Volt Pre-Amp Line Driver: The 6XS offers a high quality line driver that takes the low output voltage of a source unit and increases it up to 13 volts peak. This allows you to maximize the signal-to-noise of your system and drive your amplifiers to their maximum output without clipping. No hiss, clicks, or pops plus maximum sound quality.
PFM Subsonic Filter: This unique feature is legendary with many AudioControl fanatics for it’s ability to fine-tune the bass response of any system. No need to waste power on nasty subsonic information when your Programmable Frequency Match (PFM) filter will help you clean things up.
Bulletproof Warranty: The most important feature of all. Every AudioControl product is thoughtfully designed and manufactured by the occupants of our rainforest factory. We make every effort to insure that you will have many years of enjoyment out of your 6XS.
We also highly recommend that you allow your authorized AudioControl dealer to per-
form the installation of your 6XS to maximize the performance of this nifty device. Not only do they have all the right knowledge and tools, but in the unlikely chance your 6XS should stop working, we will back it with a limited five years parts and labor warranty. Should you choose to install it yourself, we will still give you one-year parts and labor warranty. To activate your warranty, you need to FILL OUT AND SEND

IN YOUR WARRANTY CARD!
We also recommend that you save your invoice or sales slip as proof of installation and ownership. Not only is it necessary for warranty purposes, but should your 6XS “disappear” one day while your car is parked at your local latte’ stand, you will find insurance companies very unforgiving without proof of purchase.
QUICK INSTALL INFORMATION
We interrupt your reading of this manual to provide the impatient people with “Quick Install” information and guidelines:
1) Using the following system drawings as reference, decide where in the signal path to place the 6XS. It needs to be before your amplifiers, but after your source unit, equalizers, CD player, VCR or blender.
2) Connect the input RCA connectors on your 6XS to your source unit.
3) Connect the output RCA connectors from your 6XS to your amplifier(s). You will want the “Highpass” outputs to go to your midrange and/or tweeter amplifier(s) while your “Subwoofer” output connects to the subwoofer amplifier. If you value your speakers, you will want to be careful here.
4) Connect the + 12 volt power, ground, and remote turn-on to the appropriate connections and turn the system on.
Important Note: If any of the previous QUICK INSTALLATION information does not make sense, than immediately STOP what you are doing and read the rest of this manual. If it still does not make sense, you will want to run to your nearest authorized Audio-Control dealer to have them install your 6XS. Heck, if you don't think you need to know more, you should still read on, because you can never know too much.
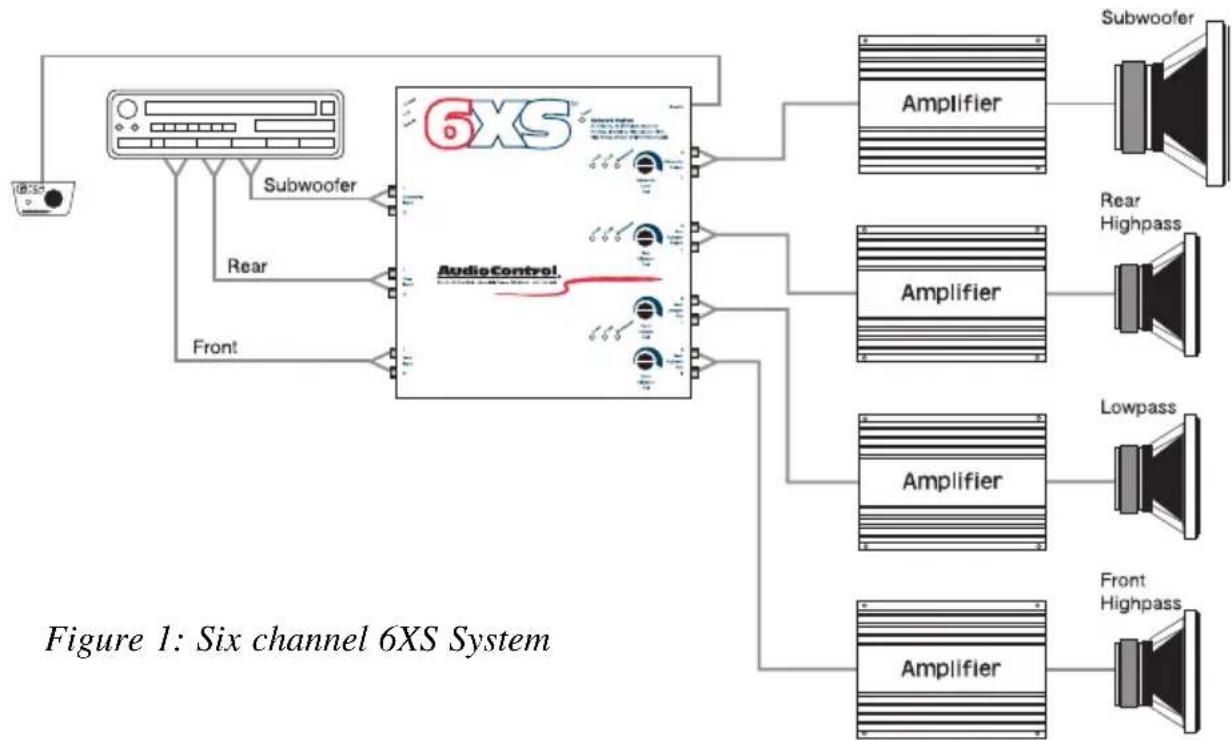
flowchart
graph TD
    A["Input Signal"] --> B["6XS System"]
    B --> C["Amplifier"]
    B --> D["Amplifier"]
    B --> E["Amplifier"]
    B --> F["Subwoofer"]
    B --> G["Rear Highpass"]
    B --> H["Front Highpass"]
    C --> I["Subwoofer"]
    D --> J["Rear Highpass"]
    E --> K["Lowpass"]
    F --> L["Front Highpass"]
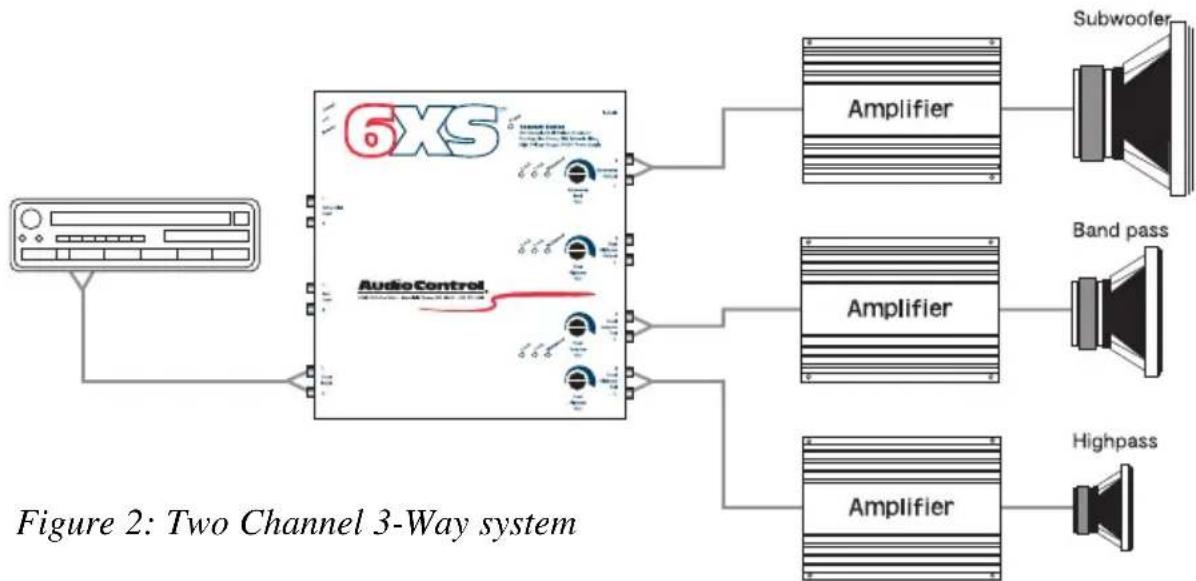
flowchart
graph LR
    A["6XS Audio Control Unit"] --> B["Amplifier"]
    A --> C["Amplifier"]
    A --> D["Amplifier"]
    B --> E["Subwoofer"]
    C --> F["Band pass"]
    D --> G["Highpass"]
    style A fill:#f9f,stroke:#333
    style B fill:#ccf,stroke:#333
    style C fill:#ccf,stroke:#333
    style D fill:#ccf,stroke:#333
GUIDED TOUR OF 6XS
The Top View
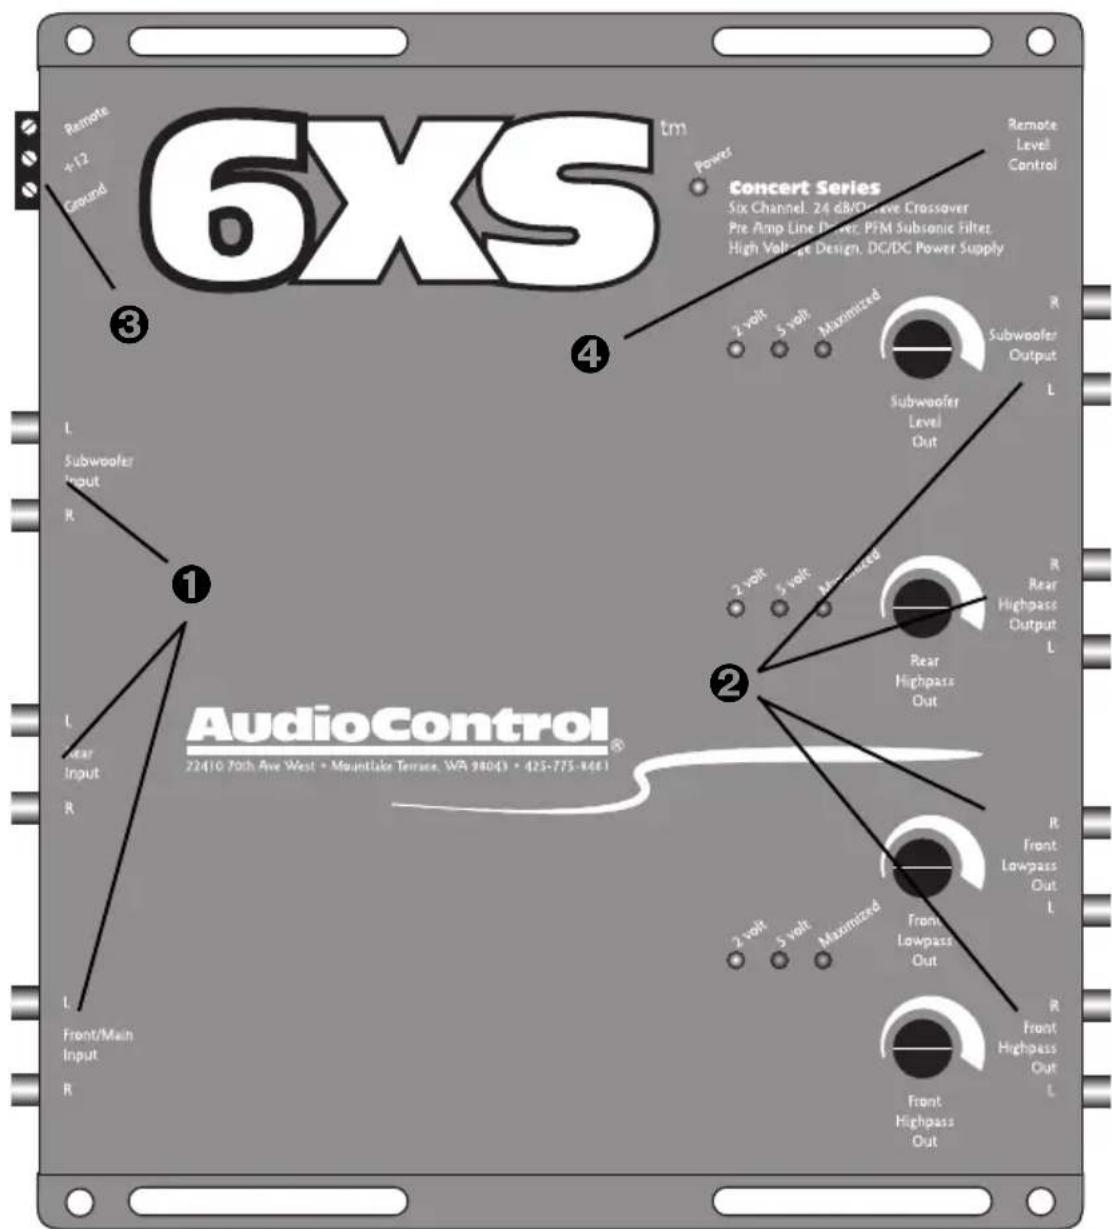
Figure 3: Top View Of The 6XS
1) Inputs: The 6XS has three pairs of inputs; FRONT, REAR, AND SUBWOOFER. These inputs should get their signals from the main source unit/head unit. If your source unit has front, rear, and subwoofer outputs (aka “six channel”), connect them to the identical inputs on your 6XS. However, if you are only using front and rear signals (four channel) or just two channels, the Auto Mode circuitry in your 6XS will automatically feed your subwoofer channel with signal from your front inputs.
2) Outputs: These RCA connectors should be connected to the amplifier(s) that are in your system. Depending upon your system configuration, you may or may not need to use all of the outputs.
3) Power Connectors: This nifty connector is a godsend to anyone who has tried to wire up their gear with their head crammed in a trunk. You can wire up the power, ground, and remote turn-on while conveniently standing outside your car and then casually plug it in the back of your 6XS.
4) Remote Level Control: This output connects, via a cable that looks strangely like it came from your phone, to a knob assembly that should be mounted in a location that is easily accessible while you are operating your system.
UNDER THE COVER
Ground Isolation Selector: Occasionally alternator whine may appear in a system because the source unit and amplifier(s) are
using different grounding schemes. To help in this situation, we have provided alternative grounding connections. Make sure your system is turned OFF before you move these jumpers.
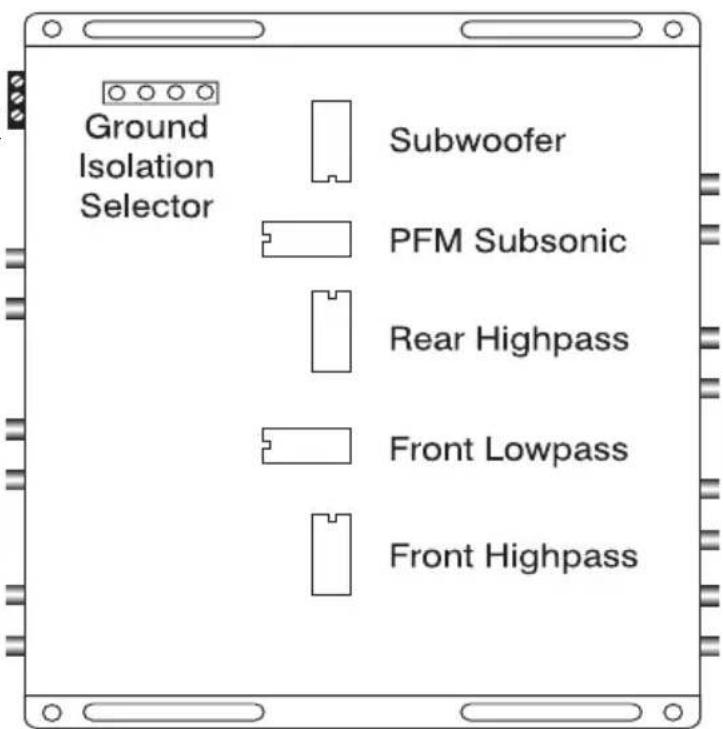
Figure 4: Under the 6XS cover
WIRING THE AUDIO (without coffee) WIRING THE
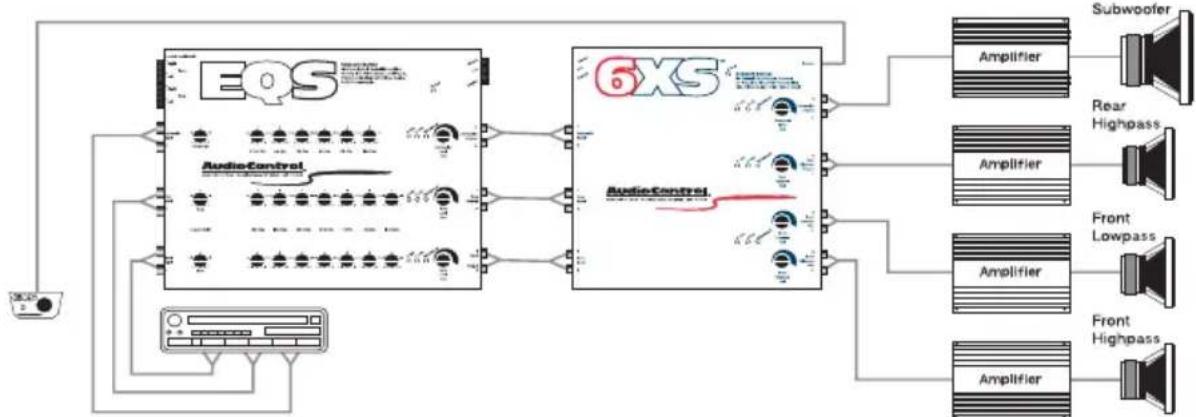
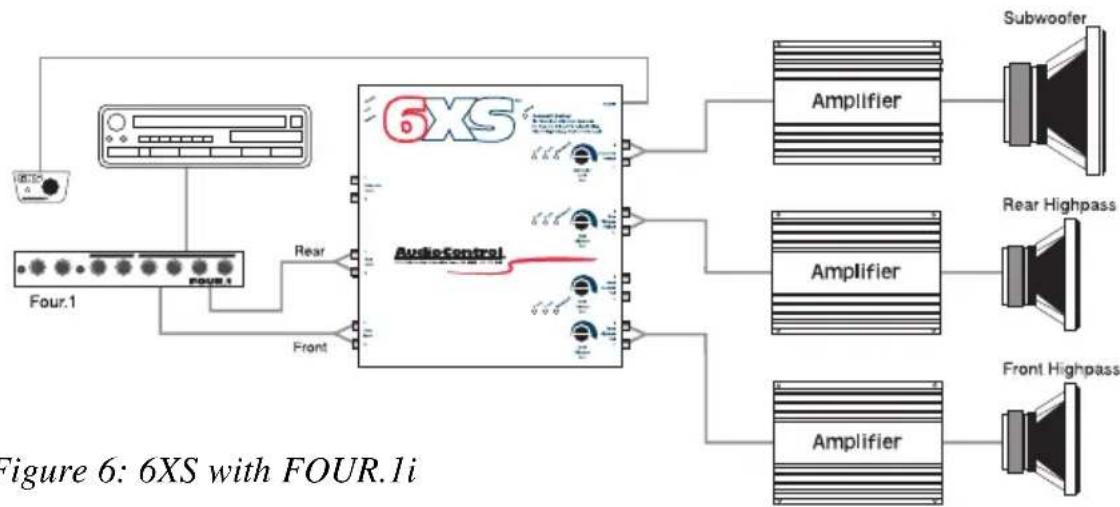
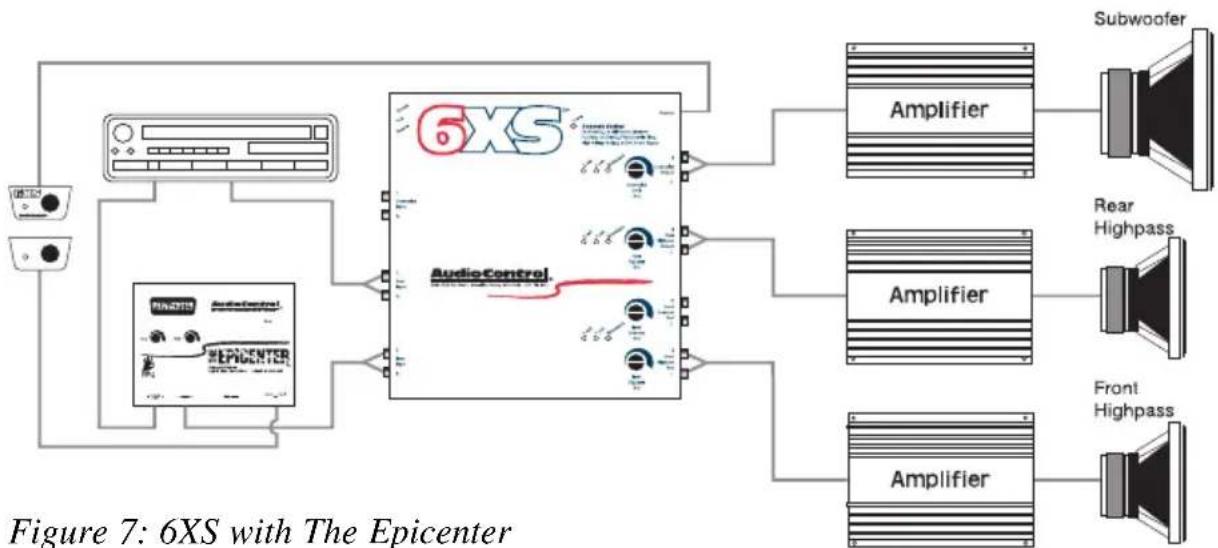
As you may already have guessed, there are numerous ways to configure the 6XS in your audio system. Spend a little quality time planning out your system and even sketching it out on paper if you can. The following diagrams are just a few of the system options:
flowchart
graph TD
    EQS["EQS"] --> AudioControl1["Audio-Control"]
    AudioControl1 --> 6XS["6XS"]
    6XS --> Amplifier1["Amplifier"]
    6XS --> Amplifier2["Amplifier"]
    6XS --> Amplifier3["Amplifier"]
    6XS --> Amplifier4["Amplifier"]
    6XS --> Subwoofer1["Subwoofer"]
    6XS --> RearHighpass1["Rear Highpass"]
    6XS --> FrontLowpass1["Front Lowpass"]
    6XS --> FrontHighpass1["Front Highpass"]
    AudioControl1 --> Control1
    6XS --> Control2
    6XS --> Control3
    6XS --> Control4
    6XS --> Control5
    6XS --> Control6
    Control1 --> AudioControl2
    Control2 --> AudioControl3
    Control3 --> AudioControl4
    Control4 --> AudioControl5
    Control5 --> AudioControl6
    style 6XS fill:#f9f,stroke:#333,stroke-width:2px
    style 6XS fill:#ccf,stroke:#333,stroke-width:2px
    style 6XS fill:#cfc,stroke:#333,stroke-width:2px
    style 6XS fill:#fcc,stroke:#333,stroke-width:2px
Figure 5: 6XS with EQS
flowchart
graph TD
    A["Four.1"] --> B["6XS"]
    B --> C["AudioControl"]
    C --> D["Amplifier"]
    D --> E["Subwoofer"]
    C --> F["Amplifier"]
    F --> G["Rear Highpass"]
    C --> H["Amplifier"]
    H --> I["Front Highpass"]
    B --> J["Rear"]
    B --> K["Front"]
flowchart
graph TD
    A["6XS"] --> B["AudioControl"]
    B --> C["Amplifier"]
    B --> D["Amplifier"]
    B --> E["Amplifier"]
    C --> F["Subwoofer"]
    D --> G["Rear Highpass"]
    E --> H["Front Highpass"]
    I["Monitor"] --> A
    J["Ground"] --> A
AutoMode Inputs: If your source unit has front, rear, and subwoofer outputs (aka “six channel”), connect them to the identical inputs on your 6XS. However, if you are only using front and rear signals (four channel) or just two channels, the Auto Mode circuitry in your 6XS will automatically feed your subwoofer channel with signal from your front inputs.
INSTALLING THE CHASSISINSTALLING THE CHASSIS
Up to this point everything you have read has served to educate you on the operations of 6XS. We are sure that you are chomping at the bit to install 6XS so we recommend you read the following sections very carefully.
Placement: The 6XS needs to be installed in the signal path between your source unit and before any amplifiers. Since you should not be changing the crossover modules while you are driving, the physical chassis of your 6XS can be mounted anywhere within the vehicle.
Mounting: Once you have selected a permanent mounting location for the chassis, position the unit and mark the appropriate mounting holes with a felt-tip pin or scratch awl. Before doing anything else, make sure you are not about to drill a hole in a gas tank or pierce any existing wiring. Nothing ruins your day more than an expensive repair bill. Drill a small pilot hole and secure the chassis of the 6XS with self-tapping screws.
ELECTRICAL CONNECTIONS
WARNING: Failure to disconnect the negative terminal of your battery prior to the installation of your 6XS can result in a warm tingly feeling.

Remote In: Connect a 22 to 18 gauge wire from the head-unit's remote turn-on to the “Remote In” connector on the 6XS.
Positive (+12V) Connection: Insert an 18 gauge or larger wire into the connector labeled “Power” on the nifty connector of your 6XS. Connect it to a good constant source of 12 volts (we suggest the battery), fused at 1 amp.
Ground Connection: Use the same gauge wire as you did for the positive connector and run it from the “Ground” connector on the 6XS to the negative terminal of the battery, a ground bus, or a verified ground location. The factory head unit ground is not a good ground!
When the electrical connections are complete, you may reconnect the negative terminal to your battery.
DASH CONTROL INSTALLATION
Placement and Mounting: The dash control may be mounted under the dash using its own bracket or through a custom hole in the dash. It should be mounted within reach of the driver and in a spot where the LED is plainly visible. The dash control mounts with two screws, which attach to the underside of the dashboard. Slide under the dash and place the dash control in its mounting position. Mark the mounting holes, drill pilot holes, and secure with two screws.
Custom Installation: For that custom look, the dash control can be flush mounted in the dashboard or center console. Disassemble the 6XS dash control from the mounting bracket. Start by pushing the LED back out of its holder followed by removing the circuit board and rotary control from the bracket. Drill a 932 hole in the dashboard for the control along with a 18 hole for the lock tab and a 1364 hole for the LED holder. Reassemble the dash control components on the dashboard and apply the new label over the openings.
Dual-Color LED: The LED on your dash control is rain forest green and should brighten or dim when you turn the knob either clockwise or counter clockwise. Should you wish to change the color to amber, remove the plug connected to the LED and turn it 180 degrees and plus it back in.
Figure 8: Dash mount remote
SETTING THE CROSSOVER MODULES
Selecting the Crossover Frequencies: Your 6XS comes “preloaded” with crossover modules that will allow it to work in a number of system configurations. Here are the factory settings:
| Outputs Channel | Four/Six Two Input Channel Input | |
| Front Highpass 2 | 50 Hz and up 250Hz and up | |
| Front Lowpass 90 | Hz to 250Hz 90 Hz to | 250 Hz |
| Rear Highpass 250 Hz and up | ||
| Subwoofer | 30 Hz to 90 Hz | 30 Hz to 90Hz |
Should your system require different frequencies than what comes with the 6XS, fear not, as you can change the crossover modules to accommodate just about any system configuration.
Most importantly, we recommend that you select crossover frequencies according to the characteristics of your speakers. We suggest the following ranges:
Tweeters: 3500 Hz and higher
Midrange: 250 Hz to 3500 Hz
Midbass: 80 Hz to 250 Hz
Subwoofers: 150 Hz and lower
As there is probably a good chance that you are not using Audio-Control speakers (because we don't make speakers), we suggest you contact the manufacturers of your speakers for their recommendation.
The Legacy Of Crossover Modules To change the crossover frequency on your 6XS, AudioControl products use a nifty plug-in module. Crossover modules are more accurate and reliable than most knobs or simple switches that are offered by other manufactures and come on many amplifiers. Your authorized AudioControl dealer will generally stock a wide selection of crossover modules for your 6XS should you wish to change the crossover frequencies.
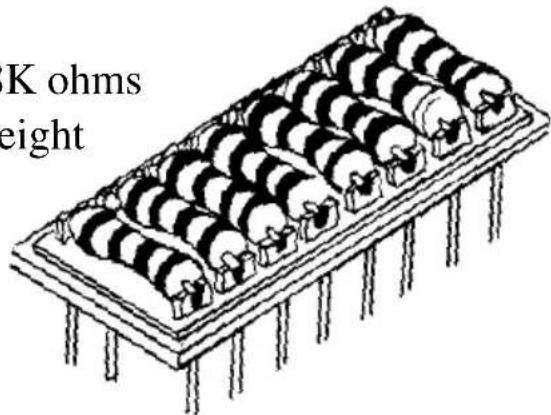
If your system design calls out for crossover frequencies that your dealers does not stock, you can create custom modules by using the following formula:
7200 = Resistor Value In Kilohms
Frequency (Hz)
Example:
For a 2500Hz module - 7200/2500=2.88K ohms
The 24 dB crossover module requires eight resistors of this value.
Note: Use 14 watt carbon or metal film resistors of a 5% tolerance or better.
USING THE PFM
(PROGRAMMABLE FREQUENCY MATCH) FILTER
Many car audio systems truly push the limits of their subwoofer . . . without really knowing it. Tuned enclosures affect the roll-off of many speakers, yet lots of source material forces the speakers to play lower than expected. The net result is wasted amplifier power and damaged speakers. The AudioControl PFM (Programmable Frequency Match) filter is a programmable subsonic filter. It allows you to only let the speaker(s) play as low as they should be playing. Because every system is different, we allow you to change the PFM roll-off frequency to whatever you choose.
On most systems, the factory installed module (33Hz) is fine. However, if you know the tuning frequency of your speaker enclosure (porting frequency or 3dB down point), you might try setting your PFM module to that frequency. If you want to protect your speaker system even more, you might even try a higher frequency.
TROUBLESHOOTING
No Power: If the Power LED on your 6XS will not turn on, check to make sure that the power wire and remote turn on wires are connected or a fuse has not blown.
Sounds Distorted: Should your system sound distorted or your speakers are moving way too much, you should first decrease the remote level control and output levels on your 6XS. If your speaker's are still moving way too much or don't sound good, check your crossover modules to make sure they are plugged in correctly and that you have selected the proper frequencies for your speaker system.
Remote Level Control: The top three things that cause the remote level control to not operate properly are the cable, the cable, and the cable. If these check out fine, than go back and check the cable.
Note: If you unplug the cable from the chassis, you will get maximum output form the subwoofer.
IF YOU LIKE 6XS, YOU'LL LOVE...
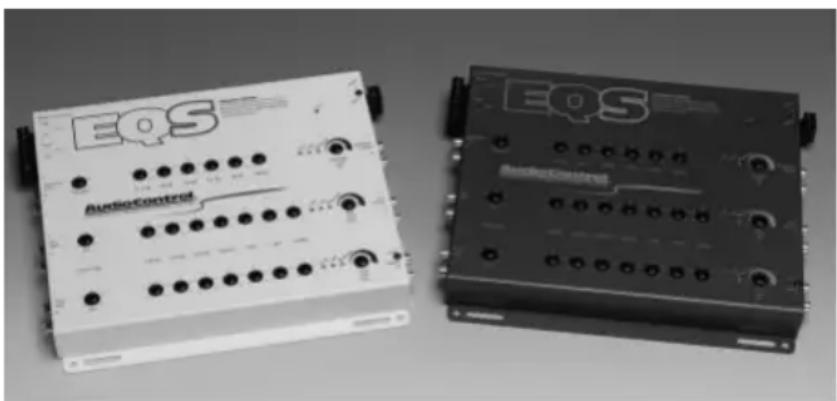
The EQS six channel trunk mount equalizer. Thirteen full octave, 1/2-octave, and 1/3 octave spaced bands help tame even the most wicked acoustical environment, your car. In addition it will almost plug directly into your 6XS.
natural_image
Two electronic control modules labeled EQS, one with ports and buttons, the other with a black panel (no visible text or symbols on the modules themselves)If more signal voltage
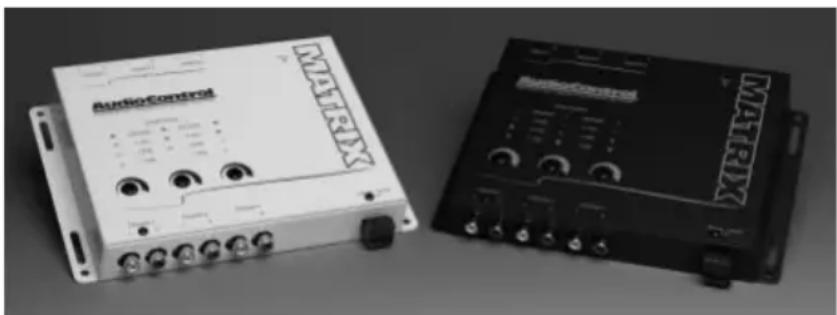
is necessary in your system, don't feel alone. Many customers have added our Matrix six channel line driver and felt like they had new amplifiers in their systems.
Do you want to make your home audio system sound just as good as your car audio system? Good news!
natural_image
Two audio control devices shown from different angles (no visible text or labels on the devices themselves)AudioControl makes a complete line of products signal processors that do the same amazing things for your home audio or theater system. Unfortunately there is just not enough space in this manual to mention every product we build, so we recommend you visit our web site at www.audiocontrol.com.
And now a word from the legal department...
THE WARRANTY
People are scared of warranties. Lots of fine print. Months of waiting around. Well fear no more as this warranty is designed to allow you to fully enjoy your 6XS while raving about us to your friends. It’s a warranty that looks out for you and helps you resist the temptation to have your friend, “...who’s good with electronics”, try to repair your AudioControl product. So go ahead, read this warranty, and then take a few days to enjoy the 6XS before sending in the warranty card and comments.
“Conditional” doesn’t mean anything ominous. The Federal Trade Commission tells all manufacturers to use the term to indicate that certain conditions have to be met before they’ll honor the warranty. If you meet all of these conditions, we will warrant all materials and workmanship on the 6XS for one year from the date you bought it (five years if it is installed by an authorized United States AudioControl dealer). We will fix or replace it, at our option, during that time.
Here are the conditional conditions:
-
You have to fill out the warranty card and send it to us within 15 days after purchasing your 6XS.
-
You must keep your sales receipt for proof of purchase showing when and from whom the unit was bought. We're not the only ones who require this, so it's a good habit to get into with any major purchase.
-
Your 6XS must have originally been purchased from an authorized AudioControl dealer. You do not have to be the original owner, but you do need a copy of the original sales slip.
-
You cannot let anybody who isn't (A) the AudioControl factory; (B) somebody authorized in writing by AudioControl to service your 6XS. If anyone other than (A) or (B) messes with your 6XS, that voids your warranty.
-
The warranty is also void if the serial number is altered or removed, or if the 6XS has been used improperly. Now that sounds like a big loophole, but here is all we mean by it.
Unwarranted abuse is: (A) physical damage (don’t use the 6XS for a jack stand); (B) improper connections (120 volts into the power jack can fry the poor thing); (C) sadistic things. This is the best mobile product we know how to build, but if you mount it to the front bumper of your car, something will go wrong.
- If an authorized United States AudioControl dealer installs the 6XS, the warranty is five years.
Assuming you conform to 1 through 6, and it really isn't all that hard to do, we get the option of fixing your old unit or replacing it with a new one.
LEGALESE SECTION
This is the only warranty given by AudioControl. This warranty gives you specific legal rights that vary from state to state. Promises of how well the 6XS will perform are not implied by this warranty. Other than what we have covered in this warranty, we have no obligation, express or implied. Also, we will not be obligated for direct or indirect consequential damage to your system caused by hooking up your 6XS.
Failure to send in a properly completed warranty card negates any service claims.
6XS BLOCK DIAGRAM
flowchart
graph LR
    A["Subwoofer"] --> B["AutoMode"]
    B --> C["PFM"]
    C --> D["Subwoofer"]
    E["Rear"] --> F["PFM"]
    F --> G["Gain"]
    G --> H["Rear Highpass"]
    I["Front/Main"] --> J["PFM"]
    J --> K["Gain"]
    K --> L["Front Lowpass"]
    M["Front/Main"] --> N["PFM"]
    N --> O["Gain"]
    O --> P["Front Highpass"]
6XS SPECIFICATIONS
All specifications are measured at 14.4 VDC (standard automotive voltage).
As technology advances, AudioControl reserves the right to continuously change our specifications, like our weather, although we are working on it.
Maximum output level 9.5 V rms /13.5 V peak
Input/output channels...... Selectable: 2, 4 or 6 channels
Signal gain.... 0 to +12 dB front/rear
0 to +18 subwoofer
Frequency response.... 10Hz-100kHz; ±1dB
Total harmonic distortion 0.005%
Crossover slope.... 24 dB/Octave Linkwitz-Riley
Crossover frequency ...... Programmable 15 to 3500 Hz
PFM subsonic filter slope.... 18 dB/Octave Chebyshev
PFM frequency...... Programmable 15 to 100 Hz
Signal to Noise ratio ....- 110dB
Input Impedance 20 K ohms
Output Impedance.... 150 Ohms
Power supply ...... High headroom PWM
Power draw....400 mA
Recommended fuse rating.... 2 amps
Size 7.25” W x 7.7” D x 1.25” H
Weight 2.5 lbs.
Warranty in U.S. 1 year parts and labor 5 years when installed by dealer
© 2002, AudioControl, a division of Electronic Engineering and Manufacturing, Inc. All rights reserved
AudioControl, Making Good Stereo Sound Better, 6XS, EQS, and The Epicenter are all trademarks of Electronic Engineering and Manufacturing, Inc.
This manual was conceived, designed, and written during a windy, and dreary rain-drenched period (which is all of the time) at our home in the Pacific Northwest Rainforest. The wheat beer was cold and so was the weather.
AudioControl®
making good stereo sound better®
22410 70th Avenue West
Mountlake Terrace, WA 98043
Phone 425-775-8461 • Fax 425-778-3166
www.audiocontrol.com
P/N 913-065-0
- Six Channel Electronic Crossover Owners Enjoyment Manual
- FEATURES AND HIGHLIGHTS OF 6XS
- IN YOUR WARRANTY CARD!
- QUICK INSTALL INFORMATION
- GUIDED TOUR OF 6XS
- The Top View
- UNDER THE COVER
- WIRING THE AUDIO (without coffee) WIRING THE
- INSTALLING THE CHASSISINSTALLING THE CHASSIS
- ELECTRICAL CONNECTIONS
- DASH CONTROL INSTALLATION
- SETTING THE CROSSOVER MODULES
- USING THE PFM
- (PROGRAMMABLE FREQUENCY MATCH) FILTER
- TROUBLESHOOTING
- IF YOU LIKE 6XS, YOU'LL LOVE...
- THE WARRANTY
- LEGALESE SECTION
- 6XS SPECIFICATIONS
- AudioControl®
Brand : AudioControl
Model : 6XS
Category : Hi-Fi System