
BIM25H34 - Ice Maker Summit - Free user manual and instructions
Find the device manual for free BIM25H34 Summit in PDF.


| Product type | Built-in ice maker |
| Brand | Summit |
| Model | BIM25H34 |
| Dimensions (W x H x D) | 63.5 x 86.4 x 61 cm (approx) |
| Net weight | 34 kg (approx) |
| Power supply | 220-240 V, 50 Hz, 2.5 A |
| Production capacity | Up to 25 kg of ice per 24 h |
| Storage capacity | Approximately 7 kg of ice |
| Ice type | Cube-shaped ice |
| Production cycle | Average duration: 15-20 minutes per batch |
| Refrigerant | R134a (or eco-friendly equivalent) |
| Main functions | Automatic ice production, level indicator, automatic shut-off when bin is full |
| Maintenance and cleaning | Regular cleaning of the filter, bin, and water circuit with a suitable product |
| Safety | Overheat protection for compressor, automatic shut-off in case of water shortage |
| Spare parts and repairability | Filter, ice bin, door, installation kit available from Summit after-sales service |
| General information | Built-in undercounter installation, requires water connection and drainage |
Frequently Asked Questions - BIM25H34 Summit
User questions about BIM25H34 Summit
0 question about this device. Answer the ones you know or ask your own.
Ask a new question about this device
Download the instructions for your Ice Maker in PDF format for free! Find your manual BIM25H34 - Summit and take your electronic device back in hand. On this page are published all the documents necessary for the use of your device. BIM25H34 by Summit.
USER MANUAL BIM25H34 Summit
natural_image
Exterior view of a stainless steel refrigerator with ventilation grilles (no text or symbols visible)Write Serial Number of unit here:
Summit Appliance Division
ISO 9001:2015 registered
770 Garrison Avenue
Bronx, New York 10474
www.summitappliance.com
IMPORTANT SAFETY INSTRUCTIONS
| WARNING | TO REDUCE THE RISK OF FIRE, ELECTRICAL SHOCK, OR INJURY WHEN USING YOUR ICE MAKER, FOLLOW THESE BASIC PRECAUTIONS: |
| READ ALL INSTRUCTIONS BEFORE USING THE ICE MAKER.NEVER CLEAN ICE MAKER PARTS WITH FLAMMABLE FLUIDS. THE FUMES CAN CREATE A FIRE HAZARD OR EXPLOSION.DO NOT STORE OR USE GASOLINE OR ANY OTHER FLAMMABLE VAPORS AND LIQUIDS IN THE VICINITY OF THIS OR ANY OTHER APPLIANCE. THE FUMES CAN CREATE A FIRE HAZARD OR EXPLOSION.DANGER:RISK OF CHILD ENTRAPMENTCHILD ENTRAPMENT AND SUFFOCATION ARE NOT PROBLEMS OF THE PAST. JUNKED OR ABANDONED APPLIANCES ARE STILL DANGEROUS. . . EVEN IF THEY WILL “JUST SIT IN THE GARAGE A FEW DAYS.”BEFORE YOU THROW AWAY YOUR OLD ICE MAKER:TAKE OFF THE DOOR. LEAVE THE SHELVES IN PLACE SO THAT CHILDREN MAY NOT EASILY CLIMB INSIDE.NEVER ALLOW CHILDREN TO OPERATE, PLAY WITH, OR CRAWL INSIDE THE APPLIANCE.- SAVE THESE INSTRUCTIONS - | |
TABLE OF CONTENTS
Important Safety Instructions .... 1
Installation Instructions 2 - 3
Before Using Your Ice Maker....2
Installation of Your Ice Maker 2
Electrical Connection 2 - 3
Connecting the Water Supply 3
Reversing the Door Swing 3
Operating Your Ice Maker 4
Initial Start-Up Operation
For Best Performance of Your Ice Maker
On/Off Switch
Storage Compartment
Care and Maintenance 5
Cleaning Your Ice Maker
Power Failure
Vacation Time/Storage
Moving Your Ice Maker
Energy-Saving Tip
Problems with Your Ice Maker 6
Limited Warranty 7
French version of this manual 8 - 15
INSTALLATION INSTRUCTIONS
Before Using Your Ice Maker
- Remove the exterior and interior packing.
- Check to be sure you have all of the following parts:
1 removable ice bin
1 plastic scoop
25 ft. hose
1 instruction manual
- CAUTION: After unpacking you MUST allow this appliance to stand upright for at least 2 hours to allow the lubricant and refrigerant to drain back into the compressor and stabilize. Failure to do so may adversely affect performance and the lifetime of the unit.
- Clean the interior surface with lukewarm water using a soft cloth.
Installation of Your Ice Maker
- This appliance is designed to be either free-standing or built-in (fully recessed). If it is built-in, leave at least 3/16" at both sides, 1/16" at the top and 2" at the rear. Be sure that airflow under the appliance is not blocked.
- Place your ice maker on a floor that is strong enough to support the ice maker when it is fully loaded. To level your ice maker, adjust the leg at the front of the unit.
- Locate the ice maker away from direct sunlight and sources of heat (stove, heater, radiator, etc.). Direct sunlight may affect the outer surface of the unit and heat sources may increase electrical consumption.
- It is recommended that this appliance always be operated in an ambient temperature of at least 60^ F and under 85^ F. The appliance may be exposed to lower or higher temperatures, but only for short periods of time, and the temperature should never be below 45^ F. Extremely cold ambient temperatures may cause the ice maker not to perform properly.
- Avoid locating the ice maker in moist areas. Too much moisture in the air will cause frost to form quickly on the evaporator, requiring more frequent defrosting of the ice maker.
- Plug the ice maker into an exclusive, properly-installed grounded wall outlet. Do not under any circumstances cut or remove the third (ground) prong from the power cord. Any questions concerning power and or grounding should be directed toward a certified electrician or an authorized SUMMIT products service center.
Electrical Connection
√ ELECTRICAL SHOCK HAZARD √
IMPROPER USE OF THE GROUNDED PLUG CAN RESULT IN THE RISK OF ELECTRICAL SHOCK. IF THE POWER CORD IS DAMAGED, HAVE IT REPLACED THROUGH AN AUTHORIZED SUMMIT PRODUCTS SERVICE CENTER.
- This ice maker should be properly grounded for your safety. The power cord of this ice maker is equipped with a three-prong plug which mates with standard three-prong wall outlets to minimize the possibility of electrical shock.
- Do not under any circumstances cut or remove the third ground prong from the power cord supplied.
- Never use a two-prong grounding adapter.
- Never use an extension cord to connect power to the unit. Failure to follow these instructions can result in fire or electrical shock.
- When a two-prong wall receptacle is encountered, contact a qualified electrician to have it replaced with a 3-prong receptacle in accordance with applicable electrical codes.
- This ice maker requires a standard 115/120 volts AC, 60Hz electrical outlet with three-prong
ground. The appliance can resist temporary voltage fluctuations from -15 to +10%.
- To prevent accidental injury, the cord should be secured behind the ice maker and not left exposed or dangling.
Connecting the Water Supply
WARNING
IMPROPER WATER LINE CONNECTION MAY RESULT IN FLOODING.
YOU MUST USE A LICENSED PLUMBER.
REVIEW STATE AND LOCAL PLUMBING CODES BEFORE INSTALLATION.
- Not all the necessary hardware is provided for installation so you should hire a professional licensed plumber to complete the installation.
- Connect tubing (supplied with unit) to the nearest cold water source. Connect sufficient tubing to the unit to allow the appliance to be moved freely for cleaning and service. Also make sure that the tubing is not pinched or damaged during transportation.
- Position the unit to allow free airflow through the front of the unit. Wipe out inside of unit and ice bin with a damp cloth.
Reversing the Door Swing
This unit can be opened from either the right side or the left. By default, the door hinge is on the right side. If you prefer it on the left, please follow these instructions:
NOTE: All of the parts (including the screws) that are removed must be kept for the reinstallation of the door.
- Remove the three screws from the top hinge.
- Remove the door from the lower hinge, and keep the padded surface upward to prevent scratching.
- Remove the two screws from the bottom hinge, then remove the bottom hinge.
- Remove the three hole covers from the upper left side of the cabinet and use them to cover the holes on the right side.
- Unscrew the hinge pin from the top hinge, flip the hinge over, and reinstall the pin.
- Reinstall the lower hinge on the opposite side.
- Set the door on the lower door hinge. Reinstall the top hinge loosely and do not tighten.
- Adjust the door so that it is straight. Once the door is in place correctly, tighten the screws.
Initial Start-Up Operation
- Plug the appliance into a 115/120V AC polarized and grounded wall electrical outlet.
- Make sure the water supply is on. As soon as the inner mechanism reaches the proper temperature, the icemaker mechanism will fill the mold with water.
- The first cubes may be small because of air in the water line. Later cubes will be of standard crescent-moon shape.
- Approximate time for the first cycle is between 30-40 minutes.
- Each cycle will take approximately 0.15 quarts of water so the ice bin should be full after 11 hours.
IMPORTANT: DISCARD ALL ICE CUBES MADE DURING THE FIRST 3 HOURS OF OPERATION.
- When the ice bin is full, the ice-making mechanism will automatically shut off. However the system will continue to cool and maintain the supply of cubes.
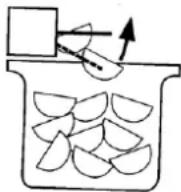
- Ice delivery may be interrupted by raising the metal arm into an upright position (see illustration).
- If the ice maker is not used regularly, it is recommended that the ice bin be emptied periodically to insure fresh ice.
- Sometimes the cubes may appear cloudy. This should not be a cause for concern and has nothing to do with the taste or chemical make-up of the water.
- This unit should be defrosted approximately every 4-6 weeks or when frost on the ice maker walls is excessive or 14 " thick. To defrost, disconnect power to the unit, remove cubes and keep door open at least two inches. There is a drain located in the rear to help remove any water.
• DO NOT SCRAPE OFF THE FROST WITH ANYTHING EXCEPT A PLASTIC SCRAPER.
For Best Performance of Your Ice Maker
- Keep appliance out of direct sunlight
- Allow for adequate air circulation
- Do not use an outlet operating on a switch
- Minimize door opening time
On/Off Switch
• This unit has an on/off switch located in the front.
Storage Compartment
- This unit includes a small storage compartment located under the icemaker. Please note that this compartment is not refrigerated.
CARE AND MAINTENANCE
Cleaning Your Ice Maker
- Unplug the ice maker and remove the ice bin.
- Wash the inside with a warm water and baking soda solution. The solution should consist of about 2 tablespoons of baking soda to a quart of water.
- Wash the ice bin with a mild detergent solution.
- The exterior of the ice maker, including the door and handle, should be cleaned with an approved stainless steel cleaning product. Do not use steel wool or a steel brush on stainless steel.
CAUTION
FAILURE TO UNPLUG THE ICE MAKER BEFORE CLEANING COULD RESULT IN ELECTRICAL SHOCK OR PERSONAL INJURY.
Power Failure
Most power failures are corrected within a few hours and should not affect the internal temperature of your ice maker if you minimize the number of times the door is opened. If the power is going to be off for a longer period of time, you need to take the proper steps to disconnect your appliance.
Vacation Time/Storage
- Shut off water supply at the main water valve.
- Disconnect the water supply line from valve.
- Allow unit to run for an hour or two until all remaining ice cubes have been ejected.
- Disconnect unit from main power source.
- Dry out excess water from ice maker assembly.
- Leave the door open at least two inches.
Moving Your Ice Maker
- Securely tape down all loose items inside your ice maker.
- Turn the leveling legs up to the base to avoid damage.
- Tape the door shut.
- Be sure the ice maker stays in the upright position during transportation.
Energy-Saving Tip
The ice maker should be located in the coolest area of the room, away from heat-producing appliances or heating ducts, and out of direct sunlight.
PROBLEMS WITH YOUR ICE MAKER
You can solve many common ice maker problems easily, saving you the cost of a possible service call. Try the suggestions below to see if you can solve the problem before calling the service technician.
Troubleshooting Guide
| PROBLEM | POSSIBLE CAUSE |
| Ice maker does not operate. | Not plugged in.The circuit breaker has tripped or a fuse has blown |
| Not producing ice | Airflow is blocked.The ice maker arm is set to the OFF position.Water supply is turned off.Water line is crimped.Ice maker has excessive frost build-up. |
| Compressor turns on and off frequently. | The room temperature is warmer than normal.The door is opened too often.The door is not closed completely.The door gasket does not seal properly. |
| Vibrations | Check to be sure the ice maker is level. |
| The ice maker seems to make too much noise. | A rattling noise may come from the flow of the refrigerant, which is normal.As each cycle ends, you may hear gurgling sounds caused by the flow of refrigerant in your ice maker.Contraction and expansion of the inside walls may cause popping and crackling noises.The ice maker is not level. |
| The door will not close properly. | The ice maker is not level.The door is reversed and not properly installed.The gasket is dirty.The ice bin is out of position. |
| Ice cubes are melted together. | Ice maker door is opened too often. |
If your ice maker shows other symptoms than those described above, or if you have checked all items listed as the cause and the problem still exists, then call SUMMIT® Customer Service at
1-800-932-4267
SUMMIT® LIMITED WARRANTY
ONE YEAR LIMITED WARRANTY
SUMMIT® Appliance warrants this product to be free from defects in materials and workmanship for a period of one year from the date of original purchase or delivery. Any parts determined to be defective will be replaced by SUMMIT® at no charge to you. Plastic parts and outer cabinets are warranted to be manufactured to commercially acceptable standards and free from defects at the time of delivery. The compressor (part only) is further warranted for an additional four years to the original purchaser only.
5 YEAR COMPRESSOR WARRANTY
- The compressor is covered for 5 years.
- Replacement does not include labor.
This limited warranty does not apply to:
- Improper installation.
- Customer misuse, negligence or damage.
- Incorrect electrical current.
- Products with the serial number altered or removed.
- Products sold or used outside the fifty United States or the District of Columbia.
- Household appliances used in commercial applications.
- Damage to this product from accidents, alterations, failure to follow instructions, fire, floods, earthquakes, war, civil disturbance or Acts of God.
SUMMIT® is not liable for consequential or incidental damage.

WARNING: This product can expose you to chemicals including Nickel (Metallic) which is known to the State of California to cause cancer.
For more information go to www.P65Warnings.ca.gov
Note: Nickel is a component in all stainless steel and some other metal components.
FELIX STORCH, INC.
770 Garrison Avenue
Bronx, NY 10474
Phone: (718) 893-3900
Fax: (844) 478-8799
www.summitappliance.com

For parts and accessory ordering, troubleshooting and helpful hints, visit:
www.summitappliance.com/support
CONSIGNES DE SÉCURITÉ IMPORTANTES
www.summitappliance.com/support
- IMPORTANT SAFETY INSTRUCTIONS
- TABLE OF CONTENTS
- INSTALLATION INSTRUCTIONS
- Before Using Your Ice Maker
- Installation of Your Ice Maker
- Electrical Connection
- √ ELECTRICAL SHOCK HAZARD √
- Connecting the Water Supply
- WARNING
- Reversing the Door Swing
- Initial Start-Up Operation
- IMPORTANT: DISCARD ALL ICE CUBES MADE DURING THE FIRST 3 HOURS OF OPERATION.
- For Best Performance of Your Ice Maker
- On/Off Switch
- Storage Compartment
- CARE AND MAINTENANCE
- Cleaning Your Ice Maker
- CAUTION
- Power Failure
- Vacation Time/Storage
- Moving Your Ice Maker
- Energy-Saving Tip
- PROBLEMS WITH YOUR ICE MAKER
- SUMMIT® LIMITED WARRANTY
- ONE YEAR LIMITED WARRANTY
- YEAR COMPRESSOR WARRANTY
- CONSIGNES DE SÉCURITÉ IMPORTANTES
Brand : Summit
Model : BIM25H34
Category : Ice Maker