
BIM45 - Ice Maker Summit - Free user manual and instructions
Find the device manual for free BIM45 Summit in PDF.


| Product Type | Built-in Ice Maker |
| Brand | Summit |
| Model | BIM45 |
| Production Capacity | 32 lbs per day (approx. 14.5 kg) |
| Storage Capacity | 25 lbs (approx. 11.3 kg) |
| Built-in Dimensions (W x H x D) | 17" x 35" x 25" (432 x 889 x 635 mm) |
| Power Supply | 115 V, 60 Hz, grounded outlet |
| Drainage Modes | Direct, pump, manual |
| Ice Cube Sizes | Small, medium, large (selectable) |
| Reversible Door | Yes (left or right opening) |
| Recommended Ambient Temperature | 10 to 32 °C (50 to 90 °F) |
| Required Water Pressure | 20 to 120 psi |
| Water Connection | 1/4" OD copper tubing |
| Maintenance and Cleaning | Clean interior with baking soda solution; ice bin washable with mild detergent |
| Safety | Grounding required; do not use extension cord; do not immerse cord |
| Warranty | 1 year parts and labor; 5 years on compressor (parts only) |
Frequently Asked Questions - BIM45 Summit
User questions about BIM45 Summit
0 question about this device. Answer the ones you know or ask your own.
Ask a new question about this device
Download the instructions for your Ice Maker in PDF format for free! Find your manual BIM45 - Summit and take your electronic device back in hand. On this page are published all the documents necessary for the use of your device. BIM45 by Summit.
USER MANUAL BIM45 Summit
Makes 32 lbs daily / Ice storage capacity: 25 lbs
Summit Appliance Division
770 Garrison Avenue
Bronx, NY 10474
www.summitappliance.com
TABLE OF CONTENTS
Important Safety Information 2
Installation Instructions 3-8
Before Using Your Ice Maker 3
Installation of Your Ice Maker 3
Installation Specifications (Built-In) 3
Connecting Ice Maker to Water Supply 4 - 5
Door Reversal Instructions 5
Ice Maker Performance Mode Instructions 6-8
Operating Instructions 8 - 10
Controls of the Ice Maker 8-9
Controlling the Size of Ice Cubes 10
Ice Bin 10
Care and Maintenance 11 – 12
Cleaning Your Ice Maker 11
Power Failure 11
Moving Your Ice Maker 11
Vacation Time 11
Cleaning the Inner Water Container 12
Troubleshooting 13
Limited Warranty 15
NOTES ON INSTALLATION OF ICE MAKER CLIM15 / BIM45
When installing the ice maker under a counter or other enclosed space, follow these spacing dimensions: Allow approximately 2" (50 mm) of clearance at rear, 1/16" (2 mm) at the top and 1" (25 mm) at sides for proper air circulation. The ventilation grille at the bottom should never be blocked. The installation should allow the ice maker to be pulled forward for servicing if necessary.
Even if the unit is to be installed free-standing, leave at least 4" of clearance at sides, top and back.
See pages 3-5 for more details on installation.
IMPORTANT SAFETY INFORMATION
READ ALL SAFETY INFORMATION BEFORE USING.
WARNING: RISK OF CHILD ENTRAPMENT
An empty ice maker is a very dangerous attraction to children. Remove either the gasket, latches, lock and/or doors from unused or discarded appliances, or take some other action to make sure it is harmless.
PRECAUTIONS
To avoid installation/operation difficulties, read these instructions thoroughly.
- This appliance must be grounded. Connect only to a properly grounded outlet. See “Grounding Instructions” section.
- Do not operate this appliance if it has a damaged power cord or plug, if it is not working properly, or if the appliance has been damaged or dropped.
- Never allow children to operate, play with, or crawl inside the appliance.
- Never clean appliance parts with flammable fluids. The fumes can create a fire hazard or explosion.
- Do not store or use gasoline or any other flammable vapors or liquids in the vicinity of this or any other appliance. The fumes can create a fire hazard or explosion.
- Do not splice the power cord that is equipped with this appliance.
- Keep the power cord away from heated surfaces.
- Do not immerse power cord plug or the appliance itself in water.
- Do not use this product near water, for example, in a wet basement, near a swimming pool or near a sink.
- Do not use corrosive chemicals or vapors in this appliance.
- Use this appliance only for its intended use, as described in this manual.
- See door surface cleaning instructions in the Care and Cleaning section(s) of this manual.
- Do not cover or block any openings on the appliance.
- This appliance is intended for household use only. Do not attempt to operate or store this appliance outdoors.
- This appliance should be serviced only by qualified service personnel. Contact the nearest authorized service facility for examination, repair or adjustment.
GROUNDING INSTRUCTIONS

WARNING:
Improper use of the grounding plug can result in a risk of electric shock.
- This appliance must be grounded. In the event of an electrical short circuit, grounding reduces the risk of electric shock by providing an escape wire for the electric current.
- This appliance is equipped with a power cord having a grounding wire with a grounding plug. The plug must be plugged into an outlet that is properly installed and grounded.
- Consult a qualified electrician or service technician if the grounding instructions are not completely understood, or if doubt exists as to whether the appliance is properly grounded.
- If the outlet is a standard 2-prong wall outlet, it is your personal responsibility and obligation to have it replaced with a properly grounded 3-prong wall outlet.
- For best operation, plug this appliance into its own electrical outlet to prevent flickering of lights, blowing of fuse or tripping of circuit breaker.
- Do not under any circumstances cut or remove the third (ground) prong from the power cord.
- Do not use an adapter plug with this appliance.
- Do not use an extension cord with this appliance. If the power cord is too short, have a qualified electrician or service technician install an outlet near the appliance.
DANGER! Risk of child entrapment
Before you throw away your old appliance:
- Take off the door.
- Leave the shelves in place so that children may not easily climb inside.
BEFORE USING YOUR ICE MAKER
- Remove the exterior and interior packaging.
- Before connecting the Ice Maker to the power source, let it stand upright for approximately 2 hours. This will reduce the possibility of a malfunction in the cooling system from handling during transportation.
- Clean the interior surface with lukewarm water using a soft cloth.
- Attach the water inlet and outlet pipe, loosen the screwnut, choose the function switch. (See Ice Maker Performance Mode instructions.)
- Before first use: Make two full batches of ice and then discard to insure that future batches are clean and sanitary.
ATTENTION
- Do not open the door unless necessary.
- If the Ice Maker will not be used for a long period, it is suggested, after a careful cleaning, to leave the door ajar to allow air to circulate inside the cabinet. This will minimize the formation of condensation, mold and odors.
INSTALLATION OF YOUR ICE MAKER
- Place your Ice Maker on a floor that is strong enough to support it when it is fully loaded. To level your Ice Maker, adjust the front leveling leg at the bottom of the unit.
- Locate the Ice Maker away from direct sunlight and sources of heat (stove, heater, radiator, etc.). Direct sunlight and heat sources may increase electrical consumption. Extremely cold ambient temperatures may also cause the unit not to perform properly.
- Avoid locating the unit in moist areas.
- Plug the unit into an exclusive, properly installed, grounded wall outlet. Do not under any circumstances cut or remove the third (ground) prong from the power cord. Any questions concerning power and/or grounding should be directed toward a certified electrician or an authorized service center.
INSTALLATION SPECIFICATIONS (BUILT-IN)
TOOLS YOU WILL NEED
FOR YOUR SAFETY:
While performing installations described in this section, gloves, safety glasses or goggles should be worn.

- It is recommended that you do not install the unit directly beside a wall. This is to allow the door to have a greater than 90° opening swing. A limited door swing may lead to damaging the door gasket.
- The rough cabinet opening must be on a level floor area at least 25" deep and 17 " wide. The opening should have a height of at least 35".
- The electrical outlet may be positioned from within either side of the adjacent cabinetry, or the rear of the shaded area (as shown in Fig A).
- If the electrical outlet is located inside the adjacent cabinetry, cut a 1-1/2" diameter hole to admit the power cord. If the cabinet wall is metal, the hole edge must be covered with a bushing or grommet.
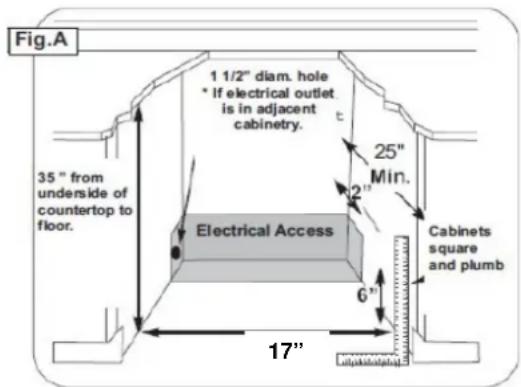
INSTALLATION INSTRUCTIONS
CONNECTING ICE MAKER TO WATER SUPPLY

WARNING
To avoid electric shock, which can cause death or severe personal injury, disconnect the Ice Maker from an electrical power outlet before connecting a water supply line to the Ice Maker.

CAUTION
Copper tubing is recommended for the water supply line. Water supply tubing made of 1/4" plastic is not recommended since it greatly increases the potential for water leaks. Manufacturer will not be responsible for any damage if plastic tubing is used for the supply line.
DO NOT install water supply tubing in areas where temperatures fall below freezing.
Connect the ice maker to a drinkable water source
that is not tied into a water softening system.
Chemicals from the softener may damage the ice maker, causing it to malfunction.

IMPORTANT
Ensure that your water supply line connections comply with all local plumbing codes.
Before Installing the Water Supply Line, You Will Need
- Basic tools: adjustable wrench and standard, flat blade screwdriver.
- Access to a household cold water line with water pressure between 20 and 120 psi.
- A water supply line made of 1/4 inch (6.4mm)OD, copper tubing, To determine the length of copper tubing needed, you will need to measure the distance from the ice maker inlet valve at the back of the Ice Maker to your cold water pipe. Then add approximately 7 feet (2.1 meters), so the Ice Maker can be moved out for cleaning.
-
A shutoff valve to connect the water supply line to your household water system. (DO NOT use a self-piercing type shutoff valve.)
-
A compression nut and ferrule (sleeve) for connecting the water supply line to the ice maker inlet valve.
To Connect Water Supply Line to Ice Maker Inlet Valve
- Disconnect Ice Maker from electric power supply.
- Place end of water supply line into sink or bucket. Turn ON water supply and flush supply line until water is clear, turn OFF water supply at shut off valve. Unscrew plastic cap from water valve inlet and save.
- Slide brass compression nut, then ferrule (sleeve), onto water supply line, as shown in Fig. A.
- Push water supply line into water valve inlet as far as it will go (1/4 inch). Slide ferrule (sleeve) into valve inlet and finger tighten compression nut onto valve. Tighten another half turn with a wrench; DO NOT over-tighten.
- With steel clamp and screw, secure water supply line to rear panel of Ice Maker at location shown in Fig. A.
- Coil excess water supply line (about 2½ turns) behind Ice Maker as shown in Fig. A and arrange coils so they do not vibrate or wear against any other surface.
- Turn ON water supply at shut off valve and tighten any connections that leak.
- Reconnect Ice Maker to electric power supply.
NOTE:
It takes approximately 24 hours for the ice maker to begin producing ice. Air in new plumbing lines may cause ice maker to cycle two or three times before making a full tray of ice. New plumbing may cause ice to be discolored or have poor flavor. Discard ice made during the first 24 hours. Although the unit has been tested and cleaned at the factory, due to long-term transit and storage, the first batch or two of cubes must be discarded.
- Never turn the water supply tap off when the ice maker is working.
- Never touch evaporator when unit is running!
- Except to take ice from the unit, keep the door closed to reduce melting and insure proper ice formation.

INSTALLATION INSTRUCTIONS
Connecting Ice Maker To Water Supply (cont'd):
Drain-pipe Connection (Drain hose not provided)
- If you choose direct drainage or force drainage mode, you need to purchase an external drain pipe available at your local hardware store. The connection instructions are below: Connect one side of the external drain pipe linked to the outlet pipe of the ice maker; put the other side into the drain hole. (See Fig B.)
A - Is a pump-assisted drain
B - Is a gravity-fed continuous drain
NOTE: When using pump-assisted drain "A", the switch (on back) must be turned to the "ON" position.

DOOR REVERSAL INSTRUCTIONS
This appliance has the capability of the door opening from either the left or the right side. The unit is delivered to you with the door opening from the left side. Should you desire to reverse the opening direction, please follow these instructions.


- Screws
- Bottom hinge (Right)
- Door axis
- Door
- Top hinge (Right)
- Lock screws
- Top hinge (Left)
-
Bottom hinge (Left)
-
Remove 2 screws (1), then pull door (4) in direction of arrow.
- Remove 3 screws of right upper hinge (5), then remove right upper hinge. (See Fig. C.)
- Use the screws which you removed from the right side hinges to fix the left upper and bottom hinges (8). (See Fig. D & Fig. E.)
- Rotate the door 180^ , then assemble the door on the opposite side in the same way it was removed.
INSTALLATION INSTRUCTIONS
ICE MAKER PERFORMANCE MODE INSTRUCTIONS

WARNING
Please disconnect unit from power. To avoid electric shock, make sure no water is near the ice maker or on floor board and follow the steps below.
Your ice maker has three different performance modes.
You can choose the most suitable mode according to your requirements. Please see detailed instructions on following page.
Fig A.
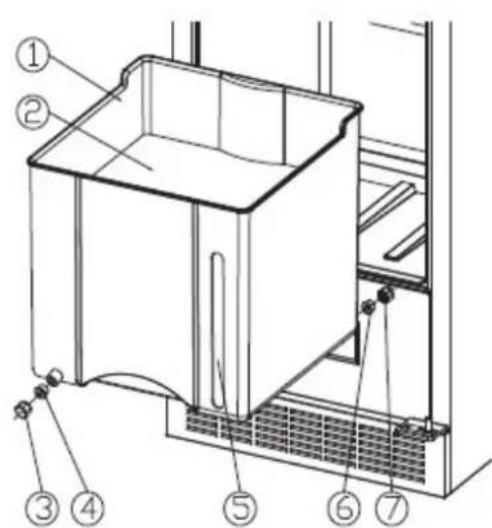
Fig B.

Fig C.
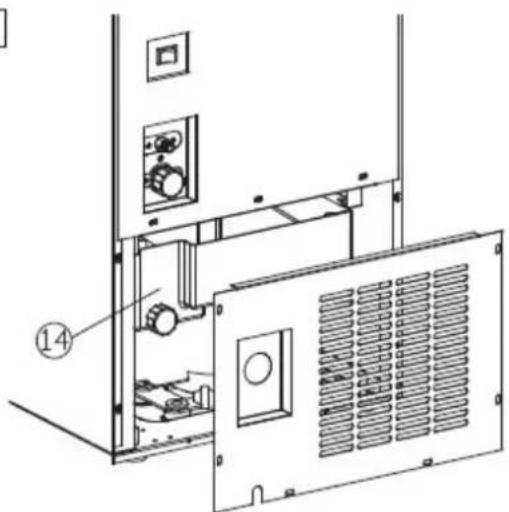
- Ice bin
- Bottom board of ice bin
- Drain nut (front)
- Drain seal (front)
- Water level indicator
- Drain seal (back)
- Drain nut (back)
- Drain pump switch
- Water inlet pipe connector
- Drain pump outlet (pump-assisted)
- Drain cap
- Drain cap
- Direct water outlet pipe connection (continuous)
- Watertank
INSTALLATION INSTRUCTIONS
Ice Maker Performance Mode Instructions (cont'd)

WARNING
Please read the following installation methods before using, and choose the correct drain mode for your situation. Set up your ice maker accordingly.
| Performance Mode Instructions Suitable situation Operation instruction | ||||
| Direct drainage mode(Recommended mode) | Excess water will be drained off by the outlet water pipe on the back of the unit | The height of drain hole in the room ≤100 mm (3-15/16")  | Ref.: Fig. A, Fig. B & Fig. C | |
| Screw Nut and Switch | Condition | |||
| screw nut(front) (3) + seal washer(front) (4) | lock | |||
| screw nut(back) (7) + seal washer(back) (6) | open | |||
| screw nut for valve seal (11) | lock | |||
| screw nut for valve seal (12) | open | |||
| force water outlet switch (8) | OFF | |||
| 1. Please be sure the screw nut and switch are in the above condition;2. Use a certain length drain pipe,connect one side to the direct water outlet pipe connection (13), the other to the drain hole. Please be sure the connection is tight to avoid water leakage. | ||||
| Drain pump mode(Recommended mode) | Excess water will be forced to drain out by the pump on back of the unit. | The height of drain hole in the room is between 101 mm~1500 mm (3-15/16"~59")  | Ref.: Fig. A, Fig. B & Fig. C | |
| Screw Nut and Switch Condition | ||||
| screw nut(front) (3) + seal washer(front)(4) | lock | |||
| screw nut(back) (7) + seal washer(back) (6) | open | |||
| screw nut for valve seal (11) | open | |||
| screw nut for valve seal (12) | lock | |||
| force water outlet switch (8) | ON | |||
| 1. Please be sure the screw nut and switch are in the above condition;2. Use a certain length drain pipe, connect one side to the force water outlet pipe connector (10), the other to the drain hole. Please be sure the connection is tight to avoid water leakage. | ||||
| ⚠ WARNINGThe lengthen of drainpipe is no more than 6000 mm (236-4/16") in order to prevent slops return. | ||||
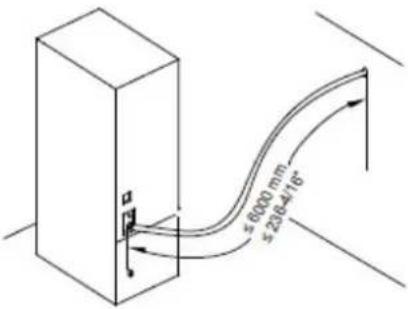 | ||||
INSTALLATION INSTRUCTIONS
Ice Maker Performance Mode Instructions (cont'd)
| Performance Mode | Instructions Suitable situation | Operation instruction | ||
| Manual drainage system mode(If you're operating using the “Manual drainage system mode”, ice water will restrict drain water from flowing out.) | Manually drain the water from the ice bin. | There is no drain hole in the room. | Ref.: Fig. A, Fig. B & Fig. C | |
| Screw Nut and Switch | Condition | |||
| screw nut (front) (3) + seal washer (front) (4) | lock | |||
| screw nut (back) (7) + seal washer(back) (6) | lock | |||
| screw nut for valve seal (11) | lock | |||
| screw nut for valve seal (12) | lock | |||
| force water outlet switch (8) | OFF | |||
| Please be sure the screw nut and switch are in the above condition to avoid water leakage.Periodically check the ice bin (1), and water level indicator (5). If the water level exceeds the indicator water level, please drain off the excess water.When draining off the water, you can remove the ice bin (1), screw nut (front) (3) and seal washer (front) (4). Remove the excess water, then tighten the above screw and seal washer. | ||||
OPERATING INSTRUCTIONS
CONTROLS OF THE ICE MAKER
The Ice Maker should be placed where the ambient temperature is between 10 - 32^ (50-90°F). If the ambient temperature is above or below this range, the performance of the unit may be affected.

natural_image
Three 3D blocks with a power switch icon, no text or symbols presentOPERATING INSTRUCTIONS
CONTROLS OF THE ICE MAKER
| Control | Type | Condition | Function | Explanat | WATER SUPPLY | |
 | Button | Press | To turn press and hold this button for approximately 3 seconds. | 1. Tired to Make supply off,2. Disconnect line from the ice maker.3. Position water supply line in a bucket.4. Turn on water and make sure water falls into bucket.5. Before reconnecting the water supply line to the ice maker, make sure the water is turned off, then reconnect the water supply line to the ice maker.If unsure, please contact your local plumber. | ||
 | Button Press Small size of ice | |||||
 | Button Press Medium size of ice | |||||
 | Button Press Large size of ice | |||||
 | Indicator Light ON Small size of ice is selected. | |||||
| [7BZ8] | Indicator Light ON Medium size of ice is selected. | |||||
| [SHAW] | Indicator Light ON Large size of ice is selected. | |||||
 | Indicator Light ON Compressor is working. | 1 “Water tank is full.”a. Unscrew the drain cap (12) located on the back of the unit and let out the water.(Refer to Page 5, Fig. B.) | ||||
 |  |  | FF Compressor stopped working. | |||
| FLASHING Stand by condition. | ||||||
 |  | Indicator Light | Flashing at the same time. | |||
||
b. After draining out all the water from the outside water tank, reconnect unit to power and it will continue to run normally.
c. If "Drain pump mode" is chosen, please confirm the "Pumped water outlet switch" is in the "ON" position. If it is in the correct position but you still get a WARNING ALARM after you power off the unit, please contact a service center.
d. If "Manual drainage system mode" is chosen, the outside water tank will be full of water within one or two weeks depending on differences in ambient temperatures, please drain the water.
②“Ice maker low on water”
a. Check if outside water supply is functioning normally. Please see "Checking the water supply" box above.
b. The icemaker will remove faults automatically within 30 minutes and work normally when outside water pipe is functioning.
c. Press “ Ⓞ ” button and turn on the unit again if icemaker does not function normally after 30 minutes;
d. If the icemaker still shows a WARNING ALARM after the above process is repeated, contact the service center.
③ “Sensor breakdown” Please contact our authorized service center.
④ "Bucket full" alarm:
a. Check if the ice bucket is full. If so, remove the ice, and the alarm will stop.
b. If the ice bucket is not full when the alarm sounds, check to see if the ice maker cover plate is stuck. Clear any obstruction and replace the cover. The alarm should stop.
c. When there is an insufficient water supply, the ice maker cover plate may stick and the "bucket full" alarm will sound. Remove any ice from around the cover plate and check that the water supply is sufficient. The alarm should stop.
OPERATING INSTRUCTIONS
CONTROLLING THE SIZE OF ICE CUBES
- Please insure the water supply is properly connected. The default setting of the ice maker is set to make medium ice. If you need to revise the ice size, you can
press buttons The Elevator Indicator light

- If you want to stop making ice, please press button for about 3 seconds; all the indicator lights
will go off and the indicator light

will stay on flashing. If you want to return to making ice, just press the button one more time.
ICE BIN
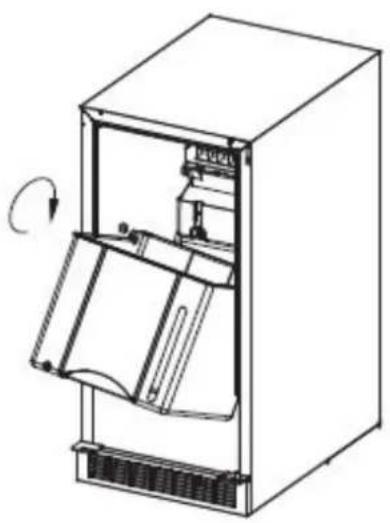
Your ice bin is designed to be easily removed, if you want to take it out, lift up the front part of the bin, then simply pull it out. (See picture below.)
natural_image
Line drawing of an open refrigerator with cooling fins and a scroll wheel (no text or symbols)CARE AND MAINTENANCE
CLEANING YOUR ICE MAKER
- Turn off the power, unplug the appliance, and remove the ice bin.
- Wash the inside surfaces with a warm water and baking soda solution. The solution should be about 2 tablespoons of baking soda to a quart of water.
- Wash the ice bin with a mild detergent solution. Wring excess water out of the sponge or cloth when cleaning area of the controls, or any electrical parts.
- Wash the outside cabinet with warm water and mild liquid detergent. Rinse well and wipe dry with a clean, soft cloth.
POWER FAILURE
- Most power failures are corrected within a few hours and should not affect the temperature of your appliance if you minimize the number of times the door is opened. If the power is going to be off for a longer period of time, you need to take the proper steps to protect your contents.
MOVING YOUR ICE MAKER
- Remove all items.
- Securely tape down all loose items (such as the bucket) inside your appliance.
- Turn the adjustable leg up to the base to avoid damage.
- Tape the door shut.
- Be sure the appliance stays secure in the upright position during transportation. Also protect the outside of the appliance with a blanket or similar item.
- The Ice Maker should be located in the coolest area of the room, away from heat producing appliances, and out of direct sunlight.
VACATION TIME
- Short vacations: Leave the Ice Maker operating during vacations of less than three weeks.
- Long vacations: If the appliance will not be used for several months, remove all items and turn off the appliance. Clean and dry the interior thoroughly. To prevent odor and mold growth, leave the door open slightly, blocking it open if necessary.
CARE AND MAINTENANCE
CLEANING THE INNER WATER CONTAINER

WARNING
Please disconnect unit from power. To avoid electric shock, make sure no water is near the ice maker or on floor board and follow the steps below.
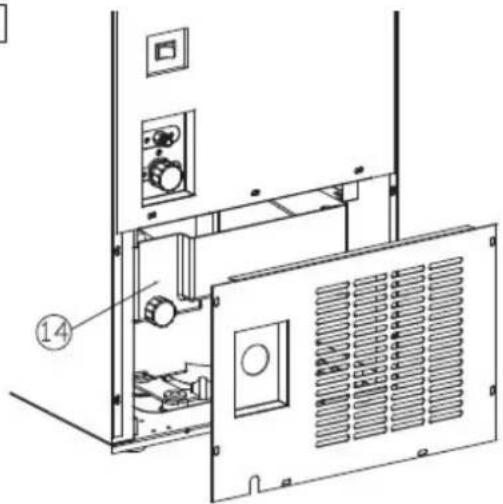
- Ice maker machine cover board
- Ice maker machine cover plate
- Water container
- Drain tube
NOTE:
If the unit is unplugged, has lost power, or is turned off, you must wait 3 to 5 minutes before restarting the unit. If you attempt to restart before this time delay, the Ice Maker will not start.


- Take out the cover board (1) of the ice maker machine (Fig. A).
- Use the brush to clean all the parts, then use clean water to flush them.
- After cleaning, install parts in reverse order.
- To drain water from the water container (3), dislodge drain tube.(4) (Fig. B).
TROUBLESHOOTING
Occasionally, a problem is minor and a service call may not be necessary. Use this troubleshooting guide for a possible solution. If the unit continues to operate improperly, call an authorized servicer or our toll-free number 1-800-932-4267.
| PROBLEM |
| The Ice Maker does not operate. |
| The ice cubes are not big enough or melt too quickly. |
| Ice Maker Alarm |
| Vibrations |
| Noise |
| Water leakage from ice maker |
| POSSIBLE CAUSE |
| Not plugged in.The appliance is turned off.No power to unit. |
| The ambient temperature is too high.The door is opened too often.The door is ajar.The door gasket does not seal properly.Incorrect mode was set.Dirty condenser. |
| External water tank is full.Not enough water. |
| Check to be sure the Ice Maker is level. |
| A rattling noise may come from the flow of the refrigerant. This is normal.As each cycle ends, you may hear gurgling sounds caused by the flow of refrigerant in your Ice Maker.Contraction and expansion of the inside walls may cause popping and crackling noises.The ice dispensing during each cycle may cause a little noise.The flow of water causes noise during normal ice maker operation.The Ice Maker is not level. |
| The water inlet pipe in the back is loose.The water outlet pipe in the back is loose. |
NOTES
LIMITED WARRANTY
ONE-YEAR LIMITED WARRANTY
Within the 48 contiguous United States, for one year from the date of purchase, when this appliance is operated and maintained according to instructions attached to or furnished with the product, warrantor will pay for factory-specified parts and repair labor to correct defects in materials or workmanship. Service must be provided by a designated service company. Outside the 48 states, all parts are warranted for one year from manufacturing defects. Plastic parts, shelves and cabinets are warranted to be manufactured to commercially acceptable standards, and are not covered from damage during handling or breakage.
5-YEAR COMPRESSOR WARRANTY
- The compressor is covered for 5 years.
- Replacement does not include labor.
ITEMS WARRANTOR WILL NOT PAY FOR:
- Service calls to correct the installation of your appliance, to instruct you how to use your appliance, to replace or repair fuses or to correct wiring or plumbing.
- Service calls to repair or replace appliance light bulbs or broken shelves. Consumable parts (such as filters) are excluded from warranty coverage.
- Damage resulting from accident, alteration, misuse, abuse, fire, flood, acts of God, improper installation, installation not in accordance with electrical or plumbing codes, or use of products not approved by warrantor.
- Replacement parts or repair labor costs for units operated outside the United States.
- Repairs to parts or systems resulting from unauthorized modifications made to the appliance.
- Expenses for travel and transportation for product service in remote locations.
- The removal and reinstallation of your appliance if it is installed in an inaccessible location or is not installed in accordance with published installation instructions.
DISCLAIMER OF IMPLIED WARRANTIES - LIMITATION OF REMEDIES
CUSTOMER'S SOLE AND EXCLUSIVE REMEDY UNDER THIS LIMITED WARRANTY SHALL BE PRODUCT REPAIR AS PROVIDED HEREIN. IMPLIED WARRANTIES, INCLUDING WARRANTIES OF MERCHANTABILITY OR FITNESS FOR A PARTICULAR PURPOSE, ARE LIMITED TO ONE YEAR. WARRANTOR SHALL NOT BE LIABLE FOR INCIDENTAL OR CONSEQUENTIAL DAMAGES. SOME STATES DO NOT ALLOW THE EXCLUSION OR LIMITATION OF INCIDENTAL OR CONSEQUENTIAL DAMAGES, OR LIMITATIONS ON THE DURATION OF IMPLIED WARRANTIES OF MERCHANTABILITY OR FITNESS, SO THESE EXCLUSIONS OR LIMITATIONS MAY NOT APPLY TO YOU. THIS WARRANTY GIVES YOU SPECIFIC LEGAL RIGHTS AND YOU MAY ALSO HAVE OTHER RIGHTS, WHICH VARY FROM STATE TO STATE.
WARNING! This product may contain chemicals known to the state of California to cause cancer or birth defects or other reproductive harm. For more information, visit: www.summitappliance.com/prop65. Chemicals known by the manufacturer to be present in this product in concentrations higher than threshold limits: NONE.
FELIX STORCH, INC.
770 Garrison Avenue
Bronx, New York 10474
Tel.: (718) 893-3900
Fax: (844) 478-8799
www.summitappliance.com
SUMMIT CLASSIC COLLECTION

For parts and accessory ordering,
troubleshooting and helpful hints, visit:
www.summitappliance.com/support
Fig. C
Fig. B

Fig. D
Fig. E
Fig B.

Fig C.
natural_image
Simple diagram showing four 3D blocks with a power switch symbol (no text or labels)OPÉRATION
COMMANDES DE LA MACHINE À GLAÇONS
natural_image
Line drawing of an open refrigerator with a scroll wheel and ventilation slots (no text or symbols)NETTOYAGE ET ENTRETIEN
NETTOYAGE DE VOTRE MACHINE À GLAÇONS
Fig B.

GARANTIE LIMITÉE D'UN AN
For parts and accessory ordering,
troubleshooting and helpful hints, visit:
www.summitappliance.com/support
Imprimé en Chine


- TABLE OF CONTENTS
- Important Safety Information 2
- Installation Instructions 3-8
- Operating Instructions 8 - 10
- Care and Maintenance 11 – 12
- Troubleshooting 13
- Limited Warranty 15
- NOTES ON INSTALLATION OF ICE MAKER CLIM15 / BIM45
- IMPORTANT SAFETY INFORMATION
- READ ALL SAFETY INFORMATION BEFORE USING.
- WARNING: RISK OF CHILD ENTRAPMENT
- PRECAUTIONS
- To avoid installation/operation difficulties, read these instructions thoroughly.
- GROUNDING INSTRUCTIONS
- WARNING:
- DANGER! Risk of child entrapment
- BEFORE USING YOUR ICE MAKER
- ATTENTION
- INSTALLATION OF YOUR ICE MAKER
- INSTALLATION SPECIFICATIONS (BUILT-IN)
- TOOLS YOU WILL NEED
- FOR YOUR SAFETY:
- INSTALLATION INSTRUCTIONS
- CONNECTING ICE MAKER TO WATER SUPPLY
- WARNING
- CAUTION
- IMPORTANT
- Before Installing the Water Supply Line, You Will Need
- To Connect Water Supply Line to Ice Maker Inlet Valve
- NOTE:
- Connecting Ice Maker To Water Supply (cont'd):
- Drain-pipe Connection (Drain hose not provided)
- DOOR REVERSAL INSTRUCTIONS
- ICE MAKER PERFORMANCE MODE INSTRUCTIONS
- OPERATING INSTRUCTIONS
- CONTROLS OF THE ICE MAKER
- ②“Ice maker low on water”
- ④ "Bucket full" alarm:
- CONTROLLING THE SIZE OF ICE CUBES
- ICE BIN
- CARE AND MAINTENANCE
- CLEANING YOUR ICE MAKER
- POWER FAILURE
- MOVING YOUR ICE MAKER
- VACATION TIME
- CLEANING THE INNER WATER CONTAINER
- TROUBLESHOOTING
- NOTES
- LIMITED WARRANTY
- ONE-YEAR LIMITED WARRANTY
- 5-YEAR COMPRESSOR WARRANTY
- ITEMS WARRANTOR WILL NOT PAY FOR:
- DISCLAIMER OF IMPLIED WARRANTIES - LIMITATION OF REMEDIES
- SUMMIT CLASSIC COLLECTION
- OPÉRATION
- COMMANDES DE LA MACHINE À GLAÇONS
- NETTOYAGE ET ENTRETIEN
- NETTOYAGE DE VOTRE MACHINE À GLAÇONS
- GARANTIE LIMITÉE D'UN AN
Brand : Summit
Model : BIM45
Category : Ice Maker