
Ruben - Baby bouncer Lionelo - Free user manual and instructions
Find the device manual for free Ruben Lionelo in PDF.


| Product type | Baby bouncer / rocker |
| Brand | Lionelo |
| Model | Ruben |
| Dimensions (L x W x H) | 62 x 40 x 35 cm |
| Weight | 3.2 kg |
| Power supply | 2 AA batteries (not included) |
| Recommended age | From birth to 6 months |
| Maximum supported weight | 9 kg |
| Safety harness | 5-point, adjustable |
| Main functions | Swinging, vibration, removable toy bar, two recline positions |
| Vibration | Yes, battery-operated, with auto shut-off |
| Toy bar | Removable, with two hanging toys |
| Cover | Removable and machine washable at 30°C |
| Frame | Steel, foldable for storage |
| Cleaning | Cover in machine, frame with damp cloth |
| Safety standards | Compliant with standard EN 12790:2009 |
| Spare parts | Available on request from Lionelo customer service |
| Repairability | Spare parts available, repair possible |
| Warranty | 2 years |
Frequently Asked Questions - Ruben Lionelo
User questions about Ruben Lionelo
0 question about this device. Answer the ones you know or ask your own.
Ask a new question about this device
Download the instructions for your Baby bouncer in PDF format for free! Find your manual Ruben - Lionelo and take your electronic device back in hand. On this page are published all the documents necessary for the use of your device. Ruben by Lionelo.
USER MANUAL Ruben Lionelo
natural_image
Line drawing of a baby's baby playroom with a star-shaped seat, air balloon, and motion capture device (no text or symbols)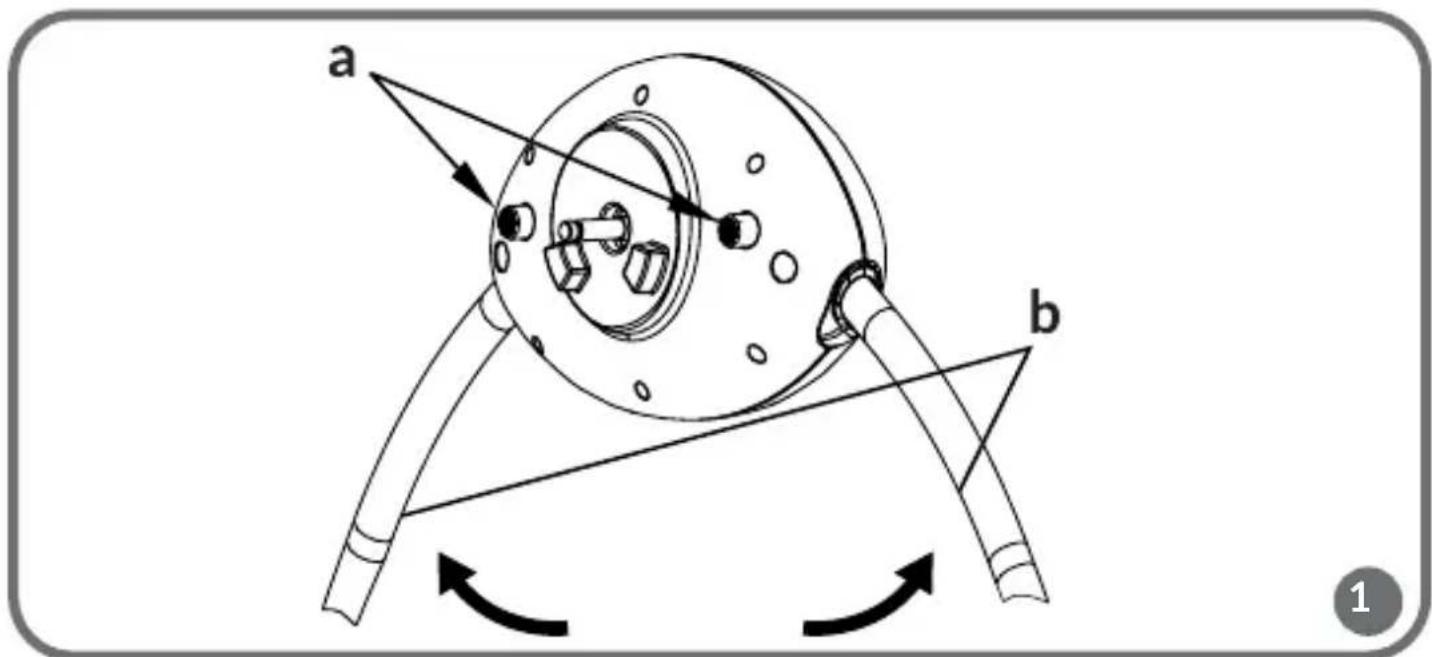
natural_image
Diagram showing three stages of a device with downward arrows indicating motion, no text or symbols present.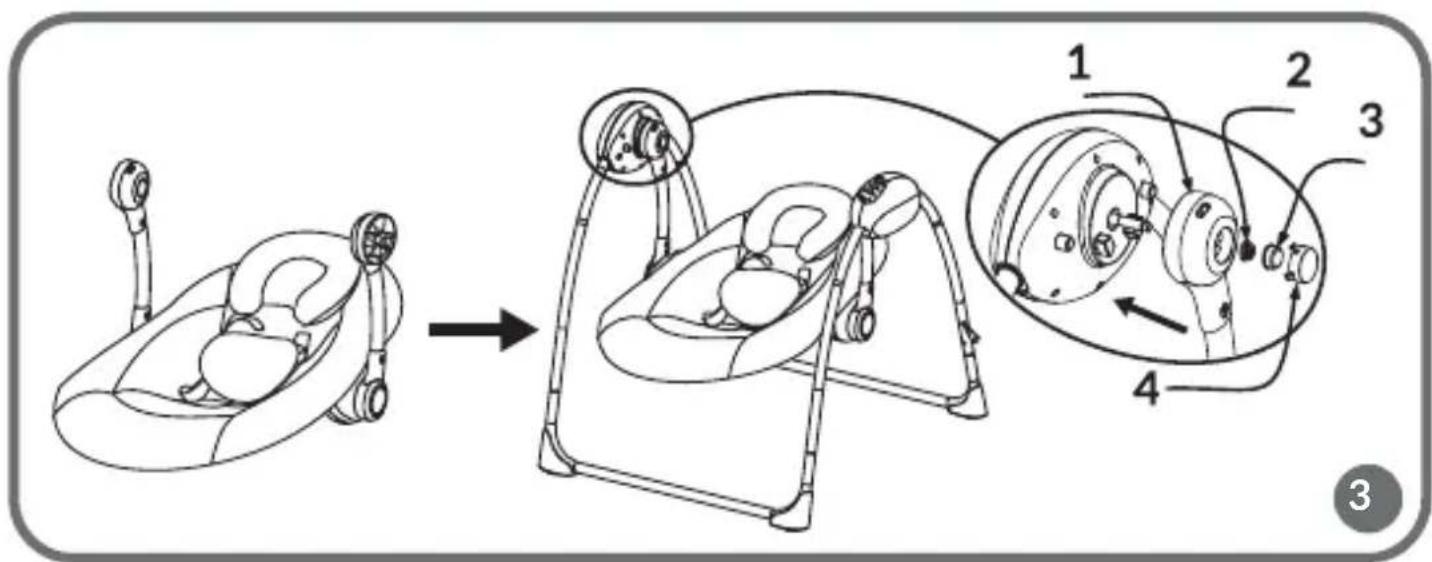
natural_image
Line drawing of a baby in a baby boom seat using a swing device, showing before and after states (no text or symbols)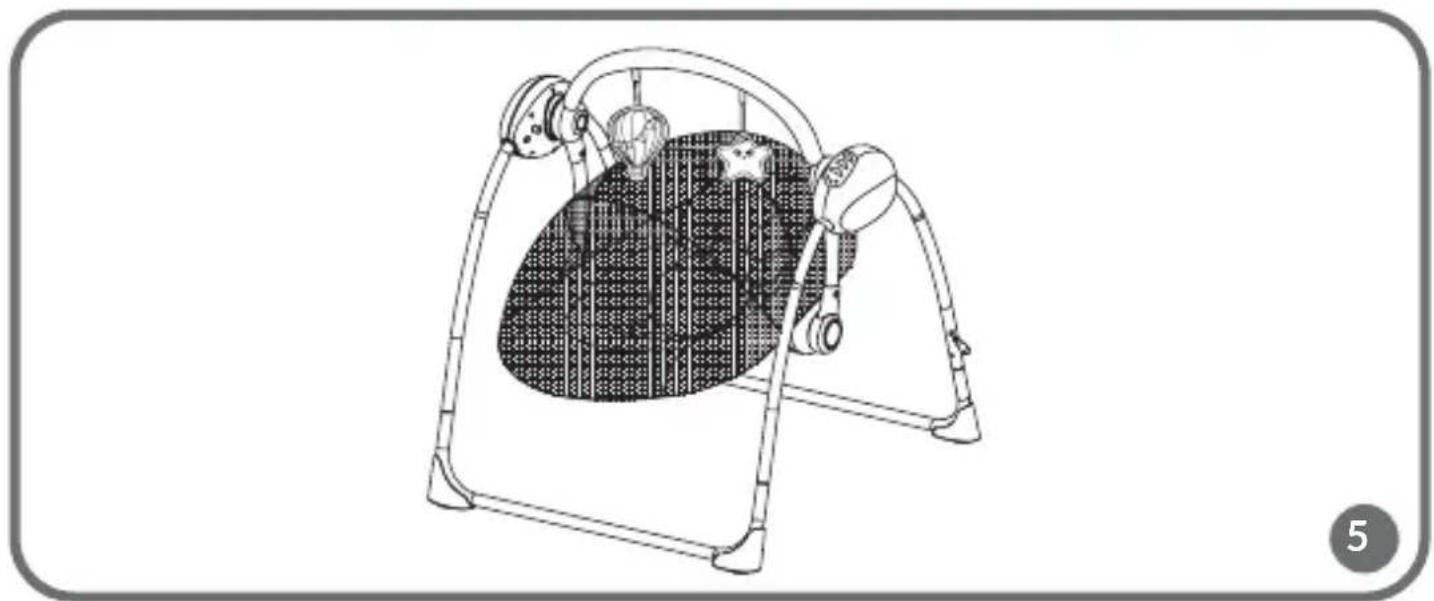
natural_image
Line drawing of a small outdoor play umbrella with a mesh backrest and camera mount (no text or symbols)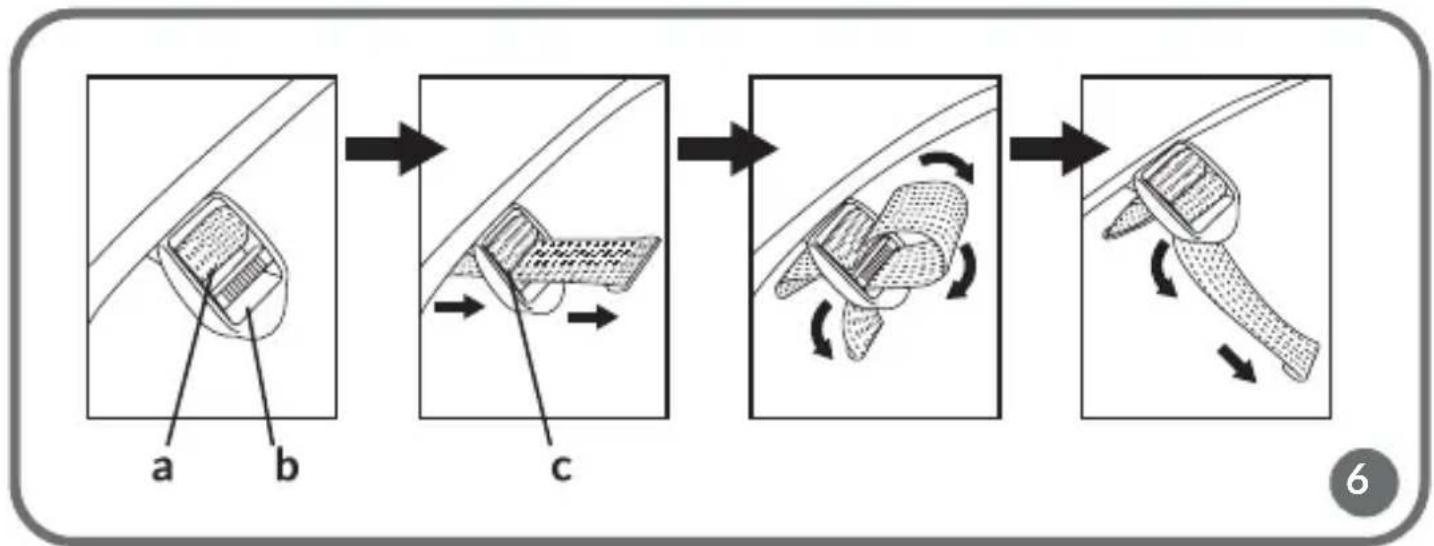
flowchart
graph LR
    A["Initial Contact"] --> B["Step a: Contact with Joint Span"]
    B --> C["Step b: Contact with Joint Span"]
    C --> D["Step c: Contact with Joint Span"]
    D --> E["Step d: Contact with Joint Span"]
    E --> F["Step f: Dissection with Joint Span"]
    F --> G["Step g: Dissection with Joint Span"]
flowchart
graph LR
    A["First: Baby in full seat"] --> B["Second: Two seats with backrest"] --> C["Third: Three seats with seatbelt"] --> D["Final: Three seats with backrest"]
Dear Customer!
In case of any questions or comments on the purchased product, please contact us: help@lionelo.com
IMPORTANT! KEEP FOR THE FUTURE
Note: The assembly of the product must be performed by an adult.
Failure to comply with this provision and the assembly instructions could result in serious injury or even death.
Producer:
BrandLine Group Sp. z o. o.
IMPORTANT! READ CAREFULLY AND KEEP FOR FUTURE REFERENCE WARNING:
- Never leave the child unattended.
- Do not use this product once your child can sit up unaided or weighs more than 9 kg.
- This product is not intended for prolonged periods of sleeping.
- Never use this product on an elevated surface (e.g. a table).
- Always use the restraint system.
- To avoid injury ensure that children are kept away when unfolding and folding this product.
- Do not let children play with this product.
- Do not move or lift this product with the baby inside it.
- This product does not replace a cot or a bed. Should your child need to sleep, then it should be placed in a suitable cot or bed.
- Do not use the product if any components are broken or missing.
- Do not use accessories or replacement parts other than those approved by the manufacturer.
1. Parts list & drawings
| Photo Name Quantity | ||
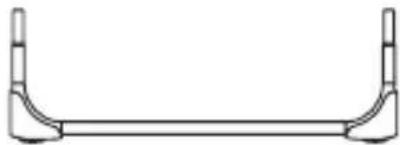 | Front and back leg tube 2 pcs | |
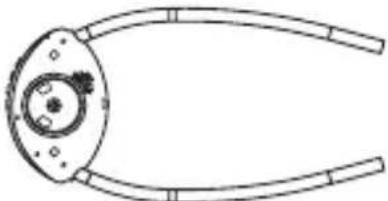 | Main model 1 pc | |
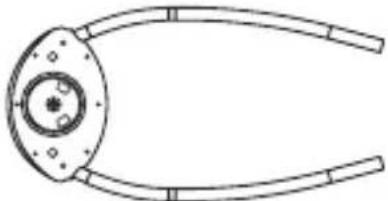 | Assist model 1 pc | |
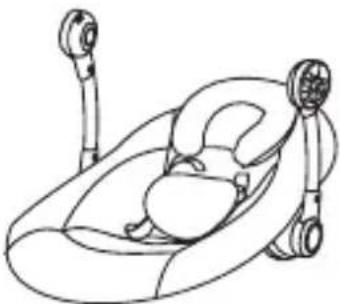 | Seat frame and seat cover 1 pc | |
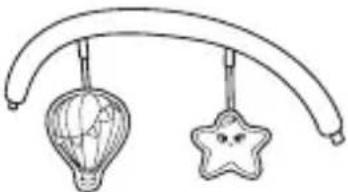 | Toy bar 1 pc | |
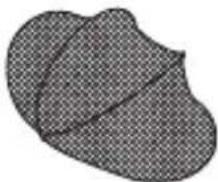 | Mosquito net 1 pc | |
| adapter - 1 pc, user manual - 1 pc, plum blossom button - 2 pcs, cap button - 2 pcs, davit cover - 2 pcs | 1 bag |
2. Assembly instructions
Warning: This item can only be installed by adults
- Open the support tube towards the two sides of the main model and assist model (by pressing down the buttons and at the same time pulling both sides of the support tube outwards) (fig. 1).
a. Press the buttons
b. Unfold the supports according to the arrows
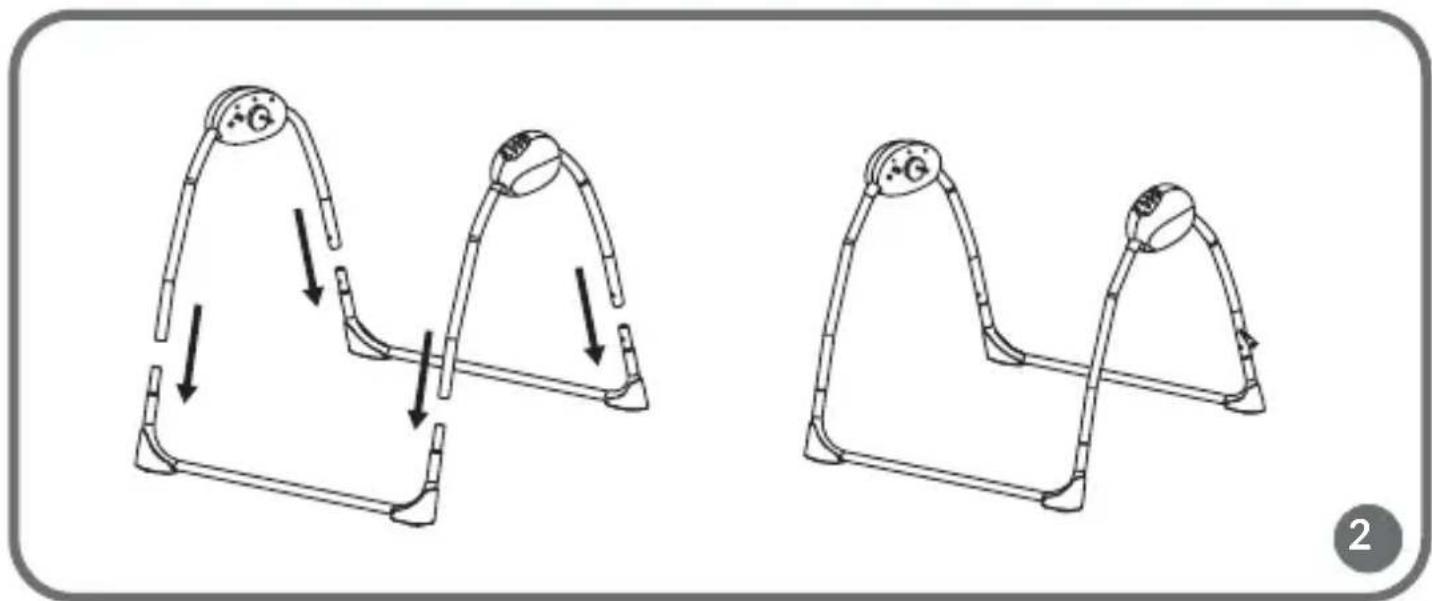
- Insert the front and back leg tube into the support tubes of main model and assist model, and make sure the shrapnel inside the tube pops well (fig 2).
-
Mount the seat frame on the shaft of the main model and assist model using mounting screws, cap button and end plugs. Then try to pull out the seat arm of the seat frame in order to make sure the installation is correct (fig 3).
-
Head of the seat arm
-
Cap button
-
Plum blossom button
-
End plug
-
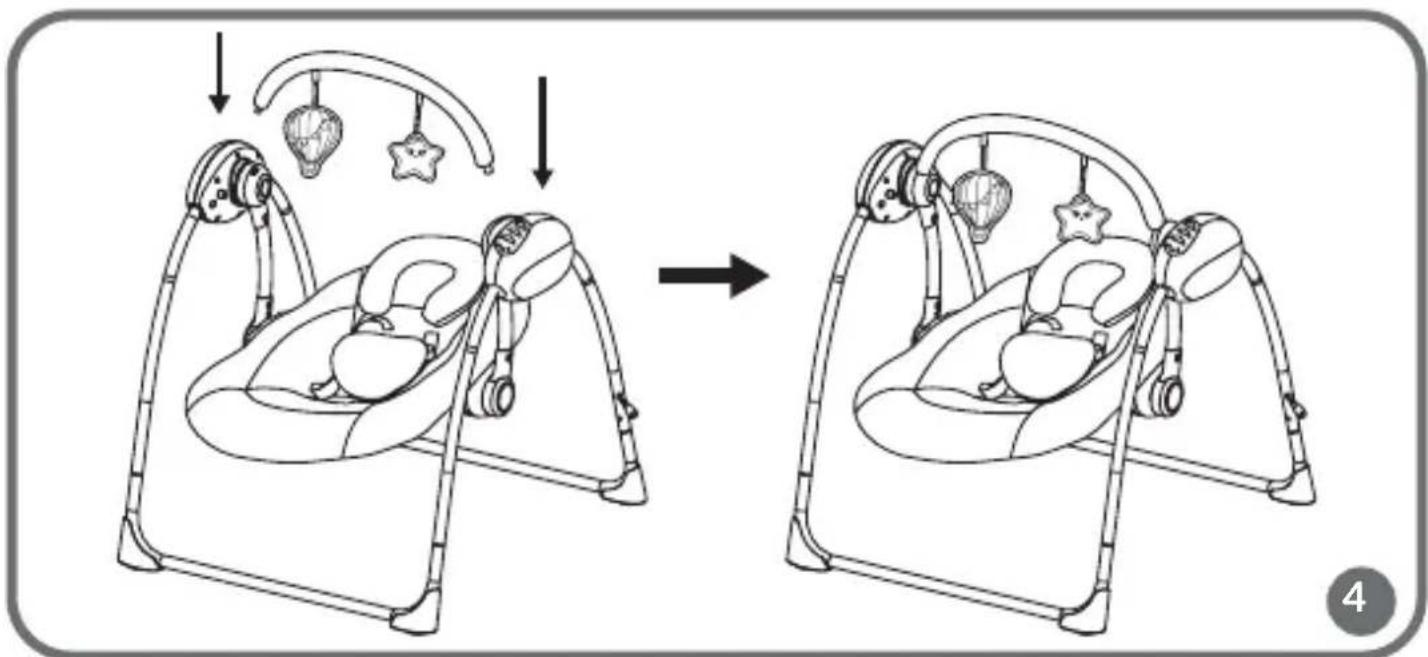
Insert the ends of the toy bar into the square holes on the left and right davit arm (fig. 4).
- Install the mosquito net on the seat (fig. 5).
- Fix the shoulder tape (fig. 6).
a. Top
b. Bottom
c. Draw the tape out from the top Then, draw it through the bottom. Fasten the tape
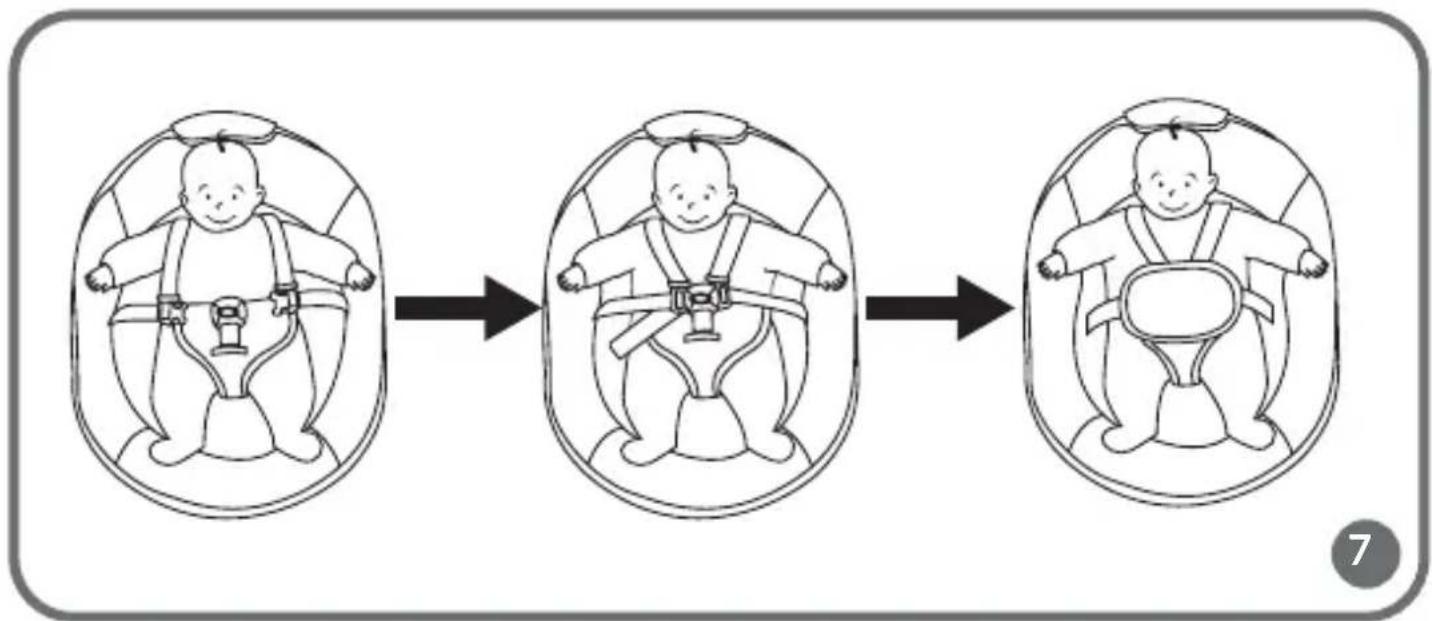
Adjust the length of the shoulder and waist belt (fig. 7).
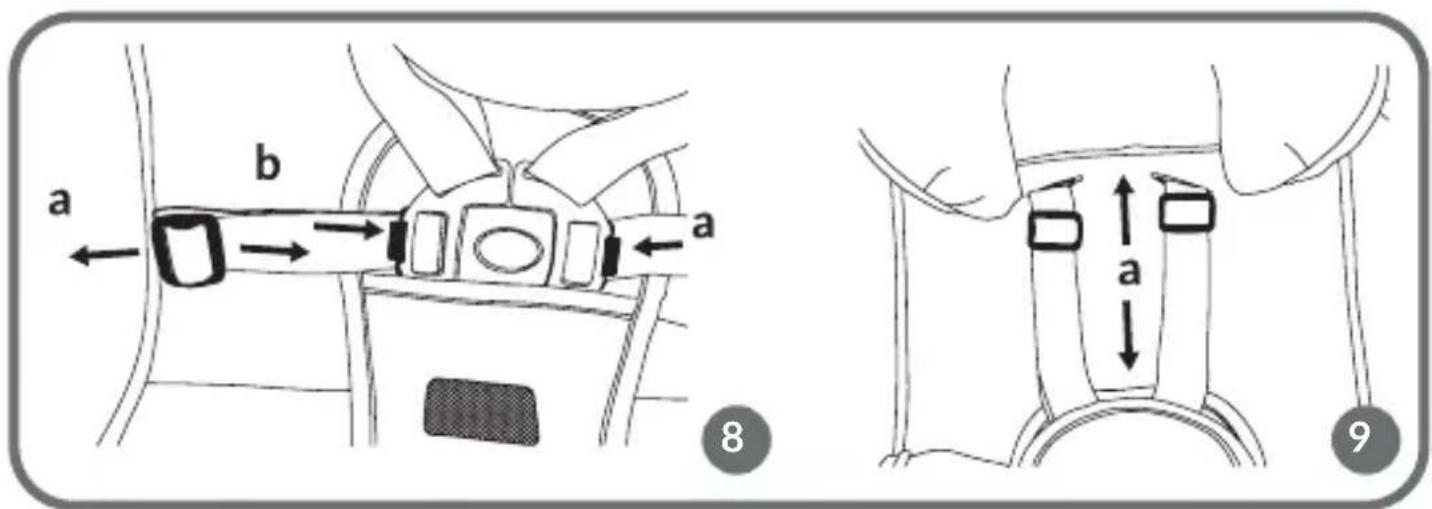
Slide the buckle left/right to adjust the length of the waist harness. Press the buckle button to level the waist harness (fig. 8).
a. side b. press side
Slide the buckle up/down to adjust the length of the waist harness (fig. 9).
ATTENTION:
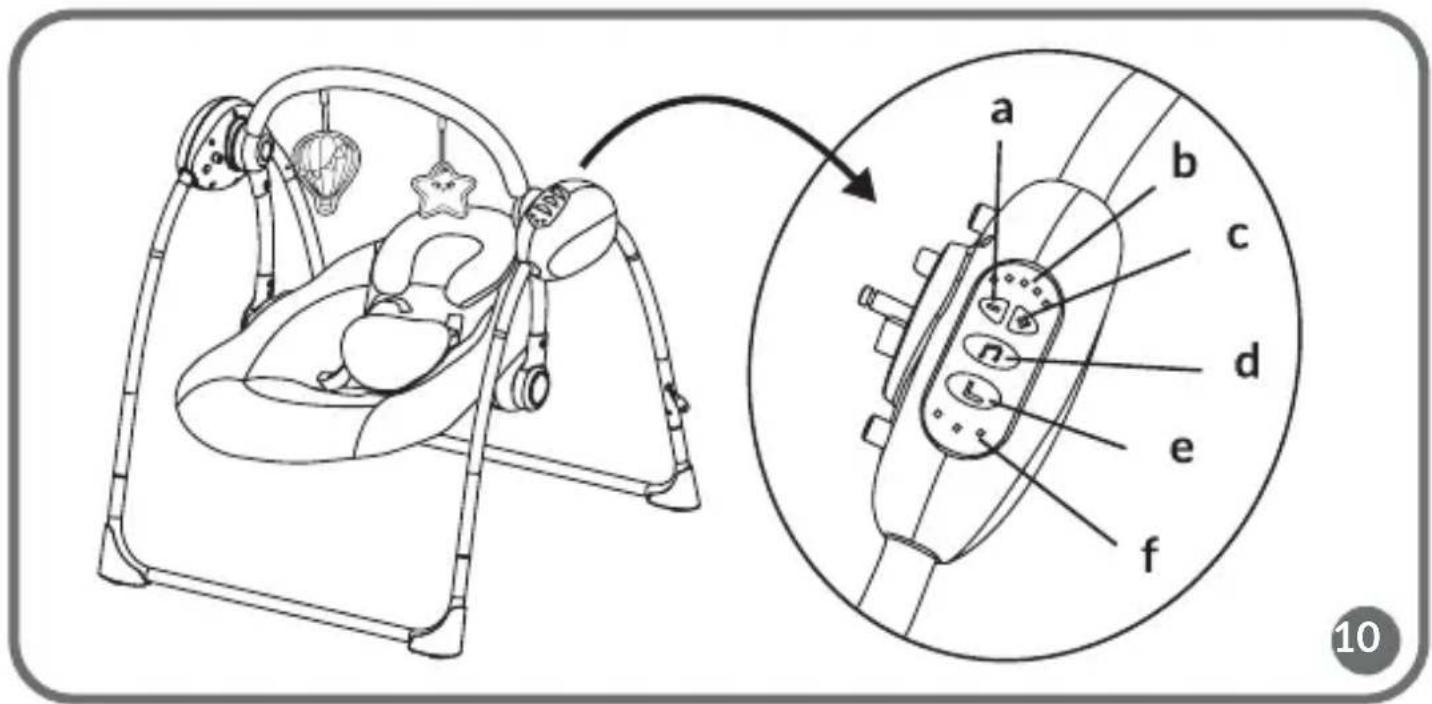
Swing function: five swing speeds available. Press “+” to speed up or “-” to speed down. The current swing speed is shown by five speed LED indicators (fig.10).
There are three time settings available. If you press the time setting button once, the first indicator lights on and the swinging is set for the following 8 minutes.
Press the button twice to choose the 15-minute program, or 3 times - to set it for 30 minutes. When the time is over all the functions stop and the swing enters the standby mode in order to save the battery power. If you don't use the time setting options, all the started functions continue until the power is off.
Music button: press once to start the music; press it again (up to 4 times) to adjust the music volume. Another press (fifth) stops the music. Press the button once again to play the next song (fig. 10).
a. Speed down
d. Music button
b. Speed lamp
e. Time setting button
c. Speed up
f. Time indicator lamp
3. Battery
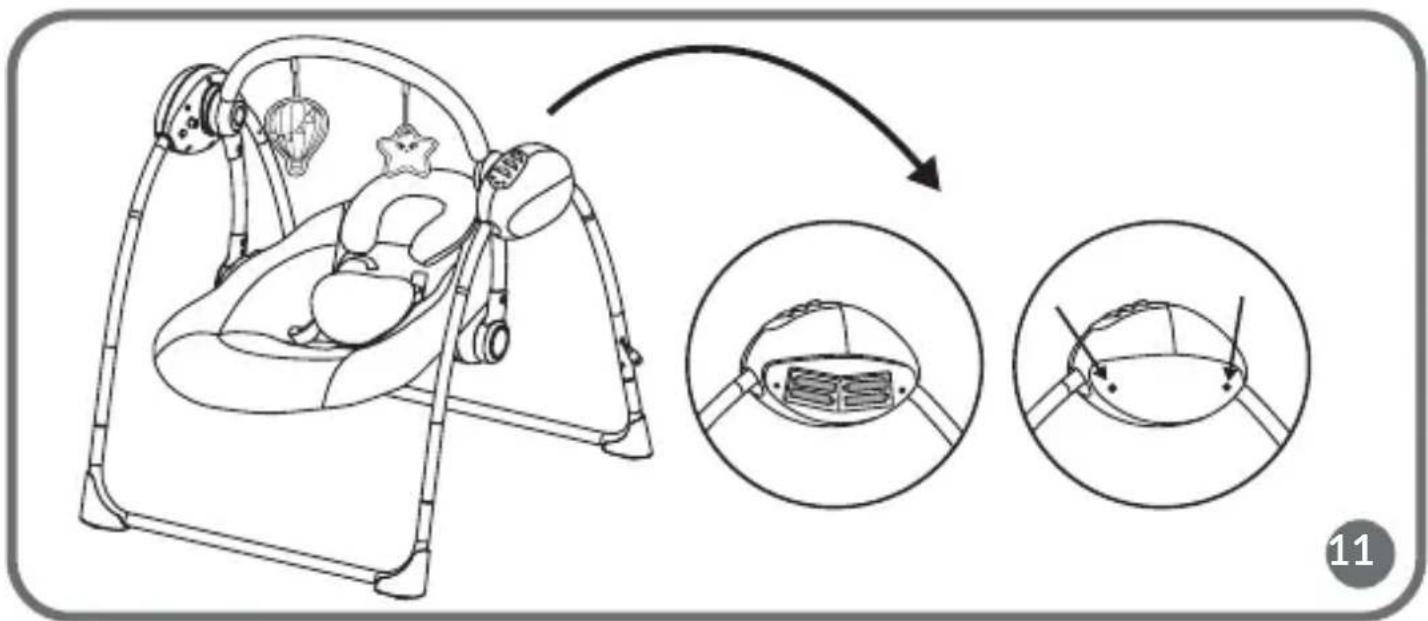
The swing can be powered by 4 1.5V AA batteries (inside the main model) or the power adapter.
- Putting the batteries into the main model (fig. 11).
a. Place the positive poles of the batteries so that they face the „+” signs inside the battery case.
b. Place the negative poles of the batteries so that they face the „-” signs inside the battery case.
c. Close the battery case and lock it with the screw.
Use the same steps in order to remove the batteries (fig. 11).
2. Main power supply:
First plug the adaptor's cord into an AC socket (100-240 V \~ 50/60 Hz 0,2 A max). Then, insert the other end of the cord into the DC port on the main unit.
WARNING
- Do not charge non-rechargeable batteries.
- Rechargeable batteries can only be charged under adult supervision.
- Rechargeable batteries should be taken out of the toys before charging.
- Different types of batteries or old and new batteries cannot be mixed.
- The batteries should be placed in the correct polarity.
- Exhausted batteries are to be removed from the swing.
- Power supply terminals must not be short-circuited.
- The adapter provided with this swing shall be used to power the product.
The input voltage of an adapter should be 100-240 V \~ 50/60 Hz 0,2 A max.
The output voltage: 5.8 - 6 V, 800 mA - 1 A.
-
The adapter should be placed away from a baby.
-
The transformers used with the swing must be regularly examined for damage to the cord, plug, enclosure and other parts, and in the event of such damage, they shall not be used.
4. Product features
Backrest angle adjustment
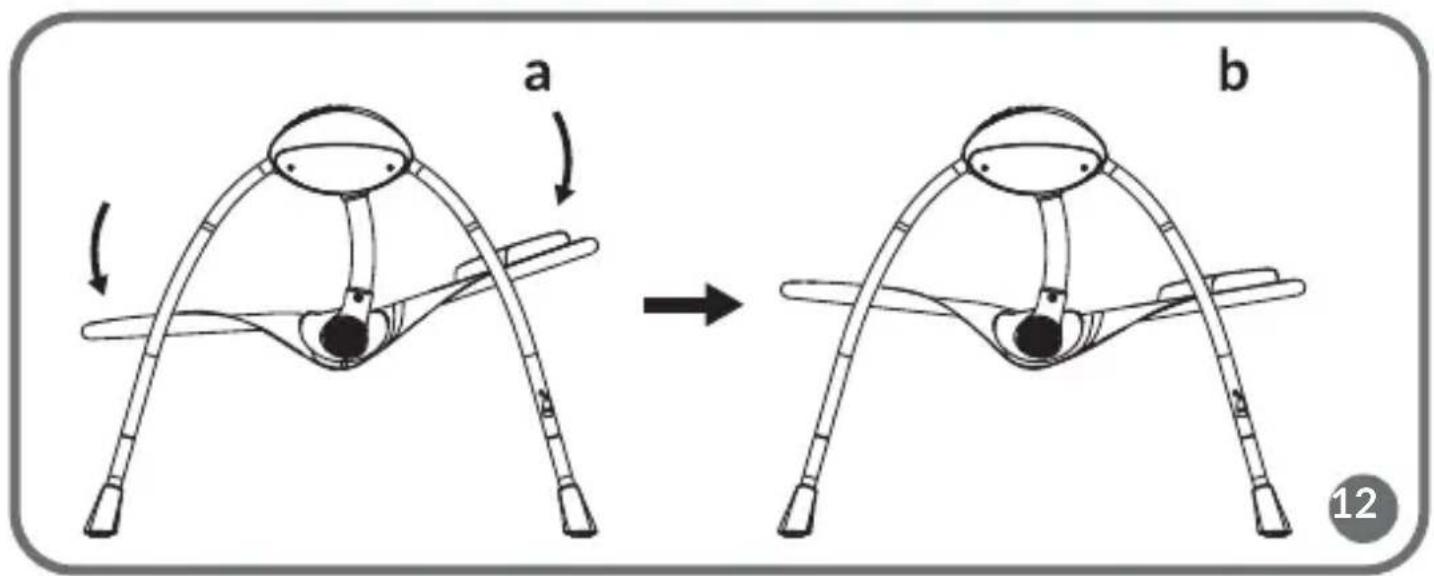
Press the left and right adjustment button of the seat at the same time, then tilt the seat up or down to adjust the backrest angle (fig. 12).
a. sitting position b. lying position
Press the adjustment buttons located on both sides of the seat and tilt the seat in the directions indicated by the arrows.
Folding:
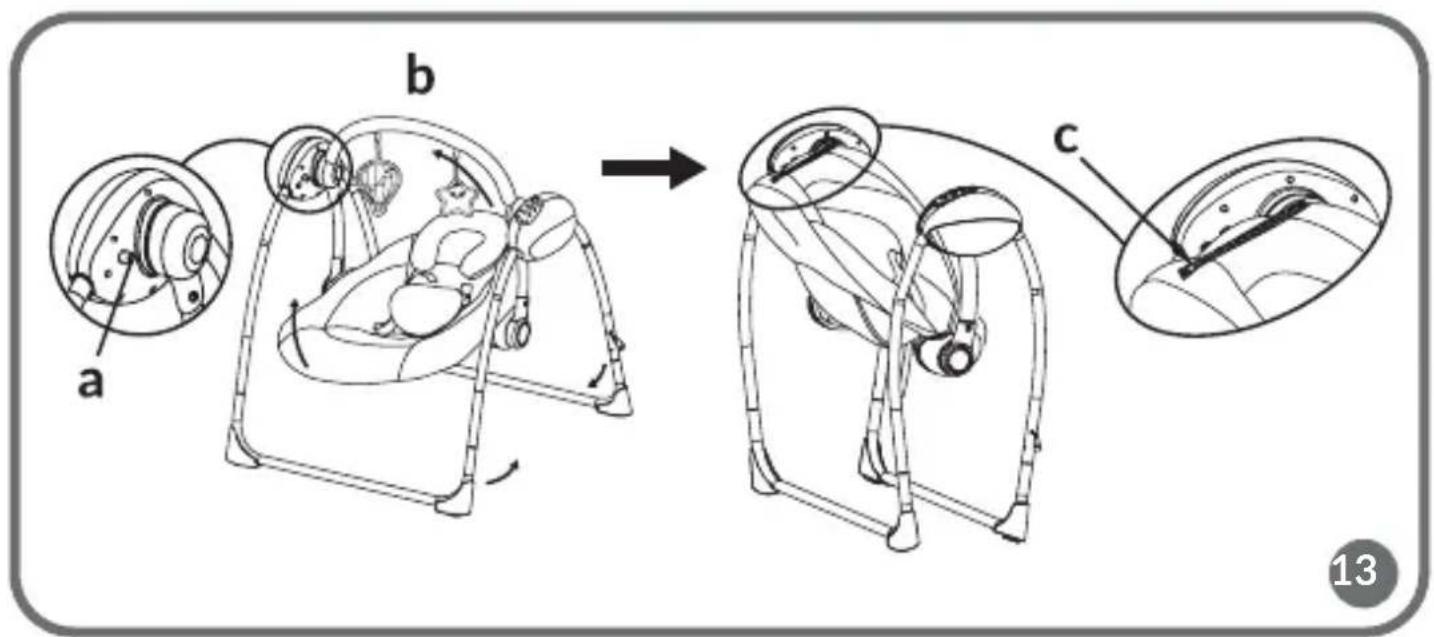
First, fold the seat and lock it by the snap fastener. Then press the lock buttons on the main model and the assist model to fold the support tubes (fig. 13).
A. Press the buttons to fold the supports
B. Fold the seat by pulling on the both sides of the seat
C. Lock the snap fastener after folding the seat
5. Care & cleaning
-
Seat pad: Remove the seat from the frame. Hand wash gently with cold water.
-
Frame: Wipe the metal frame with soft, clean cloth and mild soap.
Warning! Never machine-wash, bleach or machine-dry. Basic maintenance:
Common problems and their possible solutions
| Possible problem Solutions | ||
| 1 Music and swinging stopped The batteries are installed wrong way or the power is low | ||
| 2 There is no response when I want to start a function | Check the polarity of the batteries. | |
| 3 There | is the alarm sound when I press a button | Check whether the batteries are in the battery compartment. |
| 4 The swing | shakes terribly The battery | power is low. Please change the batteries. |
| 5 | What to do if the swing is not to be used for a long time? | Take out the batteries. |
Illustrations are for informational purposes only. The actual appearance of the products may differ from the pictures.
PL
Drogi Kliencie!
BrandLine Group Sp. z o.o.
BrandLine Group Sp. z o.o.
EN: Simplified EU / EC declaration of conformity
BrandLine Group Sp. z o. o. hereby declares that the “RUBEN” product complies with the directive: 2014/30/EU - EMC Directive, 2014/35/EU - LVD Directive, 2011/65/EU - RoHS Directive, 2009/48/EC - Toy Directive (Toy set only).
Full content of EU declaration of conformity is available on the following website:
EN: The product complies with requirements of EU directives.
Pursuant to the Directive 2012/19/EU, this product is subject to selective collection. The product must not be disposed of along with domestic waste as it may pose a threat to the environment and human health. The worn-out product must be handed over to the electrics and electronics recycling center.
Detailed warranty conditions are available on the website:
Thank you for purchasing our product
- Dear Customer!
- IMPORTANT! KEEP FOR THE FUTURE
- Producer:
- IMPORTANT! READ CAREFULLY AND KEEP FOR FUTURE REFERENCE WARNING:
- Parts list & drawings
- Assembly instructions
- Warning: This item can only be installed by adults
- ATTENTION:
- Battery
- Main power supply:
- WARNING
- Product features
- Backrest angle adjustment
- Folding:
- Care & cleaning
- Drogi Kliencie!
- EN: Simplified EU / EC declaration of conformity
Brand : Lionelo
Model : Ruben
Category : Baby bouncer