C2126-PC - Pan Cosori - Free user manual and instructions
Find the device manual for free C2126-PC Cosori in PDF.


| Product type | Electric skillet |
| Brand | Cosori |
| Model | C2126-PC |
| Dimensions (L x W x H) | 27 x 27 x 6 cm |
| Cooking surface diameter | 26 cm |
| Weight | 1.5 kg |
| Power supply | 220-240 V ~ 50/60 Hz |
| Rated power | 1500 W |
| Temperature range | 80 °C to 240 °C |
| Temperature settings | Multi-level with knob |
| Coating | PTFE non-stick (PFOA-free) |
| Handle | Bakelite, thermally insulated |
| Indicator light | Power and heating indicator |
| Automatic shut-off | Yes, after 2 hours of inactivity |
| Overheat protection | Yes, with thermal cut-off |
| Non-slip feet | Yes, silicone |
| Maintenance | Clean with a soft sponge after cooling; do not immerse |
| Available spare parts | Power cord, control knob |
| Warranty | 1 year |
Frequently Asked Questions - C2126-PC Cosori
User questions about C2126-PC Cosori
0 question about this device. Answer the ones you know or ask your own.
Ask a new question about this device
Download the instructions for your Pan in PDF format for free! Find your manual C2126-PC - Cosori and take your electronic device back in hand. On this page are published all the documents necessary for the use of your device. C2126-PC by Cosori.
USER MANUAL C2126-PC Cosori
support.eu@cosori.com
Table of Contents
English
Safety Information 4
Product Diagram 7
Pressure Cooker 7
Control Panel 8
Button Controls 9
Operation 10
Preparing To Cook 10 Glass Lid 11
Preset Cooking Modes 11 Manual Cooking Modes 12 Safely Removing The Lid 13
Care & Maintenance 14 Silicone Gasket Installation 15
Troubleshooting 16
Specifications 17
Warranty Information 18
Deutsch
Please read, understand, and comply with all the instructions provided in this manual before using the device. Failure to comply with the instructions given in this manual and/or using the device in ways other than the ones mentioned in this manual may result in serious injury and/or damage to the product.
SAFETY USE & CARE:
- DO NOT touch hot surfaces. Use handle and pot holders when necessary.
- To protect against electrical shock, do not immerse cord, plugs, or the unit in water or other liquid.
- Close supervision is necessary when this appliance is used by or near children.
- Unplug from outlet when not in use and before cleaning. Allow it to cool before putting on or taking off parts.
- DO NOT operate the pressure cooker if the cord or plug is damaged, if the unit malfunctions, if the unit has been damaged in any manner. If the unit is malfunctioning, please contact customer support.
- Using other accessories that are not compatible with the pressure cooker is not recommended. Doing so may damage the unit or cause injury.
- The pressure cooker is intended for indoor use only.
- DO NOT place on or near a hot gas or electric burner and/or in a heated oven.
- Use extreme caution when moving the pressure cooker if it contains hot oil or other hot liquids.
- To disconnect the unit from a power source, press 'Start/Cancel', then remove plug from the outlet.
- Always check the pressure release valve and floater valve for any clogging before use.
- DO NOT place any object above the pressure release valve while the steam is being released from the pressure cooker.
- DO NOT use the unit for anything other than its intended use.
- If you cook meat with a casing, such as sausage, swelling can occur when cooked under pressure. Piercing the skin after cooking can lead to bursts of hot liquid.
- DO NOT lean over the pressure cooker at any time while it is cooking.
- This pressure cooker should not be used for any medical purposes. It is
not designed to reach the required temperature for sterilization.
- The silicone gasket creates a pressure seal between the lid and the pot. Keep the gasket completely clean and free from any cracks or deterioration.
- DO NOT break the silicone gasket. Do not replace it with other rubber gaskets or use a tension belt to make the pressure cooker seal.
- It is extremely important to fill the pressure cooker with liquid prior to operation. Never cook without liquid; doing so can cause the unit to overheat and damage the safety mechanisms.
- In case of overheating, never remove the pressure cooker from the heat source. Instead, shut it off immediately and let it cool.
- Make sure all parts of the pressure release valve and floater valve are clean and properly assembled.
- DO NOT alter the safety mechanisms or attempt to repair the pressure cooker as this will void the warranty. Please refer to the Care & Maintenance section on page 14 on how to maintain the pressure cooker.
- DO NOT place the unit close to flammable materials, heating units, or wet environments.
- Check and wash anti-clog filter and pressure release valve regularly to avoid any blockage.
- DO NOT attempt to open the lid when the float valve is down.
- DO NOT put anything on or use other objects to replace the pressure release valve.
- Never use a towel to clog the gap between the lid and edge of the housing.
- The bottom of the inner pot and heating plate should be kept clean. Do not put the inner pot on other heat sources. Do not replace the inner pot with other containers.
- Only use wood or plastic ladles or spoons to prevent the stainless steel pot from being scratched.
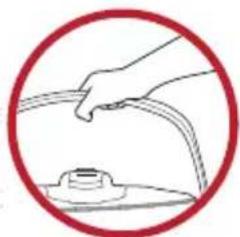
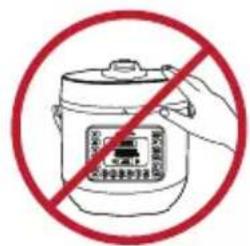
- DO NOT attempt to move the pressure cooker while it is cooking; wait until it cools down to move it. Move the unit using the built-in handle; do not try to hold the pressure cooker from the lid handle.
- DO NOT disassemble the unit on your own or try to replace with parts from different brands.
- Make sure air/pressure completely discharges before opening the lid after cooking has finished.
- Clean and properly place the water collection cup. Clean the lid before each use.
- You may experience some smoke coming out the unit during the first few uses due to the initial heating of the materials; this is normal.
- DO NOT let power cord hang over the edges of tables or counters, or touch hot surfaces.
- A short power supply cord is provided to reduce injuries resulting from entanglement and tripping. If an extension cord is used, the electrical
rating of the cord must be at least 120V/20A. The extension cord must be arranged so that it will not hang over the edge of a table or counter where it can be pulled or accidentally tripped over.
SAVE THESE INSTRUCTIONS
DO NOT use any other lid.
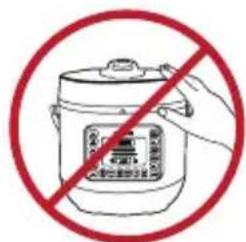
DO NOT touch the lid or stainless steel surface while heating or cooking.
natural_image
Simple line drawing of a hand holding a curved pipe above a small container, enclosed in a red circle (no text or symbols)When moving, hold the pressure cooker by the handles.

Keep out of reach of infants and young children.
Product Diagram
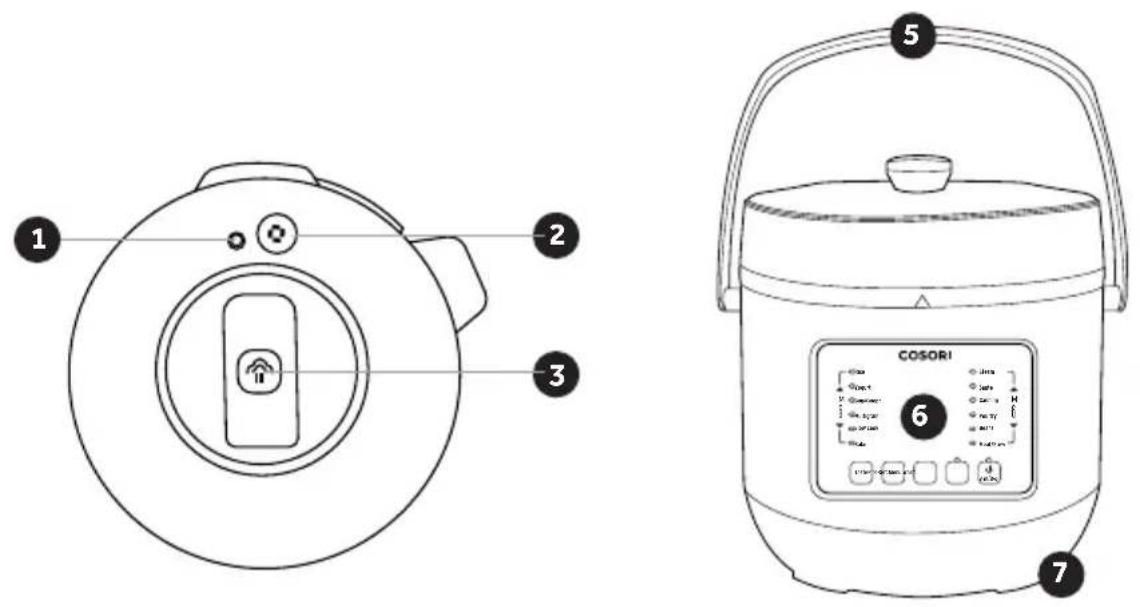
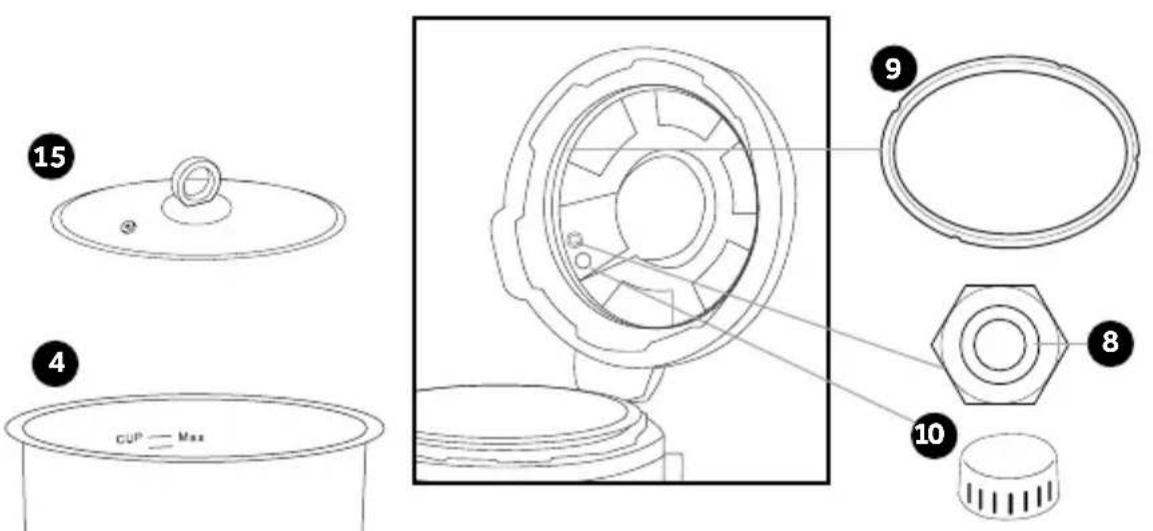
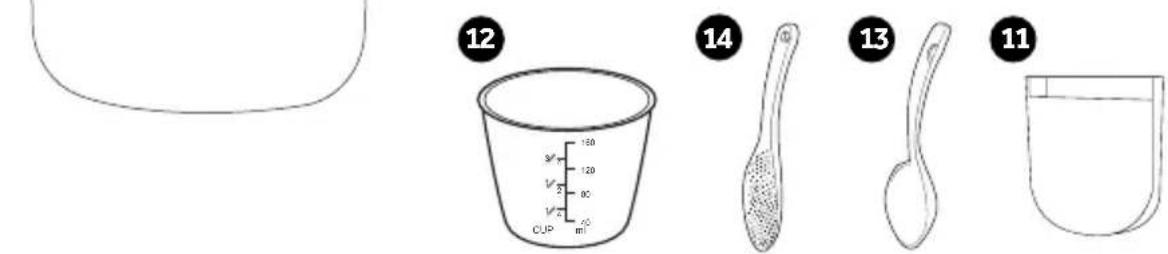
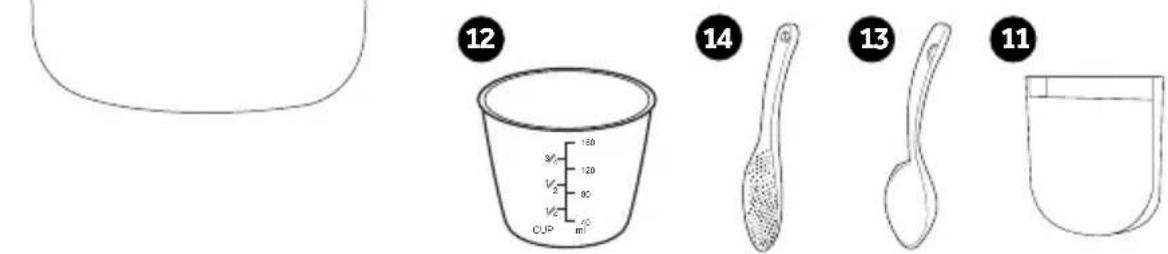
- Float valve
- Pressure release valve
- Pressure release button
- Inner pot
- Pressure cooker handle
- Control Panel
- Pressure cooker housing
- Float valve sealing ring
-
Silicone gasket
-
Anti-clog filter
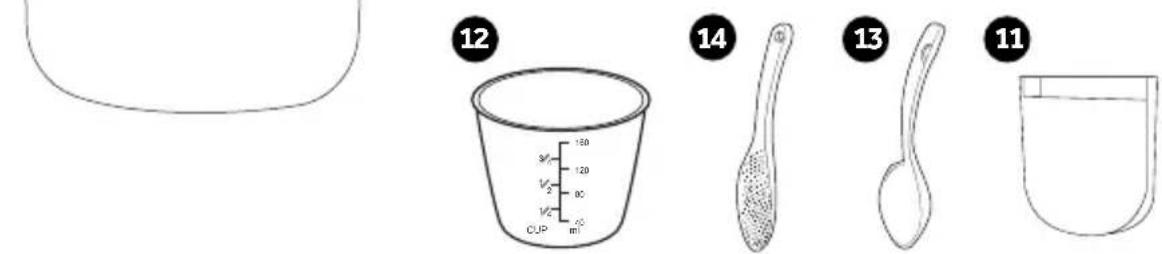
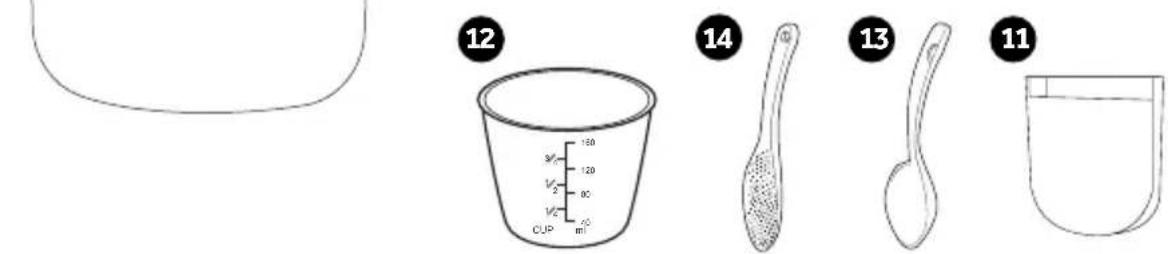
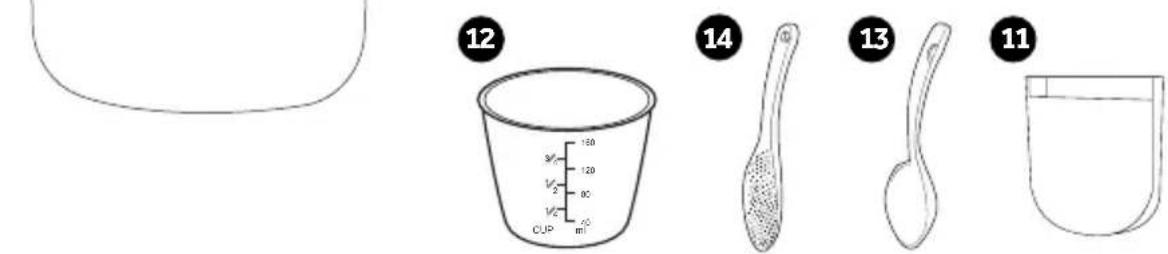
- Water collection cup
- Measuring cup
- Soup ladle
- Rice paddle
- Tempered glass lid
Control Panel
flowchart
graph TD
    A["12"] --> B["Rice"]
    A --> C["Yogurt"]
    A --> D["Menu"]
    A --> E["Soup/Porridge"]
    A --> F["Multigrain"]
    A --> G["Slow cook"]
    A --> H["Bake"]
    I["1"] --> J["Less Normal More"]
    J --> K["3 4 5 6"]
    K --> L["Pressure"]
    M["78"] --> N["Adjust"]
    O["1"] --> P["Delay Time"]
    Q["Menu"] --> R["Keep Warm"]
    S["Start Cancel"] --> T["Meat/Stew"]
    U["Steam"] --> V["Sauté"]
    W["Sauté"] --> X["Reheat"]
    Y["Poultry"] --> Z["Beans"]
    AA["Beans"] --> AB["Meat/Stew"]
    AC["Menu"] --> AD["Stop"]
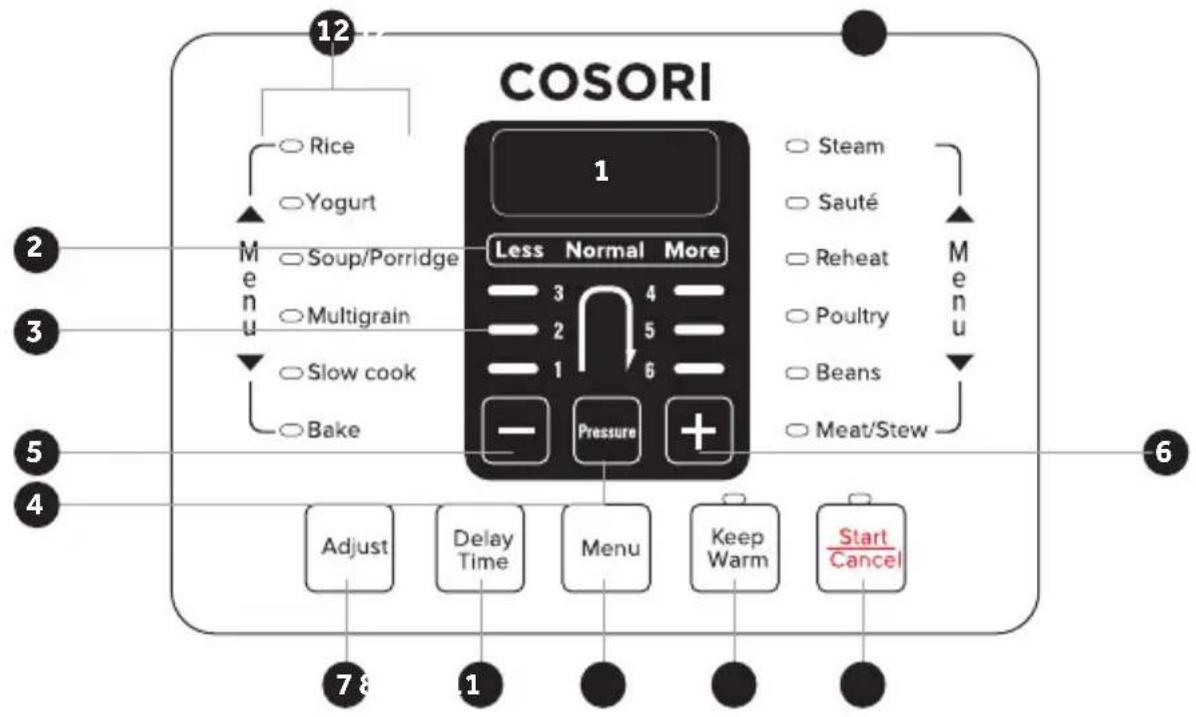
- Digital display
- Adjust indicator
- Pressure level indicator
- Pressure button
- Decrease value
-
Increase value
-
Adjust button
- Delay Time button
- Menu button
- Keep Warm button
- Start/Cancel button
- Cooking functions
Button Controls
START/CANCEL: Starts or cancels any cooking process; also cancels any selections that are made.
KEEP WARM: The warming function keeps food warm for up to 24 hours when it is finished cooking. Press the 'Keep Warm' button, then the 'Start/Cancel' button to turn on the warming function. The display will show "bb" indicating that the unit is in the warming mode.
NOTE:
• DO NOT cook foods using the warming mode.
- The pressure cooker will automatically switch to this mode when cooking has finished.
MENU: Press the 'Menu' button to cycle through the pressure cooker's different programs. See the Preset Cooking Modes section on page 11 to set up the pressure cooker using the 'Menu' button.
DELAY TIME: Press the 'Delay Time' button to adjust the start time of your cooking. Use the '+' and '-' buttons to set your desired time, then use the 'Menu' button to select your cooking function. Press 'Start/Stop' when you are ready to cook. The unit will beep when it starts cooking. You can delay the start time of the pressure cooker for up to 24 hours.
ADJUST: This is a function used to help change the consistency of your foods. "Less," "Normal" and "More" are selected guides that increase or decrease the cooking time while under pressure.
- Select a cooking function by pressing the 'Menu' button. The Adjust indicator will default to Normal time. (E.g., Select the Rice setting and the display will show 00:10).
- To change the consistency of your food, simply press the 'Adjust' button for "Less," "Normal," or "More." (E.g., When cooking rice, select "Less" for harder rice, "Normal" for soft rice, and "More" for stickier rice.)
- Close the lid and press the 'Start/Cancel' button.
- See page 12 for cooking times for the pressure cooker's different cooking programs.
NOTE: The Adjust function does not work with the Canning, Sauté, Slow Cook and Yogurt functions.
PRESSURE: The cooking function selected will determine the amount of pressure used when cooking food. You can press the 'Pressure' button to cycle through the different pressure levels (1-6) for your recipe. Some preset cooking functions already have a default pressure level, but can be adjusted to meet your needs. Please note that cooking with different pressure levels may yield varying results for your recipe.
NOTE:
- The working pressure for level 1 is about 5.8 PSI (40 kPa), while the pressure for level 6 is 10 PSI (70 kPa).
- It is recommended to cook tender foods such as vegetables on the lower pressure settings.
- The actual working pressure may vary with the amount of food and liquid being used.
Operation
Preparing to Cook
NOTE:
• Thoroughly wash the inner pot before each use.
- The minimum amount of ingredients needed to cook in the pressure cooker is 12 s of the capacity of the inner pot.
- The minimum amount of liquid needed for cooking is 160mL . (This may vary depending on the recipe you are following.)
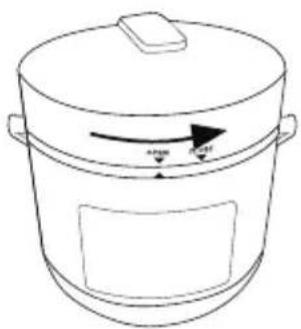
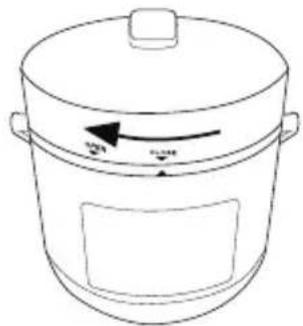
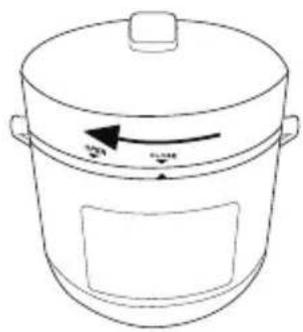
- Open lid by holding the handle and turning the lid counterclockwise to open position, then lift the handle to open the pot.
natural_image
Line drawing of a cooking pot with a lid and side handles, showing a speed arrow (no text or symbols)To open
natural_image
Line drawing of a cooking pot with a lid and side handles, showing an arrow indicating rotation (no text or symbols)To close
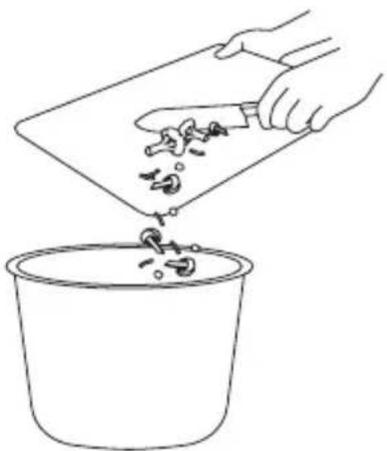
- Place your ingredients into the inner pot. Ingredients and water/liquid should not exceed 13 height of the inner pot. If the ingredients expand easily in water, then the total amount should not exceed 13 height of the inner pot.
natural_image
Line drawing of a hand using a knife to cut food into a bucket (no text or symbols)- Place the inner pot in the housing; be sure to wipe down the inner pot before placing it back into the pressure cooker.
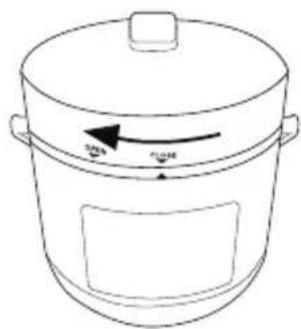
- Make sure the silicone gasket is secured. Close the lid and turn the lid handle clockwise to lock the lid in place.
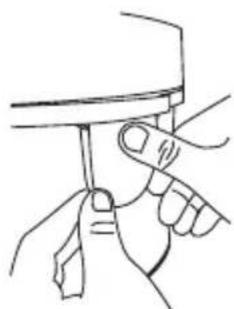
- Attach the water collection cup onto the back of the pressure cooker.
natural_image
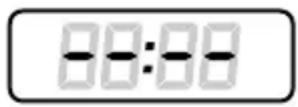
Line drawing of a hand holding a tool or device with a circular button (no text or symbols)- Plug the pressure cooker into a powered electrical outlet. The unit will beep and the display will show "--:" indicating that the unit is in standby mode.
Glass Lid
The professional grade tempered glass lid is specifically designed for use with the Cosori Electric Pressure Cooker. Use the lid for cooking while using the Sauté function to prevent any oil from splattering, or place the lid on the pressure cooker while using the Slow Cook function. The lid can be used for food presentation even when keeping food warm just before serving. It also features a steam-release vent and stainless steel rim for maximum convenience and durability, it is dishwasher safe for easy cleanup.
NOTE: ONLY use the glass lid when cooking using the Sauté, Slow Cook, Reheat or the Warm mode. Do not use the glass lid for cooking with any other mode.
Preset Cooking Functions
- If the unit is not already plugged in, connect it to a power source. The unit will beep, indicating it is in standby mode.
- Press the 'Menu' button to select a preset cooking function on the pressure cooker.
- (Optional): Before pressing the 'Start/Cancel' button, you can customize your cooking time by using the 'Delay Time' button to delay your cooking time and using the 'Adjust' or '+' or '-' buttons to extend or shorten your cooking time.
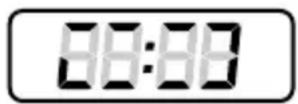
- Press the 'Start/Cancel' button to begin the cooking process. The display will show the image below, indicating that the unit is pressurizing. Please note that it may take 10-15 minutes to reach working pressure.
- The unit will beep after 10-15 minutes, indicating that the optimal pressure level has been reached. Cooking will begin and the display will read "P0:XX". The cooking times for the different presets are listed on the following page.
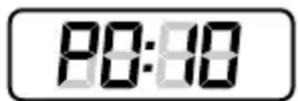
NOTE: Some steam may come out of the pressure release valve along with occasional sputtering; this is normal.
-
When cooking has finished, the pressure cooker will beep several times and will automatically go into the Warm mode.
-
Before serving your food, wait at least 10-15 minutes before opening the pressure cooker. Refer to page 13 on how to safely remove the pressure cooker lid after cooking.
| Cooking Times | ||||||
| Default Time Taste Setting | Time (Hours & Minutes) | |||||
| Presets & Functions | Default Pressure Level | Less Normal More Min. Max. | ||||
| Rice 4 00:07 | 00:10 00:13 00:01 | 01:40 | ||||
| Yogurt | N/A | N/A | 08:00 | N/A | 06:00 | 12:00 |
| Soup/Porridge | 6 00:15 00:25 | 00:50 | 00:01 01:40 | |||
| Multigrain | 6 00:35 00:40 | 00:45 | 00:01 01:40 | |||
| Slow Cook | N/A | N/A | 04:00 | N/A | 02:00 | 09:00 |
| Bake | 4 00:30 00:40 | 00:50 | 00:01 01:40 | |||
| Steam | 6 00:03 00:05 | 00:07 | 00:01 01:40 | |||
| Sauté | N/A | N/A | 00:05 | N/A | 00:01 | 00:20 |
| Canning | 6 | N/A | 00:20 | N/A | 00:01 | 01:40 |
| Poultry | 5 00:15 00:20 | 00:25 | 00:01 01:40 | |||
| Beans | 6 00:15 00:20 | 00:25 | 00:01 01:40 | |||
| Meat/Stew | 6 00:20 00:40 | 00:50 | 00:01 01:40 | |||
| Delay Time | 01:00 24:00 | |||||
| NOTE: The working pressure for level 1 is 5.8 PSI (40 kPa), while the pressure for level 6 is 10 PSI (70 kPa). The Adjust Setting times can be changed for each setting to better meet your cooking needs. | ||||||
Manual Cooking Modes
NOTE: The following cooking functions have no pressure applied when selected.
SLOW COOK: This function allows you to cook various recipes slowly at low temperatures ranging from 204°-210°F (96°-99°C).
- Open the pressure cooker and detach the lid. Only use the glass lid for this feature.
- Connect the pressure cooker to a power source.
- Place your ingredients in the inner pot and place the glass lid on top.
- Press the 'Menu' button and select the Slow Cook function. You can adjust the cooking time anywhere from 2 to 9 hours using the '+' or '-' buttons. (The default time is 4 hours.)
- Press the 'Start/Cancel' button to start cooking. The pressure cooker will beep once when the cooking has finished and will automatically set to the Warm function.
SAUTÉ: This function allows you to sauté or simmer ingredients inside the inner pot.
- Open the pressure cooker and detach the lid. Only use the glass lid for this feature.
- Connect the pressure cooker to a power source.
-
Press the 'Menu' button and select the Sauté function. You can adjust the cooking time anywhere from 1 to 20 minutes using the '+' or '-' buttons.
-
Press the 'Start/Cancel' button and place the ingredients you wish to sauté into the inner pot.
-
The pressure cooker will beep once the cooking time has ended. Carefully remove your ingredients from the inner pot, or add additional ingredients if you are still cooking.
REHEAT: This function allows you to reheat food inside the pressure cooker. You can change the Reheat temperature by pressing the 'Adjust' button to heat foods on Less (212°F/100°C), Normal (248°F/120°C), and More (284°F/140°C).
- Connect the pressure cooker to a power source.
- Press the 'Menu' button and select the Reheat function. You can adjust the cooking time using the '+' or '-' buttons.
- Press the 'Start/Cancel' button and place the food you want to reheat into the inner pot.
- The pressure cooker will beep once the cooking time has ended. Carefully remove your food from the inner pot.
Safely Removing the Lid
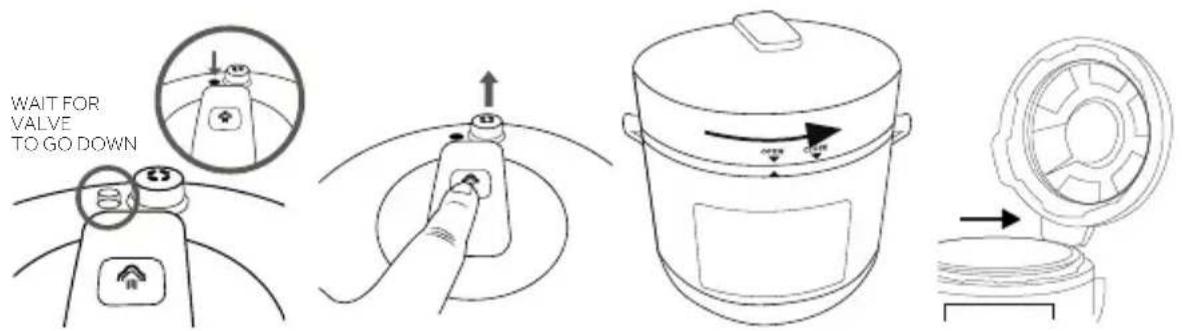
CAUTION: For your safety, open the lid slowly. Do not open the lid before all pressure has escaped through the exhaust valve and the float valve has completely fallen back into the lid. The handle may also be hot when cooking has finished.
Once cooking is complete, turn off the pressure cooker's power by unplugging the power cable.
- Let the cooker cool down on its own. Wait 15-20 minutes or until the float valve drops down before opening the lid.
- Press the pressure release button to release any residual pressure remaining in the pressure cooker. Hold down the pressure release button until all pressure is released.
- Unlock the lid by turning it counterclockwise, then carefully lift the lid away from your face. The steam coming out from the pressure cooker will be hot.
NOTE:
- DO NOT press the pressure release button if your food is in a liquid state (e.g. porridge or soup). Pressing the pressure release button immediately after cooking liquid foods may result in food spraying out via the pressure release valve. When cooking such foods, allow extra time for the food to cool down after cooking and before serving.
- Some recipes may call for a quick release. To quick release pressure, press the pressure release button immediately after cooking. Use caution as steam will be hot.
Care & Maintenance
- Unplug the pressure cooker and allow it to completely cool before cleaning.
- DO NOT immerse the base in water or spray any water in it. If necessary, wipe the inside and outside of the base with a clean, damp cloth.
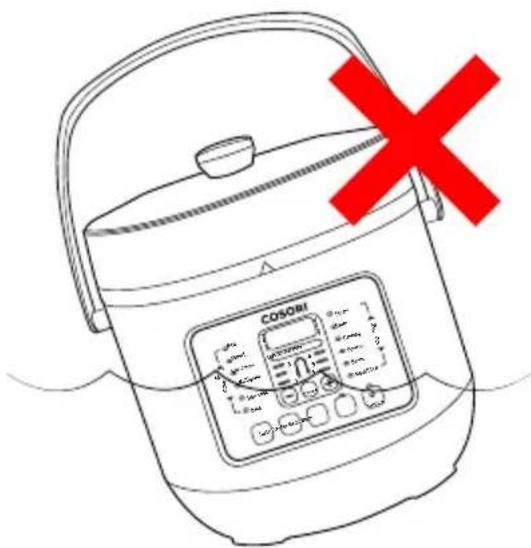
- Remove the water collection cup. Place it back onto the side of the pressure cooker.
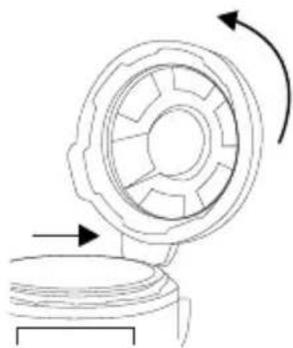
- Detach the lid from the pressure cooker housing by lifting up the lid, then turning the lid counterclockwise to remove it from the hinge.
natural_image
Mechanical component diagram showing a gear-like assembly with rotational arrows (no text or symbols)- Thoroughly wash and rinse all parts of the lid including the pressure release valve, anti-clog filter, and float valve. Wipe dry with a clean cloth.
- All parts inside the lid can be hand washed separately with water and should always be checked to make sure they are not damaged or cracked.
- The silicone gasket can be removed from the lid. Wash the gasket with liquid detergent and warm water, and dry it with a clean cloth. (Refer to the Silicone Gasket Installation section on how to remove and install the gasket.)
- Use a sponge or non-metallic soft brush to clean the inner pot, then wipe the surface with a clean cloth.
Silicone Gasket Installation
NOTE: Make sure the silicone gasket is not cracked or damaged in any way.
Removal
- While holding the lid in place, gently pull out the silicone gasket.
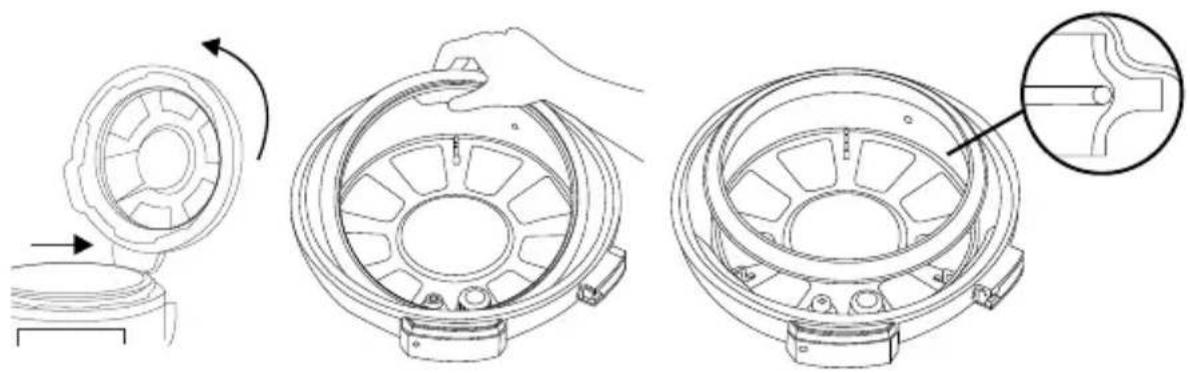
natural_image
Technical line drawing of a mechanical component with three views: top view, front view, and close-up (no text or symbols)Installation
- Line up silicone gasket on top of metal ring.
- Gently push down on silicone gasket, ensuring that the metal ring is inside the gasket's groove as shown above. Continue pushing the silicone gasket all around until it is secured by the metal ring.
- Place lid back onto pressure cooker.
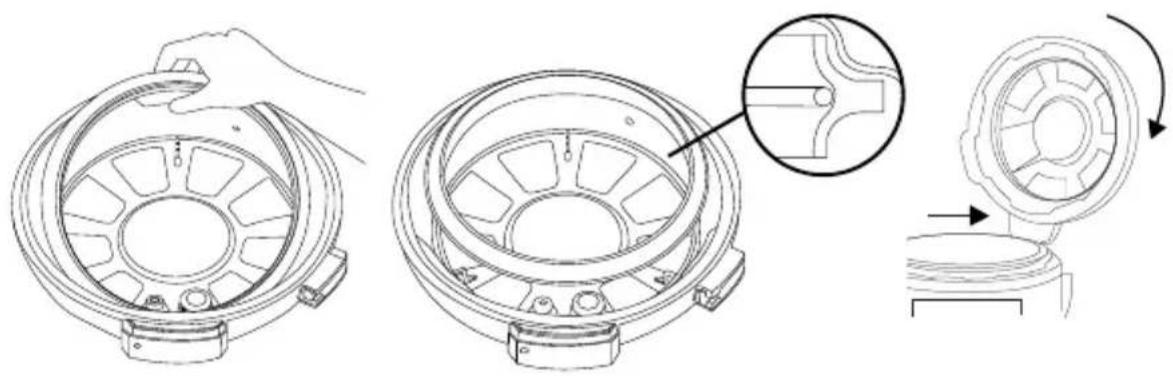
natural_image
Technical line drawing of a mechanical component with three views: top view, front view, and side view (no text or symbols)Troubleshooting
| Problem Cause Solution | ||
| Difficulty closing lid. Silicone | gasket may not be placed correctly. | Correctly place the silicone gasket inside the lid. |
| Pressure release valve may be blocking the push rod. | Make sure the push rod at the side of the lid is aligned correctly to the base. | |
| Difficulty opening lid. Pressure | release valve may not be falling down properly. | Push pressure release button. |
| Pot may still be under pressure. | ||
| Steam leaking from cooker lid. | Some ingredients may be stuck to silicone gasket. | Clean silicone gasket. |
| Silicone gasket may be broken. | Make sure the lid is closed as per instructions on page 10. | |
| Steam leaking from float valve sealing ring. | Some ingredients may stick to the anti clog filter. | Clean the anti -clog filter. |
| The silicone gasket of the floater may be broken. | The silicone gasket of the floater may need to be replaced. | |
| Floater does not rise up. There may not be enough ingredients / water to generate enough pressure. | Ingredients or water need to be at minimum level. | |
| Unit may be defective. Contact customer support. | ||
| Contact Customer Support if any of these errors occur | ||||
| Code E1 E2 | E3 E4 | |||
| Error | Broken circuit in sensor. | Short circuit in sensor. | Unit is overheating. | Signal switch broken. |
Specifications
Capacity:
6.3
Quarts
Power Supply: AC 120 V/60 Hz
Rated Power: 1000 W
Working Pressure: 5.8-10 PSI (40-70 kPa)
Keep Warm Temperature: 140°-176° F (60°-80° C)
Package Contents
1 x Electric Pressure Cooker
1 x Spoon
1 x Ladle
1 x Measuring Cup
1 x Glass Lid
1 x Sealing Ring
1 x User Manual
1 x Steamer Rack
Warranty Information
TERMS & POLICY
Cosori warrants all products to be of the highest quality in material, craftsmanship and service for a minimum of 2 years, effective from the date of purchase. Warranty lengths may vary between product categories.
Should you encounter any issues or have any questions regarding your new product, feel free to contact our helpful Customer Support Team. Your satisfaction is ours!
CUSTOMER SUPPORT
Cosori
1202 N. Miller St. Suite A
Anaheim, CA 92806
support.eu@cosori.com
*Please have your order number ready before contacting customer support.
Thank You
We thank you for purchasing a new Electric Pressure Cooker by Cosori, and we're excited to see what you'll cook up very soon.
We're looking forward with you to preparing many fresh meals in your kitchen with minimal operation or effort. And when we say "with you," we mean it—our helpful customer support team is available by email at support.eu@cosori.com. We're here to lend an ear to your questions and concerns (or your joy over a successful recipe). Happy cooking!
Show Us What You're Cooking
We hope this has been helpful to you. We can't wait to see your beautiful results, and we think you'll want to share glam shots! Others already in the community await your uploads—just pick your platform of choice below. Snap, hashtag, and tag away, Cosori chef!
Considering what to cook? Many recipe ideas are available, both from us and the Cosori community.
@CosoriCooks | #iCookCosori
More Cosori Products
Lastly, if you're happy with this Electric Pressure Cooker, the line doesn't stop here. Check out www.cosori.com for a line of all our beautiful and thoughtfully designed cookware. They might be right at home in your kitchen, too!
DE
Sicherheitshinweise
WICHTIGE
SICHERHEITSHINWEISE
natural_image
Simple line drawing of a hand holding a pipe above a tank, enclosed in a red circle (no text or symbols)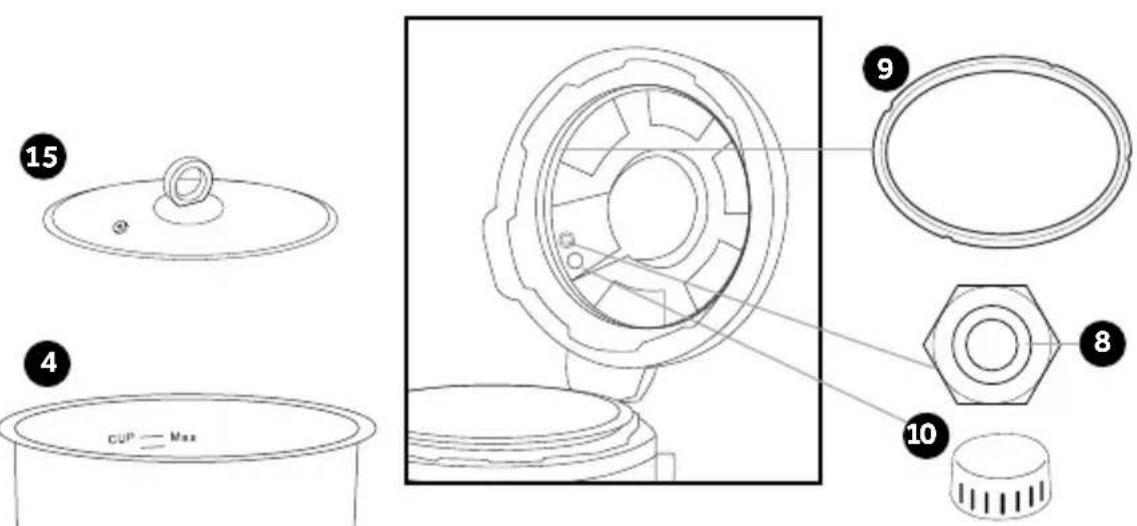
natural_image
Line drawing of a cooking pot with a lid and side panel, showing a curved arrow indicating rotation (no text or symbols)Öffnen
natural_image
Line drawing of a cooking pot with a lid and side panel, showing no text or symbolsSchließen
natural_image
Line drawing of hands using a knife to remove vegetables from a container (no text or symbols)natural_image
Line drawing of hands holding a tool or device (no text or symbols present)Pflege & Wartung
natural_image
Mechanical gear assembly diagram showing rotational motion with arrows indicating direction (no text or labels)natural_image
Technical line drawing of a mechanical component with three views: top view, front view, and close-up (no text or symbols)Einsetzen
natural_image
Technical line drawing of a mechanical component with three views: top view, front view, and side view (no text or symbols)Problembehebung
support.eu@cosori.com
No usar otra tapa.
natural_image
Simple line drawing of a hand holding a curved pipe or tube, enclosed in a red circle (no text or symbols)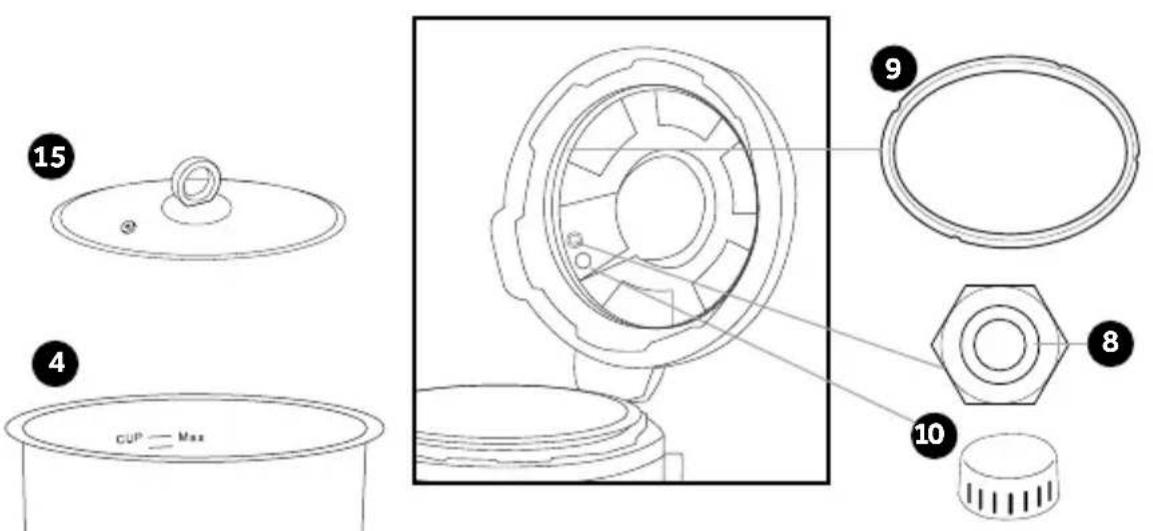
natural_image
Line drawing of a cooking pot with a lid and side handles, showing a directional arrow (no text or symbols)Para abrir
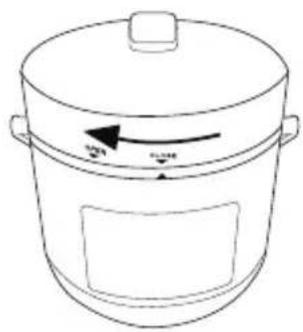
natural_image
Line drawing of a cooking pot with a lid and side panel, showing a speed arrow (no text or symbols)Para cerrar
natural_image
Line drawing of a hand using a knife to cut food from a container into a bucket (no text or symbols)natural_image
Line drawing of a hand holding a tool or device (no text or symbols present)natural_image
Mechanical gear assembly diagram showing rotational motion with arrows indicating direction (no text or labels)natural_image
Technical line drawing of a mechanical component with three views: top view, front view, and close-up (no text or symbols)Instalación
natural_image
Technical line drawing of a mechanical component with three views: top, front, and side (no text or symbols)support.eu@cosori.com
natural_image
Simple line drawing of a hand holding a curved pipe above a surface, enclosed in a red circle (no text or symbols)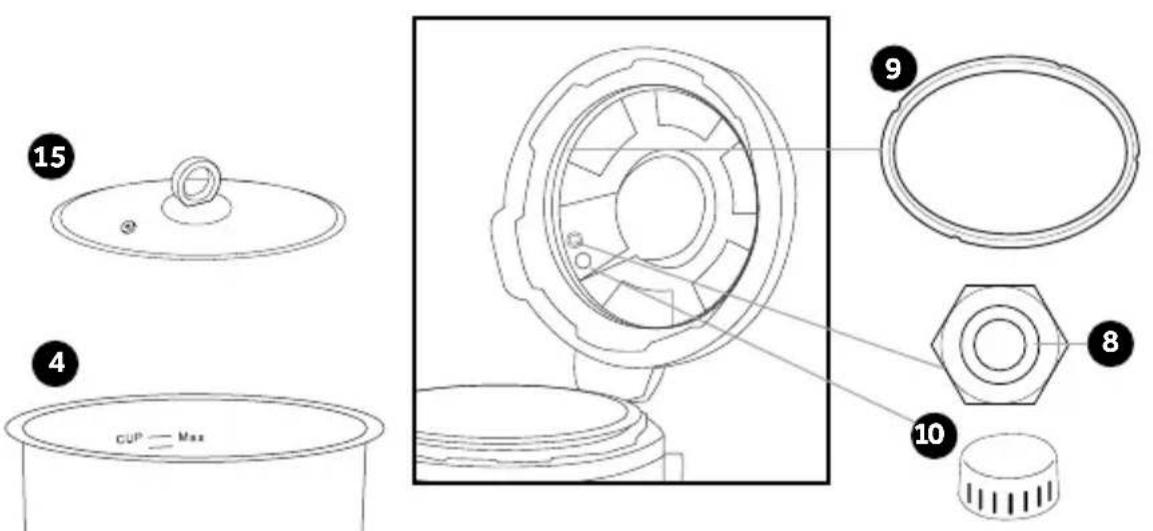
natural_image
Line drawing of a rice cooker with a lid and side panel, showing no text or symbolsPour ouvrir
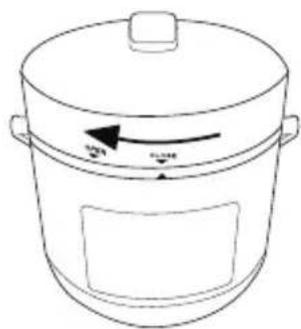
natural_image
Line drawing of a cooking pot with a lid and side handles, showing an arrow indicating rotation (no text or symbols)Pour verrouiller
natural_image
Line drawing of a hand using a knife to cut food into a bucket (no text or symbols)natural_image
Line drawing of a hand holding a tool or device, no text or symbols presentnatural_image
Mechanical gear assembly diagram showing rotational motion with arrows indicating direction (no text or labels)natural_image
Technical line drawing of a mechanical component with three views: top view, front view, and close-up (no text or symbols)Installation
natural_image
Technical line drawing of a mechanical component with three views: top view, front view, and side view (no text or symbols)Dépannage
CONDITIONS ET POLITIQUES
support.eu@cosori.com
natural_image
Simple line drawing of a hand holding a pipe above a tank, enclosed in a red circle (no text or symbols)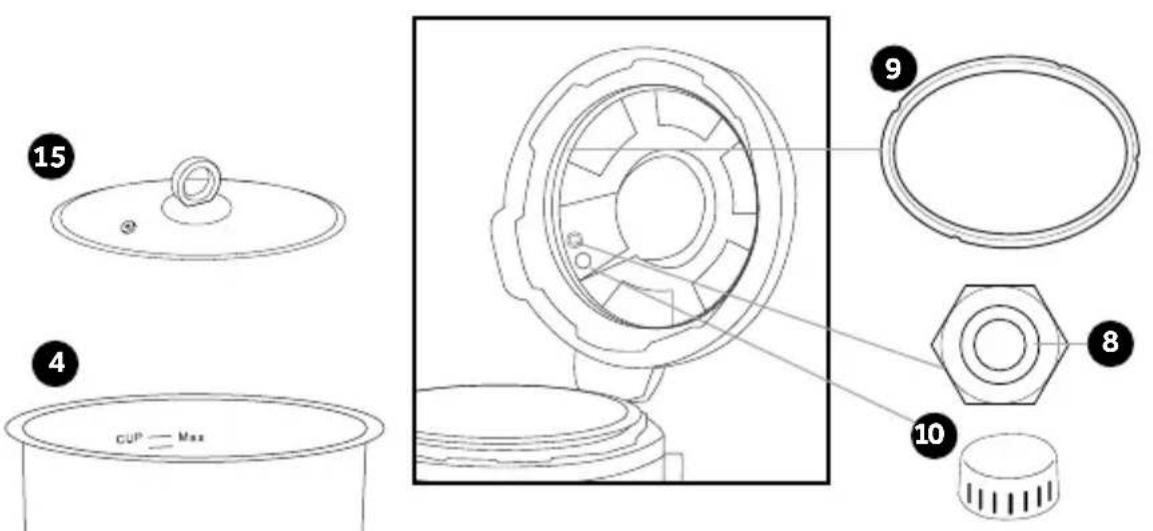
natural_image
Line drawing of a rice cooker with a lid and side panel, showing no text or symbolsPer aprire
natural_image
Line drawing of a cooking pot with a lid and side handles, showing an arrow indicating rotation (no text or symbols)Per chiudere
natural_image
Line drawing of hands chopping vegetables from a cutting board into a bucket (no text or symbols)natural_image
Line drawing of hands holding a tool or device (no text or symbols present)natural_image
Mechanical gear assembly diagram showing rotational motion with arrows indicating direction (no text or labels)natural_image
Technical line drawing of a mechanical component with three views: top view, front view, and close-up (no text or symbols)Montaggio
natural_image
Technical line drawing of a mechanical component with three views: top view, front view, and side view (no text or symbols)support.eu@cosori.com
- Table of Contents
- English
- Deutsch
- SAFETY USE & CARE:
- SAVE THESE INSTRUCTIONS
- Product Diagram
- Control Panel
- Button Controls
- NOTE:
- Operation
- Preparing to Cook
- Glass Lid
- Preset Cooking Functions
- Manual Cooking Modes
- Safely Removing the Lid
- Care & Maintenance
- Silicone Gasket Installation
- Removal
- Installation
- Troubleshooting
- Specifications
- Package Contents
- Warranty Information
- TERMS & POLICY
- CUSTOMER SUPPORT
- support.eu@cosori.com
- Thank You
- Show Us What You're Cooking
- More Cosori Products
- DE
- Sicherheitshinweise
- WICHTIGE
- Pflege & Wartung
- Einsetzen
- Problembehebung
- Instalación
- CONDITIONS ET POLITIQUES
- Montaggio
Brand : Cosori
Model : C2126-PC
Category : Pan