
T 557 - Media Players NAD - Free user manual and instructions
Find the device manual for free T 557 NAD in PDF.
| Product type | Blu-ray Disc Player |
| Brand | NAD |
| Model | T 557 |
| Dimensions (W x H x D) | 435 x 60 x 280 mm |
| Net weight | 3.5 kg |
| Power supply | AC 110-240 V, 50/60 Hz |
| Standby power consumption | < 0.7 W |
| Supported disc formats | BD, BD-R/RE, DVD-Video, DVD±R/RW, Audio CD, CD-R/RW |
| File formats | DivX, MP3, WMA, JPEG, PNG, AVCHD |
| Video outputs | HDMI 1.3b, Component (Y Pb Pr), Composite |
| Audio outputs | HDMI, Optical, Coaxial, Stereo analog |
| Maximum resolution | 1080p (HDMI), 1080i (Component) |
| Network functions | BD-Live, BONUSVIEW (PIP), Firmware update |
| USB port | 1 x USB 2.0 (FAT16/32/NTFS) |
| LAN connectivity | Ethernet 10/100 Base-T |
| Audio codecs | Dolby TrueHD, Dolby Digital Plus, DTS-HD Master Audio |
| Cleaning | Damp cloth; do not use liquid products |
| Operating temperature | 5 °C to 35 °C (estimated) |
| Included accessories | Remote control BR 2, HDMI cable (Europe model), AV cable, Power cord |
Frequently Asked Questions - T 557 NAD
User questions about T 557 NAD
0 question about this device. Answer the ones you know or ask your own.
Ask a new question about this device
Download the instructions for your Media Players in PDF format for free! Find your manual T 557 - NAD and take your electronic device back in hand. On this page are published all the documents necessary for the use of your device. T 557 by NAD.
USER MANUAL T 557 NAD
Owner's Manual
SAVE THESE INSTRUCTIONS FOR LATER USE.
FOLLOW ALL WARNINGS AND INSTRUCTIONS MARKED ON THE AUDIO EQUIPMENT.
1 Read instructions - All the safety and operating instructions should be read before the product is operated.
2 Retain instructions - The safety and operating instructions should be retained for future reference.
3 Heed Warnings - All warnings on the product and in the operating instructions should be adhered to.
4 Follow Instructions - All operating and use instructions should be followed.
5 Cleaning - Unplug this product from the wall outlet before cleaning. Do not use liquid cleaners or aerosol cleaners. Use a damp cloth for cleaning.
6 Attachments - Do not use attachments not recommended by the product manufacturer as they may cause hazards.
7 Water and Moisture - Do not use this product near water-for example, near a bath tub, wash bowl, kitchen sink, or laundry tub; in a wet basement; or near a swimming pool; and the like.
8 Accessories - Do not place this product on an unstable cart, stand, tripod, bracket, or table. The product may fall, causing serious injury to a child or adult, and serious damage to the product. Use only with a cart, stand, tripod, bracket, or table recommended by the manufacturer, or sold with the product. Any mounting of the product should follow the manufacturer's instructions, and should use a mounting accessory recommended by the manufacturer.
9 A product and cart combination should be moved with care. Quick stops, excessive force, and uneven surfaces may cause the product and cart combination to overturn.
10 Ventilation - Slots and openings in the cabinet are provided for ventilation and to ensure reliable operation of the product and to protect it from overheating, and these openings must not be blocked or covered. The openings should never be blocked by placing the product on a bed, sofa, rug, or other similar surface. This product should not be placed in a built-in installation such as a bookcase or rack unless proper ventilation is provided or the manufacturer's instructions have been adhered to.
11 Power Sources - This product should be operated only from the type of power source indicated on the marking label. If you are not sure of the type of power supply to your home, consult your product dealer or local power company.
The primary method of isolating the amplifier from the mains supply is to disconnect the mains plug. Ensure that the mains plug remains accessible at all times. Unplug the AC power cord from the AC outlet if the unit will not be used for several months or more.
12 Grounding or Polarization - This product may be equipped with a polarized alternating-current line plug (a plug having one blade wider than the other). This plug will fit into the power outlet only one way. This is a safety feature. If you are unable to insert the plug fully into the outlet, try reversing the plug. If the plug should still fail to fit, contact your electrician to replace your obsolete outlet. Do not defeat the safety purpose of the polarized plug.
13 Power Cord Protection - Power-supply cords should be routed so that they are not likely to be walked on or pinched by items placed upon or against them, paying particular attention to cords at plugs, convenience receptacles, and the point where they exit from the product.
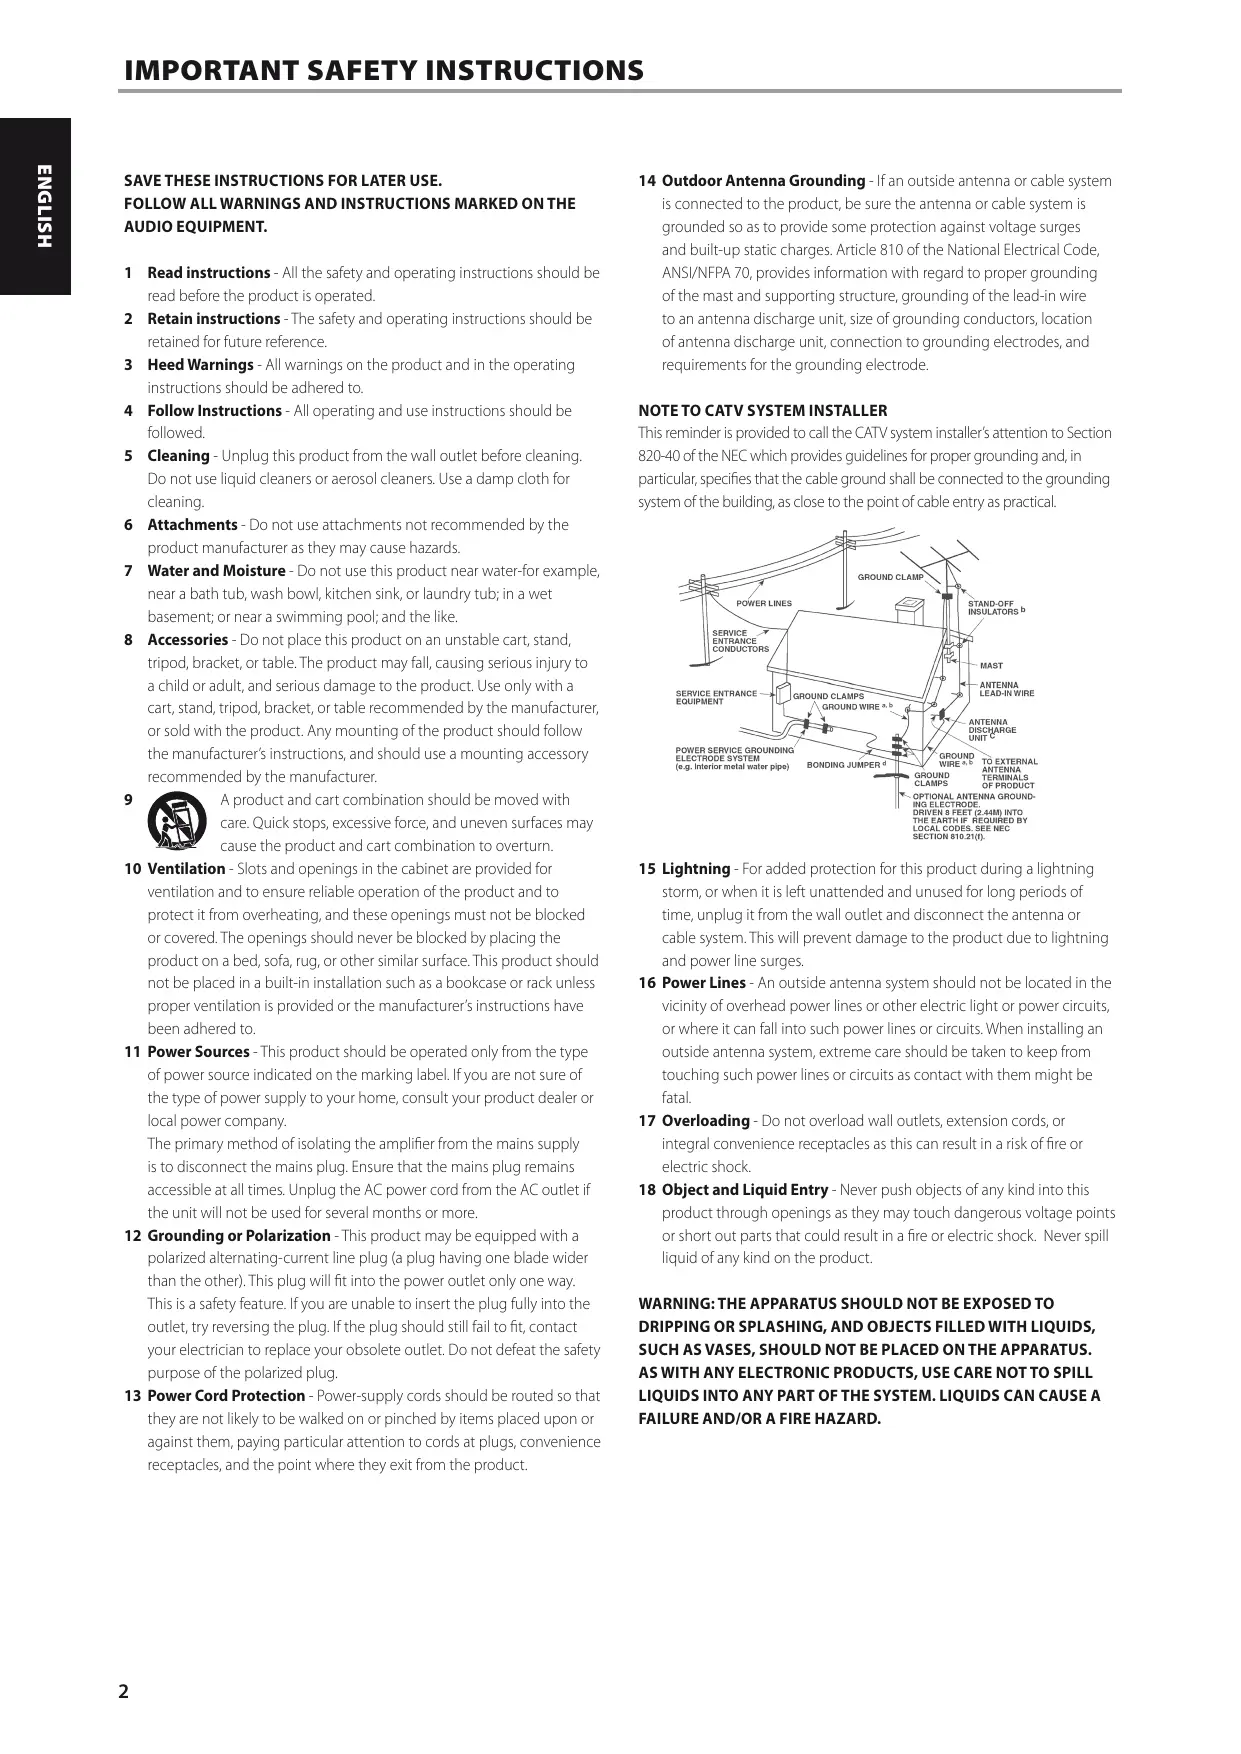
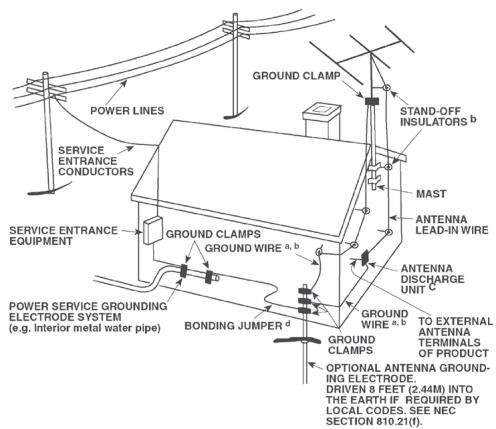
14 Outdoor Antenna Grounding - If an outside antenna or cable system is connected to the product, be sure the antenna or cable system is grounded so as to provide some protection against voltage surges and built-up static charges. Article 810 of the National Electrical Code, ANSI/NFPA 70, provides information with regard to proper grounding of the mast and supporting structure, grounding of the lead-in wire to an antenna discharge unit, size of grounding conductors, location of antenna discharge unit, connection to grounding electrodes, and requirements for the grounding electrode.
NOTE TO CATV SYSTEM INSTALLER
This reminder is provided to call the CATV system installer's attention to Section 820-40 of the NEC which provides guidelines for proper grounding and, in particular, specifies that the cable ground shall be connected to the grounding system of the building, as close to the point of cable entry as practical.
15 Lightning - For added protection for this product during a lightning storm, or when it is left unattended and unused for long periods of time, unplug it from the wall outlet and disconnect the antenna or cable system. This will prevent damage to the product due to lightning and power line surges.
16 Power Lines - An outside antenna system should not be located in the vicinity of overhead power lines or other electric light or power circuits, or where it can fall into such power lines or circuits. When installing an outside antenna system, extreme care should be taken to keep from touching such power lines or circuits as contact with them might be fatal.
17 Overloading - Do not overload wall outlets, extension cords, or integral convenience receptacles as this can result in a risk of fire or electric shock.
18 Object and Liquid Entry - Never push objects of any kind into this product through openings as they may touch dangerous voltage points or short out parts that could result in a fire or electric shock. Never spill liquid of any kind on the product.
WARNING: THE APPARATUS SHOULD NOT BE EXPOSED TO DRIPPING OR SPLASHING, AND OBJECTS FILLED WITH LIQUIDS, SUCH AS VASES, SHOULD NOT BE PLACED ON THE APPARATUS. AS WITH ANY ELECTRONIC PRODUCTS, USE CARE NOT TO SPILL LIQUIDS INTO ANY PART OF THE SYSTEM. LIQUIDS CAN CAUSE A FAILURE AND/OR A FIRE HAZARD.
19 Damage Requiring Service - Unplug this product from the wall outlet and refer servicing to qualified service personnel under the following conditions:
a) When the power supply cord or plug is damaged.
b) If liquid has been spilled, or objects have fallen into the product.
c) If the product has been exposed to rain or water.
d) If the product does not operate normally by following the operating instructions. Adjust only those controls that are covered by the operating instructions as an improper adjustment of other controls may result in damage and will often require extensive work by a qualified technician to restore the product to its normal operation.
e) If the product has been dropped or damaged in any way.
f) when the product exhibits a distinct change in performance—this indicates a need for service.
20 Replacement Parts - When replacement parts are required, be sure the service technician has used replacement parts specified by the manufacturer or have the same characteristics as the original part. Unauthorized substitutions may result in fire, electric shock, or other hazards.
21 Safety Check - Upon completion of any service or repairs to this product, ask the service technician to perform safety checks to determine that the product is in proper operating condition.
22 Wall or Ceiling Mounting - The product should be mounted to a wall or ceiling only as recommended by the manufacturer.
23 Heat - The product should be situated away from heat sources such as radiators, heat registers, stoves or other products (including amplifiers) that produce heat.
WARNING
TO REDUCE THE RISK OF FIRE OR ELECTRIC SHOCK, DO NOT EXPOSE THIS PRODUCT TO RAIN OR MOISTURE.
CAUTION
TO PREVENT ELECTRIC SHOCK, MATCH WIDE BLADE OF PLUG TO WIDE SLOT, FULLY INSERT.
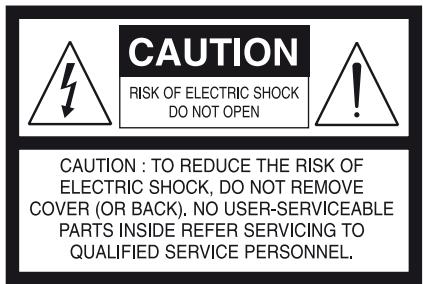
CAUTION
This equipment employs a Laser System. To ensure proper use of this product, please read this owner's manual carefully and retain for future reference. Should the unit require maintenance, contact an authorized service location. Use of controls, adjustments or the performance of procedures other than those specified may result in exposure to laser radiation. To prevent direct exposure to laser beam, do not try to open the enclosure. Visible laser radiation when the enclosure is opened.
DO NOT STARE INTO BEAM.
FCC NOTICE
This equipment has been tested and found to comply with the limits for a Class B digital device, pursuant to part 15 of the FCC Rules. These limits are designed to provide reasonable protection against harmful interference in a residential installation.
This equipment generates, uses and can radiate radio frequency energy and if not installed and used in accordance with the instructions, may cause harmful interference to radio communications. However, there is no guarantee that interference will not occur in a particular installation. If this equipment does cause harmful interference to radio or television reception, which can be determined by turning the equipment off and on, the user is encouraged to try to correct the interference by one or more of the following measures
• Reorient or relocate the receiving antenna.
- Increase the separation between the equipment and receiver.
- Connect the equipment into an outlet on a circuit different from that to which the receiver is connected
- Consult the dealer or an experienced radio/TV technician for help.
FCC WARNING
Changes or modifications not expressly approved by the party responsible for compliance could void the user's authority to operate the equipment.
INDUSTRY CANADA REQUIREMENT
This Class B digital apparatus meets all requirements of the Canadian Interference-Causing Equipment Regulations.

THE LIGHTNING FLASH WITH ARROWHEAD SYMBOL, WITHIN AN EQUILATERAL TRIANGLE, IS INTENDED TO ALERT THE USER TO THE PRESENCE OF UNINSULATED "DANGEROUS VOLTAGE" WITHIN THE PRODUCT'S ENCLOSURE THAT MAYBE OF SUFFICIENT MAGNITUDE TO CONSTITUTE A RISK OF ELECTRIC SHOCK TO PERSONS.

THE EXCLAMATION POINT WITHIN AN EQUILATERAL TRIANGLE IS INTENDED TO ALERT THE USER TO THE PRESENCE OF IMPORTANT OPERATING AND MAINTENANCE (SERVICING) INSTRUCTIONS IN THE LITERATURE ACCOMPANYING THE APPLIANCE.
CAUTION
Changes or modifications to this equipment not expressly approved by NAD Electronics for compliance could void the user's authority to operate this equipment.
CAUTION REGARDING PLACEMENT
To maintain proper ventilation, be sure to leave a space around the unit (from the largest outer dimensions including projections) that is equal to or greater than shown below.
Left and Right Panels: 10 cm
Rear Panel: 10 cm
Top Panel: 50 cm
WARNING
If this product is used at 240VAC, a suitable attachment plug should be used.

This product is manufactured to comply with the radio interference requirements of EEC DIRECTIVE 2004/108/EC.
NOTES ON ENVIRONMENTAL PROTECTION

At the end of its useful life, this product must not be disposed of with regular household waste but must be returned to a collection point for the recycling of electrical and electronic equipment. The symbol on the product, user's manual and packaging, point this out.
The materials can be reused in accordance with their markings. Through re-use, recycling of raw materials or other forms of recycling of old products, you are making an important contribution to the protection of our environment. Your local administrative office can advise you of the responsible waste disposal point.
INFORMATION ABOUT COLLECTION AND DISPOSAL OF WASTE BATTERIES (DIRECTIVE 2006/66/EC OF THE EUROPEAN PARLIAMENT AND THE COUNCIL OF EUROPEAN UNION) (FOR EUROPEAN CUSTOMERS ONLY)

Pb
Batteries bearing any of these symbols indicate that they should be treated as “separate collection” and not as municipal waste. It is encouraged that necessary measures are implemented to maximize the separate collection of waste batteries and to minimize the disposal of batteries as mixed municipal waste.

Hg
End-users are exhorted not to dispose waste batteries as unsorted municipal waste. In order to
achieve a high level of recycling waste batteries, discard waste batteries separately and properly through an accessible collection point in your vicinity. For more information about collection and recycling of waste batteries, please contact your local municipality, your waste disposal service or the point of sale where you purchased the items.
By ensuring compliance and conformance to proper disposal of waste batteries, potential hazardous effects on human health is prevented and the negative impact of batteries and waste batteries on the environment is minimized, thus contributing to the protection, preservation and quality improvement of the environment.
RECORD YOUR MODEL NUMBER (NOW, WHILE YOU CAN SEE IT)
The model and serial number of your new T 557 are located on the back of the cabinet. For your future convenience, we suggest that you record these numbers here:
Model no:......
Serial no:....
TABLE OF CONTENTS
IMPORTANT SAFETY INSTRUCTIONS ....2
INTRODUCTION
GETTING STARTED....6
UNPACKING AND SETUP 6
CHOOSING A LOCATION 6
DISC LOADING AND PLAYBACK 6
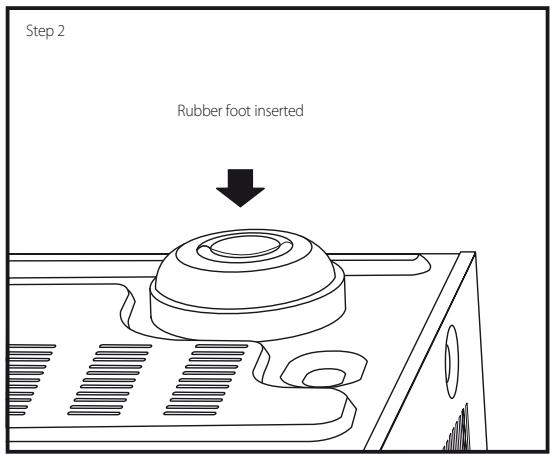
ASSEMBLY OF RUBBER FOOT WITH PLASTIC FOOT ....6
QUICK START....6
REGION MANAGEMENT INFORMATION ....7
PLAYABLE DISCS....7
ABOUT THE Ⓧ SYMBOL DISPLAY ....7
BD-ROM DISC FEATURES ....7
BD-ROM DISC COMPATIBILITY....7
IDENTIFICATION OF CONTROLS
FRONT PANEL....8
REAR PANEL 9
BR 2 REMOTE CONTROL....10
OPERATION
USING THE T 557....11
NAVIGATING THE SETUP MENU OSD AND MAKING CHANGES..... 11
DISPLAY DISC OSD 11
DISPLAY SETUP MENU.... 11
LANGUAGE SETUP MENU 13
AUDIO SETUP MENU 14
LOCK SETUP MENU (APPLICABLE TO BD AND DVD PLAYBACK ONLY)..15
NETWORK SETUP MENU 16
OTHERS SETUP MENU 17
USING THE T 557 - FEATURES ....18
USB MODE 18
PLAYING AUDIO CD/MP3/WMA 18
VIEWING A PHOTO FILE 19
DIVX PLAYBACK 19
ADJUSTING THE PICTURE MODE 20
ENJOYING BD-LIVE™ OR BONUSVIEW™ IN BD-VIDEO 20
SCREENSAVER....20
LAST SCENE MEMORY....20
USING THE T 557 - FUNCTION CONTROL....21
AUDIO 21
SUBTITLE 21
ZOOM....21
PICTURE....21
RPT (REPEAT) 21
MARKER, SEARCH, CLEAR 22
REFERENCE
REFERENCE TABLES ......23
RESOLUTION SETTINGS 23
AUDIO OUTPUT SPECIFICATIONS.... 23
LANGUAGE CODE LIST 24
AREA CODE....25
TROUBLESHOOTING 26
NOTES ON DISCS....26
HANDLING DISCS 26
STORING DISCS....26
CLEANING DISCS 26
SPECIFICATIONS 27
THANK YOU FOR CHOOSING NAD.
The T 557 brings NAD's penchant for performance to the exciting new Blu-ray Disc format. This Profile 2.0 Blu-ray Disc Player brims with the latest features and offers for the first time a true High Definition source for digital Home Theater systems.
As with all our products, NAD's "Music First" design philosophy guided the T 557's design in such a way that it can confidently promise you state-of-the-art visual fidelity and audiophile-quality music listening for years to come. We have been careful to ensure that the T 557 is as musically transparent, faithful to every video detail and spatially accurate as possible, incorporating much of what we've learned from a quarter-century's experience designing audio, video and home-theater components.
We encourage you to take a few minutes now to read right through this manual. Investing a little time here at the outset might save you a good deal of time later, and is by far the best way to ensure that you make the most of your investment in the T 557.
One more thing: We urge you to register your T 557 ownership on the NAD Worldwide Web site:
http://NADelectronics.com/warranty
For warranty information contact your local distributor.
GETTING STARTED
UNPACKING AND SETUP
WHAT'S IN THE BOX
Packed with your T 557 you will find:
• An audio/video cable connector
• The BR 2 remote control with 2 (two) AA batteries
• A detachable AC power cord
• HDMI cable (European version model only)
- Set of rubber feet
• This owner's manual
SAVE THE PACKAGING
Please save the box and all of the packaging in which your T 557 arrived. Should you move or otherwise need to transport your T 557, this is by far the safest container in which to do so. We've seen too many otherwise perfect components damaged in transit for lack of a proper shipping carton, so please: Save that box!
CHOOSING A LOCATION
Choose a location that is well ventilated (with at least several inches to both sides and behind), and that will provide a clear line of sight, within 23 feet/7 meters, between the T 557's front panel and your primary listening/viewing position. This will ensure reliable infrared remote control communications. The T 557 generates a modest amount of heat, but nothing that should trouble adjacent components. It is perfectly possible to stack the T 557 on top of other components.
DISC LOADING AND PLAYBACK
There are two different disc sizes. Place the disc in the correct guide on the disc tray. If the disc is out of the guide, it may damage the disc and cause the T 557 to malfunction. "Check Disc" appears at the On-Screen Display (OSD) ("ERROR" at the VFD), if the disc is placed upside down (and it is a single sided disc).
The following are important tips when loading a disc
- Do not push the disc tray while it is moving. Doing so may cause the T 557 to malfunction.
- Do not push up the disc tray or put any objects other than discs on the disc tray. Doing so may cause the T 557 to malfunction.
- Keep your fingers well clear of the disc tray as it is closing. Be especially careful with children's fingers around the closing disc tray, as there is a risk of personal injury.
Press [▶], the disc tray is automatically closed. Playback of the first track starts if a CD is loaded. For BD, DVD, USB or other disc media, playback operation is accessible through their menu screen.
NOTE
Do not move the T 557 during playback. Doing so may damage the disc and the T 557.
ASSEMBLY OF RUBBER FOOT WITH PLASTIC FOOT

QUICK START
In case you simply cannot wait to experience the performance of your new NAD T 557, we provide the following "Quick Start" instructions to get you underway.
Please make all the connections to your T 557 with the unit unplugged. It is also advisable to power down or unplug all associated components while making or breaking any signal or AC power connections.
PLAY A BLU-RAY DISC
1 Using a compatible HDMI connector, connect the T 557's HDMI OUT to the corresponding HDMI input of your HDMI-compatible TV/monitor.
2 Connect the supplied AC cord to the T 557 AC mains input and then plug into an AC outlet. Follow the same for your HDMI-compatible TV as applicable. Switch ON your TV and set it to the HDMI input where the T 557 is connected.
3 Press the [OPEN/CLOSE] button to switch ON the T 557 and at the same time open the disc tray.
4 Load the Blu-ray disc in the disc tray.
5 Press the front panel [PLAY/PAUSE] button or [▶] button of BR 2 remote control to close the disc tray and start playback. You should hear audio and see an image on the TV/monitor. If one or the other fails to appear, check your TV/monitor's input settings or the T 557 audio/video connections.
Enjoy the movie but be sure to set aside time to read this manual thoroughly to set up and configure your T 557 according to your preference.
REGION MANAGEMENT INFORMATION
The T 557 is designed and manufactured to respond to the Region Management Information that is recorded on a DVD disc or Blu-ray disc. If the Region or BD code described on the disc does not correspond to the Region or BD code shown on the T 557 rear panel, the T 557 cannot play that disc. The disc tray automatically opens after the OSD briefly displays "This disc has been coded for Region _ only and will not play in this machine. Please eject this disc and play only on a Region _ player." (BD only) or "Check Regional Code"(DVD only)" when an incompatible Region or BD disc is loaded.
PLAYABLE DISCS
The T 557 has exceptional playability. It has support for the following disc formats
- Blu-ray Disc (BD), BD-R/RE discs that contain audio titles, DivX, MP3, WMA or Photo files.
- DVD-Video, DVD±R, DVD±RW discs that contain audio titles, Movie, DivX, MP3, WMA or Photo files.
- Audio CD, CD-R/-RW discs that contain audio titles, DivX, MP3, WMA or Photo files.
• Advanced Video Codec High Definition (AVCHD) format discs.
ADVANCED VIDEO CODEC HIGH DEFINITION (AVCHD)
AVCHD video format is recorded using the MPEG-4 AVC/H.264 video compression codec. It is a high definition digital video camera format used to record SD (standard definition) or HD (high definition) signals. The MPEG-4 AVC/H.264 format enables a HD video signal shot on a digital video camera recorder to be recorded on DVDs in the same way as that of SD television signal.
"AVCHD" and the "AVCHD" logo are trademarks of Matsushita Electric Industrial Co., Ltd. and Sony Corporation.
NOTES
- You cannot playback discs other than those listed above. To do so may render the T 557 permanently inoperable.
• An AVCHD formatted disc will not play if it is not correctly finalized. - Depending on the recording condition, some AVCHD format discs may not play.
ABOUT THE ⊗ SYMBOL DISPLAY
"⊗" may appear on your TV display during operation. This indicates that the function you entered or try to execute is not available on that specific disc or file.
BD-ROM DISC FEATURES
BD-ROM (Blu-ray Disc Read-Only Memory) is a commercially produced disc and available in the same capacities as that of regular Blu-ray discs. Other than conventional movie and video contents, BD-ROM has enhanced features such as interactive content, menu operations, pop-up menus, subtitle selection, slideshow and other features.
BD-ROM Discs can store 25 GB (single layer) or 50 GB (dual layer) on a single sided disc - about 5 to 10 times the capacity of a DVD. BD-ROM Discs also support the highest quality HD video available in the industry (up to 1920 x 1080) - large capacity means no compromise on video quality. Furthermore, a BD-ROM disc has the same familiar size and look as DVD.
The following BD-ROM disc features are disc dependent and will vary. Appearance and navigation of features will also vary from disc to disc. Some features may not be available on some discs.
VIDEO HIGHLIGHTS
The BD-ROM format for movie distribution supports three highly advanced video codecs, including MPEG-2, MPEG4 AVC (H.264), and SMPTE VC1. The 1920 x 1080 HD and 1280 x 720 HD video resolutions are also available.
HIGH-DEFINITION PLAYBACK
To view high-definition contents from BD-ROM discs, an HDTV is required. Some discs may require HDMI OUT for viewing of high-definition contents. Ability to view high-definition contents in BD-ROM discs maybe limited depending on the resolution of your TV.
GRAPHIC PLANES
Two individual full HD resolution (1920x1080) graphic planes (layers) are available on top of the HD video layer. One plane is assigned to video-related, frame accurate graphics (like subtitles), and the other plane is assigned to interactive graphic elements, such as buttons or menus. For both planes, various wipes, fades and scroll effects may be available.
MENU SOUND
When you highlight or select a menu option, sound can be heard such as button clicks or a voice-over explaining the highlighted menu choice.
MULTI-PAGE/POP-UP MENUS
With DVD-Video, playback is interrupted each time a new menu screen is accessed. Due to BD-ROM disc's ability to preload data from the disc without interrupting playback, a menu can consist of several pages. You can browse through the menu pages or select different menu paths, while the audio and video remain playing in the background.
INTERACTIVITY
Certain BD-ROM Discs may contain animated menus and/or trivia games.
USER BROWSABLE SLIDESHOWS
With BD-ROM Discs, you can browse through various still pictures while the audio remains playing.
SUBTITLES
Depending on what is contained on the BD-ROM disc, you may be able to select different font styles, sizes and colors for some subtitles. Subtitles may also be animated, scrolled or faded in and out.
BD-J INTERACTIVE CAPABILITY
The BD-ROM format supports Java for interactive functions. "BD-J" offer content providers almost unlimited functionality when creating interactive BD-ROM titles.
BD-ROM DISC COMPATIBILITY
The T 557 supports BD-ROM Profile 2. Aside from the BONUSVIEW function, the T 557 supports BD-Live (BD-ROM version 2 Profile 2) discs that allow usage of interactive functions when the T 557 is connected to the internet.
The T 557 is also compatible with discs supporting BONUSVIEW (BD-ROM version 2 Profile 1 version 1.1/Final Standard Profile) that enables Virtual packages or Picture-in-Picture functions.
NOTES
- Viewing high-definition content and up-converting standard DVD content may require an HDMI-capable input or HDCP-capable DVI input on your display device.
- Dolby TrueHD, Dolby Digital Plus and DTS-HD Master Audio are supported with maximum 7.1 channels when HDMI OUT is the selected audio output port.
- You can use the USB flash drive that is used to store some disc related information, including downloaded on-line content. The disc you are using will control how long this information is retained.
FRONT PANEL
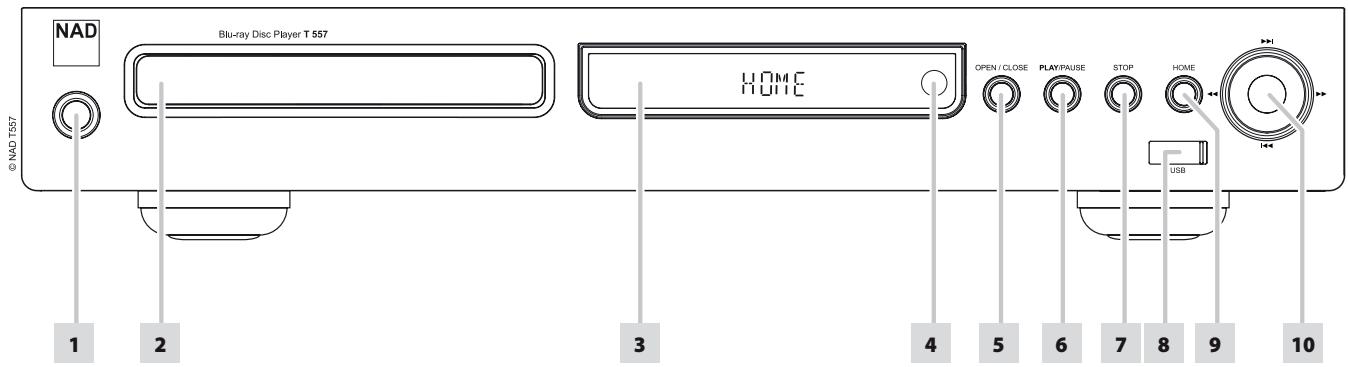
1 STANDBY: Press this button to switch ON the T 557. The display window will illuminate. If there is disc loaded, the display window will show the playback time status of the disc. If there is no disc loaded, the VFD will briefly show "NO DISC" and thereafter show the default display "HOME".
Pressing the [▲] button of the BR 2 will switch ON the T 557 from standby mode and at the same time open the disc tray. The T 557 can also be switched ON by pressing the [ON] or [▶] buttons of the remote control. Pressing the standby button again turns the unit back to standby mode. Unplug the AC power cord from the AC wall socket to completely shut down the T 557.
2 DISC TRAY: With the DISC TRAY open, insert a Blu-ray disc (BD), DVD, CD or other compatible media disc face down onto the tray.
"Check Disc" appears at the On-Screen Display (OSD) ("ERROR" at the VFD), if the disc is placed upside down (and it is a single sided disc). The disc tray will then automatically open.
3 VACUUM FLUORESCENT DISPLAY (VFD): If there is disc loaded, the display window will show the elapsed playback time of the current track/file/chapter (and track number; applicable for CD playback only). If there is no disc inside, the display window will show "HOME".
4 REMOTE SENSOR: Point the BR 2 at the remote sensor and press the buttons. Do not expose the remote sensor of the T 557 to a strong light source such as direct sunlight or illumination. If you do so, you may not be able to operate T 557 with the remote control.
Distance: About 23 ft (7 m) from the front of the remote sensor Angle: About 30° in each direction of the front of the remote sensor
5 OPEN/CLOSE: Press this button to open and close the disc tray.
6 PLAY/PAUSE: This dual-function button alternates between starting and stopping playback. Press this button to toggle between Play and Pause of a BD, DVD, CD or other compatible media disc. Press to start play or resume play after Pause. If the disc tray is open, press this button to automatically close the tray and start playback if a CD disc is loaded.
During playback, press this button to stop playback temporarily, keeping the optical pickup at its current position on the disc. To resume playback at the exact point where it stopped, press [PLAY/PAUSE] again.
7 STOP: Except for BD playback, pressing this button will stop and at the same time pause playback of the disc. Press [PLAY/PAUSE] button to resume play from the spot it was stopped. For BD playback, pressing the [STOP] button will fully stop the playback and will return you to the TITLE or MENU option of the disc.
8 USB INPUT: Connect an external USB device into this input. Refer also to the "USB MODE" section of "USING THE T 557 – FEATURES" under the "OPERATION" main heading.
9 HOME: Press to access all the media for playback and setup of the T 557. Refer also to the "USING THE HOME MENU" section of "USING THE T 557" under the "OPERATION" main heading.
10 [◀◀/▶▶I], [◀◀/▶▶], ENTER: Press [▶▶I] to skip forward or [◀◀] to skip backward a track, file or chapter.
Press [◀◀/▶▶] to scan fast-forward or fast-reverse during playback. Each time the button is pressed, the speed increases until the maximum level is reached. The scanning speed is indicated by trailing icons ◀ or ▶ as shown in the OSD and may vary by disc type. The speed will be retained even after the button is released; press [PLAY/PAUSE] to resume normal playback.
The front panel [◀◀/▶▶], [◀◀/▶▶] and ENTER buttons respectively simulate the same functions of the [▲/▼/◀/▶] and ENTER buttons of the BR 2 remote control under the following conditions or options only
- Navigating through the HOME menu and SETUP menu.
- Select through MOVIE, MUSIC or PHOTO files as contained in a disc.
Outside of the above conditions, the [◀◀/▶▶] and [◀◀/▶▶] buttons normally function as SKIP and SCAN modes.
NOTE
Not all media support maximum speeds for scanning.
ATTENTION!
Please make sure that the T 557 is powered off or unplugged before making any connections. It is also advisable to power down or unplug all associated components while making or breaking any signal or AC power connections.
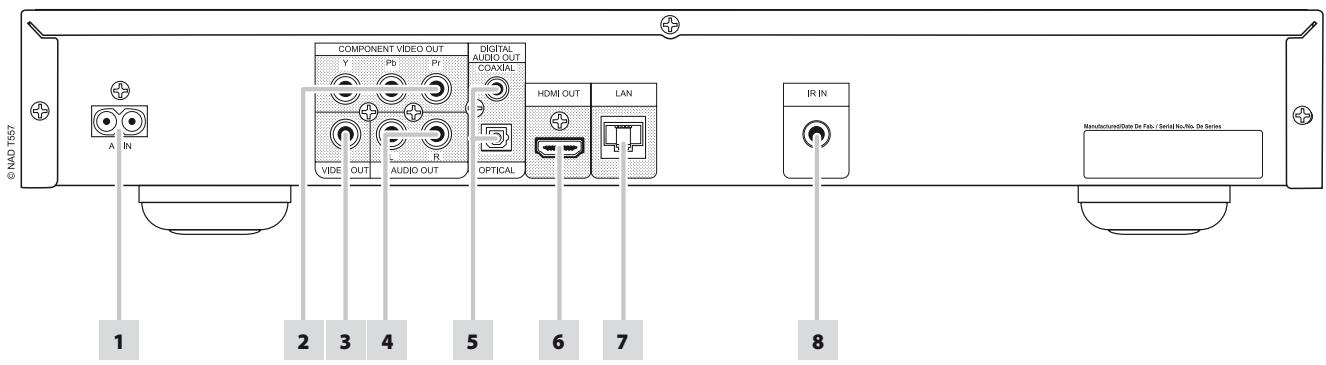
1 AC MAINS INPUT: The T 557 comes supplied with a separate AC Mains cable. Before connecting the cable to a live wall socket, ensure first that it is firmly connected to the T 557's AC Mains input socket. Always disconnect the AC Mains cable plug from the live wall socket first, before disconnecting the cable from the T 557's Mains input socket.
2 COMPONENT VIDEO OUT: Connect to the corresponding component video input of a compatible equipment like a monitor/television, projector, A/V receiver or processor. Be sure to observe consistency in connecting the appropriate Y, Pb, Pr jacks to the corresponding sources/inputs. Do not rely purely on the color coding of the jacks, which may not always be consistent among brands.
3 VIDEO OUT: Connect to the corresponding composite video input of a compatible monitor/television, projector, A/V receiver or processor using quality dual-RCA cable designed for video signals.
4 AUDIO OUT: This analog audio output can be connected to the corresponding analog audio input of a compatible equipment like an amplifier, receiver, TV or stereo system.
5 DIGITAL OUT (COAXIAL, OPTICAL): The digital playback audio output signal is available at these ports. Connect the optical or coaxial digital OUT ports to the corresponding S/PDIF digital input of an amplifier, receiver, computer soundcard or other digital processors.
6 HDMI OUT: Using a HDMI cable (supplied only for European version model), connect the HDMI OUT jack to the corresponding HDMI input jack of a compatible equipment like a HDTV, a projector or an A/V Receiver.
Dolby TrueHD, Dolby Digital Plus and DTS-HD Master Audio are supported with maximum 7.1 channels when HDMI OUT is the selected audio output port. Make sure to connect to an amplifier or receiver with a built-in (Dolby Digital, Dolby Digital Plus, Dolby TrueHD, Dolby Digital Plus, DTS-HD Master Audio and other applicable formats) decoder to playback applicable multichannel audio formats.
WARNING
Before connecting and disconnecting any HDMI cables, both the T 557 and the ancillary source must be powered OFF and unplugged from the AC outlet. Failure to observe this practice may cause permanent damage to all equipment connected via HDMI sockets.
IMPORTANT NOTICE
If your HDMI equipped TV is not capable of decoding DTS or Dolby Digital Bitstream, set the T 557's HDMI or SPDIF setting at the "Audio Setup Menu" to "PCM Stereo". There may be a rushing noise heard if your TV is not capable of decoding the DTS (or Dolby Digital) Bitstream; most TVs do not have this capability.
7 LOCAL AREA NETWORK (LAN) PORT: Using a commercially available straight LAN cable (Category 5/CAT5 or better with RJ45 connector), connect this LAN port to the corresponding port of your modem or router. By connecting the T 557 to broadband internet, you can playback a disc that offers BD-Live function. Refer also to the "NETWORK SETUP MENU" section of "USING THE T 557" under the "OPERATION" main heading.
NOTES
- NAD is not responsible for any malfunction of the T 557 and/or the internet connection due to communication errors or malfunctions associated with your broadband internet connection or other connected equipment. Contact your Internet Service Provider (ISP) for assistance or the service bureau of your other equipment.
- Contact your ISP for policies, charges, content restrictions, service limitations, bandwidth, repair and other related issues pertinent to internet connectivity.
- Some disc related material available through internet may not be compatible with the T 557. Contact the producer of the disc for questions about such content availability or compatibility.
8 IR IN: This input is connected to the output of an IR (infrared) repeater (Xantech or similar) or the IR output of another component to allow control of the T 557 from a remote location. Most NAD products with IR OUT are fully compatible with the T 557.
BR 2 REMOTE CONTROL
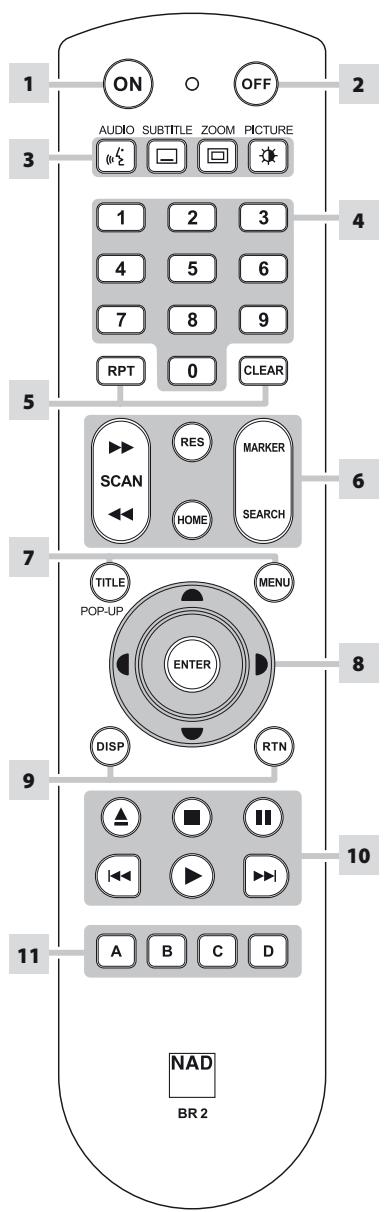
1 ON: Switch T 557 ON.
2 OFF: Switch T 557 OFF.
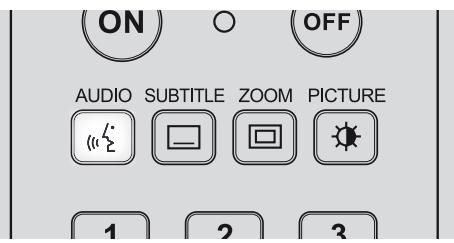
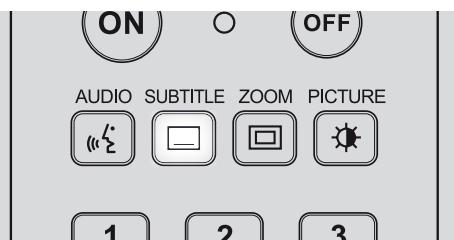
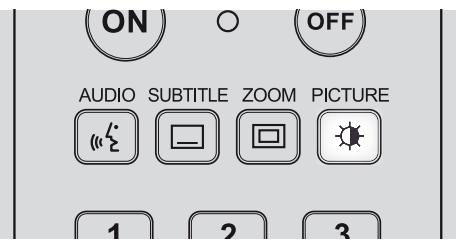
3 AUDIO: Select an audio language.
SUBTITLE: Select a subtitle language.
ZOOM: Enlarge video image.
PICTURE: Display or exit the Picture Mode menu.
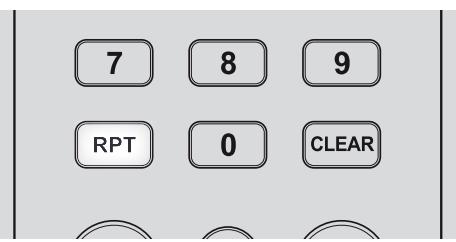
4 0-9 number buttons: Select numbered items in a menu.
5 RPT: Repeat track, chapter, title, file, folder, all.
CLEAR: Remove a marker on the search menu or a number when setting the password.
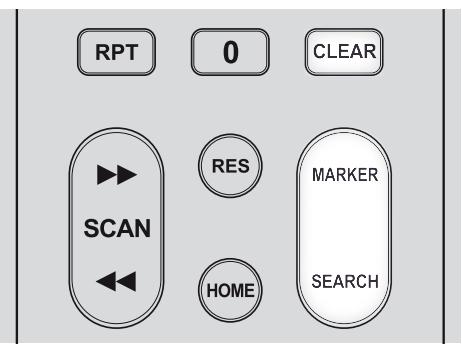
6 SCAN ◀◀/▶▶: Fast reverse or forward search.
RES: Set output resolution of HDMI and Component Video output.
HOME: Display or exit HOME menu.
MARKER: Mark desired scene for selective playback.
SEARCH: Display or exit the search menu.
7 TITLE/POP-UP: Display DVD title menu or BD-ROM pop menu, if available.
MENU: Access menu on a DVD disc, if available.
8 ▲/▼/◄/►: Select an item in a menu.
ENTER: Acknowledge menu selection.
9 DISP: Access on-screen display.
RTN: Exit from a menu window.
10 ▲: Opens and closes the disc tray.
■ : Stop playback.
II: Pause playback temporarily.
|◀◀/▶▶▶: Go to beginning of current/previous track, file or chapter; go to next track/file/chapter.
▶: Start playback.
11 A,B,C,D : Navigate or select BD-ROM menu, if applicable; Page up/down PHOTO and MUSIC menu list.
You may operate the T 557 from its front panel or via the BR 2 remote control. Since the remote control will be the primary controller for most cases, we will focus on remote-controlled operations. Be sure also to read the section, "IDENTIFICATION OF CONTROLS - FRONT PANEL".
USING THE HOME MENU
From the Home Menu screen, you can access the Setup menu as well as select desired media for playback. If the Home Menu does not appear, check your applicable video connections.
1 Press [HOME] and the Home Menu appears.
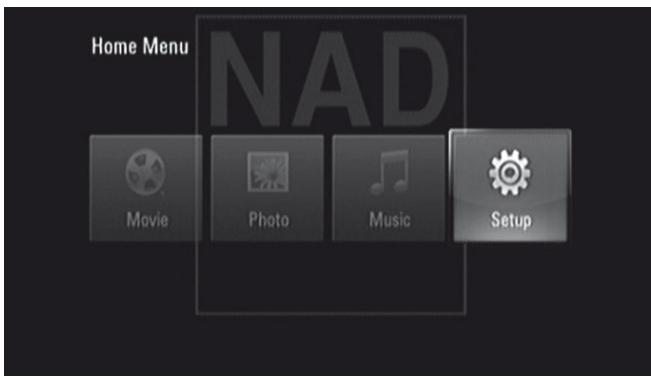
2 Use [◀/▶] keys to select among the following menu options - Movie, Photo, Music or Setup. If there is no disc loaded, only "Setup" is accessible from these Home Menu options.
3 Press [ENTER] to select menu option.
DISPLAY THE T 557 SETUP MENU
The Setup Menu allows one to customize the operation of the T 557. If the factory defaults do not suit your taste, you will need to use the setup menu to configure the T 557 yourself.
Press the BR 2's [HOME] button and then select "Setup" for the Setup Menu OSD to appear. With the use of the BR 2's navigation buttons, you may select various menus.
NAVIGATING THE SETUP MENU OSD AND MAKING CHANGES
To navigate through the Setup Menu OSD options, please do the following using the BR 2 remote control:
1 Use [▲/▼] keys to move up or down the menu selections.
2 Press [◀/▶] to move backward or forward a menu window.
3 Use [▲/▼] keys to select through the options of a particular menu item.
4 Press [ENTER] to select a desired setting/selection.
5 Press [RTN] to exit the Setup menu.
DISPLAY DISC OSD
You can display the general disc playback status on the TV screen. Some items can be changed using the menu. To use the on-screen display
1 Press the BR 2's [DISP] button during playback.
2 Press [▲/▼] to select an item. The selected item is highlighted.
3 Key-in the desired the number button, press [◀/▶] or [ENTER] as applicable.
NOTES
- The display feature may not be available for all disc media and is media dependent.
- Display disc OSD does not apply to audio only discs like CD and MP3/WMA files as they are already presented in their respective menu screens.
- If no button is pressed for about 15 seconds, the on-screen display disappears.
DISPLAY SETUP MENU
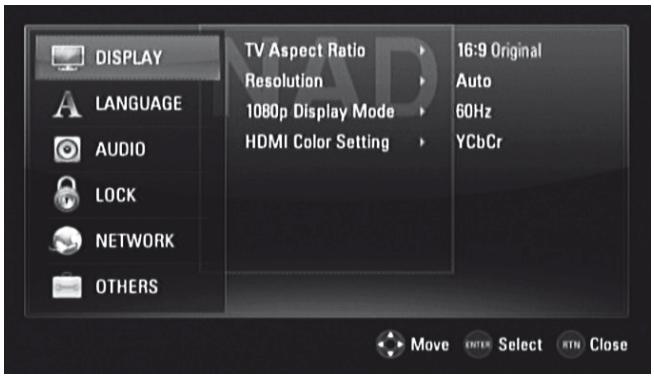
TV ASPECT RATIO
Set TV ASPECT RATIO to select a picture size matching the aspect ratio of your TV/Monitor.
Select "4:3 Letter Box" or "4:3 Pan Scan" when a standard 4:3 TV is connected.
4:3 Letter Box: Displays a wide picture with bands on the upper and lower portions of the screen.
4:3 Pan Scan: Automatically displays the wide picture on the entire screen and cuts off the portions that do not fit.
Select "16:9 Original" or "16:9 Full" when a 16:9 wide TV is connected.
16:9 Original: The 4:3 picture is displayed with an original 4:3 aspect ration, with black bars appearing at the left and right sides.
16:9 Full: The 4:3 pictures is adjusted horizontally (in a linear proportion) to fill the entire screen.
NOTE
"4:3 Letter Box" or "4:3 Pan Scan" are not selectable when the resolution is set to higher than 480i/480p (576i/576p).
USING THE T 557
RESOLUTION
The T 557 provides several video output resolutions for the HDMI OUT and COMPONENT VIDEO OUT jacks. Resolution can be changed via the "Resolution" option in the DISPLAY SETUP menu or by toggling the [RES] button of the BR 2 remote control. The T 557 must be at STOP mode when BR 2's [RES] button is used to change the RESOLUTION setting.
The following resolutions are selectable or available
Auto: If the HDMI OUT jack is connected to a TV that provides display information, the T 557 automatically selects the resolution best suited to the connected TV. If COMPONENT VIDEO OUT is the selected video output media, the resolution changes to "Auto" – the default resolution for Component Video OUT.
1080p: Outputs 1080 lines of progressive video (applicable only for HDMI connection).
1080i: Outputs 1080 lines of interlaced video.
720p: Outputs 720 lines of progressive video.
480p/576p: Outputs 480/576 lines progressive video.
480i/576i: Outputs 480/576 lines of interlaced video.
Available resolution varies according to connection and media format.
HDMI OUT CONNECTION
- For the 480i/576i resolution setting, the output resolution of HDMI OUT will change to 480p/576p.
- If you select a resolution manually and then connect the HDMI jack to TV and your TV does not accept it, the resolution setting will automatically be set to "Auto".
- The 1080p video output frame rate may be automatically set to either 24Hz or 50/60Hz depending upon the capability and preference of the connected TV and based on the native video frame rate of the BD-ROM disc's contents.
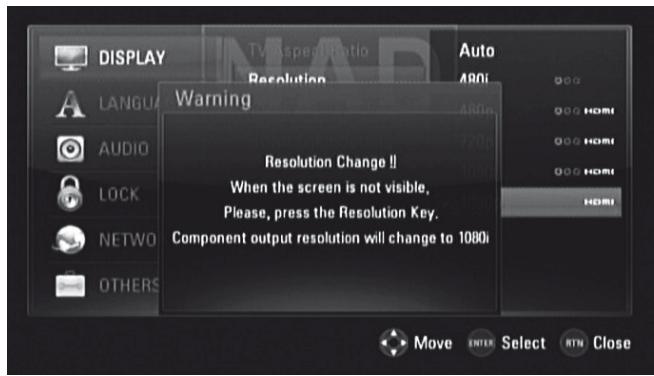
- If you select a resolution that is not compatible with your TV, a warning message as shown below will appear.
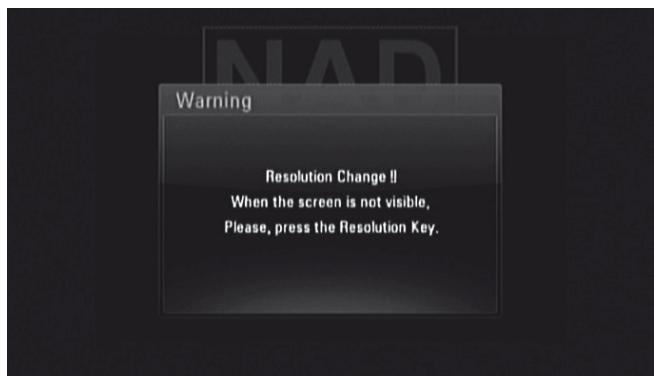
After resolution change, if you cannot see the screen, please wait for about 20 seconds and the resolution will automatically revert back to the previous resolution or a message screen as below may appear
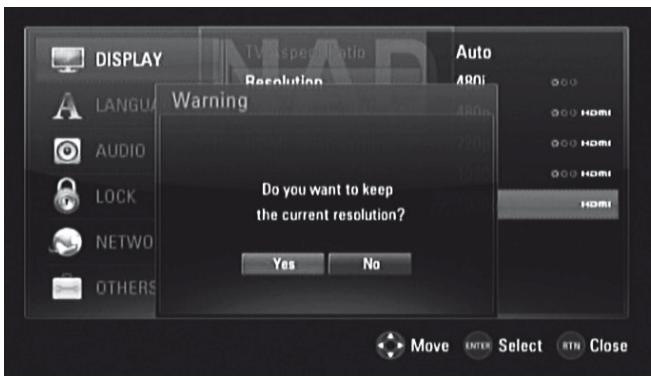
Select "Yes" for the current resolution setting (the VFD will show the current resolution setting) to be applied. "Current" resolution setting is the suggested new resolution setting.
Select "No" to seek for the next applicable resolution setting. The above "Warning" screens will interchangeably be displayed until you select "Yes" to a suggested resolution setting.
COMPONENT VIDEO OUT CONNECTION
- For the 1080p resolution setting with unprotected media, the COMPONENT VIDEO OUT resolution will change to 1080i.
- When a protected media is loaded for playback, 720p, 1080i or 1080p resolution settings of COMPONENT VIDEO OUT will change to either 480i/576i or 480p/576p (depends upon the connectivity of a HDMI cable - plugged-in or unplugged).
• BD or DVD could prevent up-scaling on analog output.
VIDEO OUT CONNECTION
• The resolution of the VIDEO OUT jack is fixed to 480i/576i.
NOTES
- Depending on your display, some of the resolution settings may result to abnormal picture or the picture disappearing altogether. When this happens, press [HOME] key and then toggle [RES] repeatedly until the picture reappears.
- The T 557 supports simultaneous output of all video out jacks. The resolution of the HDMI output will not be the same as the resolution on the Component Video output.
- For a list of applicable resolution settings with respect to video output port and type of media, please refer also to the "RESOLUTION SETTINGS" section of "REFERENCE TABLES" under the "REFERENCE" main heading.
1080P DISPLAY MODE
Movies shot with film camera consist of 24 frames per second. Since conventional televisions display frames either at 1/60 or 1/50 second intervals, the 24 frames do not appear at an even pace. The "24Hz" setting of the T 557's "1080p Display Mode" option enables the faithful reproduction of such film-based materials, displaying each frame at 1/24 second intervals.
24Hz: Using an HDMI-equipped display compatible with 1080/24p input, set "1080p Display Mode" to "24Hz" for smooth presentation of film-based materials.
50/60Hz: If "24Hz" is selected and some picture disturbance is experienced when the video switches between video and film material, set "1080p Display Mode" to "50Hz" (European version model only) or "60Hz" (North America version model only) instead.
NOTE
If your TV is not compatible with 1080/24p, the actual frame frequency of the video output will be 50Hz (or 60Hz) even though the "1080p Display Mode" is set to "24Hz".
HDMI COLOR SETTING
Set the type of video output from HDMI OUT jack. Select the setting that matches your display device.
YCbCr: Select when connecting to an HDMI display device.
RGB: Select when connecting to a DVI device.
LANGUAGE SETUP MENU
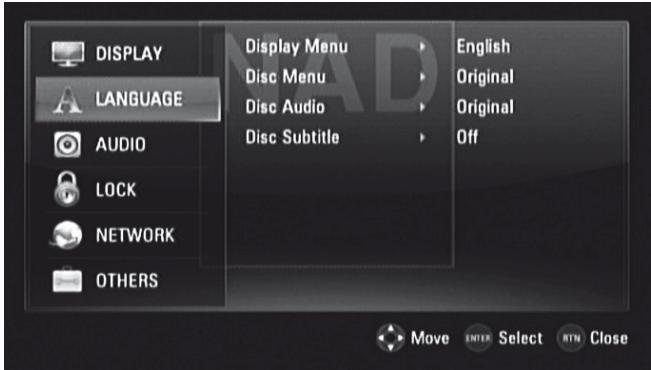
DISPLAY MENU
Select a language for the SETUP menu and on-screen display.
DISC MENU/AUDIO/SUBTITLE
Select the language you prefer for the audio track (disc audio), subtitles and the disc menu. Depending on the media, only those Disc Audio, Disc Subtitle and Disc Menu languages recorded on the media are available. When a language is chosen, it will become the default setting unless the media overrides the settings.
Original: Refers to the original language in which the disc was recorded.
Other: Select "Other" if the desired language is not on the list. Use [▲/▼] to highlight "Other", press [ENTER] and then input the 4-digit language code using the number keys of the remote control. If you enter the wrong language code, complete entering the 4-digit numbers, press [ENTER] and then encode the correct 4-digit numbers. See "LANGUAGE CODE LIST" under the main heading "REFERENCE" for a list of applicable language codes.
Off: If you choose for the disc subtitle not to come up, select "Off".
USING THE T 557
AUDIO SETUP MENU
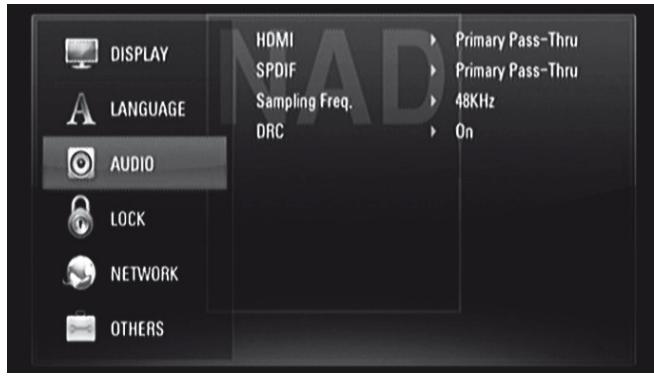
Each DVD disc has a variety of audio output options. Set the T 557's AUDIO options according to the type of audio system you use.
HDMI/SPDIF (DIGITAL AUDIO OUTPUT)
Select the audio output setting for HDMI OUT or DIGITAL AUDIO OUT port.
PCM Stereo: Select when connected to a two-channel digital stereo decoder.
PCM Multi-Ch (HDMI only): Select when connected to a device with multi-channel decoder. This is applicable to HDMI OUT only.
DTS Re-Encode: Select when connected to a device with DTS decoder.
Primary Pass-Thru: Select when connected to a device with LPCM, Dolby Digital, Dolby Digital Plus, Dolby TrueHD, DTS and DTS-HD decoder.
Refer also to the "AUDIO OUTPUT SPECIFICATIONS" section of "REFERENCE TABLES" under the "REFERENCE" main heading.
SAMPLE FREQ. (FREQUENCY)
Set the sampling frequency of the audio signal.
48KHz: If your receiver or amplifier is not capable of handling 96 kHz and 192 kHz signals, select 48 kHz. When this choice is made, this unit automatically converts any 96 kHz and 192 kHz signals to 48 kHz so your system can decode them.
96KHz: If your receiver or amplifier is not capable of handling 192 kHz signals, select 96 kHz. When this choice is made, this unit automatically converts any 192 kHz signal to 96 kHz so your system can decode them.
192KHz: If your receiver or amplifier is capable of handling 192 kHz signals, select 192 kHz. When this choice is made, a 192 kHz signal passes through without any further processing.
Check the documentation of your amplifier to verify its capabilities.
DRC (DYNAMIC RANGE CONTROL)
You can select the effective dynamic range (subjective range from soft to loud) for playback of Dolby Digital or Dolby Digital Plus soundtracks. It is useful when you watch your favorite action movie without disturbing others at night.
On: The "On" setting is for late-night sessions or other times when you wish to retain maximum dialog intelligibility while minimizing overall volume levels.
Off: To maintain full dynamic range, set to "Off".
NOTE
DRC setting can be changed only at STOP mode or when there is no disc loaded.
LOCK SETUP MENU (APPLICABLE TO BD AND DVD PLAYBACK ONLY)
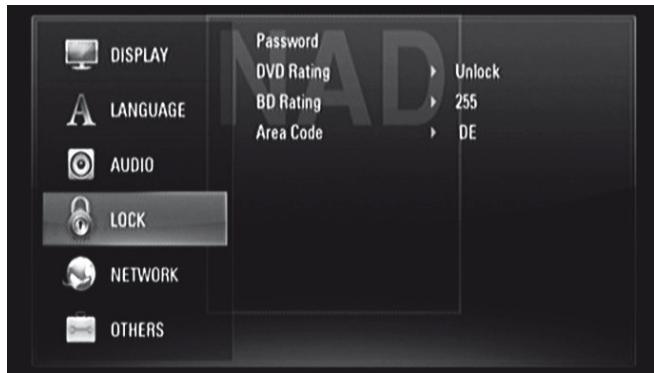
Some movies contain scenes that may not be suitable for children to view. Many of these discs contain parental control information that applies to the complete disc or to certain scenes on the disc. Movies and scenes are rated depending on the country. Some discs offer more suitable scenes as an alternative.
PASSWORD
When you access Lock Setup Menu for the first time, it is advised that you setup first your Password.
1 While at "Password" line menu, press [▶] to select "New" option.
2 Press [ENTER]. Input your desired 4-digit password code. Press [ENTER] again.
3 Enter again the 4-digit password code for verification.
4 Press [ENTER]. You have now setup your Parental Rating password.
You can change the password for parental control. Enter your four-digit password when prompted on the screen.
1 While at "Password" line menu, press [▶] to select "Change" option.
2 Press [ENTER].
3 Enter your old four-digit password using the numeric buttons (0-9). Press [ENTER].
4 You will be prompted to enter your new password. Enter the new four-digit password using the numeric buttons (0-9). Press [ENTER].
5 You will be prompted to verify your new password. Enter the new four-digit password again.
6 Press [ENTER]. The new four-digit password is now valid.
The setup Password can be deleted by the following procedure
1 While at "Password" line menu, press [▶] and then [▼] to select "Delete" option.
2 Press [ENTER].
3 Enter your four-digit password using the numeric buttons (0-9). Press [ENTER]. The password is now deleted.
DVD RATING
The parental rating feature allows you to block access to scenes greater than the rating you set up, thereby preventing your children from viewing material you believe is unsuitable. To activate "DVD Rating", please be guided by the following:
1 While at "DVD Rating" line menu, press [▶]. A "Password" prompt will come up in the menu screen.
2 Input the password you have setup.
3 Upon entering the password, you can now set the parental rating level you prefer. Use [▲/▼] to step through the rating levels.
4 Press [ENTER] to confirm your rating selection.
RATING 1-8
Rating "1" (Kids) has the most restrictions and Rating "8" (Adult) is the least restrictive.
UNLOCK
If you select "Unlock", parental lock is not active and the disc plays in full.
NOTE
If you set a rating level for the player, all disc scenes with the same rating level or lower are played. Higher rated scenes are not played unless an alternate scene is available on the disc. The alternative must have a lower rating. If no suitable alternative is found, playback stops. You must enter the 4-digit password in order to play the disc.
Should you forget your password, you can reset it by using the following steps.
1 Remove any disc loaded.
2 Select "Password" option.
3 Use the number button to enter "210499".
"PINCLR" appears in the VFD and the password is reset.
BD RATING
Set an age limit for rated BD-ROM playback.
1 While at "BD Rating" line menu, press [▶]. A "Password" prompt will come up in the menu screen.
2 Input the password you have setup.
3 Upon entering the password, you can now set the age limit for BD viewing.
255: All BD ROM can be played back.
0 - 254: Prohibits playback according to the ratings recorded on the BD ROM.
4 Press [ENTER] to confirm your BD Age selection.
AREA CODE
Enter the code of the country/area whose standards were used to rate your DVD. See "AREA CODE" under the main heading "REFERENCE" for a list of applicable area codes.
1 While at "Area Code" line menu, press [▶]. A "Password" prompt will come up in the menu screen.
2 Input the password you have setup. Press [ENTER].
3 Select desired "Area Code" using [▲/▼] buttons.
4 Press ENTER to confirm your area code selection.
USING THE T 557
NETWORK SETUP MENU

The NETWORK settings are needed to use the BD Live feature. By connecting the T 557 to the internet, special BD-ROM sites can be enabled by some BD-ROM discs. Online contents can be downloaded and watched if a BD-ROM site contains links to future movie trailers, bonus contents and other related features.
Ensure proper broadband connectivity when configuring the following NETWORK features.
CONNECTION SETTING
Press [▶] or [ENTER] to setup your network connection. Use the following procedure in setting up your connection.
1 Upon selecting > or [ENTER], the CONNECTION SETTING as below is shown. Use [▲/▼/◄/►] to configure your connection with below OSD.
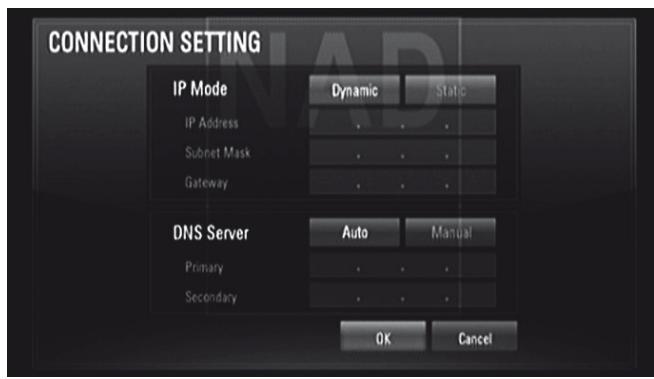
Static: Select to set manually the IP address, Subnet Mask, Gateway and consequently the DNS Server settings.
Dynamic: Select to automatically allocate an IP address.
2 After selecting either "Static" or "Dynamic", click "OK" to complete the network connection.
3 After setting up the connection, a menu will prompt you test your network connection. Click "OK" to complete the network connection and exit the "CONNECTION SETTING" menu.
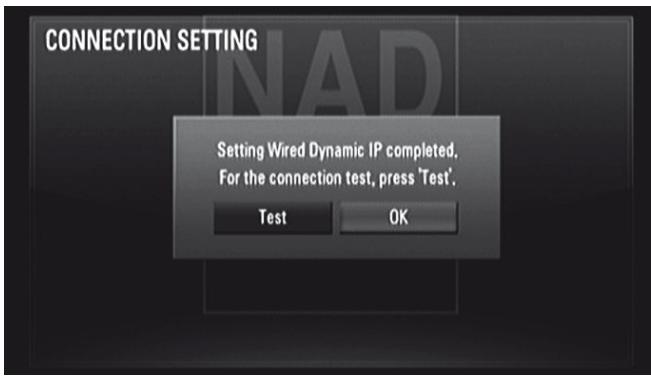
4 If "Test" is selected, the network connection status is displayed as in below
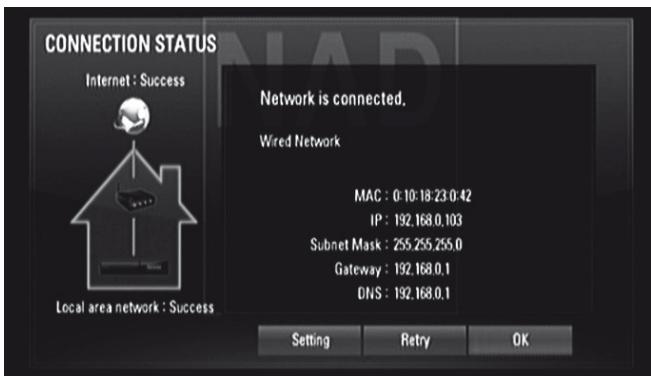
5 Select "OK" to exit connection setting/status OSD.
CONNECTION STATUS
Selecting "Connection Status" will test and consequently display the status of your network connection. The status of your network connection will be displayed like "Success" (as in above OSD) or "Fail".
NOTES ON NETWORK CONNECTION
- NAD is not responsible for any malfunction of the T 557 and/or the internet connection feature due to communication errors/malfunctions associated with your broadband internet connection or other connected equipment.
- NAD is not responsible for the functionality or continued availability of the features of BD-ROM discs made available through the Internet Connection. Some disc related material available by the Internet Connection may not be compatible with the T 557. If you have questions about such content, please contact the producer of the disc.
- Any fees charged by an ISP including, without limitation, connection charges are your responsibility.
- A 10 Base-T or 100 Base-TX LAN port is required for wired connection to the T 557. If your internet service does not allow for such a connection, you will not be able to connect the T 557.
BD-LIVE CONNECTION
You can restrict Internet access when BD-Live functions are used.
Permitted: Internet access is permitted for all BD-Live contents.
Partially permitted: Internet access is permitted only for BD-Live contents that have content owner certificates. Internet access and AACS Online functions are prohibited for all BD-Live contents without a certificate.
Advanced Access Content System (AACS) is a standard for content distribution and digital rights management, intended to restrict access to and copying of the next generation of optical discs and DVDs. The AACS standard has been adopted as the access restriction scheme for Blu-ray Disc.
Prohibited: Internet access is prohibited for all BD-Live contents.
OTHERS SETUP MENU
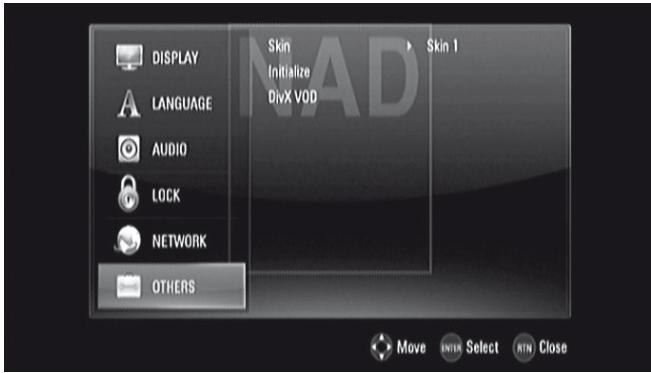
SKIN
Change the background or wallpaper of the OSD. The default "Skin" is "Skin 1" which is actually the NAD logo.
INITIALIZE
You can reset the player to its original factory settings or initialize the BD contents of the connected USB device.
Factory Set: Select to restore the T 557 to its factory default settings except the LOCK SETUP MENU settings.
BD Storage Clear: Delete the BD contents from the connected USB device.
For both of the above options, the confirm message prompt appears to complete the selection. Use [◀/▶] to select "Yes" or "No" and then press [ENTER].
DIVX VOD
DivX is the name of a revolutionary new video codec which is based on the new MPEG-4 compression standard for video. You will be able to play DivX discs using the T 557.
DivX Reg. Code: The registration code of your T 557 is displayed.
Deactivate: The T 557 is deactivated and the deactivation code is displayed.
NOTE
Only downloaded videos from DivX VOD can be played back on your T 557.
USING THE T 557 - FEATURES
USB MODE
The T 557 can play back MP3/WMA/JPEG/PNG/DivX files stored in external USB (Universal Serial bus) devices. The following are the T 557's capabilities with respect to USB device playability.
- Support USB Flash Drive and External HDD formatted in FAT16, FAT32 or NTFS.
• Support USB 1.1 and USB 2.0.
• Support up to 4 partitions of the USB device.
• Digital camera and mobile phone are not supported. - If a USB extension cable or USB HUB is used, the USB device may not be recognized.
NOTE
External HDD formatted in NTFS is read only; thus, it cannot be used for downloading BD-Live contents.
IMPORTANT NOTICE
USB port of the T 557 cannot be connected to a PC. T 557 cannot be used as a storage device.
USB PLAYBACK
1 Connect the external USB device to the front panel's USB input.
2 Press [HOME]. Select "Movie", "Photo" or "Music" option. Press [ENTER].
3 If a disc is loaded and a USB device is inserted simultaneously, the menu prompt for selecting a media will appear
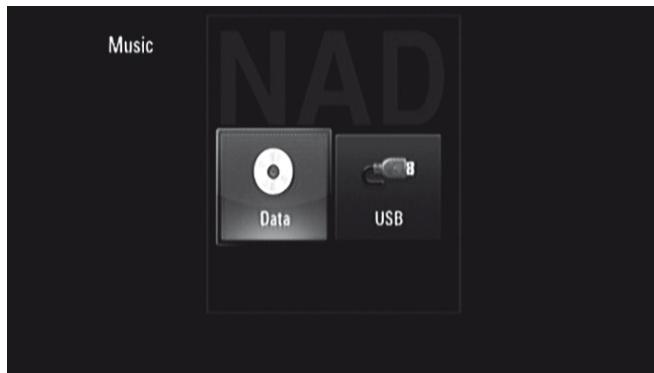
4 Select "USB" as the desired media and then press [ENTER].
For details of operations on applicable file type, refer to the relevant sections below about MP3/WMA/Photo/DivX playback.
PLAYING AUDIO CD/MP3/WMA
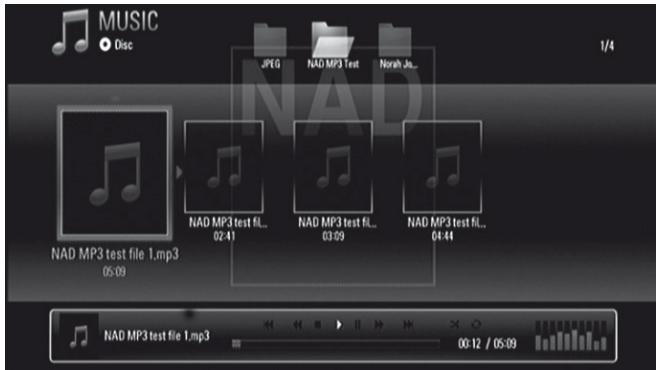
The T 557 can play Audio CD and MP3/WMA formatted recordings on CD-R/RW, DVD±R/RW,BD-R/RE discs or USB flash drive.
1 Load the applicable disc or connect USB containing files. Select "Music" from the "Home" menu.
2 Press [ENTER]. The "MUSIC" menu appears at the OSD. A list of folders, tracks or files is shown at the OSD.
3 Use the BR 2's [◀/▶] keys to navigate through the folders, tracks or files.
4 Press ENTER to see the folder contents.
5 Press [◀/▶] to select a track or file.
6 Press [▶] or [ENTER] to start playback.
NOTES
- Playback may start automatically if an Audio CD is loaded.
- If you are in a file list and want to return to the previous Folder list, use the [▲/▼] buttons on the remote to highlight the folder and press [ENTER].
- Use BR 2's red (A), green (B), yellow (C) or blue (D) buttons as indicated in the OSD – go to the first file/page, move up or down the file/page list or jump to last file/page.
- During playback, press [RTN] once or twice to go back to the previous menu/page/OSD.
IMPORTANT NOTICES
- Customers should note that permission is required in order to download MP3/WMA files and music from the Internet. NAD ELECTRONICS INTERNATIONAL has no right to grant such permission. Permission should always be sought from the copyright owner.
- Maximum files per disc/USB: less than 2000 (total number of files and folders).
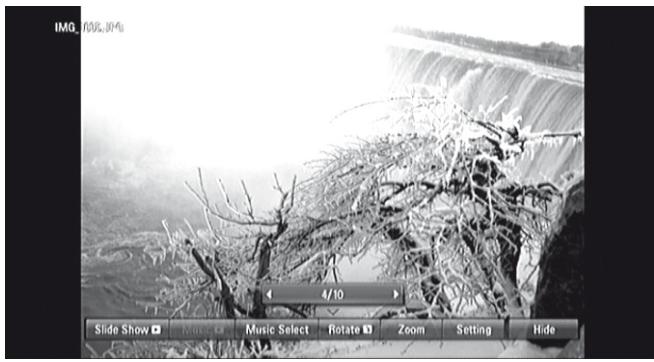
VIEWING A PHOTO FILE
natural_image
Black-and-white photo of a frozen waterfall with bare branches, no visible text or symbolsThe T 557 allows the playback or viewing of PHOTO files.
1 Load the applicable disc or connect USB containing files. Select "Photo" from the "Home" menu. Press [ENTER].
2 The PHOTO menu appears on the TV screen. A thumbnail of the photos loaded in the disc will be shown in the OSD.
3 Press [▲/▼/◄/►] to go over the photo files.
4 Press [ENTER] or [▶] to select a file and start playback.
5 During photo playback, several selectable options are shown in the bottom portion of the photo. Use [◀/▶] to highlight and select any of the following options.
Slide Show: Press [ENTER] button to start or pause the slide show.
Music: Press [ENTER] to play or pause the background music. This option is available after the background music is selected using "Music Select" option.
Music Select: Select the background music during photo playback. Press [ENTER] and the "Select the music album" submenu appears. Use [▲/▼/◄/►] to select a media or folder containing music files. Press ENTER to confirm your selection and start playback of selected background music.
Rotate: Toggle [ENTER] to continually rotate the picture clockwise. This option is not available during slide show.
Zoom: During playback or pause mode, press [ZOOM] to display the [Zoom] menu. Use BR 2's green or yellow buttons to zoom in or out of the picture. You can move through the zoomed picture using [▲/▼/◄/►] buttons. Press RTN to exit the [Zoom] menu and return to the normal picture size. The zoom function can also be operated by BR 2's [ZOOM] button.
Setting: Use [▲/▼] to select "Effect" or "Delay". Use [▲/▼/◄/►] and then press ENTER to set the selected option.
Effect: Apply various effects when sliding photos.
Off: Slide Show without any effect.
Random: Slide show effects are applied randomly.
Slide: Slides a photo from various directions.
Door: Photo will be appear like door opening.
Lattice: Photo will be appear from tiled pieces to full screen image
Delay: Set the photo delay time for Slide Show. Use BR 2's [◀/▶] to select Slow, Normal or Fast.
Hide: Toggle [ENTER] to exit or display the menu options.
NOTES
- If you are in a file list and want to return to the previous Folder list, use the [▲/▼] buttons on the remote to highlight the folder and press [ENTER].
- Use BR 2's red (A), green (B), yellow (C) or blue (D) buttons as indicated in the OSD – go to the first file/page, move up or down the file/page list or jump to last file/page.
- During playback, press [RTN] once or twice to go back to the previous menu/page/OSD.
- Recommended size: less than 4000 x 3000 x 24 bit/pixel or less than 3000 x 3000 x 32 bit/pixel.
• Maximum files per disc/USB: less than 2000 (total number of files and folders).
DIVX PLAYBACK
The T 557 supports DivX playback.
1 Load the applicable disc or connect USB containing files. Select "MOVIE" from the "Home" menu.
2 Press [ENTER]. A list of DivX files is shown in the OSD. Use [▲/▼/◄/►] to select a file.
3 Press [ENTER] to select a file and start playback.
NOTE
Use BR 2's red (A), green (B), yellow (C) or blue (D) buttons as indicated in the OSD – go to the first file/page, move up or down the file/page list or jump to last file/page.
MOVIE FILE REQUIREMENTS (USB/DISC)
Movie file compatibility with the T 557 is limited as follows:
1 Available resolution size: 1920 x 1080 (W x H) pixels
2 File extensions: ".avi", ".divx", ".mpg", ".mpeg", ".mp4", ".mkv"
3 Playable subtitle: SubRip (.srt/.txt), SAMI (.smi), SubStation Alpha (.ssa/.txt), MicroDVD (.sub/.txt), VobSub (.sub), SubViewer 1.0 (.sub), SubViewer 2.0 (.sub/.txt), TMPlayer (.txt), DVD Subtitle System (.txt)
4 Playable Codec format: "DIVX3.xx", "DIVX4.xx", "DIVX5.xx", "XVID", "DIVX6.xx" (Standard playback only), H.264/MPEG-4 AVC, DIVX-HD, MPEG1 SS, MPEG2 PS, MPEG2 TS
5 Playable Audio format: "Dolby Digital", "DTS", "MP3", "WMA", "AAC", "AC3"
6 Sampling frequency: within 32-48 kHz (WMA), within 16-48 kHz (MP3)
7 Bit rate: within 20-320 kbps (WMA), within 32-320 kbps (MP3)
8 CD-R/RW, DVD±R/RW, BD-R/RE Format: ISO 9660+JOLIET, UDF and UDF Bridge format
9 Maximum Files/Folder: Less than 2000
• The movie file name and subtitle are limited to 180 characters.
• Not all the WMA and AAC Audio format is compatible with this unit.
- HD movie files contained on the CD or USB 1.0/1.1 may not be played properly. BD, DVD or USB 2.0 are recommended to play back HD movie files.
- This player support H.264/MPEG-4 AVC profile Main, High at Level 4.1.
- For a file with higher level, a warning message will appear on the screen.
- This player does not support files that are recorded with GMC (Global Motion Compensation) or Qpel (Quarter pixel). Video encoding techniques in MPEG4 standard, like DivX or XVID, are supported.
USING THE T 557 - FEATURES
ADJUSTING THE PICTURE MODE
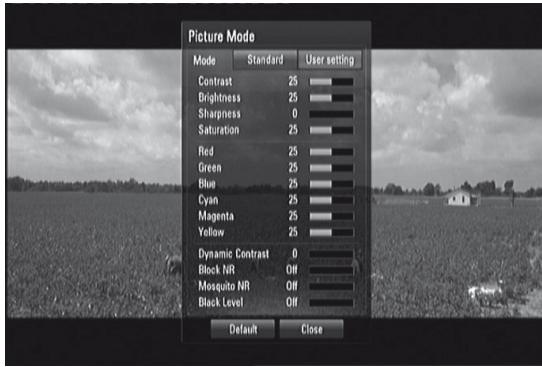
Select the video quality mode during playback. You can adjust various options such as Contrast, Brightness, Sharpness, etc.
1 Press BR 2's [PICTURE] button while playing a BD, DVD or a movie file. The [Picture Mode] menu appears on the screen.
2 Use [◀/▶] to select between "Standard" and "User Setting" options.
Standard: Disable video color setting options.
User Settings: Enable video color setting options.
3 Use [▲/▼] to select a desired option. Upon selection, only the selected option will remain shown in the OSD. Use [◀/▶] to adjust the value.
4 Use [▲/▼] again to move on to the next video color option or press [ENTER] to display again all options.
5 Press [RTN] or [PICTURE] to complete all settings and exit Picture Mode menu.
6 Select "Default" to restore Picture Mode default settings. Select "Close" to accept all changes done and at the same time exit Picture Mode menu.
The following filter settings can be adjusted even if the picture mode is in "Standard" mode. These settings can be used to reduce the noise level or set the black level of the video image on the screen.
Block NR (Block Noise Reduction): Set this option to "Low", "Mid" or "High" to reduce the block noise produced in the MPEG compression process which may appear especially on fast-moving pictures. Select "Off" to retain current settings.
Mosquito NR (Mosquito Noise Reduction): Reduce mosquito (scattering) noise produced in the MPEG compression process by selecting "Low", "Mid" or "High" option. Select "Off" to retain current settings.
Black Level: Black level determines the amount of light a picture display emits for the darkest areas of an image. Select "On" to display deeper, richer black than in "Off" setting. Black Level control is only valid in composite output.
ENJOYING BD-LIVE™ OR BONUSVIEW™ IN BD-VIDEO
The T 557 supports picture-in-picture (PIP), secondary audio, Virtual packages and other features for BD-Video supporting BONUSVIEW (BD-ROM version 2 Profile 1 version 1.1/ Final Standard Profile). In addition to the BONUSVIEW function, BD-Video supporting BD-Live (BD-ROM version 2 Profile 2) allow more functions like online games by connecting the T 557 to the internet.
ENJOYING BD-LIVE DISCS
The T 557 supports BD-Live, a new BD-Video function that allows access features like interactive functions when connected to the internet. The usable functions and the operating method may vary with each disc so make sure to refer to the disc's instructions for proper access and playability.
The T 557 must be connected to the internet to use the BD-Live functions. It may take up to several minutes to load and start enjoying BD-Live contents. Additional contents like movie trailer, subtitles, BD-J and similar features can be downloaded to a USB device connected to the front panel USB input port. Make sure that the free space in the USB device is more than 1GB.
IMPORTANT NOTICE
Ensure that a USB flash drive is connected to the front USB port when accessing BD-Live functions.
SCREENSAVER
The screensaver appears when you leave the T 557 in Stop mode or HOME menu mode for about five minutes. If the Screen Saver is displayed for five minutes, the T 557 automatically turns itself off.
LAST SCENE MEMORY
The T 557 memorizes the last scene from the last disc that is viewed. The last scene remains in memory even if the disc is removed from the unit or the unit turned off. If you load a disc that has the scene memorized, the scene is automatically recalled.
NOTES
- The T 557 does not memorize the scene of a disc if it is turned off before the disc is played back.
- Last Scene Memory function for a previous disc is erased once a different disc is played.
• This function may not work on some discs or titles.
USING THE T 557 - FUNCTION CONTROL
Depending on the media, the following basic function controls of the T 557 can be accessed directly using the BR 2 remote control.
AUDIO
The AUDIO button will allow one to switch the audio language or format only if the media supports the AUDIO button feature.
Press [AUDIO] repeatedly to select desired audio language or format.
SUBTITLE
It is possible to change the subtitle language to a different language from the one selected at the initial settings. This operation works only with discs on which multiple subtitle languages are recorded.
1 Press [SUBTITLE] during playback. When no subtitles are recorded, "OFF" will be displayed.
2 Press [SUBTITLE] repeatedly until the desired language is selected.
When the desired language is not selected even after pressing the button several times, it means that the language is not available on the disc.
To eliminate the On Screen Subtitles, press [SUBTITLE] repeatedly to select "OFF".
ZOOM

Use [ZOOM] to enlarge the video image. Press [ZOOM] during playback or still playback to activate the Zoom function.
Use the green and yellow buttons to select Zoom mode (up to 16 levels). Move through the zoomed picture using the [▲/▼/◄/►] buttons. To return to normal picture size, press the yellow (C) button repeatedly until the picture returns to its normal size (Zoom).
NOTE
Zoom may not work on some discs or titles.
PICTURE
Press to go to PICTURE MODE menu wherein video color setting options can be enabled, adjusted, disabled or turned off. Refer also to the item about ADJUSTING THE PICTURE MODE under the USING THE T 557 – FEATURES segment of the main OPERATION heading.
RPT (REPEAT)
Press [RPT] repeatedly to select desired repeat mode. The following are the repeat modes
Track: Repeated playback of current track or file.
All: Repeated playback of all tracks, files and folders.
✗ (audio disc/file only): Tracks or files are played back in random order.
All: Repeated playback of all tracks, files and folders in random order.
Chapter: Repeated playback movie chapter.
Title: Repeated playback of movie title.
A-B (video disc/file, audio CD only): Repeat specific portion of a scene. Press [RPT] to select beginning of the portion- "A-". Press [ENTER] to select the end of the portion – "A-B". A scene portion less than 3 seconds cannot be selected.
Off: Repeated press [RPT] until "Off" to cancel all repeat modes.
NOTES
- For other disc type, the repeat mode may not be possible as above. The repeat mode of such discs maybe enabled from the disc's menu itself or other built-in features.
• REPEAT feature does not apply to PHOTO files.
USING THE T 557 - FUNCTION CONTROL
MARKER, SEARCH, CLEAR
Use the [MARKER] button to selectively mark a scene that you wish to playback.
ENTER A MARKER
Press [MARKER] at the desired point on the disc. The marker icon appears on the screen briefly. You can enter up to nine markers.
RECALL OR CLEAR A MARKER SCENE
Press [SEARCH] and the search menu appears on the screen. Press a number button to select a marker number that you want to recall. Playback starts from the marked scene.
Alternatively, press [▼] to highlight a marker number. Use [◀/▶] to select a marked scene you want to recall or clear. Press [ENTER] and playback starts from the marked scene. Press [CLEAR] and the marked scene is erased from the search menu.
NOTES
• This MARKER feature is applicable only to video discs/files.
• This function may not work on some discs or titles.
- All marked points are cleared if the title is in complete STOP mode, title is changed or the disc is unloaded.
RESOLUTION SETTINGS
PLAYBACK OF UNPROTECTED MEDIA
| VIDEO OUTPUT | ||||
| RESOLUTION | HDMI OUT | COMPONENT VIDEO OUT | VIDEO OUT | |
| HDMI CONNECTED | HDMI DISCONNECTED | |||
| 480i/576i | 480p/576p | 480i/576i | 480i/576i | 480i/576i |
| 480p/576p | 480p/576p | 480p/576p | 480p/576p | 480i/576i |
| 720p | 720p | 720p | 720p | 480i/576i |
| 1080i | 1080i | 1080i | 1080i | 480i/576i |
| 1080p/24Hz mode | 1080p/24Hz mode | 480i/576i | 1080i | 480i/576i |
| 1080p/50Hz/60Hz | 1080p/50Hz/60Hz | 480i/576i | 1080i | 480i/576i |
PLAYBACK OF COPY PROTECTED MEDIA
| VIDEO OUTPUT | ||||
| RESOLUTION | HDMI OUT | COMPONENT VIDEO OUT | VIDEO OUT | |
| HDMI CONNECTED | HDMI DISCONNECTED | |||
| 480i/576i | 480p/576p | 480i/576i | 480i/576i | 480i/576i |
| 480p/576p | 480p/576p | 480p/576p | 480p/576p | 480i/576i |
| 720p | 720p | 480i/576i | 480p/576p | 480i/576i |
| 1080i | 1080i | 480i/576i | 480p/576p | 480i/576i |
| 1080p/24Hz mode | 1080p/24Hz mode | 480i/576i | 480p/576p | 480i/576i |
| 1080p/50Hz/60Hz | 1080p/50Hz/60Hz | 480i/576i | 480p/576p | 480i/576i |
AUDIO OUTPUT SPECIFICATIONS
| SOURCE | AUDIO OUTPUT PORT | |||||||
| ANALOG AUDIO OUT | SPDIF (DIGITAL AUDIO OUT) | HDMI OUT | ||||||
| AUDIO OUTPUT SETTING | AUDIO OUTPUT SETTING | |||||||
| PCM STEREO | DTS RE-ENCODE | PRIMARY PASS-THRU | PCM STEREO | PCM MULTI-CH | DTS RE-ENCODE | PRIMARY PASS-THRU | ||
| Dolby Digital | PCM 2ch | PCM 2ch | DTS | Dolby Digital | PCM 2ch | PCM 5.1ch | DTS | Dolby Digital |
| Dolby Digital Plus | PCM 2ch | PCM 2ch | DTS | Dolby Digital | PCM 2ch | PCM 7.1ch | DTS | Dolby Digital Plus |
| Dolby TrueHD | PCM 2ch | PCM 2ch | DTS | Dolby Digital | PCM 2ch | PCM 7.1ch | DTS | Dolby TrueHD |
| DTS | PCM 2ch | PCM 2ch | DTS | DTS | PCM 2ch | PCM 5.1ch | DTS | DTS |
| DTS-HD | PCM 2ch | PCM 2ch | DTS | DTS | PCM 2ch | PCM 7.1ch | DTS | DTS-HD |
| Linear PCM 2ch | PCM 2ch | PCM 2ch | DTS | PCM 2ch | PCM 2ch | PCM 2ch | DTS | PCM 2ch |
| Linear PCM 5.1ch | PCM 2ch | PCM 2ch | DTS | PCM 2ch | PCM 2ch | PCM 5.1ch | DTS | PCM 5.1ch |
| Linear PCM 7.1ch | PCM 2ch | PCM 2ch | DTS | PCM 2ch | PCM 2ch | PCM 7.1ch | DTS | PCM 7.1ch |
NOTES
- It is not possible to set up at the same time "PCM Multi-Ch" or "Primary Pass-Thru" setting for "HDMI" option and "DTS Re-Encode" setting for "SPDIF" option. If the "HDMI" option is set to "PCM Multi-Ch" or "Primary Pass-Thru", the "SPDIF" option is set automatically to "PCM Stereo". Conversely, if "SPDIF" option is set to "DTS Re-Encode", the "HDMI" option is set automatically to "PCM Stereo".
- If the T 557 plays back a disc of Dolby Digital Plus or Dolby TrueHD audio format and "HDMI" option set to "PCM Multi-Ch" and "SPDIF" option set to "Primary Pass-Thru", SPDIF output is limited to "PCM 2ch" only.
- If the T 557 plays back a disc of Dolby Digital Plus or Dolby TrueHD audio format, HDMI connection is 1.3 version and audio output is taken from HDMI OUT port with both HDMI and SPDIF connected simultaneously, SPDIF output is limited to "PCM 2ch" only.
• The audio output format for MP3/WMA playback is PCM 48kHz/16 bit and PCM 44.1kHz/16 bit for Audio CD.
LANGUAGE CODE LIST
Use this list to input your desired language for the following settings: DISC AUDIO/DISC SUBTITLE/DISC MENU language.
| Language | Code |
| Abkhazian | 6566 |
| Afar | 6565 |
| Afrikaans | 6570 |
| Albanian | 8381 |
| Ameharic | 6577 |
| Arabic | 6582 |
| Armenian | 7289 |
| Assamese | 6583 |
| Aymara | 6588 |
| Azerbaijani | 6590 |
| Bashkir | 6665 |
| Basque | 6985 |
| Bengali; Bangla | 6678 |
| Bhutani | 6890 |
| Bihari | 6672 |
| Breton | 6682 |
| Bulgarian | 6671 |
| Burmese | 7789 |
| Byelorussian | 6669 |
| Cambodian | 7577 |
| Catalan | 6765 |
| Chinese | 9072 |
| Corsican | 6779 |
| Croatian | 7282 |
| Czech | 6783 |
| Danish | 6865 |
| Dutch | 7876 |
| English | 6978 |
| Esperanto | 6979 |
| Estonian | 6984 |
| Faroese | 7079 |
| Language | Code |
| Fiji | 7074 |
| Finnish | 7073 |
| French | 7082 |
| Frisian | 7089 |
| Galician | 7176 |
| Georgian | 7565 |
| German | 6869 |
| Greek | 6976 |
| Greenlandic | 7576 |
| Guarani | 7178 |
| Gujarati | 7185 |
| Hausa | 7265 |
| Hebrew | 7387 |
| Hindi | 7273 |
| Hungarian | 7285 |
| Icelandic | 7383 |
| Indonesian | 7378 |
| Interlingua | 7365 |
| Irish | 7165 |
| Italian | 7384 |
| Japanese | 7465 |
| Javanese | 7487 |
| Kannada | 7578 |
| Kashmiri | 7583 |
| Kazakh | 7575 |
| Kirghiz | 7589 |
| Korean | 7579 |
| Kurdish | 7585 |
| Laothian | 7679 |
| Latin | 7665 |
| Latvian, Lettish | 7686 |
| Language | Code |
| Lingala | 7678 |
| Lithuanian | 7684 |
| Macedonian | 7775 |
| Malagasy | 7771 |
| Malay | 7783 |
| Malayalam | 7776 |
| Maltese | 7784 |
| Maori | 7773 |
| Marathi | 7782 |
| Moldavian | 7779 |
| Mongolian | 7778 |
| Nauru | 7865 |
| Nepali | 7869 |
| Norwegian | 7879 |
| Oriya | 7982 |
| Panjabi | 8065 |
| Pashto, Pushto | 8083 |
| Persian | 7065 |
| Polish | 8076 |
| Portuguese | 8084 |
| Quechua | 8185 |
| Rhaeto-Romance | 8277 |
| Rumanian | 8279 |
| Russian | 8285 |
| Samoan | 8377 |
| Sanskrit | 8365 |
| Scots Gaelic | 7168 |
| Serbian | 8382 |
| Serbo-Croatian | 8372 |
| Shona | 8378 |
| Sindhi | 8368 |
| Language | Code |
| Singhalese | 8373 |
| Slovak | 8375 |
| Slovenian | 8376 |
| Somali | 8379 |
| Spanish | 6983 |
| Sudanese | 8385 |
| Swahili | 8387 |
| Swedish | 8386 |
| Tagalog | 8476 |
| Tajik | 8471 |
| Tamil | 8465 |
| Tatar | 8484 |
| Telugu | 8469 |
| Thai | 8472 |
| Tibetan | 6679 |
| Tigrinya | 8473 |
| Tonga | 8479 |
| Turkish | 8482 |
| Turkmen | 8475 |
| Twi | 8487 |
| Ukrainian | 8575 |
| Urdu | 8582 |
| Uzbek | 8590 |
| Vietnamese | 8673 |
| Volapük | 8679 |
| Welsh | 6789 |
| Wolof | 8779 |
| Xhosa | 8872 |
| Yiddish | 7473 |
| Yoruba | 8979 |
| Zulu | 9085 |
Enter the appropriate code number for setting up the "Area Code".
CODE Country
| AF | Afghanistan |
| AL | Albania |
| DZ | Algeria |
| AS | American Samoa |
| AD | Andorra |
| AO | Angola |
| AI | Anguilla |
| AQ | Antarctica |
| AG | Antigua and Barbuda |
| AR | Argentina |
| AM | Armenia |
| AW | Aruba |
| AU | Australia |
| AT | Austria |
| AZ | Azerbaidjan |
| BS | Bahamas |
| BH | Bahrain |
| BD | Bangladesh |
| BB | Barbados |
| BY | Belarus |
| BE | Belgium |
| BZ | Belize |
| BJ | Benin |
| BM | Bermuda |
| BT | Bhutan |
| BO | Bolivia |
| BA | Bosnia-Herzegovina |
| BW | Botswana |
| BV | Bouvet Island |
| BR | Brazil |
| IO | British Indian Ocean Territory |
| BN | Brunei Darussalam |
| BG | Bulgaria |
| BF | Burkina Faso |
| BI | Burundi |
| KH | Cambodia6 |
| CM | Cameroon |
| CA | Canada |
| CV | Cape Verde |
| KY | Cayman Islands |
| CF | Central African Republic |
CODE Country
| TD | Chad |
| CL | Chile |
| CN | China |
| CX | Christmas Island |
| CC | Cocos (Keeling) Islands |
| CO | Colombia |
| KM | Comoros |
| CG | Congo |
| CK | Cook Islands |
| CR | Costa Rica |
| HR | Croatia |
| CU | Cuba |
| CY | Cyprus |
| CZ | Czech Republic |
| DK | Denmark |
| DJ | Djibouti |
| DM | Dominica |
| DO | Dominican Republic |
| TP | East Timor |
| EC | Ecuador |
| EG | Egypt |
| SV | El Salvador |
| GQ | Equatorial Guinea |
| ER | Eritrea |
| EE | Estonia |
| ET | Ethiopia |
| FK | Falkland Islands |
| FO | Faroe Islands |
| FJ | Fiji |
| FI | Finland |
| CS | Former Czechoslovakia |
| SU | Former USSR |
| FR | France |
| FX | France (European Territory) |
| GF | French Guyana |
| TF | French Southern Territories |
| GA | Gabon |
| GM | Gambia |
| GE | Georgia |
CODE Country
| DE | Germany |
| GH | Ghana |
| GI | Gibraltar |
| GB | Great Britain |
| GR | Greece |
| GL | Greenland |
| GD | Grenada |
| GP | Guadeloupe(French) |
| GU | Guam (USA) |
| GT | Guatemala |
| GN | Guinea |
| GW | Guinea Bissau |
| GY | Guyana |
| HT | Haiti |
| HM | Heard and McDonald Islands |
| HN | Honduras |
| HK | Hong Kong |
| HU | Hungary |
| IS | Iceland |
| IN | India |
| ID | Indonesia |
| IR | Iran |
| IQ | Iraq |
| IE | Ireland |
| IL | Israel |
| IT | Italy |
| CI | Ivory Coast |
| JM | Jamaica |
| JP | Japan |
| JO | Jordan |
| KZ | Kazakhstan |
| KE | Kenya |
| KI | Kiribati |
| KW | Kuwait |
| KG | Kyrgyzstan |
| LA | Laos |
| LV | Latvia Islands |
| LB | Lebanon |
| LS | Lesotho |
| LR | Liberia |
| LY | Libya |
| LI | Liechtenstein |
| LT | Lithuania |
CODE Country
| LU | Luxembourg | PG | Papua New Guinea |
| MO | Macau | ||
| MK | Macedonia | PY | Paraguay |
| MG | Madagascar | PE | Peru |
| MW | Malawi | PH | Philippines |
| MY | Malaysia | PN | Pitcairn Island |
| MV | Maldives | PL | Poland |
| ML | Mali | PF | Polynesia (French) |
| MT | Malta | ||
| MH | Marshall Islands | PT | Portugal |
| MQ | Martinique (French) | PR | Puerto Rico |
| QA | Qatar | ||
| MR | Mauritania | RE | Reunion (French) |
| MU | Mauritius | RO | Romania |
| YT | Mayotte | RU | Russian Federation |
| MX | Mexico | ||
| FM | Micronesia | RW | Rwanda |
| MD | Moldavia | GS | S. Georgia & S. Sandwich Isls. |
| MC | Monaco | ||
| MN | Mongolia | SH | Saint Helena |
| MS | Montserrat | KN | Saint Kitts & Nevis Anguilla |
| MA | Morocco | ||
| MZ | Mozambique | LC | Saint Lucia |
| MM | Myanmar | PM | Saint Pierre and Miquelon |
| NA | Namibia | ||
| NR | Nauru | ST | Saint Tome and Principe |
| NP | Nepal | ||
| NL | Netherlands | VC | Saint Vincent & Grenadines |
| AN | Netherlands Antilles | WS | Samoa |
| NC | New Caledonia (French) | SM | San Marino |
| SA | Saudi Arabia | ||
| NZ | New Zealand | SN | Senegal |
| NI | Nicaragua | SC | Seychelles |
| NE | Niger | SL | Sierra Leone |
| NG | Nigeria | SG | Singapore |
| NU | Niue | SK | Slovak Republic |
| NF | Norfolk Island | SI | Slovenia |
| KP | North Korea | SB | Solomon Islands |
| MP | Northern Mariana Islands | SO | Somalia |
| ZA | South Africa | ||
| NO | Norway | KR | South Korea |
| OM | Oman | ES | Spain |
| PK | Pakistan | LK | Sri Lanka |
| PW | Palau | SD | Sudan |
| PA | Panama | SR | Suriname |
CODE Country
| SJ | Svalbard and Jan Mayen |
| SZ | Swaziland |
| SE | Sweden |
| CH | Switzerland |
| SY | Syria |
| TJ | Tadjikistan |
| TW | Taiwan |
| TZ | Tanzania |
| TH | Thailand |
| TG | Togo |
| TK | Tokelau |
| TO | Tonga |
| TT | Trinidad and Tobago |
| TN | Tunisia |
| TR | Turkey |
| TM | Turkmenistan |
| TC | Turks and Caicos Islands |
| TV | Tuvalu |
| UG | Uganda |
| UA | Ukraine |
| AE | United Arab Emirates |
| US | United States |
| UY | Uruguay |
| UM | USA Minor Outlying Islands |
| UZ | Uzbekistan |
| VU | Vanuatu |
| VA | Vatican City State |
| VE | Venezuela |
| VN | Vietnam |
| VG | Virgin Islands (British) |
| VI | Virgin Islands (USA) |
| WF | Wallis and Futuna Islands |
| EH | Western Sahara |
| YE | Yemen |
| YU | Yugoslavia |
| ZR | Zaire |
| ZM | Zambia |
| ZW | Zimbabwe |
TROUBLESHOOTING
| CONDITION | POSSIBLE CAUSES | POSSIBLE SOLUTIONS |
| No power. | ·The power cord is disconnected. | ·Plug the power cord into the wall outlet securely. |
| The power is on, but the T 557 does not work. | ·No disc is inserted. | ·Insert a disc. |
| No picture. | ·The TV is not set to receive video input signal from the T 557 | ·Select the appropriate video input mode on the TV. |
| ·The video cable is not connected securely. | ·Connect the video cable securely. | |
| ·Mismatched resolution setting between the T 557 and the TV. | ·Check TV capability. | |
| ·Set the Resolution according to your TV's capability. | ||
| No sound. | ·The connected equipment is not capable of detecting or decoding audio signal from the T 557. | ·Connect the audio output of the T 557 to an equipment with appropriate audio decoders. |
| ·The power of the equipment connected with the audio cable is turned off. | ·Turn on the equipment connected with the audio cable. | |
| ·The AUDIO output settings are incorrect. | ·Check audio output settings as configured in the Audio Setup menu. | |
| The T 557 does not start playback. | ·An unplayable disc is inserted. | ·Insert a playable disc. (Check the disc type and regional code.) |
| ·The rating level is set. | ·Cancel the rating function or change the rating level. | |
| BD-Live feature does not work. | ·Internet connection is not established. | ·Ensure that the T 557 is connected to the local area network and can access the internet. |
| ·External USB is not connected. | ·Connect USB device to the front panel USB port. | |
| The remote control does not work properly. | ·T 557 front panel is in very bright sunlight or ambient light. | ·Reduce sunlight/room lighting. |
| ·IR transmitter window on remote or IR receiver window is obstructed. | ·Check IR windows and ensure clear line-of-sight from remote to T 557. | |
| ·The remote control batteries are dead. | ·Replace the remote control batteries. |
NOTES ON DISCS
HANDLING DISCS
Do not touch the playback side of the disc. Hold the disc by the edges so that fingerprints do not get on the surface. Never stick paper or tape on the disc.


STORING DISCS
After playing, store the disc in its case. Do not expose the disc to direct sunlight or sources of heat and never leave it in a parked car exposed to direct sunlight.
CLEANING DISCS
Fingerprints and dust on the disc can cause poor picture quality and sound distortion. Before playing, clean the disc with a clean cloth. Wipe the disc from the center out.
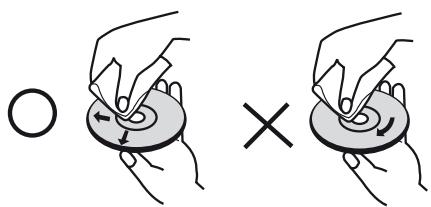
Do not use strong solvents such as alcohol, benzine, thinner, commercially available cleaners, or anti-static spray intended for older vinyl records.
SYSTEM
| Signal system | Auto/NTSC/PAL (European version model only) |
| NTSC (North America version model only) | |
| Laser | Semiconductor laser |
| Frequency response | ±2dB (Ref. 0dB 20 Hz – 20 kHz) |
| Signal-to-noise ratio | >100dB (A-WTD, analog OUT) |
| Dynamic range | >95dB |
| Total Harmonic Distortion | <0.008 % |
| LAN port | Ethernet jack, 10 Base-T/100 Base-TX |
OUTPUT
| Output format | Video OUT: up to 480i/576i |
| Component video OUT: up to 1080i | |
| HDMI OUT: up to 1080p | |
| Video out | 1Vp-p/75 ohms |
| Component (Y signal) | 1Vp-p/75 ohms |
| Component (Pb/Pr signal) | 0.7Vp-p/75 ohms |
| Audio output level | 2.0 Vrms (Ref. 1 kHz, 0 dB) |
| HDMI version | 1.3b |
| Digital out (coaxial) | 0.5Vp-p |
| Digital out (optical) | 3Vp-p |
GENERAL
| Power requirements | AC 110V - 240V 50/60 Hz |
| Standby power | <0.7W |
| Unit Dimension (W x H x D) | 435 x 60 x 280 mm (Gross)* |
| Net weight | 3.5 kg |
| Shipping weight | 5.7 kg |
* - Gross dimensions include feet, extended buttons and rear panel terminals.
Specifications are subject to change without notice. For updated documentation and features, please log onto www.NADElectronics.com for the latest information about T 557.
Manufactured under license under U.S. Patent #'s: 5,451,942; 5,956,674; 5,974,380; 5,978,762; 6,226,616; 6,487,535 & other U.S. and worldwide patents issued & pending. DTS is a registered trademark and the DTS logos, Symbol, DTS-HD and DTS-HD Advanced Digital Out are trademarks of DTS, Inc. © 1996-2008 DTS, Inc. All Rights Reserved.
Manufactured under License from Dolby Laboratories. "Dolby" and the double-D symbol are trademarks of Dolby Laboratories.
DivX, DivX Certified, and associated logos are trademarks of DivX, Inc. and are used under license.
HDMI, the HDMI logo and High-Definition Multimedia Interface are trademarks or registered trademarks of HDMI Licensing LLC.
"Blu-ray Disc" is a trademark.
"BD-LIVE" logo is a trademark of Blu-ray Disc Association.
Java and all Java-based trademarks and logos are trademarks or registered trademarks of Sun Microsystems, Inc. in the United States and other countries.
This product incorporates copyright protection technology that is protected by method claims of certain U.S. patents and other intellectual property rights owned by Macrovision Corporation and other rights owners. Use of this copyright protection technology must be authorized by Macrovision Corporation, and is intended for home and other limited viewing uses only unless otherwise authorized by Macrovision Corporation. Reverse engineering or disassembly is prohibited.

www.NADelectronics.com
©2010 NAD ELECTRONICS INTERNATIONAL
A DIVISION OF LENBROOK INDUSTRIES LIMITED
All rights reserved. NAD and the NAD logo are trademarks of NAD Electronics International, a division of Lenbrook Industries Limited. No part of this publication may be reproduced, stored or transmitted in any form without the written permission of NAD Electronics International.
- SAVE THESE INSTRUCTIONS FOR LATER USE.
- FOLLOW ALL WARNINGS AND INSTRUCTIONS MARKED ON THE AUDIO EQUIPMENT.
- NOTE TO CATV SYSTEM INSTALLER
- WARNING
- CAUTION
- DO NOT STARE INTO BEAM.
- FCC NOTICE
- FCC WARNING
- INDUSTRY CANADA REQUIREMENT
- CAUTION REGARDING PLACEMENT
- NOTES ON ENVIRONMENTAL PROTECTION
- INFORMATION ABOUT COLLECTION AND DISPOSAL OF WASTE BATTERIES (DIRECTIVE 2006/66/EC OF THE EUROPEAN PARLIAMENT AND THE COUNCIL OF EUROPEAN UNION) (FOR EUROPEAN CUSTOMERS ONLY)
- RECORD YOUR MODEL NUMBER (NOW, WHILE YOU CAN SEE IT)
- TABLE OF CONTENTS
- IMPORTANT SAFETY INSTRUCTIONS ....2
- INTRODUCTION
- IDENTIFICATION OF CONTROLS
- OPERATION
- REFERENCE
- THANK YOU FOR CHOOSING NAD.
- http://NADelectronics.com/warranty
- GETTING STARTED
- UNPACKING AND SETUP
- WHAT'S IN THE BOX
- SAVE THE PACKAGING
- CHOOSING A LOCATION
- DISC LOADING AND PLAYBACK
- NOTE
- QUICK START
- PLAY A BLU-RAY DISC
- REGION MANAGEMENT INFORMATION
- PLAYABLE DISCS
- ADVANCED VIDEO CODEC HIGH DEFINITION (AVCHD)
- NOTES
- ABOUT THE ⊗ SYMBOL DISPLAY
- BD-ROM DISC FEATURES
- VIDEO HIGHLIGHTS
- HIGH-DEFINITION PLAYBACK
- GRAPHIC PLANES
- MENU SOUND
- MULTI-PAGE/POP-UP MENUS
- INTERACTIVITY
- USER BROWSABLE SLIDESHOWS
- SUBTITLES
- BD-J INTERACTIVE CAPABILITY
- BD-ROM DISC COMPATIBILITY
- FRONT PANEL
- ATTENTION!
- IMPORTANT NOTICE
- BR 2 REMOTE CONTROL
- USING THE HOME MENU
- DISPLAY THE T 557 SETUP MENU
- NAVIGATING THE SETUP MENU OSD AND MAKING CHANGES
- DISPLAY DISC OSD
- DISPLAY SETUP MENU
- TV ASPECT RATIO
- USING THE T 557
- RESOLUTION
- HDMI OUT CONNECTION
- COMPONENT VIDEO OUT CONNECTION
- VIDEO OUT CONNECTION
- 1080P DISPLAY MODE
- HDMI COLOR SETTING
- DISPLAY MENU
- DISC MENU/AUDIO/SUBTITLE
- HDMI/SPDIF (DIGITAL AUDIO OUTPUT)
- SAMPLE FREQ. (FREQUENCY)
- DRC (DYNAMIC RANGE CONTROL)
- PASSWORD
- DVD RATING
- RATING 1-8
- UNLOCK
- BD RATING
- AREA CODE
- CONNECTION SETTING
- CONNECTION STATUS
- NOTES ON NETWORK CONNECTION
- BD-LIVE CONNECTION
- SKIN
- INITIALIZE
- DIVX VOD
- USING THE T 557 - FEATURES
- USB MODE
- USB PLAYBACK
- IMPORTANT NOTICES
- DIVX PLAYBACK
- MOVIE FILE REQUIREMENTS (USB/DISC)
- Movie file compatibility with the T 557 is limited as follows:
- ENJOYING BD-LIVE™ OR BONUSVIEW™ IN BD-VIDEO
- ENJOYING BD-LIVE DISCS
- SCREENSAVER
- LAST SCENE MEMORY
- USING THE T 557 - FUNCTION CONTROL
- ENTER A MARKER
- RECALL OR CLEAR A MARKER SCENE
- RESOLUTION SETTINGS
- LANGUAGE CODE LIST
- TROUBLESHOOTING
- NOTES ON DISCS
- HANDLING DISCS
- STORING DISCS
- CLEANING DISCS
Brand : NAD
Model : T 557
Category : Media Players