
CH-965 - Vacuum Cleaner BUSH - Free user manual and instructions
Find the device manual for free CH-965 BUSH in PDF.


| Product Type | Cylinder Vacuum Cleaner |
| Model | CH-965 |
| Brand | Bush |
| Motor Power | 1200 W |
| Suction Power | 250 AW |
| Dust Capacity | 2.0 L |
| Filtration System | HEPA 13 |
| Noise Level | 78 dB(A) |
| Cord Length | 6 m |
| Operating Radius | 8 m |
| Dimensions (LxWxH) | 400 x 250 x 300 mm |
| Weight | 5.2 kg |
| Power Cord Type | Retractable |
| Dust Container Type | Bagless |
| Cleaning Method | Dry |
| Floor Types | Hard floors, carpets |
| Attachments Included | Crevice tool, dusting brush, upholstery nozzle |
| Variable Power Control | Yes, on handle |
| Wheels | 4 swivel castors |
| Filter Maintenance | Washable foam filter |
| Storage | Vertical parking |
| Safety Features | Thermal overload protection |
| Repairability | Replaceable motor, belts, filters |
Frequently Asked Questions - CH-965 BUSH
User questions about CH-965 BUSH
0 question about this device. Answer the ones you know or ask your own.
Ask a new question about this device
Download the instructions for your Vacuum Cleaner in PDF format for free! Find your manual CH-965 - BUSH and take your electronic device back in hand. On this page are published all the documents necessary for the use of your device. CH-965 by BUSH.
USER MANUAL CH-965 BUSH
This product is guaranteed against manufacturing defects for a period of

Year
This product is guaranteed for twelve months from the date of original purchase.
Any defect that arises due to faulty materials or workmanship will either be replaced, refunded or repaired free of charge where possible during this period by the dealer from whom you purchased the unit.
The guarantee is subject to the following provisions:
- The guarantee does not cover accidental damage, misuse, cabinet parts, knobs or consumable items.
- The product must be correctly installed and operated in accordance with the instructions contained in this manual.
• It must be used solely for domestic purpose - The guarantee will be rendered invalided if the product is re-sold or has been damaged by inexpert repair.
- Specifications are subject to change without notice.
• The manufacturer disclaims any liability for the incidental or consequential damages.
• The guarantee is in addition to, and does not diminish your statutory or legal rights.
Guarantor: Argos Limited
489 - 499 Avebury Boulevard
Central Milton Keynes
MK9 2NW

Instruction Manual
CH-965

natural_image
Exterior view of a modern vacuum cleaner with a black handle and 'SUSH' branding, placed on a grid-patterned surface (no text or symbols on device)Table of contents
SafetyWarnings 2
SafetyWarnings 3
Accessories included....4
Overview of controls....4
Recharging information
Emptying your Cleaner
Operating instructions....5 Operating instructions (cont)....6
Operating in products (bank) 5 Cleaning & maintenance
Wall mounting instructions 7
Wall mounting & fixings 8
Care & maintenance 9
Purchasing replacement filters 9
Troubleshooting....9
Rechargeable battery disposal....9
Technical specifications....9
MuseoSansRounded-100

ProductCodes
CH-965

Safety information
Important – Please read these instructions fully before installation
Safety Warnings
IMPORTANT SAFETY INSTRUCTIONS
We recommend this product is not used by children and please read the instruction booklet for further information.
When using an electrical appliance, basic safety precaution should always be observed, including the following.
PLEASE READ ALL INSTRUCTIONS CAREFULLY BEFORE USING THE PRODUCT. AND KEEP FOR FUTURE REFERENCE.
WARNING: To reduce the risk of fire, electrical shock or injury:
1: User must read & understand instructions prior to usage of this product. Use only as described in this manual. Use manufacturer's original accessories only.
2: Follow all label and marking instructions on your Vacuum Cleaner.
3: Do not use or recharge the Vacuum Cleaner outdoors.
4: Do not pick up anything that is burning or smoking, such as cigarettes, matches. This is a fire risk
Page 2
5: Do not use the Vacuum Cleaner to pick up flammable or combustible liquids.
6: Do not use in an area where dangerous items are stored.
7: Do not handle or use the Vacuum or Battery Charging Adapter with wet hands
8: Do not use the Vacuum when it is plugged in to a mains socket
9: Do not use the Vacuum without a filter in place.
10: While vacuuming, do not block the air-intake, or the exhaust vents of the Vacuum. This could cause the motor to overheat and malfunction.
11: Take care in keeping all body parts (hair, fingers & clothing) away from moving parts & openings.
12: Keep the air-intake (nozzle); exhaust vents, crevice tool & brush away from your face and body & loose clothing.
13: Take care when vacuuming stairs.
14: Do not charge if the charger plug or cable is damaged in any way.
15: Plug the charging unit directly into a mains wall socket; do not use an extension cable.
16: Store the Vacuum (indoors) correctly after use to avoid accidents.
BUSH

Safety information
Important – Please read these instructions fully before installation
17: This vacuum includes rechargeable NI-MH cells.
DO not incinerate cells or expose to high temperatures, as they may explode.
18: Do not remove the battery pack yourself. Take the entire Vacuum to qualified service engineer.
19: Use only the attachments & charging adapter supplied by the manufacturer
20: Do not continue to use this Vacuum if it appears to be malfunctioning
21: If the Vacuum malfunctions, or is damaged in any way it should be taken to a qualified service engineer for repair.
22: Do not apply lubricants to the motor of the Vacuum Cleaner
23: Leakage of ingredients contained within the battery pack, can cause personal injury as well as damage to your Vacuum. If battery leakage occurs, avoid contact with skin. If contact occurs, immediately wash thoroughly with soap and water. If liquid leaking from a battery pack comes into contact with your eyes, immediately flush thoroughly with water and see a doctor.
BUSH
24: The Vacuum Cleaner is not a toy, keep away from small children.
25: Do not abuse the charger cable. Never carry the charger or base by the cable or pull to disconnect from a socket. Instead grasp the plug and pull to remove.
26: Keep the charger away from hot surfaces.
27: Do not insert objects into openings. Do not use with openings blocked; keep free of dust, lint & hair. Anything that may reduce air flow.
28: Do not attempt to use the charger with any other product nor attempt to charge this product with another charger. Use only the charger supplied with this product.
29: Do not use this Vacuum while charging.
30: This appliance can be used by children aged from 8 years and above and persons with reduced physical, sensory or mental capabilities or lack of experience and knowledge if they have been given supervision. Children shall not play with the appliance. Cleaning and user maintenance shall not be made by children without supervision.
Page 3
Functions & controls
Please familiarise yourself with the parts and accessories listed below
Accessories included
• 1X CH-965 Vacuum
• 1X Instruction Manual
- 1X Power Brush
• 1X Crevice Tool
• 1X Wall Bracket with Adaptor
- 2 X Screws & Plugs
Overview of controls

Features:
- Charging Indicator
- Handle
- On/Off Switch
- Release Button
-
Inner Filter
-
Outer Filter
- Dust Compartment/Bin
- Inlet
- Crevice Tool
-
Power Brush
-
Wall Bracket with Adaptor
Page 4

User instructions
Note: For Dry Use Only
Recharging information
- Before using for the first time charge the vacuum cleaner for at least 14 hours. The recommended duration for each subsequent charge is 14 hours to maintain maximum performance from the internal battery.
NOTE: The LED indicator will illuminate during charging.
- To maintain peak performance - We recommend discharging the Vacuum battery fully at least once a month and then charging for the full 14 hours.
- Recommendation for efficient cleaning - Please keep the usage time to no more than 10 minutes each time.
- The air vents must not be blocked at any time. Blocking the vents may cause overheating which will damage the motor.
• We recommend you clean the dust filter
after each use. - Do not use on liquids.
IMPORTANT
We strongly recommend following our easy Care and Cleaning Instructions. This will optimise the performance of your hand vacuum and prolong its operating life.
Emptying your Cleaner
Note: Always switch 'OFF' before opening your hand-held vacuum cleaner.
- Press the release button down and detach the dust compartment.

- Remove the filters from the dust compartment and empty the container.


- Gently tap out each of the filter to dislodge any dust and debris. A soft brush can be used to gently remove any dirt and dust from the filter.
To clean the filter more thoroughly, you can rinse them with cold or tepid water.
Ensure the filter parts are correctly fitted together, before putting back into the dust compartment. This will make the task easier. Maximum dust collection will only be obtained with clean filter/s and an empty dust compartment replacing back into the vacuum.

User instructions
Cleaning & maintenance
REMOVING THE DUST CONTAINER
1: Press the DUST CONTAINER RELEASE BUTTON on the top of the handle, and slide the DUST CONTAINER away from the motor section.

natural_image
Line drawing of a handheld vacuum cleaner with a handle and internal components (no text or symbols)2: To re-fit the DUST CONTAINER, slide the CONTAINER back onto the motor section until it locates the bottom pip first and then locate the hole in the top of the DUST CONTAINER, it will then click into place.
NOTE: This Vacuum is intended for NORMAL household usage only.
Cleaning & maintenance (cont)
CLEANING THE DUST CONTAINER & FILTER
1: Remove the DUST CONTAINER (see step 1 of removing the dust container). 2: Remove the FILTER by sliding the entire plastic section out of the largest end of the CONTAINER.
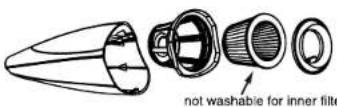
3: Clean the DUST FILTER section and if required the inside of the DUST CONTAINER. 4: Re-fit the FILTER inside the CONTAINER (Ensure the filter is pushed fully up to the stops inside the container) and follow step 2 of 'removing the dust container' to re-fit the DUST CONTAINER.
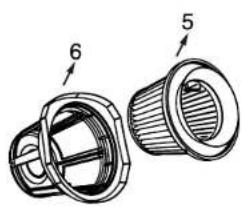
REPLACING THE FILTER After time the filter will become clogged with particles and will require changing. Follow the below steps to replace the dust filter.
1: Follow steps 1-3 to remove & clean the DUST FILTER.
2: The outer filter (6) can be cleaner using a soft brush to remove any dust/debns.
3: Insert the replacement filter block(5)
4: Once secure push the FILTER back inside the DUST CONTAINER until fitted snugly.
NOTE: Replacement filters are available to purchase. Please see details in the rear of this manual.
User instructions
Wall mounting instructions
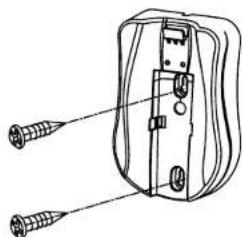
See the below diagram for wall mounting the charging dock. Further fixing instructions can be found on pg 8.
1: Insert the wall fixings supplied (or suitable fixings as described on page 8) shown to below.
natural_image
Technical line drawing of a mechanical component with two screws inserted (no text or symbols)2: Dock the Vacuum as show on the diagram below. Ensure the Charging dock is mounted with the JACK pointing vertically upwards to ensure the Vacuum remains seated when docked.

natural_image
Line drawing of a mechanical device with a side panel and internal components (no text or symbols)A Guide to
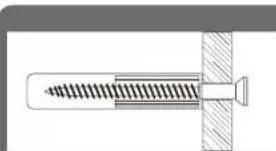
Wall Mounting & Fixings
natural_image
Technical line drawing of a screw fastener inserted into a pin (no text or symbols)IMPORTANT:
When drilling into walls always check that there are no hidden wires or pipes etc. Make sure that the screws and wall plugs being used are suitable for supporting your unit. Consult a qualified tradesperson if you are unsure.
HINTS:

Always use a larger screw and wall plug if you are not sure.
2) Ensure you use the recommended drill bit to match the wall plug and hole size.
3) Ensure you drill the hole horizontally do not force the drill or enlarge the hole.
4) Take extra care when drilling high walls, ceilings and ceramic tiles. Ensure the plug is fitted below a ceramic tile to avoid splitting or cracking.
5) Ensure wall plugs are well fitted and are a tight fit in the drilled hole.
Types of Walls
You can use one of the following types of wall plug if your walls are made of brick, breeze block, concrete, stone, wood or plaster board.
No.1 "Standard" Wall Plug General Wall Materials

These come in various sizes and are made from plastic or sometimes wood fibre.
No.2 "General Purpose" Wall Plug Aerated / Breeze Block

Generally aerated blocks should not be used to support heavy loads. Use a specialist fitting in this case. For light loads, a general purpose plug can be used.
No.3 "Sheild Anchor" Wall Plug Heavy Loads
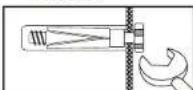
For use with heavier loads such as TV, Hi-Fi speakers & Satellite dishes etc.
No.4 "Cavity Fixing" Wall Plug

For use with plaster board partitions or hollow wooden doors.
No.5 "Cavity Fixing - Heavy Duty" Wall Plug

For use when fitting or supporting heavy loads such as shelving, wall cabinets & coat racks.
No.6 "Hammer Fixing" Wall Plug

For use with walls stuck with plaster board. The hammer fixing allows it to be fixed to the wall rather than the plaster board. Always check the fixing is secure to the retaining wall.
CARE & MAINTENANCE

SAFETY
Always check the fitting and location to ensure your safety in and around the home.

FITTING
From time to time check the fitting to ensure the wall plugs or screws do not become loose.
User instructions
Care & maintenance

Important: Always unplug the appliance from the power socket during cleaning and maintenance.
Never use any sharp instruments or abrasive substances, soap, household cleaner, detergent or wax polish for cleaning.
Clean the external surfaces with a damp soft cloth only. Never use abrasive products or solvents as they may damage the appliance.
Purchasing replacement filters
Replacement filters are available for Purchase. If you would like to purchase a filter please phone 08432 899160 between the hours of 9am-5pm Mon-Fri
Troubleshooting
In the unlikely event of difficulties with your appliance please follow the trouble shooting guide below.
If the problem persists, contact the retailer if the machine is still under guarantee.
Customer helpline: 0345 604 0105 between the hours of 8am - 7pm Mon - Sat and 10am - 4pm Sun
| Problem | Reason(s) | Solution(s) |
| No Power | Battery is drained | Charge the battery fully |
| Low or no suction power | Battery is drainedDust container is fullFilter is clogged | Charge the battery fullyEmpty the container (see page 6)Clean the filter (see page 6) |
| Dust leaking from the unit | Dust container is fullDust container is not fitted to the motor section correctly | Empty the container (see page 6)Re-fit the Dust container (see page 6) |
Rechargeable battery disposal
DO NOT use ordinary batteries for replacements. These may leak and damage the Vacuum cleaner and cause personal injury.
In order to preserve the ecology please dispose of this unit properly so that it can be recycled. Do not dispose of to unsorted waste.
For more detailed information about recycling of this product or battery, please contact your local Civic Office, your household waste disposal service or the shop where you purchased the product.
Technical specifications
| Motor | 12V 72W |
| Battery Charger Rating | Input 100-240V~50/60Hz 0.3A |
| Battery Charger Voltage | 17V 0.3A |
| Charging Rate | 14 Hours(Approx) |
| Battery Pack | Ni-MH AA 12V (1.2V x 10) 1200mAh |

- Table of contents
- Safety information
- Important – Please read these instructions fully before installation
- Safety Warnings
- IMPORTANT SAFETY INSTRUCTIONS
- PLEASE READ ALL INSTRUCTIONS CAREFULLY BEFORE USING THE PRODUCT. AND KEEP FOR FUTURE REFERENCE.
- WARNING: To reduce the risk of fire, electrical shock or injury:
- Functions & controls
- Please familiarise yourself with the parts and accessories listed below
- Features:
- User instructions
- Note: For Dry Use Only
- Recharging information
- IMPORTANT
- Emptying your Cleaner
- Cleaning & maintenance
- REMOVING THE DUST CONTAINER
- Cleaning & maintenance (cont)
- CLEANING THE DUST CONTAINER & FILTER
- Wall mounting instructions
- A Guide to
- Wall Mounting & Fixings
- IMPORTANT:
- HINTS:
- Types of Walls
- CARE & MAINTENANCE
- Purchasing replacement filters
- Troubleshooting
- Rechargeable battery disposal
Brand : BUSH
Model : CH-965
Category : Vacuum Cleaner