
VCM40A16L0B-70 - Vacuum Cleaner BUSH - Free user manual and instructions
Find the device manual for free VCM40A16L0B-70 BUSH in PDF.


| Product Type | Canister Vacuum Cleaner |
| Model | VCM40A16L0B-70 |
| Brand | Bush |
| Motor Power | 700 W |
| Suction Power | 250 Air Watts |
| Dust Capacity | 1.6 L |
| Filtration System | HEPA 13 filter + washable foam |
| Cord Length | 6 m |
| Operating Radius | 8 m |
| Weight | 5.2 kg |
| Dimensions (LxWxH) | 400 x 260 x 280 mm |
| Power Supply | 220-240 V ~ 50/60 Hz |
| Noise Level | 78 dB(A) |
| Vacuum Cleaner Type | Cylinder / Canister |
| Bagless | Yes (cyclonic) |
| Floor Nozzle | Combination (hard floor & carpet) |
| Accessories Included | Crevice tool, dusting brush, upholstery tool |
| Filter Maintenance | Washable foam; replace HEPA every 6 months |
| Overload Protection | Yes (thermal cut-out) |
| Warranty | 2 years |
Frequently Asked Questions - VCM40A16L0B-70 BUSH
User questions about VCM40A16L0B-70 BUSH
0 question about this device. Answer the ones you know or ask your own.
Ask a new question about this device
Download the instructions for your Vacuum Cleaner in PDF format for free! Find your manual VCM40A16L0B-70 - BUSH and take your electronic device back in hand. On this page are published all the documents necessary for the use of your device. VCM40A16L0B-70 by BUSH.
USER MANUAL VCM40A16L0B-70 BUSH
Multi Cyclonic Bagless Cylinder Vacuum Cleaner
Model: VCM40A16L0B-70
SKU: 134082072
Cat: 8455578

natural_image
Exterior view of a modern vacuum cleaner with purple vent, displayed against an orange geometric background (no text or symbols)You'll soon be enjoying your new Bush Multi Cyclonic Bagless Cylinder Vacuum Cleaner.
It all begins here, with your instructions. Don't worry, there's nothing too technical coming up. Just simple, step-by-step guidance to get you up and running quickly. Sound good? Then let's get started.
Help and Guidance
We're here to help you get the most from your Bush Multi Cyclonic Bagless Cylinder Vacuum Cleaner.
Should you require any guidance; call our Help line on 0345 604 0105.
Further contact details can be found online at: www.bush-support.co.uk
Contents
1 Safety information Power source 6
Ventilation heat and moisture 7
Warning 7
Plug / Wiring advice 8
2 Getting to know your vacuum cleaner
Accessories 10
Parts 11
3 Installing your vacuum cleaner
Assembly 14
4 Using your vacuum cleaner
Getting started 16
Nozzle use 17
Storage 17
5 Care and maintenance
Maintenance 20
Emptying the dust container 20
Cleaning the filters 21
Technical specification 23
6 Product support
Troubleshooting 26
Help and assistance 27
Recycling electrical products 28
Guarantee 29
Safety information
1

natural_image
Abstract geometric pattern composed of orange triangles on a white background (no text or symbols)
Safety information
Important - Please read these instructions fully before installing or operating
Power source
- For household and indoor use only
- Keep the appliance and its cord out of reach of children less than 8 years.
- Do not allow children to use the appliance without supervision.
- This appliance can be used by children aged from 8 years and above and persons with reduced physical, sensory or mental capabilities or lack of experience and knowledge if they have been given supervision or instruction concerning use of the appliance in a safe way and understand the hazards involved. Children shall not play with the appliance. Cleaning and user maintenance shall not be made by children unless they are aged from 8 years and above and supervised.
- Do not pull on the cable to disconnect from mains supply.
- Fully unwind the cable before plugging in and ensure the cable is positioned away from areas where it is likely to get damaged or cause a trip hazard.
- Do not operate the vacuum if damaged or after it malfunctions. In the event the supply cord is damaged, it must only be replaced by a qualified service engineer, with a suitably approved part.
- This appliance must be positioned so that the plug is accessible and the plug socket is within easy reach of the power cord.
- Switch off and unplug when not in use and before emptying, cleaning or servicing the appliance. Servicing of this appliance must only be carried out by a qualified electrician.

Safety information
Important - Please read these instructions fully before installing or operating

Ventilation, heat and moisture
- Keep appliance, cable and plug away from areas where it is likely to get splashed. Never immerse in water.
Warning!
- Do not place fingers or other objects into the hose nozzle or under the floor head when the vacuum cleaner is in use.
- Do not run the appliance over the power cable.
- Do not use the appliance to pick up burning or hot objects (e.g. coal, ash, cigarettes etc) of any kind.
- Do not use the appliance to pick up any liquids or use on wet surfaces.
- Do not cover the appliance or restrict air vents.
- Do not use the appliance to pick up sharp objects (e.g. pins, nails, tacks, staples etc) or string.

Safety information
Important - Please read these instructions fully before installing or operating
Plug / Wiring advice
The wires in this mains lead are coloured in accordance with the following UK electrical code: BLUE = NEUTRAL
$$ \mathrm{BROWN} = \mathrm{LIVE} $$
Non-rewireable plug
This appliance may be fitted with a "non-rewireable" plug. If you need to change the fuse in a "non-rewireable" plug, the fuse cover must be refitted. If the fuse cover is lost or damaged, the appliance must not be used.
Rewireable plug
The colours of the wires in the mains lead of this appliance may not correspond with the coloured markings identifying the terminals in a rewireable plug. Rewireable plugs should only be replaced by a suitably competent person. If in doubt, consult a qualified electrician.
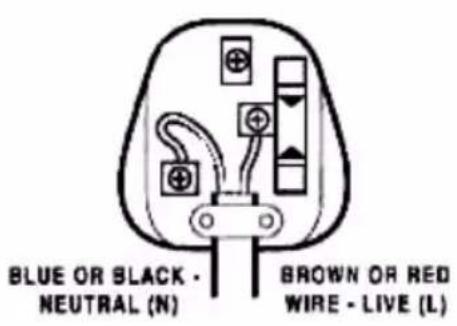
The BLUE wire must be connected to the terminal marked with the letter N
The BROWN wire must be connected to the terminal marked with the letter L
Getting to know your vacuum
2

natural_image
Abstract geometric pattern composed of orange triangles on a white background (no text or symbols)Getting to know your vacuum
You'll be up and running in no time
Ready? Let's begin...
Please read these instructions carefully. They contain important information which will help you get the best from your vacuum and ensure safe and correct installation and operation.
If you require any further assistance, our technical experts are happy to help. For full details, refer to the product support section at the end of these instructions.
Accessories

natural_image
Technical line drawing of a mechanical device with no visible text or symbols
natural_image
Line drawing of a vacuum cleaner device with no visible text or symbolsVacuum cleaner Floor head

natural_image
Simple line drawing of a cylindrical object with three protrusions, enclosed in a rounded square frame (no text or symbols)
natural_image
Line drawing of a flexible hose with a loop and connector (no text or symbols)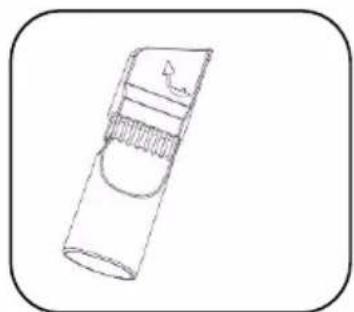
natural_image
Simple line drawing of a cylindrical object with a lid and internal structure (no text or symbols)Combination nozzle
Extension tube Flexible hose
If you require any technical guidance or find that your product is not operating as intended, a simple solution can often be found in the
Troubleshooting section of these instructions
Getting to know your vacuum
You'll be up and running in no time

1 Carrying handle
2 Dust container release button
3 Cable rewind button
4 Floor head storage point
5 Outlet filter cover
6 Power cable
7 Flexible hose socket
8 ON/OFF button
9 Dust container
10 Dust container catch
11 Dust container lid
Installing your vacuum
3

natural_image
Abstract geometric pattern composed of orange triangles on a white background (no text or symbols)Installing your vacuum
Bringing it all together
Assembly
- Insert the flexible hose coupling into the hose socket and push to secure, a click will be heard.
- Fit the extension tube onto the end of the curved handle and push fit the floor head onto the extension tube (fig.1). The crevice nozzle can fit onto the curved handle and the extension tube in a similar manner.

- To adjust the length of the extension tube, press the extension tube button and pull out the inner tube to the required length.
- To remove the extension tube and accessories firmly pull apart.
- To disconnect the flexible hose from the body of the cleaner ensure that vacuum cleaner is switched off. Squeeze the hose release button and pull apart.
If you require any technical guidance or find that your product is not operating as intended, a simple solution can often be found in the
Troubleshooting section of these instructions
Using your vacuum
4

natural_image
Abstract geometric pattern composed of orange triangles on a white background (no text or symbols)Using your vacuum
Let's get started
Getting started
- Before use, pull out the cable until the yellow mark on the cable is visible. This is the ideal cable length. Do not extend the cable beyond the RED mark.
- Fit the correct nozzle for the cleaning application (see next page) and plug the vacuum cleaner into the mains supply.
- Press the ON/OFF button to start the vacuum cleaner and vacuum as required.
- The suction can be released quickly by moving the suction release slider on the top of the flexible hose handle (fig. 2).
-
To raise or lower the brushes on the floor head (fig. 3) press or lift the floor head adjustment lever.
-
When cleaning carpets, raise the brushes on the floor head.
-
When cleaning hard floors, lower the brushes on the floor head.
-
Press the ON/OFF button again to switch the vacuum cleaner off after use and before disconnecting the plug from the mains supply.
-
Rewind the cable by pressing the cable rewind button. It is advisable to guide the cable with your hand to prevent the cable whipping and damaging the appliance or other household property. If the cable does not rewind completely, pull the cable out a small way and press the rewind button again.

Fig. 2

Fig. 3
Using your vacuum
Let's get started
Nozzle use
| Nozzle | Cleaning area | |||||||
| Floor & carpets | Furniture | Between cushions | Curtains | Stairs | Walls | Skirting edges | Radiators | |
| Floor head | √ | √ | ||||||
| Combination-brush | √ | √ | √ | √ | ||||
| Combination-crevice tool | √ | √ | √ | √ | √ | |||
Storage
To store the vacuum cleaner tidily when not in use, slide the storage point on the floor head into the socket at the rear of the cleaner as shown (fig. 4).

natural_image
Line drawing of a mechanical device with hoses and a wheel (no text or symbols)Fig. 4
Care and maintenance
5

natural_image
Abstract geometric pattern composed of orange triangles on a white background (no text or symbols)Care and maintenance
Looking after your appliance
Maintenance
Switch off and disconnect from the mains supply before carrying out cleaning and maintenance.
To ensure your vacuum cleaner works at optimum efficiency, keep the ventilation holes and vacuum cleaner surface free from dirt.
Ensure that the dust container is emptied and the air filters are washed regularly.
- Wipe the outside of the vacuum cleaner and accessories with a damp (not wet) cloth and then wipe dry. Do not use detergents, solvents or abrasives as these may scratch or damage the surface.
- Never immerse the vacuum cleaner, cable or plug in water.
- When not in use, store in a cool, dry place.
Emptying the dust container
- When the dust container reaches the MAX line marked on the dust container or when the suction power is reduced, it is time to empty the dust container.
- Switch off and disconnect from the mains supply.
- Press the dust container release button and lift off the dust container using the handle (fig.5).

Fig.6

natural_image
Diagram of a mechanical device pouring granular material into a container (no text or symbols)If you require any technical guidance or find that your product is not operating as intended, a simple solution can often be found in the
Troubleshooting section of these instructions
Care and maintenance Looking after your appliance
- Position the dust container over a refuse bin, then press the lever at the rear of the container to open the base (fig. 6) and empty the container. Gently tap the container against the side of the bin to remove any stubborn dust.
- The inside of the dust container maybe wiped clean with a damp cloth. Dry with a soft dry cloth before closing the flap and refitting the container to the cleaner. A click will be heard when it is correctly engaged.
Cleaning the filters
-
The frequency that the filters should be cleaned will depend on appliance usage. For maximum efficiency the filter at the top of the dust container should be cleaned every time the dust container is emptied and the exhaust filter every two months. Switch off and disconnect from the mains supply.
-
Remove the dust container from cleaner (fig. 5) and empty the dust container (fig.6).
-
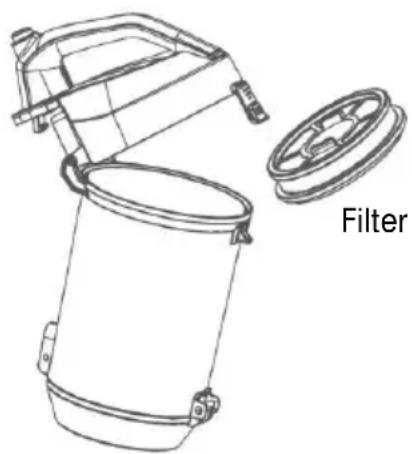
To clean the dust container filter, flip open the lid of the dust container using the catch at the front of the dust container and lift out the filter (fig. 7).
-
Tap the filter against a dustbin to remove most of the dust and then wash the filter in cold running water until the water runs clear. Allow to air dry fully. Using a damp or wet filter will reduce the suction and damage the motor.
natural_image
Line drawing of a portable water filter with labeled component (no text or symbols on the diagram itself)Fig. 7
Care and maintenance Looking after your appliance
- The cyclone assembly can also be lifted from the dust container (fig.8) and washed under running water if needed (fig. 9).

natural_image
Technical line drawing showing a mechanical device being processed into two different waste bins, with no visible text or symbols.Fig. 8 Fig.9
- When the filter and cyclone assembly is completely dry, reverse the above steps and refit the filter into the dust container and close the lid.
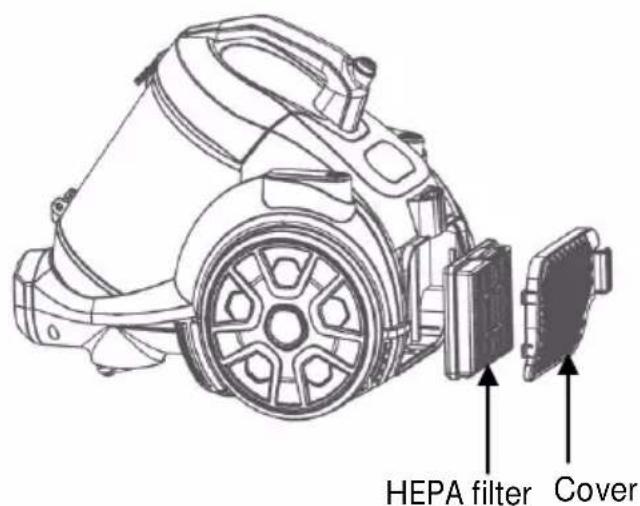
- To clean or replace the air outlet (HEPA) filter, press the catch at the side of the outlet filter cover (fig. 10) and lift off the cover. Wash and dry the filter (fig. 11) in accordance with step 4 above.
- Refit the filter and cover into the cleaner.

Notes:
• Take care of the filters supplied, as replacements are not available.
If you require any technical guidance or find that your product is not operating as intended, a simple solution can often be found in the Troubleshooting section of these instructions
Other information Technical Specification
| Model | VCM40A16L0B-70 |
| SKU | 134082072 |
| Rated voltage | 220 -240V~ 50Hz |
| Power | 700W nominal |
| 770W max | |
| Class rating | II (double insulated) |
| BS 1362 fuse | 13A |
| Dust Container Capacity | 2.0 litres |
| Noise | 78 dB(A) |
| Carpet cleaning performance class | D |
| Hard floor cleaning class | A |
| Dust re-emission class | A |
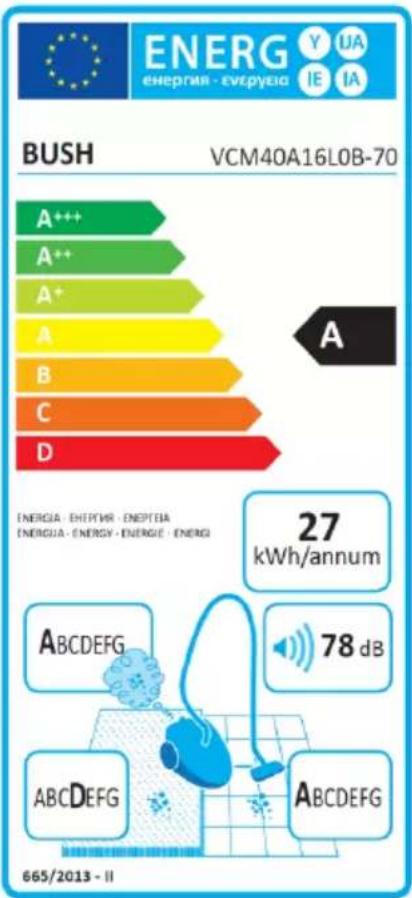
bar
| Category | Value | | -------- | ----- | | A+++ | 27 kWh/annum | | A++ | 27 kWh/annum | | A+ | 27 kWh/annum | | A | 27 kWh/annum | | B | 27 kWh/annum | | C | 27 kWh/annum | | D | 27 kWh/annum | | ABCDEFG | 78 dB | | ABCDEFG | 78 dB | | ABCDEFG | 78 dB | | ABCDEFG | 78 dB | | ABCDEFG | 78 dB | | ABCDEFG | 665/2013 - II |

Product support
5

natural_image
Abstract geometric pattern composed of orange triangles on a white background (no text or symbols)Product support Help is always at hand
Troubleshooting
| Observation | Potential cause / solution |
| Vacuum cleaner does not work | Is the plug fully inserted into the mains socket and switched on? |
| Do you have a power cut? | |
| Suction power weak | Does the dust container need to be emptied? |
| Are the filters clogged and need to be cleaned? | |
| Is the something blocking the nozzle? | |
| Vacuum cleaner overheating | Is the filter clogged and need to be cleaned? |
| Dust escaping vacuum cleaner | Check that the dust container is securely fitted. |
Product support Help is always at hand
Help and assistance
If you require any technical guidance or find that your Bush vacuum is not operating as intended, a simple solution can often be found in the Troubleshooting section of these instructions or online at www.bush-support.co.uk
If you still require further assistance, call one of our experts on 0345 604 0105*. To help give us give you a fast and efficient service please have the following information ready:
Model Ref:
Serial number
Date of purchase


You can find this information on the rating plate – a small sticker (usually a sticker or metal plate on the rear of your product)
This will be shown on your receipt
Local call rate applies*
Lines open 8am-7pm Monday to Saturday and 10am-4pm Sunday.
* Calls to Bush enquiry lines may attract a charge and set up fee from residential lines depending on your call plan / tariff. Mobile and providers costs may vary, see www.bt.com/pricing for details
For security and training purposes, telephone calls to and from customer service centres maybe recorded and monitored. Calls from Republic of Ireland will attract international call charges.
Product support Help is always at hand
Recycling electrical products
You should now recycle your waste electrical goods and in doing so help the environment.
This symbol means an electrical product should not be disposed of with normal household waste. Please ensure it is taken to a suitable facility for disposal when finished with.
Visit www.recycle-more.co.uk, click on "bank locator" and enter your postcode to find your nearest recycling site.
Product support Help is always at hand
BUSH
Call us now and register your 12 month guarantee
Thank you for choosing Bush. Your new product is guaranteed against faults and breakdowns for 12 months. Don't forget to register it with us today so we can provide you with our best possible after-sales service and useful updates.
www.bushregistration.co.uk
FREEPHONE*
0800 597 8548
Lines open 8am-8pm, 365 days a year. *Calls may be recorded and monitored.
Your Bush Guarantee
This product is guaranteed for twelve months from the date of original purchase. Any defect that arises due to faulty materials or workmanship will be repaired free of charge (or if applicable the product will be replaced or the purchase price refunded) where possible during this period by the dealer from who your purchased the unit.
The guarantee is subject to the following provisions:
- The guarantee does not cover accidental damage, misuse, cabinet parts, knobs or consumable items.
- The product must be correctly installed and operated in accordance with the instructions contained in the manual.
- It must be used solely for domestic purposes. The guarantee will be rendered
invalid if the product is re-sold or has been damaged by inexpert repair.
- Specifications are subject to change without notice.
- Bush disclaim any liability for loss or damage arising from the breakdown of the product.
- This guarantee is in addition to and does not diminish your statutory or legal rights.
Important Data Protection Information
To find out how we and Domestic & General Insurance PLC use your data please refer to the guarantee registration material or visit www.bushregistration.co.uk
Guarantor: Argos Limited - 489 - 499 Avebury Blvd. - Milton Keynes - MK9 2NW
BUSH
Produced for Bush
489-499 Avebury Boulevard, Milton Keynes MK9 2NW
Made in China.
Bush is a registered trademark of Argos Ltd.
Issue 1 06/18


- Help and Guidance
- Contents
- Safety information
- 1
- Important - Please read these instructions fully before installing or operating
- Power source
- Ventilation, heat and moisture
- Warning!
- Plug / Wiring advice
- Non-rewireable plug
- Rewireable plug
- Getting to know your vacuum
- 2
- Ready? Let's begin...
- You'll be up and running in no time
- Installing your vacuum
- 3
- Bringing it all together
- Assembly
- Using your vacuum
- 4
- Let's get started
- Getting started
- Storage
- Care and maintenance
- 5
- Looking after your appliance
- Maintenance
- Emptying the dust container
- Care and maintenance Looking after your appliance
- Cleaning the filters
- Notes:
- Other information Technical Specification
- Product support
- Product support Help is always at hand
- Help and assistance
- Lines open 8am-7pm Monday to Saturday and 10am-4pm Sunday.
- Recycling electrical products
- BUSH
- www.bushregistration.co.uk
- Your Bush Guarantee
- The guarantee is subject to the following provisions:
- Important Data Protection Information
Brand : BUSH
Model : VCM40A16L0B-70
Category : Vacuum Cleaner