
Vario 4 - Toaster DUALIT - Free user manual and instructions
Find the device manual for free Vario 4 DUALIT in PDF.


| Product Type | 4-Slot Toaster |
| Brand | Dualit |
| Model | Vario 4 |
| Dimensions (W x D x H) | 39 cm x 30 cm x 20 cm |
| Weight | 4.5 kg |
| Power Supply | 230 V, 50 Hz, 2000 W |
| Number of Slots | 4 |
| Browning Control | Electronic variable with 7 settings |
| Functions | Defrost, Reheat, Cancel, Auto-centering, High-lift |
| Material | Stainless steel housing |
| Crumb Tray | Removable, dishwasher safe |
| Cord Length | 1.2 m |
| Safety Features | Cool-touch sides, automatic shut-off, non-slip feet |
| Maintenance | Wipe exterior with damp cloth; empty crumb tray regularly |
| Spare Parts Available | Heating elements, timers, knobs, crumb trays |
| Repairability | Yes, modular design with replaceable components |
| Warranty | 2 years (limited) |
| Country of Origin | United Kingdom |
| Included Accessories | User manual, warranty card |
Frequently Asked Questions - Vario 4 DUALIT
User questions about Vario 4 DUALIT
0 question about this device. Answer the ones you know or ask your own.
Ask a new question about this device
Download the instructions for your Toaster in PDF format for free! Find your manual Vario 4 - DUALIT and take your electronic device back in hand. On this page are published all the documents necessary for the use of your device. Vario 4 by DUALIT.
USER MANUAL Vario 4 DUALIT
Instruction Manual & Guarantee
Dualit®
Since 1945
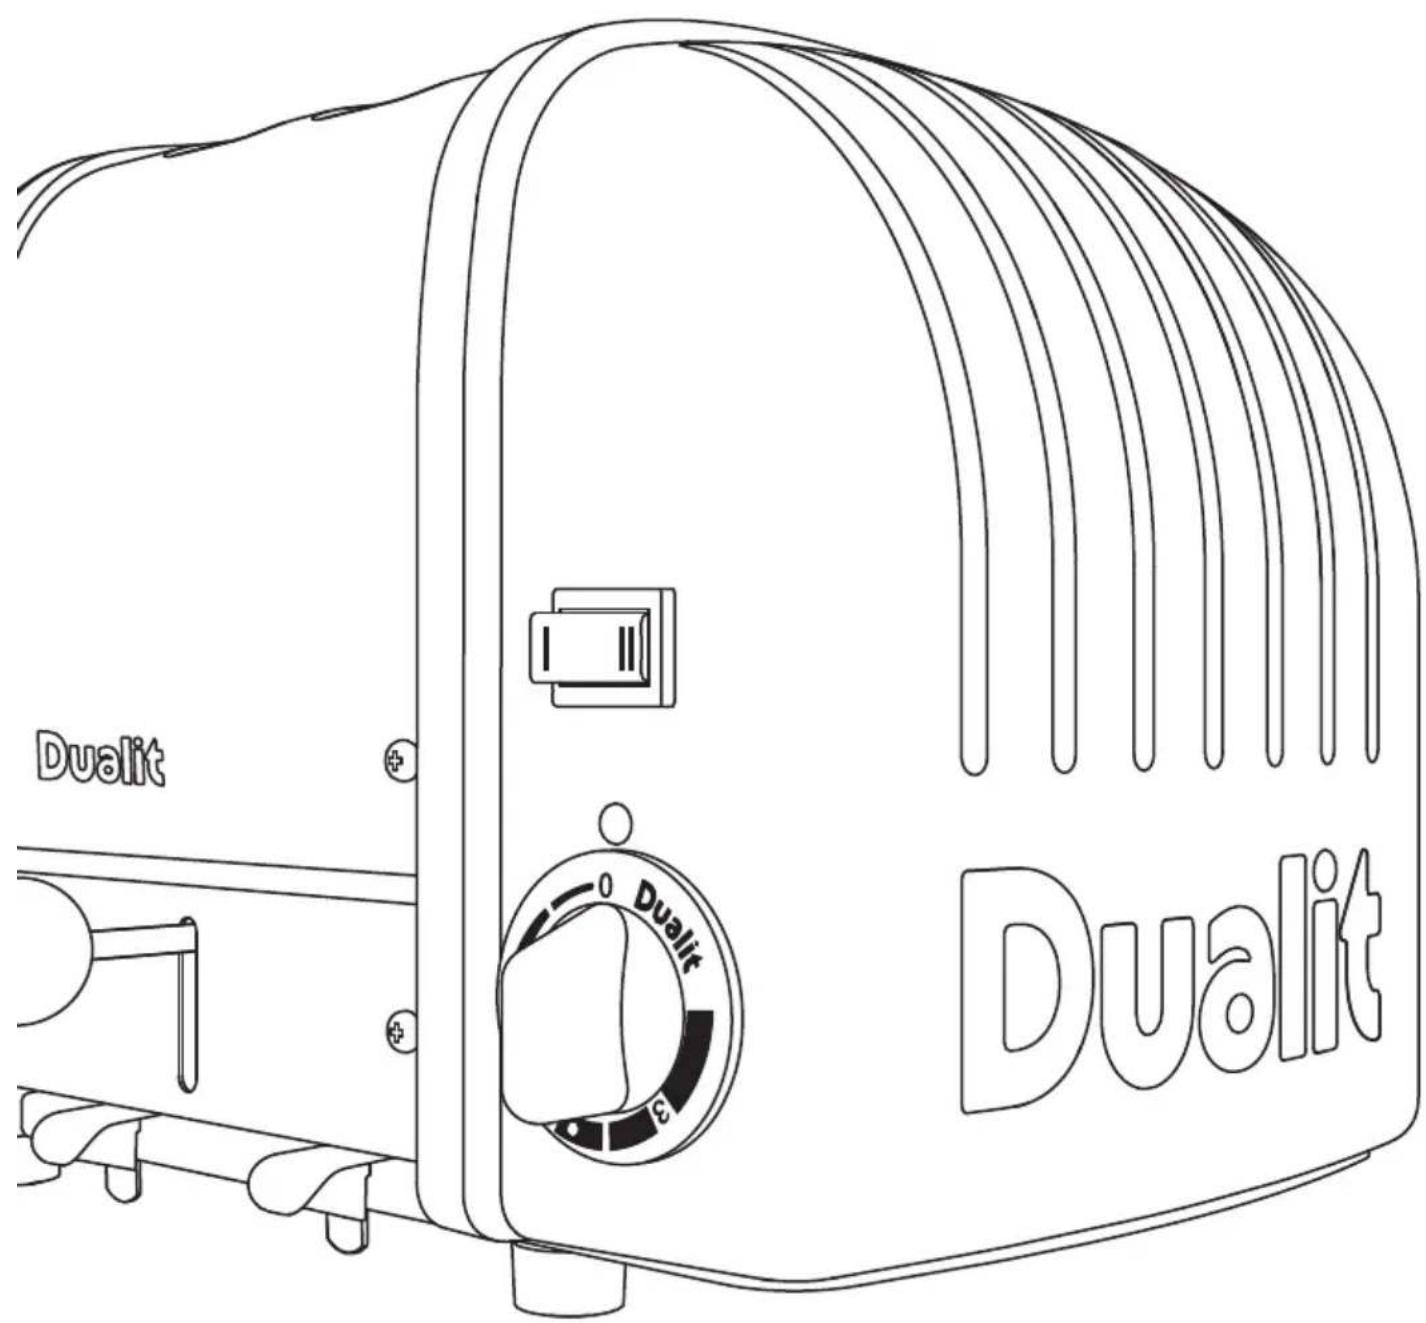

TOASTING SINCE 1945
For over sixty eight years, Dualit toasters have reflected an attitude that's fundamentally British. They are a symbol of the fact that it's the simple things in life that are the most rewarding and the most important.
Dualit toasters can turn out hundreds of crisp, golden slices per hour. They are gleaming, sturdy and tough as old boots. And as much a part of British life as toast itself.
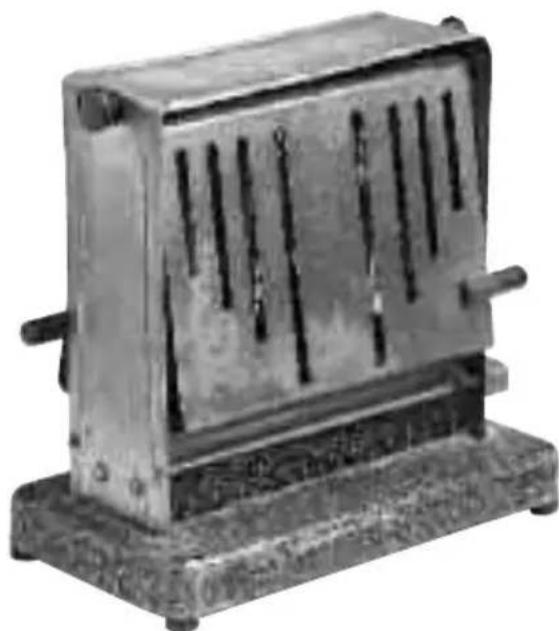
It should come as no surprise that the man who invented the Dualit toaster was an engineer. In 1946, Max Gort-Barten produced the original Dualit toaster from his workshop just off London's Old Kent Road.
Combining strength, versatility and ingenuity it was a toaster that set new standards, soon followed by a commercial toaster, incorporating a time switch among its many (entirely) original features.
natural_image
Metallic rectangular device with vertical slots and a base, no visible text or symbolsManually operated and designed for heavy-duty use, each Dualit toaster is a blend of the simple and highly sophisticated. Each toaster is assembled by hand, much as it always was. The assembler's individual number will be found on the base plate.
In an age in which so much becomes obsolete overnight, the Dualit toaster is built without compromise. It remains one of the few objects to survive the passing of the years with grace and style.
CONTENTS
Safety precautions 4
Before first use 5
Knowing your toaster 6
Accessories 8
Sandwich Cage
Warming Rack
Toasting tips 9
Setting up 10
The Selector 11
Toasting 12
Toasting frozen bread 13
Making toasted sandwiches 14
Cleaning and care 15
Thermal protection device 16
Resetting thermal fuse 17
Replacement parts 18
Replacing elements 19
Troubleshooting 20
Guarantee 22
SAFETY PRECAUTIONS
READ ALL INSTRUCTIONS
BEFORE USING THE TOASTER KEEP THESE INSTRUCTIONS FOR FUTURE REFERENCE
• THIS IS AN ATTENDED APPLIANCE.
Do not leave unattended during use, unplug after each use (risk of fire if an unattended appliance is left operating).
- Should the neon light remain illuminated after using the appliance immediately unplug the toaster and call service centre.
- If the timer sticks, unplug and do not use. Spare timers are available from www.dualit.com and must be fitted by a qualified electrical engineer.
- Crumb tray must be in place during toasting.
• We recommend that the toaster is plugged into a socket that has no other appliance connected to it. Failure to do this may cause an overload, trip a circuit breaker or blow a fuse. Preferably the socket outlet should be protected by a Residual Current device (RCD)
- Before plugging in, check that the voltage on the rating label is the same as the mains supply.
• To protect against electric shock, do not immerse any part of this product
in water or other liquid.
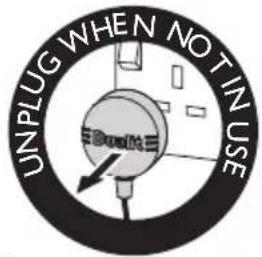
- Unplug from outlet when not in use and before cleaning. Allow to cool before putting on or taking off parts.
- Do not operate the appliance with a damaged cord or plug.
- Do not allow cable to touch hot surfaces, or to hang over edge of a table or counter top.
- When in use a fire may occur if the toaster is covered or touching flammable material.
- Do not attempt to dislodge bread when the toaster is plugged in.
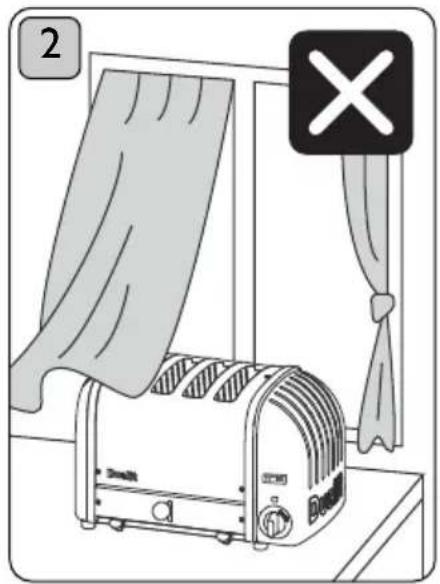
- Bread may burn. Therefore toasters must not be used near or below curtains and other combustible materials.
- This appliance is not intended for use by persons (including children) with reduced physical, sensory or mental capabilities, or lack of experience and knowledge, unless they have been given supervision or instruction concerning use of the appliance by a person responsible for their safety.
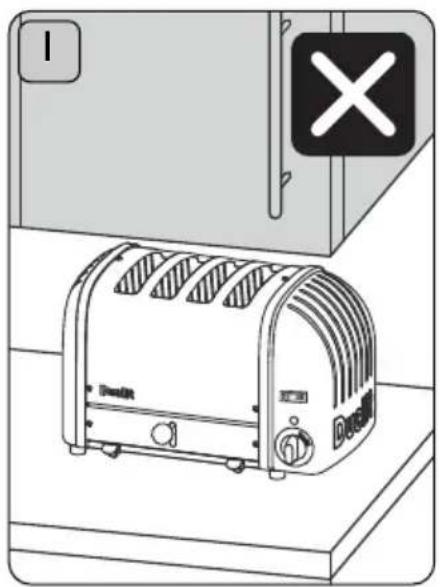
• Children should be supervised to ensure that they do not play with this appliance. - Do not store or use toaster in an appliance garage or under cupboards.
-
Do not put a pan on top of the toaster or warming rack.
-
Do not use outdoors.
- The toaster is not intended to be operated by means of an external timer or separate remote-control system.
- Accessible surfaces of the toaster may get hot during use.
NOTE: Any plug cut from power supply cord should be disposed of immediately. Inserting any cut off plug into a 13A socket-outlet is hazardous. - Never use the plug without the fuse cover fitted. Ensure replacement fuse is the same current value as original.
- Replacement fuses should be ASTA approved to BS 1362.
- Do not operate any appliance with a damaged lead or plug, or after the appliance malfunctions, or has been damaged in any manner.
If the supply cord is damaged, it must be replaced by the manufacturer, its service agent or similarly qualified persons in order to avoid a hazard.
WARNING: This appliance must be earthed.
SAVE THESE INSTRUCTIONS
Accessible surfaces of the toaster may get hot during use.

In the interest of improving products, Dualit Ltd. reserves the right to change the product specification without prior notice.
IMPORTANT - BEFORE USING
Your Dualit toaster has patented ProHeat elements. These elements need to be conditioned before toasting for the very first time. Then continue to toast as per the instructions.
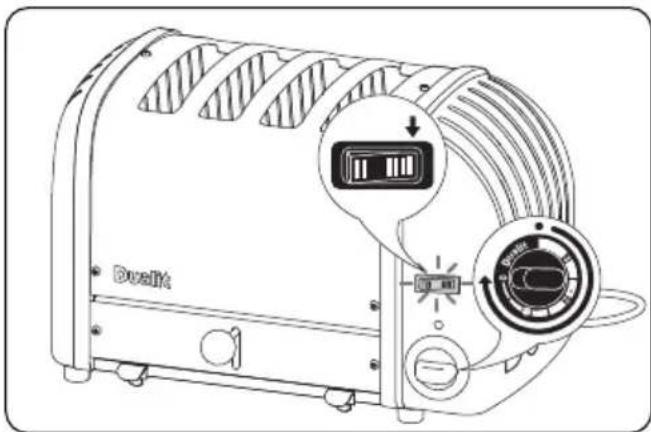
Set the selector switch so ALL the slots are active, with NO bread in the slots, turn the timer all the way round and let it run back to the off position.
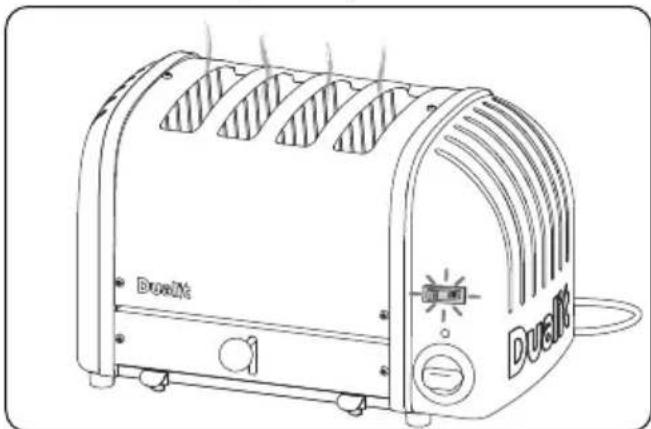
Some smoke may vent from the slots, THIS IS NOT A FAULT and is perfectly safe. There may be a slight popping crinkling sound, this is due to heat expansion of the elements and is perfectly normal.
natural_image
Line drawing of a DualKit toaster with heat exchanger and control buttons (no text or symbols on device body)Your toaster is now conditioned and ready for use.
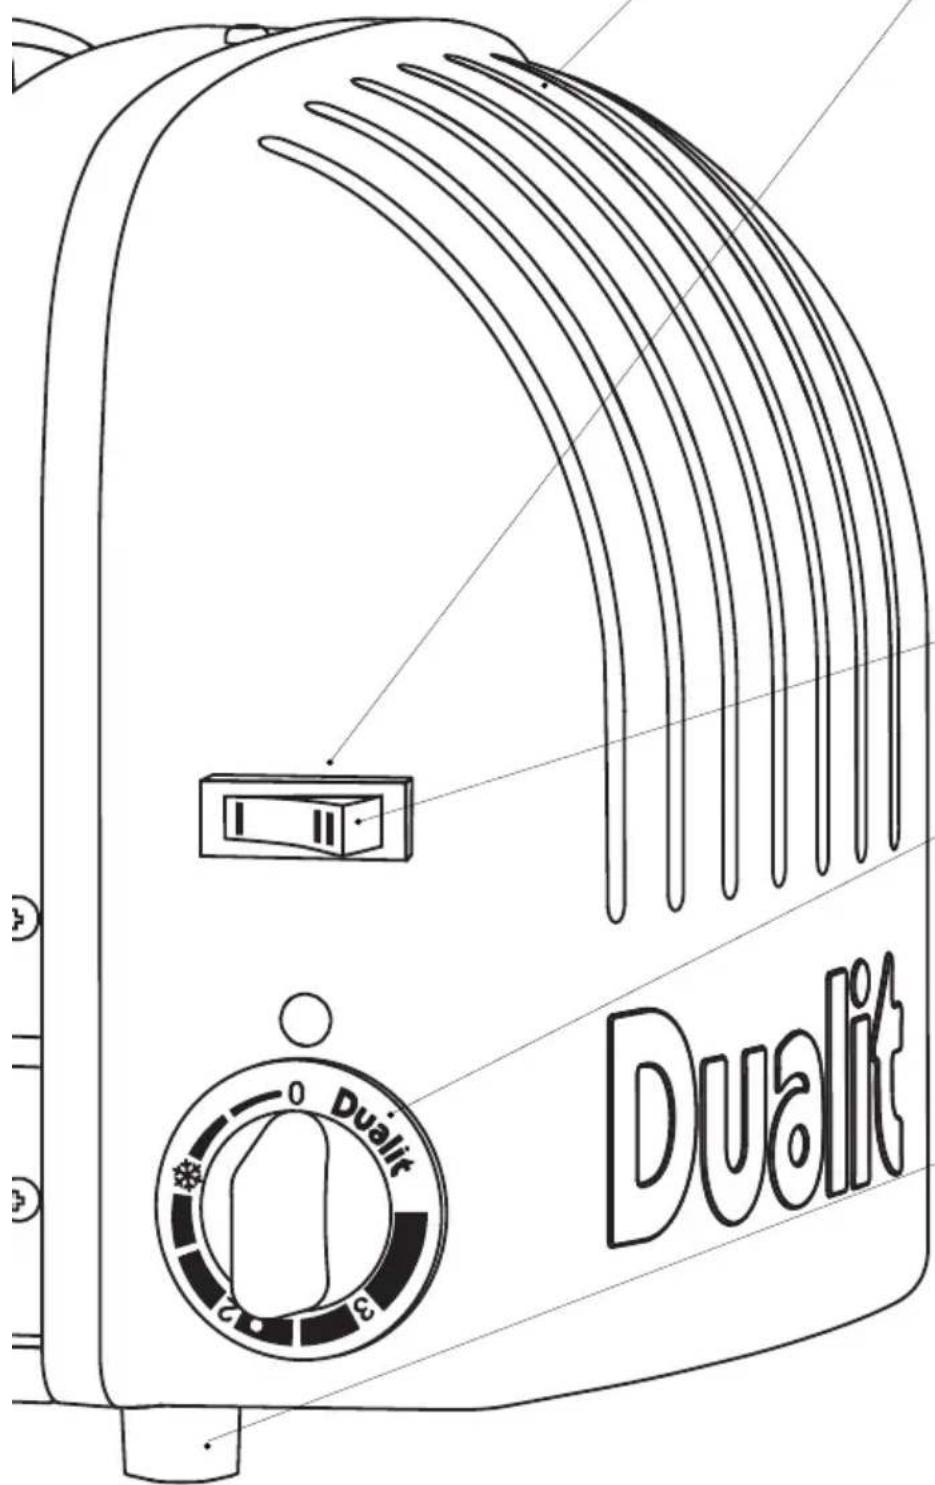
KNOW YOUR TOASTER
Unpack the box with care, keeping all the packaging materials until you are satisfied everything is present and in working order. Once satisfied remove any tags from the toaster and recycle the packaging appropriately.
PROHEAT ELEMENTS
Patented heavy duty replaceable elements.
STAINLESS STEEL COVER
MANUAL EJECTOR
Mechanical Peek & Pop ejector for greater toasting control.
CRUMB TRAY
Keeps your work surfaces clear of crumbs.
WIDE SLOTS
Wide slots to fit thick bread, buns and sandwich cages.
ALUMINIUM CASTINGS
Heavy duty cast aluminium castings.
SELECTOR SWITCH
Select number of slices or buns you are toasting.
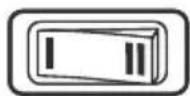
2 Slot model
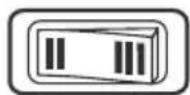
3 Slot model
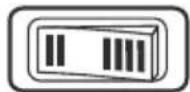
4 Slot model
POWER NEON
Illuminates when power on.
MECHANICAL TIMER WITH DEFROST
Timer controlled defrost and toasting.
FEET
Compensate for uneven surfaces.
All illustrations are for representation only, your model may have a different selector switch and number of slots from illustrations shown.
ACCESSORIES - SOLD SEPARATELY
THE SANDWICH CAGE
Convert your toaster into a toasted sandwich maker with this quick and easy to use accessory.
Using a cage also offers greater toasting control, for toasting smaller items such as crumpets, scones, teacakes or muffins.
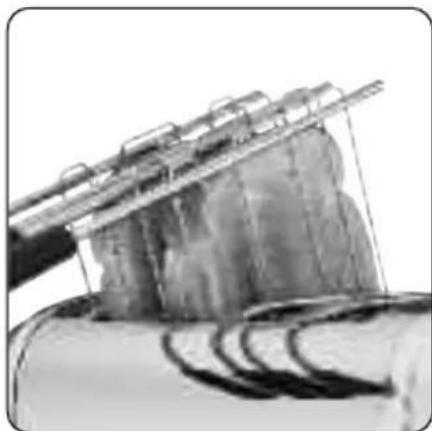
natural_image
Black-and-white photo of a cliffside structure with visible supports and water below (no text or symbols)THE WARMING RACK
The ‘warming rack’ is a universal accessory for all Dualit NewGen Toasters.
Perfect for warming or lightly toasting any bread product that will not fit inside the slots. Such as croissants, scones, pastries or tortillas.
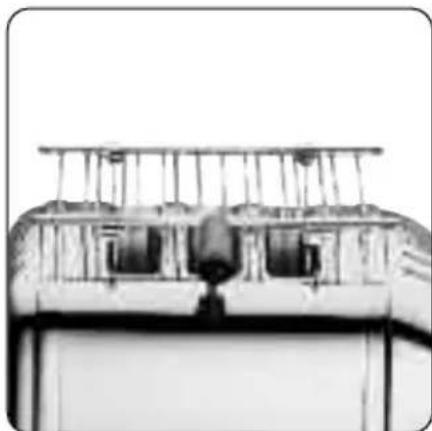
natural_image
Close-up of a mechanical component with vertical supports and a central bell (no visible text or symbols)Use for a maximum of 3 minutes and then allow to cool between each use.
DO NOT PUT A PAN ON TOP OF THE WARMING RACK.
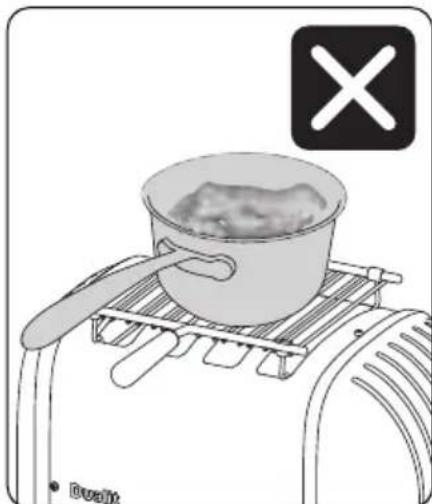
natural_image
Illustration of a cooking setup with a pot on a grater and a crossed-out icon (no text or symbols)TOASTING TIPS
Here are a few tips to help get the best out of your toaster.
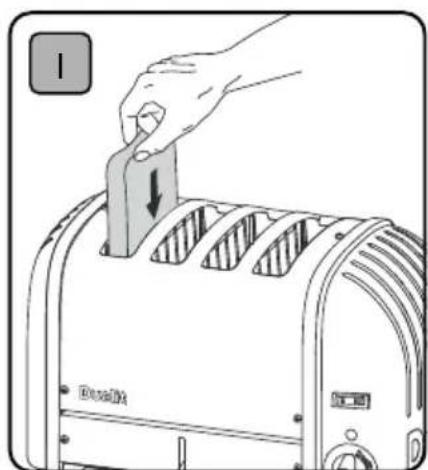
- FULLY LOAD ALL HEATED UP SLOTS. If a slot is heated but no bread is inserted, the bread in the adjacent slot will toast unevenly.
• ALWAYS LOAD YOUR SLOTS STARTING FROM THE LEFT. - DIFFERENT BREADS WILL TOAST AT DIFFERENT RATES, wholemeal bread takes longer than white bread, fresh bread will take longer than day old bread. Remember to adjust your timer to allow for your particular type of bread.
- After the first round of toast, the elements and toaster body will be at full operating temperature, subsequent rounds will take less time to toast.
- The thickest slice of bread that will fit in your toaster is 28mm thick. Forcing bread which is too thick or too long into the slots will be difficult to eject once toasted.
- You may find it easier to use a 'sandwich cage' to toast smaller items. Inserting, checking and removing will all be easier (sold separately).
- When hand cutting a fresh loaf, cut the slices as evenly as possible. Uneven slices will toast unevenly.
- Keep elements free from breadcrumbs and broken pieces of bread. If left these may burn out the elements. With the toaster unplugged use a soft brush to clean inside your toaster, do not use a knife!
• To reheat recently made toast set timer to 'defrost' symbol. - Cancel toasting manually at any time by rotating the timer back to 'O'. This will not damage your timer.
• Always unplug your toaster from the wall socket after use.
SETTING UP
natural_image
Illustration of a toaster with a door and a cross symbol (no text or labels)DO NOT STORE OR USE YOUR TOASTER IN AN APPLIANCE GARAGE OR UNDER CUPBOARDS.
natural_image
Illustration of a toaster with a double-tan roof and a 'X' symbol, next to a curtain and a table (no text or symbols on main objects)DO NOT STORE OR USE YOUR TOASTER NEAR CURTAINS OR FLAMMABLE MATERIAL.
natural_image
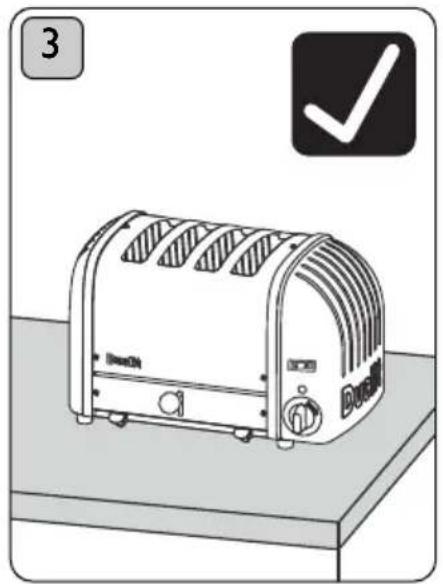
Illustration of a toaster with a checkmark icon (no text or symbols on the device itself)Place the toaster on a open level surface.
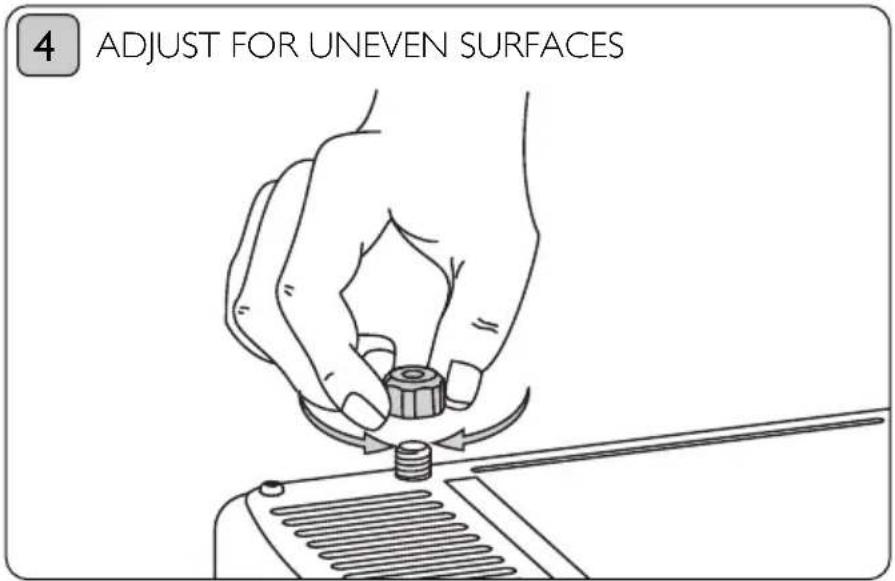
Your toaster is fitted with one adjustable foot which may be raised or lowered to compensate for unevensurfaces. The adjustable foot is located on the base of the toaster and is hexagonal in shape, rotate it to adjust the height.
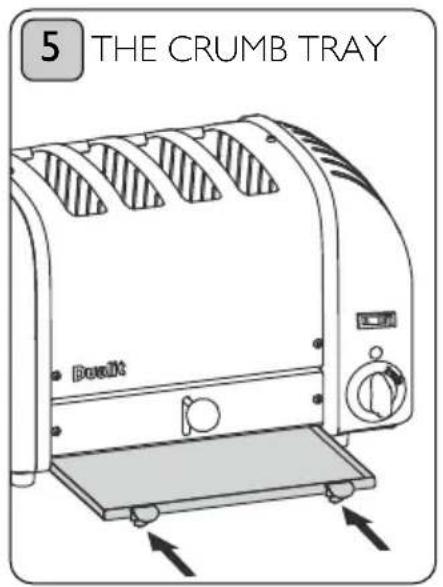
CRUMB TRAY MUST BE IN PLACE DURING TOASTING.
THE SELECTOR
This avoids uneven toasting and saves energy at the same time.
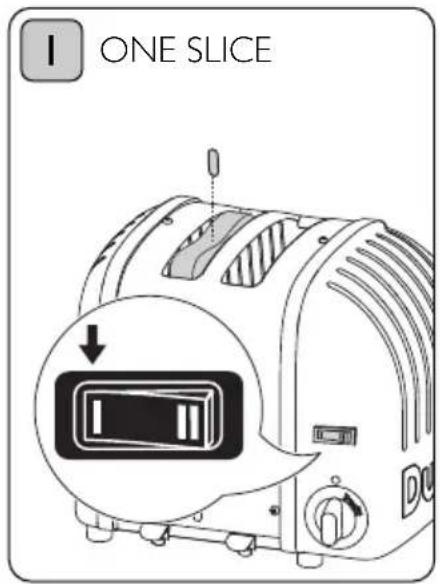
2 slot model: Select the one slice indicator on the 'selector switch'. The left hand slot will heat up on both sides.
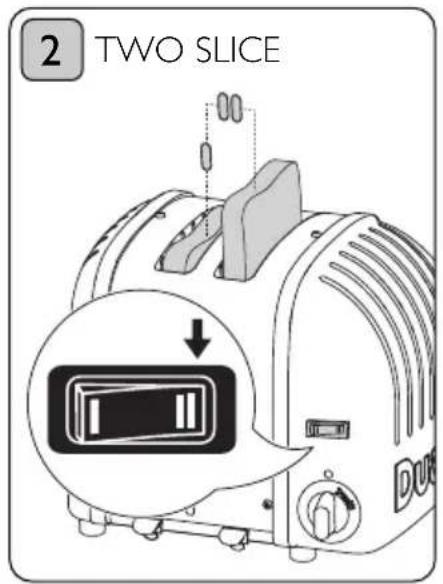
2, 3 & 4 slot model: Select the two slice indicator. The two slots from the left will toast on both sides.
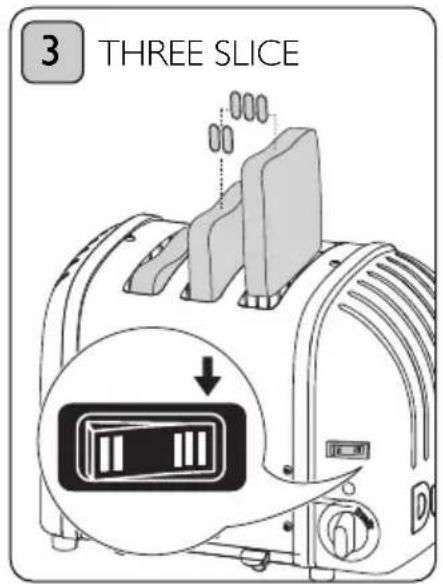
3 slot model: Select the three slice indicator. The three slots from the left will toast on both sides.
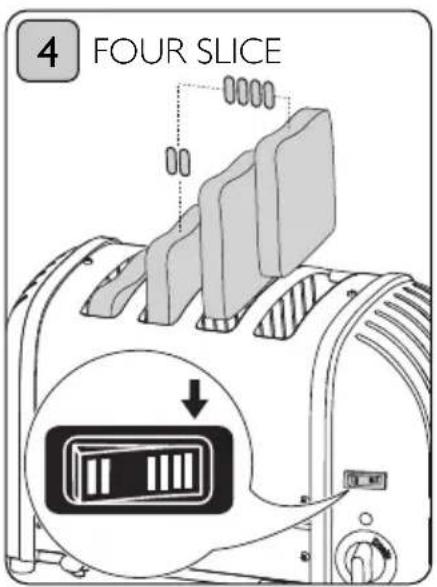
4 slot model: Select the four slice indicator. All slots will heat up.
TOASTING
This is an attended appliance. Do not leave unattended during use. Unplug after each use (risk of fire if an unattended appliance is left operating).
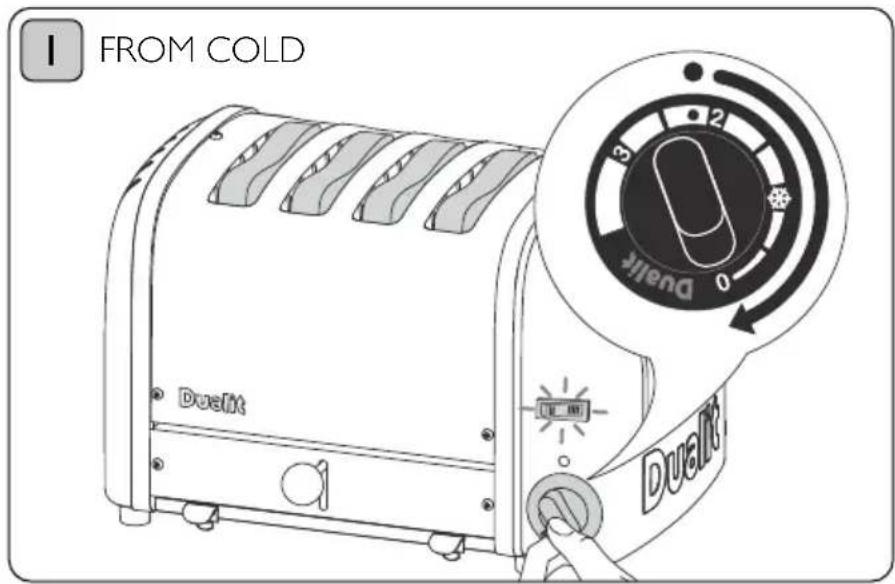
When the toaster is cold and being used for the first time set the 'timer' to the 'circle' indicator, the extra time is because the metal body will absorb some heat. After the toaster has warmed up, slightly reduce the toasting time to give consistent results.
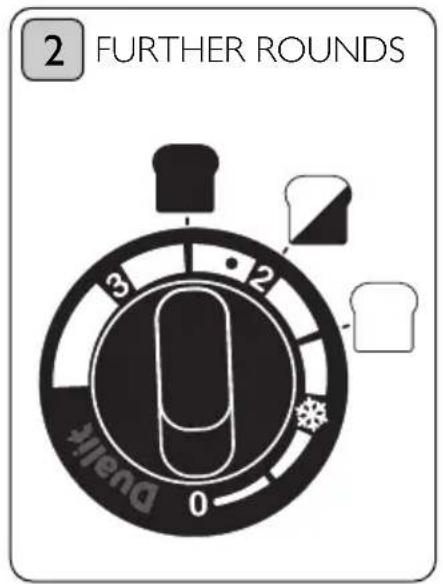
Set 'timer' to desired level.
1.5 = Lightly toasted
2.0 = Medium toast
2.5 = Well done toast.
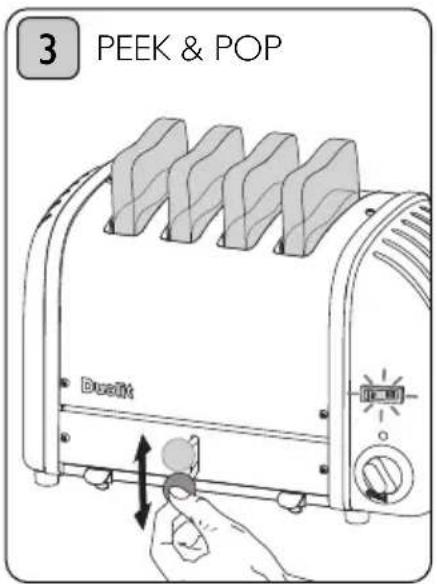
Check the progress of your toast at any time by pushing down on the 'ejector knob'. If you remove your toast before the cycle is complete, cancel timer and unplug.
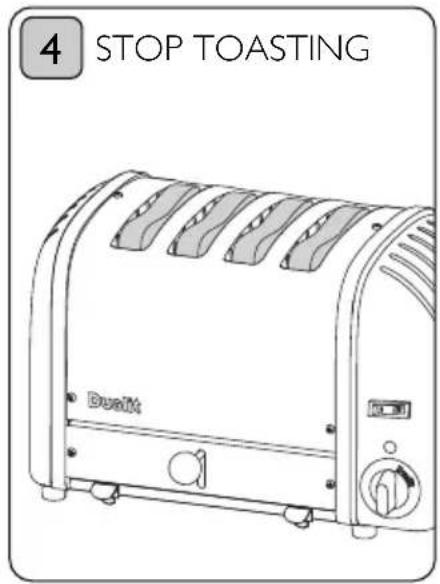
The 'timer' will click off to 'O' position. To cancel toasting manually rotate the 'timer' to If neon light remains illuminated after use immediately unplug to toaster & call service centre.
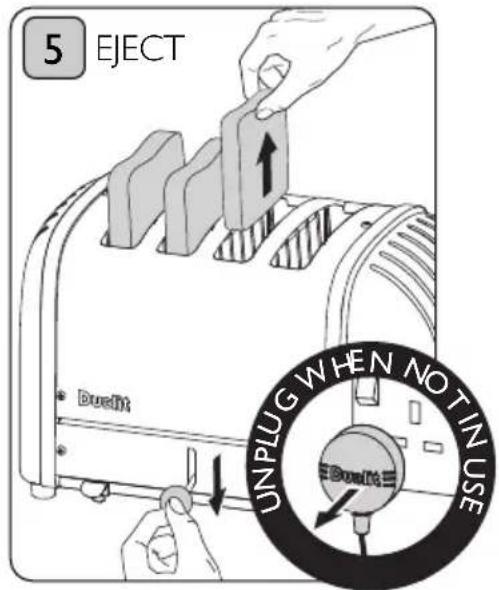
The toast will not pop up, but will keep warm inside the toaster. Press down the 'ejector knob' and the toast will pop up ready for serving.
TOASTING FROZEN BREAD
Toast bread directly from the freezer with this handy setting.
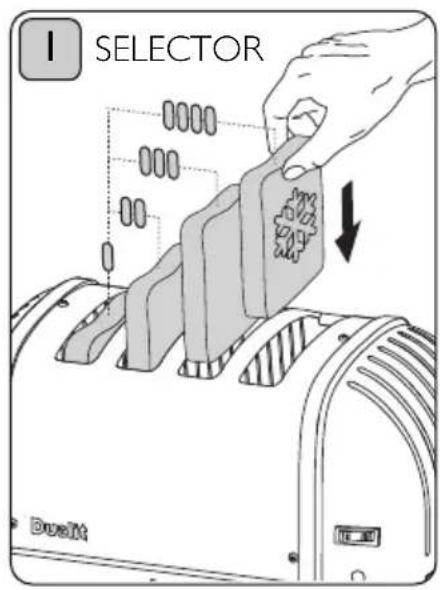
Set the 'selector switch' to the desired number slots you require and insert your frozen slices of bread.
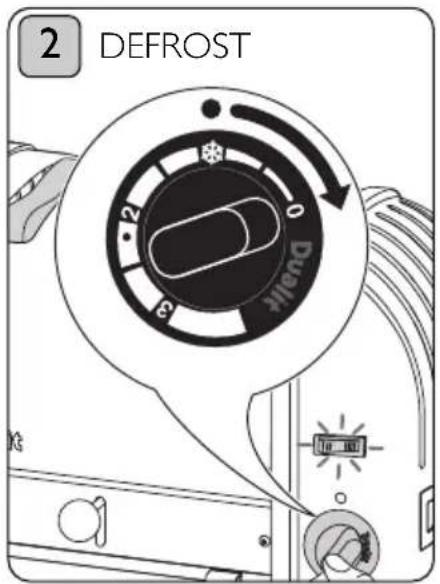
Rotate the 'timer' to the defrost symbol and let the timer wind down to '0'.
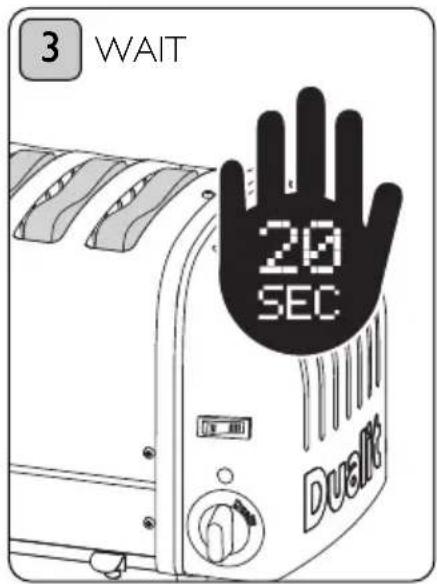
When the timer stops wait 20 seconds.
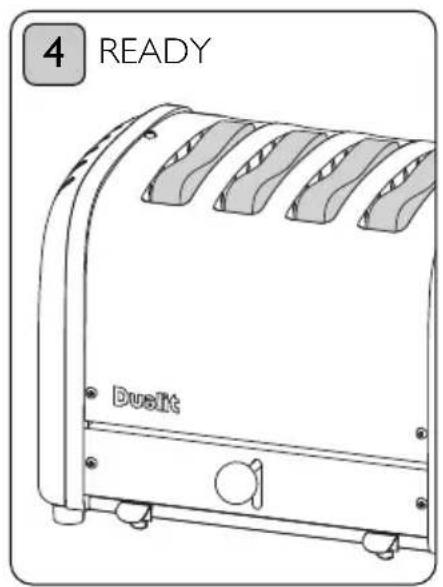
Your bread will now be defrosted and ready for toasting.
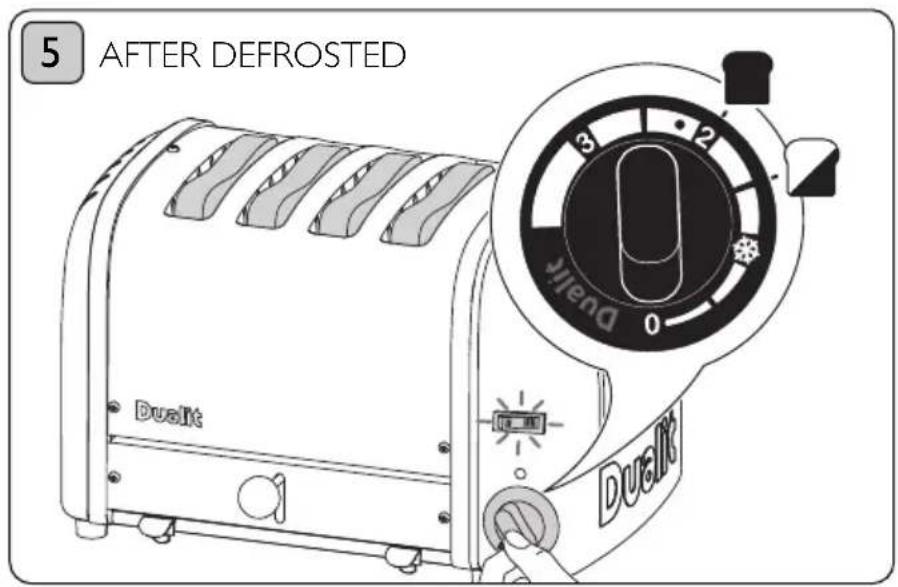
Wind the 'timer' to the '2' indicator for well done toast or '1.5' for medium toast.
Then continue to toast as if toasting fresh bread as shown on previous page.
MAKING TOASTED SANDWICHES
The sandwich cage accessory (sold separately) will transform your toaster into a versatile sandwich toaster.
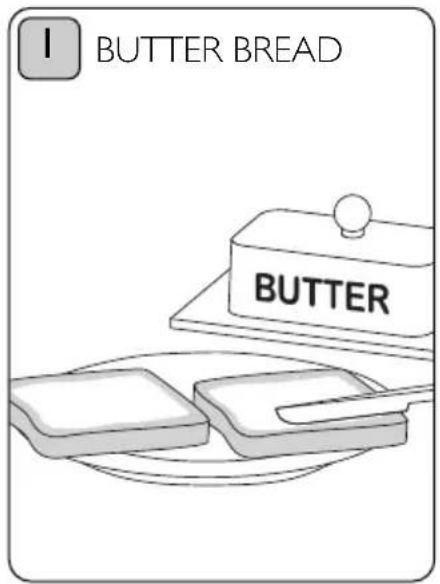
Use medium sliced bread, lightly butter the OUTSIDE OF EACH SLICE.
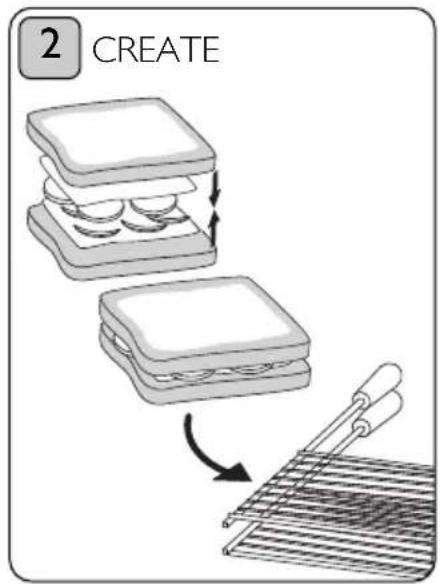
Place your fillings between the MunbutteredMsides. DO NOT OVERFILL THE SANDWICH. Place sandwich in cage.
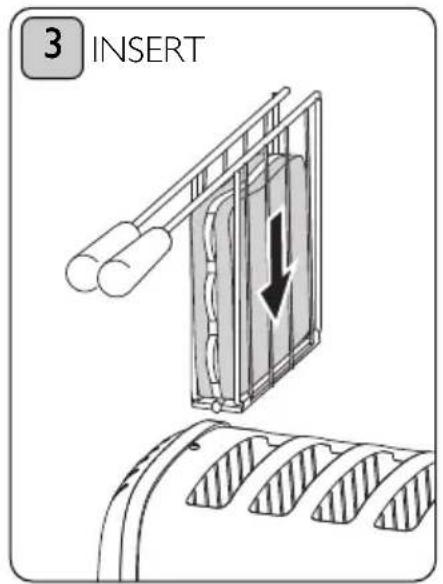
Set 'selector' and starting from the left insert cage into the slots. Push down until clamped tightly shut.
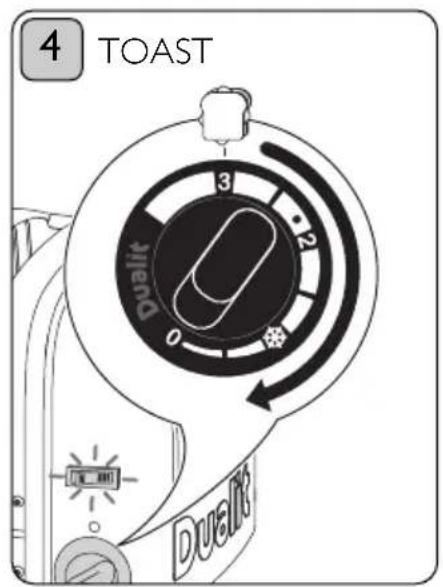
Toast until the sandwich is golden. Setting 3 on the 'timer'. Adjust for your bread type.
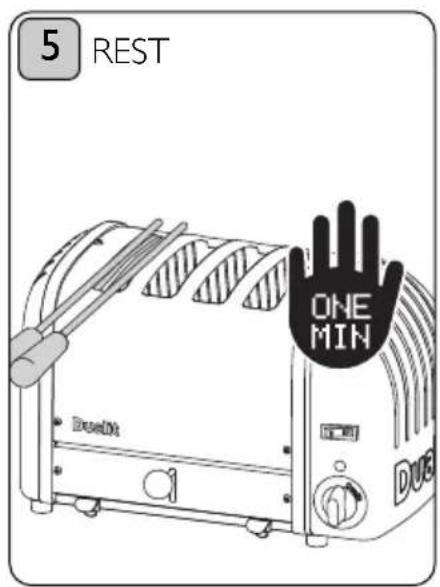
Allow to rest for a further minute inside, cut and serve. the toaster to allow fillings to fully warm CAUTION: FILLINGS If neon light remains illuminated CAN BE HOT. after use immediately unplug the toaster & call the service centre.
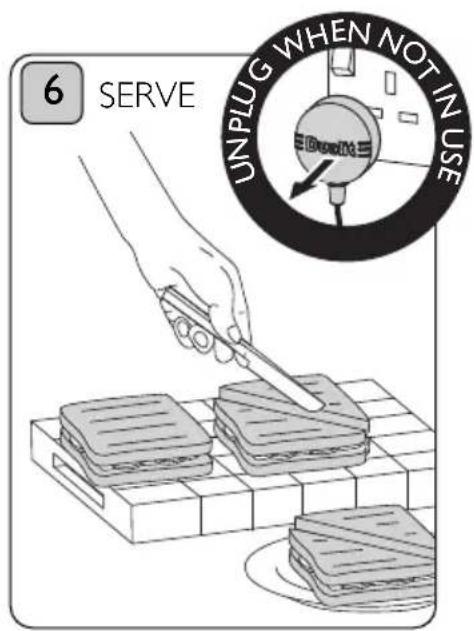
Reimside, cut and serve. fully warm CAUTION: FILLINGS CAN BE HOT.
CLEANING & CARE
IMPORTANT: ENSURE THE TOASTER IS UNPLUGGED AND ALLOWED TO FULLY COOL BEFORE STARTING TO CLEAN.
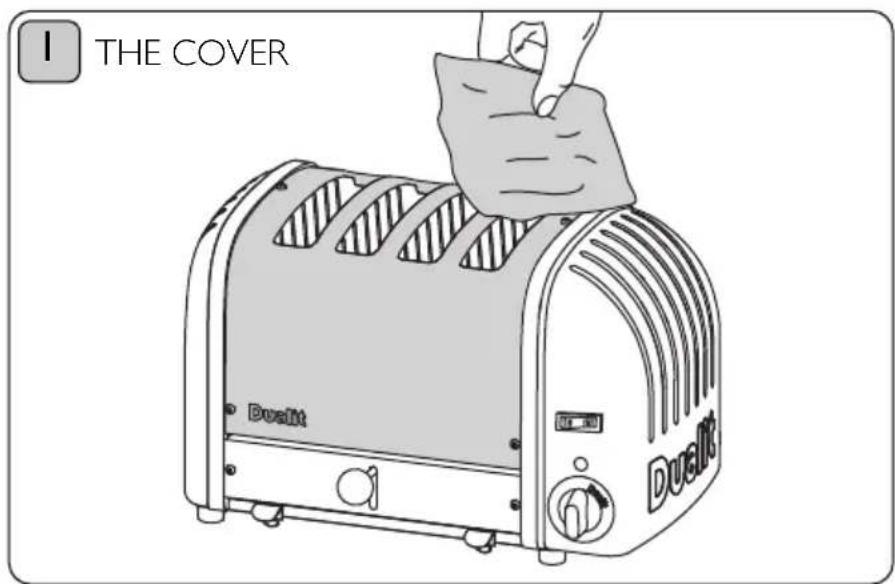
AFTER EACH USE
Wipe the ‘stainless steel cover’ with a non-abrasive cloth. A stainless steel cleaner can be used to restore shine to the cover only, but do not use an aggressive cleaner or one that contains ammonia.
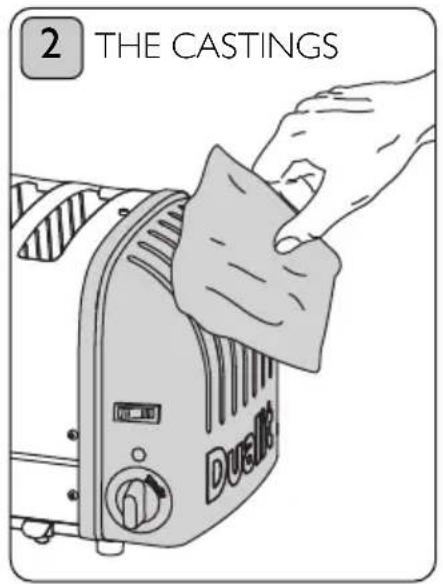
Wipe the aluminium end castings with a damp cloth. Do not use a chemical or abrasive cleaner.
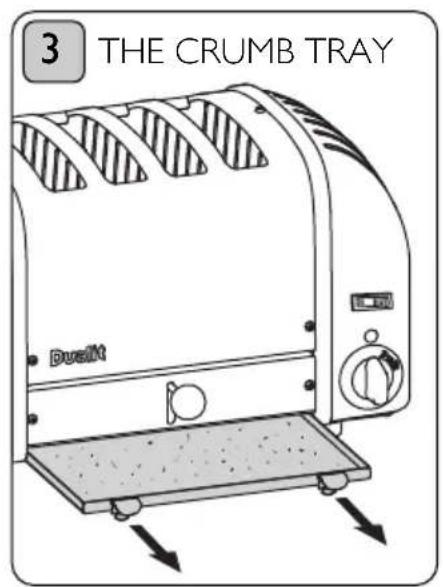
Empty the 'crumb tray' on a regular basis. Daily if being used in a commercial kitchen. CRUMB TRAY MUST BE IN PLACE DURING TOASTING.
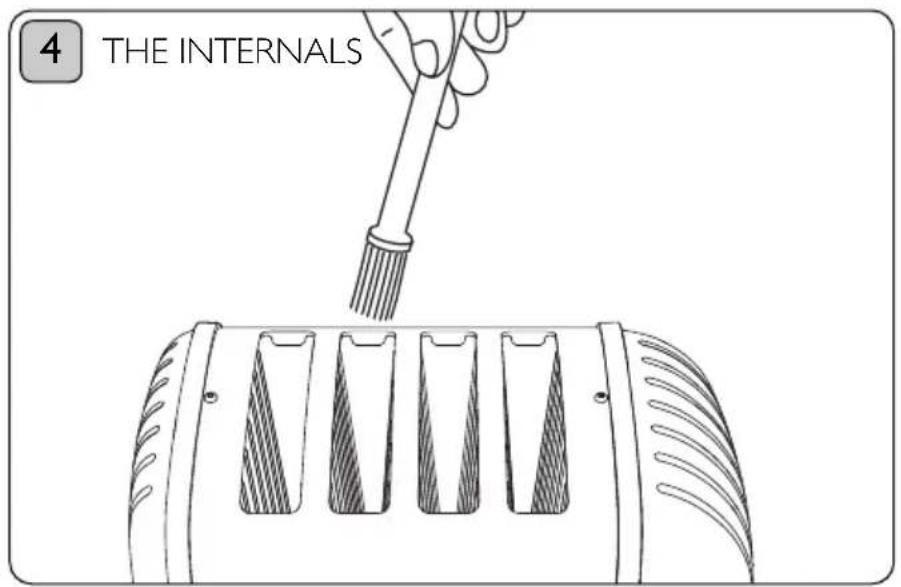
With the toaster unplugged use a SOFT BRUSH to clean inside your toaster, do not use a sharp or metal utensil! Crumbs should be carefully brushed off the elements using only a soft brush, the toaster can be turned upside down and excess crumbs be shaken out.
THERMAL PROTECTION DEVICE
NOTE: I Be mindful that repeated use of the Warming Rack without allowing the toaster to fully cool between cycles may cause the cause the device to activate.
TO PREVENT ACTIVATING THE THERMAL PROTECTION DEVICE:
- Ensure your toaster is situated in an area with at least 10cm of space to the left, right and back of the toaster.
- Use the toaster clear of overhanging cupboards and away from any flammable materials.
natural_image
Illustration of a hand placing a card into a toaster with a downward arrow (no text or symbols)Always load bread into the toaster starting from the left hand slot.
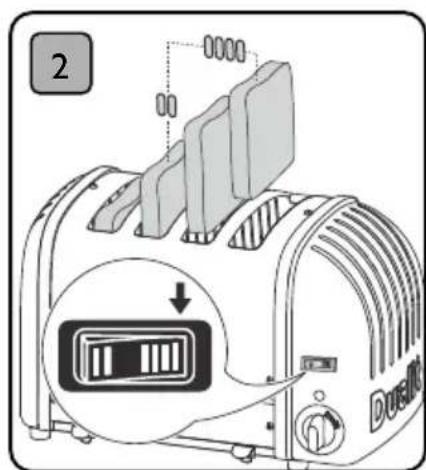
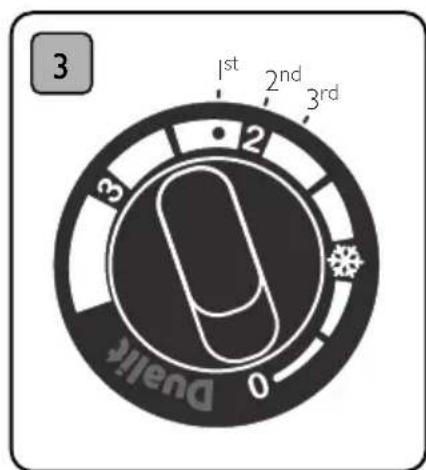
Always use the appropriate Be mindful of reducing the setting for the number of toasting time if the toaster is slices of bread to be toasted already warm from previous
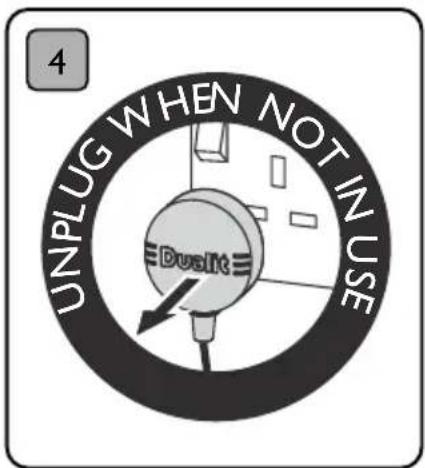
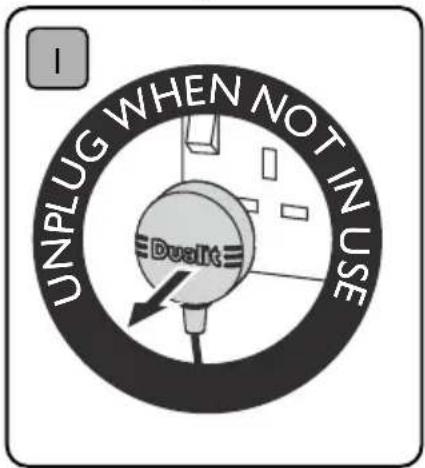
Always unplug the toaster after use.
use, as the bread toasts
faster on 2nd and 3rd cycles.
\( \text{Ⅲ} \)%&&!\\&\\$ \text{Ⅲ} \%" \)
1?30?:,>?0=90:9477@849,?0>□-@??30070809?>1,47?:B,=8@;:=41?30=04>,9,@ L.74.6F,-:A0?309:=8,7?4.6492:1?30?480=1=:8?30?:,>?0=B34704?4>|>?477:;0=,?49 8,D3,A0,.?4A,?0/?30Thermal Protection Device
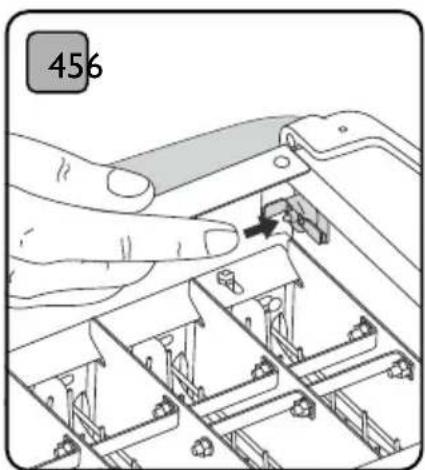
01:=0!=0>0??492D:@8@>?09>@=0?3,?30=04>9:?,1,@7?B4?349?30,;;74,9.0Dc reset @970>>,<@,74140/070.?=4.4,93,>0C,8490/?30?:,>?0=,9/A0=4140/?3,?30 Selector Switch, Timer and all other Components ,=0492::/B:=6492:=/0=
&30Thermal Protection Device .9-0=0>0?-D,77:B492?30?:,>?0=?:1@77D:::7unplugging the toaster 1=:8?30B,77#:60?,9/1:77:B49249>?=@.?4:9>-07:B
Resetting the Thermal Protection Device should only be carried out by a qualified electrician. The toaster must be Portable Appliance Tested following reset of the Thermal Protection Device ^1 %3:@7/D:@=0@4=0,9D1@=?30=,>4>?9.0.,77@,74?F>%0=A4.00;=?809?:9
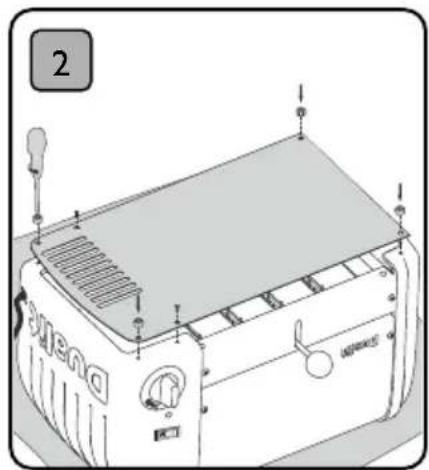
'9;7@2?30?:,>?0=☐ ,9/☐,77:B?:☐1@77D:.:7☐
natural_image
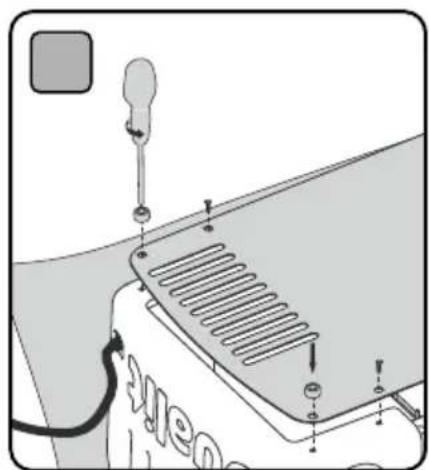
Technical line drawing of a portable electronic device with ventilation grilles and control panel (no text or symbols)08:A0?30.=@8-?=,D,9/?:,>?0=☐-,>0☐;7,?0?:,..0>>?301@>0
natural_image
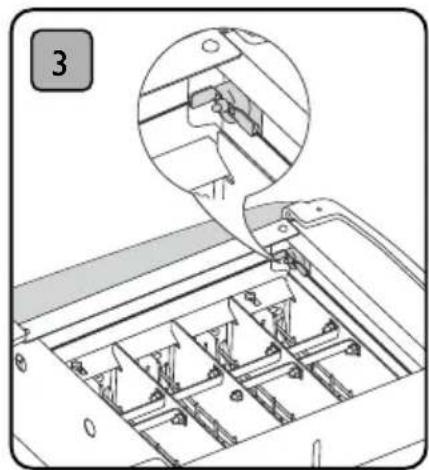
Technical diagram of a mechanical assembly with a magnified inset showing a component inserted into a housing (no text or symbols visible)&30□1@>0□.,9□-0□7::,?0/□49 ?30□=0,=□.:=90=□:1□?30 ?:,>?0=□-:/D□
&30□1@>0□4>□=0>0?□-D /0;=0>>492□?30□>8,77□B34?0 -@??:9□:9□4?>□1,.0□
natural_image
Diagram of a vehicle hood with a tool inserted, showing components like a valve and sensors (no text or symbols present)014C ?30 -,>0 ;7, 0 ,9/ =0? @=9 \?30 .=@8- \?= ,D
The Vario toaster is also kind on the environment, all parts are repairable or replaceable. You don't throw away a Dualit Vario toaster, for a nominal cost we fix it for you!
Dualit repairs department regularly receive toasters over 40 years old. They are fixed and go back to the owner in full working order. If your toaster needs a repair, simply contact our helpline on 01293 652 500 for repair or servicing advice.
ALL SERVICING MUST BE CARRIED OUT BY A QUALIFIED ELECTRICIAN OR REPAIRER.
For your own protection only use original Dualit spares in your toaster.
- Fitting of non Dualit parts will invalidate the guarantee.
ELEMENT SPARES
- When replacing ProHeat elements, only use genuine Dualit elements (stamped "DUALIT").
- The safety and the performance of the toaster cannot be guaranteedMif inferior elements are used.
TIMER SPARES
- When replacing the timer, only use a genuine Dualit timer.
- The safety and the performance of the toaster cannot be guaranteedMif an inferior timer is used.
REPLACING ELEMENTS
ALL SERVICING MUST BE CARRIED OUT BY A QUALIFIED ELECTRICIAN OR REPAIRER & PORTABLE APPLIANCE TESTED.
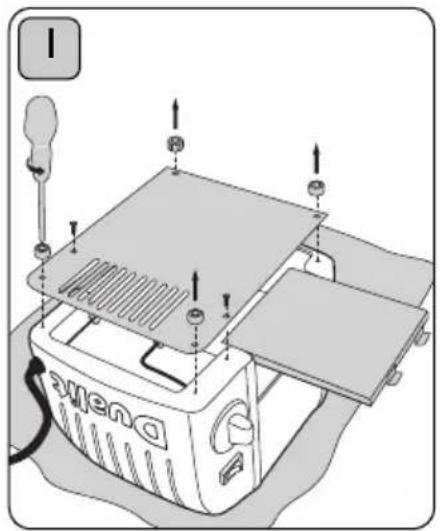
Unplug and place toaster on a soft cloth. Remove crumb tray and unscrew feet to remove the base plate.
natural_image
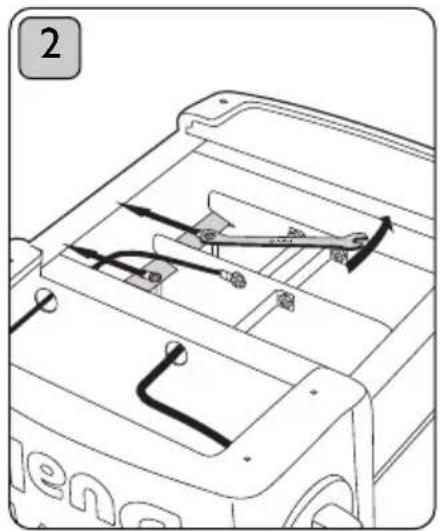
Technical line drawing of a vehicle chassis with internal components and motion arrows (no text or symbols)Loosen locking nuts on retaining plate using a 6.5mm spanner and slide back. Ensure that the retaining plate is correctly in position when reassembling.
natural_image
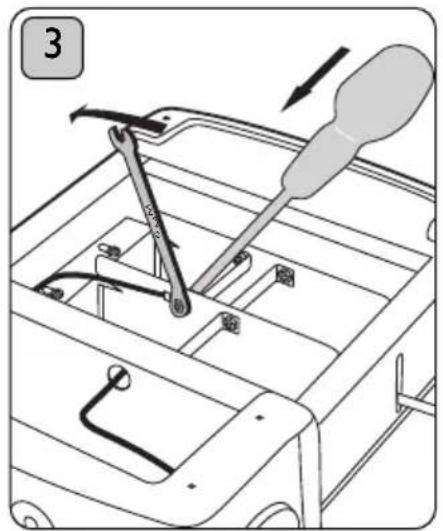
Diagram of a mechanical device with a tool and screwdriver inserted into a housing (no text or symbols)Unscrew brass links and wires.
natural_image
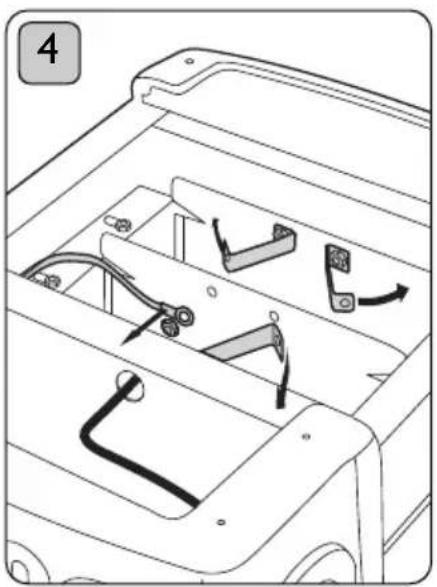
Technical diagram of a vehicle chassis with internal components and directional arrows (no text or symbols)Bend brass links and wires away from the element.
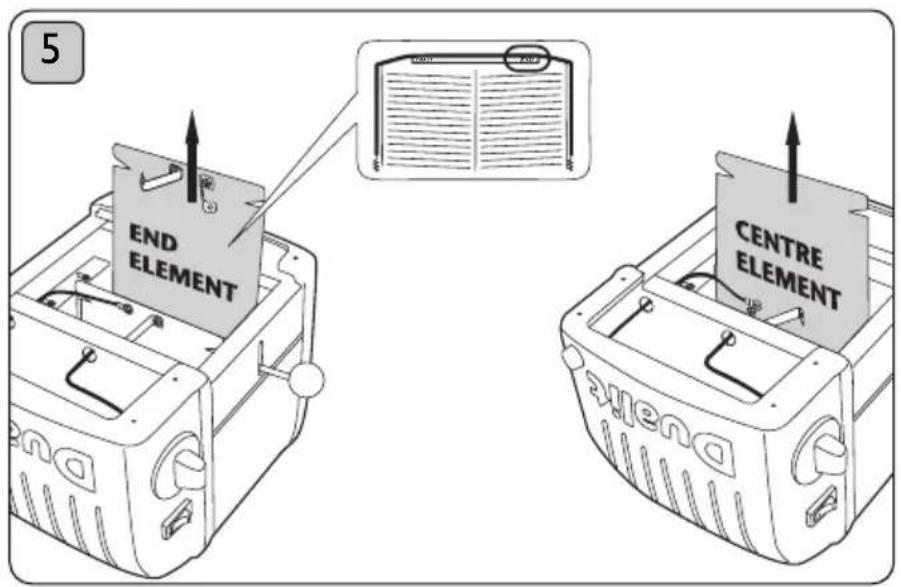
Remove element. To reassemble, reverse procedure ensuring wires and parts are correctly positioned. Ensure new element is marked the same as the one removed. The element heats on both sides and can be inserted facing either way. Check it is seated correctly in the channels either side. Portable Appliance Tested before use.
TROUBLESHOOTING
MY TOASTER IS NOT WORKING:
- Check the toaster is plugged in.
- Check if the 'neon' is glowing red.
If yes, your elements or 'selector' switch may need replacing.
If no, your plug fuse may have blown or your timer may need replacing.
I GET UNEVEN TOASTING:
- Check the selector switch is set for the number of slots being used.
• Starting from the left, ensure you have loaded all heated up slots. - The heavy duty Proheat elements can take a few moments to reach optimum toasting temperature. Preheating the slots prior to inserting your bread will eliminate this. Rotate the ‘timer’ all the way round, let it wind down to the circle indicator then insert your bread into the active slots.
- Ensure size and type of bread being toasted is the same.
- End elements take a little longer to warm up than centre elements, once toaster is at optimum operating temperature this will no longer occur.
- The timer is noticeably slow, unplug and do not use the toaster. Spare timers are available from www.dualit.com and must be fitted by a qualified electrical engineer.
MY TOASTER WOBBLIES ON MY WORK SURFACE:
- Use the adjustable foot under the toaster to compensate for uneven surfaces.
MY TOAST GETS STUCK WHEN I EJECT FROM THE TOASTER:
• Slices thicker than 28mm will get stuck.
• Hand cut slice must be cut evenly.
• Using a ‘sandwich cage’ can make toasting thicker items eaiser.
ONE SIDE OF MY BREAD IS NOT TOASTING:
- Check the 'selector' switch is set correctly. If set to Bagel setting only one side will toast and remember to insert bread from the very left hand slot.
- One or more of the elements may need replacing, call the helpline or visit www.dualit.com for replacements.
SMOKE COMING OUT OF THE SLOTS
- If this is the first time using your toaster, this is normal, your elements are being conditioned.
• Empty the crumb tray. A build up of crumbs can burn or cause a fire. - Some crumbs or pieces of bread may be stuck in the toaster. Unplug, remove the crumb tray then turn the toaster down over a sink or bin and gently shake the crumbs out or use a soft brush to clean inside your toaster.
MY TIMER IS NOTICABLY SLOW OR STICKING
- Unplug and do not use the toaster. Replace the timer immediately. Spare timers are available from www.dualit.com and must be fitted by a qualified electrical engineer.
THE POWER NEON IS ILLUMINATED BUT MY TOASTER IS NOT TOASTING
• The thermal fuse has been activated. See page 17.
GUARANTEE
This appliance is of excellent quality and construction. However, if any defects in materials or workmanship do appear during the relevant guarantee period, we will, at our discretion, either repair or replace the defective parts, free of charge, subject to the terms and conditions of our Guarantee shown below.
This Guarantee covers both parts and labour. Carriage is not included.
Your guarantee period is as follows:
• I year on parts
• 2 years on ProHeat elements
This Guarantee provides benefits which are additional to, and do not affect, your statutory rights. This guarantee does not cover the cost of returning the product to the dealer from whom it was purchased or to ourselves. This guarantee applies only to products sold and located in mainland Great Britain. It does not cover liability in respect of or replacement of plugs, cables or fuses and also does not cover defects due to:
- Failure to use or maintain product in accordance with Dualit's instructions.
- The product being connected to an unsuitable electricity supply.
• Accidental damage to or abuse or misuse of theMproduct.
• The product has not been modified except by Dualit or approved agent. - Dismantling of or interference with the product.
- Theft or attempted theft of the product.
Before returning any product under this guarantee, please check that:
• You have followed the product instructions correctly.
- Your mains electricity supply is functional.
• The defect is not due to a blown fuse.
If you wish to claim under this guarantee you should: - Send the product, postage or carriage paid, to the dealer from whom it was purchased or to Dualit direct.
- Ensure that the product is clean and packed carefully (preferably in its original carton).
- Enclose details of your name, address and telephone number and when and where the product was purchased, together with proof of purchase (e.g. a till receipt).
- Give exact details of the nature of the defect.
This Guarantee does not cover any other claims whatsoever, including, without limitation, any liability for incidental, indirect or consequential damage, nor does it cover any claims for conversion or modification or for the costs of repair carried out by any third party without the prior consent of Dualit. If replacement parts are fitted to the product this will not extend the period of the Mguarantee.
For further advise contact the Dualit customer helpline on +44 (0)1293 652 500 (09:00 to 17:00 Monday to Friday).
Alternatively, email Dualit at info@dualit.com or visit www.dualit.com.
Dualit®

Dualit Limited County Oak Way Crawley West Sussex RH117ST
Telephone: +44 (0) 1293 652 500 Facsimile: +44 (0) 1293 652 555
Email: info @dualit.com Web: www.dualit.com
VARIOGB-E

natural_image
Pure line drawing of a curved mechanical component without any text, numbers, or symbols- Dualit®
- TOASTING SINCE 1945
- CONTENTS
- SAFETY PRECAUTIONS
- READ ALL INSTRUCTIONS
- SAVE THESE INSTRUCTIONS
- IMPORTANT - BEFORE USING
- KNOW YOUR TOASTER
- PROHEAT ELEMENTS
- STAINLESS STEEL COVER
- MANUAL EJECTOR
- CRUMB TRAY
- WIDE SLOTS
- ALUMINIUM CASTINGS
- SELECTOR SWITCH
- POWER NEON
- MECHANICAL TIMER WITH DEFROST
- FEET
- ACCESSORIES - SOLD SEPARATELY
- THE SANDWICH CAGE
- THE WARMING RACK
- DO NOT PUT A PAN ON TOP OF THE WARMING RACK.
- TOASTING TIPS
- SETTING UP
- THE SELECTOR
- TOASTING
- TOASTING FROZEN BREAD
- MAKING TOASTED SANDWICHES
- CLEANING & CARE
- IMPORTANT: ENSURE THE TOASTER IS UNPLUGGED AND ALLOWED TO FULLY COOL BEFORE STARTING TO CLEAN.
- AFTER EACH USE
- THERMAL PROTECTION DEVICE
- \( \text{Ⅲ} \)%&&!\\&\\$ \text{Ⅲ} \%" \)
- ALL SERVICING MUST BE CARRIED OUT BY A QUALIFIED ELECTRICIAN OR REPAIRER.
- ELEMENT SPARES
- TIMER SPARES
- REPLACING ELEMENTS
- ALL SERVICING MUST BE CARRIED OUT BY A QUALIFIED ELECTRICIAN OR REPAIRER & PORTABLE APPLIANCE TESTED.
- TROUBLESHOOTING
- MY TOASTER IS NOT WORKING:
- I GET UNEVEN TOASTING:
- MY TOASTER WOBBLIES ON MY WORK SURFACE:
- MY TOAST GETS STUCK WHEN I EJECT FROM THE TOASTER:
- ONE SIDE OF MY BREAD IS NOT TOASTING:
- SMOKE COMING OUT OF THE SLOTS
- MY TIMER IS NOTICABLY SLOW OR STICKING
- THE POWER NEON IS ILLUMINATED BUT MY TOASTER IS NOT TOASTING
- GUARANTEE
Brand : DUALIT
Model : Vario 4
Category : Toaster