
EDF 6046 QXA++ - Dishwasher ECG - Free user manual and instructions
Find the device manual for free EDF 6046 QXA++ ECG in PDF.


| Product Type | Dishwasher |
| Model | EDF 6046 QXA++ |
| Brand | ECG |
| Energy Class | A+++ |
| Place Settings | 14 |
| Dimensions (H x W x D) | 85 x 60 x 60 cm |
| Weight | 45 kg |
| Power Consumption (annual) | 260 kWh |
| Water Consumption (per cycle) | 10 L |
| Noise Level | 46 dB(A) |
| Number of Programs | 6 (Eco, Auto, Intensive, Quick, Glass, Pre-rinse) |
| Additional Functions | Delay start, Half load, Extra dry |
| Safety Features | Child lock, Overflow protection, Leak detection |
| Filter System | Self-cleaning triple filter |
| Drying System | Condensation drying |
| Interior Light | Yes |
| Adjustable Rinse Aid | Yes |
| Water Softener | Yes, with adjustable hardness |
| Spare Parts Availability | Minimum 10 years |
| Warranty | 2 years |
Frequently Asked Questions - EDF 6046 QXA++ ECG
User questions about EDF 6046 QXA++ ECG
0 question about this device. Answer the ones you know or ask your own.
Ask a new question about this device
Download the instructions for your Dishwasher in PDF format for free! Find your manual EDF 6046 QXA++ - ECG and take your electronic device back in hand. On this page are published all the documents necessary for the use of your device. EDF 6046 QXA++ by ECG.
USER MANUAL EDF 6046 QXA++ ECG
natural_image
Exterior view of a modern stainless steel ECG appliance (no visible text or symbols on the main body)EDF 6046 QXA++
English
Deutsch
Čeština
Eesti keel
Hrvatski
Bosanski
Latviešu valoda
Lietuvių kalba
Magyar
Slovenčina
Slovenščina
Srpski
Crnogorski
DISHWASHER
INSTRUCTION MANUAL
GESCHIRRSPÜLMASCHINE
BEDIENUNGSANLEITUNG
MYČKA NA NÁDOBÍ
NÁVOD K OBSLUZE
NÕUDEPESUMASIN
KASUTUSJUHEND
PERILICA POSUĐA
UPUTE ZA UPORABU
TRAUKU MAZGĀJAMĀ MAŠĪNA
ROKASGRAMATA
INDAPLOVÉ
INSTRUKCIJŲ VADOVAS
MOSOGATÓGÉP
HASZNÁLATI ÚTMUTATÓ
UMÝVAČKA RIADU
NÁVOD NA OBSLUHU
POMIVALNI STROJ
NAVODILA
MAŠINA ZA PRANJE SUDOVA
UPUTSTVO ZA UPOTREBU
CONTENTS
DESCRIPTION 5
Control panel....5
Dishwasher interior 5
INSTALLATION INSTRUCTIONS....6
Placement of the dishwasher 6
Connecting the water supply hose 6
Connecting the drain hose....6
Power connection....7
OPERATING INSTRUCTIONS....8
Before first use 8
Addition of salt to water softener....9
Filling the rinse aid dispenser....9
Detergent function 11
Detergents....12
Filing the dishwasher baskets 13
STARTING THE WASH PROGRAM....17
MAINTENANCE AND CLEANING....19
Filtration system....19
Cleaning of the spray arms....20
Caring for the dishwasher....20
TROUBLESHOOTING TIPS....21
Before calling the service....21
Error codes....22
TECHNICAL SPECIFICATIONS....23
SAFETY INSTRUCTIONS
Read carefully and save for future use!
Warning: The safety measures and instructions, contained in this manual, do not include all conditions and situations possible. The user must understand that common sense, caution and care are factors that cannot be integrated into any product. Therefore, these factors shall be ensured by the user/s using and operating this appliance. We are not liable for any damages caused during shipping, by incorrect use, voltage fluctuation or the modification or adjustment of any part of the appliance.
Always, when using electrical appliances, you should follow basic precautions including the following measures to prevent the risk of fire or electric shock:
- Do not force open the door or the baskets for dishes, do not sit on the door and do not step on it.
- Do not touch the heating element after finishing the washing.
- Do not start the dishwasher until it is properly seated. If the dishwasher is running, open the door very carefully because of the risk of scalding.
- Do not place heavy objects on the open door, the dishwasher could tip over.
- When you put in the dishes for washing:
- Place sharp-edged objects so that they do not damage the door seal.
- Attention: Knives and similar sharp objects must be put into baskets horizontally or with sharp edges downward.
- When using the dishwasher, make sure that the plastic items cannot come into direct contact with heating elements.
• After the end of the washing cycle, check, if the detergent dispenser is empty. - Do not wash plastic dishes in the dishwasher that are not identified as suitable for a dishwasher.
- Use only detergents and rinse aids designed for dishwashers.
- Use only detergents and rinse aids designed for automatic dishwashers. Never use soaps, laundry detergents or detergents for manual washing.
- Protect your appliance from children.
- Prevent children from coming into contact with washing detergent. Do not let them come close to the open door, inside may still be residues of detergent.
- The appliance is not designed for people with limited physical, sensory or mental abilities (including children), or lack of experience and knowledge, unless they are supervised or are familiarized with the use of the device by a person responsible for their safety.
- Children should be supervised to ensure that they do not play with the appliance.
- The detergents are strongly alkaline and their ingestion can be extremely dangerous! Prevent contact with skin and eyes. When the door is open, prevent children to come close to the dishwasher.
- Do not leave the door open, you can easily trip over it.
- If the power cable is damaged, it may be replaced only by the manufacturer, service technician or other qualified person, to avoid the risk of electric shock.
- Ensure ecological liquidation of the packaging material.
- Use the dishwasher only for the purpose for which it was designed.
• The power cable may not be pulled, bent or overloaded during installation. Do not touch the controls before installation. - When installing connect a new set of hoses, old hoses should not be used again.
- If there are ventilation openings on the bottom of the appliance, they must not be covered by a carpet.
- The appliance is intended for household use. Commercial use will void the warranty.
GROUNDING OF THE APPLIANCE
- This appliance must be grounded. In the event of a failure or accident, grounding reduces the risk of electric shock. The appliance is equipped with a three core power cable with a plug with grounding contact. In accordance with local laws and directives, the power cord must be connected to a properly grounded power outlet. Improper connection of the grounding conductor may increase the risk of electric shock.
• If you are not convinced about proper grounding of the appliance, contact a qualified technician. If the power cord plug of the device does not match your wall outlet, ask a qualified technician for replacement.
DESCRIPTION
CONTROL PANEL
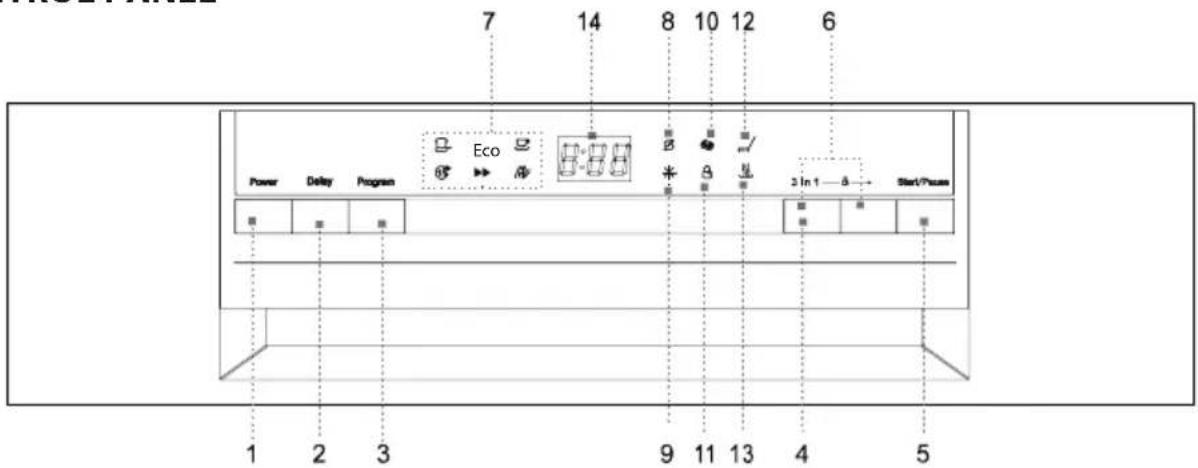
- Switch: Switching the appliance on and off.
- DELAY button: You can delay the start of the program by up to 24 hours by pressing this button.
- Program buttons: Select the required program by pressing the button repeatedly. Light of a particular indicator shows the selected washing program.
- "3 in 1" button: Press this button to activate or deactivate the function of the tablet 3in1.
- START/PAUSE button: Press this button to start or to pause the washing.
- Child lock: Press and hold (3 seconds) these two buttons to lock the dishwasher controls. If you want to unlock the controls again, press these buttons again.
- Selected program indicators: The selected program is indicated by a lit up indicator.
- Salt refill indicator: Lights up when you need to refill the salt dispenser.
- Rinse-aid refill indicator: Lights up when you need to refill the dispenser.
- Indicator 3in1: Function indicator lights up when activated.
- Child lock indicator: When the child lock is activated, the indicator flashes 6× and then remains lit when the lock is active.
- Washing indicator: It is on when the dishwasher washes the dishes.
- Drying indicator: Light is on when the dishwasher dries the dishes.
- Digital display: Shows the remaining part of the program, error codes and countdown of the delayed start.
DISHWASHER INTERIOR
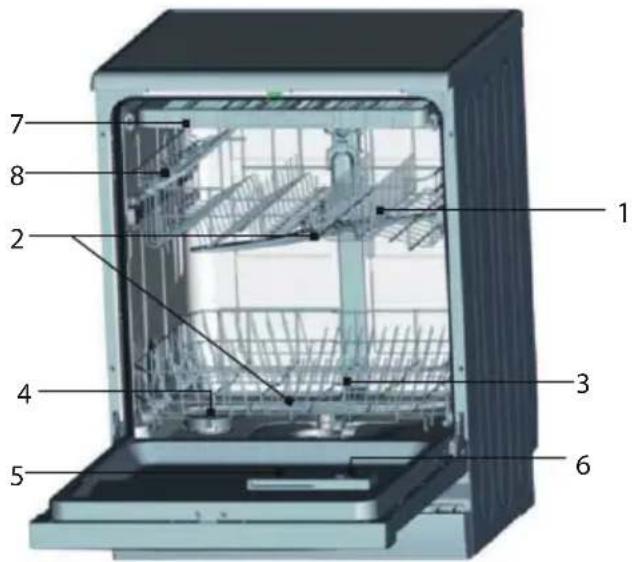
- Upper basket
- Spray arms
- Bottom basket
- Water softener
- Detergent dispenser
- Rinse aid dispenser
- Cutlery compartment
- Cups holder
INSTALLATION INSTRUCTIONS
WARNING!
- Entrust the dishwasher connections for power supply and water supply to qualified professionals.
- The appliance must not stand on the supply or drain hose or on the electrical power cable.
- The dishwasher must be connected to a water supply with a new set of hoses. Do not use an old supply hose.
PLACEMENT OF THE DISHWASHER
- Before installation, unpack the dishwasher and dispose of all packaging according to label instructions, and make sure that there is no damage caused by transportation. If you find any damage, stop the installation immediately and contact your vendor.
- When choosing a place for the dishwasher, make sure that you can load and unload dishes easily.
- Place the dishwasher close to water supply and drain.
- To facilitate the installation, the supply and drain hoses may be connected from left and right sides.
- When moving the dishwasher, do not lift it holding the door or the front panel.
- The dishwasher can also be inserted under your kitchen counter. Be careful when inserting the dishwasher in place that you do not squeeze the supply and drain hoses. Make sure that the dishwasher is not standing on the power cable.
- Place the dishwasher on a flat hard floor. Using the front adjustable feet, level the dishwasher horizontally. The tilt of the dishwasher should no exceed 2°. The level horizontal position ensures greater stability, prevents movement of the appliance and limits vibration and noise. Correct positioning of the dishwasher will also make the opening and closing of the door easier.
- If the dishwasher door does not close correctly, make sure the dishwasher is stable and level and if necessary adjust the level using the adjustable levelling feet.
Note: Maximum height of adjustable feet is 20 mm.
CONNECTING THE WATER SUPPLY HOSE
- The water pressure must be in range 0.04 up to 1.0 MPa. If the water pressure is lower, contact a technician.
- Make sure that the supply hose is not bent or twisted.
- If the water pipes are new or have not been used for a long time, have at first flow out enough water until completely clean water comes out.
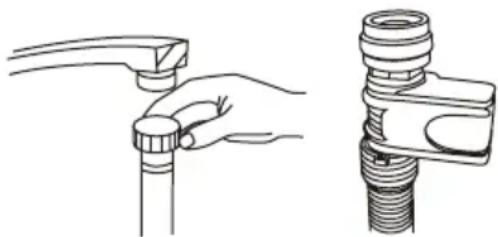
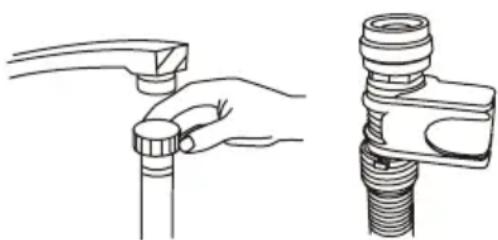
- Attach the hose to the water supply with 3/4 inch thread and tighten fittings.
- Check the tightness of the connection.
- Open the water supply tap fully before using the dishwasher.
CONNECTING THE DRAIN HOSE
Connect the drain hose to the drain pipe and make sure that the hose does not bend or twist. If the drain hose is too short, contact an authorized service center to request a longer hose of the same material. Keep in mind that the hose must not be even with an extension longer than 4 meters. A longer drain hose would prevent proper functioning of the dishwasher. Attach the hose firmly to the drain pipe so that it will not loosen during the operation of the dishwasher.
Connecting to the sink siphon
Drain connection must be positioned at a height between 50 cm (minimum) and 100 cm (maximum) above the bottom of the
natural_image
Technical line drawing showing two different pipe fitting configurations (no text or symbols)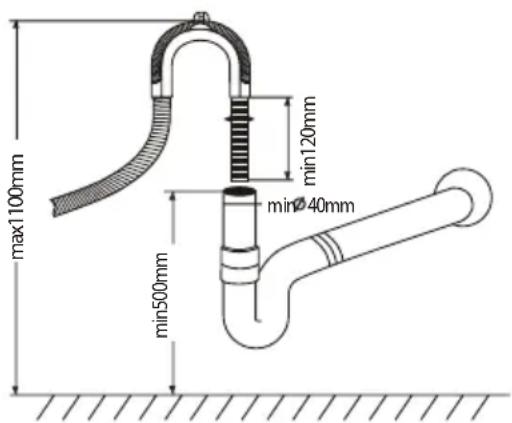
dishwasher. The drain hose should be attached by a clamp. The free end of the hose must not be submerged in water.
POWER CONNECTION
Before connecting the plug of the power cord into an electrical outlet, check the following:
- The outlet is grounded and complies with current standards.
- The outlet is suitable for the maximum power of the appliance, which is indicated on the rating plate on the inside of the door.
- The outlet voltage corresponds to the one on rating plate of the appliance.
- The type of outlet matches the type of plug of the power cord of the appliance. Otherwise, ask an authorized technician to replace the improper outlet. Do not use extension cords or power strips to connect the dishwasher.
STARTING THE DISHWASHER
Before starting the dishwasher, you need to check the following items.
- The dishwasher stands straight and firm.
- The intake valve is open.
- Hose connections do not leak water.
- The power cable is properly connected.
- The outlet is powered.
- The supply and drain hoses are not pinched or twisted.
- All packaging and labels are removed from the dishwasher.
WARNING:
• After installation keep the instruction manual.
- The content of the manual provides important information for the user.
OPERATING INSTRUCTIONS
BEFORE FIRST USE
Before first operation:
- Set the water softener.
- Pour in the salt dispenser 500ml of water and add dishwasher salt.
- Fill the rinse aid dispenser.
- Fill the detergent dispenser.
Water softener
Set the water softener manually using the rotary control of water hardness.
The function of the water softener is to remove from the water minerals and salts that could adversely affect the operation of the dishwasher. The higher content of minerals and salts the harder is the water. The water softener should be set according to the hardness of your water. Your water supplier should provide you with information about your water hardness.
Setting the salt consumption
The dishwasher allows to regulate the consumption of salt depending on the hardness of the water used. Thus can be the salt consumption optimized and regulated. When regulating the salt consumption, proceed as follows:
Salt dispenser can be set from H0 to H7, when setting is H0, the salt is not dispensed.
Determine the hardness of your water (this information can be obtained from your water supplier), and set the dose according to water hardness table:
- Close the door.
- Turn on the dishwasher using the button "Power".
- Hold the "Delay" button and then press the "Program" button for 5 seconds. A beep signal sounds and the display flashes H. (the default setting is H4).
- Press the "Delay" button to change the setting. The value of the dose increases by 1 level with each pressing of the "Delay" button. After reaching H7, it jumps with next pressing of the "Delay" button to H0 (dispensing is off).
- Press the button "Program". The setting is saved in the memory of the appliance.
Water hardness table
| Water hardness | mmol/l Set value | |
| °Clark Hardness | ||
| 0-8 soft 0-1.1 H0 | ||
| 9-10 soft 1.2-1.4 H1 | ||
| 11-12 medium 1.5-1.8 H2 | ||
| 13-15 medium 1.9-2.1 H3 | ||
| 16-20 medium 2.2-2.9 H4 | ||
| 21-26 | hard | 3.0-3.7 H5 |
| 27-38 | hard | 3.8-5.4 H6 |
| 39-62 | hard | 5.5-8.9 H7 |
Note:
• The water hardness can vary in each area.
• If hard water would be used, deposits would form on the dishes and cutlery.
- The appliance is equipped with a special water softener using salt dispenser designed to remove calcium and other minerals from the water.
ADDITION OF SALT TO WATER SOFTENER
The salt dispenser is located under the bottom basket. Fill it according to the following description:
- Use only salt designed for dishwashers! Other types of salts, which are not intended for dishwashers, for example kitchen salt would damage the water softener. In case of damage caused by use of improper salt the manufacturer does not keep warranty and is not responsible for any damage.
- Replenish salt just before starting one of the complete washing programs. You will prevent corrosion due to left over salt crystals or overflowed solution on the bottom of the dishwasher.
natural_image
Close-up of a kitchen sink with a metal tool and a glass bowl (no visible text or symbols)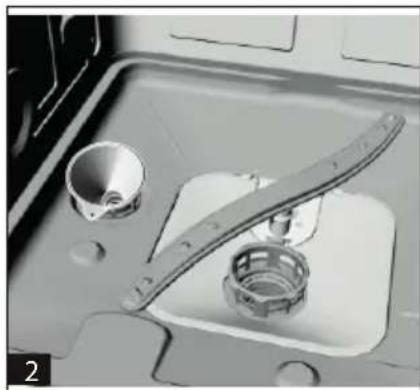
natural_image
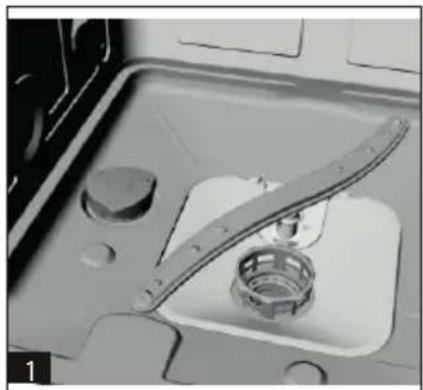
Interior view of a mechanical device with a tool and cylindrical components (no visible text or symbols)A. Remove the bottom basket and then unscrew the lid of the salt dispenser 1
B. If you fill the dispenser for the first time, fill to 2/3 of the volume with water (about 500 ml) 2.
C. Insert a funnel (not included) into the opening of the dispenser and pour into it about 2 kg of salt. A small amount of water usually overflows from the dispenser.
D. Screw the lid back properly after filling the dispenser.
E. Usually within 2–6 days after filling the salt container the salt indicator light goes off.
Note:
- Salt should be added when on the control panel the salt indicator lights up. Before the salt fully dissolves, the salt indicator is lit even after the salt has been replenished.
- If you spill salt around the container, start the soaking / rinsing program, which removes salt.
FILLING THE RINSE AID DISPENSER
The rinse aid function
Rinse aid is automatically dispensed for the final polishing process and prevents spotting and streaking upon drying.
WARNING:
Use only brand name rinse aids for the dishwasher. Never fill the rinse aid dispenser with any other substances (e.g. dishwasher detergent, liquid detergent). The dishwasher could be damaged.
When to replenish the rinse aid dispenser
When the rinse aid content decreases, the extent of indicator's dark parts changes as shown in the picture.
Full
3/4 of the content
1/2 of the content
1/4 of the content – necessary to replenish to prevent spots.
Empty
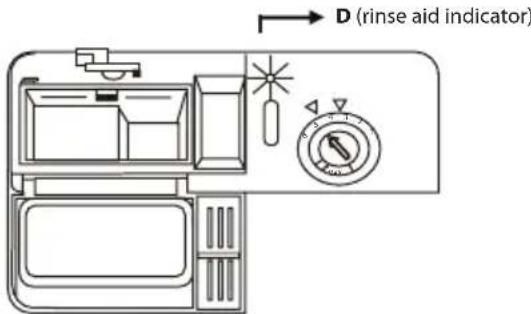
RINSE AID DISPENSER
natural_image
Line drawing of a hand holding a device with a finger pressing the button (no text or symbols)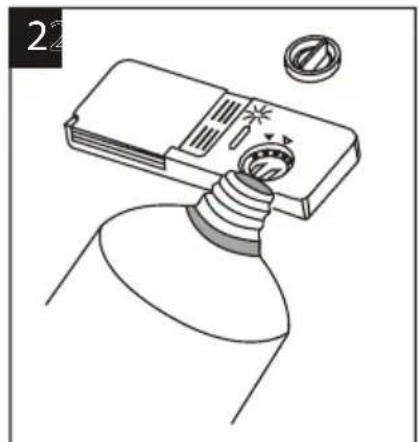
natural_image
Illustration of a light bulb with a screwdriver inserted into it, no text or symbols present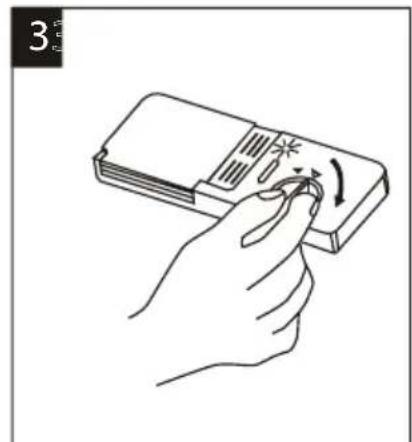
natural_image
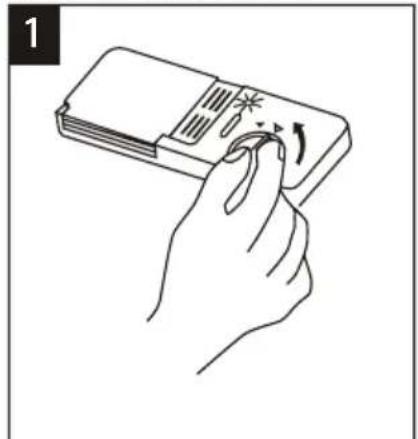
Line drawing of a hand holding a device with a scroll, showing motion (no text or symbols)- Open the dispenser by turning the cap to the arrow "open" (left) and remove the lid.
- Pour in the rinse aid carefully so it does not overflow.
- Put the lid back on, flush with the arrow "open", and close it by turning right towards "closed".
The rinse aid is released during the final phase of the program during polishing. This prevents forming drops on the dishes, which would leave them with stains and smudges. Also, it speeds drying and water draining from the dishes.
Liquid rinse aid is used in your dishwasher. The rinse aid dispenser is located in the door next to the detergent dispenser. When filling the dispenser remove the lid and pour rinse aid into it until indicator of rinse aid goes completely dark. The volume of the rinse aid dispenser is 140 ml.
Be careful to avoid overfilling the dispenser – residues of rinse aid cause foaming. Wipe off the leaked residue with cloth. Before closing the door, remember to put back the lid of the dispenser.
WARNING:
Wipe with absorbent cloth the rinse aid spilled during replenishing, to prevent excessive foaming during the next wash.
Setting the rinse aid dispenser
Rinse aid dispenser allows six setting positions. For the first time wash set the control to "4". If you encounter difficulties with the bad drying and spots, increase the rinse aid dosage by moving the dispenser lid and set the control to "5". If the dishes still are not drying well and bear noticeable stains, set the control to the next higher value, until spots stop forming. The manufacturer's setting is 5.
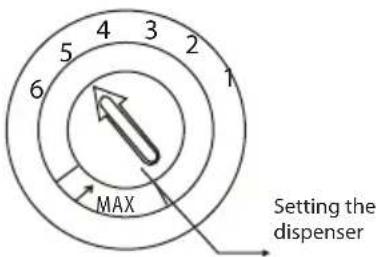
Note:
- If after washing are on the dishes drops of water or chalky stains, increase the rinse aid dosage. If there appear on the dishes white, sticky spots or on the knives and glass bluish coating, reduce the rinse aid dosage.
DETERGENT FUNCTION
The detergent contains chemicals necessary to dissolve and remove dirt from dishes and wash them out of the dishwasher. For these purposes are suitable most of the generally available quality detergents.
Concentrated detergent
According to their chemical composition, detergents can be split into two basic groups:
• Conventional alkaline agents with caustic components
- Weak alkaline concentrated agents with natural enzymes
Using the washing program "Eco" together with the concentrated detergent reduces environmental pollution and is optimal for your dishes. These washing programs are specially adapted to the enzyme's ability to dissolve dirt. For this reason, the "Eco" wash program using concentrated detergent can achieve the same results as would otherwise only be achieved using the "intensive" program.
Detergent tablets
Detergents in tablets of different brands dissolve at different speeds. For this reason, some tablets during short programs are not completely dissolved and do not release all cleaning agents. Therefore use the detergents in tablets only for long programs to dissolve all the contained chemicals.
Detergent dispenser
The detergent must be added before each wash as described in the instruction in the program table. This dishwasher uses less detergent and rinse aid than conventional dishwashers. The normal dose of detergent is only one tablespoon for one wash of normal load of dishes. More dirty dishes require a higher dose of detergent. Always add the detergent just before starting the dishwasher, otherwise it could become moist and hard to dissolve.
Used amount of detergent
natural_image
Line drawing of a hand pressing down on a device with a screwdriver and directional arrow (no text or symbols)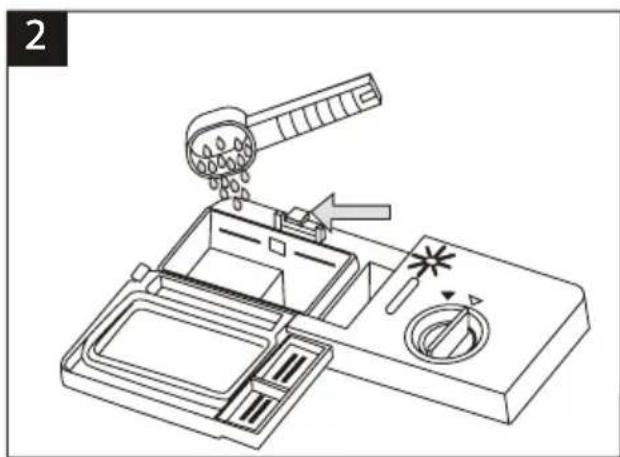
Note:
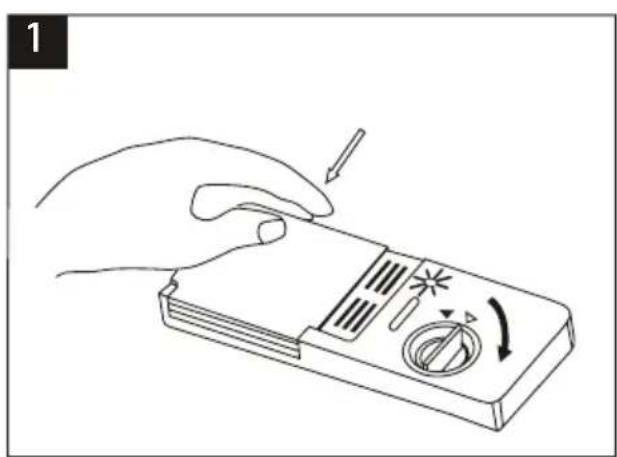
- When the lid is closed: push the open button. The lid opens.
- Add detergent just before washing. Use only brand name detergents designed for dishwashers.
WARNING:
Detergents are aggressive substances! Keep carefully away from children.
Proper use of detergent
Use only detergents designed for use in dishwashers. Store detergents in a dry and clean place. Pour the powder detergent in the dispenser just before dishwashing.
Detergent dosage
Fill the dispenser with detergent. Markings indicate the correct dose, as shown:
1 Compartment for detergent for the main washing cycle. The value "MIN" represents about 20 g of the detergent.
2 Compartment for the detergent for the pre-wash cycle, about 5 g of the detergent.
When dispensing and storing detergents, make sure to follow the manufacturer's instructions on the packaging.
Push the lid until it locks.
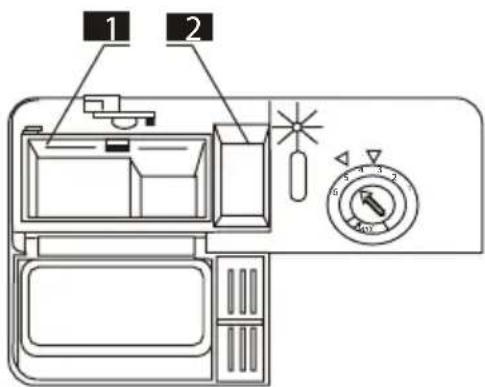
If the dishes are heavily soiled, fill the detergent compartment of the prewash cycle also. The agent will start to work during prewash.
Note:
• In the program table you will find information about dosage of detergent for each program. Please note that due to the degree of soiling of the dishes and the hardness of the water some differences may occur.
- Read the recommendations of the manufacturer on the detergent's packaging.
DETERGENTS
There are three kinds of detergents
- With phosphates and chlorine
- With phosphates without chlorine
- Without phosphates and without chlorine
New powder detergents usually do not contain phosphates. For this reason there is not water softening by phosphates. In this case it is recommend to fill the salt container, even if the water hardness is only 6^ dH. When using phosphate-free detergent with hard water, white spots often appear on the dishes and glass. In this case you can achieve better results, when you add larger amount of detergent. Chlorine-free detergents bleach less. Dark coloured stains may not be removed completely. In this case, run a program with higher working temperature.
Using the "3 in 1" tablets
General recommendations
These products are detergents with integrated rinse aid and softener (salt).
- You should make sure prior to using these products that the hardness of your water allows the use of the tablets (see the recommendation of the manufacturer on the product package).
- These products should be used exactly according to the manufacturer's instructions.
- If you would encounter problems when using "3 in 1" the first time, contact the customer support of the manufacturer.
Special recommendation
- When using combined products, the rinse aid and the softener are not effective. It could be useful to set the lowest possible water hardness.
Selecting the "3in1" function
- Press the power button to turn on the dishwasher and select the washing program 3in1 (press the 3in1 button, so that indicator starts flashing).
- Press Start/Pause to start the program 3in1. The indicator 3in1 will be on.
Cancelling the "3in1" function
Proceed according to instructions "Cancelling an active program". If you decide to use a standard washing detergent, we recommend:
- Refill the salt and rinse aid dispensers.
- Change the water hardness setting to the highest possible degree and run three ECO washing cycles without dishes.
- Pre-set the water hardness back according to the hardness of your water.
Note: The washing cycle "3in1" is an additional function and has to be used together with another washing program (Intensive, ECO, light).
FILING THE DISHWASHER BASKETS
You will achieve the best cleaning results if you follow these instructions. The function and the appearance of the baskets can vary according to the model of the dishwasher.
Loading and unloading dishes from the basket
- Remove larger food leftovers from the dishes. Let the pans with burnt leftovers soak. It is not necessary to pre -rinse the dishes under running water.
- Load the objects in the dishwasher as follows:
- Objects such as cups, glasses, pots, bowls, etc. put in bottom up.
– Lay diagonally the dishes with carved or arched portions to allow water to run out. - Arrange all the object so that they cannot be overturned.
- Arrange all objects so that the spray arms can move freely.
- You should not put very small objects in the dishwasher; they could fall through the basket.
- When loading the dishwasher, the bottom and the upper basket should not be pulled out simultaneously to prevent overturning.
Unloading dishes from the dishwasher
We suggest that you empty the lower basket first and then the top, you avoid dripping water from the upper basket to the bottom.
Filling the upper basket
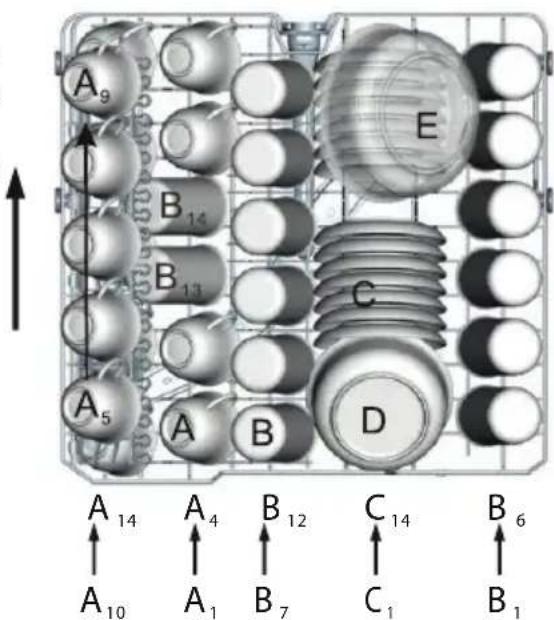
The upper basket is designed for more delicate and smaller items such as glasses, mugs, cups and saucers, plates, bowls and shallow bowls (if they are not too dirty).
Load the dishes and the cutlery in such a way that they cannot be overturned by streaming water.
A. Cups
B. Glasses
C. Saucers
D. Bowl
E. Bowl
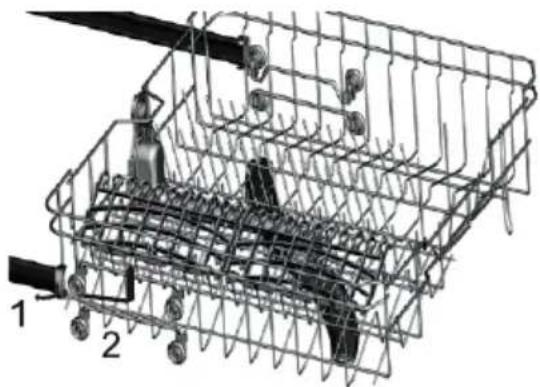
Adjusting the upper basket
The height of the upper basket can be adjusted to create more space for large utensils either in the upper or lower basket. Adjust the height of the upper basket by inserting the basket rollers in the rails positioned at different heights. Load the long objects, serving and table cutlery and knives in the basket in such a way that they do not impede the movement of the spray arms. Compartment can be laid down or removed if not used.
natural_image
Mechanical assembly diagram showing a wire cage with springs and components, labeled 1 and 2 (no text or symbols present)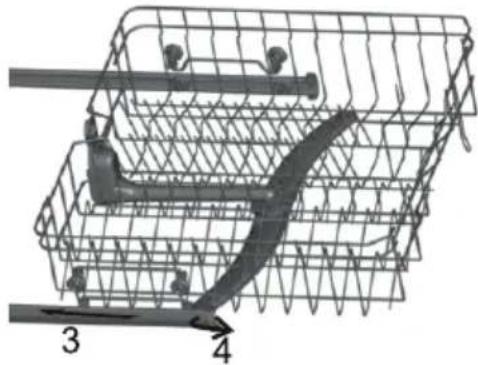
natural_image
Diagram of a shopping basket with numbered guide pins (3 and 4) indicating parts of the basket structure (no text or symbols on the diagram itself)Filling the bottom basket
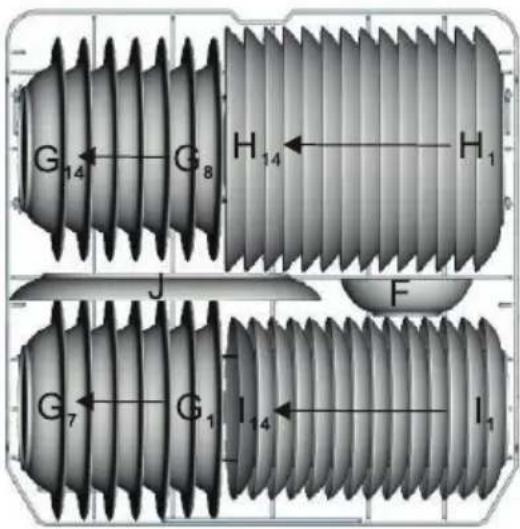
Larger objects and objects that are difficult to clean, i.e. Pots, pans, lids, plates and bowls, should be placed in the lower basket as shown in the picture.
We recommend to put the plates and the lids on the sides of the basket so as not to impede the rotation of the upper spray arm. Pots, bowls, etc. must always be placed upside down.
Deep pots are loaded on slant to allow water to run out of them. The bottom basket has folding stands enabling the loading of large pots and pans.
F. Bowl
G. Soup plate
H. Shallow plate
I. Desert plate
J. Oval platter
Folding tines of the upper and bottom baskets
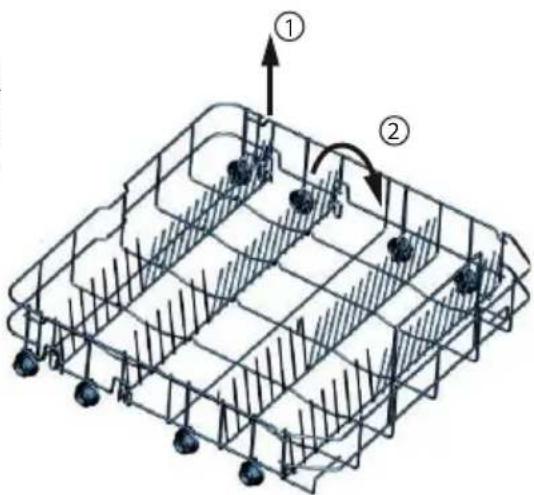
Folding tines consist of two parts. When you fold the tines in the bottom basket you make more space for larger pots and pans. If desired, each part can be separately folded or both parts folded simultaneously and you create a large storage area in the bottom basket.
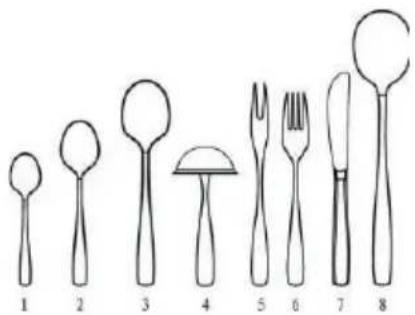
Cutlery tray
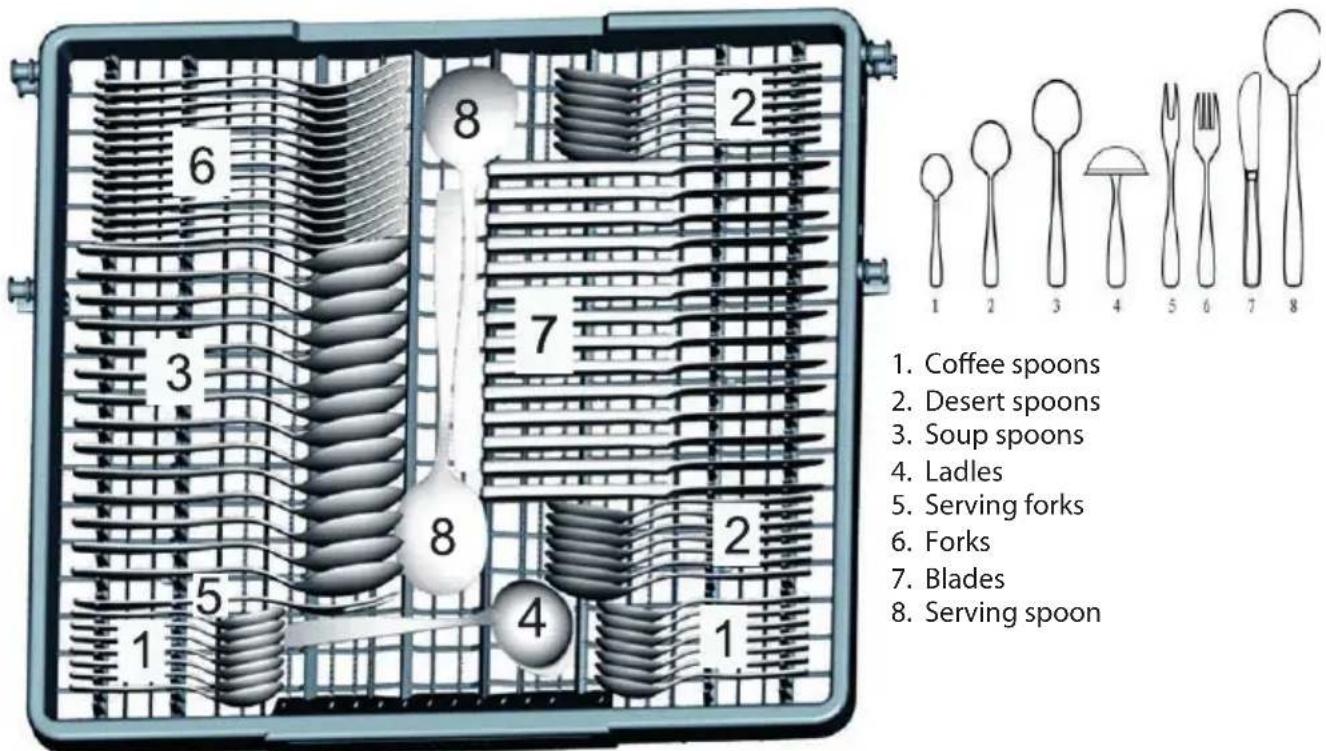
Place the cutlery in the tray in the indicated manner. Place the cutlery so that the water can flow through freely.
Door side
Dishes unsuitable for washing in the dishwasher
Entirely unsuitable
Cutlery with handles of wood, porcelain, horn or mother of pearl.
Plastic dishes which are not heat resistant.
Cutlery with glued parts that are not heat resistant.
Glued dishes and cutlery.
Tin and copper objects.
Crystal glass.
Steel objects, which corrode.
Wooden boards.
Objects made of synthetic fibres.
Not recommended
Certain types of glass, which may be tarnished after repeated washing.
Silver and aluminium parts which tend to lose color during washing.
Glazed patterns may fade when frequently washed in a dishwasher.
NOTE: Do not insert objects soiled by cigarette ash, wax or paint. When buying a new kitchen equipment, make sure that it is suitable for dishwasher.
NOTE: Never overload the dishwasher. Do not use dishes that are not suitable for use in dishwashers. Only in this way you will get good results and save energy.
Loading dishes and cutlery
Before loading dishes:
- Remove larger leftovers.
- Let the remains of burnt meals soak.
WARNING:
- Make sure that no object can pass through the basket bottom.
• Always load sharp objects with blades downward!
When loading the dishes and cutlery, always make sure that:
- The loaded items do not impede turning of the spray arms.
- Hollow items such as cups, glasses, bowls, etc. load upside down, so that the water does not collect in them.
- Dishes and cutlery must not lie inside one another and may not overlap.
- The glasses should not touch one another to prevent damage.
- Load larger items, more difficult to wash, in the bottom basket.
- The upper basket is designed for more delicate and smaller items such as glasses, cups and mugs.
WARNING:
Long-bladed knives loaded in an upright position are a potential hazard! Long or sharp objects, such as carving knives must be positioned horizontally in the upper basket.
Damage to glasses and other dishes
Possible causes:
- Unsuitable type of glass or product. Chemical composition of the detergent.
- Unsuitable water temperature and length of the program.
Recommended solutions:
- Use glass and china marked by the manufacturer as dishwasher safe.
- Use fine detergents designed for the appropriate dishes. If necessary, ask the detergent manufacturer for more information.
- Select program with lower temperature.
- Remove glass and cutlery out of the dishwasher as soon as possible after washing to prevent possible damage.
After finishing washing
After finishing the work cycle, the dishwasher emits six sound signals. Press the power button to switch off the dishwasher, stop the water supply and open the door of the dishwasher. Before removing the dishes from the dishwasher, wait a few minutes before handling the dishes while they are still hot and there is a greater risk of breakage. Also, the dishes dry better.
STARTING THE WASH PROGRAM
TABLE OF WASH PROGRAMS
| Programme | Information for program selection | Program description | Detergent Pre-wash/wash | Program length (min.) | Energy consumption (kWh) | Water consumption (l) |
 Intensive Intensive | For heavily soiled pots and pans and dishes with dried food remains. | Pre-wash Wash (60 °C)Rinse 1Rinse 2Hot rinseDrying | 5/30 g (or 3in1) | 169 1.50 | 18 | |
| Eco(*EN 50242)(standard program) | For normally soiled loads, such as pots, plates, glasses and lightly dirty pans.Standard daily cycle. | Pre-wash Wash (46 °C)Hot rinseDrying | 5/30 g (or 3in1) | 178 0.93 | 11 | |
 Light Light | Light washing program is suitable for delicate dishes, sensitive to high temperatures. (Start immediately after using the dishes) | Wash (45 °C)RinseHot rinseDrying | 5/20 g (or 3in1) | 147 0.95 | 14 | |
 60 min 60 min | Lightly and normally soiled glasses, plates or bowls, everyday washing. | Pre-wash Wash (60 °C)Hot rinseDrying | 5/20 g 60 1.00 | 11.5 | ||
 Fast Fast | Short wash for lightly dirtied dishes, which are not necessary to dry. | Wash (45 °C)Hot rinse | 15 g 36 0.55 | 7 | ||
 Rinse Rinse | To rinse dishes, which you want to wash later. | Pre-wash / 11 0.01 | 4 |
* EN 50242: this program is a testing cycle.
Information for comparative test in accordance with EN 50242 is as follows:
- Capacity: 14 sets
• Upper basket position: Bottom position - Setting of rinse-aid dispenser: 5 (or 4 for dispenser with four positions)
SWITCHING ON THE APPLIANCE
Starting the wash program
- Fill both baskets with dishes and load them back.
We recommend to fill first the bottom basket and then the upper one (see chapter „Control panel“). - Add the detergent (see chapters on dosage).
- Connect the power cord to a suitable power outlet, see rating plate of the appliance. Check, if the water supply is fully open.
- Make sure that nothing prevents the spray arms from moving and close the door.
- Press the power switch and pressing the program button select the required washing cycle, see Program table.
Note:
- When you properly close the door you will hear a click. After completing the wash, you can turn off the appliance by pressing the power button.
CHANGING PROGRAM
Basic condition: You can change the program during the operation only in case that the dishwasher runs for only a short time. Otherwise, the detergent may be already consumed and water is drained. Then you need to refill the detergent dispenser again (see section "Adding detergent").
- Press the power button to cancel the program and when you press this button again, you turn the dishwasher on.
- Now you can select new required program (see "Starting the washing program").
Note:
- If you open the door during the washing cycle, the dishwasher stops, an alarm signal sounds and the display shows error message "E1". When you close the door, the dishwasher resumes washing after a short pause.
Note:
- If all the control lights start flashing, it means that the dishwasher is out of order. Turn off the main switch, close the water supply and call service.
If you forget to load the dishes
Forgotten dishes can be loaded at any time until the opening of the detergent dispenser.
- Open the door slightly and wait until the program stops.
- Once the spray arms stop working, you can open the door.
- Load the forgotten dishes.
- Close the door, the dishwasher starts again after 10 seconds.
WARNING!
- It is dangerous to open the door during operation, there is a risk of scalding by the hot water. The washing program stops only when the digital display shows “- - - ” and a beep sounds 6 x. Then turn off the dishwasher using the power switch and turn off the water supply.
AFTER FINISHING PROGRAM
- Press the switch to turn the dishwasher off.
- Close the water supply.
- Open the dishwasher door carefully, leave it ajar and wait a few minutes before removing the dishes. The dishes can cool down and dry better.
Notes
- Open the door carefully, the steam coming from the open door is hot!
- Before removing the dishes and cutlery from the dishwasher, wait a few minutes, because shortly after washing the dishes are hot and could easily crack.
Unloading dishes from the dishwasher
- The interior of the dishwasher is usually moist.
- Unload first the bottom basket and then the upper one. Thus you will avoid water dripping from the upper into the bottom basket.
MAINTENANCE AND CLEANING
FILTRATION SYSTEM
The filter protects the pump against penetration of larger pieces of food and other objects. Remains of food may clog the filter. Therefore it is necessary to remove and clean the filter from time to time.
Filtration system consists of a coarse filter, a flat (main filter) and a fine microfilter.
1 Flat filter
The food remains and dirt are guided by a special jet on the lower arm into this filter.
2 Coarse filter
This filter captures the larger particles such as pieces of bone or glass, which could clog the drain. If you need to remove trapped particles from the filter, gently squeeze the tabs at the top and pull out the filter.
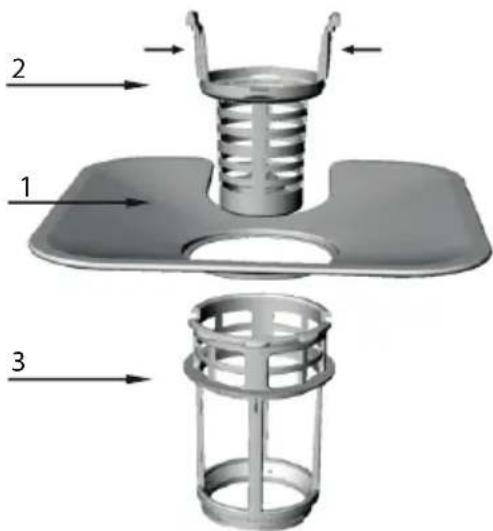
3 Micro filter
This filter captures in the dirt trap small food particles and prevents their returning on the dishes.
- Check after each use of the dishwasher that the filter is not clogged.
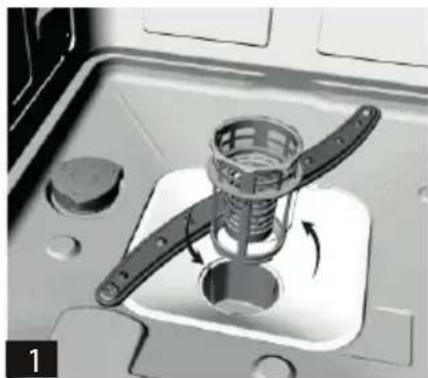
- After unscrewing the coarse filter, you can remove the entire filter system. Remove all food remains and then rinse the filter under running water.
natural_image
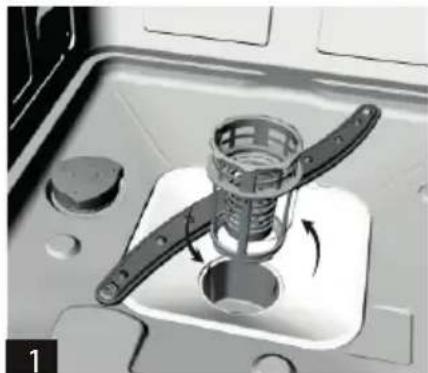
Mechanical component with spring mechanism and rotating arrow (no text or symbols)Step 1: Turn the filter counter-clockwise and then slide it out.
natural_image
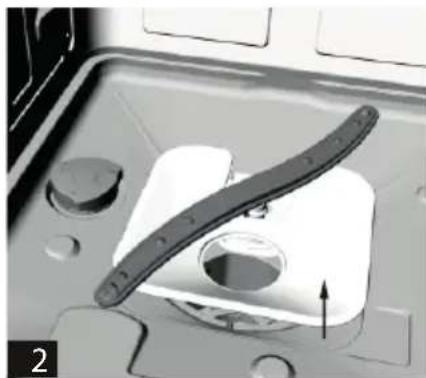
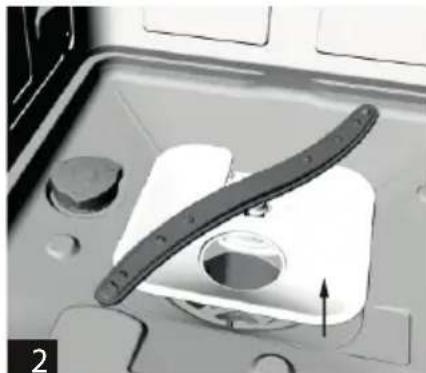
Close-up of a mechanical component with a curved handle and circular opening, no visible text or symbolsStep 2: Push the flat filter upward.
Note:
- When removing the filter, proceed from step 1 to step 2, when inserting the filter back, proceed from step 2 to step 1.
Filter assembly
Regular filter cleaning ensures optimum performance and washing results. The filter effectively captures particles from the wash water and allows the recycling of water during the cycle. It is therefore advisable after each wash cycle to remove from the filter larger trapped particles by rinsing the filter under running water. Remove the filter by pulling the tab of the filter in the vertical direction. The whole filter should be cleaned once a week.
Use a cleaning brush to clean the coarse and fine filter. Then reassemble the filter as shown above and insert the entire filtration system into the dishwasher back into position and push it downward.
WARNING!
- The dishwasher must never be used without a filter! Improper insertion of the filter may reduce the performance of the appliance and damage dishes and utensils.
- Do not tap on the filter when cleaning it. Deformed filter negatively affects the functionality of the appliance.
CLEANING OF THE SPRAY ARMS
Regular cleaning of the spray arms of chemicals from hard water is important because emerging limescale clogs jets and bearings. You can remove the spray arms by unscrewing the nut at the top of the arm in a clockwise direction, then you can remove the arms. Rinse spray arms in warm, soapy water and using a soft brush clean the jets. After thorough rinsing put the arms back.
CARING FOR THE DISHWASHER
Clean the control panel using slightly wet cloth. Dry thoroughly after cleaning.
For the maintenance of the exterior use high quality polishing wax. Never use sharp tools, abrasive powders or aggressive cleaners to clean the dishwasher.
Frost protection
If the dishwasher is left in the winter in an unheated place, do the following:
- Disconnect the dishwasher from power.
- Close the water supply and disconnect the hose from the water supply.
- Drain water from the water supply hose and water valve. (Use pot to catch the water.)
-
Reconnect the water supply hose to the water valve.
-
From the bottom of the dishwasher, remove the filter tank and use a sponge to dry the water from the sink trap.
Cleaning the door
- Use only a cloth dampened with warm water to clean around the rim of the door. Do not use spray cleaners to prevent water from penetrating the door lock or electrical components. Also do not use any abrasive cleaners or abrasive powders that could scratch the surface of the appliance. Even some paper towels can leave traces on the surface or scratches.
How to keep your dishwasher in good condition
After each washing
After each wash, close the water supply to the appliance and leave the door slightly open so that the moisture and odors can vent from the interior.
Disconnect the power supply
Before any cleaning and maintenance disconnect the power supply. Do not take a risk.
Do not use solvents or abrasive cleaners.
Never use solvents or abrasive cleaners to clean the exterior and rubber parts of the dishwasher. Use only cloth dipped into warm, soapy water. Remove stains and residue from the interior surfaces of the dishwasher with a cloth soaked in a mild vinegar solution or a special agent intended for dishwashers.
During vacations
If the appliance will not be in use for longer time, perform a wash cycle without dishes, disconnect the power supply, close the water supply and leave the door of the dishwasher ajar. This will prevent forming odors inside the appliance and you will save the door seal.
Moving the dishwasher
If the machine must be moved, try to transport it in an upright position. If it is absolutely necessary, it can be placed on its back.
Seal
Remains of food that gets stuck in the door seals are one of the factors creating the odor in the dishwasher. Prevent the formation of odor by regularly cleaning the seal with a damp sponge.
TROUBLESHOOTING TIPS
BEFORE CALLING THE SERVICE
The commendations in the following table may help you solve the problem. If the problem persists, contact an authorized service center.
| Problem Possible cause | use Corrective action | |
| The dishwasher does not start. | There is a blown fuse or a tripped circuit breaker. | Replace the fuse or switch back the breaker. Disconnect all electrical appliances plugged into the same outlet circuit. |
| The power is not on. Make sure | the dishwasher is turned on and the door is properly closed. Make sure that the power cord plug is securely plugged into the wall outlet. | |
| Too low water pressure Make sure | re the water supply is connected properly and the intake valve is open. | |
| The drain pump does not stop. | Overflow The system is designed | to detect an overflow condition. In this case, the circulation pump stops and the drain pump starts. |
| Noise Certain sounds are | normal during washing | Sound of opening the lid of the detergent dispenser. |
| Dishes are not properly secured in baskets or a small object fell into the basket. | Make sure that all the dishes in the dishwasher are properly secured. | |
| Motor noise The dishwasher was | not used regularly. If you rarely use the dishwasher, do not forget every week to fill and drain water to prevent drying of seals. | |
| Foam in the dishwasher tub | Wrong detergent Use only detergents designed for automatic dishwashers. In the case of foam, open the dishwasher door and let the foam evaporate. Pour into the tub about 4.5 litres of cold water. Close the dishwasher and run the program "soaking" to drain the water. Repeat if necessary. | |
| Rinse aid overflow Wipe the spilled rinse aid immediately. | ||
| Coloured interior of the tub | Detergent with dye was used. Make sure that the detergent used does not contain dyes. | |
| The dishes and cutlery are not clean | Unsuitable program was selected | Select a more intensive program. |
| Improper loading of dishes in the baskets | Make sure that the effects of the detergent dispenser and spray arms are not blocked by large dishes. | |
| Spots and film on glasses and cutlery | 1. Very hard water2. Low temperature3. Too many dishes in the dishwasher4. Incorrectly loaded dishes5. Old or wet detergent6. Empty rinse aid dispenser7. Incorrect dosage of the detergents | Removing spots from glass:1. Remove all metal cutlery2. Do not replenish detergent3. Select the longest program4. Run the dishwasher and let it run for about 18 to 22 minutes before coming into the main wash.5. Open the door and pour in 2 cups of white vinegar.6. Close the door and let the dishwasher finish the program. If the vinegar does not help: Repeat the above procedure, but instead of vinegar, use 1/4 cup (60 ml) of citric acid crystals. |
| Coating on glassware. The combination of soft water and an excessive amount of detergent. | If you are using soft water, use less detergent for glass washing and select a shorter program. | |
| Problem Possible cause | Corrective action | |
| Yellow or brown film on interior surfaces | Coffee or tea spots Use a solution | of 1/2 cup of bleach and 3 cups of water and remove stains manually.WARNING!After completing the program, wait before cleaning the interior surface for at least 20 minutes to let the heating elements cool down. Otherwise, there is a risk of burns. |
| Metal deposits in water can cause pervasive coating | Contact your water supplier with a request to install a special filter. | |
| White coating on the inner surface. | Hard water containing minerals | To clean the interior, use a sponge soaked in detergent for dishwashers. Use rubber gloves. Never use any other cleaner than for dishwasher to prevent formation of foaming or suds. |
| Detergent dispenser lid does not close properly | The residue of detergent clogged the lid catch. | Remove the residue of the detergent from the catch. |
| Detergent remained in the detergent dispenser trays. | The dishes blocked the dispenser trays. | Rearrange the dishes. |
| Steam This is normal Certain amount of steam comes through the ventilation openings during drying and draining of water. | ||
| Black or gray spots on the dishes. | Aluminium utensils have rubbed against other dishes. | To remove these stains use a mild abrasive cleaner. |
| Water remains on the bottom of the sink | This is normal Small amount of water on the bottom of the sink prevents drying of the water seal. | |
| Water leak from the dishwasher | Overfilling dispenser or spill of the rinse aid | Make sure that you do not overfill the rinse aid dispenser. Spilled rinse aid can cause excessive foaming and may lead to overflow. Wipe the spilled rinse aid using wet cloth. |
| The dishwasher is not in level position | Make sure that the dishwasher is in level position. | |
ERROR CODES
In the event of a malfunction a corresponding error code appears on the dishwasher control panel using the LED indicators.
| Code meaning | Possible cause | |
| E1 Open door | Open door during dishwasher | running |
| E2 Water supply | Water supply malfunction | |
| E3 Water drainage | Water drainage malfunction | |
| E4 Temperature | sensor Temperature sensor failure | |
| E5 Overflow/leakage | of water Overflow/leakage | of water occurred |
| E6 Water leakage | Water leakage occurred | |
| E7 Heating element | Heating malfunction |
WARNING:
- If there is a water leak, close the water inlet valve and contact an authorized service center. If there is on the floor of the dishwasher water due to overflow or leak, remove it before restarting the dishwasher.
TECHNICAL SPECIFICATIONS
Specifications for the household dishwasher according to EU regulations no. 1059/2010:
| Manufacturer ECG | |
| Model EDF 6046 QXA++ | |
| Number of dish sets 14 | |
| Energy efficiency class ^1 | A++ |
| Annual energy consumption ^2 | 266 kWh |
| Energy consumption per standard wash cycle 0.93 kWh | |
| Energy consumption in off mode 0.35 W | |
| Energy consumption in standby mode 0.9 W | |
| Annual water consumption ^3 | 3080 l |
| Drying efficiency class ^4 | A |
| Standard wash cycle ^5 | Eco |
| The length of program of the standard wash cycle 178 min | |
| Noise level 47 dB(A) | |
| Assembly Freestanding | |
| Height 850 mm | |
| Width 600 mm | |
| Depth (including connections) 600 mm | |
| Power input 1850 W | |
| Rated voltage / frequency 220–240 Vac / 50 Hz | |
| Water pressure (hydrodynamic pressure) | 0,4-10.0 bar = 0,04-1.0 MPa |
| Water temperature | Max. 61 °C |
Note:
1 A + + + (highest effectiveness) up to D (lowest effectiveness)
2 The annual consumption of energy 266 kWh is calculated on the basis of 280 standard wash cycles using cold water and programs with lower energy consumption. Actual energy consumption will depend on how the appliance is used.
3 The annual consumption of water 3080 litres is calculated on the basis of 280 standard wash cycles. Actual water consumption will depend on how the appliance is used.
4 A (highest effectiveness) up to G (lowest effectiveness)
5 This program is suitable for washing normally soiled dishes and in the same time the program is the most efficient in terms of energy and water consumption for that category of dishes.
The appliance meets European standards and regulations in their current version:
- LVD - EU directive 2014/35/EU
- EMC – EU directive 2014/30/EU
- EUP 1016/2010
The above values were measured under specific conditions, in accordance with the relevant standards. Results may vary significantly depending on the amount and degree of soiling of the dishes, water hardness, amount of detergent, etc.
This instruction manual is written according to the standards and regulations of the European Union.
DISPOSAL
Remove properly all the packaging material from the dishwasher. All packaging material can be recycled.
Plastic parts are marked with standard international abbreviations:
• PE......polyethylene, e.g. shrink wrap
- PS ......styrofoam, e.g. padding material
- POM .....polyoxymethylene, e.g. plastic clips
- PP......polypropylene
• ABS......acrylonitrile-butadiene-styrene, e.g. a control panel
NOTICE
- Packaging material may be dangerous for children!
- Please, hand over the unused packaging material to the collection center. Disable the appliance by removing the door and by cutting the power cord.
- Cardboard packaging is made from recycled paper and therefore should be separately collected for further recycling.
• Proper disposal of the device will help to protect the environment and human health, which could be jeopardized in case of improper handling of the product. - For more information about recycling this product, contact your local authorities or collection center.
DISPOSAL: Do not place the product into unsorted municipal household garbage. Individual parts have to be separated according to the materials and stored separately for further processing.
USE AND DISPOSAL OF WASTE
Wrapping paper and corrugated paperboard – deliver to scrapyard. Packing foil, PE bags, plastic elements – throw into plastic recycling containers.
PRODUCT DISPOSAL AFTER END OF LIFE
Disposal of electric and electronic equipment (valid in EU member countries and other European countries with an implemented recycling system)
The represented symbol on the product or package means the product shall not be treated as domestic waste. Hand over the product to the specified location for recycling electric and electronic equipment. Prevent negative impacts on human health and the environment by properly recycling your product. Recycling contributes to preserving natural resources. For more information on the recycling of this product, refer to your local authority, domestic waste processing organization or store, where you purchased the product.
This product complies with EU directives on electromagnetic compatibility and electrical safety.
The instruction manual is available at website www.ecg-electro.eu.
Changes of text and technical parameters are reserved.

INHALT
BESCHREIBUNG 28
Bedienfeld 28
natural_image
Illustration of a hand holding a pipe fitting and a threaded connector (no text or symbols)natural_image
Close-up of a mechanical component with a handle and central hub (no visible text or symbols)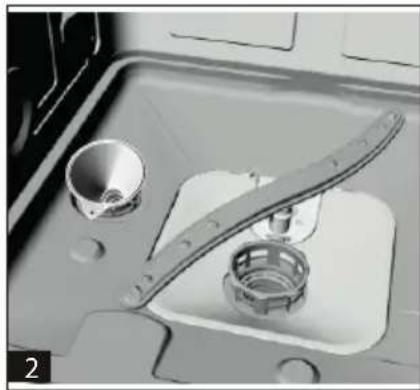
natural_image
Interior view of a mechanical device with a tool and circular component (no visible text or symbols)KLARSPÜLER NACHFÜLLEN
Klarspüler-Funktion
natural_image
Line drawing of a hand pressing down on a device component with an arrow indicating rotation (no text or symbols)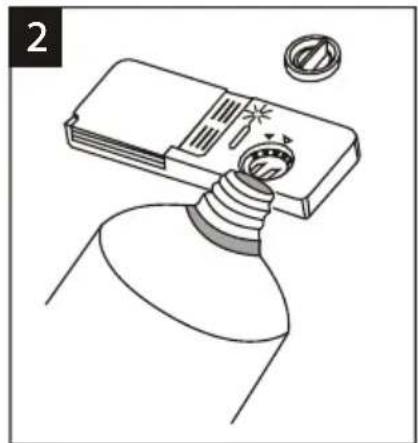
natural_image
Illustration of a light bulb with a screwdriver inserted, showing internal components and a magnified view (no text or symbols)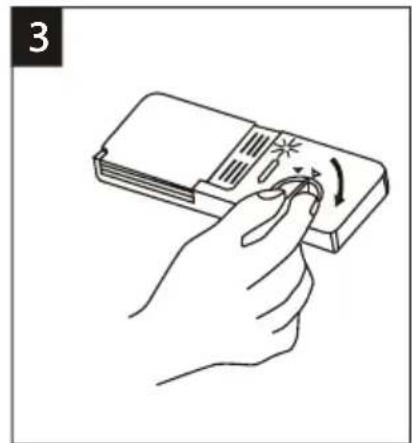
natural_image
Line drawing of a hand holding a device with a scroll wheel (no text or symbols)natural_image
Line drawing of a hand pressing down on a device with a screwdriver and directional arrow (no text or symbols)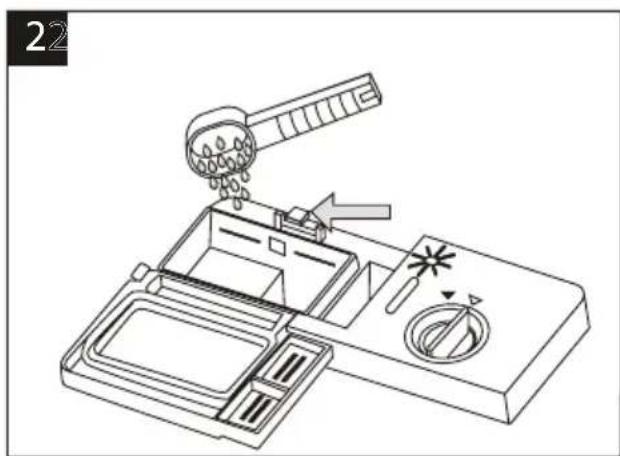
Bemerkung:
natural_image
Diagram of a wire mesh cage with two labeled components (1 and 2), showing internal structure and connections without any readable text or symbols.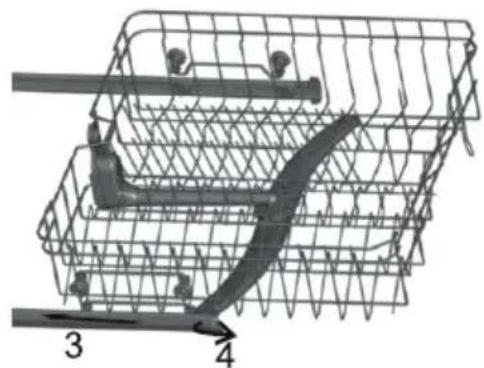
natural_image
Diagram of a wire mesh basket with numbered arrows indicating components (no text or symbols present)Besteckfach
3 Mikrofilter
natural_image
Close-up of a mechanical component with a handle and internal spring mechanism (no visible text or symbols)natural_image
Close-up of a mechanical component with a curved blade and circular opening, no visible text or symbolsnatural_image
Technical line drawing of a mechanical device with rotating arms and mounting base (no text or symbols)POKYNY K INSTALACI
VAROVÁNÍ!
natural_image
Technical line drawing showing two different mechanical or plumbing assembly configurations (no text or symbols present)PŘIPOJENÍ ODPADNÍ HADICE
natural_image
Close-up of a mechanical component with a lever and housing (no visible text or symbols)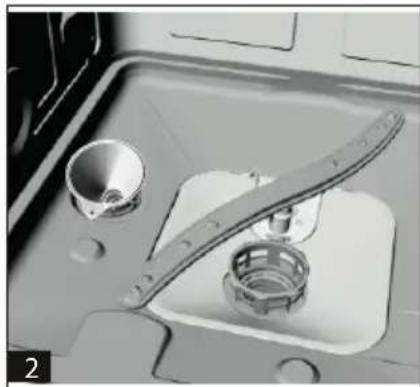
natural_image
Close-up of a kitchen sink with a metal tool and a bowl, no visible text or symbolsnatural_image
Line drawing of a hand pressing down on a device with an arrow indicating rotation (no text or symbols)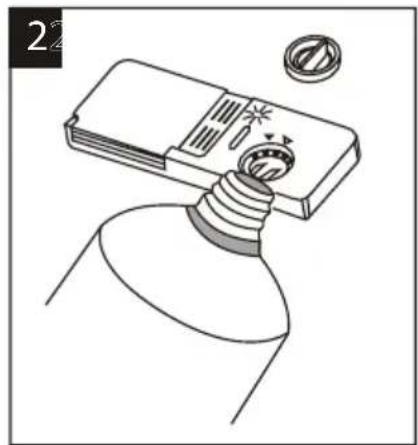
natural_image
Illustration of a light bulb with a screwdriver inserted, no text or symbols present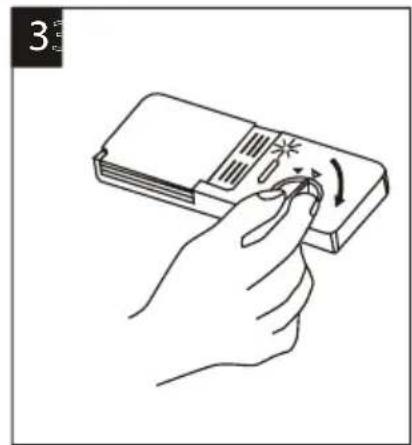
natural_image
Line drawing of a hand holding a device with a scroll wheel, no text or symbols presentnatural_image
Line drawing of a hand pressing down on a device with a tool, showing no text or symbols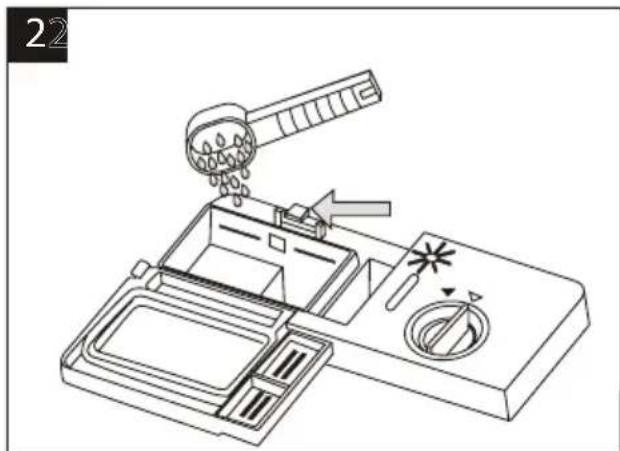
Poznámka:
natural_image
Technical illustration of a wire mesh cage with two labeled components (1 and 2), showing internal structure and no readable text or symbols.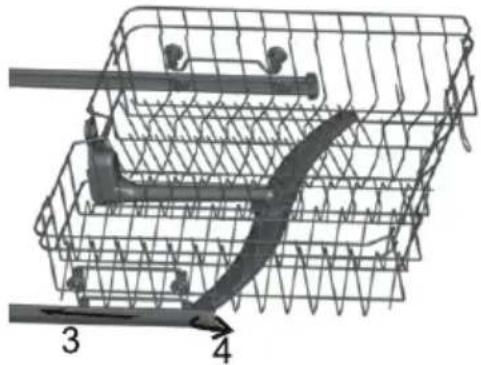
natural_image
Diagram of a shopping basket with numbered guide pins (3 and 4) and a curved handle, no readable text or symbols.Plnění dolního koše
Tác na příbory
Čeština
3 Mikrofiltr
natural_image
Mechanical component with spring and lever mechanism (no visible text or symbols)natural_image
Close-up of a mechanical component with a curved black handle and circular features, no visible text or symbolsKrok 2: Vysuňte plochý filtr nahoru.
Poznámka:
natural_image
Technical line drawing of a mechanical device with rotating components and directional arrows (no text or symbols)O dovolené
NÕUDEPESUMASINA SISEMUS
PAIGALDAMISJUHISED
HOIATUS!
natural_image
Technical line drawing showing a hand adjusting a pipe fitting with a separate mechanical component (no text or symbols)ÄRAVOOLUVOOLIKU ÜHENDAMINE
natural_image
Close-up of a mechanical component with a handle and central bowl (no visible text or symbols)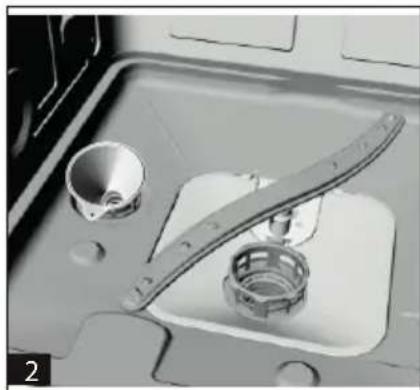
natural_image
Interior view of a mechanical device with a tool and cylindrical components (no visible text or symbols)natural_image
Line drawing of a hand holding a device with a knob, showing a rotation arrow (no text or symbols)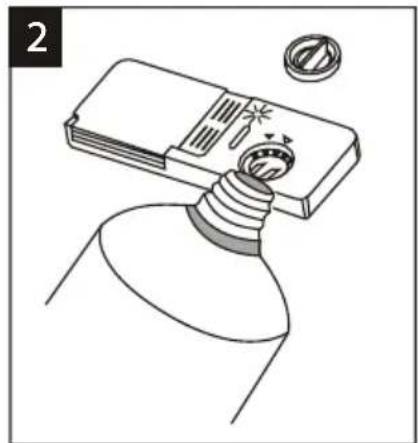
natural_image
Illustration of a light bulb with a screwdriver inserted, no text or symbols present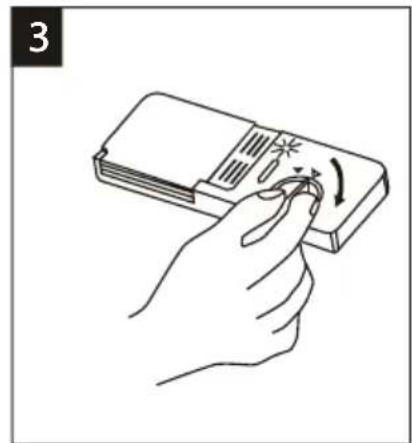
natural_image
Line drawing of a hand holding a device with a scroll wheel, no text or symbols presentnatural_image
Line drawing of a hand pressing down on a device with a tool, showing no text or symbols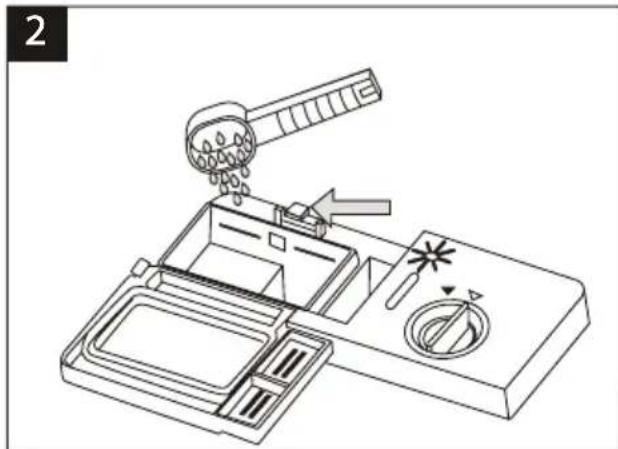
Märkus:
natural_image
Diagram of a wire cage with coiled springs and two labeled components (1 and 2), no readable text or symbols present.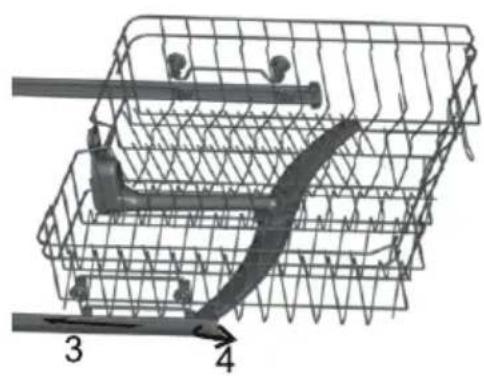
natural_image
Diagram of a shopping basket with numbered guide pins (3 and 4) indicating selection or positioning, no text or symbols present.Söögiriistade alus
3 Peenfilter
natural_image
Mechanical component with spring and lever mechanism (no visible text or symbols)natural_image
Close-up of a mechanical component with a curved blade and circular opening, no visible text or symbolsnatural_image
Technical line drawing of a mechanical device with rotating components and directional arrows (no text or symbols)NÕUANDED VEAOTSINGUKS
ENNE TEENINDUSKESKUSESSE HELISTAMIST
UPUTE ZA UGRADNJU
UPOZORENJE!
- Spajanje perilice na električnu mrežu i napajanje vodom povjerite obučenim profesionalcima.
- Uređaj ne smije biti postavljen na dovodno ili odvodno crijevo, kao ni na kabel za napajanje električnom energijom.
- Perilica mora biti spojena na vodovod pomoću potpuno novog kompleta crijeva. Nemojte koristiti staro crijevo za dovod vode.
SMJEŠTAJ PERILICE POSUĐA
natural_image
Technical line drawing showing two different mechanical or plumbing joint configurations (no text or symbols present)SPAJANJE CRIJEVA ZA ODVOD
natural_image
Close-up of a mechanical component with a handle and central hub (no visible text or symbols)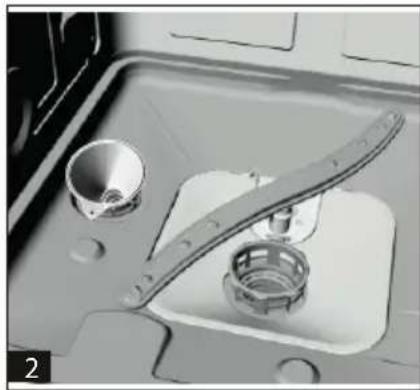
natural_image
Interior view of a kitchen appliance with a tool and bowl (no visible text or symbols)A. Izvucite donji koš i zatim odvrnite i uklonite poklopac spremnika za sol označen brojem 1.
B. Kad prvi puta punite spremnik soli, napunite ga do dvije trećine vodom (oko 500 ml) 2.
C. Na otvor spremnika postavite lijevak (nisu priložene) i naspite u njega oko 2 kg soli. Često iz spremnika isteknu male količine vode.
D. Nakon sto je spremnik napunjen, pažljivo navrnite poklopac.
E. Obično nakon 2–6 dana nakon punjenja spremnika kontrolna žaruljica za stol prestane svijetliti.
Napomena:
- Sol treba nadopunjavati onda kad na kontrolnom panelu zasvijetli kontrolna žaruljica za sol. Prije nego se sol potpuno otopi, može se dogoditi da kontrolna žaruljica nastavi svijetliti i nakon što je sol bila dopunjena.
- Raspete li sol oko spremnika, pokrenite program ispiranja ili pretpranja koji će ju ukloniti.
PUNJENJE DOZATORA SJAJILOM
Funkcija sjajila
Sjajilo se automatski dozira u završnom dijelu pranja i poliranja i sprečava stvaranje mrlja i pruga prilikom sušenja.
UPOZORENJE
U perilici koristite samo sjajila provjerenih marki. Nikada ne punite dozator sjajila drugim tvarima (npr. deterdžentom za ručno pranje suđa, tekućim sapunom). To bi moglo dovesti do oštećenja perilice.
Kada puniti dozator sjajila
natural_image
Line drawing of a hand holding a device with a knob, showing a rotation arrow (no text or symbols)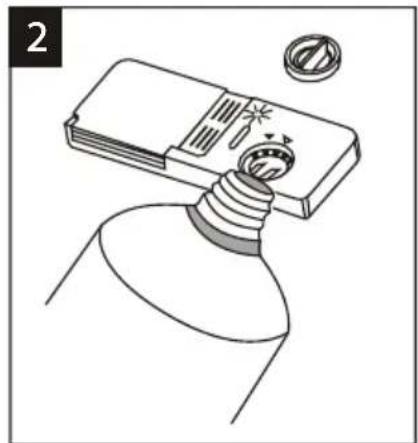
natural_image
Illustration of a light bulb with a screwdriver inserted, showing mechanical components (no text or symbols)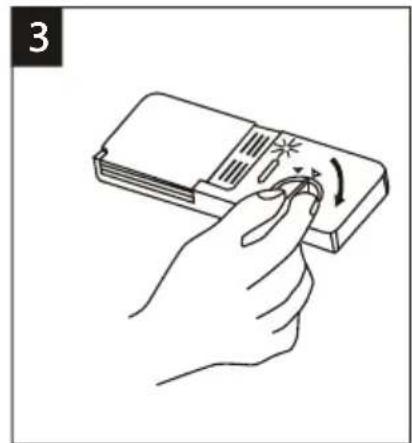
natural_image
Line drawing of a hand holding a device with a scroll wheel, no text or symbols presentnatural_image
Line drawing of a hand pressing down on a device with a screwdriver and directional arrow (no text or symbols)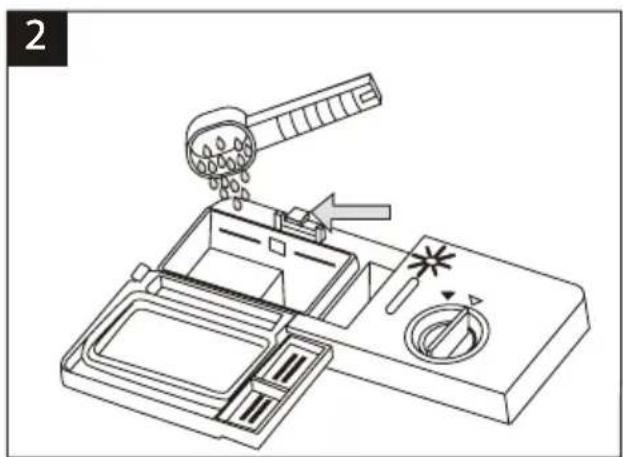
Napomena:
- Ako je poklopac zatvoren: pritisnite tipku za otvaranje. Poklopac se otvara.
- Deterdžent napunite neposredno prije pranja. Koristite samo one marke deterdženta koje su preporučene za ovu perilicu.
UPOZORENJE
Deterdženti su agresivne tvari! Pažljivo ga odložite da bi bio stalno izvan dohvata djece!
Pravilno korištenje deterdženta
Koristite samo deterdžente marki preporučenih za perilice. Deterdžente čuvajte na suhom i čistom mjestu. Uspite deterdžent u prahu u dozator neposredno prije pranja posuđa.
Doziranje deterdženta
Napunite dozator deterdžentom. Oznake za količinu imaju ovdje prikazano značenje, pogledajte sliku:
1 Prostor za količinu za glavno pranje posuđa. Vrijednost „MIN“ odgovara oko 20 g deterdženta.
2 Prostor za količinu za ciklus pretpranja, oko 5 g deterdženta.
Kod doziranja i odlaganja deterdženata obratite pozornost i postupite prema uputama proizvođača koje su navedene na ambalaži proizvoda.
natural_image
Technical illustration of a wire cage with two labeled components (1 and 2), showing internal structure and no readable text or symbols.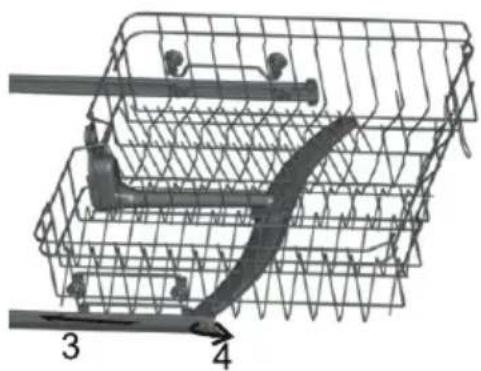
natural_image
Diagram of a multi-level electric motor stator with labeled parts (3 and 4), no text or symbols present.Ulaganje u donji koš
Veće predmete koje je teško oprati kao što su lonci, tave, poklopci, tanjuri i zdjele treba postaviti u donji koš kao što je prikazano na slici.
Rešetka za jedaći pribor
NAKON ZAVRŠETKA PROGRAMA
- Pritisnite tipku za uključivanje da biste isključili perilicu.
- Zatvorite dovod vode.
- Pažljivo otvorite vrata perilice, ostavite ih malo otvorena i prije nego izvadite posuđe pričekajte nekoliko minuta. Posuđe se tako može ohladiti i bolje se osuši.
Napomene
natural_image
Mechanical component with spring mechanism and rotating arrow (no text or symbols visible)natural_image
Close-up of a mechanical component with a curved blade and circular opening, no visible text or symbolsKorak 2: Povucite ravni filtar prema gore.
Napomena:
- Prilikom uklanjanja filtra provedite korak 1, a zatim korak 2, a kad budete ponovo sastavljali sustav filtracije prvo obavite korak 2, pa zatim korak 1.
Ugradnja filtra
Redovito čišćenje filtra osigurava optimalan rad i moć pranja. Filtar učinkovito zaustavlja čestice iz vode za pranje i omogućuje recikliranje vode za vrijeme ciklusa. Zbog toga je potrebno nakon svakog ciklusa pranja ukloniti iz filtra veće zadržane čestice ispiranjem filtra pod mlazom vode. Filtar izvadite povlačenjem za njegovu ručku prema gore. Cijeli filtar bi se trebao čistiti jednom tjedno.
natural_image
Technical line drawing of a mechanical device with rotating components and directional arrows (no text or symbols)Čišćenje vrata
- Da biste očistili rub oko vrata poslužite se samo krpom natopljenom toplom vodom. Nemojte koristiti nikakve sprejeve za čišćenje da ne bi došlo do ulaska vode u bravu vrata ili da ne bi prodrla do električnih dijelova. Nemojte koristiti agresivne otopine, abrazivna sredstva za čišćenje ili abrazivne praške, budući da time možete oštetiti površinu. Čak i neki papirni ručnici mogu na površini ostaviti tragove ili ogrebotine.
UZSTĀDĪŠANAS INSTRUKCIJAS
BRĪDINĀJUMS:
natural_image
Illustration of a hand holding a pipe fitting and a threaded pipe fitting (no text or symbols)NOTECES ŠLŪTENES PIEVIENOŠANA
natural_image
Close-up of a mechanical component with a curved handle and central hub (no visible text or symbols)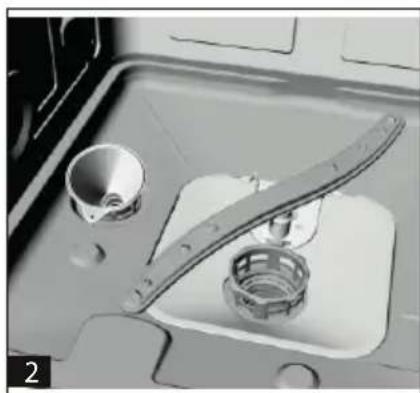
natural_image
Close-up of a mechanical component with a tool and cylindrical part inside a container (no visible text or symbols)natural_image
Line drawing of a hand holding a device with a scroll, no text or symbols present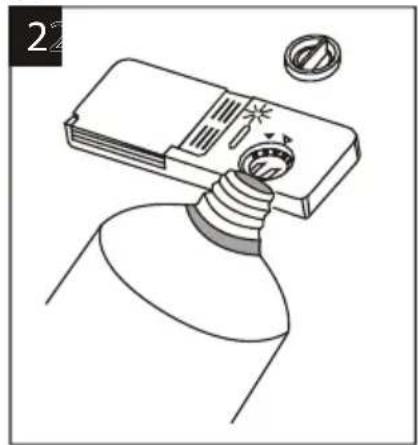
natural_image
Diagram of a light bulb with a screw and a washer, no text or symbols present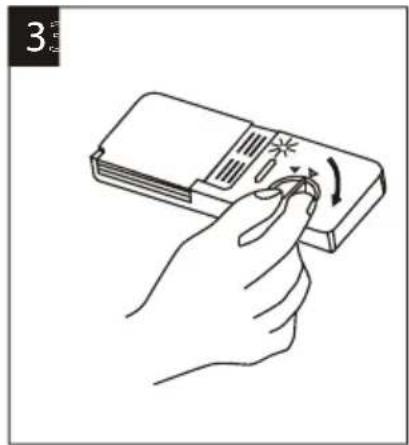
natural_image
Illustration of a hand holding a device with a scroll wheel, showing motion (no text or symbols)natural_image
Line drawing of a hand pressing down on a device with a scroll and directional arrow (no text or symbols)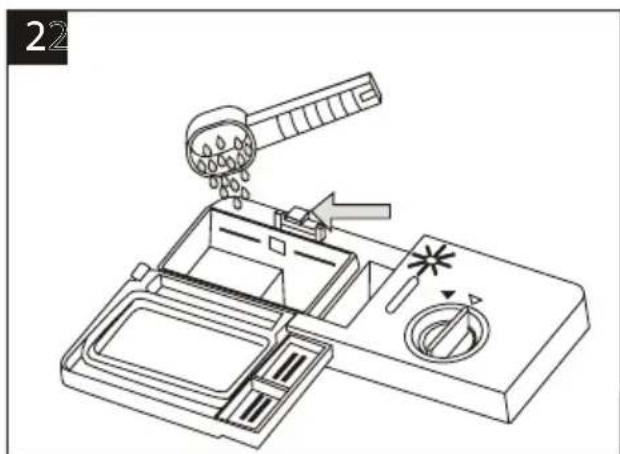
Piezime:
natural_image
Technical illustration of a wire cage with two labeled components (1 and 2), showing internal structure and no readable text or symbols.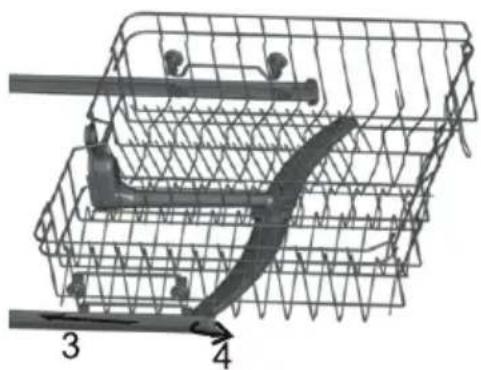
natural_image
Diagram of a multi-tiered shopping basket with a curved handle and numbered arrows (no text or symbols)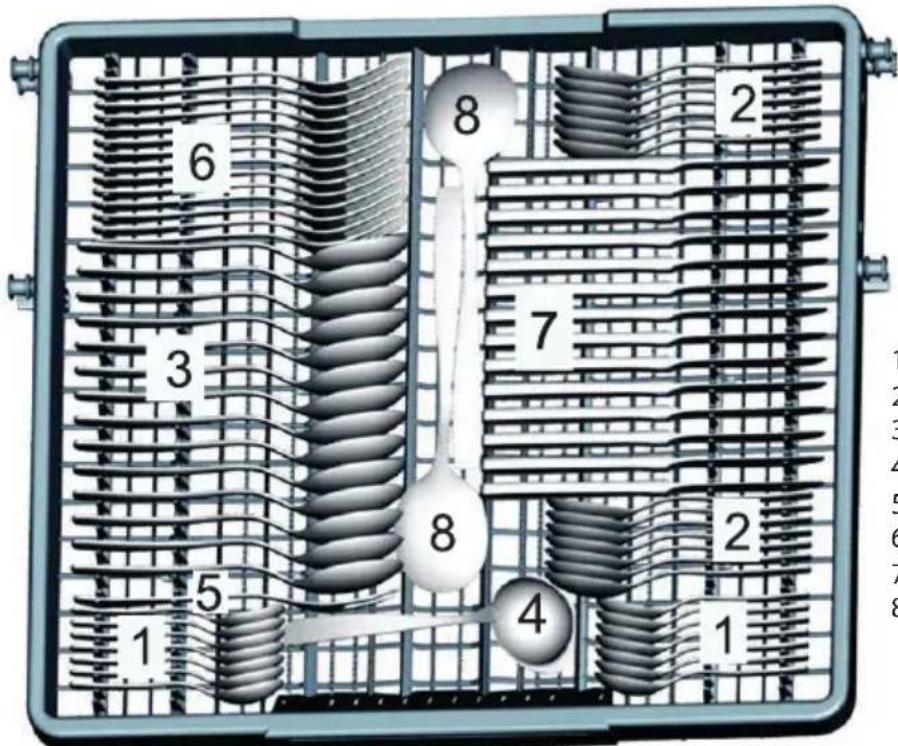
Durvju mala
PÊC PROGRAMMAS BEIGÃM
natural_image
Mechanical component with spring mechanism and rotating arrows (no text or symbols)natural_image
Close-up of a mechanical component with a curved blade and circular opening, no visible text or symbols- solis: bīdiet plakano filtru augšup.
Piezime:
IRENGIMO INSTRUKCIJOS
ISPÈJIMAS!
natural_image
Technical line drawing showing a hand holding a pipe fitting and a threaded component (no text or symbols)VANDENS IŠLEIDIMO ŽARNOS PRIJUNGIMAS
natural_image
Close-up of a mechanical component with a curved tool and central hub (no visible text or symbols)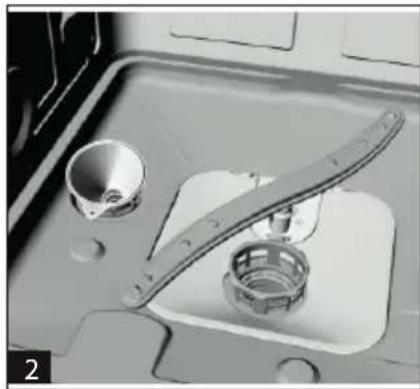
natural_image
Close-up of a mechanical component with a curved tool and circular base (no visible text or symbols)natural_image
Line drawing of a hand inserting a device into a device with a scroll wheel (no text or symbols)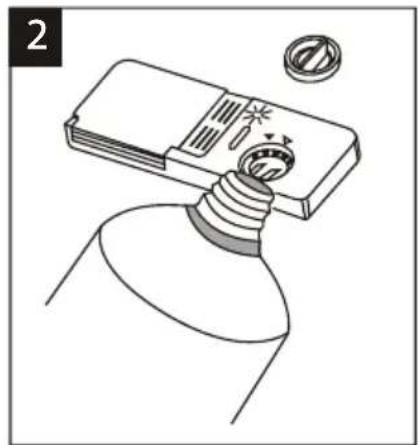
natural_image
Diagram of a lampshade with a screw and plastic cup, no text or symbols present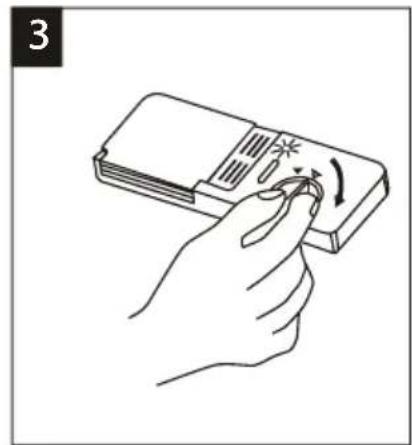
natural_image
Line drawing of a hand holding a device with a scroll wheel (no text or symbols)natural_image
Line drawing of a hand pressing down on a device with a screwdriver and directional arrow (no text or symbols)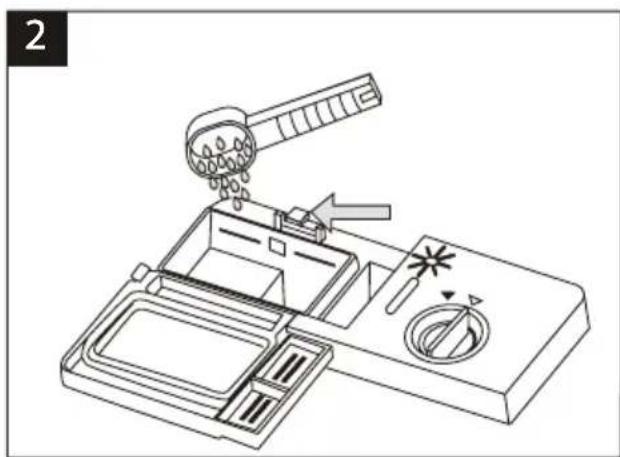
Pastaba:
natural_image
Technical illustration of a wire mesh cage with two labeled components (1 and 2), showing internal components and no readable text or symbols.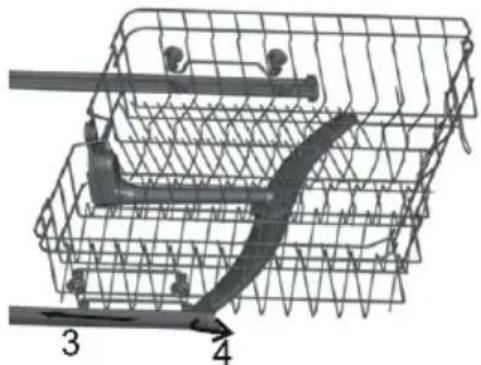
natural_image
Diagram of a shopping basket with numbered arrows indicating parts of the basket (no text or symbols present)PROGRAMAI PASIBAIGUS
3 Mikrofiltras
natural_image
Mechanical component with spring mechanism and rotating arrows (no text or symbols)natural_image
Close-up of a mechanical component with a curved blade and circular opening, no visible text or symbolsnatural_image
Technical line drawing of a mechanical device with rotating lever and mounting base (no text or symbols)Atostogų metu
SZERELÉSI ÚTMUTATÓ
FIGYELMEZTETÉS!
natural_image
Technical line drawing showing two different pipe fittings (no text or symbols present)A SZENNYVÍZCSŐ CSATLAKOZTATÁSA
natural_image
Close-up of a mechanical component with a handle and central hub (no visible text or symbols)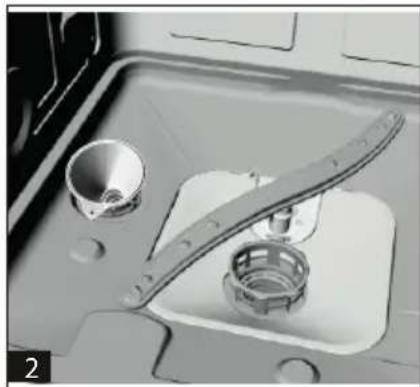
natural_image
Close-up of a kitchen sink with a metal tool and a bowl, no visible text or symbolsnatural_image
Line drawing of a hand holding a device with a scroll wheel (no text or symbols)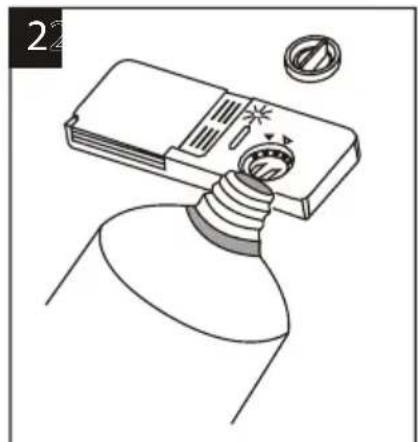
natural_image
Illustration of a light bulb with a screwdriver inserted into it, no text or symbols present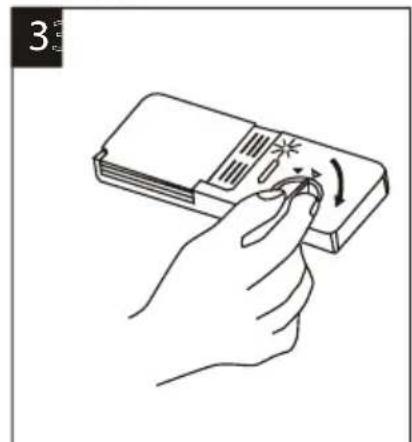
natural_image
Line drawing of a hand holding a device with a scroll, no text or symbols presentnatural_image
Line drawing of a hand pressing down on a device with a screwdriver and directional arrow (no text or symbols)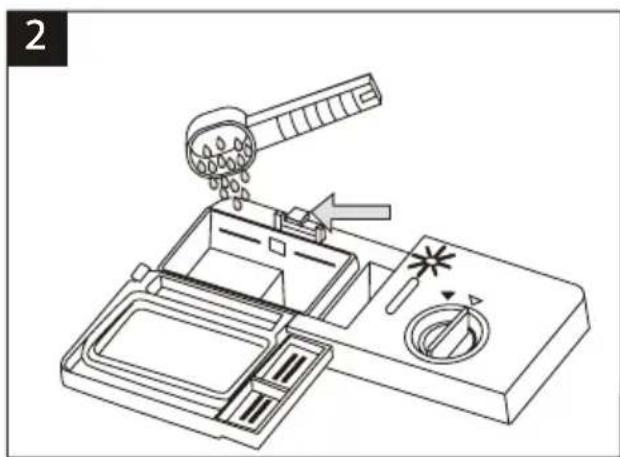
Megjegyzés:
natural_image
Technical illustration of a wire cage with two labeled components (1 and 2), showing internal structure and no readable text or symbols.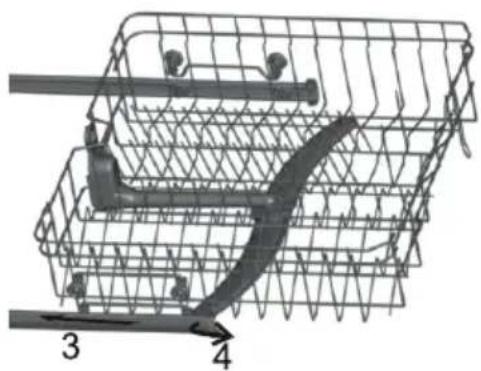
natural_image
Diagram of a shopping basket with a curved arrow indicating direction (no text or symbols present)Evőeszköz tálca
3 Mikroszűrő
natural_image
Mechanical component with spring and lever mechanism (no visible text or symbols)natural_image
Close-up of a mechanical component with a curved blade and circular opening, no visible text or symbolsnatural_image
Technical line drawing of a mechanical device with rotating lever and mounting base (no text or symbols)POKYNY PRE INŠTALÁCIU
VAROVANIE!
natural_image
Technical line drawing showing a hand holding a pipe fitting and a threaded component (no text or symbols)PRIPOJENIE ODPADOVEJ HADICE
natural_image
Close-up of a mechanical component with a handle and central hub (no visible text or symbols)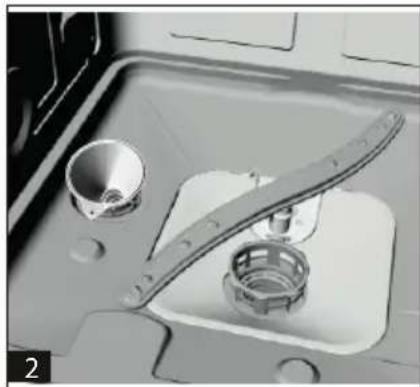
natural_image
Close-up of a kitchen sink with a metal tool and a bowl, no visible text or symbolsnatural_image
Line drawing of a hand pressing down on a device with an arrow indicating rotation (no text or symbols)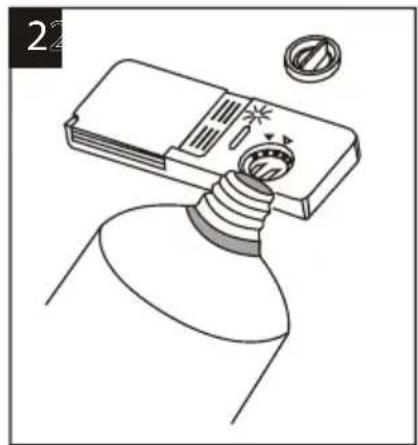
natural_image
Illustration of a light bulb with a screwdriver inserted, no text or symbols present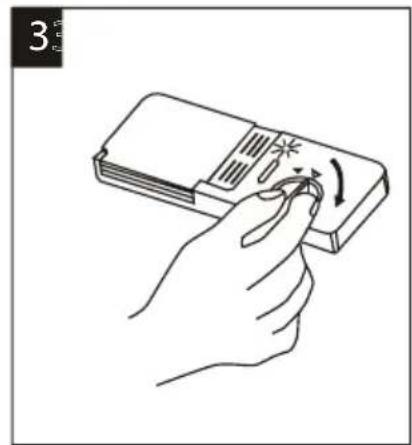
natural_image
Line drawing of a hand holding a device with a scroll wheel, no text or symbols presentnatural_image
Line drawing of a hand pressing down on a device with a tool, showing no text or symbols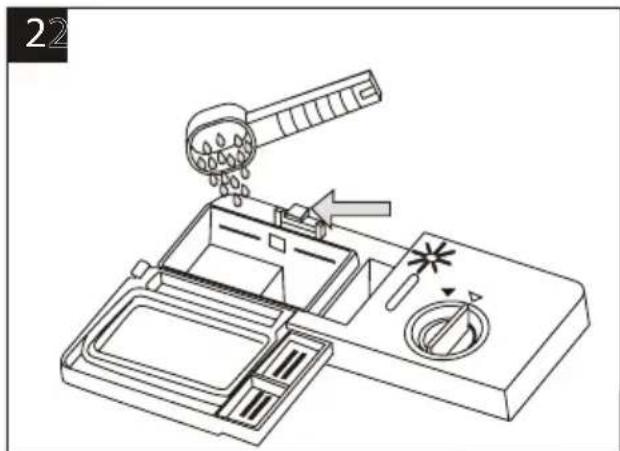
Poznámka:
natural_image
Technical illustration of a wire cage with two labeled components (1 and 2), showing internal structure and no readable text or symbols.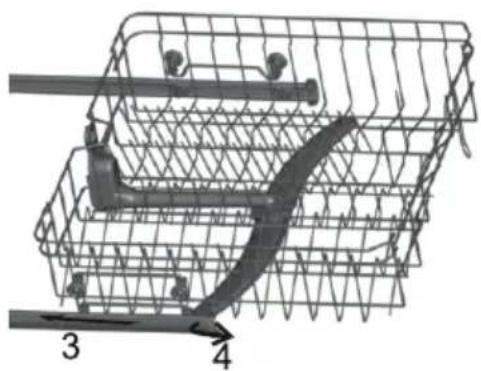
natural_image
Diagram of a shopping basket with a curved arrow indicating direction (no text or symbols present)Tácka na príbory
3 Mikrofilter
natural_image
Mechanical component with spring and lever mechanism (no visible text or symbols)natural_image
Close-up of a mechanical component with a black curved handle and white cylindrical body, no visible text or symbolsKrok 2: Vysuňte plochý filter nahor.
Poznámka:
natural_image
Technical line drawing of a mechanical device with rotating lever and mounting base (no text or symbols)TIPY NA RIEŠENIE ŤAŽKOSTÍ
SKÔR AKO ZAVOLÁTE SERVIS
NAPOTKI ZA NAMESTITEV
SVARILO!
natural_image
Technical line drawing of a hand holding a pipe fitting and a threaded component (no text or symbols)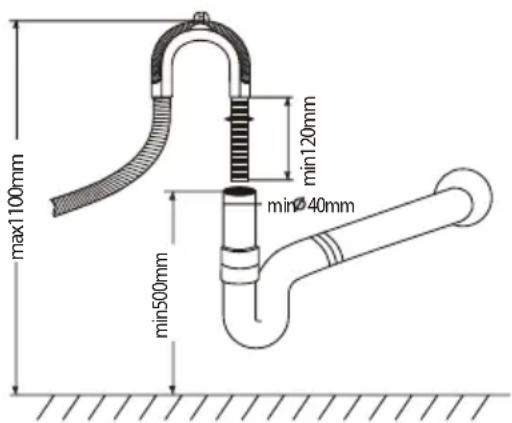
natural_image
Close-up of a mechanical component with a handle and central hub (no visible text or symbols)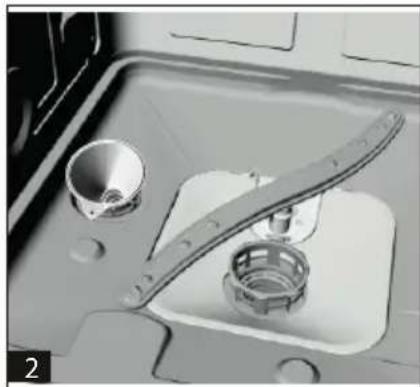
natural_image
Close-up of a kitchen sink with a metal tool and a bowl, no visible text or symbolsA. Odstranite spodnjo košaro in nato odvijte in snemite pokrov zbiralnika soli 1.
B. Če prvič polnite zbiralnik, ga napolnite do 2/3 prostornine z vodo (pribl. 500 ml) 2
C. V odprtino v zbiralniku vstavite lijak (ni priloženo) in vanj nasujte pribl. 2 kg soli. Majhna količina vode običajno steče iz izbiralnika.
D. Po polnjenju zbiralnika dobro privijte pokrov nazaj.
E. Ponavadi v 2–6 dneh po polnjenju zbiralnika soli neha svetiti kontrolna lučka soli.
Opomba:
natural_image
Line drawing of a hand holding a device with a scroll wheel (no text or symbols)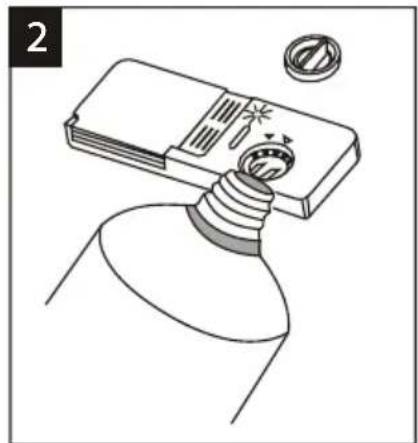
natural_image
Diagram of a light bulb with a screwdriver inserted, showing internal components and a magnified view (no text or symbols)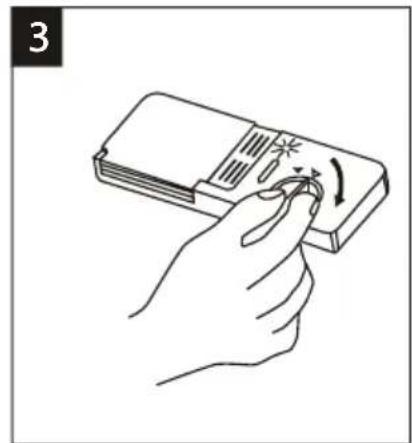
natural_image
Line drawing of a hand holding a device with a scroll wheel, no text or symbols presentnatural_image
Line drawing of a hand pressing down on a device with a screwdriver and directional arrow (no text or symbols)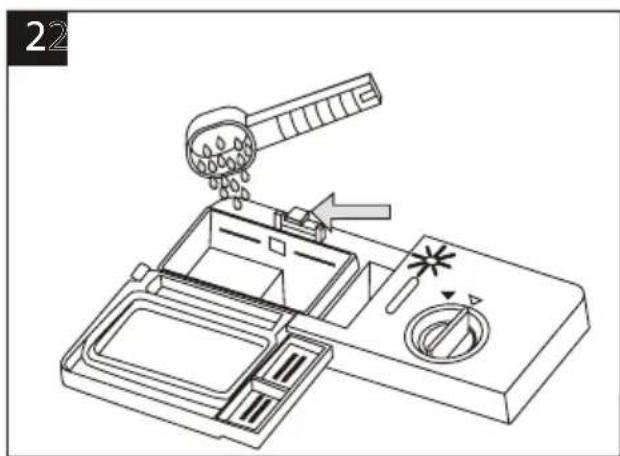
Opomba:
natural_image
Technical illustration of a wire cage with two labeled components (1 and 2), showing internal structure and no readable text or symbols.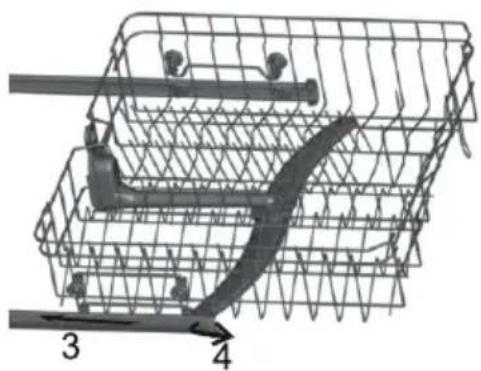
natural_image
Diagram of a shopping basket with a curved arrow indicating direction (no text or symbols present)Polnjenje spodnje košare
Pladenj za pribor
Pred zlaganjem posode:
- Odstranite grobe ostanke.
- Ostanke prismojene hrane namočite.
OPOZORILO
- Prepričajte se, da noben predmet ne sega skozi dno košare.
- Ostre predmete zlagajte vedno z ostrino navzdol!
natural_image
Close-up of a mechanical component with a spring and lever mechanism (no visible text or symbols)Korak 1: Filter zasučite proti smeri urnega kazalca in ga izvlecite.
natural_image
Close-up of a mechanical component with a curved blade and circular features, no visible text or symbolsKorak 2: Izvlecite ploščati filter navzgor.
Opomba:
natural_image
Technical line drawing of a mechanical device with rotating components and directional arrows (no text or symbols)Čiščenje vrat
BEZBEDNOSNA UPUTSTVA
UPUTSTVA ZA UGRADNJU
UPOZORENJE!
- Povezivanje mašine za pranje sudova na električnu mrežu i napajanje vodom poverite obučenim profesionalcima.
- Uređaj ne sme da bude postavljen na dovodno ili odvodno crevo, kao ni na kabl za napajanje električnom energijom.
- Mašina za pranje sudova mora biti priključena na vodovod pomoću potpuno novog kompleta creva. Nemojte koristiti staro crevo za dovod vode.
POSTAVLJANJE MAŠINE ZA PRANJE SUDOVA
- Pre nego što je postavite, raspakujte mašinu za pranje sudova, uklonite sve ambalažne materijale prema uputstvima na njima i proverite da nije došlo do oštećenja prilikom transporta. Ako otkrijete bilo kakvu štetu, prekinite ugradnju i odmah se obratite vašem prodavaču.
- Prilikom izbora mesta za postavljanje mašine za pranje sudova, vodite računa da je postavite na mesto na kojem ćete je lako puniti i prazniti.
- Mašinu za pranje sudova postavite u blizini izvora i odvoda vode.
- Creva za dovod i odvod vode mašine za pranje sudova možete lako postaviti i s leve i s desne strane uređaja.
- Kada je premešate, mašinu za pranje sudova nemojte hvatati za vrata i za prednji panel.
- Mašinu za pranje sudova takođe možete da umetnete u vašu kuhinju ispod radne ploče. Budite oprezni kada gurnete mašinu za pranje sudova u njeno mesto da ne biste pritisli crevo za dovod, odnosno odvod vode. Osigurajte da uređaj ne bude smešten na električnu liniju.
- Mašinu za pranje sudova postavite na ravnu i tvrdu podlogu. Pomoću prednjih podesivih nožica poravnajte mašinu za pranje sudova dok ne bude u vodoravnom položaju. Nagib mašine za pranje sudova ne sme da prelazi 2°. Horizontalni položaj će osigurati veću stabilnost, sprečiti pomeranje mašine za pranje sudova i smanjiti vibracije i buku. Pravilno postavljanje mašine za pranje sudova olakšava i otvaranje i zatvaranje vrata.
- Ako se vrata mašine za pranje sudova ne budu pravilno zatvarala, proverite da li mašina za pranje sudova stoji stabilno i vodoravno, a po potrebi je dovedite u vodoravan položaj pomoću prednjih podesivih nožica.
Napomena: Najveća visina podesivih nožica je 20 mm.
SPAJANJE CREVA ZA DOVOD VODE
- Pritisak vode mora da bude između 0,04 i 1,0 MPa. Ako je pritisak niži, obratite se svom tehničaru.
- Uverite se da crevo za dovod nije savijeno ili prignječeno.
- Ako su creva za vodu nova, ali dugo nisu korišćena, pustite da kroz njih pre montiranja prolazi dovoljno velika količina vode dok ne počne oticati potpuno čista voda.
- Pričvrstite crevo za dovod vode na slavinu opremljenu navojem od 3/4 cola i stegnite.
- Proverite vodonepropusnost spoja.
- Pre korišćenja mašine za pranje sudova otvorite slavinu dovoda vode do kraja.
SPAJANJE CREVA ZA ODVOD
Crevo za odvod vode spojite na kanalizacionu cev i osigurajte da bude stabilna i zaštićena. Ako odvodno crevo nije dovoljno dugačko, obratite se ovlašćenom servisu i tražite duže crevo. Imajte na umu da crevo ni sa produžetkom ne sme da bude duže od 4 metra. Kad bi crevo za odvod vode bilo duže, to bi ugrozilo ispravan rad mašine za pranje sudova. Crevo čvrsto priključite na cev odvoda da se ne bi moglo osloboditi za vreme rada mašine za pranje sudova.
natural_image
Technical line drawing showing a hand holding a pipe fitting and a threaded component (no text or symbols)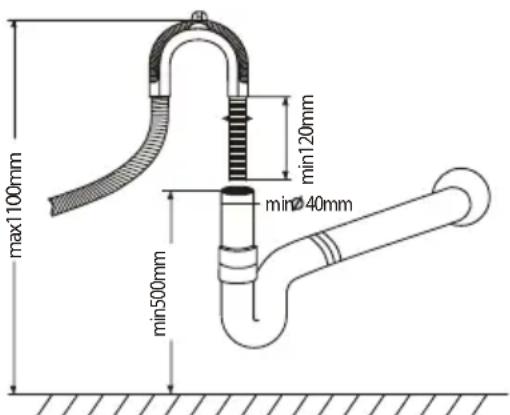
Spajanje sa sifonom sudopere
Spoj na odvod mora biti smešten u visini od 50 (minimalno) do 100 (maksimalno) cm od poda mašine za pranje sudova. Odvodno crevo bi trebalo biti pričvršćeno zavrtnjem. Slobodni kraj creva ne sme da bude uronjen u vodu.
POVEZIVANJE NA MREŽU
Prije povezivanja utikača u utičnicu, proverite sljedeće:
natural_image
Close-up of a mechanical component with a handle and central hub (no visible text or symbols)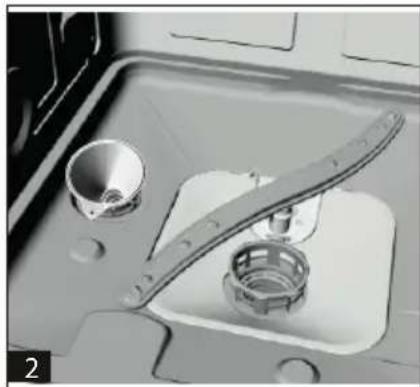
natural_image
Close-up of a kitchen sink with a metal tool and a bowl, no visible text or symbolsA. Izvucite donju korpu i zatim odvrnite i uklonite poklopac uloška za so označen brojem 1.
B. Kada prvi put punite uložak za sol, napunite ga do dve trećine vodom (oko 500 ml) 2
C. Na otvor uloška postavite levak (nisu priložene) i naspite u njega oko 2 kg soli. Često iz uloška isteknu male količine yode.
D. Nakon što se uložak napuni, pažljivo zavrnite poklopac.
E. Obično nakon 2-6 dana nakon punjenja uloška, kontrolna lampica za so prestane da svetli.
Napomena:
- So treba dopunjavati onda kada na upravljačkom panelu zasvetli kontrolna lampica za so. Pre nego što se so potpuno otopi, može se dogoditi da kontrolna lampica nastavi da svetli i nakon što je so bila dopunjena.
- Ako prospete so oko uloška, pokrenite program ispiranja ili pretpranja koji će je ukloniti.
PUNJENJE DOZATORA SIAJEM
Funkcija sjaja
Sjaj se automatski dozira u završnom delu pranja i poliranja i sprečava stvaranje mrlja i pruga prilikom sušenja.
UPOZORENJE
U mašini za pranje sudova koristite samo sjajeve proverenih marki. Nikada ne punite dozator sjaja drugim sredstvima (npr. deterdžentom za ručno pranje sudova, tečnim sapunom). To bi moglo dovesti do oštećenja mašine za pranje sudova.
Kada puniti dozator sjaja
natural_image
Line drawing of a hand inserting a device into a device with a scroll wheel (no text or symbols)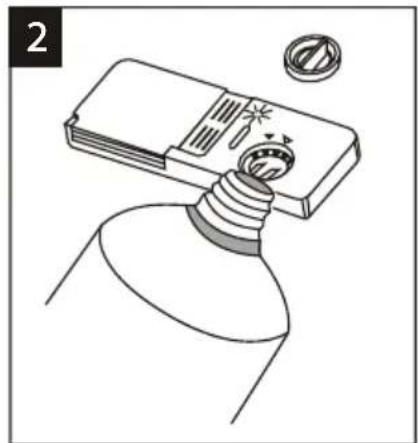
natural_image
Illustration of a light bulb with a screwdriver inserted, showing internal components and a magnified view (no text or symbols)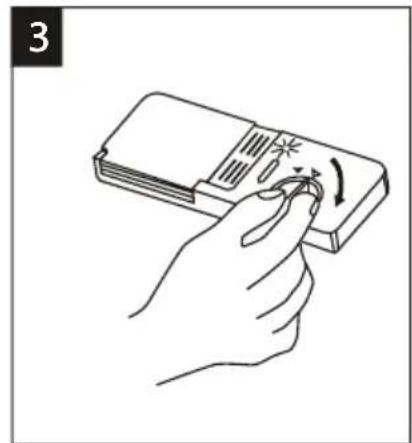
natural_image
Line drawing of a hand holding a device with a scroll wheel, no text or symbols present- Otvorite dozator okretanjem poklopca u smeru strelice „open“ (ka levo) i skinite poklopac.
- Pažljivo dolevajte sjaj u dozator tako da ne prelijete.
- Stavite poklopac nazad u ravni sa strelicom „open“, i zatvorite ga okrećući desno prema „closed“.
Sjaji se oslobađa u završnoj fazi ciklusa pranja i poliranja. To sprečava da se na sudovima stvaraju kapljice koje bi na njima mogle ostavljati mrlje i pruge. To takođe ubrzava sušenje i ceđenje vode sa sudova.
U vašoj mašini za pranje sudova se koristi tečni sjaj. Dozator sjaja je smešten na vratima pored deterdženta. Prilikom punjenja dozatora odvrnite poklopac i ulijte sjaj sve dok pokazivač ne bude potpuno taman. Kapacitet uloška za sjaj je oko 140 ml.
natural_image
Line drawing of a hand pressing down on a device with a screwdriver and directional arrow (no text or symbols)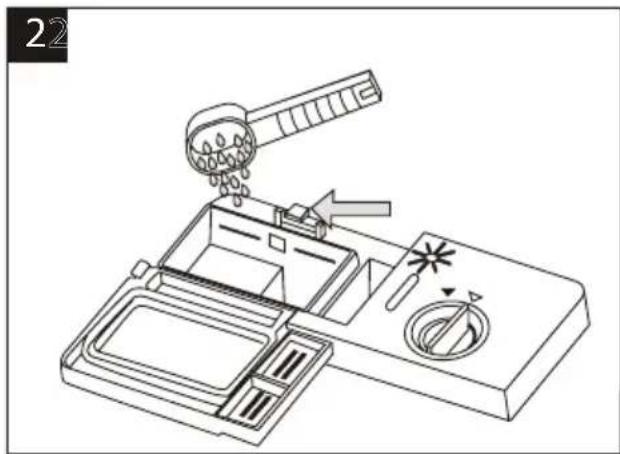
Napomena:
- Ako je poklopac zatvoren: pritisnite taster za otvaranje. Poklopac se otvara.
- Deterdžent napunite neposredno pre pranja. Koristite samo one marke deterdženta koje su preporučene za ovu mašinu za pranje sudova.
UPOZORENJE
Deterdženti su agresivne supstance! Pažljivo ga držite van domašaja dece.
Pravilno korišćenje deterdženta
Koristite samo deterdžente marki preporučenih za mašine za pranje sudova. Deterdžente čuvajte na suvom i čistom mestu. Uspite deterdžent u prahu u dozator neposredno pre pranja sudova.
Doziranje deterdženta
Napunite dozator deterdžentom. Oznake za količinu imaju ovde prikazano značenje, pogledajte sliku:
1 Prostor za količinu za glavno pranje sudova. Vrednost „MIN“ odgovara oko 20 g deterdženta.
2 Prostor za količinu za ciklus pretpranja, oko 5 g deterdženta.
Prilikom doziranja i odlaganja deterdženata obratite pažnju i postupajte prema uputstvima proizvođača koja su navedene na ambalaži proizvoda.
Pritisnite poklopac dok potpuno ne nalegne.
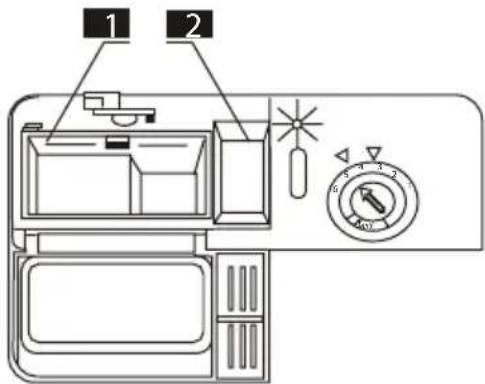
Ako su sudovi znatno zaprljani, napunite deterdžentom i pregradu za ciklus pretpranja. Tako će deterdžent početi da deluje i tokom pretpranja.
Napomena:
- U tabela programa možete pronaći informacije o doziranju deterdženta za pojedine programe. Imajte na umu da može doći do razlike usled različitog stepena zaprljanosti sudova i tvrdoće vode.
- Pročitajte preporuke proizvođača koje su navedene na ambalaži deterdženta.
DETERDŽENTI
Postoje tri vrste deterdženata.
- S fosfatima i hlorom
- S fosfatima i bez hlora
- Bez fosfata i hlora
Novi deterdženti uglavnom ne sadrže fosfate. Zbog toga izostaje omekšavanje vode delovanjem fosfata. U tom slučaju preporučujemo da se napuni uložak za so i kada je tvrdoća vode samo 6°H. Kada koristite deterdžente bez fosfata i voda je tvrda, na sudovima i na staklu se često javljaju bele mrlje. U tom slučaju bolje rezultate postižete dodavanjem više deterdženta. Deterdženti bez hlora manje izbeljuju. Tamne i obojene mrlje možda neće biti moguće potpuno ukloniti. U tom slučaju uključite program s višom radnom temperaturom.
Korišćenje tableta „3 u 1“
Opšte preporuke
To su proizvodi-deterdženti u kojima su ugrađeni i sredstvo za sjaj i omekšivači (soli).
- Pre korišćenja tih proizvoda bi prvo trebalo da proverite da li tvrdoća vaše vode omogućuje korišćenje takvih tableta (pogledajte preporuke proizvođača na ambalaži proizvoda).
- Te deterdžente bi trebalo koristiti upravo onako kako je to preporučio proizvođač.
- Ako se susretnete s problemima prilikom prvog korišćenja proizvoda „3 u 1“, obratite se službi za korisnike proizvođača deterdženta.
Posebne preporuke
- Kada upotrebljavate kombinovane proizvode, sjaj i so za omekšavanje nisu efikasni. Može biti praktično da se izabere najnižu postavku tvrdoće vode.
Izbor funkcije „3 u 1“
- Pritisnite taster za uključivanje mašina za pranje sudova i izaberite program za pranje „3 u 1“ (pritiskujte taster za izbor funkcije „3 u 1“ toliko dugo dok ne zatreperi odgovarajuća kontrolna lampica).
- Pritiskom na taster Start/Pause pokrenite program „3 u 1“. Indikator „3 u 1“ će svetliti.
natural_image
Technical illustration of a wire mesh cage with two labeled components (1 and 2), showing internal structure and no readable text or symbols.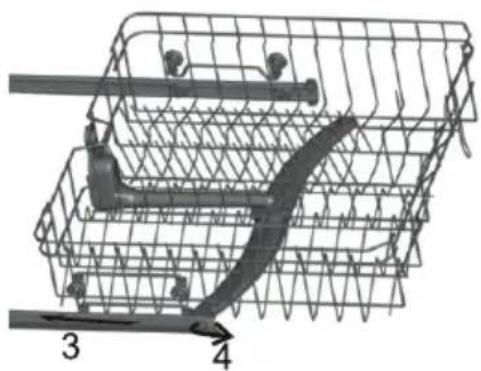
natural_image
Diagram of a multi-level electric motor stator with labeled parts (3 and 4), no text or symbols present.Ulaganje u donju korpu
Veće predmete koje je teško oprati kao što su lonci, tave, poklopci, tanjiri i zdele treba postaviti u donju korpu kao što je prikazano na slici.
Preporučujemo da tanjire i poklopce slažete sa strane korpe da ne bi ometali kretanje ručica s mlaznicama.
Sklopive police gornje i donje korpe
Rešetka za pribor za jelo
Pribor za jelo rasporedite po rešetki kako je prikazano. Postavite ga tako da oko njega voda može slobodno da teče.
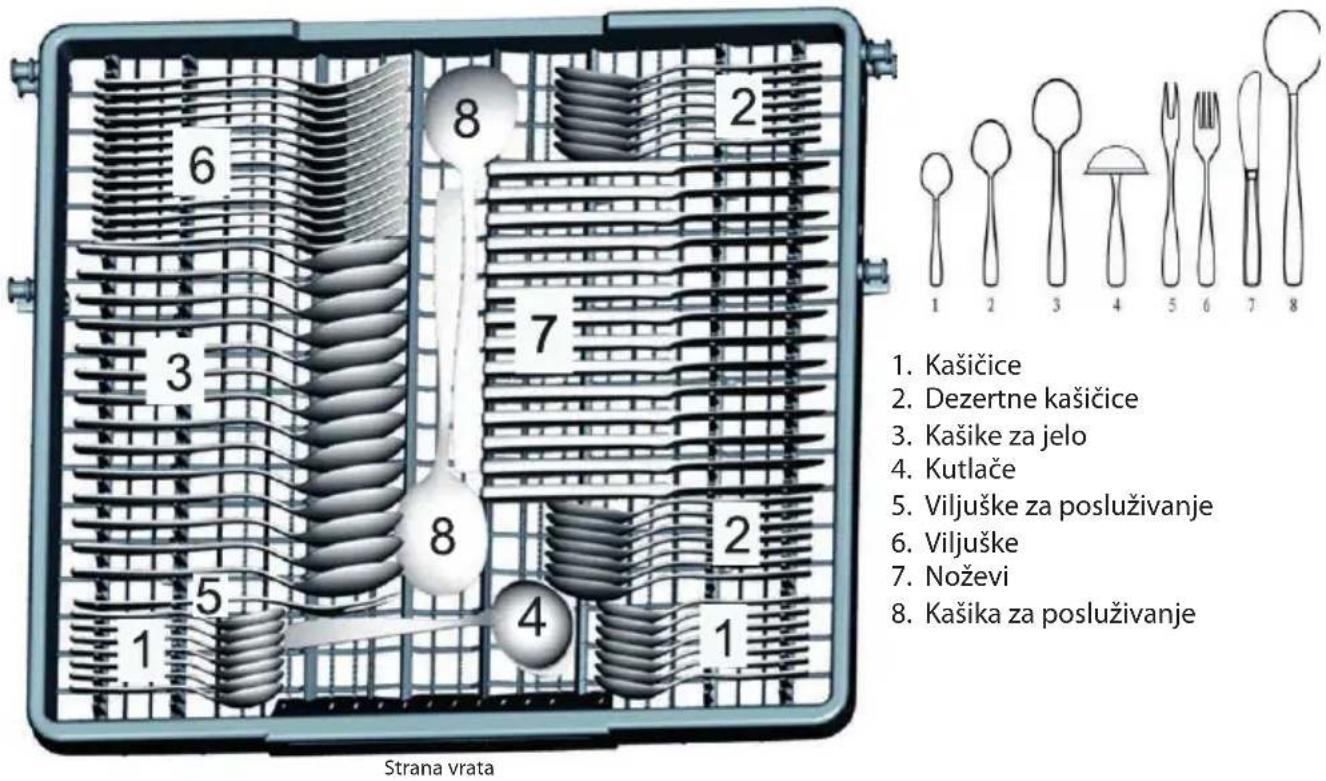
NAKON ZAVRŠETKA PROGRAMA
- Pritisnite taster za uključivanje da biste isključili mašinu za pranje sudova.
- Zatvorite dovod vode.
- Pažljivo otvorite vrata mašine za pranje sudova, ostavite ih malo otvorena i pre nego što izvadite sudove, sačekajte nekoliko minuta. Sudovi se tako mogu ohladiti i bolje se osušiti.
Napomene
- Pažljivo otvorite vrata, jer je para koja izlazi iz unutrašnjosti mašine za pranje sudova vruća!
- Prije vađenja sudova i pribora za jelo iz mašine za pranje sudova, sačekajte nekoliko minuta, jer je posuđe neposredno nakon pranja vrlo vruće, a može se lako razbiti.
Vađenje sudova iz mašine za pranje sudova
- U mašini za pranje sudova je obično vlažno.
- Prvo ispraznite donju korpu, a nakon toga gornju. Tako ćete izbeći da voda iz gornje korpe kaplje na donju.
ODRŽAVANJE I ČIŠĆENJE
SISTEM ZA FILTRACIJU
3 Mikrofilter
Ovaj filter skuplja u svom kontejneru prljavštine i sitne otpatke i sprečava da oni ponovno zaprljaju sudove.
- Nakon svake upotrebe mašine za pranje sudova proverite da li je filter možda zaprljan.
- Nakon odvrtanja grubog filtera možete izvaditi ceo sistem za filtriranje. Uklonite sve ostatke hrane, a zatim filter isperite pod tekućom vodom.
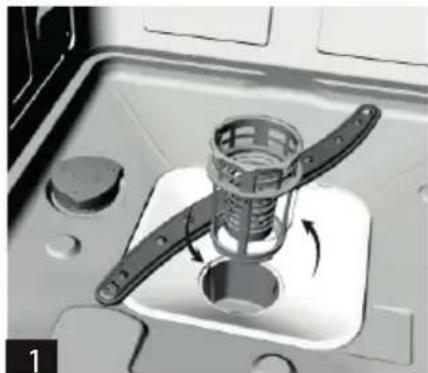
natural_image
Close-up of a mechanical component with a spring and lever mechanism, no visible text or symbolsKorak 1: Okrenite filter u suprotnom smeru od kretanja kazaljki na satu i zatim ga izvucite.
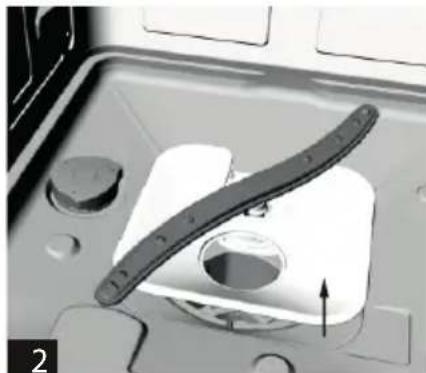
natural_image
Close-up of a mechanical component with a curved blade and circular opening, no visible text or symbolsKorak 2: Povucite ravni filter prema gore.
Napomena:
- Prilikom vađenja filtera obavite korak 1, a zatim korak 2, a kada budete ponovo sastavljali sistem za filtriranje, prvo obavite korak 2, pa zatim korak 1.
Ugradnja filtera
Redovno čišćenje filtera osigurava optimalan rad i moć pranja. Filter efikasno zaustavlja čestice iz vode za pranje i omogućuje recikliranje vode za vreme ciklusa. Zbog toga je potrebno nakon svakog ciklusa pranja ukloniti iz filtera veće zadržane čestice ispiranjem filtera pod mlazom vode. Filter izvadite povlačenjem za njegovu ručku prema gore. Ceo filter bi trebalo da se čisti jednom nedeljno.
250 69 Klíčany, Czech Rep. e-post: ECG@kbexpert.cz
Hrvatski
K+B Progres, a.s.
U Expertu 91 tel.: +420 272 122 111
250 69 Klíčany, Czech Rep. e-mail: informacije@kbprogres.cz
Bosanski
K+B Progres, a.s.
U Expertu 91 tel.: +420 272 122 111
250 69 Kličany, Czech Rep. e-mail: informacije@kbprogres.cz
Latviešu valoda
K+B Progres, a.s.
U Expertu 91 tel.: +420 272 122 111
250 69 Klíčany, Czech Rep. e-pasts: ECG@kbexpert.cz
Lietuvių kalba
K+B Progres, a.s.
U Expertu 91 tel.: +420 272 122 111
250 69 Klíčany, Czech Rep. el. paštas: ECG@kbexpert.cz
Magyar
K+B Progres, a.s.
U Expertu 91 tel.: +420 272 122 111
250 69 Klíčany, Czech Rep. e-mail: ECG@kbexpert.cz
Slovenčina
- EDF 6046 QXA++
- CONTENTS
- SAFETY INSTRUCTIONS
- Read carefully and save for future use!
- GROUNDING OF THE APPLIANCE
- DESCRIPTION
- CONTROL PANEL
- DISHWASHER INTERIOR
- INSTALLATION INSTRUCTIONS
- WARNING!
- PLACEMENT OF THE DISHWASHER
- CONNECTING THE WATER SUPPLY HOSE
- CONNECTING THE DRAIN HOSE
- Connecting to the sink siphon
- POWER CONNECTION
- STARTING THE DISHWASHER
- WARNING:
- OPERATING INSTRUCTIONS
- BEFORE FIRST USE
- Before first operation:
- Water softener
- Setting the salt consumption
- Note:
- ADDITION OF SALT TO WATER SOFTENER
- FILLING THE RINSE AID DISPENSER
- The rinse aid function
- When to replenish the rinse aid dispenser
- RINSE AID DISPENSER
- Setting the rinse aid dispenser
- DETERGENT FUNCTION
- Concentrated detergent
- Detergent tablets
- Detergent dispenser
- Used amount of detergent
- Proper use of detergent
- Detergent dosage
- DETERGENTS
- Using the "3 in 1" tablets
- General recommendations
- Special recommendation
- Selecting the "3in1" function
- Cancelling the "3in1" function
- FILING THE DISHWASHER BASKETS
- Loading and unloading dishes from the basket
- Unloading dishes from the dishwasher
- Filling the upper basket
- Adjusting the upper basket
- Filling the bottom basket
- Folding tines of the upper and bottom baskets
- Cutlery tray
- Dishes unsuitable for washing in the dishwasher
- Entirely unsuitable
- Not recommended
- Loading dishes and cutlery
- When loading the dishes and cutlery, always make sure that:
- Damage to glasses and other dishes
- Possible causes:
- Recommended solutions:
- After finishing washing
- STARTING THE WASH PROGRAM
- SWITCHING ON THE APPLIANCE
- CHANGING PROGRAM
- If you forget to load the dishes
- AFTER FINISHING PROGRAM
- Notes
- MAINTENANCE AND CLEANING
- FILTRATION SYSTEM
- Flat filter
- Coarse filter
- Micro filter
- Filter assembly
- CLEANING OF THE SPRAY ARMS
- CARING FOR THE DISHWASHER
- Frost protection
- Cleaning the door
- How to keep your dishwasher in good condition
- After each washing
- Disconnect the power supply
- Do not use solvents or abrasive cleaners.
- During vacations
- Moving the dishwasher
- Seal
- TROUBLESHOOTING TIPS
- BEFORE CALLING THE SERVICE
- ERROR CODES
- TECHNICAL SPECIFICATIONS
- DISPOSAL
- NOTICE
- USE AND DISPOSAL OF WASTE
- PRODUCT DISPOSAL AFTER END OF LIFE
- INHALT
- KLARSPÜLER NACHFÜLLEN
- Klarspüler-Funktion
- Bemerkung:
- Besteckfach
- Mikrofilter
- POKYNY K INSTALACI
- VAROVÁNÍ!
- PŘIPOJENÍ ODPADNÍ HADICE
- Poznámka:
- Plnění dolního koše
- Tác na příbory
- Mikrofiltr
- O dovolené
- NÕUDEPESUMASINA SISEMUS
- PAIGALDAMISJUHISED
- HOIATUS!
- ÄRAVOOLUVOOLIKU ÜHENDAMINE
- Märkus:
- Söögiriistade alus
- Peenfilter
- NÕUANDED VEAOTSINGUKS
- ENNE TEENINDUSKESKUSESSE HELISTAMIST
- UPUTE ZA UGRADNJU
- UPOZORENJE!
- SMJEŠTAJ PERILICE POSUĐA
- SPAJANJE CRIJEVA ZA ODVOD
- Napomena:
- PUNJENJE DOZATORA SJAJILOM
- Funkcija sjajila
- UPOZORENJE
- Kada puniti dozator sjajila
- Pravilno korištenje deterdženta
- Doziranje deterdženta
- Ulaganje u donji koš
- Rešetka za jedaći pribor
- NAKON ZAVRŠETKA PROGRAMA
- Napomene
- Ugradnja filtra
- Čišćenje vrata
- UZSTĀDĪŠANAS INSTRUKCIJAS
- BRĪDINĀJUMS:
- NOTECES ŠLŪTENES PIEVIENOŠANA
- Piezime:
- PÊC PROGRAMMAS BEIGÃM
- IRENGIMO INSTRUKCIJOS
- ISPÈJIMAS!
- VANDENS IŠLEIDIMO ŽARNOS PRIJUNGIMAS
- Pastaba:
- PROGRAMAI PASIBAIGUS
- Mikrofiltras
- Atostogų metu
- SZERELÉSI ÚTMUTATÓ
- FIGYELMEZTETÉS!
- A SZENNYVÍZCSŐ CSATLAKOZTATÁSA
- Megjegyzés:
- Evőeszköz tálca
- Mikroszűrő
- POKYNY PRE INŠTALÁCIU
- VAROVANIE!
- PRIPOJENIE ODPADOVEJ HADICE
- Tácka na príbory
- TIPY NA RIEŠENIE ŤAŽKOSTÍ
- SKÔR AKO ZAVOLÁTE SERVIS
- NAPOTKI ZA NAMESTITEV
- SVARILO!
- Opomba:
- Polnjenje spodnje košare
- Pladenj za pribor
- OPOZORILO
- Čiščenje vrat
- BEZBEDNOSNA UPUTSTVA
- UPUTSTVA ZA UGRADNJU
- POSTAVLJANJE MAŠINE ZA PRANJE SUDOVA
- SPAJANJE CREVA ZA DOVOD VODE
- SPAJANJE CREVA ZA ODVOD
- Spajanje sa sifonom sudopere
- POVEZIVANJE NA MREŽU
- PUNJENJE DOZATORA SIAJEM
- Funkcija sjaja
- Kada puniti dozator sjaja
- Pravilno korišćenje deterdženta
- DETERDŽENTI
- Korišćenje tableta „3 u 1“
- Opšte preporuke
- Posebne preporuke
- Izbor funkcije „3 u 1“
- Ulaganje u donju korpu
- Sklopive police gornje i donje korpe
- Rešetka za pribor za jelo
- Vađenje sudova iz mašine za pranje sudova
- ODRŽAVANJE I ČIŠĆENJE
- SISTEM ZA FILTRACIJU
- Ugradnja filtera
- Hrvatski
- Bosanski
- Latviešu valoda
- Lietuvių kalba
- Magyar
- Slovenčina
Brand : ECG
Model : EDF 6046 QXA++
Category : Dishwasher