
GR-409GTPA - Freezer LG - Free user manual and instructions
Find the device manual for free GR-409GTPA LG in PDF.


| Product Type | Freezer |
| Model | GR-409GTPA |
| Brand | LG |
| Total Capacity | 409 Liters |
| Dimensions (W×H×D) | 595 × 1850 × 700 mm |
| Net Weight | 70 kg |
| Power Supply | 220-240 V, 50 Hz |
| Energy Consumption | 0.85 kWh/24h (approx.) |
| Climate Class | SN-T (10°C - 43°C) |
| Noise Level | 39 dB(A) |
| Freezing Capacity | 15 kg/24h |
| Temperature Range | -18°C to -24°C (adjustable) |
| Fast Freeze Function | Yes |
| Door Alarm | Yes |
| Interior Light | LED |
| Shelves Material | Tempered glass |
| Door Opening Alarm | Yes |
| Refrigerant | R600a (Isobutane) |
| Defrosting | Manual |
| Cleaning | Wipe interior with mild detergent, avoid abrasive cleaners |
| Safety Features | High temperature alarm, power failure indicator |
| Spare Parts Availability | Contact LG service center for genuine parts |
| Repairability Index | 8.0 (rated by users) |
| Warranty | Standard LG warranty: 2 years (check local) |
Frequently Asked Questions - GR-409GTPA LG
User questions about GR-409GTPA LG
0 question about this device. Answer the ones you know or ask your own.
Ask a new question about this device
Download the instructions for your Freezer in PDF format for free! Find your manual GR-409GTPA - LG and take your electronic device back in hand. On this page are published all the documents necessary for the use of your device. GR-409GTPA by LG.
USER MANUAL GR-409GTPA LG
Please read this User's Guide carefully before operating and keep it handy for reference at all times.
FAGYASZTÓ ÉS HÜTÖGÉP
HASZNÁLATI ÚTMUTATÓ
Important Safety Instruction 4
Identification of Parts 6
Installation
Installation 7
Starting 7
Operation
Temperature Control 8
Quick Freeze 8
Vacation 9
Self Test 9
Door Alarm 9
Ice Making 9
Defrosting 9
Water Dispenser 10
Suggestion On
Storing Food 12
Food storage
Care and
General Information 13
Maintenance
Lamp Replacement 13
Cleaning 14
Trouble Shooting
Trouble Shooting 16
To Reverse the
Precaution 18
Doors
How to Reverse the Doors 18
Registration
Introduction
The model and serial number are found on the rear of this unit. This number is unique to this unit and not available to others. You should record requested information here and retain this guide as a permanent record of your purchase. Staple your receipt here.
Date of Purchase : ____
Dealer Purchased From : ____
Dealer Address :
Dealer Phone No. : ____
Model No. :
Serial No. :
Precaution
Important Safety Instruction
This fridge-freezer must be properly installed and located in accordance with the Installation Instruction before it is used.
Never unplug your fridge-freezer by pulling on the power cord. Always grip plug firmly and pull straight out from the outlet.
When moving your appliance away from the wall, be careful not to roll over or damage the power cord.
After your fridge-freezer is in operation, do not touch the cold surfaces in the freezer compartment, particularly when hands are damp or wet. Skin may adhere to these extremely cold surfaces.
Important Safety Instruction
Precaution
Do not modify or extend the Power Cord length
Don't Use an Extension Cord
Accessibility of Supply Plug
Supply Cord Replacement
Danger
Don't store
Grounding (Earthing)
▲Warning
Pull out the power plug prior to cleaning the fridge-freezer.
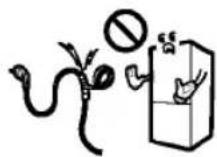
Never damage, serverely bend, pull out, or twist the power cord because power cord damage may cause a fire or electronic shock.
Never place glass products in the freezer because they may be broken when their inner contents are frozen.
It will cause electric shock or fire.
If possible, connect the fridge-freezer to its own individual electrical outlet to prevent it and other appliances or household lights from causing an overload.
The supply plug of the refrigerator-freezer should be placed in easy accessible position for quick disconnection in emergency.
If the supply cord is damaged, it must be replaced by the manufacturer or its service agent or a similarly qualified person in order to avoid a hazard.
Risk of child entrapment.
Before you throw away your old refrigerator or freezer: Take off the doors.
Leave the shelves in place so that children may not easily climb inside.
Don't store or use gasoline or other flammable vapors and liquids in the vicinity of this or any other appliance.
In the event of an electric short circuit, grounding (earthing) reduces the risk of electric shock by providing an escape wire for the electric current. In order to prevent possible electric shock, this appliance must be grounded. Improper use of the grounding plug can result in an electric shock. Consult a qualified electrician or service person if the grounding instructions are not completely understood, or if you have doubts on whether the appliance is properly grounded.
⚠ Keep ventilation openings, in the appliance enclosure or in the built-in structure, clear of obstruction.
Do not use mechanical devices or other means to accelerate the defrosting process, other than those recommended by the manufacturer.
Do not damage the refrigerant circuit.
Do not use electrical appliances inside the food storage compartments of the appliance, unless they are of the type recommended by the manufacturer.
The refrigerant and insulation blowing gas used in the appliance require special disposal procedures. When disposal, please consult with service agent or a similarly qualified person.
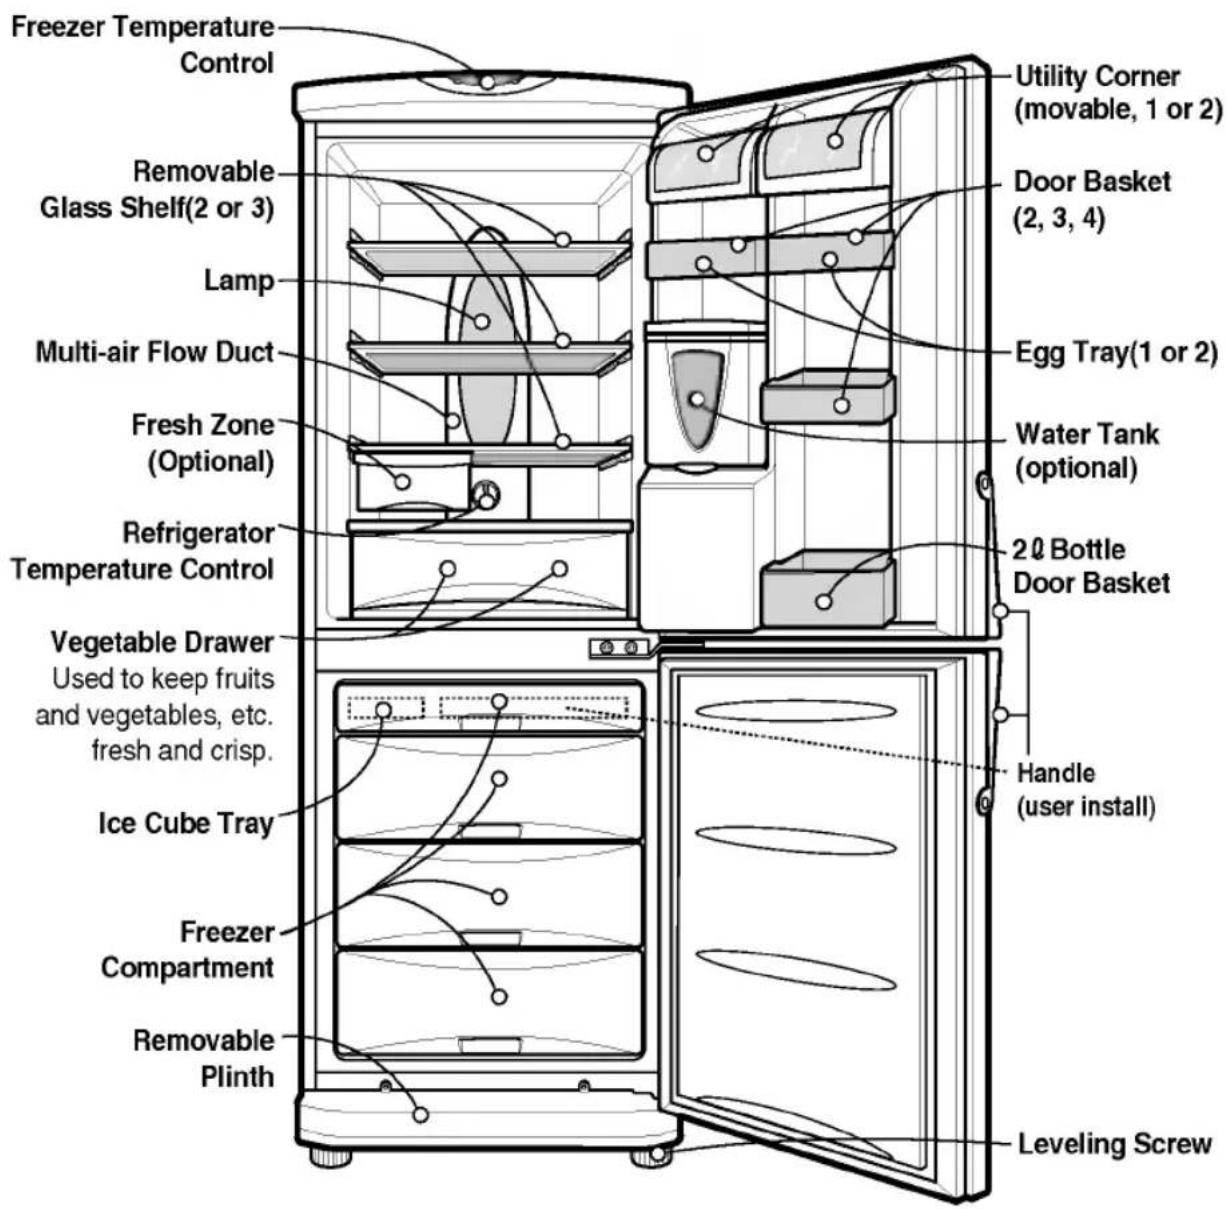
Identification of Parts
Note
If you found some parts missing from your unit, they may be parts only used in other models.
Installation
- Select a good location. Place your fridge-freezer where it is easy to use.
- Avoid placing the unit near heat sources, direct sunlight or moisture.
- There must be proper air circulation around your fridge-freezer to keep it operating efficiently.
- To avoid vibration, the unit must be leveled. If required, adjust the leveling screws to compensate for the uneven floor. The front should be slightly higher than the rear to aid in door closing. Leveling screws can be turned easily by tipping the cabinet slightly. Turn the leveling screws counterclockwise( ) to raise the unit, clockwise( ) to lower it.
- Clean your fridge-freezer thoroughly and wipe off all dust accumulated during shipping.
- Install accessories such as ice cube box, etc., in their proper places. They are packed together to prevent possible damage during shipment.
- Connect the power supply cord (or plug) to the outlet. Don't double up with other appliances on the same outlet.
- To ensure proper air circulation around the fridge - freezer, please maintain sufficient space on both the sides as well as top and maintain at least 2 inches (5 cm) from the rear wall.
Starting
When your fridge-freezer is installed, allow it 2-3 hours to stabilize at normal operating temperature prior to filling it with fresh or frozen foods.
If power plug is disconnected, allow 5 minutes delay before restarting.
Your fridge-freezer is now ready for use.
Temperature Control
Your fridge-freezer has two controls that let you regulate the temperature in the fridge and freezer compartments.
Fridge
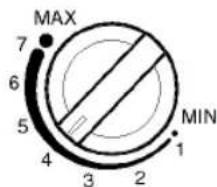
- Initially set the TEMP. CONTROL at "4". Then adjust the compartment temperature according to your desire.
TEMP. CONTROL
- If you want an inside temperature slightly less cold or colder, turn the knob towards MIN or MAX, respectively. When the surrounding temperature is low, adjust the TEMP. CONTROL'MIN'.
Freezer
- Freezer temperature control is on the top of the fridge-freezer. Initially set the Freeze Temp at mid-point. By pressing the Freezer Temp button, you can adjust the temperature of the Freezer as indicated by the numbers of lamps lit.(the setting is composed of five steps, 5 lamps lit indicates coldest.) - When you starting the Fridge-Freezer or connecting the power plug to the outlet, temperature setting is automatically set to the mid-point.

Quick Freeze
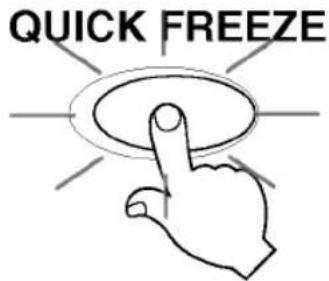
- This function is used when you want to freeze the foods quickly. Press the 'QUICK FREEZE' button once, and then the quick freeze operation starts with the lamp lit.
The quick freeze operation takes about 3 hours.
When its operation ends, it automatically returns to the normal state.
If you want to stop the quick freeze operation, press the 'QUICK FREEZE' button once more, the lamp goes out, and the quick freeze operation stops and the refrigerator returns to the normal state.
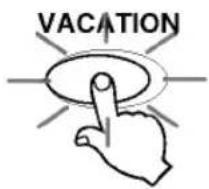
Vacation
This function makes the fridge-freezer work in a power saving mode which is useful for when you are away on holiday, by reducing energy consumption as much as possible.
Pressing 'VACATION' starts operation with lamp ON and pressing it again stops the operation.
For better functioning, you should set the TEMP. CONTROL to "MIN".
Self Test
This function allows you to check for operational problems. If you think you have a problem with your fridge-freezer, then press the temperature control button:
- If the indicate lights move up or down, then there is no problem with your fridge-freezer.
- If the indicate lights do not move up or down, then please leave the power connected and call your nearest service agent.
Door Alarm
When the door of the fridge is left opened for a while, the alarm sounds.
Ice Making
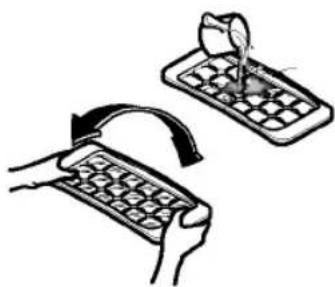
• To make ice cubes, fill the ice tray to the water level and place it in the freezer.
- If ice cubes are required fast, press the 'QUICK FREEZE' button.
• To remove ice cubes,
hold the tray at its ends and twist gently.
natural_image
Illustration of a hand using a keyboard to press a device into a grid, with no visible text or symbols.Tip
To remove ice cubes easily, run water on the tray before twisting.
Defrosting
Defrosting takes place automatically. The defrosting water flows down to the evaporating tray and is evaporated automatically.
Water Dispenser (optional)
Features

Install
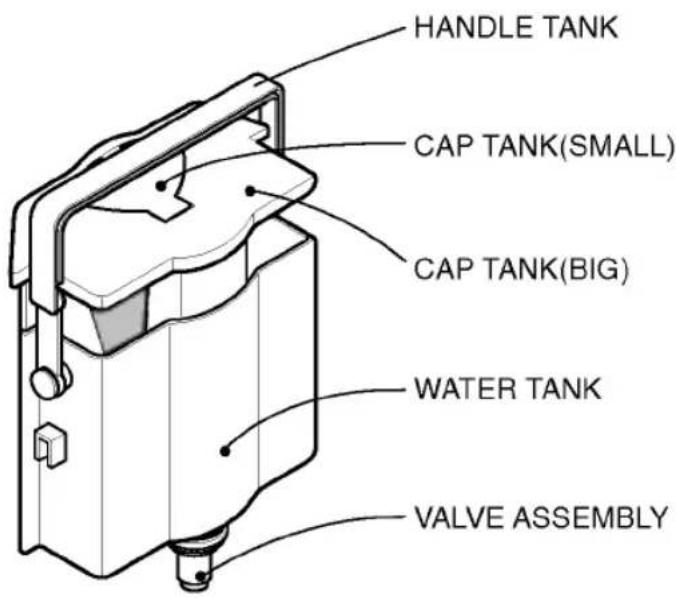
Please assemble the VALVE ASSEMBLY after correctly adjusting it with a DOOR HOLE.
Operation
Filling of WATER TANK
- After turning the HANDLE Tank backward with the WATER TANK installed at the DOOR, Open the CAP TANK (SMALL) and then fill water using a kettle etc.
* Fill water while watching a sight glass on the front of the WATER TANK.
* Water up to 4.5¢ can be filled.
-
Press and fix the CAP TANK(SMALL).
-
After filling spring water, fix the HANDLE TANK at a proper position.
Drinking
-
Press the Dispenser Pad with a cup.
-
If pressing the Pad, water inside of the Dispenser is supplied.
-
If slowly removing a cup from the Pad, water will not fall down.
Caution
Do not use other beverage (milk, juice, carbonated beverage etc) than spring water. Especially beverage including grain must not be used (may result in failure).
Storing Food
- Do not store food which goes bad easily at low temperature, such as banana, and melon.
- Allow hot food to cool prior to storing. Placing hot food in the fridge-freezer could spoil other food, and lead to higher electric bills.
- When storing the food, use a container with a lid. This prevents moisture from evaporating, and helps food to keep its taste and nutrients.
- Do not block air vents with food. Smooth circulation of cold air keeps fridge-freezer temperature even.
- Do not open the door frequently. Opening the door lets warm air enter the fridge-freezer, and cause temperature to rise.
- To adjust the temperature control easily, do not store food near the temperature control dial.
- Never keep too many foods in door rack, as this may stop the door from fully closing.
- Do not store bottles in the freezer compartment - they may break when frozen.
- Do not refreeze food that has been thawed. This causes loss of taste and nutrition.
Note
If you keep the fridge-freezer in a hot, and humid place, frequently open its door or put a lot of vegetables in it, dew may form in it, which has no effect on its performance.
Remove the dew with dust cloth free from care.
General Information
Power Failure
If You Move
Anti Condensation Pipe
- 1\~2 hour power failure does no harm to the foods stores. Try to avoid opening and closing the door too frequently.
• Take out foods from the fridge-freezer and firmly fix the loose items with tape. - Turn the leveling screws until they stop before moving the fridge-freezer. Otherwise the screw may scratch the floor or the fridge-freezer cannot move.
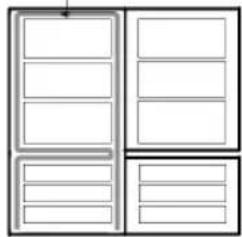
- The Anti-Condensation pipe is installed around the front side of fridge-freezer as well as on the partition between fridge compartment and freezer compartment to prevent dewing.
- Especially after installation or when ambient temperature is high, the fridge-freezer may feel hot, which is quite normal.
Anti-Condensation Pipe
natural_image
Pure diagram of a refrigerator with no text, numbers, or symbolsLamp Replacement
- Unplug the power cord from the outlet.
- Remove fridge shelves.
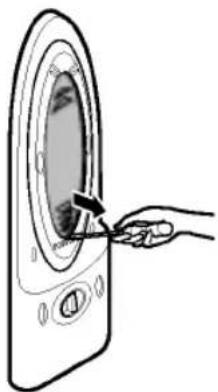
- To remove the lamp cover, insert ⊖ type driver in the underside of the lamp cover and pull it out forwards.
- Turn the lamp counterclockwise.
- Assemble in reverse order of disassembly. Replacement lamp must be the same specification as original.
- You must check the O-RING, which is made by rubber and prevent electric spark.
natural_image
Hand inserting a small object into a circular device (no text or symbols visible)Cleaning
Before Cleaning
Exterior
Be sure to unplug the power.
Clean the outside of the fridge-freezer with a soft cloth soaked with hot water or liquid detergent. If you use a detergent, be sure to wipe it with a clean wet cloth.
Interior
As above.
After Cleaning
Check that the power cord is not damaged, power plug has not overheated, and that the power plug is tightly inserted into the outlet.
Warning
Be sure to dry the appliance with a cloth after washing it with water.
Do not use abrasive, petroleum, benzene, thinner, hydrochloride acid, boiling water, rough brush, etc, as they may damage parts of the fridge-freezer.
Care and Maintenance
GRILLE and DRIP TRAY
- After removing the HOLE part of the GRILLE with the finger, slowly pull the DRIP TRAY out.
- After discharging Drip Water inside of the DRIP TRAY, clean and fully rinse the GRILLE and the DRIP TRAY.
- Wipe moisture out around the DOOR part and the DRIP TRAY using a clean cloth.
Exterior Dispenser
Wipe moisture etc out outside of Dispenser and on the Dispenser Pad using a cloth.
Water Tank
- Lift the WATER TANK up by pressing the fixing LEVER on the bottom of WATER TANK and then remove it.
- After removing the CAP TANK (BIG), clean and fully rinse the inside/outside part of the WATER TANK by using neutral cleansing agent.
Cap Tank(Big & Small)
Clean and fully rinse the Cap Tank (Big & Small) by using neutral cleansing agent.
Especially for the groove part of the CAP TANK, it is convenient to cleanse it by using a small brush.
Valve Assembly
Clean and fully rinse the VALVE ASSEMBLY by using a small brush. Rinse it while operating the bottom part of the valve assembly. Always fix the Sealing Rubber separated for cleansing at the existing position (may result in water leakage).
Trouble Shooting
| Before calling for service, check this list. It may save you both time and expense. This list includes common occurrences that are not the result of defective workmanship or materials in this appliance. | |
| Problem | Possible Causes |
| Fridge-Freezer does not operate | Power plug may be unplugged from the electric outlet.Plug it in securely.House fuse has blown or circuit breaker has tripped.Check and/or replace fuse and reset circuit breaker.Power cut.Check house lights. |
| Fridge or Freezer Compartment Temperature too warm | Temperature control not set on proper position.Refer to Temperature Control section.Appliance is placed close to heat source.Warm weather-frequent door openings.Door left open for a long time.Package holding door open or blocking air duct in freezer compartment. |
| Vibration or Rattling or Abnormal Noise | The floor on which the fridge-freezer is installed may be uneven or the fridge-freezer may be unstable.Make it even by rotating the leveling screw.Unnecessary objects placed in the back side of the fridge-freezer. |
| Frost or Ice Crystals on frozen Food | Door may have been left ajar or package holding door open.Too frequent or too long door openings.Frost within package is normal. |
| Moisture forms on Cabinet Surface | This phenomenon is likely to occur in a wet space.Wipe it with a dry towel. |
Problem
Moisture collects inside
Fridge has odor
Door not closing properly
Interior light does not work
Possible Causes
- Too frequent or too long door openings.
- In humid weather, air carries moisture into fridge when doors are opened.
- Foods with strong odors should be tightly covered or wrapped.
- Check for spoiled food.
- Interior needs cleaning. Refer to CLEANING section
- Food package is keeping door open. Move packages that keep door from closing.
- Fridge-freezer is not level. Adjust the leveling screws.
- The floor on which the fridge-freezer is installed may be uneven or the fridge-freezer may be unstable. Slightly raise the front side with the leveling screw.
- No power at outlet. - Light lamp needs replacing. Refer to the Lamp Replacement section
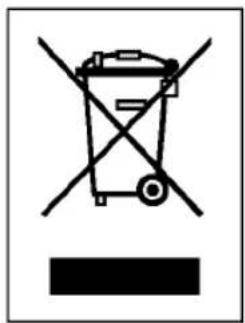
DISPOSAL OF YOUR OLD APPLIANCE
- When this crossed-out wheeled bin symbol is attached to a product it means the product is covered by the European Directive 2002/96/EC.
- All electrical and electronic products should be disposed of separately from the municipal waste stream via designated collection facilities appointed by the government or the local authorities.
- The correct disposal of your old appliance will help prevent potential negative consequences for the environment and human health.
- For more detailed information about disposal of your old appliance, please contact your city office, waste disposal service or the shop where you purchased the product.
To Reverse the Doors
Your fridge-freezer is designed with reversible doors, so that they may open from either the left of right hand side to suit your kitchen design.
Precaution
- Before reversing the door, first of all, you should take out food and accessories like shelves or trays which are not fixed in the fridge-freezer.
- Use Torque Wrench or Spanner to fix or remove the bolt.
- Do not lay the fridge-freezer down. This will cause problems.
- Be careful not to drop the doors in disassembling or assembling.
How to Reverse the Doors
- Remove SCREWS ③ after removing a CAP ② from the right part of the refrigerator room HANDLE ①. Remove 2 SCREWS ③ on the bottom part of the refrigerator room HANDLE ①. The freezer room HANDLE ⑤ may be also separated in the same sequence as in the refrigerator room HANDLE ①.
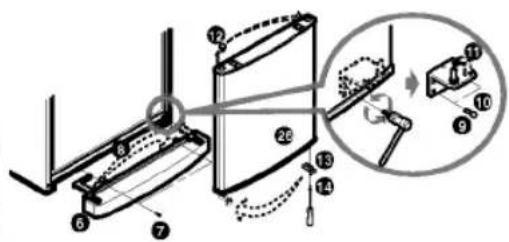
- Remove screw ⑦ and remove Cover ⑥ and move Cap Cover ⑧. And, remove screw ⑨, Hinge-L ⑩, and remove pin ⑪. Remove the Freezer Door ⑫, and move the position of the cap ⑫. Move the position of bracket door ⑬ and screw ⑭.
- Remove bolt 15 and remove the Hinge-C 16 and the Fridge Door 17. Move the position of the cap 18. Move the position of bracket door 22 and screw 21.


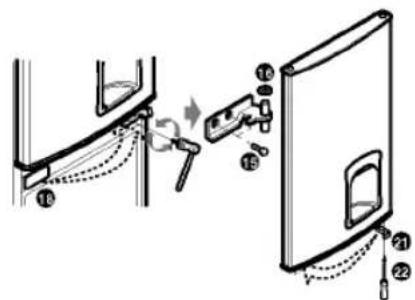
- Move the position of Hinge-U pin 19, and Cap, Top cover 20 Assemble the Fridge Door 17 Assemble Hinge-C 16 and bolt 15 Assemble F-Door 25. Assemble the Hinge-L 10 and bolt 9. Assemble Low Cover 6 and screw 7.
- Install HANDLES ^⑤ installed at the existing freezer room, at the refrigerator room. Adjust the bottom part of HANDLES to the groove and then fasten 2 screws ^③ after removing the CAP ^⑦ . After bolting SCREWS in the side of the refrigerator room DOOR, press and insert the CAP ^② . Insert the CAP ^④ to hole which the HANDLE ^① was installed previous. The freezer room HANDLES ^① are assembled in the same manner as above using the existing.
- Stop the groom where the existing HANDLE ①, ⑤ was installed at by using the CAP removed in the initial installation.

Note
Reversing the doors is not covered by the warranty.
Memo
Tartalomjegyzék
Előszó
Rejesztráció 22
natural_image
Line drawing of a hand cursor clicking a circular button with radiating lines (no text or symbols)natural_image
Illustration of a hand using a keyboard to press a button into a grid, with no text or symbols present.Jótanács
natural_image
Pure diagram of a refrigerator with no text, numbers, or symbolsLámpacsere
natural_image
Hand inserting a button into a circular device (no text or symbols visible)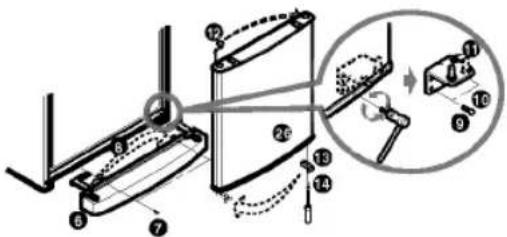

Memo
Obsah
Úvod
Registrace 40
natural_image
Illustration of a hand using a keyboard to press a device, showing the keyboard and mouse (no text or symbols present)Tip
natural_image
Hand inserting a card into a circular device (no text or symbols visible)Čištění
Před čištěním
LIKVIDACE STARÝCH SPOTŘEBIČŮ
Pozn-mka
natural_image
Illustration of a hand using a keyboard to press a device into a grid, with no text or symbols present.Съвет
natural_image
Pure diagram of a cabinet or wardrobe layout without any text, numbers, or symbolsСмяна на крушката
natural_image
Hand inserting a button into a circular device (no text or symbols visible)Почистване
Преди почистване
natural_image
Symbol of a waste bin with no text or labels, featuring a crossed-out box and a solid rectangle below (no readable text or symbols)ИЗХВЪРЛЯНЕ НА ВАШИЯ СТАР УРЕД


Забележка
natural_image
Illustration of two hands using a keyboard to interact, one with an arrow indicating rotation (no text or symbols present)Indicatie
Instalare
Înlocuirea lămpii
natural_image
Line drawing of a hand inserting a component into a circular device (no text or symbols)Întreținere
Curățare
Înainte de curățare
CASAREA APARATELOR VECHI

Notă
natural_image
Illustration of two hands using a handheld device to interact, showing a curved arrow and a rose (no text or symbols)natural_image
Pure diagram of a refrigerator with doors and drawers, no text or symbols presentZamena lampice
- Isključite utikač iz utičnice.
- Uklonite police frižidera.
- Da biste uklonili poklopac sa lampice ubacite šrafciger sa donje strane poklopca lampice i povucete ga napred.
- Okrenite sijalicu suprotno kazaljci na satu.
- Sastavite suprotnim redosledom. Lampica za zamenu mora imati iste osobine kao i original.
- Morate proveriti O-PRSTEN koji je napravljen od gume i sprečava pojavu varnica.

natural_image
Hand inserting a small object into a circular device (no text or symbols visible)Čišćenje
Pre čišćenja
Proverite da li ste icključili utikač iz utičnice.
Spoljašnost
Očistite spoljašnjost frižidera-zamrzivača mekom krpom navlaženom toplom vodom ili tečnim deterdžentom. Ako koristite deterdžent, obavezno ga obrišite čistom, vlažnom krpom.
Unutrašnjost
Isto kao prethodno.
Posle čišćenja
Proverite da kabal nije oštećen, da utikač nije pregrejan, kao i da li je utikač dobro uključen u utičnicu.
Upozorenje
Obavezno obrišite aparat suvom krpom nakon što ste ga oprali vodom.
Ne koristite abrazivna sredstva, petroleum, benzin, razređivač, hlornu kiselinu, ključalu vodu, grube četke itd. zato što to može oštetiti delove frižidera-zamrzivača.
Čuvanje i održavanje
REŠETKA I TACNICA
UKLANJANJE STARIH APARATA
- Ako se na proizvodu nalazi simbol prekrižene kante za smeće, to znači da je proizvod u skladu sa evropskom smernicom 2002/96/EC.
- Električni i elektronski proizvodi ne smeju se odlagati zajedno s komunalnim otpadom, već na posebna mesta koja je odredila vlada ili lokalne vlasti.
- Ispravno odlaganje starog aparata sprečiće potencijalne negativne posledice za okolinu i zdravlje ljudi.
- Detaljnije informacije o odlaganju starog aparata potražite u gradskom uredu, komunalnoj službi ili u prodavnici u kojoj ste kupili proizvod.
Promena strane otvaranja vrata
Vaš frižider sa zamrzivačem sa mogućnošću je promene strane otvaranja vrata, tako da otvaranje vrata može biti levo, odnosno desno, a prema vašoj potrebi.
Upozorenje
- Pre promene strane otvaranja vrata morate izvaditi namirnice i pribor što nije pričvršćen za frižider sa zamrzivačem, kao što su, na primer, police ili fioke.
- Koristite ključ za zavrtnje da bi odvrnuli ili zavrnuli zavrtanj.
- Nemojte stavljati frižider sa zamrzivačem da leži. Ovo bi izazvalo probleme.
- Pazite da ne bi ispustili vrata prilikom rastavljanja ili sastavljanja.
Kako promeniti stranu otvaranja vrata
- Odvrnite ZAVRTNJE ③ nakon skidanja KAPICE ② sa desnog dela RUČICE ① vrata frižidera. Odvrnite 2 ZAVRTNJA ③ sa donjeg dela RUČICE ① vrata frižidera. RUČICU ⑤ vrata zamrzivača možete skinuti istim redosledom kao i RUČICU ① vrata frižidera.

- Odvrnite zavrtanj ⑦, skinite zaklopac ⑥ pa promenite mesto kapice ⑧ zaklopca. Zatim odvrnite zavrtanj ⑨, skinite L šarku ⑩, pa izvadite šplint ⑪. Skinite vrata zamrzivača ⑫, pa promenite mesto kapice ⑬. Promenite mesto držača vrata ⑭ i zavrtnja ⑮.

- Odvrnite zavrtanj 15, pa skinite C šarku 16 i vrata frižidera 17. Promenite mesto kapice 18. Promenite mesto držača vrata 22 i zavrtnja 21.

- Promenite mesto šplinta 19 U šarke i kapice 20 gornjeg zaklopca. Postavite vrata frižidera 17. Pričvrstite C šarku 16 pomoću zavrtnja 15. Postavite vrata zamrzivača 28. Pričvrstite L šarku 10 pomoću zavrtnja 9. Pričvrstite donji zaklopac 6 pomoću zavrtnja 7.
- Postavite RUČICU ⑤, koja je pre toga bila na vratima zamrzivača, na vrata frižidera. Smestite donji deo RUČICE u žleb, a zatim je pričvrstite pomoću 2 zavrtnja ③, nakon što skinete KAPICU ⑦. Čim pričvrstite ZAVRTNJE za VRATA frižidera, pritisnite i umetnite KAPICU ②. Umetnite KAPICU ④ u rupu gde je pre toga bila pričvršćena RUČICA ①. Pričvrstite na isti način RUČICU ①, koja je pre toga bila na vratima frižidera, na vrata zamrzivača.
- KAPICAMA 27 koje ste skinuli prilikom montaže zatvorite žlebove gde su pre toga bile pričvršćene RUČICE 1, 5.

Napomena
Garancija ne obuhvata promenu strane otvaranja vrata.
Memo
Sadržaj
Uvod
Registracija 112
Važne upute za sigurnost 112
natural_image
Illustration of a hand using a keyboard to press a rose, showing the process (no text or symbols present)Pravljenje leda
- Za pravljenje kockica leda potrebno je vodom napuniti posude za pravljenje leda do ruba i staviti ih u zamrzivač.
- Ukoliko led trebate brzo, pritisnite tipku za brzo zamrzavanje.
- Kad poželite izvaditi kockice leda, podložak za led primite na krajevima i lagano zaokrenite.
Savjet
Za lakše vađenje kockica leda, prelijte podložak za led vodom prije zaokretanja i vađenja.
Odmrzavanje
Odmrzavanje se događa automatski.
natural_image
Simple line drawing of a refrigerator with multiple windows (no text or symbols)Zamjena žaruljice
natural_image
Hand inserting a component into a circular device (no text or symbols visible)Čišćenje
Prije čišćenja
Vanjština
natural_image
Symbol of a trash bin with crossed x and y lines, no text or numbers presentUKLANJANJE STAROG APARATA
- Ako se na proizvodu nalazi simbol prekrižene kante za smeće, to znači da je proizvod pokriven europskom direktivom 2002/96/EC.
- Električni i elektronski proizvodi ne smiju se odlagati zajedno s komunalnim otpadom, već u posebna odlagališta koja je odredila vlada ili lokalne vlasti.
- Pravilno odlaganje starog proizvoda sprečit će potencijalne negativne posljedice po okoliš i zdravlje ljudi.
- Podrobnije informacije o odlaganju starog proizvoda potražite u gradskom uredu, službi za odlaganje otpada ili u trgovini u kojoj ste kupili proizvod.
| MODEL | NOISE(dB) |
| GR-369/409 | 40 |

LG
- FAGYASZTÓ ÉS HÜTÖGÉP
- HASZNÁLATI ÚTMUTATÓ
- Installation
- Operation
- Suggestion On
- Food storage
- Care and
- Maintenance
- Trouble Shooting
- To Reverse the
- Doors
- Registration
- Introduction
- Precaution
- Important Safety Instruction
- Do not modify or extend the Power Cord length
- Don't Use an Extension Cord
- Accessibility of Supply Plug
- Supply Cord Replacement
- Danger
- Don't store
- Grounding (Earthing)
- ▲Warning
- Identification of Parts
- Note
- Starting
- Temperature Control
- Fridge
- Freezer
- Quick Freeze
- Vacation
- Self Test
- Door Alarm
- Ice Making
- Tip
- Defrosting
- Water Dispenser (optional)
- Features
- Install
- Filling of WATER TANK
- Drinking
- Caution
- Storing Food
- General Information
- Power Failure
- If You Move
- Anti Condensation Pipe
- Lamp Replacement
- Cleaning
- Before Cleaning
- Exterior
- Interior
- After Cleaning
- Warning
- Care and Maintenance
- GRILLE and DRIP TRAY
- Exterior Dispenser
- Water Tank
- Cap Tank(Big & Small)
- Valve Assembly
- Problem
- Moisture collects inside
- Fridge has odor
- Door not closing properly
- Interior light does not work
- Possible Causes
- DISPOSAL OF YOUR OLD APPLIANCE
- To Reverse the Doors
- How to Reverse the Doors
- Tartalomjegyzék
- Előszó
- Jótanács
- Lámpacsere
- Obsah
- Úvod
- Čištění
- Před čištěním
- LIKVIDACE STARÝCH SPOTŘEBIČŮ
- Pozn-mka
- Съвет
- Смяна на крушката
- Почистване
- Преди почистване
- ИЗХВЪРЛЯНЕ НА ВАШИЯ СТАР УРЕД
- Забележка
- Indicatie
- Instalare
- Înlocuirea lămpii
- Întreținere
- Curățare
- Înainte de curățare
- CASAREA APARATELOR VECHI
- Notă
- Zamena lampice
- Čišćenje
- Pre čišćenja
- Spoljašnost
- Unutrašnjost
- Posle čišćenja
- Upozorenje
- Čuvanje i održavanje
- REŠETKA I TACNICA
- UKLANJANJE STARIH APARATA
- Promena strane otvaranja vrata
- Kako promeniti stranu otvaranja vrata
- Napomena
- Sadržaj
- Uvod
- Pravljenje leda
- Savjet
- Odmrzavanje
- Zamjena žaruljice
- Prije čišćenja
- Vanjština
- UKLANJANJE STAROG APARATA
Brand : LG
Model : GR-409GTPA
Category : Freezer