
LIFE P64103 (MD 84498) - Hi-Fi System MEDION - Free user manual and instructions
Find the device manual for free LIFE P64103 (MD 84498) MEDION in PDF.


| Product type | Hi-Fi system |
| Brand | Medion |
| Model | LIFE P64103 (MD 84498) |
| Dimensions (W x H x D) | 200 x 300 x 150 mm |
| Weight | 3 kg |
| Power supply | 230 V ~ 50 Hz |
| Output power | 2 x 20 W RMS |
| CD player | Yes, compatible with CD, CD-R, CD-RW |
| Radio | FM with 30 presets |
| Wireless connectivity | Bluetooth 5.0 |
| USB port | Yes, supports MP3/WMA |
| Audio input | 3.5 mm auxiliary input |
| Headphone output | Yes, 3.5 mm jack |
| Speakers | 2-way with tweeter |
| Remote control | Included |
| Display | Backlit LCD screen |
| Maintenance and cleaning | Clean with a soft dry cloth. Do not use abrasive products. |
| Safety | Do not expose to moisture. Unplug before cleaning. |
| Spare parts and repairability | Repairability index: 6.5/10 (estimate). Parts available from the manufacturer. |
| General information | Compact Hi-Fi system with modern features. Ideal for home use. |
Frequently Asked Questions - LIFE P64103 (MD 84498) MEDION
User questions about LIFE P64103 (MD 84498) MEDION
0 question about this device. Answer the ones you know or ask your own.
Ask a new question about this device
Download the instructions for your Hi-Fi System in PDF format for free! Find your manual LIFE P64103 (MD 84498) - MEDION and take your electronic device back in hand. On this page are published all the documents necessary for the use of your device. LIFE P64103 (MD 84498) by MEDION.
USER MANUAL LIFE P64103 (MD 84498) MEDION
Micro-Audio-System mit Bluetooth-Funktion Micro audio system with Bluetooth function Micro chaîne audio avec fonction Bluetooth Micro-audiosysteem met Bluetooth
MEDION® LIFE® P64103 (MD 84498)
Inhaltsverzeichnis
1) CD-Fach-Öffner
4.4. Fernbedienung
Contents
1. Notes on how to use these instructions .... 27
1.1. Warning symbols and key words used in these instructions .....27
1.2. Proper use....28
2. Safety instructions
2.1. Keep electrical equipment out of reach of children ....28
2.2. Setting up the device safely 28
2.3. Ventilation 29
2.4. Ensure accessibility of the mains power socket....29
2.5. Never carry out repairs yourself ....30
2.6. The CD player....30
2.7. Earphones....30
2.8. Information on electrostatic charge 30
2.9. Battery information....31
3. Notes on conformity.... 32
4. Overview of the appliance 32
4.1. Front 32
4.2. Rear....33
4.3. Top....33
4.4. Remote control....34
5. Start of operation 35
5.1. Check package contents 35
5.2. Inserting the batteries in the remote control 36
5.3. Setting up the device 36
5.4. Aerial reception 36
5.5. Mains connection 36
5.6. Connecting the loudspeakers 36
5.7. Connecting the headphones....36
6. Basic functions.... 37
6.1. STANDBY....37
6.2. Automatic switch-off – SLEEP ....37
6.3. Sound settings....37
7. Radio mode
7.1. Tuning....37
7.2. Stereo/mono reception....38
7.3. Saving and selecting stations 38
8. CD/USB operation
8.1. Playback media....38
8.2. Inserting and removing CDs 39
8.3. Inserting a USB device 40
8.4. Playback functions ....40
8.5. Program the playing order of tracks 41
9. Bluetooth mode
9.1. Using the remote control ....42
-
Cleaning 43
-
Disposal 43
-
Technical data 44
-
Legal notice 45
1. Notes on how to use these instructions

Please read through this section and all of the documentation carefully and follow all of the instructions given.
Always keep these operating instructions near at hand to the device, but store them safely so that you can pass them on to a new owner should you sell the device.
1.1. Warning symbols and key words used in these instructions
 | DANGER!Warning: immediate mortal danger!WARNING!Warning of possible risk of fatal injury and/or serious irreversible injuries! |
 | CAUTION!Please follow the instructions to prevent injuries and property damage!ATTENTION!Please follow the guidelines to avoid property damage! |
 | NOTE!Additional information on using the appliance! |
 | NOTE!Please follow the guidelines in the operating instructions! |
 | WARNING!Warning: danger of electric shock! |
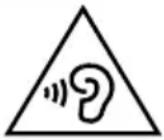 | WARNING!Warning: danger due to excessive volume! |
| • Bullet | point/information on operating steps and results |
| ► Tasks to be performed | |
1.2. Proper use
This device is used to receive and play back radio stations and to play back audio files from CDs or USB sources. This device is for private use only and may not be used for commercial purposes.
2. Safety instructions
2.1. Keep electrical equipment out of reach of children
- This device is not intended for use by people (including children) with reduced physical, sensory or mental abilities or for those without experience and/or knowledge, unless they are supervised by a person responsible for their safety or they have been instructed in its use.
- Children should be supervised to ensure they do not play with this device.

DANGER!
Keep plastic packaging out of the reach of children. There is a risk of suffocation.
- If swallowed, batteries may endanger life. For this reason, keep the batteries out of reach of children. If a battery is swallowed, please obtain immediate medical assistance.
2.2. Setting up the device safely
- This device is intended for private use only. Only use the device in residential rooms or similar rooms.
- Set up and operate all components on a stable, level and vibration-free surface to prevent the device from falling down.
Make sure that:
- the device is not exposed to direct sources of heat (e.g. heaters);
- the device is not placed in direct sunlight;
- there is no contact with moisture, water and splashes;
- naked flames (such as lit candles) are not placed near or on the device;
- no liquid-filled containers (e.g. vases) are placed on any part of the device;
- the device is not placed close to magnetic fields (e.g. television sets or other speakers);
- the vents are uncovered so as to ensure there is always adequate ventilation.
2.3. Ventilation
- Do not cover the air vents. Ensure that ventilation is adequate.
- Maintain a minimum distance of approx. 5 cm on all sides.
2.4. Ensure accessibility of the mains power socket
- Only connect the device to a mains socket (100-240 V \~ 50/60 Hz) that is easy to reach and is close to the place where you have set up the device. The socket outlet must be freely accessible, so that you can unplug the device from the mains quickly if necessary.
- Unwind the cable fully when using the appliance.
- When disconnecting the device from the mains supply, always pull on the plug rather than on the cable.
- To avoid the risk of tripping, please avoid using extension cables.
2.5. Never carry out repairs yourself
- If the plug, power cable or the device is damaged or if liquids or foreign bodies enter the device, remove the plug immediately from the socket.
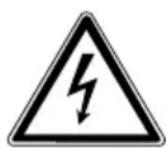
WARNING!
Never try to open and/or repair the product yourself.
There is a risk of electric shock!
- If there is a fault, contact the Medion Service Centre or her suitable specialist workshop.
2.6. The CD player
- The CD player is a class 1 laser product. The device has a safety system that prevents dangerous laser rays from escaping during normal use.

- To avoid eye injuries, never tamper with or damage the safety system of the device.
2.7. Earphones
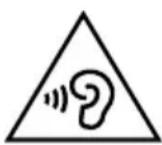
WARNING
High volume when using earphones can cause hearing loss. Before putting on earphones, reduce the volume to minimum! Your hearing can be damaged if you listen at high volumes over a long period or if the volume is increased too suddenly.
2.8. Information on electrostatic charge
If the device does not work correctly because of electrostatic charge, reset it by disconnecting it from the mains for a short period of time.
2.9. Battery information
Batteries may contain combustible materials. If handled incorrectly, batteries can leak, become very hot, ignite or even explode, which could damage your appliance and/or your health.
It is very important that you follow the instructions below:
- Keep batteries away from children.
Contact your doctor immediately if a battery is swallowed. - Never charge non-rechargeable batteries. There is a risk of explosion!
- Never create a short-circuit between the batteries and connection terminals of the device.
- Never expose the batteries to excessive heat (such as direct sunlight, fire or similar).
- Do not dismantle or deform the batteries.
You could injure your hands or fingers, or battery fluid could come into contact with your eyes or skin. If this happens, rinse the affected areas with plenty of clean water and contact your doctor immediately. - Avoid heavy impacts and vibrations.
- If necessary, clean the battery and device contacts before insertion.
• Always observe the correct polarity.
Make sure that the plus (+) and minus (−) poles are correctly inserted to avoid short-circuits. - Do not mix up new and old batteries or different types of batteries. This could cause your device to malfunction. In addition, the weaker batteries would discharge too much.
- Remove spent batteries from the device immediately.
- Remove the batteries from the device if you do not intend to use it for a long period of time.
- Replace all of the old batteries in a device with new batteries of the same type.
- Cover the contacts of the batteries with sticky tape if you want to store or dispose of them.
3. Notes on conformity
Medion AG hereby declares that the product conforms to the following European requirements:
• EMC Directive 2004/108/EC
• Low Voltage Directive 2006/95/EC
• Ecodesign Directive 2009/125/EC
• RoHS Directive 2011/65/EU.
Full declarations of conformity are available at www.medion.com/conformity.
4. Overview of the appliance
4.1. Front
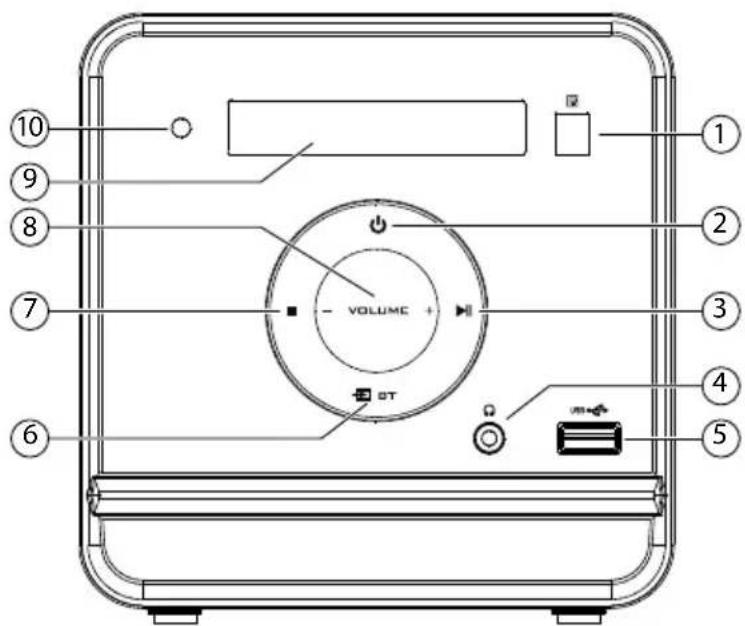
1) Infrared sensor for remote control
2) Switch on the device from standby mode and switch back to standby mode
3) ▶ II : start/pause playback / radio station button +
4) Earphone socket
5) USB: connection port for USB storage media
6) Select playback mode
7) ■: stop playback / radio station button -
8) Volume selector
9) Display
10) Standby LED
4.2. Rear

1) FM wire aerial
2) Connection sockets for loudspeakers
4.3. Top

1) CD compartment opener
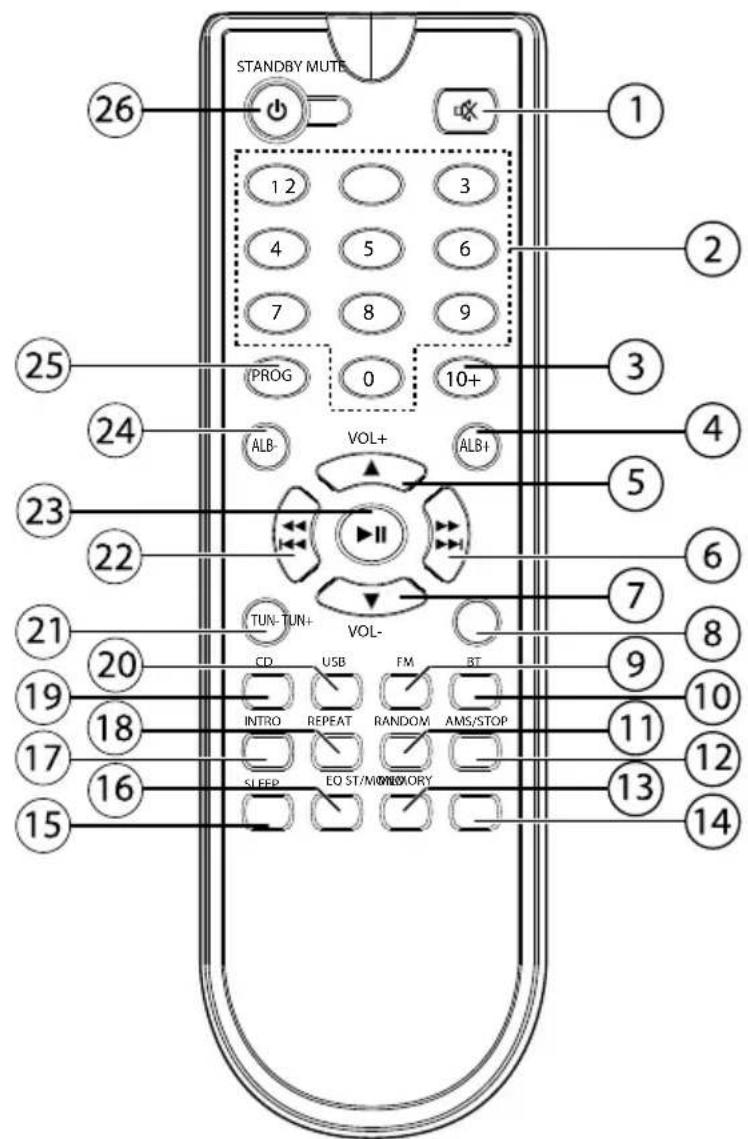
4.4. Remote control

1) MUTE: switches off sound
2) Number keys 0–9
3) 10+: two or three-digit number entry
4) ALB+: one file folder forward in USB/MP3 CD mode
5) VOL+: increase volume
6) ▶/▶: fast forward/select next track / radio station button +
7) VOL-: decrease volume
8) TUN+: forward station search
9) FM: select radio mode
10) BT: select Bluetooth mode
11) RANDOM: random playback
12) AMS/STOP: scan radio stations; stop playback
13) MEMORY: save stations
14) ST/MONO: switch between stereo and mono playback
15) SLEEP: select sleep mode
16) EQ: select equaliser mode (FLAT, CLASSIC, ROCK, POP, JAZZ)
17) INTRO: play all tracks for 10 sec.
18) REPEAT: select repeat mode
19) CD: select CD mode
20) USB: select USB playback medium
21) TUN-: backward station search
22) ◀/◄◄: fast reverse/select previous track / radio station button –
23) ▶ II : start/pause playback
24) ALB-: one file folder back in USB/MP3 CD mode
25) PROG: program function
26) STANDBY: switch on device from standby mode and back into standby mode
5. Start of operation
5.1. Check package contents
Remove all packaging materials. Open the CD compartment and remove the transport protection insert.

WARNING!
Do not let children play with the plastic film. There is a risk of suffocation!
Please check your purchase to ensure that all items are included. If anything is missing, please contact us within 14 days of purchase. The product you have purchased includes:
• 1 Micro Audio System
• 2 loudspeakers
- 1 remote control
- 2 x 1.5 V R03/LR03/AAA batteries
- Operating instructions and warranty documents
5.2. Inserting the batteries in the remote control
Insert the two supplied 1.5 V R03/LR 03/AAA batteries into the remote control.
▶ Open the battery compartment by pushing the lid catch in the direction of the arrow.
Insert the batteries so that the negative pole is placed next to the springs.
Put the battery compartment lid back onto the remote control and press it down lightly until you hear a click.
5.3. Setting up the device
Place the device on a sturdy, level surface.
5.4. Aerial reception
You will find a wire aerial at the rear of the device. Adjust the wire aerial for optimum reception.
5.5. Mains connection
Once you have made all the connections, connect the plug to an easily accessible mains socket (100-240 V \~ 50/60 Hz.).
5.6. Connecting the loudspeakers
▶ Make sure that the device is not connected to the mains.
Connect the bare ends of the speaker cables to the corresponding colour-coded sockets on the rear of the micro audio system.
R (right) is for the cable pair of the right loudspeaker, L (left) is for the cable pair of the left loudspeaker.
5.7. Connecting the headphones
▶ You can connect headphones with a 3.5 mm jack plug to the socket on the right side of the device. The loudspeakers switch off automatically whenever the headphones are connected.

WARNING!
Loud volumes when using headphones or earphones generate excessive acoustic pressure that can cause hearing loss. Before putting on headphones, set the volume to minimum.
6. Basic functions
6.1. STANDBY
To switch on the device, press the STANDBY button on the device or on the remote control. Information will appear on the display.
To switch the device back to standby mode, press the STANDBY button on the device or on the remote control.
The device is now back in standby mode and the Standby LED lights up.
6.2. Automatic switch-off - SLEEP
You can set a time after which the device will automatically switch into standby mode. The device needs to be switched on for this.
▶ Press the SLEEP button on the remote control repeatedly to set the required time: 90 minutes > 80 minutes > 70 minutes, etc. down to 10 minutes. The SL symbol will appear on the display to show that the SLEEP timer has been set.
▶ To switch off the SLEEP timer, press SLEEP until S-00 appears on the display.
6.3. Sound settings
6.3.1. VOLUME
▶ Press ▲/VOL+ or ▼/VOL- on the remote control or press the VOLUME -/+ on the device to increase or decrease the volume. The volume level is displayed (maximum 40).
6.3.2. EQ (Equaliser)
▶ Press EQ on the remote control to select the required preset: FLAT, JAZZ, CLASSIC, ROCK, POP.
6.3.3. Mute
To turn off the sound completely, press the MUTE button on the remote control. The display will show MUTE. – Press MUTE or VOLUME to restore the sound.
7. Radio mode
If necessary, press the FM button to switch to radio mode, or press the → button repeatedly until you reach the radio mode.
7.1. Tuning
▶ Briefly press the TUN+ or TUN- buttons on the remote control to set a certain frequency. Hold down one of the buttons to automatically search for the next station.
7.2. Stereo/mono reception
Stereo reception of a station in the FM range is shown on the display with the ST symbol.
If the stereo reception is weak (there is noise interference), the reception signal can sometimes be improved by switching to mono reception.
▶ Press the ST/MONO button to switch between stereo and mono reception.
7.3. Saving and selecting stations
You can store up to 30 stations.
7.3.1. Storing stations automatically
▶ Hold down the AMS/STOP button until the automatic station search begins. All of the stations found are now automatically saved in sequence. Press the button again to stop the automatic station search.
7.3.2. Storing stations manually
▶ Tune in a station that you would like to save.
▶ Press the MEMORY button on the remote control. The programme position will flash on the display.
▶ While the display is flashing, use the ◀ or ▶ buttons to choose the programme position for this station.
▶ Press the MEMORY button again to store the station; the selected programme position (e.g. P01) remains displayed.
7.3.3. Calling up stations
▶ You can call up the saved stations again with the ◀◀ or ▶▶ buttons on the remote control or the ■ or ▶ ▶ // buttons on the device.
8. CD/USB operation
8.1. Playback media
playable media are:
• Audio CDs, CD-Rs, CD-RWs
- USB memory stick. Please note that it is not possible to guarantee full compatibility with all memory sticks.

NOTE!
The playback functions for these media are largely identical and have therefore been described together in these instructions.
8.2. Inserting and removing CDs
8.2.1. Information about the CD compartment
- Never insert foreign objects into the CD compartment as this could damage the mechanism.
- To prevent dust from accumulating in the device, do not leave the CD compartment open for long periods of time.
- Never touch the lens in the CD compartment.
- If a CD is very dirty or badly marked with fingerprints, the playback function may be delayed or the disc may start from another position.
- Dirt on the scanning lens may cause interruptions during playback or other malfunctions.
- If you want to remove dust from the CD compartment, simply use a normal blower brush (found in photographic supplies shops).
8.2.2. Inserting a CD
If necessary, press the CD button to switch to CD mode, or press the ➕ button repeatedly until you reach the CD mode.
▶ Open the CD compartment by pressing the opening depression on the CD compartment lid. The CD compartment lid opens upwards. OPEN is displayed on the screen.
Place a CD with the label side up on the support and make sure it is seated firmly.
▶ Close the CD compartment by gently pressing down the compartment lid. The CD starts to rotate and READ appears on the display.
The total number of tracks and the total running time of the CD are displayed. If there is no disc inserted or if the disc cannot be read, the display reads NO DISC.

NOTE!
Do not open the CD compartment while the disc is still playing or rotating. Press STOP first.
To remove a CD, grasp it by the edges and carefully press down the holder in the middle.
8.3. Inserting a USB device
If necessary, press the USB button to switch to USB mode, or press the → button repeatedly until you reach the USB mode.
The tracks are read and the display shows the total number of albums and tracks in stop mode.

CAUTION!
To avoid damaging the device, do not use a USB extension cable and do not connect the device directly to the USB port of a computer.
The USB connection is only designed to be used for USB memory sticks; other external storage media such as external hard disks cannot be operated via the USB port.
8.4. Playback functions
8.4.1. PLAY, PAUSE, STOP, track search
▶ Press the ▶ II button on the device or on the remote control in order to start playback.
▶ To pause playback, press the ▶ II button again.
▶ Press ▶ II again to continue playback from the same point.
▶ To jump to the start of a track, press the ◀ button during playback. Press ▶ to playback the next track.
▶ If you hold down ◀ or ▶ during playback, you start the fast forward/rewind functions.
▶ Press the ■ button on the device or STOP on the remote control in order to stop playback. The device goes into stop mode.
8.4.2. Folders in MP3 format
In order to change the folder on an MP3 data carrier, press the ALB- or ALB+ buttons.
8.4.3. REPEAT
▶ Press the REPEAT button.
"REP" appears on the display; the current track will be repeated.
In MP3 mode, press REPEAT again to repeat the whole folder. The display will show REP ALB.
▶ Press the REPEAT button again.
REP ALL appears on the display; all tracks will be repeated.
To end the repeat function, press the REPEAT button. The repeat indicator will disappear from the display.
8.4.4. RANDOM
With the RANDOM function enabled all the tracks are played in a random order.
▶ Press the RANDOM button during playback or in stop mode. RND appears on the display; random playback begins.
▶ Press the RANDOM button again to revert to normal playback mode.
8.4.5. INTRO
▶ Press the INTRO button on the remote control during playback or in stop mode. All tracks are played for 10 seconds each.
▶ Press the INTRO button on the remote control again to return to normal play mode.
8.5. Program the playing order of tracks
You can set a playing order for up to 20 tracks in CD mode and 99 tracks in MP3 mode. The device must be in stop mode for this.
▶ Stop playback with ■ on the device or STOP on the device.
▶ Press the PROG button on the remote control. The programme position P01 appears on the display and the track display 00 or 000 flashes.
Now use ◀◀ or ▶▶ to select a track.
You can also enter the track number directly using the number keys. Press the 10+ button once to enter two-digit numbers, pressing it again lets you enter three-digit numbers.
▶ Press the PROG button and save further tracks in the same way.
▶ Press ▶ II to play the list.

NOTE!
You can also use the repeat functions (repeat one track and repeat all tracks) as described above for the programmed list.
The programmed list cannot be stored and will be lost when you switch off the device or change the mode.
9. Bluetooth mode
You can play back tracks on this device wirelessly via Bluetooth from external devices (e.g. an MP3 player or mobile telephone with Bluetooth).
▶ Switch on the audio system and activate the Bluetooth function by pressing the BT button on the remote control.
▶ Also activate the Bluetooth function on your external device and carry out the pairing process. Please refer to the instructions for your device for this process. The name of the audio system is "Medion MD 84498".
If a password is requested on the display of the external device, enter the code number "0000".
The pairing process is now complete ("CONNECT" appears on the display) and the external device can now be used from the audio system.
Playing back tracks and controlling the volume and special functions can be carried out both on your external device and on the audio system. What functions are available is dependent on your external device and the software that you use.
If you want to terminate the Bluetooth connection, switch off Bluetooth on the external device.
▶ You can unpair a paired device (delete the connection between the external device and the audio system) by holding down the ▶ II button on the audio device until BT is shown on the display.
9.1. Using the remote control
If you want to control tracks using the remote control, you have the following options:
- Press the ▲ or ▼ buttons to increase or decrease the volume.
- Start or pause playback with the ▶ II button.
- Skip to the previous or next track with the ◀◀ or ▶▶ buttons.
Please note that not every function is available for every external end device. It is possible that some functions will be shown on the display of the external end device
10. Cleaning
Always disconnect the device from the mains supply before cleaning it.
Only use a dry, soft cloth to clean the device. Do not use chemical solutions or cleaning products because these may damage the device's surface and/or inscriptions.
11. Disposal
Packaging

Your device is packaged to protect it from damage in transit. Packaging materials are raw materials and can therefore be reused or recycled.
Device

Do not dispose of the product in the household rubbish at the end of its service life. Ask your local authority about suitable environmentally friendly disposal facilities.

Batteries

Do not dispose of used batteries in household rubbish. Take the batteries to a collection point for used batteries.
12. Technical data
Power supply
Voltage: AC 100–240 V \~ 50/60 Hz
Power consumption: approx. 20 watts
Output power: 2 x 5 watts
Batteries for remote control: 2 x 1.5 V R03/LR03/AAA
Radio
FM waveband: 87.5 - 108 MHz
Connections for external functions
FM aerial: permanently installed wire aerial
Headphones: 3.5 mm jack plug
Headphone output voltage: <150mV
USB input: version 1.1
CD player
Laser output: Class 1 laser product
USB socket
Voltage: DC → max. 100mA 5
Bluetooth
Specification: V3.0, Class II
Transmission frequency: 2.4 GHz
Range: approx. 10 metres
Discs supported:
Audio CDs, CD-Rs, CD-RWs, MP3
Only play audio CDs which are labelled as follows:


NOTE!
These days, there are many non-standard ways of recording CDs, copy protection methods, and also a wide variety of blank CD-R and CD-RW discs. This can occasionally lead to errors or delays in the input process. This does not mean that the device is faulty.
Subject to technical changes!
C€0979
13. Legal notice
Copyright © 2015
All rights reserved.
This operating manual is protected by copyright.
Mechanical, electronic and any other form of reproduction is prohibited without the written permission of the manufacturer
Copyright is owned by the company:
Medion AG
Am Zehnthof 77
45307 Essen
Germany

The operating manual can be reordered via the service hotline and is available for download via the service portal at www.medion.com/gb/service/start/.
You can also scan the QR code above and download the operating manual onto your mobile device via the service portal.
Sommaire
CD audio, CD-R, CD-RW, MP3
Inhoudsopgave

- INHALTSVERZEICHNIS
- FERNBEDIENUNG
- CONTENTS
- NOTES ON HOW TO USE THESE INSTRUCTIONS .... 27
- SAFETY INSTRUCTIONS
- NOTES ON CONFORMITY.... 32
- OVERVIEW OF THE APPLIANCE 32
- START OF OPERATION 35
- BASIC FUNCTIONS.... 37
- RADIO MODE
- CD/USB OPERATION
- BLUETOOTH MODE
- NOTES ON HOW TO USE THESE INSTRUCTIONS
- WARNING SYMBOLS AND KEY WORDS USED IN THESE INSTRUCTIONS
- PROPER USE
- KEEP ELECTRICAL EQUIPMENT OUT OF REACH OF CHILDREN
- DANGER
- SETTING UP THE DEVICE SAFELY
- VENTILATION
- ENSURE ACCESSIBILITY OF THE MAINS POWER SOCKET
- NEVER CARRY OUT REPAIRS YOURSELF
- WARNING
- THE CD PLAYER
- EARPHONES
- INFORMATION ON ELECTROSTATIC CHARGE
- BATTERY INFORMATION
- NOTES ON CONFORMITY
- OVERVIEW OF THE APPLIANCE
- FRONT
- REAR
- TOP
- REMOTE CONTROL
- START OF OPERATION
- CHECK PACKAGE CONTENTS
- DO NOT LET CHILDREN PLAY WITH THE PLASTIC FILM. THERE IS A RISK OF SUFFOCATION
- INSERTING THE BATTERIES IN THE REMOTE CONTROL
- SETTING UP THE DEVICE
- AERIAL RECEPTION
- MAINS CONNECTION
- CONNECTING THE LOUDSPEAKERS
- CONNECTING THE HEADPHONES
- BASIC FUNCTIONS
- STANDBY
- AUTOMATIC SWITCH-OFF - SLEEP
- SOUND SETTINGS
- VOLUME
- EQ (EQUALISER)
- MUTE
- TUNING
- STEREO/MONO RECEPTION
- SAVING AND SELECTING STATIONS
- STORING STATIONS AUTOMATICALLY
- STORING STATIONS MANUALLY
- CALLING UP STATIONS
- PLAYBACK MEDIA
- NOTE
- INSERTING AND REMOVING CDS
- INFORMATION ABOUT THE CD COMPARTMENT
- INSERTING A CD
- INSERTING A USB DEVICE
- CAUTION
- PLAYBACK FUNCTIONS
- PLAY, PAUSE, STOP, TRACK SEARCH
- FOLDERS IN MP3 FORMAT
- REPEAT
- RANDOM
- INTRO
- PROGRAM THE PLAYING ORDER OF TRACKS
- USING THE REMOTE CONTROL
- CLEANING
- DISPOSAL
- PACKAGING
- DEVICE
- BATTERIES
- TECHNICAL DATA
- POWER SUPPLY
- RADIO
- CD PLAYER
- USB SOCKET
- BLUETOOTH
- SUBJECT TO TECHNICAL CHANGES
- LEGAL NOTICE
- GERMANY
- SOMMAIRE
- INHOUDSOPGAVE
Brand : MEDION
Model : LIFE P64103 (MD 84498)
Category : Hi-Fi System