
Vaporona 1800 - Steam cleaner TERMOZETA - Free user manual and instructions
Find the device manual for free Vaporona 1800 TERMOZETA in PDF.


| Product Type | Steam Cleaner |
| Brand | Termozeta |
| Model | Vaporona 1800 |
| Power Supply | 220-240V ~ 50/60Hz |
| Power Consumption | 1500 W |
| Water Tank Capacity | 1.2 L |
| Heating Time | Approx. 3-5 minutes |
| Steam Pressure | 3.5 bar |
| Steam Flow Rate | Adjustable, up to 30 g/min |
| Dimensions (L x W x H) | 30 x 20 x 25 cm |
| Weight | 2.5 kg |
| Cable Length | 3 m |
| Main Functions | Steam cleaning for floors, upholstery, windows, kitchen surfaces; includes accessories |
| Accessories Included | Floor nozzle, detail brush, window squeegee, extension tubes, measuring cup |
| Safety Features | Overheat protection, pressure safety valve, child lock (if applicable) |
| Maintenance | Descaling every 3 months using recommended descaler |
| Spare Parts Availability | Replacement nozzles, brushes, seals available via authorized service centers |
| Reparability | Non-user-serviceable internal parts; contact support for repairs |
| Warranty | 2 years |
| Certifications | CE, RoHS |
Frequently Asked Questions - Vaporona 1800 TERMOZETA
User questions about Vaporona 1800 TERMOZETA
0 question about this device. Answer the ones you know or ask your own.
Ask a new question about this device
Download the instructions for your Steam cleaner in PDF format for free! Find your manual Vaporona 1800 - TERMOZETA and take your electronic device back in hand. On this page are published all the documents necessary for the use of your device. Vaporona 1800 by TERMOZETA.
USER MANUAL Vaporona 1800 TERMOZETA
natural_image
White portable air conditioner with a vertical pole and handle, no visible text or symbols on the device body.
- DATI TECNICI
- TECHNICAL DATA
- TEHNIČNI PODATKI
VAPORONA 1800
Type 310005
220-240V \~ 50/60Hz 1700W
Made in China
DESCRIZIONE
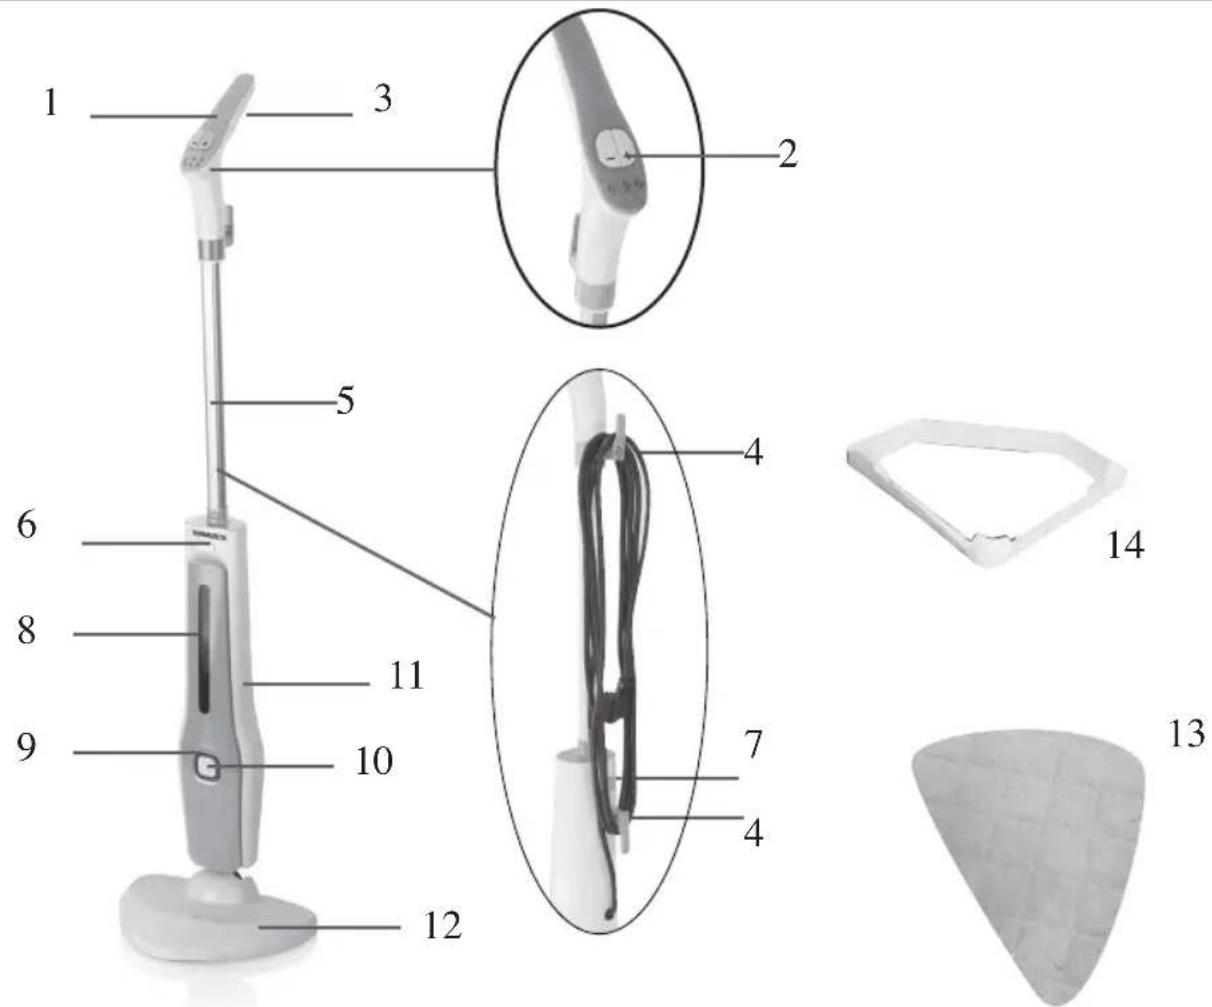
- Handle
- Steam adjust button
- Battery box cover
- Cord wrap hook
- Tube
- Water tank release button
- Tube release button
- Water tank
- Power on light
- ON/OFF push button
- Main body
- Mop head
- Cleaning pad
- Accessory for hard floor and carpet cleaning
OPIS
natural_image
Close-up of a mechanical component with a black arrow indicating a downward motion (no text or symbols)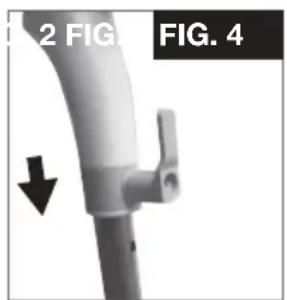
natural_image
Close-up of a white cylindrical mechanical component with a black arrow pointing to a small protrusion, labeled 'FIG. 2' and 'FIG. 4' (no text or symbols on the object itself)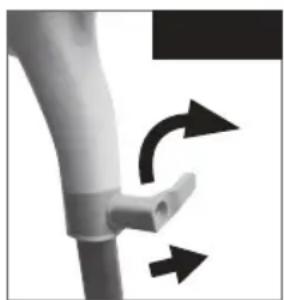
natural_image
Close-up of a curved mechanical component with directional arrows indicating rotation or movement (no text or symbols)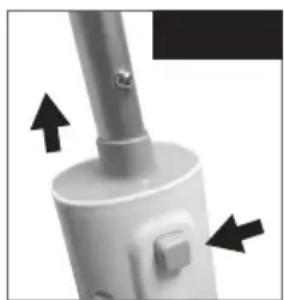
natural_image
Close-up of a white cylindrical device with a metallic rod and a button, showing directional arrows (no text or symbols visible)RIEMPIMENTO DEL SERBATOIO
natural_image
Close-up of a laboratory pipette device with mechanical components (no visible text or symbols)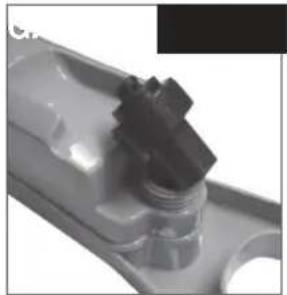
natural_image
Close-up of a mechanical component with a black cylindrical feature on a metallic surface (no visible text or symbols)
ATTENZIONE!
natural_image
Close-up of a textured, curved surface with no visible text or symbolsnatural_image
White plastic component with a curved edge and a small mark, labeled 'FIG. 8' in the top right corner (no other text or symbols)MESSA IN FUNZIONE

ATTENZIONE!
natural_image
Close-up of a wind turbine blade with a circular dial and three buttons (no text or symbols visible)DOPO L'USO
This manual is an integral part of the appliance and must be carefully read before using it as it gives important indications with regard to safety of installation, use and maintenance. Keep it with care.
- After taking off the packing make sure that the appliance is intact. In case of doubt do not use it and contact an assistance centre authorised by TERMOZETA.
- Do not leave pieces of packing (plastic bags, polystyrene foam, nails etc.) within reach of children or persons with reduced mental capabilities, since these are potential sources of danger.
- The electrical safety of this appliance is ensured only if it is correctly connected to an effective earthing system in compliance with the existing electrical safety standards. TERMOZETA shall not be held responsible for any damage caused by the lack of an earthing system.
- Before connecting the plug to the outlet check that the working voltage of the appliance corresponds to the one in your house. If in doubt, contact professionally qualified staff.
- Use of adaptors, multiple outlets and extension leads is not advisable. In case of necessity use exclusively approved appliances in conformity with the current safety regulations while making sure that they are compatible with the appliance power. If in doubt, contact professionally qualified staff.
- Any installation which doesn't comply with what is specified can endanger your safety and the warranty expires.
- This appliance is intended for domestic use only, for household cleaning purposes.
-
For safety reasons pay attention and:
-
do not use the appliance when you are barefoot or having wet hands or feet
- do not use the appliance outside the domestic environment
- do not leave the appliance exposed to atmospheric agents (sun, rain, etc.)
- never pull the power cord or the appliance itself in order to disconnect the plug from the outlet
- do not leave the appliance unattended when it is plugged into the main power supply
- never immerse the appliance in water or other liquids
- This appliance can be used by people with reduced physical, sensory or
ENGLISH
mental capabilities or lack of experience and knowledge, provided under supervision or after they have received instructions for the safe use of the appliance and understanding of the relevant dangers. Children should not play with the appliance.
- The power cord of the appliance should never be replaced by the user himself. In case of necessity contact an assistance centre authorised by TERMOZETA or professionally qualified staff.
- In case of failure and/or malfunctioning of the appliance, turn it off and do not tamper with it. For any repairs contact an assistance centre authorised by TERMOZETA and ask for the use of original spare parts.
- At the end of the life-cycle of the appliance, put it out of service by cutting the power cord after disconnecting the plug from the outlet. For the disposal of the appliance follow the regulations which are valid in your place of residence.
- TERMOZETA cannot be considered responsible for any damage to persons, animals or things caused by the incorrect installation or as a result of an illegitimate, mistaken or unreasonable use.
- The iron is not to be used if it has been dropped, if there are visible signs of damage or if it is leaking.
- Keep the appliance out of children's reach while in use or while cooling.
- During use the appliance produces steam and its surfaces could reach high temperatures. Pay attention not to enter in contact with steam and with the hot surfaces of the appliance since they could cause burns.
- Do not touch the appliance nor the plug having wet hands.
- Do not use the appliance when you are barefoot.
- During use never place the appliance on one of its sides and never direct the steam towards people, animals, plants or equipments with electric components, for example the oven internal parts.
- Do not use the appliance to clean vertical surfaces.
- Always check that the water tank is intact and correctly mounted on the appliance.
- Do not use the appliance near baths, sinks or water containers.
- At the end of the use, empty the tank so that the remaining water does not deposit limestone inside the appliance.
DESCALING

WARNING: limestone deposits (naturally present in water) can seriously affect the proper working of the appliance,
IT IS THEREFORE ABSOLUTELY NECESSARY TO CARRY OUT A DESCALING WASH,
every 2 or 3 months or every 30/40 hours of use with proper descalers commonly on the market.
IMPORTANT: the company will not take charge of maintenance services due to lack of descaling processes by the user.
Read carefully the instructions and the warnings on the descaler packaging.
Never use vinegar.
FIELD OF APPLICATION
- The appliance must only be used for domestic purposes to clean dry surfaces; do not use the appliance on inclined ramps or stairs.
- Do not use the appliance in areas with particular inflammability conditions: gas presence, spray, volatile dust, explosives, diluents, spirit varnishes, etc.
- Do not use the appliance in external areas.
- Do not use the appliance to clean waxed floors, leather surfaces, synthetic materials, velvet or other material sensitive to steam.

UNPACKING
• Take out all the components inside the packing and make sure the appliance is intact.
- Do not leave pieces of packing (plastic bags, polystyrene foam, nails, cardboard, metallic points, etc.) within reach of children or persons with reduced mental capacities since these are potential sources of danger.
- Dispose of the packing elements in accordance with local regulations.
INSTRUCTION FOR USE
HANDLE SHAFT FITTING AND BATTERY INSERTING
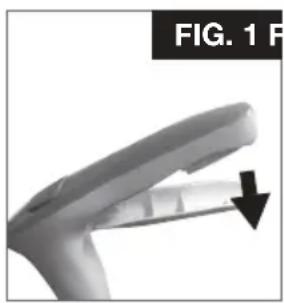
- Take out the handle, open the cover for buttery box, put 2*AAA battery in it, and close the cover.(Fig. 1)
- After assembled, insert handle into the tube (Fig. 2). Push in it until you hear it click into place.
- To disassemble the handle, pull out the cord wrap (Fig. 3).
- Push release tab on tube (5), then insert tube (5) with handle into main body (11). Make sure that the locking tab snaps into place.
- Disassemble the tube (5), push the release button on back of main body (11), then pull it out (Fig. 4).
natural_image
Close-up of a mechanical component with a black arrow indicating a specific part (no text or symbols present)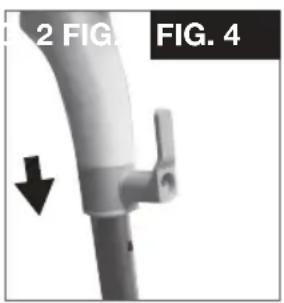
natural_image
Close-up of a white cylindrical mechanical component with a black arrow pointing to a small protrusion, labeled 'FIG. 2' and 'FIG. 4' (no text or symbols on the object itself)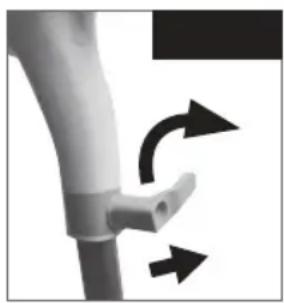
natural_image
Close-up of a mechanical joint with curved and angular arrows indicating motion (no text or symbols)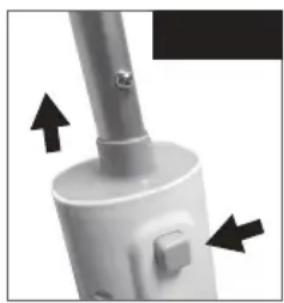
natural_image
Close-up of a mechanical component with two black arrows pointing to features (no text or symbols visible)TANK FILLING
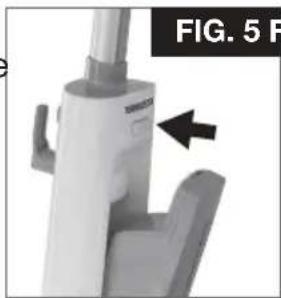
- Press the tank release push button (6) and remove the water tank (8) from the appliance body (11) (Fig. 5).
- Unscrew the tank cap and fill the tank with water (Fig. 6).
• After filling the tank, screw the tank cap and fit the tank into the appliance body (11).
NOTE: Use distilled water if water in your area is particularly calcareous so as to prevent
limestone scaling inside the tank.
Alternatively, use boiled water and pour it into the tank (8) only when the water is cooled.
natural_image
Close-up of a medical device with a black arrow pointing to a component (no visible text or symbols)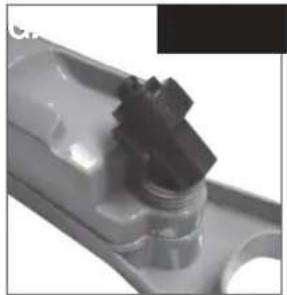
natural_image
Close-up of a mechanical component with a black cylindrical part mounted on a transparent base (no visible text or symbols)
WARNING!
Do not add more than 450 ml of water which is the maximum capacity.
Do not add detergents, chemical additives or water softeners since they may damage the appliance and invalidate the warranty.
PAD FITTING

WARNING!
Turn the appliance off, unplug it from the power socket and make sure it is cold before removing the cloth and the appliance base.
natural_image
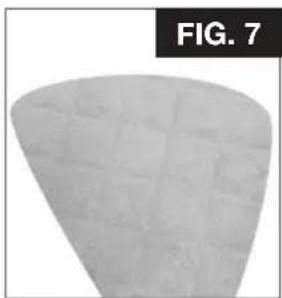
Close-up of a conical metallic object with grid pattern, labeled 'FIG. 7' (no other text or symbols)Align the velcro fasteners on the cloth with the graining parts under the appliance base (2) avoiding any wrinkles (Fig. 7).
It is possible to wash the cloth by hand with hot water and soap or in the washing machine
ACCESSORY FOR CLEANING CARPETS AND ROUGH SURFACES
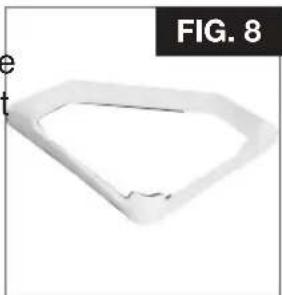
Use this accessory (14) only to clean carpets or rough surfaces. Place the accessory on the floor and put the broom on it (Fig.8). Then start cleaning: the accessory (14) allows the appliance to run easily also on rough surfaces.
natural_image
White plastic outline with a small circular mark and label 'FIG. 8' (no other text or symbols)STARTING UP

WARNING!
Never use the steam mop without the micro-fiber cleaning pad attached to the mop head or without water in the water tank.
After fitting the handle shaft and filling the tank, plug the appliance into the socket. Push the ON/OFF button (10). The operation blue light (8) around the power switch turns on showing that the steam mop is working. After about 20 seconds, the appliance reaches the working temperature. The pump starts working and steam comes out from the appliance base.
ENGLISH
Now it is possible to use the steam mop on the desired area.
NOTE: When the pump is running, it makes noise. This is normal. If water in the tank runs out during use, the appliance becomes more noisy and steam emission decrease. In this case, turn the appliance off by pushing the ON/OFF button (10); remove the tank and fill it with water, fit it again on the appliance and turn the appliance on by pushing the ON/OFF button (10).

WARNING!
After use and during the tank filling operation, switch off the appliance and unplug it from the power socket.
STEAM ADJUST BUTTONS (2)
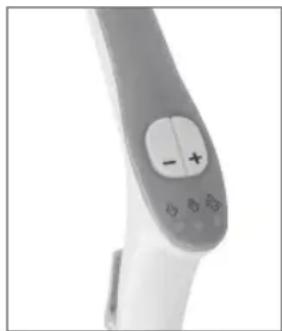
The buttons (2), on the handle (1) upper side, allows the adjusting of the steam output according to the surface to be cleaned: the left button allows the decrease, the right one the output increase. The selected value (low, middle, high) is shown by the related light.
natural_image
Close-up of a white cylindrical device with a gray handle and a circular button labeled '− +' (no additional text or symbols visible)AFTER USE
After using the appliance, it is possible to place it vertically on the practical stop/rest position. It is advisable to empty the tank so that the remaining water does not deposit any limestone inside the appliance when it is not used.
NOTE: Before using the appliance, test it on a small area. Do not stay on the same area too much time since steam may damage the material or the surface which is being cleaned.

WARNING!
- Shiny plastic material may change in opaque due to the steam.
- Acrylic material, velvet and linen are very sensitive to steam.
- Before switching on the appliance, always check that the material or the surface to be cleaned are suitable for a steam treatment.
- Painted wood and leather may discolor with steam.
- Do not use the appliance on uncoated floors.
- Do not use the appliance on waxed floors.
To avoid the pump to be dry, fill the tank (8) with water constantly.
If the tank is completely empty, the air expulsion process may require some time.
CLEANING AND MAINTENANCE

WARNING!
Always unplug the appliance from the outlet before starting any cleaning operations.
- It is possible to wash the cloth by hand with hot water and soap or in the washing machine using the warm water setting. Wash the pad with a mild detergent.
- Use a damp and soft cloth to clean accessories and the appliance body (4). Never use acid solutions or abrasive substances.
- Never submerge the appliance into water or other liquid.
- Before using the appliance again, make sure all of its components are dry.
TROUBLE SHOOTING
PROBLEM POSSIBLE CAUSE POSSIBLE SOLUTION
| STEAM MOP WILL NOT OPERATE | - Power cord not firmly plugged into outlet. - No power in wall outlet. | - Plug unit in firmly - Check fuse or breaker. Replace fuse/reset breaker |
| STEAM MOP WILL NOT MAKE STEAM | - No water in tank - Add water | to the water tank following instructions. |
| STEAM MOP LEAVES WATER ON THE FLOOR | - Micro-fiber cleaning pad is too wet. | - Unplug unit from power outlet and change the micro-fiber cleaning pad |
| STEAM MOP LEFT WHITE SPOT IN FLOOR | - Steam mop left in one spot too long. - Hard water | - Never leave the steam mop on the floor with a damp or wet cleaning pad still attached when not in use. - Use distilled water. |
INFORMATION FOR USERS
In accordance with European Directive 2012/19/UE on electric and electronic equipment waste disposal.
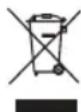
- The barred symbol of the rubbish bin shown on the equipment indicates that, at the end of its useful life, the product must be collected separately from other waste.
- Therefore, any products that have reached the end of their useful life must be given to waste disposal centres specialising in separate collection of waste electrical and electronic equipment, or given back to the retailer at the time of purchasing new similar equipment, on a one for one basis.
- The adequate separate collection for the subsequent start-up of the equipment sent to be recycled, treated and disposal of in an environmentally compatible way contributes to preventing possible negative effects on the environment and health and optimises the recycling and reuse of components making up the apparatus.
- Abusive disposal of the product by the user involves application of the administrative sanctions according to the laws in force.
Termozeta S.p.A. reserves the right to introduce technical and/or aesthetic changes to its products intended to improve performances.
Termozeta is an international trademark. Copyright © 1995. All rights reserved.
Termozeta S.p.A. - Via Magenta, 41/43 - 20010 Bareggio (MI) Italy
VARNOSTNA NAVODILA

natural_image
Close-up of a mechanical component with a black arrow indicating a downward motion (no text or symbols)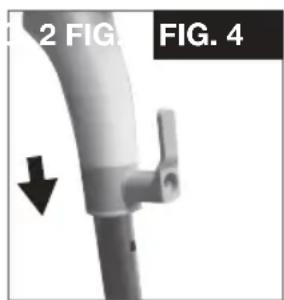
natural_image
Close-up of a white mechanical component with a black arrow indicating a downward motion, labeled 'FIG. 2' and 'FIG. 4' (no text or symbols on the object itself)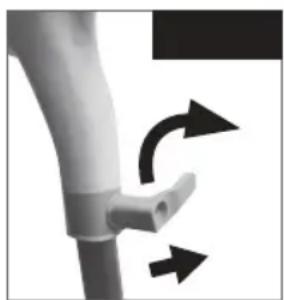
natural_image
Close-up of a mechanical component with curved arrows indicating rotation or movement (no text or symbols)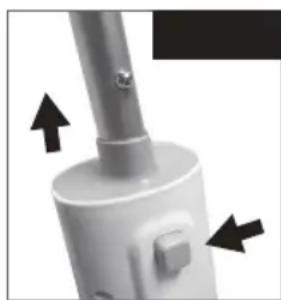
natural_image
Close-up of a white handheld device with a cylindrical port and a button, showing directional arrows (no text or symbols visible)POLNJENJE REZERVOARJA
* Pritisnite na tipko za sprostitev (6) in odstranite vodni rezervoar (8) z ogrodja naprave (11) (Slika 5).
* Odvijte zamašek rezervoarja in le-tega napolnite z vodo (Slika 6).
* Ko napolnite rezervoar, zaprite zamašek in ponovno namestite rezervoar na osrednje ogrodje (11), da se zaskoči.
••SLOVENIJA ••
natural_image
Close-up of a medical device with a black arrow pointing to a component (no visible text or symbols)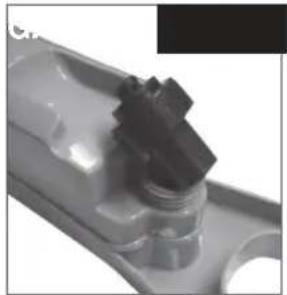
natural_image
Close-up of a mechanical component with a black textured top and circular base (no visible text or symbols)POZOR!
Ne presezite maksimalne kapacitete rezervoarja, ki znaša 450ml.
natural_image
Close-up of a smooth, curved surface with no visible text or symbolsPoravnajte velkro na krpi z ustreznimi hrapavimi deli na osnovi naprave (12); poskušajte se izogniti oblikovanju gub (Slika 7).
natural_image
White plastic component with a curved edge and a small mark, labeled 'FIG. 8' in the top right corner (no other text or symbols)PRIPRAVA NA UPORABO
POZOR!
Parne metle nikoli ne uporabljajte brez čistilne krpe iz mikrovlaken na osnovi naprave (12) ali brez vode v rezervoarju.
natural_image
Close-up of a handheld electronic device with a dial and control buttons (no visible text or symbols)PO UPORABI
- DESCRIZIONE
- OPIS
- RIEMPIMENTO DEL SERBATOIO
- ATTENZIONE!
- MESSA IN FUNZIONE
- DOPO L'USO
- ENGLISH
- DESCALING
- IT IS THEREFORE ABSOLUTELY NECESSARY TO CARRY OUT A DESCALING WASH,
- FIELD OF APPLICATION
- UNPACKING
- INSTRUCTION FOR USE
- HANDLE SHAFT FITTING AND BATTERY INSERTING
- TANK FILLING
- WARNING!
- PAD FITTING
- ACCESSORY FOR CLEANING CARPETS AND ROUGH SURFACES
- STARTING UP
- STEAM ADJUST BUTTONS (2)
- AFTER USE
- CLEANING AND MAINTENANCE
- TROUBLE SHOOTING
- INFORMATION FOR USERS
- VARNOSTNA NAVODILA
- POLNJENJE REZERVOARJA
- ••SLOVENIJA ••
- POZOR!
- PRIPRAVA NA UPORABO
- PO UPORABI
Brand : TERMOZETA
Model : Vaporona 1800
Category : Steam cleaner