
DVD-L77 - Portable DVD Player SANYO - Free user manual and instructions
Find the device manual for free DVD-L77 SANYO in PDF.


| Product type | Portable DVD player with LCD screen |
| Brand | SANYO |
| Model | DVD-L77 |
| Screen | LCD 16:9 6.2 inches (diagonal) |
| Compatible disc formats | DVD, Video CD, Audio CD, MP3, Kodak Picture CD, JPEG CD |
| Additional functions | FM/AM stereo radio, karaoke (optional microphones) |
| Power supply | AC 110-240 V (depending on version), 12 V DC (car/boat adapter included), 8 LR14/C batteries |
| Outputs | Composite video, digital optical audio, digital coaxial audio, stereo headphone |
| Playback functions | A-B repeat, zoom (x2/x3/x4), scene search, program (16 memories), multiple angle, subtitles, audio language change |
| Remote control | Yes, with included CR2025 battery |
| Dimensions (approx.) | 200 x 170 x 45 mm |
| Weight (approx.) | 1.2 kg |
| Care and cleaning | Wipe with a soft, dry cloth; for the screen, use a slightly damp cloth (mild soapy water) then dry. Do not use alcohol or solvents. |
| Safety | Macrovision copy protection, automatic shutdown after about 30 minutes in stop mode |
| Spare parts and repairability | Replaceable fuse in the 12 V adapter; remote control and power adapter available from retailer. 1-year warranty (Canada). |
| General information | User manual and instructions available free in PDF |
Frequently Asked Questions - DVD-L77 SANYO
User questions about DVD-L77 SANYO
0 question about this device. Answer the ones you know or ask your own.
Ask a new question about this device
Download the instructions for your Portable DVD Player in PDF format for free! Find your manual DVD-L77 - SANYO and take your electronic device back in hand. On this page are published all the documents necessary for the use of your device. DVD-L77 by SANYO.
USER MANUAL DVD-L77 SANYO
DVD/VIDEO CD/CD Player with stereo radio and 6.2" widescreen LCD
text_image
DVD BOOMER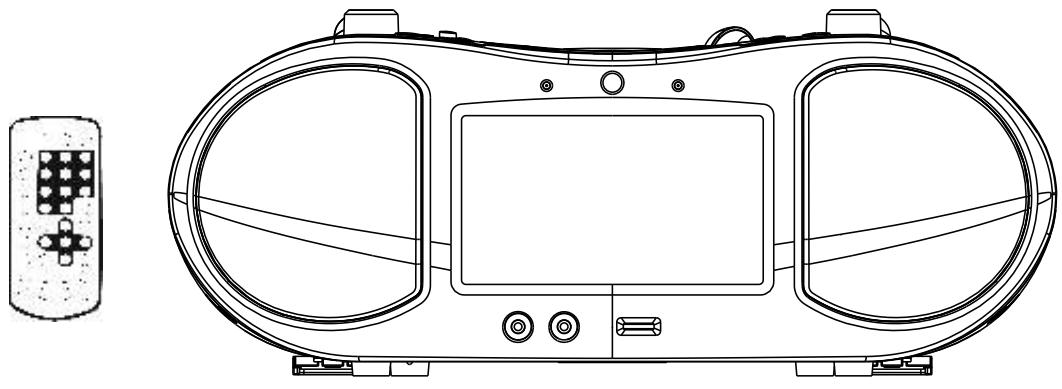
natural_image
Line drawing of a portable electronic device with front panel, control buttons, and remote control (no text or symbols)




Thank you for choosing SANYO. Please read this manual carefully to obtain maximum benefits from your product. Before attempting to connect, operate or adjust this player, please read these instructions completely.
Table of contents
ILLUSTRATION OF THE CONTROLS/JACKS ON THE MAIN UNIT 2-3
MAIN UNIT
REMOTE CONTROL UNIT
BASIC CONNECTION ....4
CONNECTING TO A STEREO TV SET
CONNECTING TO A MONO TV SET
OPTIONAL AUDIO CONNECTIONS ....5-6
CONNECTING TO A DECODER WITH DOLBY DIGITAL (AC-3/DTS) PROCESSING (OPTIONAL)
REMOTE CONTROL UNIT PREPARATION ....7
BATTERY INSTALLATION
COLOR AND BRIGHTNESS ADJUSTMENT (FOR THE LCD SCREEN)
INITIAL DVD SETTINGS 9-10
PROCEDURES FOR INITIAL SETTINGS
SYSTEM SETUP
LANGUAGE SETUP
AUDIO SETUP
VIDEO SETUP
SPEAKER SETUP
DISC HANDLING AND MAINTENANCE ....13
MACROVISION INFORMATION ....13
WARRANTY 14
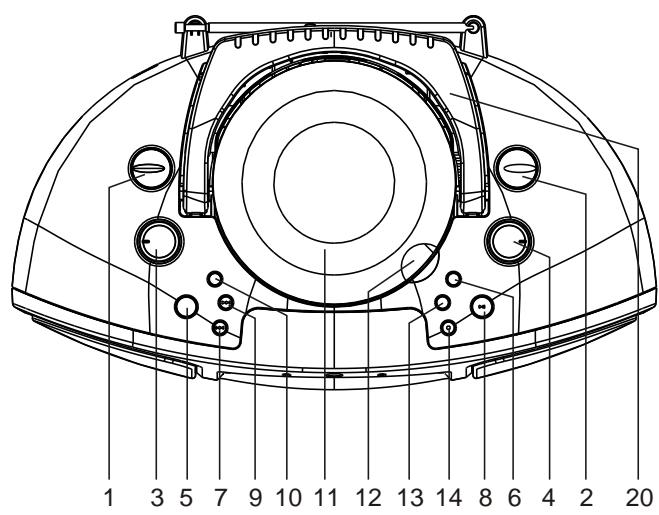
Main unit
text_image
1 3 5 7 9 10 11 12 13 14 8 6 4 2 20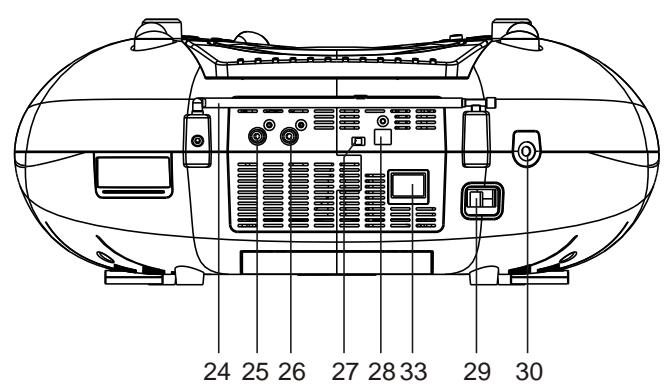
text_image
24 25 26 27 28 33 29 30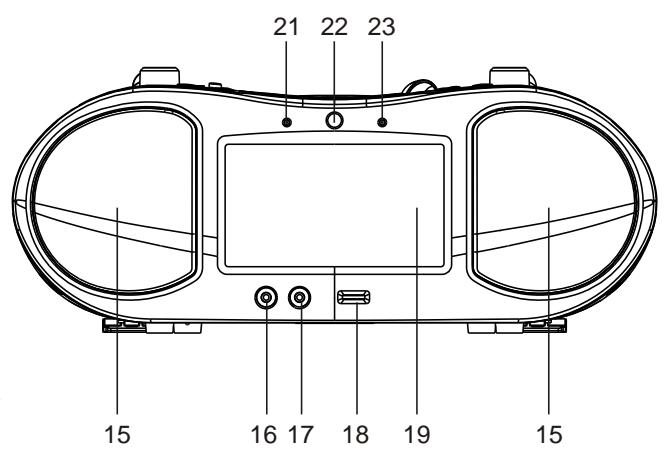
text_image
21 22 23 15 16 17 18 19 15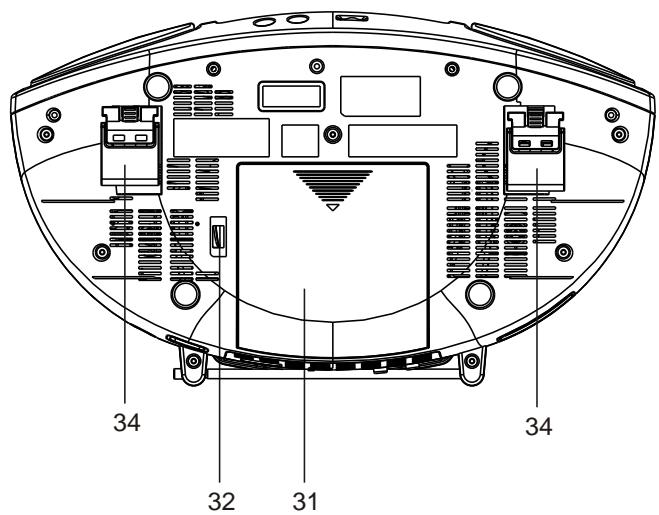
text_image
34 32 31 34- FUNCTION CONTROL
- BAND CONTROL
- VOLUME CONTROL
- TUNING CONTROL
- COLOR/BRIGHT ADJUSTMENT BUTTON
- FAST FORWARD BUTTON
- PREVIOUS BUTTON
- PLAY/PAUSE BUTTON
- NEXT BUTTON
- BASS BOOST BUTTON
- CD DOOR
- CD DOOR OPENING TAB
- FAST REWIND BUTTON
- STOP BUTTON
- SPEAKERS
- MIC 1 SOCKET (OPTIONAL)
- MIC 2 SOCKET (OPTIONAL)
- MIC LEVEL (OPTIONAL)
-
LCD 16:9 WIDESCREEN (6.2" DIAGONAL MEASURE)
-
HANDLE
- POWER INDICATOR
- REMOTE SENSOR
- FM STEREO INDICATOR
- FM TELESCOPIC ANTENNA
- VIDEO OUTPUT JACK
- COAXIAL OUTPUT JACK
- FRONT SCREEN ON/OFF SWITCH
- OPTICAL AUDIO OUTPUT JACK
- AC SOCKET
- PHONES JACK
- BATTERY COMPARTMENT
-
ANGLE ADJUSTERS
-
AC VOLTAGE SELECTOR (FOR DUAL VOLTAGE VERSION - NOT NORTH AMERICA)
-
DC JACK (TO CONNECT 12 VOLTS CAR/BOAT ADAPTOR, INCL.)
text_image
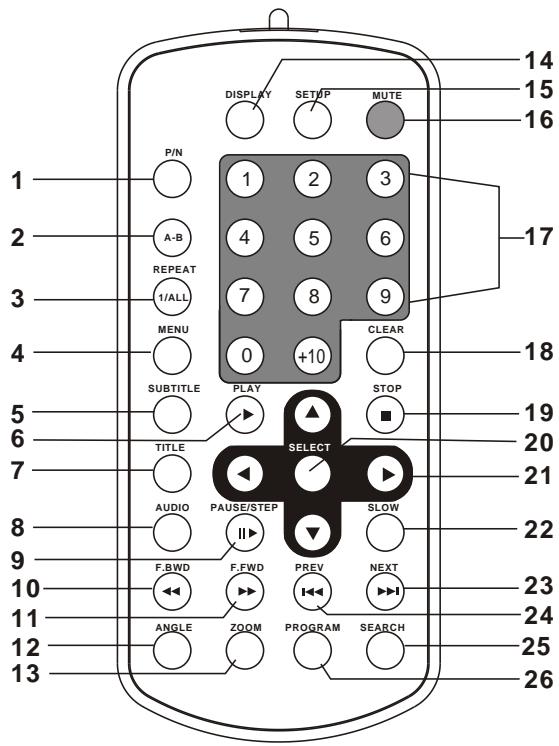
1 2 3 4 5 6 7 8 9 10 11 12 13 14 15 16 P/N A-B REPEAT 1/ALL MENU SUBTITLE PLAY STOP TITLE SELECT AUDIO PAUSE/STEP SLOW F.BWD F.FWD PREV NEXT ANGLE ZOOM PROGRAM SEARCH 17 18 19 20 21 22 23 24 25 26- PAL/NTSC/AUTO button
- REPEAT A-B button
- REPEAT 1/ALL button
- MENU button
- SUBTITLE button
- PLAY button
- TITLE button
- AUDIO button
- PLAY/STEP button
- F.BWD button
- F.FWD button
- ANGLE button
- ZOOM button
- DISPLAY button
- SETUP button
- MUTE button
- NUMERIC buttons
- CLEAR buttons
- STOP button
- SELECT button
- NAVIGATION buttons
- SLOW button
- NEXT button
- PREV button
- SEARCH button
- PROGRAM button
Ensure that this player and other equipment that you might choose to connect to the unit are in standby or off mode. Disconnect the
AC power cords before commencing connection.
Do not block ventilation holes of any piece of the equipment and arrange them so that air can circulate freely.
Read through the instructions before connecting other equipment.
Ensure that you observe the color coding when connecting audio and video cables.
Locate away from moisture.
If this player is connected to a TV through a video cassette recorder, the picture may not be played back normally with some
DVDs due to copyguard. If this is the case, connect the player directly, not via the VCR.
Connecting to a TV set (if applicable)
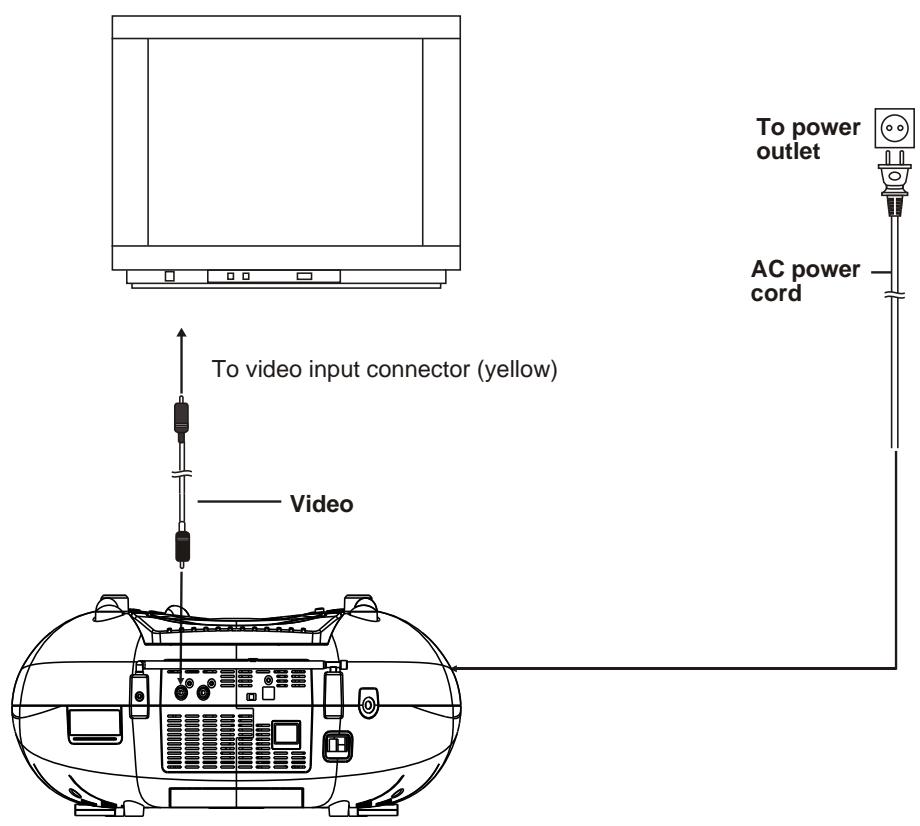
text_image
To power outlet AC power cord To video input connector (yellow) VideoConnecting to a decoder with Dolby Digital (AC-3/DTS) processing (optional)
When DVD recorded in Dolby Digital/DTS are played, Dolby digital/DTS bitstream is output from the player's OPTICAL digital audio output connector or COAXIAL digital audio output connector. When the player is connected to a Dolby Digital/DTS decoder, you can enjoy theater-quality audio in your home. [An optical digital audio cable or coaxial audio cable (both optional) is required when an optional Dolby digital/DTS decoder is used.]
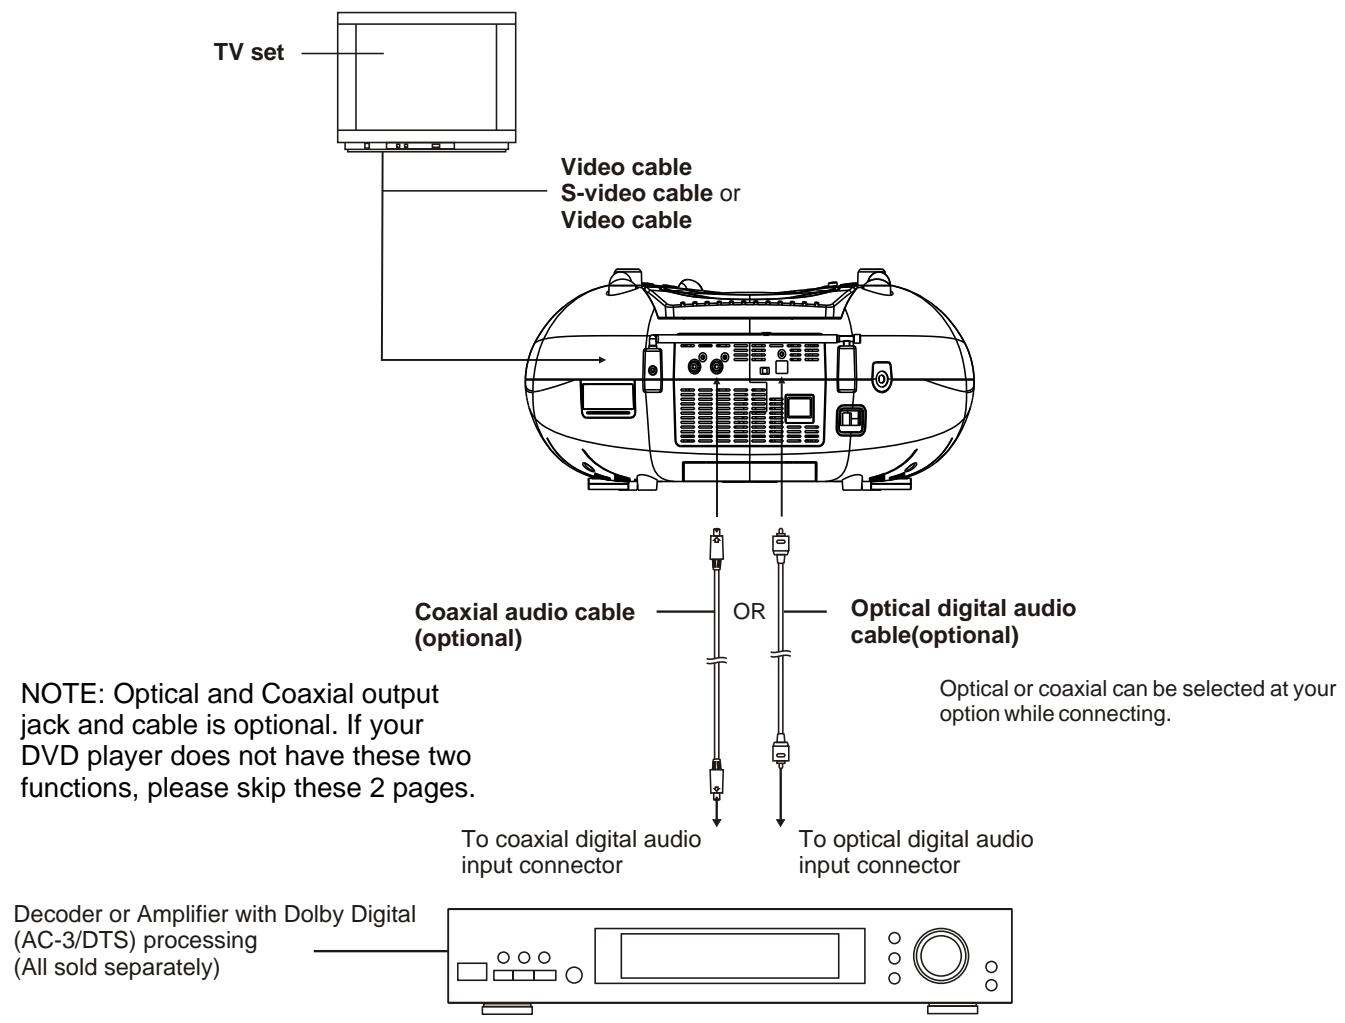
text_image
TV set Video cable S-video cable or Video cable Coaxial audio cable (optional) OR Optical digital audio cable(optional) NOTE: Optical and Coaxial output jack and cable is optional. If your DVD player does not have these two functions, please skip these 2 pages. To coaxial digital audio input connector To optical digital audio input connector Decoder or Amplifier with Dolby Digital (AC-3/DTS) processing (All sold separately)
flowchart
graph TD
    A["Center speaker"] --> B["Front speaker (left)"]
    A --> C["Front speaker (Right)"]
    B --> D["Subwoofer"]
    D --> E["Surround speaker (left)"]
    C --> F["Surround speaker (Right)"]
Optional audio connections
Notes when connecting the optical digital audio cable (optional)
Remove the dust protection cap from the optical digital audio output and connect the cable firmly so that the configurations of both the cable and the connector match.
Keep the dust protection cap to protect against dust. Always reattach the cap when not using the connector.
Concerning the audio output from the player's optical/coaxial digital audio output connector
| Disc | Sound recording format | Optical/coaxial digital audio output from connector |
| DVD | Dolby Digital (AC-3) | Dolby Digital bitstream (2-5.1ch) or PCM (2ch) (48 kHz/16 bit)*1 |
| Linear PCM (48/96 kHz 16/20/24 bit) | Linear PCM (2ch) (48 kHz sampling/16 bit only)*2 or no output*1 | |
| Video CD | MPEG 1 | PCM (44.1 kHz sampling) |
| CD | Linear PCM | Linear PCM (44.1 kHz sampling) |
*1 The type of audio output from the connector can be selected by the initial settings.
*2 Sound having 96 KHz sampling is converted into 48 KHz or 96KHz sampling when it is output from the player's optical/coaxial digital audio output connector.
For your reference:
- Dolby Digital (AC-3) is a digital sound compression technique developed by the Dolby Laboratories Licensing Corporation.
- Linear PCM is signal recording format used in a CD. While a CD is recorded in 44.1 KHz/16 bit, a DVD is recorded in 48 KHz/16 bit up to 96 KHz/24 bit.
- If you have a Dolby Pro Logic Surround decoder, you will obtain the full benefit of Pro Logic from the same DVD movies that provide full 5.1-channel Dolby Digital soundtracks, as well as from titles with the Dolby Surround mark.
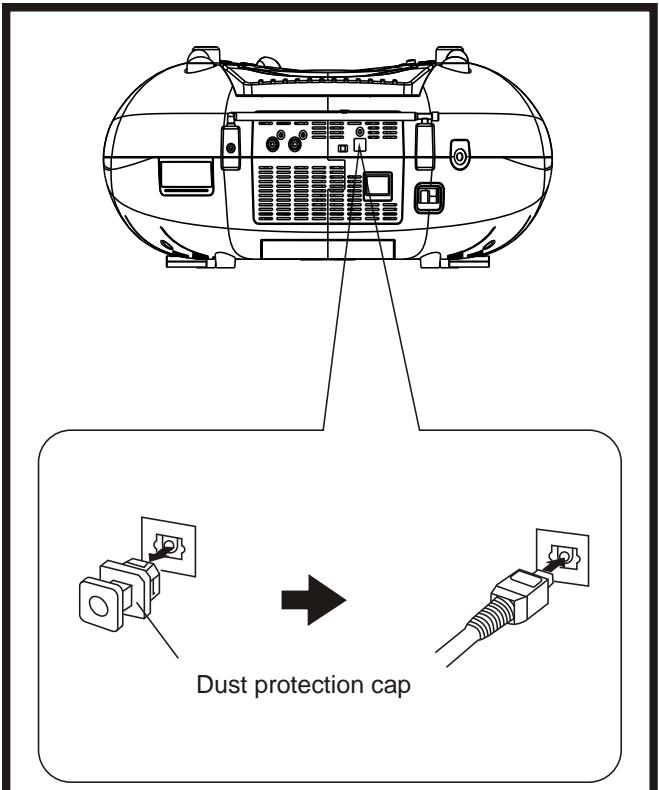
text_image
Dust protection capManufactured under license from Dolby Laboratories. "Dolby" and the double-D symbol are trademarks of Dolby Laboratories. Confidential Unpublished Works. © 1992-1997 Dolby Laboratories, inc. All rights reserved.
Remote control unit preparation
Battery installation A
Insert the battery while observing the correct (+) and (-) polarities as illustrated at right.
Service life of batteries
The life of a battery normally lasts for about one year although this depends on how often, and for what operations, the remote control unit is used.
If the remote control unit fails to work even when it is operated near the player, replace the battery.
Use one size CR2025 battery.
Note:
Do not attempt to recharge, short-circuit, disassemble, heat or throw batteries into the fire.
Do not drop, step on or otherwise impact the remote control unit. This may damage the parts or lead to malfunction.
If the remote control unit is not going to be used for a long time, remove the battery. Otherwise, electrolyte may leak which may lead not only to malfunctioning but also burns if contact is made with the electrolyte.
Wipe away any electrolyte leak inside the remote control unit, and install new batteries.
If any electrolyte should come into contact with parts of your body, wash it off thoroughly with water.
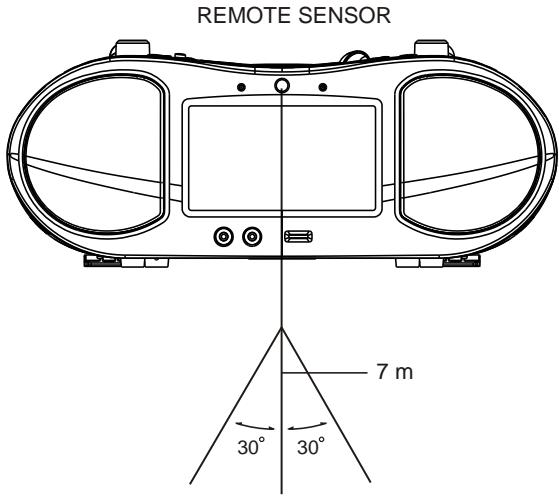
Remote control operation range B
Point the remote control unit no more than 7m away from the remote control sensor and within 60° angle from the front of the player.
The operating distance may vary according to the brightness of the room.
Note:
Do not point bright lights at the remote control sensor.
Do not place objects between the remote control unit and the remote control sensor.
Do not use this remote control unit while simultaneously operating a remote control unit of another equipment.
A
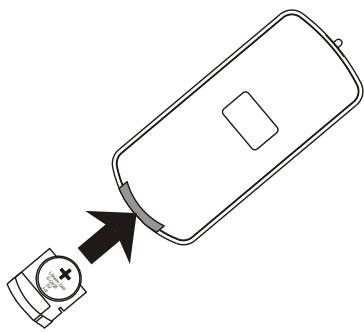
natural_image
Simple line drawing of a battery with an arrow pointing to it, no text or symbols present.B
text_image
REMOTE SENSOR 7 m 30° 30°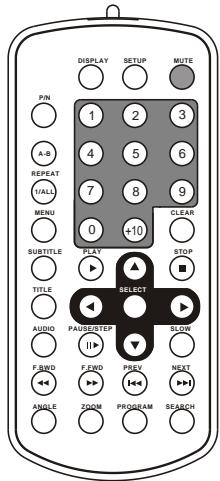
text_image
DISPLAY SETUP MUTE PIN 1 2 3 A-B 4 5 6 REPEAT 7 8 9 1/ALL 0 +10 MENU CLEAR SUBTITLE PLAY STOP TITLE SELECT AUDIO PAUSER/STEP SLOW F.SWD II> F.FWD PREV NEXT ANGLE ZOOM PROGRAM SEARCHPREPARATION
If applicable: Power-on the TV set and select video input mode. Power-on the audio system which is connected to the player.
GETTING STARTED
- Turn on the player.
- Raise the hinged disc cover.
- Place a disc onto the disc tray.
- Close the cover screen and playback starts automatically.
- When a menu screen appears on the move the navigation buttons or press the numeric buttons on the remote control to select a preferred track number, then press SELECT button to start playback.
- Gently pull the 2 angle adjusters (34) at the underside of the cabinet to "angle-back" for better picture quality, if required.
VIDEO SYSTEM
Normally set to AUTO, the P/N button on the remote control toggles among AUTO, PAL and NTSC video systems.
LCD SCREEN ON/OFF
When listening to CD's on alkaline battery power, the LCD screen can be turned off by sliding the switch (27) at the back of the cabinet. Remember to reset afterwards.
SKIP AHEAD OR BACK
Press NEXT SKIP or PREV SKIP button once during play to skip a chapter (DVD) or a track (Video CD/CD) ahead or backwards.
During playback, press F.FWD button or F. BWD button several times to scan the disc forward or backward at X2, X4, X8, X20 normal speed.
Press PLAY button to resume normal play.
PAUSE OR STEP PLAY
During playback, press PAUSE/STEP button to pause; in pause mode, each time the PAUSE/STEP button is pressed, the player will only play one frame; to resume normal play, press PLAY button again.
STOP PLAYBACK
Press STOP button during playback to stop play; the player activates its resume function when STOP is pressed in STOP mode. Press PLAY button again, playback resumes at the point it stopped previously. Open the disc tray or press the STOP button one more time to clear the resume function.
Press SLOW button on the remote control during playback, the disc will play at 1/2 normal speed at first, each time this button is pressed, the play speed becomes slower (down to 1/7 normal speed.)
Press PLAY button, normal play will resume.
REPEAT 1/ALL
Press REPEAT 1/ALL button during play, it will repeat one chapter/title, or repeat all (for DVD disc), or repeat one track or all tracks (for VCD / CD).
NOTE: Repeat 1/ALL for VCD/CD disc will ONLY work in PBC OFF mode.
A-B REPEAT PLAY
Repeating sections between two specific points (A-B repeat)
- Press A-B REPEAT button during play at one point where repeat play is to be started (A).
- Press A-B REPEAT button at other point where repeat play is to be ended (B). Repeat play of the selection between points A and B starts.
- Press A-B REPEAT button again to return to normal play.
SEARCH FOR PREFERRED SCENE
- Press SEARCH button during play and highlight the item to be played (Title, Chapter, or Chapter time) by navigation buttons
- Input the desired number or time via the numeric buttons.
- Press SELECT button to confirm and the playback from the located scene starts.
- To exit search menu, press SEARCH button directly.
PROGRAM PLAY(UP TO 16 MEMORIES)
- Press PROGRAM during playback to display the program menu.
- Select location(s) to be memorized via navigation buttons and then enter desired Titles/Chapters numbers via numeric buttons.
Note: Inputting leading zero is not necessary. Press +10 key to be on the tenth chapter/title/track. If the chapter/title/track number is behind the cardinal 10, press +10 key first and then the unit digit. Some figure inputs may be useless, because it 's greater figure than total title/chapter/track number on the disc.
Example: Track 3, press "3"
Track 12, press "+10" and then "2"
Track 21, press "+10" twice and then "1" - To start programmed playback, select PLAY on the menu; pressing PROGRAM button again to exit programming.
- To clear programmed items, select the items and then press CLEAR button on the remote control. To clear all items, select the
on the menu, and then press SELECT button on remote control. - You can also cancel program mode by clearing all the items in the program menu.
ZOOM PLAY
Press the ZOOM key continuously to zoom in the picture by
2, 3 or 4 times. Zoom out by 1/2, 1/3, 1/4 of normal size.
Press this key once more when the picture is at 1/4 size to return to normal size display.
Scroll to view the enlarged picture using Navigation buttons.
ON SCREEN DISPLAY INFORMATION
When the player is in operation, press DISPLAY button continuously on the remote control, the screen will display parts of information (current disc type, title number, chapter number, playtime, audio language, audio type, subtitle language and multi angle, etc) in a sequence.
CHANGING AUDIO SOUNDTRACK LANGUAGE (DVD/VCD DISC)
It is possible to change the audio soundtrack language to a different language from the one selected at the initial settings (This operation works only with discs on which multiple audio soundtrack languages are recorded).
Press AUDIO button during DVD disc play, the sound track language changes with the current sound track number shown on the TV screen.
Pressing AUDIO button during VCD disc play will change audio output mode: MONO L, MONO R and stereo.
NOTE: When no soundtrack languages are recorded, pressing this button will not work.
MULTI-ANGLE VIEWING (DVD ONLY)
Press ANGLE button during playback to display the number of angles being played and then select a desired angle to view the scene.
Note: Only the DVDs shot with multi-angle scenes have this function.
CHANGING SUBTITLE LANGUAGE (DVD ONLY)
Press SUBTITLE button during playback, the subtitle language shown on the screen will change as a response to each press;
When the desired language appears, release the button to view the subtitle in that language.
Note: This function only works on the DVDs recorded with multi-language subtitles.
WATCHING VIDEO CDS (NOT DVDS) WITH PLAYBACK CONTROL FEATURE
After loading a VCD 2.0/1.0 with PBC, the TV screen shows the Disc formats and then a menu.
Select desired track by means of numeric buttons: use one corresponding key of numeric buttons 1\~9 to choose track 1 to track 9; 0 key to choose track 10; If the track number exceeds 10, press +10 button first, and then numeric buttons 1\~9.
During playback, press MENU button to return main menu (DVD).press this button to select PBC ON/OFF mode (VCD) TITLE button: Play the title (DVD)
MP3 PLAYBACK
- Load the MP3 disc onto the disc tray and the TV screen will show all its folders after a few seconds.
- Select the folder you want by the navigation buttons and then SELECT button to confirm.
- The files in this folder are displayed and select your favourable song via navigation buttons and press SELECT button to start playback.
- Press NEXT and PREV button to select track directly.
- Press REPEAT 1/ALL button change play mode. REPEAT 1- repeat one file. REPEAT DIR- repeat all tracks in the current album REPEAT ALL- repeat all tracks in current disc. REPEAT OFF-cancel repeat modes.
KODAK PICTURE CD / JPEG CD PLAYBACK
Slide show of Kodak Picture CD after being loaded begins automatically;
Folders of JPEG picture CD after being loaded are displayed on the TV screen; use the navigation buttons to select the desired folder and then press SELECT button to confirm.
The files in this folder are displayed and you can select your favourable pictures using the up/down navigation buttons and press SELECT button to start playback.
Preview of the picture will be displayed while you scroll across the filenames.
KODAK PICTURE CD / JPEG CD OPERATIONS
1. Play modes
Press 1/ALL button during play to change the play modes.
REPEAT 1- repeat one file
REPEAT DIR- repeat all picture in the current album
REPEAT ALL- repeat all pictures in current disc.
REPEAT OFF- cancel repeat modes.
During playback, press STOP to enter preview mode.
2. SKIP TO NEXT/PREVIOUS PICTURE
Press NEXT button to skip to the next picture or PREV button to the previous picture.
If no key is pressed for a few seconds, it will skip to next picture automatically.
3. PICTURE ROTATIONS
Press RIGHT and LEFT navigation buttons to rotate the picture clockwise and anti-clockwise respectively.
4. PICTURE FLIPS
Press UP navigation button to flip the picture vertically. Press DOWN navigation button to flip the picture horizontally
5. PICTURE ZOOM IN/OUT
Press ZOOM button continuously, the picture zooms in by 2, 3, 4 times or zooms out by 1/2, 1/3, 1/4 the original size.
Press this button once more when the picture is at 1/4 size to return to the normal play.
If the picture is enlarged, you may use the navigation buttons to view blocked parts of the picture.
6. SLIDE SHOW TRANSITION MODES
During slide show playback, press the PROGRAM button cyclically to select one of the following modes to play.
WIPE TOP
WIPE BOTTOM
WIPE LEFT
WIPE RIGHT
DIAGONAL WIPE LEFT TOP
DIAGONAL WIPE RIGHT TOP
DIAGONAL WIPE LEFT BOTTOM
DIAGONAL WIPE RIGHT BOTTOM
EXTEND FROM CENTER H
EXTEND FROM CENTER V
COMPRESS TO CENTER H
COMPRESS TO CENTER V
WINDOW H
WINDOW V
WIPE FROM EDGE TO CENTER
RANDOM
NONE
Color and brightness adjustment (for the LCD screen)
Use the addition button on the main unit to adjust the colour intensity, brightness and contrast respectively. Press the button once to enter the colour adjustment mode, and press the skip buttons to adjust. Press the button twice to enter the Brightness mode and press the skip buttons to adjust. Press the button three times to enter the contrast mode and press the skip buttons to adjust.
Initial DVD Settings
If some of the factory settings need to be adjusted to your preference, please follow the procedures below. Once the initial settings are done they are retained in the CPU of the player until otherwise modified.
Procedures for initial settings
-
Press SETUP button.
-
Use the navigation buttons to select the item you want to modify, press SELECT button to confirm. Setting page with further set items will show on the TV screen. Again use navigation buttons to make changes. Press again SELECT button to confirm modifications.
-
Use navigation buttons to switch to another setting on the main setting page.
1. SYSTEM SETUP
SYSTEM SETUP
| TV SYSTEM |
| SCREEN SAVER |
| TV TYPE |
| PASSWORD |
| RATING |
| DEFAULT |
| EXIT SETUP |
1.1 TV SYSTEM - It is used to select the TV mode.
Options: NTSC / PAL/ AUTO
Please select this option as per your area or TV set.
1.2 SCREEN SAVER - When the player is not in use for 3 minutes, a running DVD logo will move across the TV screen to protect an external screen.
Options: On: Screen saver is enabled
Off: Screen saver is disabled
1.3 TV TYPE- It is used to select the TV scan mode, please set as per your TV set, if an external TV is connected.
Options: 4:3PS : Normal Pan & scan mode
4:3LB : Normal Letter box mode
16:9 : 16:9 wide screen mode
1.4 PASSWORD - Input password to unlock the system. The steps are as follows:
1.4.1 Enter SYSTEM SETUP, select the PASSWORD item by scrolling the down navigation button, and then press the right navigation button to select the input box.
1.4.2 Input user's password "0000" to unlock it, in this case, select the input box again to change the password by inputting another new four numeric numbers and then press SELECT button to confirm. When the password is changed, you are needed to input the new one to unlock the system.
1.4.3 If you forget your own password, enter "8200" to unlock it.
NOTE: If wrong password was input in unlock status, the system will lock.
1.5 RATING - Set the rating of this player. If you want to change the rating of parental lock, please input the password to unlock first.
Options: 1 KID SAFE/2 G/3 PG/4 PG 13/5 PG-R/6R/7 NC-17/8 ADULT
1.6 DEFAULT - Reset to factory settings.
2. LANGUAGE SETUP
LANGUAGE SETUP
| OSD LANGUAGE |
| AUDIO LANG |
| SUBTITLE LANG |
| MENU LANG |
| EXIT SETUP |
2.1 OSD LANGUAGE - It is used to select different On Screen Display language for different user.
Options: ENGLISH JAPAN
(The number of these options depends on the customer's need.)
2.2 AUDIO LANG - Select preferred audio language (DVD only, need disc software support).
Options: ENGLISH/SPANISH/PORTUGUESE/ITALIAN/FRENCH/GERMAN/DUTCH/JAPAN.
2.3 SUBTITLE LANG- Select preferred subtitle language (DVD only, need disc software support).
Options: ENGLISH/SPANISH/PORTUGUESE/ITALIAN/FRENCH/GERMAN/DUTCH/JAPAN.
2.4 MENU LANG - Select preferred disc menu language (DVD only, need disc software support).
Options: ENGLISH/SPANISH/PORTUGUESE/ITALIAN/FRENCH/GERMAN/DUTCH/JAPAN.
3. AUDIO SETUP
AUDIO SETUP
| AUDIO OUT |
| EXIT SETUP |
3.1 AUDIO OUT - Set digital output code format.
Options:
SPDIF/OFF: If you are not connecting to an amplifier via digital output, please select this option.
SPDIF/RAW: Used in general home theatre, select this can output 5.1 channels audio.
SPDIF/PCM: Select this it can only output 2 channel, but you will get higher quality audio output.
4. VIDEO SETUP
VIDEO SETUP
| BRIGHTNESS |
| CONTRAST |
| HUE |
| SATURATION |
EXIT SETUP
4.1 BRIGHTNESS-- to set the brightness for the display. Options: 0/2/4/6/8/10/12
4.2 CONTRAST--to set the contrast effect for display. Options: 0/2/4/6/8/10/12
4.3 HUE--to set the colour impression for display. Options: -6/-4/-2/0/+2/+4/+6
4.4 SATURATION--to set the saturation level for display. Options: 0/2/4/6/8/10/12
5. SPEAKER SETUP
SPEAKER SETUP
| DOWNMIX |
| EXIT SETUP |
5.1 DOWNMIX
Options: LT/RT- Left/Right mix mode
STEREO- Select this option if you don't
have a 5.1 channels amplifier.
TO PLAY THE RADIO
- Turn the FUNCTION switch to the RADIO position; the POWER Indicator will light up.
- Select the desired band with the BAND switch.
- Tune to the desired station by rotating the TUNING control (move the control back and forth until you get the clearest sound).
- The built-in AM antenna and external FM TELESCOPIC ANTENNA are directional.
= When receiving an FM broadcast, fully extend the TELESCOPIC ANTENNA and position for the best reception.
= For AM broadcasts, rotate the whole set until the best reception is heard.
- Adjust the volume level to a comfortable listening level.
- To turn off the radio, slide the FUNCTION switch to the OFF position.
NOTES:
= If a particular FM (STEREO) station is weak, or you hear too much static noise, try moving the position of the band selector switch to the FM (MONO) position. This often result in a much clearer reception.
= When the band selector switch is set to FM STEREO and a stereo broadcast is being received, the FM STEREO indicator near the top of the unit will be lit.
STEREO HEADPHONE JACK (HEADPHONES/EARPHONES NOT INCLUDED)
A stereo headphone jack has been provided so that you can listen to the unit without disturbing others. To use this jack, plug in the headphones/earphones (not included) and adjust the VOLUME control to a comfortable listening level.
NOTE: When external headphones/earphones are connected, the sound to the unit's main speakers will be muted.
Sing along with the music!
If your model is equipped, attach 1 or 2 microphones (not included) to the front jacks.
Karaoke discs are widely available at stores such as Toys R Us ®, Wal-Mart®, Best Buy®, Future Shop®, etc.
Install a disc, press PLAY, and adjust microphone volume. Avoid shouting into the microphones and setting the player volume too high or else damage to speakers could result. This type of damage will void the product warranty.
3-WAY POWER
This unit operates on AC, 12 volts, or 8 x "C" (alkaline) batteries. A 12-volt car/boat cord is included.
NOTE:
- Batteries should be removed if they will not be used for longer than a 1-month period.
- The car/boat cord has a built-in user-changeable fuse. If your player fails to operate on 12-volt power, check the fuse by turning the front of the plug that connects to the vehicle. Change fuse and re-assemble the plug.

text_image
FUSE REPLACEMENT FUSEBefore requesting service for this player, check the chart below for a possible cause of the problem you are experiencing. Some simple checks or a adjustment on your part may eliminate the problem and restore proper operation.
| Symptom (Common) | Remedy |
| No power. | Insert the AC power plug securely into the power outlet. |
| The player is automatically set to the standby mode. | The player is automatically set to the standby mode after approx. 30 minutes in the stop mode (auto power-off function). Turn the power on again. |
| • Play fails to start even when PLAY is pressed.• Play starts but then stops immediately. | • Condensation has formed: wait about 1 to 2 hours to allow the player to dry out.• This player cannot play a disc other than DVD, Video CD and CD.• The disc may be dirty and may require cleaning.• Ensure that the disc is installed with the label side up.• If on battery operation, check battery conditions and polarities.• Check fuse in 12-volt car-boat adaptor plug. |
| No picture. | • Ensure that the equipment is connected properly.• Ensure that the input setting for the TV is "Video".• Ensure that the LCD ON/OFF switch is set to ON |
| • No sound.• Distorted sound. | • Ensure that the equipment is connected properly.• Ensure that the input setting for the TV and stereo system are correct.• Adjust the master volume using the GUI screen for player information. |
| Picture is distorted during rapid advance or rapid reverse. | The picture will be somewhat distorted at times: this is normal. |
| No rapid advance or rapid reverse play. | Some discs may have sections which prohibit rapid advance (or rapid reverse.) |
| No operations can be performed with the remote control unit. | • Check if the battery is installed with the correct polarities (+ and -).• The battery is exhausted: replace with new one.• Point the remote control unit at the remote control sensor and operate.• Operate the remote control unit at a distance of not more than 7 m from the remote control sensor.• Remove obstacles between the remote control unit and remote control sensor. |
| No key operation (by the main unit and/or the remote control unit) is effective. | Press POWER to set the player to the standby mode and then back to ON.Alternatively, press POWER to set the player to the standby mode, disconnect the power plug and then re-connect it. (The player may not be operating properly due to lightning, static electricity or some other external factor.) |
| Symptom [DVD] | Remedy |
| Play does not start even when title is selected. | Confirm the " Rating" setting. |
| Audio soundtrack and/or subtitle language is not the initial settings. | If the audio soundtrack and/or subtitle language does not exist on the disc, the language selected at the initial settings will not be seen/heard. |
| No subtitles. | Subtitles appear only with discs which contain them.Perform the steps to display the subtitles. |
| Alternative audio soundtrack (or subtitle) languages fail to be selected. | An alternative language is not selected with discs which do not contain more than one language.In the case of some discs, the alternative language cannot be selected by operating the AUDIO or SUBTITLE button. Try selecting it from the DVD menu if one is available. |
| Angle cannot be changed. | This function is dependent on software availability. Even if a disc has a number of angles recorded, these angles may be recorded for specific scenes only. |
| The password for rating level has been forgotten. | Please contact your local sales dealer. |
| Symptom [Video CD] | Remedy |
| No menu play. | This function works only for Video CDs with playback control. |
Handling precautions
- Hold the disc by the edges so the surface will not be soiled with fingerprints.
Fingerprints, dirt and scratches can cause skipping and distortion. - Do not write on the label side with a ball-point pen or other writing utensils.
- Do not use record cleaning sprays, benzine, thinner or static electricity prevention liquids.
- Be careful not to drop or bend the disc.
- Do not install more than 1 disc on the disc tray.
- Do not close the disc tray when the disc is not installed properly.
- Be sure to store the disc in its exclusive case when not in use.
If the disc surface is soiled
Wipe gently with a soft, damp (water only) cloth.
When cleaning the disc, wipe in straight lines from the center of the disc to the edge.
(If you wipe the discs using a circular motion, circular scratches are likely to occur, which will cause noise.)
If the disc is brought from a cold to a warm environment, moisture may form on the disc
Wipe this moisture off with a soft, dry, lint-free cloth before using the disc.
Improper disc storage
You can damage discs if you store them in the following places:
- Areas exposed to direct sunlight
• Humid or dusty areas - Areas directly exposed to a heat outlet or heating appliance
Product Maintenance
- Be sure to turn the player off and disconnect the AC power cord before cleaning the player.
- Wipe the player and LCD screen with a dry, soft cloth.
- If necessary wipe clean with a cloth slightly dampened with a mild soap-and-water solution.
Then wipe again with a dry cloth. - Never use alcohol, benzine, thinner, cleaning fluid or other chemicals. Do not use compressed air to remove dust.
- When storing or carrying the product, keep sharp and magnetized objects away from the cabinet and LCD screen.
MACROVISION Information
This DVD/VCD/CD player is protected by MACROVISION™ and no unauthorized copy can be made by VIDEO CASSETTE RECORDER.
This product incorporates copyright protection technology that is protected by method claims of certain U.S. patents and other intellectual property rights owned by Macrovision Corporation and other rights owners. Use of this copyright protection technology must be authorized by Macrovision Corporation, and is intended for home and other limited viewing uses only unless otherwise authorized by Macrovision Corporation. Reverse engineering or disassembly is prohibited.
WARRANTY
WARRANTY APPLICATION
New, unused SANYO Audio products purchased through a SANYO authorized dealer in Canada are warranted against manufacturing defects in materials and workmanship for ONE YEAR from the date of purchase by the original retail purchaser for non-commercial use. This warranty only applies in favour of the original retail purchaser of the warranted product.
SANYO CANADA INC.'S RESPONSIBILITY
During the warranty period, SANYO Canada Inc. will repair, or at our option, replace an Audio product which shows evidence of a manufacturing defect in materials or workmanship. Replacement PARTS are warranted for the remaining portion of the warranty period.
WHAT IS NOT COVERED
(A) Audio products purchased outside Canada.
(B) Audio products purchased in a used condition.
(C) Problems due to product set up and installation.
(D) Adjustments that are outlined in the Operating Manual
(E) Accessory items including antenna, batteries.
(F) Damage in or due to transportation.
(G) Damage due to improper maintenance, improper wiring, accident, abuse, misuse or negligence.
(H) Damage caused by lightning and power surges.
(I) The cost of removal and reinstallation of an Audio product designed for automobile use.
ORIGINAL RETAIL PURCHASER'S RESPONSIBILITY
You, the original retail purchaser, must present your original, dated bill of sale together with this warranty to SANYO Canada Inc. or to an authorized SANYO Service Depot when you make a claim under this Warranty. You, the original retail purchaser, are responsible for any costs of TRANSPORTING the product to and from SANYO Canada Inc. or an authorized SANYO Service Deport.
You also are responsible for the cost of any MAINTENANCE necessary in respect of the product.
LIMITATIONS
(A) SANYO Canada Inc. reserves the right to change or improve the design of the model of the product warranted hereunder without incurring any obligation to make any modifications to or to install any improvement in or on the product.
(B) In no event shall SANYO Canada Inc. or any of its Authorized Dealers be liable for special or consequential damage arising from the use of this product.
STATUTORY WARRANTIES
The above provisions do not preclude the operation of any applicable provincial statute which in certain circumstances may not allow some of the limitations and exclusions described in this Warranty. Where any terms of this Warranty are prohibited by such a statute, they shall be deemed null and void but the remainder of this warranty shall remain in effect.
HOW TO OBTAIN WARRANTY SERVICE
Please contact the SANYO Authorized Dealer from whom the product was purchased, or contact us directly at:
SANYO Canada Inc.
1-300 Applewood Cres.
Concord, Ontario
L4K 5C7
1-800-263-2244
www.sanyo.ca