L18CTHB12 - Heating Logik - Free user manual and instructions
Find the device manual for free L18CTHB12 Logik in PDF.


| Brand | Logik |
| Model | L18CTHB12 |
| Product Type | Fan Heater |
| Power Source | AC 220-240V, 50Hz |
| Power Consumption | 1500W (max) |
| Dimensions (H x W x D) | 25 cm x 18 cm x 30 cm |
| Weight | 2.0 kg |
| Heating Elements | Ceramic |
| Thermostat | Adjustable thermostat with temperature control |
| Heat Settings | 2 (Low / High) |
| Fan Modes | Cool air (no heat) mode |
| Safety Features | Overheat protection, tip-over switch, thermal cut-off |
| Housing Material | ABS plastic with fire-retardant properties |
| Control Type | Mechanical dials |
| Portability | Built-in carrying handle |
| Cord Length | 1.5 m |
| Noise Level | ~45 dB (on high setting) |
| Room Coverage | Up to 20 m² |
| Cleaning | Wipe exterior with a dry cloth; clean air intake grille with a brush |
| Maintenance | Remove dust from fan blades periodically |
| Spare Parts Availability | Contact Logik customer service for replacement parts |
| Repairability | Repairs should only be carried out by a qualified technician |
Frequently Asked Questions - L18CTHB12 Logik
User questions about L18CTHB12 Logik
0 question about this device. Answer the ones you know or ask your own.
Ask a new question about this device
Download the instructions for your Heating in PDF format for free! Find your manual L18CTHB12 - Logik and take your electronic device back in hand. On this page are published all the documents necessary for the use of your device. L18CTHB12 by Logik.
USER MANUAL L18CTHB12 Logik
IMPORTANT SAFETY INSTRUCTIONS READ CAREFULLY AND KEEP FOR FUTURE REFERENCE
Please follow all the safety precautions listed below for safety and to reduce the risk of injury or electrical shock.
• This appliance is intended for indoor, domestic use only.
- Always ensure that your power supply voltage matches this appliance's rating label.
- Do not kink or wrap the mains cable and plug around the appliance.
- Always position the appliance with the mains plug in an accessible position and avoid the use of an extension cables as they may overheat and create a potential fire risk.
- Do not use the appliance in wardrobes or near fabrics or clothing. Do not stand the appliance on deep pile carpets.
- Do not use the appliance in areas where petrol, paints or other flammable substances are used or stored.
- Do not use in very dusty areas as dust may accumulate on the heating elements and cause overheating.
- Ensure that the unit is used on a stable and level surface. If the floor surface is uneven there is a risk that the appliance could tip over. Also, excessive vibration and noise may occur. If the appliance should be accidentally tipped over, please immediately disconnect from the power supply.
- Do not use if there are any visible signs of damage to the appliance.
- Do not operate with wet hands or spill liquids onto the appliance, the mains cable or plug.
• Never leave the appliance unattended while in operation.
- Do not place any part of your body near the air inlet and outlet to avoid personal injury, electric shock or fire.
- Avoid obstructing the air inlet and the air outlet.
- Children should be supervised to ensure that they do not play with the appliance. Do not place the appliance in places that are easy to reach by children.
• Always unplug the appliance when not in use.
- Do not repair the appliance yourself, but rather consult an authorised expert.
- For safety reasons a broken or damaged mains cable may only be replaced by the manufacturer or a similarly qualified person.
- Do not operate the appliance in direct sunlight, near heat sources, humid environments or in places near water or other liquids such as bathrooms, shower or swimming pool.
- This appliance is not intended for use by persons (including children) with reduced physical, sensory or mental capabilities, or lack of experience and knowledge, unless they have been given supervision or instructions concerning the use of the appliance by a person responsible for their safety.

WARNING: In order to avoid overheating, do not cover the appliance.
- The heater must not be located immediately below a mains socket. Do not use the appliance with a programmer, timer or any other device that switches the appliance on automatically. A fire risk exists if the appliance is covered or positioned incorrectly.

SPECIFICATIONS
Mains supply: 220-240V\~50Hz
Power consumption: 1800W
Specifications and features may change without prior notice.

KNOWHOW
For general information about this appliance
nd handy hints and tips, please visit
www.knowhow.com/knowledgebank or call 0844 5611234.

Visit Partmaster.co.uk today for the easiest way to buy electrical spares and accessories. With over 1 million spares and accessories available we can deliver direct to your door the very next day. Visit www.partmaster.co.uk or call 0844 800 3456 (UK customers only). Calls charged at National Rate.

This symbol on the product or in the instructions means that your electrical and electronic equipment should be disposed at the end of its life separately from your household waste. There are separate collection systems for recycling in the EU. For more information, please contact the local authority or your retailer where you purchased the product.
DSG Retail Limited (Registered in England No. 504877) Maylands Avenue, Hemel Hempstead, Hertfordshire HP2 7TG. UK
IB-L18CTHB12_130606V2
LOGIK
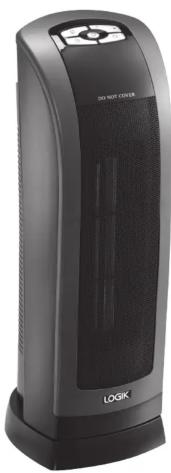
Ceramic Tower Heater
Instruction Manual L18CTHB12
natural_image
Black LOGIK digital power grid tower with 'DO NOT COLD' label (no additional text or symbols visible)Thank You for purchasing your new Logik Ceramic Tower Heater.
We recommend that you spend some time reading this instruction manual in order to fully understand all the operational features it offers.
Read all the safety instructions carefully before use and keep this instruction manual for future reference.
UNPACKING
Remove all packaging from the unit. Retain the packaging. If you dispose of it, please do so according to any local regulations.
The following items are included:
The Main Unit

Remote Control
If items are missing or damaged, please contact Partmaster (UK only). Tel: 0844 800 3456 for assistance.
PRODUCT OVERVIEW

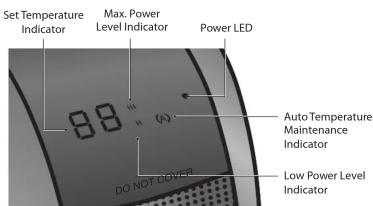
CONTROL PANEL

LED DISPLAY
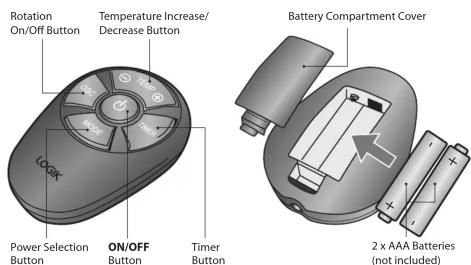
REMOTE CONTROL
OPERATION
- Position the heater upright on the floor away from curtains, furniture or wall coverings before plugging your heater into the mains socket.
- Connect the heater to the mains socket. Be sure the mains plug fits tightly in the mains socket. A loose fit will cause overheating and damage the mains plug.
- Switch on the heater using the Power Switch at the rear of the heater. The unit will beep and the Power LED will light up red. The default power level is high. Use the Mode button to adjust the power level to low or high.
- In Auto Temperature Maintenance Mode, once the unit's temperature sensor detects that the room temperature is 2ircC above the desired temperature, the heater will switch off automatically. After 4 minutes, if the room temperature falls below the desired temperature, the unit will turn on again to maintain the temperature.
| Press: | To: | Description: |
| Start the heater. | Heater will beep and the LED Display will show the room temperature and Power Level set. | |
| Stop the heater. | Heater will beep and the LED Display will wink out. | |
| MODE | Set heater to Max. Power Level. | Power Level indicator will light up red and show W\L |
| MODE | Set heater to Low Power Level. | Power Level indicator will light up orange and \L |
| TEMP | Set heater to Auto Temperature Maintenance Mode. | LED Display will show the temperature and (a) will light up red. |
| Press: | To: | Description: |
| OSC | Rotate the heater. | LED Display will show the temperature and Power Level. |
| TIMER | Set the timer for the heater. | LED Display will show the following timer sequence: 1h > 2h > 3h > 4h > 5h > 6h > 7h > 8h > 0h |
| TEMP ⊕ | Increase the temperature (max. 32ircC ) | Temperature will increase by 1 degree. |
| TEMP ⊖ | Lower the temperature (min. 4ircC ) | Temperature will decrease by 1 degree. |
- To fully switch off the heater, turn off the Power Switch at the rear and unplug the unit from the mains socket.

It is normal for the heater to emit some smell when it is turned on for the first time or when turned on after not being used for a long time. This smell will disappear when the heater has been turned on for a short while.
SAFETY PROTECTIVE DEVICE
Overheat Protection System
The power to the heater will automatically cut off if the temperature of the heater exceeds a certain limit. If the heater overheats, it will stop operating. Switch the heater off and allow it to cool for at least 30 mins. The heater will then resume operating as normal.

The heater cannot be switched on when it has overheated. Allow it to cool down for at least 30 mins and then switch it on again.
CLEANING
Your heater should be cleaned regularly to stop dirt and dust building up which will affect its performance. Ensure the air inlet and the air outlet are not blocked. This can be done with a vacuum cleaner, using the brush attachment.

Ensure you unplug your heater from the mains socket and wait for the heater to cool down completely before cleaning.
HINTS & TIPS
My heater does not work when I turn it on
-
Check that your heater is plugged in and the power is turned on at the mains socket.
-
The heater may be overheating. Switch it off and allow it to cool down for at least 30 mins, then switch it on again.
- Turn the Power Switch to the "High Temp" position.
- Try replacing the BSI or ASTS approved 13 Amp BS1362 fuse in the plug.
- If the heater still doesn't work, do not try to repair the heater yourself.
If your heater's power is automatically cut off follow the steps below:
- Unplug your heater and allow it to cool down for at least 30 mins.
- Inspect your heater.
- Plug-in the heater and switch it on again. If it cuts off again, move the heater to a better ventilated location.
- If there is any sign of physical damage (e.g. melting, or burning of the case), do not attempt to use your heater. Please leave all maintenance work to qualified personnel.
- IMPORTANT SAFETY INSTRUCTIONS READ CAREFULLY AND KEEP FOR FUTURE REFERENCE
- SPECIFICATIONS
- KNOWHOW
- LOGIK
- Ceramic Tower Heater
- UNPACKING
- OPERATION
- SAFETY PROTECTIVE DEVICE
- Overheat Protection System
- CLEANING
- HINTS & TIPS
- My heater does not work when I turn it on
- If your heater's power is automatically cut off follow the steps below:
Brand : Logik
Model : L18CTHB12
Category : Heating