OHNWF 6127-37 - Washing machine Otsein-Hoover - Free user manual and instructions
Find the device manual for free OHNWF 6127-37 Otsein-Hoover in PDF.


| Product Type | Washing machine with drying function |
| Brand | Otsein-Hoover |
| Model | OHNWF 6127-37 |
| Capacity (Wash) | 7.5 kg |
| Capacity (Dry) | 5 kg (cotton) |
| Dimensions (W x D x H) | 600 x 600 x 850 mm |
| Weight | Approx. 70 kg |
| Power Supply | 230 V, 50 Hz, 16 A |
| Maximum Spin Speed | 1600 rpm |
| Energy Efficiency Class | A+ |
| Water Pressure | 0.05 - 0.8 MPa |
| Programmes | Cottons (Algodón Resistentes, Colores, Delicados), Synthetics, Wool, Silk, Sport, Quick 29' & 44', A-wash 59', Rinse, Spin, Drain, Drying (High & Low) |
| Special Features | Delay start (up to 9h), Extra rinse, Spin reduction, Temperature selector, Automatic variable capacity, Out-of-balance protection, Child lock (door lock) |
| Dispenser Compartments | 3: Prewash (I), Main wash (II), Fabric softener (flower symbol) |
| Maintenance | Clean filter monthly, clean dispenser, maintenance wash twice a year |
| Safety Features | Earthing required, door lock safety, anti-flood design, thermal protection |
| Installation Requirements | Min space 600mm wide, 850mm high; cold water connection; drain hose height 800mm (standpipe) or 500mm (waste pipe); transit bolts removal |
| Noise Level | Not specified (typical < 75 dB) |
| Spare Parts | Special mains cord available from GIAS service, replacement hoses, filter |
| Warranty | Refer to guarantee card |
Frequently Asked Questions - OHNWF 6127-37 Otsein-Hoover
User questions about OHNWF 6127-37 Otsein-Hoover
0 question about this device. Answer the ones you know or ask your own.
Ask a new question about this device
Download the instructions for your Washing machine in PDF format for free! Find your manual OHNWF 6127-37 - Otsein-Hoover and take your electronic device back in hand. On this page are published all the documents necessary for the use of your device. OHNWF 6127-37 by Otsein-Hoover.
USER MANUAL OHNWF 6127-37 Otsein-Hoover
Unpacking the Product 5
Installation....7
Choose a location 7
Electricity supply 8
Water supply 8
Connecting to the cold water supply 9
Connection of the machine to the drain 10
Moving the machine into position 11
Adjusting the feet 11
Testing the installation 12
Washing and Drying advice....13
Loading your washing machine....13
Sorting the laundry 13
Drying 14
The Dispenser 15
Detergent dosage 15
Dispensing instructions 16
The Control Panel 17
Wash and Dry Options 20
Automatic Features 22
Programme Selector 23
Special Programmes....24
Daily Programmes 25
Programme Guide....26
A Typical Wash and Dry Cycle 28
Selecting the programme 29
Starting the cycle 29
Cleaning and Routine Maintenance....31
Troubleshooting....33
Power Failure 36
Introduction
Please read and follow these instructions carefully and operate the machine accordingly. This booklet provides important guidelines for safe use, installation, maintenance and some useful advice for best results when using your machine.
Keep all documentation in a safe place for future reference or for any future owners.
Delivery information
Please check that the following items are delivered with the appliance:
●Instruction manual
●Guarantee card
●Blanking plug
●Inlet hose & hooked end support (see Unpacking and Installation Instructions)
●Base panel & x2 push clips
●Energy Label
Do's
●All packaging materials used are environmentally-friendly and recyclable. Please help dispose of the packaging via environmentally-friendly means. Your local council will be able to give you details of current means of disposal.
●To ensure safety when disposing of an old washing machine disconnect the mains plug from the socket, cut the mains power cable and destroy this together with the plug. To prevent children shutting themselves in the machine break the door hinges or the door lock.
●This machine is solely for domestic use, i.e. to wash, rinse and spin dry household textiles and garments.
Check that no damage has occurred to the machine during transit. If it has, call for service by GIAS.
If the appliance is not running properly or breaks down, switch it off, disconnect the plug from the socket, turn off the water supply and do not tamper with the appliance. Consult GIAS Service for possible repair.
Don'ts
●Do not touch the appliance when hands or feet are damp or wet.
●Do not lean on the door when loading the machine or use the door to lift or move the machine.
●Do not use adapters, multiple connectors and/or extensions.
●Do not allow children to play with the machine or its controls.
●Do not try to open the door when water is visible in the drum or the Seguridad Puerta indicator is on.
Failure to comply with the above can compromise the safety of the appliance. You may be charged for a service call if a problem with your machine is caused by misuse.
Unpacking the product
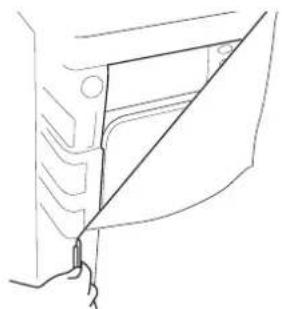
Remove the machine from its packaging close to the final location of the machine.
- Cut carefully around the base of the packaging.
natural_image
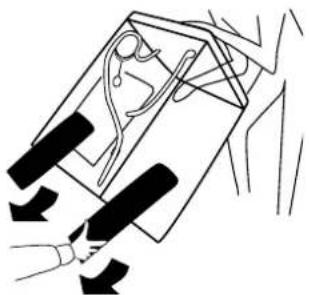
Pure technical line drawing of a mechanical component without any text, numbers, or symbols- Lay the machine on its back and remove the base and the two polystyrene spacers on each side of the machine. We recommend that a second person assist in the lifting and manoeuvring of the machine.
natural_image
Line drawing of a hand holding a device with arrows indicating motion or force (no text or symbols)Dispose of the packaging safely. Make sure it is out of the reach of children, it is a potential source of danger.
natural_image
Technical line drawing of a mechanical lever or bracket with bolts and a central fulcrum (no text or symbols)-
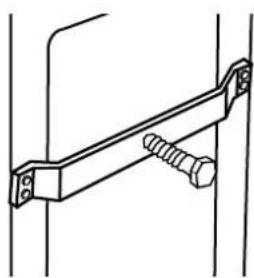
Return the machine to the upright position, remove the remainder of the packaging and the central screw in the transit bar.
-
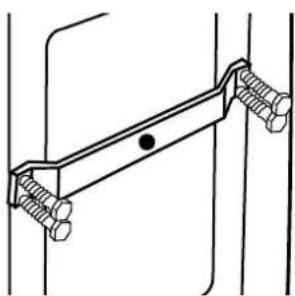
Remove the four retaining screws in the transit bar and pull out the transit bracket.
natural_image
Technical line drawing of a mechanical bracket with bolts and a central dot (no text or symbols)We recommend you keep the transit bracket and screws to protect the machine for future transit. The manufacturers will not be responsible for any damage to the machine caused by not following the instructions relating to releasing the transit protection. The user is responsible for all installation costs.
natural_image
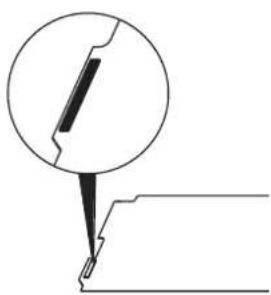
Pure technical diagram showing a circular component with a diagonal line and a pointed tip, no text or symbols present.- Take the base panel provided and fit the two self adhesive strips by removing the backing paper on one side and locating the strips on each side of the base panel.
natural_image
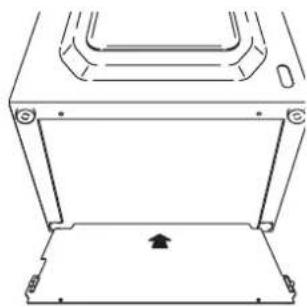
Technical line drawing of a mechanical component with no visible text or symbols- Tilt the machine forward and locate the base panel under the front of the machine. Remove the remaining backing paper from the self-adhesive strips and offer up the base panel to the bottom of the cabinet.
natural_image
Technical line drawing of a mechanical component with an inset magnified detail showing a detail with arrows and symbols (no readable text or labels)-
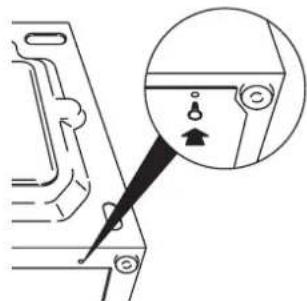
Take the two plastic fixing clips and fix the base panel to the base of the machine. Bring the machine back to the upright position.
-
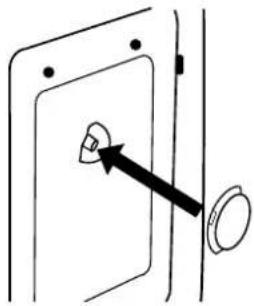
Cover the central hole in the rear of the machine with the cap enclosed in the instruction bag.
natural_image
Simple line drawing of a door with a knob and a circular button, no text or symbols presentInstallation
Choose a location
●After the machine has been installed, ensure that the mains plug and water supply valves are easily accessible.
●Make sure there is enough space for the machine. Select a space at least 600mm wide and 850mm high. Also leave enough space to open the door fully so you can load and unload it easily.
- Keep the area underneath and around the machine free of combustible materials such as lint, paper, rags, chemicals etc.
Do not plug the machine in and switch it on at the mains until the installation is completed.
You may be charged for a service call if a problem with your machine is caused by incorrect installation.
If the mains cord on this appliance is damaged, it must be replaced by a special cord which is ONLY obtainable from the GIAS spares service. It must be installed by a competent person.
Electricity supply
Washing machines are supplied to operate at a voltage of 230V, 50 Hz single phase. Check that the supply circuit is rated to at least 16A.
Electricity can be extremely dangerous.
This washing machine must be earthed.
The socket outlet and the plug on the appliance must be of the same type.
Do not use multiple adapters and/or extension leads.
The wires in the mains lead are coloured in accordance with the following codes:
Blue NEUTRAL
Brown LIVE
Green and Yellow EARTH
CE Appliance complies with European Directive 89/336/EEC, 73/23/EEC and subsequent amendments.
Water supply
●The cold water pressure should be between 0.05-0.8 Mpa.
●Do not connect the machine to a single outlet instantaneous water heater.
●The water supply tap should be accessible when the machine is installed.
●Before connecting the fill hose, check that the water is running from the water supply tap to be used.
Connecting to the cold water supply
This machine has an inlet hose with a 19mm (3/4") threaded ferrule fitted to the end, to attach between the threaded connector on the appliance and the water supply.
Only use the new hose supplied to connect the machine and ensure that the sealing washers are in place inside the hose connectors.
Do not re-use old hoses which are attached to existing installations.
Do not over-tighten the connections. Hand tight is sufficient.
Do not trap or kink the hose.
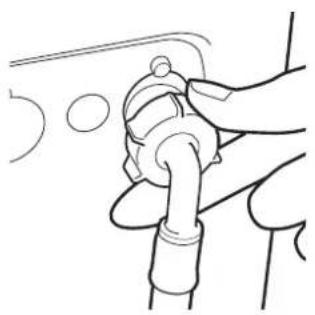
- Connect the elbow end of the hose provided to the threaded inlet on the back of the machine.
Grey pipe to the white threaded inlet on the machine.
-
Hand tighten the connector.
-
Connect the straight ends of the pipes to the water supply; ensure that there are no kinks.
-
Turn on the water supply and check for leaks. If there is a leak, turn off the water supply, disconnect the hose and check the sealing washers are in place. Refit the hose and turn on the water supply.
natural_image
Line drawing of a hand adjusting a pipe fitting with circular motion indicators (no text or symbols)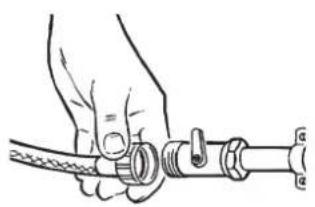
natural_image
Illustration of a hand holding a coiled cable with a valve and connector (no text or symbols)Connection of the machine to the drain
This machine must be connected in accordance with the water supply regulations. Water byelaws prohibit connection to a surface water drain. Decide which plumbing option suits you best then follow the instructions below.
All machines are tested with water prior to leaving the factory so a small amount of water may remain in the drum and drain hose.
Flooding could occur if any part of the installation is not completed correctly.
Option 1
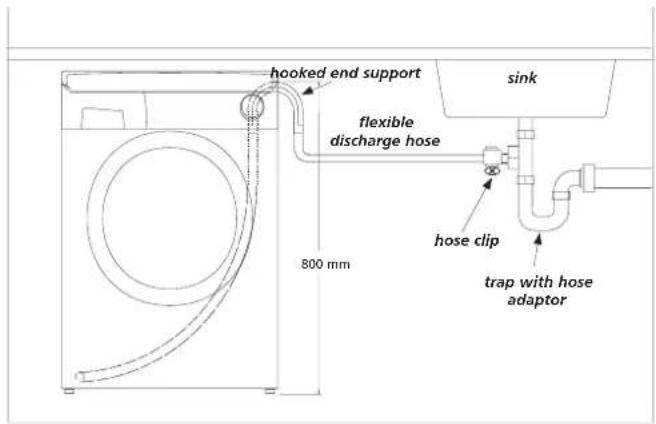
Waste pipe connection (waste trap)
Fit the hooked end support to the outlet pipe. Position at least 800mm off the floor.
After removing the blanking plug or cutting the membrane from the waste system securely fix the outlet pipe to the drainage system, using a hose clip. Secure the hooked end support up to at least 800mm to avoid water being drawn back into the machine.
Option 2
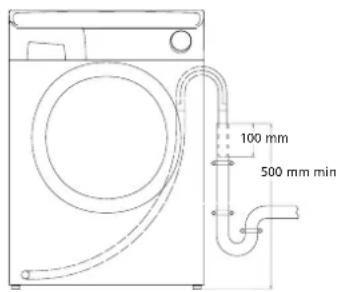
Into a standpipe
Ensure that the standpipe is not located near an electrical socket.
Fit the hooked end support to the outlet pipe. Install the hose into the standpipe ensuring that the pipe is at least 500mm from the floor.
Insert the outlet pipe approximately 100mm into the standpipe.
Moving the machine into position
Your machine is heavy so care must be taken when moving it. We recommend that two people move the machine to avoid strain and possible injury.
●Take care not to damage flooring when moving the machine.
- When moving the machine to its final position take care not to kink or damage the hose at the back of the machine.
Do not drag or lift the machine by its door.
Adjusting the feet
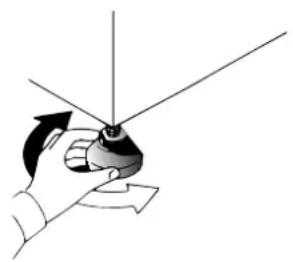
Once the machine is in place the feet should be adjusted to ensure that the machine is level. If the machine is not level it may become noisy or move.
Adjust the feet on the front corners of the machine until the machine is firm and level. When the machine is firm and level, tighten the locking nuts on the two feet.
natural_image
Hand holding a small mechanical component with directional arrows indicating rotation (no text or symbols)Testing the installation
Refer to the programme guide for details of how to select programmes.
-
Turn on the water supply and check for leaks from the fill hose.
-
Switch on the electricity supply.
-
Select the spin programme 📋 and then press the Start Pausa button to start the machine. Allow the programme to continue for one minute and then cancel the programme by returning the selector to the OFF position. This will remove any water remaining in the machine from factory testing.
-
To check for cold water filling to the machine:
Select the rinse programme 📋/ 📋 and press the Start Pausa button to start the machine.
Allow the tumble action to continue until the water has pumped out. Check that the drain outlet is not leaking or overflowing.
-
Switch off the machine at the end of the cycle by turning the programme knob to the OFF position.
-
Select the spin programme 📄 and press the Start Pausa button to start the machine. If the machine takes longer than one minute to empty check the drain hose for kinks.
Installation testing is now complete.
This programme will take approximately 2 hours to complete.
Now you have successfully installed the machine we advise that you run the machine to ensure the drum is thoroughly clean after testing and storage. Select the Algodón Resistentes programme and run the machine for a complete cycle using only wash detergent and water. Ensure that the drying timer is in the OFF position.
Washing and Drying advice
The following tips are designed to assist in getting the best results from your machine whilst utilising it in the most environmentally-friendly and economical way. It is also important to understand the items to avoid in your laundry, to ensure the continued safe and reliable operation of your machine.
Loading your washing machine
To make further reductions of energy, water and detergent consumption, we recommend that you put a full load into your machine. Energy savings of up to 50% can be achieved by washing one full load compared to two half loads. Do not overload the machine as this will reduce the quality of the wash and may cause damage to the machine and your laundry.
When is prewashing really needed?
Only with particularly dirty loads! Energy savings of 5 to 15% are made by not selecting the prewash option for less dirty laundry. Pre-treat awkward stains with a washable stain remover.
Which wash temperature should you choose?
Using stain removers before machine washing reduces the need to wash at temperatures over 60°C.
Using a 40°C wash temperature can make energy savings of up to 50%.
Heavily soiled laundry
To ensure the best performance when washing a particularly dirty load, we recommend that you reduce the amount of items to be put into the machine. Allowing more space in the drum the items can circulate more freely and will wash cleaner.
Sorting the laundry
Items to avoid
We recommend that you do not wash underwired bras in the machine. Should the wires become detached it could cause damage to your clothes and the machine. If the washcare label states that the bra is machine washable then we advise placing it in a wash bag.
Recommendations
Always follow the wash care labelling on the garments.
Fasten zips, tie strings and close press studs to prevent tangling. Ensure that pockets are emptied of loose change and other small items.
Check that there are no metal objects in the laundry as these may damage the laundry and the machine. Place small items in a wash bag.
Drying
In addition to the above advice the guidelines below must be followed when drying the clothes.
Sort the load for drying:
●By care symbols:
These can be found on the collar or inside seam:

Suitable for tumble drying. Tumble drying at high temperature.

Tumble drying at low temperature only. Do not tumble dry.
If the item does not have a care label it must be assumed that it is not suitable for tumble drying.
●By amount and thickness
Whenever the load is bigger than the dryer capacity, separate clothes according to thickness (e.g. towels from thin underwear).
●By type of fabric
Cottons/linen: Towels, cotton jersey, bed and table linen.
Synthetics: Blouses, shirts, overalls, etc. made of polyester or polyamid, as well as for cotton/synthetic mixes.
Things to avoid
●Do not tumble dry woollens, silk, delicate fabrics, nylon stockings, delicate embroidery, fabrics with metallic decorations, garments with PVC or leather trimmings, training shoes, bulky items such as sleeping bags, etc.
●Do not dry articles which have been treated with a dry cleaning fluid or rubber clothes (danger of fire or explosion).
●Foam rubber materials can, under certain circumstances, when heated become ignited by spontaneous combustion. Foam plastic, foam rubber and rubber-like material are not suitable for tumble drying. Articles made from these materials MUST NOT be placed in the dryer.
- Do not try to dry items that are dripping wet, this may damage the appliance. Spin these items first.
Do not use the machine to wash and dry items that do not have a wash label.
Do not wash and dry items previously treated with solvents.
The Dispenser
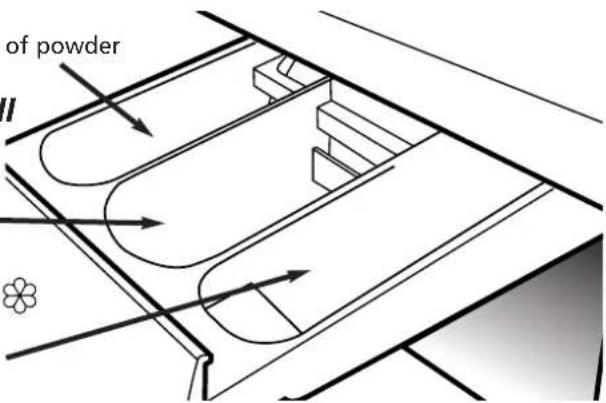
COMPARTMENT I
Prewash detergent
Maximum dosage 100ml of powder
COMPARTMENT II
Mainwash detergent
Maximum dosage 200ml of powder
COMPARTMENT
Fabric Conditioner
Maximum dosage 100ml
Detergent dosage
Only use detergents which are suitable for use in a washing machine. You will obtain the best results from your wash with the minimum use of chemical products, and the best care for your laundry if you take into consideration the degree of soiling as well as the type of detergent to choose.
The amount of detergent to use depends on:
●Water hardness.
Depending on the hardness of the water and the type of detergent used, it is possible to reduce the amount of detergent.
The softer the water supply, the less detergent is required.
●The degree of soiling.
It is possible to reduce the amount of detergent used depending on the degree of soiling.
Use less detergent for less soiled items.
●Amount of laundry.
It is possible to reduce the amount of detergent when washing only a small amount of laundry.
For smaller loads use less detergent.
The dosages shown on the packaging of detergents for washing delicates often already refer to a reduced wash size. Always follow the dosage instructions on the detergent packaging.
DO NOT exceed the maximum detergent dosage
Do not put any items into the drawer other than detergents that are designed to be dispensed from the drawer as they may cause blockage or damage.
Dispensing instructions
The detergent drawer is split into 3 compartments:
●the first, labelled "I", is for detergent utilised during Prewash.
●the second, labelled "II", is for detergent utilised during the main wash.
●the third, labelled 🌿 is for special additives such as fabric softeners, fragrances, starch, brighteners etc.
Dispensing in the drum
Liquid detergents and some tablets are dispensed via the machine drum using the recommended dispensing device which is placed upright on top of the washload towards the back of the drum. Some tablets are designed to be placed in the dispenser drawer, check the detergent pack for details.
The Control Panel
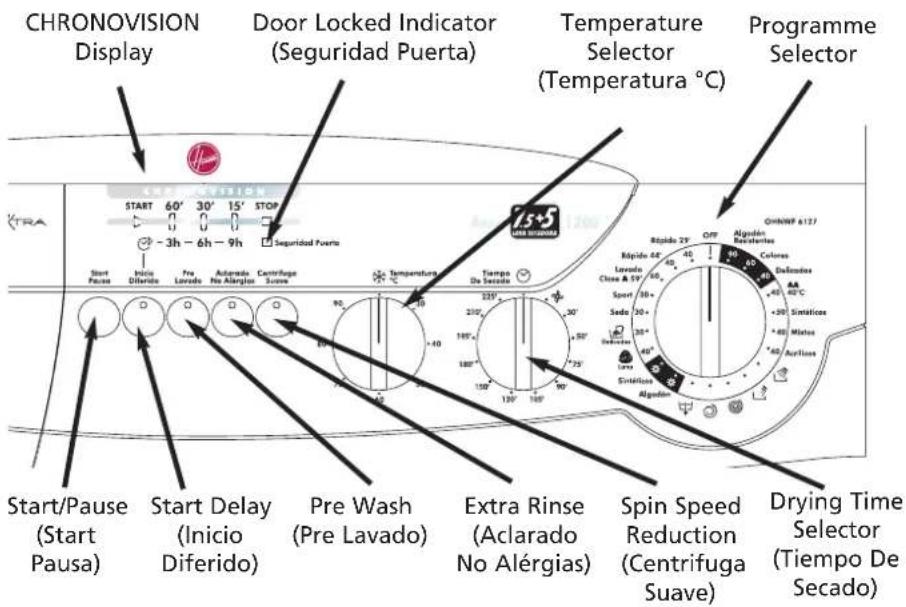
The programme selector must be returned to the OFF position to reset the controls between each wash cycle.
Turning the machine On
The machine is turned on by selecting a programme via the programme selector. This status will be indicated by the STOP indicator light flashing, this light will continue to flash until the machine has started or the machine is returned to the OFF position.
Start/Pause (Start Pausa)
Start
After selecting the programme and the required options press the Start Pausa button once to start the machine. The STOP light will stop flashing and START light will illuminate and there will be a short time delay to the start of the programme while the machine sets the wash parameters for the selected programme and options. If the duration of the programme you have selected
When starting a subsequent wash cycle the programme selector must be returned to OFF prior to the next programme being selected and started.
is shorter than 60 minutes, then the time remaining indicator will illuminate accordingly. The Seguridad Puerta indicator light will also illuminate a few seconds after pressing the Start Pausa button.
Pause (Pausa)
The programme may be paused at any time during the wash cycle by holding down the Start Pausa button for about two seconds. When the machine is in the paused mode, the time remaining for the programme in the CHRONOVISION indicator and option buttons will flash. The Seguridad Puerta indicator light will remain illuminated for approximately 2 minutes. The door can be opened when this indicator goes out. To restart the programme, press the Start Pausa button once again.
Cancelling and changing the programme
To cancel the programme the programme selector should be rotated to the OFF position.
Select a new programme and start as detailed above.
The Seguridad Puerta indicator light is illuminated when the door is fully closed and the machine is ON.
When Start Pausa is pressed on the machine with the door closed the indicator will flash momentarily and then illuminate. If the door is not closed the indicator will continue to flash.
A special safety device prevents the door from being opened immediately after the end of the cycle. Wait for 2 minutes after the wash cycle has finished and the Seguridad Puerta light has gone out before opening the door. As a safety measure, check that there is no water evident in the drum. At the end of the cycle turn the programme selector to OFF.
If the programme is paused, the Seguridad Puerta indicator will go out after 2 minutes and the door
can be opened. Check there is no water evident in the drum before opening the door.
CHRONOVISION
In order to better manage your time, this washing machine features an indicator light system that keeps you constantly informed on the remaining cycle time and the status of the start delay function.
When a drying time is selected the CHRONOVISION display will display the time remaining on the washing programme when the washing is taking place and the time remaining in the drying phase when drying is taking place.
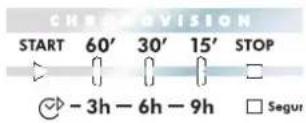
| CHRONOVISION DISPLAY | |||
| WASH PROGRESS | START DELAY | ||
| START | Remaining time above 60 minutes | 3h | 3 hours or less remaining before the programme commences |
| 60' | Remaining time less than 60 minutes | ||
| 30' | Remaining time less than 30 minutes | 6h | 6 hours or less remaining before the programme commences |
| 15' | Remaining time less than 15 minutes | 9h | 9 hours or less remaining before the programme commences |
| STOP | End of the programme | ||
Wash and Dry Options
The options should be selected BEFORE pressing the Start Pausa button
This option is available to delay the start of the wash cycle by up to 9 hours. The selection of the time is completed by pressing the Inicio Diferido button, the CHRONOVISION display will indicate the time selected. When the correct delay is selected press the Start Pausa button to start the cycle.
This option is available on the cottons and synthetics programmes. Prewash is automatic on the Sports programme. This option is particularly useful for heavily soiled loads and can be used before selecting the main wash programme. Detergent for this programme should be added to the first compartment of the soap drawer labelled "I" (Please refer to Detergent Drawer section of manual). We recommend you only use 20% of the main wash detergent quantity.
Extra Rinse (Aclarado No Alérgias)
This option is available on the cottons programmes. The option increases the number of rinses to five (including the final conditioned rinse). This can help prevent skin irritation from detergent residue for people with particularly sensitive skin. Selecting the (Aclarado No Alérgias) button is also recommended when washing heavily soiled fabrics which need a lot of detergent, or when the wash load contains towelling fabrics that have a greater tendency to retain detergent.
Spin Reduction (Centrifuga Suave)
This option is available on the Cottons programmes (Algodón Resistentes, Colores, Delicados), AA 40°C, Lavado Clase A 59', Sport and Daily (Rápido 29', Rápido 44') programmes to reduce the maximum spin speed to 600rpm thus reducing creasing. It is not recommended that this option be selected when a drying programme will follow, as the length of the drying cycle will be increased.
Temperature Selector (Temperatur °C)
The washing machine is equipped with a temperature selector knob to set the temperature you require. Bigger energy savings can be achieved by using the lower temperature settings around the dial between ✦ and 40°C. By selecting the ✦ position, the wash temperature is limited to the water inlet temperature, thus reducing energy consumption further. We recommend that the temperature shown on wash care garments should never be exceeded.
In the case where the temperature has been accidentally set higher than that of the chosen programme, (see Programme Guide table), the machine will lower the temperature automatically to protect the fabrics.
For tumble drying select the appropriate drying programme via the Programme Selector. For drying cotton fabrics select the High Dry (Algodón) option and for synthetic fabrics select the Low Dry (Sintéticos) option. Turn the drying time selector until the indicator aligns with the desired time. Do not mix cottons and synthetics to avoid damage to the laundry.
Note: If the drying time is selected before the wash cycle is completed the machine will automatically commence the drying programme. Refer to the Programme Guide to identify which drying programme will be automatically selected after the wash programme. To protect your laundry certain programmes (e.g. Seda) cannot be followed automatically by a drying programme. The drying time can be reduced at any time during the cycle but cannot be increased.
Drying Time Guide
The times given are indicative and will vary with the exact level of dryness required (eg for ironing or ready to hang) and the size and composition of the load.
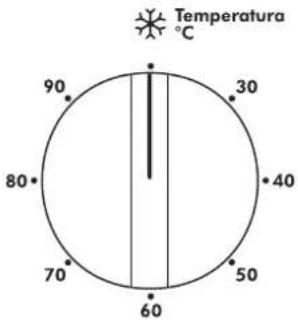
radar
Temperature °C | Temperature (°C) | | :--- | | 30 | | 40 | | 50 | | 60 | | 70 | | 80 | | 90 |Tiempo
De Secado

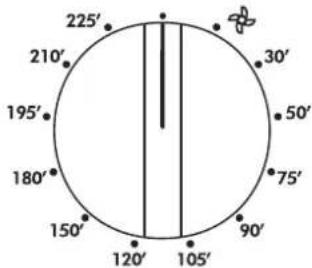
Only a maximum of 5kg of dry laundry can be loaded.
| Spin SpeedDRYING TIME GI | |||
| Fabric | Load Size | 1200/1300 rpm | 1500/1600 rpm |
| Cottons, linen | 5kg | 220 minutes | 190 minutes |
| 2kg | 80 minutes | 70 minutes | |
| Synthetics and mixed fabrics | 2kg | 70 minutes | 60 minutes |
| 1kg | 50 minutes | 40 minutes | |
Automatic Features
Automatic Variable Capacity (Half Load)
The washing machine is fitted with a self adjusting water level system. This system enables the machine to use the optimum amount of water needed to wash and rinse the laundry in relation to the particular load. This results in a reduction of the water and electricity used without in any way compromising the washing and rinsing performance. The amount of water and electricity used will always be appropriate for the clothes load.
The washing machine automatically ensures excellent washing results at minimum cost whilst respecting the environment.
Out of Balance protection
This model is fitted with an electronic sensor device that checks if the load is balanced correctly. If the load is slightly unbalanced the machine will re-balance it automatically to then carry out the normal spin.
If, after several attempts, balance is not restored a reduced spin speed will be used.
If loads are seriously unbalanced the spin stage will be cancelled. This helps limit vibration, reduce noise and improve the washing machine's reliability and life.
Programme Selector
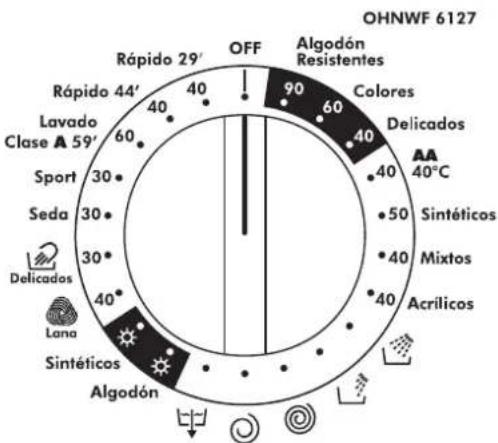
gauge
| Component | Value | |---|---| | Algodón Resistentes | 90 | | Colores | 60 | | Delicados | 40 | | AA 40°C | 40 | | Sintéticos | 50 | | Mixtos | 40 | | Acrílicos | 40 | | Sintéticos | 40 | | Delicados | 30 | | Seda | 30 | | Sport | 30 | | Clase A 59' | 60 | | Lavado | 60 | | Rápido 44' | 40 | | Rápido 29' | 40 | | OFF | 0 | OHNWF 6127For handling the various types of fabric and their level of soiling in your laundry the washing machine has different programme groups according to type of wash, temperature, spin speeds and duration (see Programme Guide).
Cottons (Algodón)
The programmes are designed for maximum washing and rinsing. With spin cycles in between, they guarantee the laundry is rinsed perfectly. The final spin cycle ensures laundry is spun dry as much as possible up to the maximum speed.
Synthetics and mixed fabrics (Sintéticos y Tejidos Mixtos)
Washing and rinsing performance is optimised through drum rotation speeds and water levels. The delicate spin action minimises creasing.
This is a new concept in washing, with a cycle that comprises alternate periods of activity and pauses, particularly suitable for washing very delicate fabrics.
Washing and rinsing are carried out using a high water level to provide the best results.
Rinse, Spin and Drain


Individual programmes are available for rinsing, (including the opportunity to add fabric conditioner), spinning, at 800rpm or maximum spin speed, and draining the water from the machine.
Special Programmes
Drying
Note: Dispensers used for concentrated powders and liquid detergents must be removed from the drum before commencing the tumble drying programmes.
The load is dried in thermostatically controlled warm air. The drum changes direction during the drying cycle to prevent the laundry from tangling and hence produce even drying. Cool air is used during the last ten minutes of the drying cycle to minimise creasing.
High temperature drying programme for Cottons and linen items, always refer to the care label.
Low temperature drying programme for synthetics and mixed fibres, always refer to the care label.
Woolmark (Lana)
A programme dedicated to washing fabrics labelled with the woolmark symbol 📄. The cycle comprises of alternate periods of activity and pauses. Washing and rinsing are carried out using a high water level to provide the best results. The programme has a maximum temperature of 30^ C and concludes with 3 rinses, one for fabric conditioner, and a short spin.
Silk (Seda)
This washing machine also has a gentle Silk and Hand Wash programme cycle. This programme allows a complete washing cycle for garments specified as "Hand Wash only" and laundry items made from silk or specified "Wash as silk" on the fabric label.
The programme has a maximum temperature of 30^ C and concludes with 3 rinses, one for fabric conditioner, and no final spin.
Sport
Sports items have been given their own wash care programme. This washing machine has a unique Sportswear programme.
It is specially designed to wash mixed sportswear fabrics that cannot be washed on hotter programmes and is designed to remove the soiling and staining created by participation in sports activities.
This programme starts with a cold prewash that breaks down and loosens any excess dirt and then washes at a cool 30°C, rinses twice (one is for fabric conditioner) and spins slowly for the best care of your heavily soiled, delicate garments.
Detergent for the prewash part of the programme should be added to compartment I and detergent for the mainwash should be added to compartment II. Follow the instructions given in 'The Dispenser' section.
"A" wash 59' (Lavado Clase A 59')
This specially designed programme maintains the high quality wash performance identified with the "A" rating whilst greatly reducing the wash time. The programme is designed for a maximum load of 3 kg and is intended for cotton fabrics and items colourfast to 60°C. The programme concludes with 2 rinses and a high speed spin sequence.
Daily Programmes (Lavado Rápido)
By maintaining exceptional washing performance, these programmes allow you to know in advance the necessary time for your everyday laundry. In fact, this washing machine is equipped with two daily rapid programmes at 40^ C, that were just studied for lightly soiled fabrics and medium or small loads.
A complete washing cycle (wash, rinse and spin), able to wash in approximately 44 minutes suitable for:
●a maximum load of 3 kgs
●lightly soiled fabrics (cotton and mixed fabrics)
With this programme we recommend that you reduce the detergent loading dose (compared to the normal one), in order to avoid detergent waste.
Daily 29' (Rápido 29')
A complete washing cycle (wash, rinse and spin), able to wash in approximately 29 minutes suitable for:
●a maximum load of 2 kgs
●lightly soiled fabrics (cotton and mixed fabrics)
With this programme we recommend that you reduce the detergent loading dose (compared to the normal one), in order to avoid detergent waste.
Programme Guide
| Programme | Fabric Type | Max. Load Size (kg) | Max. Water Temp (°C) | Auto Drying Cycle | ||||
| Max. Drying Load | High Dry | Low Dry | ||||||
| CottonsSintéticos Mixed | Algodón Resistentes | Cottons, linen | 7.5 | 90 | 5 | √ | - | |
| Colores | Cotton, colourfast mixed fibres | 7.5 | 60 | 5 | √ | - | ||
| Delicados | Cottons, mixed fabrics, Coloureds Non-fast | 7.5 | 40 | 5 | √ | - | ||
| Fabrics | AA 40°C | Cottons, mixed fabrics and synthetics | 7.5 | 40 | 2 | - | √ | |
| Sintéticos | Mixed fabrics and synthetics | 2 | 50 | 2 | - | √ | ||
| Mixtos | Coloured mixed fabrics and synthetics | 2 | 40 | 2 | - | √ | ||
| Delicados | Acrílicos | Delicates and acrylics | 2 | 40 | - | - | - | |
| Rinses and Spins | Rinse | Cottons, linens | - | - | 5 | √ | - | |
| Final Rinse | Mixed Fabrics | - | - | 2 | - | √ | ||
| Spin | Cottons, linens. Maximum spin speed | - | - | 5 | √ | - | ||
Energy label data based on Colores programme tested in accordance with CENELEC EN60456
| Programme | Fabric Type | Max.Load Size (kg) | Max.Water Temp (°C) | Auto Drying Cycle | ||||
| Max.Drying Load | High Dry | Low Dry | ||||||
| Spin | ||||||||
| Spins and Drain | Drain | Mixed Fabrics | - | - | 2 | - | √ | |
| Algodón | Cottons and linen | 5 | - | 5 | √ | - | ||
| Sintéticos | Synthetics | 2 | - | 2 | - | √ | ||
| Lana | Machine washable wool | 1 | 40 | - | - | - | ||
| Delicados | Delicates and 'Hand Wash only' items | 1.5 | 30 | - | - | - | ||
| Seda | Silks | 1.5 | 30 | - | - | - | ||
| Sport | Mixed fabrics | 2.5 | 30 | 2 | - | √ | ||
| Lavado Clase A 59' | Cottons, colourfast mixed fabrics | 3 | 60 | 3 | √ | - | ||
| Rápido 44' | Lightly soiled cottons and mixed fabrics | 3 | 40 | 2 | - | √ | ||
A Typical Wash and Dry Cycle
Liquid detergents and some concentrated powders and tablets that are to be placed directly into the drum should use the recommended dispensing device.
Do not use such powders and dispensing devices if you are completing a continuous wash and dry cycle.
This section summarises the main points when completing a wash and dry cycle. For detailed explanations of features, options and details of the machine refer to the relevant section in the instruction manual.
Preparing the laundry
Select and sort the laundry according to the wash care labels found on each garment. Always check the care labels.
Loading the laundry
Open the door.
Put the laundry in the washing machine. Close the door by pushing it until it clicks, ensuring that no items of laundry are obstructing the lock or door seal.
Putting detergent in machine
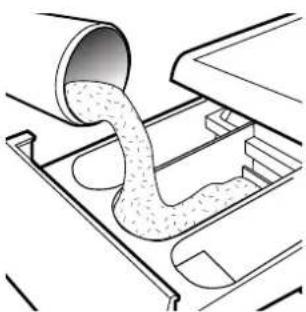
Open the drawer, choose the detergent and put in the recommended amount.
Do not exceed the dosage stated below Close the drawer again.
natural_image
Diagram of a car interior showing airflow through a duct and dashboard (no text or symbols)| Compartment | Wash | Maximum quantity of powder/liquid |
| I | Prewash (option) | 100ml |
| II | Main Wash (all programmes) | 200ml |
| Fabric Conditioner | 100ml |
Selecting the programme
Refer to the Programme Guide or the programme descriptions on the front of the machine to select the most suitable programme.
The programme is selected by turning the programme selector and aligning the programme name with the indicator.
Check that the STOP indicator is flashing, if not check that the door is properly closed.
Check that the tap is turned on and that the discharge hose is positioned correctly.
Select the required wash options
Select the appropriate drying time based on the table to be found on page 21.
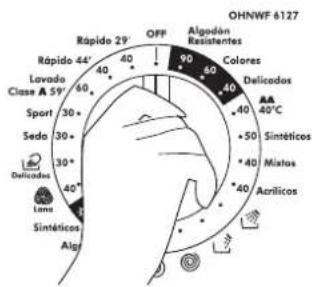
Starting the cycle
Press the Start Pausa button. The Seguridad Puerta indicator and the START light illuminate, within a few seconds the programme will begin.
Do not try to open the door when the Seguridad Puerta indicator is on.
Do not open the dispenser drawer during the wash programme.
If you wish to pause the programme press the Start Pausa button and after 2 minutes the door can be opened. To cancel the programme the programme selector should be turned to the OFF position. A new programme can be selected after cancelling the programme.
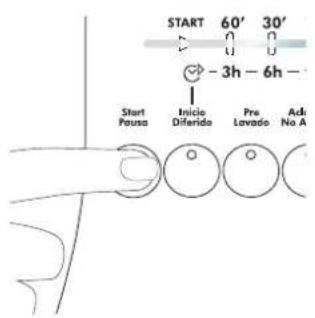
To test the laundry for dryness
When completing the drying phase it is possible to check the load for dryness.
Press the Start Pausa button, the machine will go into pause mode indicated by the CHRONOVISION display time and the option buttons flashing.
After 2 minutes the Seguridad Puerta light will go out indicating that the door can be opened and the load checked.
Be very careful as the load and door glass may be very hot.
To continue close the door and press the Start Pausa button. The programme will restart and continue for the remaining time.
When the programme has finished
Wait for the door lock to be released. The Seguridad Puerta indicator will go out after approximately 2 minutes and then the door can be opened.
Switch off the machine by turning the programme selector to the OFF position before selecting the next programme (this action resets the memory in the machine).
Open the door.
Remove the laundry.
Disconnect the plug from the mains power supply and turn off the water supply after every use.
Cleaning and Routine Maintenance
The washing machine needs very little maintenance, but regular attention to a few small details will ensure the continued performance of your washing machine.
Do not use abrasive cleaners, scouring pads, solvent based cleaners or polishes; wiping the outside of the machine with a damp cloth will suffice.
Cleaning the soap dispenser
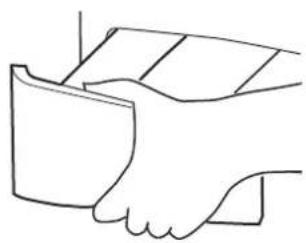
- Clean the compartments occasionally to remove detergents and additives.
-
To do this you just need to pull the drawer out firmly from the machine, but without forcing it.
-
Clean the compartments and the syphon cap and cover under warm running water.
- Clean the soap dispenser housing to remove any residue of soap powder
- Replace the drawer.
natural_image
Simple line drawing of a hand gripping a piece of paper (no text or symbols)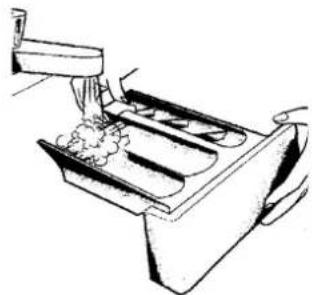
natural_image
Line drawing of a kitchen appliance with a drain and drawer (no text or symbols)Cleaning the door glass
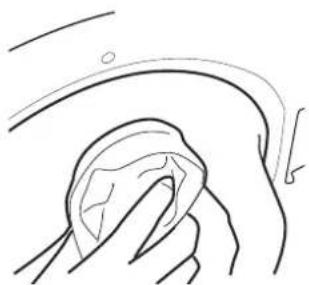
Regularly clean the door glass with a damp cloth. A build up of soiling and residues from the water may result in water leaking from the door.
Do not use abrasive cleaners as they can scratch the surface.
natural_image
Simple line drawing of a hand holding a cloth or towel, with no text or symbols present.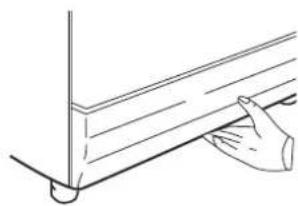
natural_image
Line drawing of a hand holding a wooden beam with a vertical support (no text or symbols)Cleaning the filter
The washing machine is fitted with a special filter to prevent items such as coins, buttons, etc. blocking the discharge hose. These may be retrieved by:
- Removing the kickplate by gently pulling it from the bottom in an outwards and upwards direction.
- Use the kickplate to collect the water still in the filter.
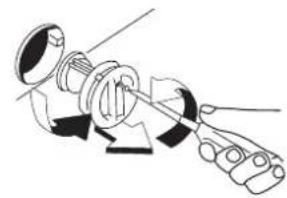
- Use a screwdriver to loosen the screw holding the filter, turn the filter anticlockwise until it stops, remove it and clean it. After cleaning it, reassemble following the above instructions in reverse order.
Replace the kickplate.
We recommend that the filter be cleaned frequently, at least once a month.
natural_image
Diagram of a mechanical assembly with rotating components and a handle (no text or symbols)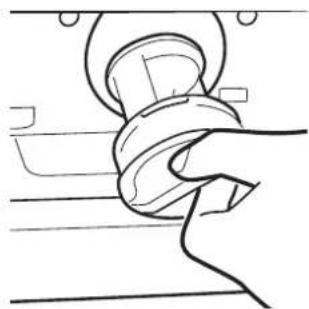
natural_image
Simple line drawing of a hand gripping a coiled cable or wire (no text or symbols)Maintenance wash
Using small quantities of detergent and low temperature wash programmes can cause the gradual build up of grease, dirt and scale. Over time these deposits can damage your laundry and your machine. They can also cause your machine to smell. We recommend that you carry out a maintenance wash a couple of times per year to keep your machine and pipe work clean and free of these deposits. Simply run the Algodón Resistentes programme without a load and with the normal quantity of detergent.
This wash will take approximately 2 hours to complete.
Troubleshooting
What might be the cause of...
Defects you can remedy yourself
Before calling GIAS Service for technical advice please run through the following checklist. A charge will be made if the machine is found to be working or has been installed incorrectly or used incorrectly. If the problem persists after completing the recommended checks, please call the GIAS Service, they may be able to assist you over the telephone.
The machine will not start...
- Close the door. Check that there is power to the machine. Select a programme and press Start Pausa. Check if the door lock light is illuminated.
If it is not, check the following:
- Is the machine connected to the electrical supply?
- Is the electrical supply OK, check another socket?
- Has the fuse on the machine blown? If so, replace it.
- If the door locked light is illuminated and the machine does not start this means that the machine cannot fill with water, check the following:
- Check the programme dial is correctly aligned with the programme.
- Is the water supply to the machine switched on?
- Are the pipes kinked or restricted in any way?
Water does not drain away...
●Ensure that there is not a blockage in the drain hose or the hose is not kinked.
●Is the drain hose installed correctly? If connected to the sink waste make sure you have cut the membrane or removed the bung from the under sink drainage unit.
- Check for foreign bodies in the filter. If present, clean the filter.
If you have found any of the above problems correct them and run the machine through a spin cycle to drain the water.
Water on the floor around the washing machine...
●Is the fill hose tightened? If so, replace the rubber washers and re-tighten.
●Is the standpipe or the household drain blocked? If so, clear the blockage yourself or call a plumber.
●Is there clothing or dirt between the door gasket and the door glass?
Ensure that the door glass and gasket are kept clean and free of laundry
when loading the machine.
The machine does not spin...
●Water has not drained from the machine? Check the points highlighted above.
●Have you selected an option that changes the spin profile? Check the feature in the description of the controls.
- Is the load unbalanced? To reduce noise and vibration and improve the machine's reliability and life, the machine is fitted with an electronic sensor that detects if the load is unbalanced. To improve the spin performance the load can be re-distributed by hand at the end of the cycle and then re-spun.
The machine is noisy or vibrates a lot during the cycle...
●Has the transit system been fully removed? Check that the bracket and the polystyrene packing have been taken off the machine.
●Are there any loose items in the pockets of clothing that can rattle in the drum and cause damage?
●Is the load unbalanced? Stop the programme, re-distribute the load and restart.
The programme takes a long time...
●Some programmes do take a long time (over 2 hours). Low water pressure can increase the length of the programme.
The door will not open...
●Has the programme finished? Is the STOP light illuminated? If not the programme is not complete. Has the Seguridad Puerta light gone out? If not wait a further couple of minutes and the light will go out and you will be able to open the door.
●Has the programme finished but the door remains locked? The START and Pre Lavado light will flash intermittently indicating that the water supply has been interrupted during the wash cycle. Turn the machine to OFF to reset the machine and this will allow the door to open.
- If water remains in the drum refer to 'Water does not drain away...' above.
Problem with the dispenser...
●Not all the detergent has been flushed away.
1. Check the water supply tap is fully turned on.
2. Check the inlet hose is not kinked.
●The dispenser drawer will not close properly.
1. Check the drawer is aligned properly
- Check the drawer is not clogged with detergent (see Cleaning and Routine Maintenance)
●Steam is coming from the dispenser.
The machine is designed to vent through the drawer, this is nothing to worry about.
The clothes load is not dry...
●Was sufficient time selected to dry the clothes load? (Refer to Drying Time Guide page 21.)
●Is the wash programme selected followed automatically by a drying programme? (Refer to Programme Guide page 26/27.)
●Was the laundry correctly spun prior to drying? Select a spin programme to remove the excess water.
●Has the correct drying programme been selected? Refer to the laundry care label for guidance.
Remember, you may be charged for the service call if incorrect installation or misuse causes a problem with your machine.
Note:
The use of environmentally-friendly, phosphate-free detergents (check detergent information on pack) can have the following effects:
●Waste water from rinsing may be cloudier because of the presence of a white powder (zeolites) held in suspension, without the rinse performance being adversely affected.
●Presence of white powder on laundry after washing, which is not absorbed by the fabric and does not alter the colour of the fabric.
●The presence of foam in the final rinsing water is not necessarily an indication of poor rinsing. Carrying out more rinse cycles does not serve any purpose in such cases.
Power Failure
If there is a power failure the wash cycle will be interrupted, and the wash programme and functions will be suspended. When the power is restored, the wash programme and functions will re-start from the same point and complete the programme.
During a power failure the water can be drained and the load can be removed from the machine as follows:
- Switch off the machine both via the programme knob and the mains power supply. Remove the plug from the mains power supply socket.
- Carefully move the machine so the rear of the machine is accessible. Please follow the safety precautions which we recommend under the Safety Notes section of this manual.
- Unclip the drain hose from the rear panel of the machine and lower the hose into a bowl on the floor. When the bowl is full raise the end of the drain pipe to a height higher than the top of the appliance to stop the flow of water. Empty and replace the bowl and continue draining the machine until empty.
- Once the machine is fully drained of water, clip the hose to the rear of the machine. Open the door and remove the load.
The door can be opened approximately 2 minutes after the power failure.
Do not force open the door.



—
—
—
—
—
Introducción....39
natural_image
Pure technical line drawing of a mechanical component without any text, numbers, or symbolsnatural_image
Line drawing of a hand holding a device with arrows indicating motion (no text or symbols)natural_image
Technical line drawing of a mechanical lever or bracket with a screw and nut (no text or symbols)natural_image
Technical line drawing of a mechanical bracket with bolts and a central dot (no text or symbols)natural_image
Simple line drawing of a tool tip interacting with a circular object (no text or symbols)natural_image
Technical line drawing of a mechanical component with mounting holes and a central arrow indicating direction (no text or symbols)natural_image
Technical line drawing of a mechanical component with an inset magnified view showing a detail (no text or symbols)natural_image
Simple line drawing of a door with a knob and a circular button, no text or symbols presentInstalación
natural_image
Line drawing of a hand adjusting a pipe fitting with circular components (no text or symbols)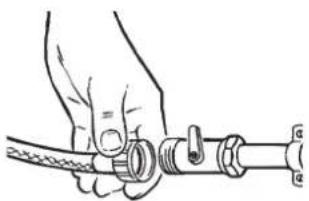
natural_image
Illustration of a hand holding a coiled cable with a valve and connector (no text or symbols)natural_image
Hand holding a small mechanical component with directional arrows indicating rotation (no text or symbols)natural_image
Technical line drawing of a mechanical component with directional arrows indicating motion (no text or symbols)natural_image
Simple line drawing of a hand gripping a piece of paper or tape (no text or symbols)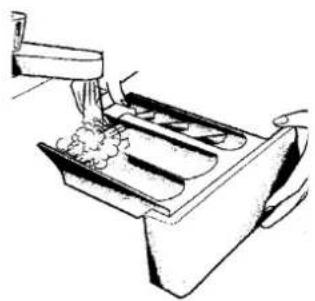
natural_image
Line drawing of a kitchen grater with a hand pouring liquid from a bowl into a tray (no text or symbols)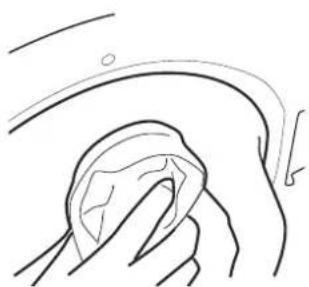
natural_image
Simple line drawing of a hand holding a cloth or towel, with no text or symbols present.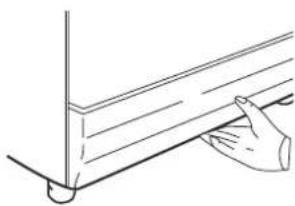
natural_image
Line drawing of a hand holding a wooden beam with a vertical support (no text or symbols)Limpieza del filtro
natural_image
Diagram of a mechanical assembly with no visible text or symbols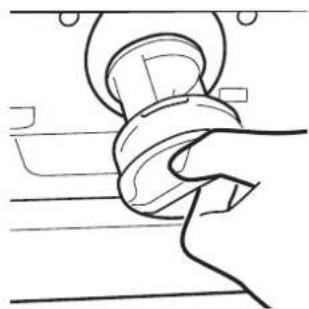
natural_image
Simple line drawing of a hand gripping a coiled cable or wire (no text or symbols)natural_image
Pure geometric lines and markers without any text, numbers, or symbols
natural_image
Pure geometric lines and markers without any text, numbers, or symbols
bar
| Value | | --------- | | 40001884 |- Introduction
- Delivery information
- Do's
- Don'ts
- Unpacking the product
- Installation
- Choose a location
- Electricity supply
- Water supply
- Connecting to the cold water supply
- Connection of the machine to the drain
- Option 1
- Waste pipe connection (waste trap)
- Option 2
- Into a standpipe
- Moving the machine into position
- Adjusting the feet
- Testing the installation
- Installation testing is now complete.
- Washing and Drying advice
- Loading your washing machine
- When is prewashing really needed?
- Which wash temperature should you choose?
- Heavily soiled laundry
- Sorting the laundry
- Items to avoid
- Recommendations
- Drying
- Sort the load for drying:
- Things to avoid
- The Dispenser
- COMPARTMENT I
- COMPARTMENT II
- COMPARTMENT
- Detergent dosage
- Dispensing instructions
- Dispensing in the drum
- Turning the machine On
- Start/Pause (Start Pausa)
- Start
- Pause (Pausa)
- Cancelling and changing the programme
- CHRONOVISION
- Wash and Dry Options
- The options should be selected BEFORE pressing the Start Pausa button
- Extra Rinse (Aclarado No Alérgias)
- Spin Reduction (Centrifuga Suave)
- Temperature Selector (Temperatur °C)
- Drying Time Guide
- Automatic Features
- Automatic Variable Capacity (Half Load)
- Out of Balance protection
- Programme Selector
- Cottons (Algodón)
- Synthetics and mixed fabrics (Sintéticos y Tejidos Mixtos)
- Rinse, Spin and Drain
- Special Programmes
- Woolmark (Lana)
- Silk (Seda)
- Sport
- "A" wash 59' (Lavado Clase A 59')
- Daily Programmes (Lavado Rápido)
- Daily 29' (Rápido 29')
- A Typical Wash and Dry Cycle
- Preparing the laundry
- Loading the laundry
- Putting detergent in machine
- Selecting the programme
- Select the required wash options
- Starting the cycle
- To test the laundry for dryness
- When the programme has finished
- Cleaning and Routine Maintenance
- Cleaning the soap dispenser
- Cleaning the door glass
- Cleaning the filter
- Maintenance wash
- Troubleshooting
- What might be the cause of...
- Defects you can remedy yourself
- The machine will not start...
- Water does not drain away...
- Water on the floor around the washing machine...
- The machine does not spin...
- The machine is noisy or vibrates a lot during the cycle...
- The programme takes a long time...
- The door will not open...
- Problem with the dispenser...
- The clothes load is not dry...
- Note:
- Power Failure
- Introducción....39
- Instalación
- Limpieza del filtro
Brand : Otsein-Hoover
Model : OHNWF 6127-37
Category : Washing machine