
XG-3785E - Video projector SHARP - Free user manual and instructions
Find the device manual for free XG-3785E SHARP in PDF.


| Product Type | Video Projector |
| Brand | Sharp |
| Model | XG-3785E |
| Display Technology | LCD |
| Resolution | XGA (1024 x 768) |
| Brightness | 3000 ANSI Lumens |
| Contrast Ratio | 2000:1 |
| Lamp Life | 3000 hours (Normal Mode) |
| Dimensions (W x H x D) | 315 x 100 x 230 mm |
| Weight | 3.5 kg |
| Power Consumption | 240 W (Standby: <1 W) |
| Inputs | VGA, Composite, S-Video, Audio |
| Outputs | VGA (Monitor Out), Audio |
| Keystone Correction | Vertical +/- 30° |
| Built-in Speaker | 2W Mono |
| Projection Distance | 1.0 - 10.0 m |
| Screen Size (diagonal) | 30 - 300 inches |
| Cleaning Instructions | Clean lens with soft cloth; avoid solvents |
| Safety Precautions | Do not look into lens; ensure proper ventilation |
| Repairability | Replaceable lamp; accessible filters |
Frequently Asked Questions - XG-3785E SHARP
User questions about XG-3785E SHARP
0 question about this device. Answer the ones you know or ask your own.
Ask a new question about this device
Download the instructions for your Video projector in PDF format for free! Find your manual XG-3785E - SHARP and take your electronic device back in hand. On this page are published all the documents necessary for the use of your device. XG-3785E by SHARP.
USER MANUAL XG-3785E SHARP
THIS COPY MUST NOT BE REMOVED FROM CEG OFFICE.
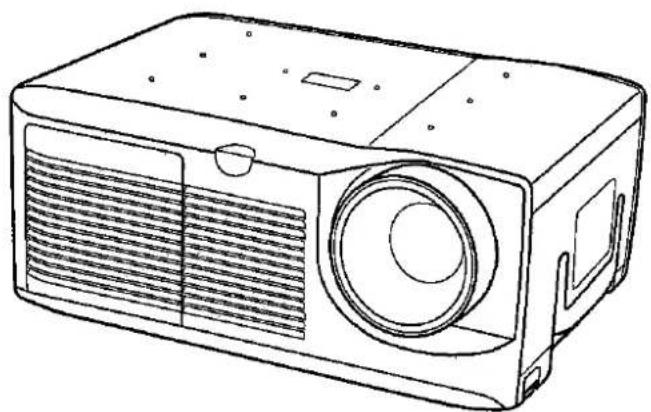
natural_image
Line drawing of a projector with ventilation grilles and front panel (no text or symbols)JADYHOT 030
2010 TOB TESN YUQI KENT SOMO SIO MOTA BINGEN
This equipment complies with the requirements of Directives 89/336/EEC and 73/23/EEC as amended by 93/68/EEC.
Welcome to the SHARP family. We are pleased that you are now the owner of a SHARP Colour LCD Projector built for outstanding quality, reliability and performance.
Every SHARP Colour LCD Projector is adjusted for a proper picture and has passed through the most stringent quality control tests at the factory. We have prepared this OPERATION MANUAL so that you have the ability to adjust the picture and colour to your personal viewing preference. We sincerely hope that you will be satisfied with the quality and performance of your Colour LCD Projector for many years to come.
Please read the instructions carefully, and keep them handy for future reference.
IMPORTANT
For your assistance in reporting the loss or theft of your colour LCD Projector, please record the Serial Number located on the rear of the projector and retain this information. The model number, power rating, and warnings are displayed on the rear of the unit.
Model No.: XG-3785E
Serial No.:
Before disposing of the packaging, please be sure that you have checked the contents of the carton thoroughly against the "Supplied Accessories" listed in the operation manual on page 25.
Important Information
WARNING

Intense light source, do not look into the beam or view it directly. Be especially careful that children do not look directly into the beam.
WARNING:
TO REDUCE THE RISK OF FIRE OR ELECTRIC SHOCK, DO NOT EXPOSE THIS APPLIANCE TO LIQUIDS.
CAUTION:
TO REDUCE THE RISK OF ELECTRIC SHOCK, DO NOT REMOVE CABINET. NO USER-SERVICEABLE PARTS ARE INSIDE. REFER SERVICING TO QUALIFIED SERVICE PERSONNEL.
Outstanding Features

natural_image
Line drawing of a projector with ventilation grilles and front panel (no text or symbols)Allows easy projection of large screen, full-colour computer and video images.
- Can be projected directly onto a video screen or white wall.
• Lightweight, convergence-free system for easy installation.
DIRECT COMPUTER COMPATIBILITY
A multi-scan RGB Input accepts signals from SVGA (800 dots × 600 lines compressed), VGA and Mac 640 dots × 480 lines maximum) compatible computers without the need for any additional hardware.
KEYSTONE FUNCTION
Actively corrects keystone distortions to provide a square picture with a correction in screen size.
HIGH PICTURE QUALITY
A single LCD panel contains 307,200 × RGB pixels to achieve exceptionally bright, high quality video images with up to 500 line doubled TV lines of resolution.
FLEXIBLE USE
- In addition to the standard front projection mode, the menu driven functions can be used to instantly reverse the image (for rear projection).
- Screen projection size adjusts from 40 to 150 inches.
BUILT-IN STEREO SPEAKERS
Built-in 5W+5W amplifiers and stereo speakers eliminate the need for external audio components.
Contents
- Important Information .... 1
- Outstanding Features.... 1
- Important Safeguards.... 3
- Location of Controls.... 4
- Remote Control Operation.... 5
- Setting Up the Projector 6
- Connecting the Projector 9
- Connecting the Projector (RGB: Computer).... 10
- Input Signals (Recommended Timing).... 12
- RGB Adjustment Controls.... 13
- Basic Operation of the Projector 14
- Adjusting the Picture 16
- Adjusting the Audio 18
• SVGA Functions 19
- Functions on the Projector 20
• Air Filter Maintenance.... 23
- Lamp/Maintenance Indicators.... 24
- Before Calling for Service.... 24
- Specifications 25
- Dimensions 26
SPECIAL NOTE FOR USERS IN THE U.K.
The mains lead of this product is fitted with a non-rewireable (moulded) plug incorporating a 13A fuse. Should the fuse need to be replaced, a BSI or ASTA approved BS 1362 fuse marked 🌐 or 🎩 and of the same rating as above, which is also indicated on the pin face of the plug, must be used.
Always refit the fuse cover after replacing the fuse. Never use the plug without the fuse cover fitted.
In the unlikely event of the socket outlet in your home not being compatible with the plug supplied, cut off the mains plug and fit an appropriate type.
DANGER: The fuse from the cut-off plug should be removed and the cut-off plug destroyed immediately and disposed of in a safe manner.
Under no circumstances should the cut-off plug be inserted elsewhere into a 13A socket outlet, as a serious electric shock may occur.
To fit an appropriate plug to the mains lead, follow the instructions below:
IMPORTANT: The wires in the mains lead are coloured in accordance with the following code:
Blue : Neutral
Brown: Live
As the colours of the wires in the mains lead of this product may not correspond with the coloured markings identifying the terminals in your plug, proceed as follows:
- The wire which is coloured blue must be connected to the plug terminal which is marked N or coloured black.
- The wire which is coloured brown must be connected to the plug terminal which is marked L or coloured red.
Ensure that neither the brown nor the blue wire is connected to the earth terminal in your three-pin plug.
Before replacing the plug cover make sure that:
- If the new fitted plug contains a fuse, its value is the same as that removed from the cut-off plug.
- The cord grip is clamped over the sheath of the mains lead, and not simply over the lead wires.
IF YOU HAVE ANY DOUBT, CONSULT A QUALIFIED ELECTRICIAN.
ATTENTION: Please read all of these instructions before you operate your LCD Projector for the first time. Save these instructions for future reference.
For your own protection and prolonged operation of your LCD Projector, be sure to read the following "Important Safeguards" carefully, before use.
This projector has been engineered and manufactured to ensure your personal safety. But IMPROPER USE CAN RESULT IN POTENTIAL ELECTRICAL SHOCK OR FIRE HAZARDS. In order not to defeat the safeguards incorporated into this LCD Projector, observe the following basic rules for its installation, use and servicing.
1 Unplug the LCD Projector from the wall outlet before cleaning.
2 Do not use liquid cleaners or aerosol cleaners. Use a damp cloth for cleaning.
3 Do not use attachments not recommended by the LCD Projector manufacturer, as they may cause hazards.
4 Do not use the LCD Projector near water; for example, near a bathtub, washbowl, kitchen sink, laundry tub, in a wet basement, near a swimming pool, etc. Never spill liquid into the projector.
5 Do not place the LCD Projector on an unstable cart, stand, or table. The LCD Projector may fall, which may cause serious injury to a child or an adult, and/or serious damage to the unit.
6 LCD Projector equipment and cart combinations should be moved with care.
Quick stops, excessive force, and uneven surfaces may cause the equipment and cart combination to overturn.

natural_image
Silhouette of a person climbing a ladder inside a circular frame with a diagonal line (no text or symbols)7 To ensure reliable operation of the LCD Projector and to protect it from overheating, these openings must not be blocked or covered. Slots and openings in the cabinet back and bottom are provided for ventilation.
8 The openings should never be covered with cloth or other material. This LCD Projector should never be placed near or over a radiator or heating vent. The LCD Projector should not be placed in a built-in installation such as a bookcase unless proper ventilation is provided.
9 The LCD Projector should be operated only from the type of power source indicated on the back of the projector or in the specifications. If you are not sure of the type of power supplied to your home, consult your LCD Projector dealer or local power company.
10 Do not place the LCD Projector where the cord will be abused by persons walking on it.
11 Follow all warnings and instructions marked on the LCD Projector.
12 To prevent damage to the projector due to lightning and power-line surges, unplug the projector from the power outlet, when not in use.
13 Do not overload wall outlets and extension cords with too many products, because this can result in fire or electric shock.
14 Never push objects of any kind into the LCD Projector through the cabinet slots as they may touch high-voltage points or cause a short circuit. This could result in a fire or electric shock.
15 Do not attempt to service the LCD Projector yourself. Opening or removing covers may expose you to dangerous voltage or other hazards. Refer all servicing to qualified service personnel.
16 Unplug the LCD Projector equipment from the wall outlet and refer servicing to qualified service personnel under the following conditions:
A. When the power cord or plug is damaged or frayed.
B. If liquid has been spilled into the LCD Projector.
C. If the LCD Projector has been exposed to rain or water.
D. If the LCD Projector does not operate normally when you follow the operating instructions. Adjust only those controls that are covered by the operating instructions, as improper adjustment of other controls may cause damage and will often require extensive work by a qualified technician to restore the LCD Projector to normal operation.
E. If the LCD Projector has been dropped or the cabinet has been damaged.
F. When the LCD Projector exhibits a distinct change in performance — this indicates a need for service.
17 When replacement parts are required, be sure the service technician has used replacement parts specified by the manufacturer that have the same characteristics as the original parts. Unauthorized substitutions may result in fire, electric shock, or other hazards.

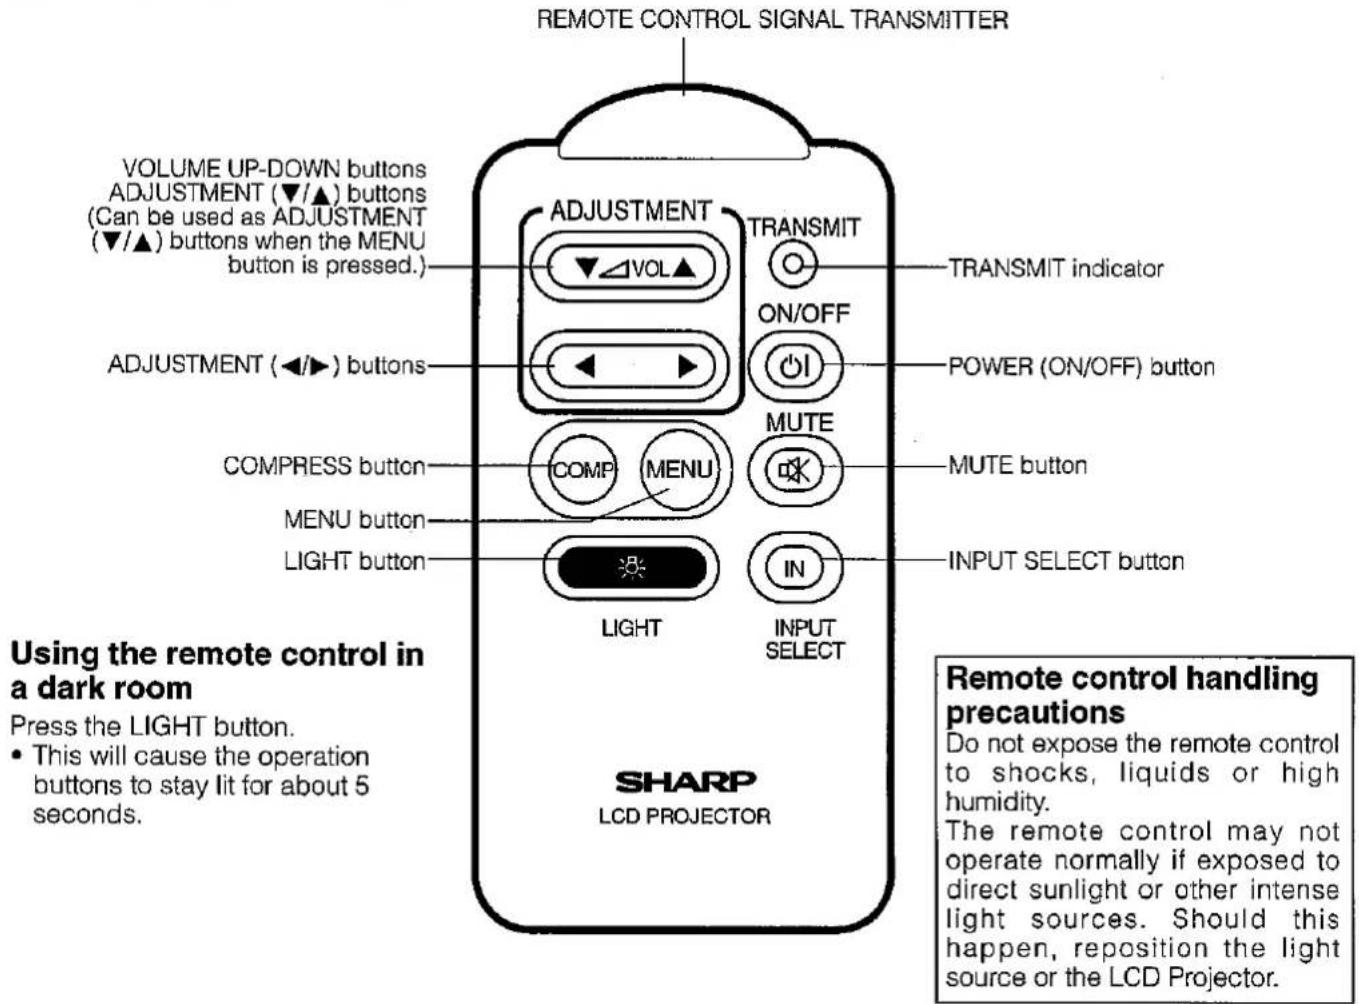
REMOTE CONTROL

Inserting the Batteries
Remove the battery cover as shown and insert two AAA size batteries making sure the polarity matches the (+) and (−) marks inside the battery compartment.
Notes:
Incorrect use of batteries may cause them to leak or burst.
- Insert the batteries with the (+) and (-) polarities as indicated.
- Remove the batteries if the remote control will not be operated for an extended period of time.
- Maintain the batteries in clean condition.
- Do not mix different brands of batteries. The life expectancy of the new batteries will be shortened and the old batteries may leak.
- When the batteries have been used up, remove them immediately to prevent leakage and damage. Leaked battery fluid may irritate the skin. Remove any battery fluid by wiping with a cloth.
- Due to storage conditions and the shelf life of the supplied batteries, they may run out after a short time. Replace them with new batteries as soon as possible.

Remote control positioning
Use the remote control as shown in the figures on the left.
Note:
- The signal from the remote control can be reflected off the screen for easy operation. However, the effective distance of the signal may differ due to the screen material.
Projector Distance and Picture Size Relationship
This projector has a fixed-focus lens.
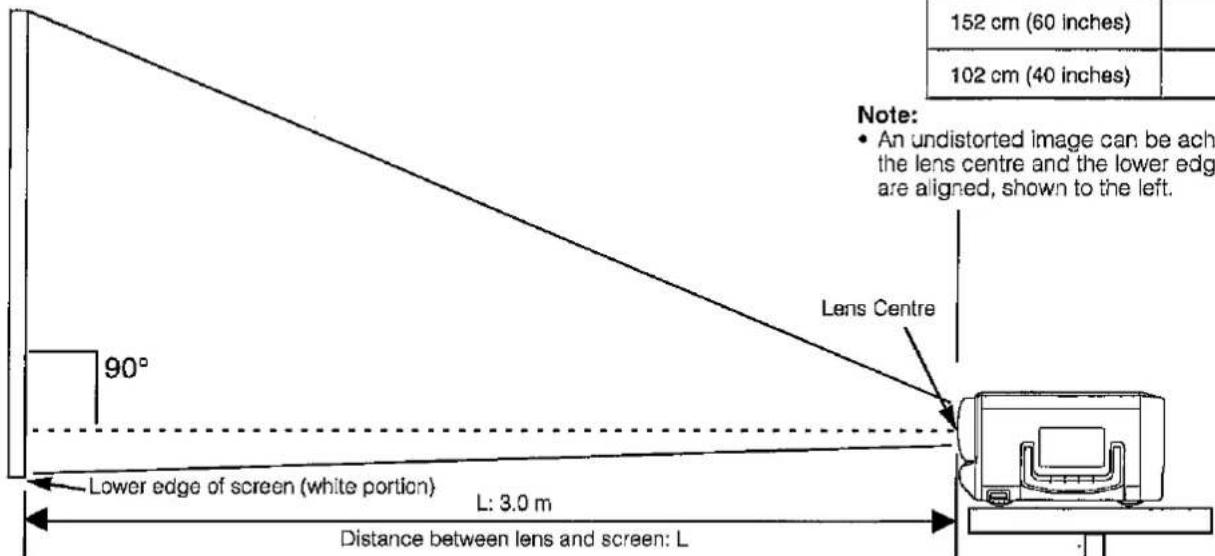
Refer to the diagram below to determine the picture size and projection distance.
The picture can be focused when the projector is within 1.3 m to 4.4 m of the screen. Please set up the projector within this range.
Distance from screen
Picture size: 254 cm (100 inches)
| Picture size (dieg.) | Projection distance (L) |
| 381 cm (150 inches) | 4.4 m |
| 254 cm (100 inches) | 3.0 m |
| 203 cm (80 inches) | 2.4 m |
| 152 cm (60 inches) | 1.9 m |
| 102 cm (40 inches) | 1.3 m |
Note:
- An undistorted image can be achieved when the lens centre and the lower edge of screen are aligned, shown to the left.
- Above is an illustration of projection distance for the XG-3785E with a picture size of 254 cm (100 inches).
Height of projector
This projector is equipped with a Keystone adjustment function that lets you adjust the projection height without moving the projector.
■ Adjust to match the setup configuration.
| Picture size (diag.) | Distance from lens centre to lower edge of screen (H) | |
| Upper position | Lower position | |
| 150 inches | 56 cm | -21 cm |
| 100 inches | 38 cm | -15 cm |
| 80 inches | 30 cm | -12 cm |
| 60 inches | 23 cm | -8 cm |
| 40 inches | 15 cm | -6 cm |
Picture size: 254 cm (100 inches)

How to set up the projector and screen
Caution: When setting up the projector
- Do not place it in humid or dusty places, or places where the air is scoty or full of cigarette smoke. If the lens, mirror, or other optical components become dirty, the picture will blur or darken, making viewing difficult.
- Do not expose to extreme heat or cold.
Operating temperature: 5°C to 40°C
Storage temperature: -20°C to 60°C - Do not tilt the projector more than 10^ .
■ Position the screen so that it is not in direct sunlight or room light. Light falling directly onto the screen washes out colours, making viewing difficult. Close the curtains and dim the lights when using the screen in a bright or sunny room.
The best picture will be obtained when the projector is at a 90 degree angle to the screen. Position the projector and screen as shown.
Example of a standard setup
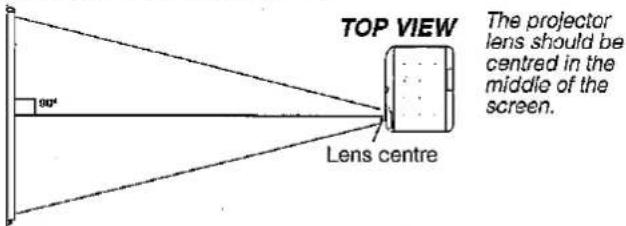

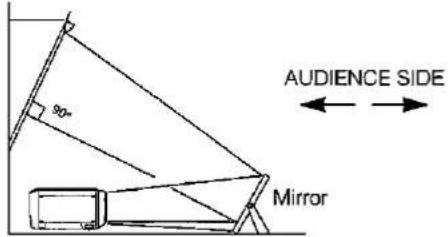
■ Using the horizontal reverse function makes the following setups possible.
Example of a reversed image setup
- By placing a mirror (normal flat type) in front of the lens and using the reverse function, the image reflected from the mirror can be projected onto the screen. (See GB-21.)
- Rear projection with a rear projection screen is also possible when using the reverse function.
The projector lens should be centred in the middle of the screen.

If the projector and screen are not centred properly, the picture will be distorted, making viewing difficult.
Using the Focus, Keystone and Size Correction Functions
■ Focus, Keystone and Reversed Image mode functions broaden your options for projector placement.
■ See pages 6 and 7 for details on projector setup.
2
natural_image
Line drawing of a projector with a circular lens and ventilation grille (no text or symbols)1. Turn ON the POWER.
See page 14 for turning on the power.
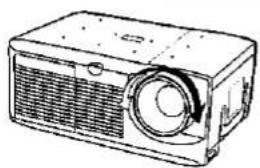
2. Adjusting the Focus
Rotate the focus ring until the top portion of the screen is in focus.
3
flowchart
graph TD
    A["KEYSTONE"] --> B["SIDE CORRECTION"]
    B --> C["Device 1"]
    B --> D["Device 2"]
    B --> E["Device 3"]
    C --> F["Output"]
    D --> G["Output"]
    E --> H["Output"]
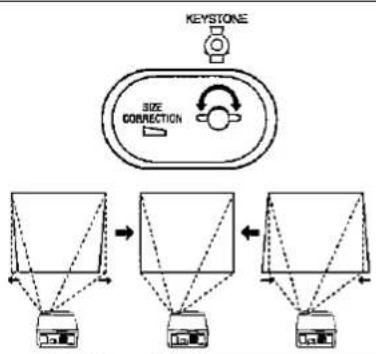
3. Controlling keystone effects
This projector allows you to fix uneven screen images of up to approximately 10° due to projector or screen positioning.
- Rotate the KEYSTONE/SIZE CORRECTION knob to the right or left to widen or shorten the bottom portion of the screen.
4

4. Correcting the picture size
Move the KEYSTONE/SIZE CORRECTION knob.
- Slide it to the left to enlarge the picture size or decrease the projection distance.
- Slide it to the right to decrease the picture size or increase the projection distance.
Note:
- This function allows you to correct the screen size up to approximately 10% after adjusting the Keystone effects.
Adjusting the Height of the Picture

1

natural_image
Illustration of a projector with arrows indicating force or movement (no text or symbols)2
natural_image
Illustration of a projector with two legs and a screen, showing bidirectional arrows indicating motion (no text or symbols)3

natural_image
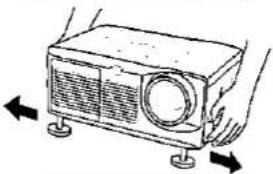
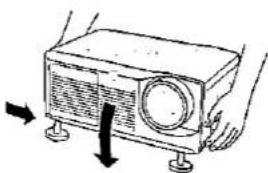
Illustration of a projector with two hands holding it, showing a circular lens and base mount (no text or symbols)- Use the adjuster release to adjust the angle of the projector and height of the picture. Minor adjustments can be made with the adjusters.
- Press the adjuster release and lift the projector to the desired angle with both hands.
- The adjuster legs will extend to the surface of the table.
- Remove your hand from the adjuster release.
- The adjuster legs will lock in position. Release the projector once you are sure the adjuster legs have locked in position.
- Make any minor adjustments necessary.
- Turn the adjusters to further adjust the angle of the projector.
Returning the projector to its original position
- While holding the projector with both hands, press the adjuster release and slowly lower the projector to its original position.
Notes:
- When adjustments are made with the adjusters, the picture may become distorted, depending on the relative positions of the projector and the screen.
- After adjusting, in some cases, all of the adjusters' feet may not be resting on the mounting surface. To prevent the projector from wobbling, adjust the adjusters' feet so that they firmly contact the mounting surface.
Cautions:
- Do not press the adjuster release when the adjuster legs are extended without firmly holding the projector.
- When lowering the projector, be careful not to get your fingers caught in the area between the adjusters and the projector.
- Do not hold the lens when lifting or lowering the projector.
Transporting the Projector
Use the carrying handle when moving the projector
When transporting the projector, carry it by the handle located on the side of the unit.
Note:
When transporting the projector, always put on the lens cap to prevent damage to the lens.
Caution:
Do not lift or carry the projector by the lens.

natural_image
Simple line drawing of a hand pressing down on a rectangular object with dots, no text or symbols presentRear terminals

To watch video playback with the projector connected to audio/video output equipment, such as a VCR or Laser Disc Player, or to view on a separate monitor:
- Always turn off the LCD Projector while connecting to video equipment, in order to protect both the projector and the equipment being connected.
Note the following when using the S-VIDEO INPUT terminal:
- The S-VIDEO INPUT terminal uses a video signal system in which the picture is separated into a color and a luminance signal to realize a higher-quality picture.
- The S-VIDEO INPUT terminal has priority over the VIDEO INPUT terminal. Make the audio connection via the VIDEO INPUT audio terminals (left/right).
- The S-VIDEO INPUT terminal is used when the AV equipment to be connected has an S-VIDEO output terminal.
• VIDEO OUT does not function when AV equipment is connected to the S-VIDEO INPUT terminal.
Note:
- By using the external amplifier, the volume can be amplified for greater sound.
1

You can connect your projector to a computer for easy projection of full-colour computer images, or an external monitor for simultaneous viewing.
Before connecting, be sure to turn both the projector and the computer off.
After making all connections, turn the projector on first. The computer should always be turned on last.
1. Connecting to an IBM-PC (VGA, SVGA) Series computer — 800 x 600 maximum resolution
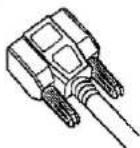
Plug the VGA signal cable correctly into the RGB INPUT terminal on the projector and into the RGB signal output terminal on the computer, and secure the plugs by tightening the thumb screws.
Note:
- This connection is possible only when using a computer with a VGA/SVGA or Mac display output port.
20
Macintosh
RGB Signal
Output Socket
MacVGA Adaptor (Supplied)

2
Rear view of the projector
RGB Signal
Input Socket
RGB Signal Output Socket

ANALOG
RGB OUT
VGA Signal Cable (Supplied)
2. Connecting to a Macintosh Series Computer
- 640 x 480 resolution
① First, connect the supplied Mac/VGA adaptor to the RGB signal output terminal on your Macintosh Series computer, as shown on the left, and secure the plugs.
② Next, firmly plug the supplied VGA signal cable into both the RGB input terminal on the projector and the Mac/VGA adaptor on the computer, and secure the plugs by tightening the thumb screws.
3. Connecting to other compatible computers
When connecting the projector to a compatible computer other than an IBM-PC (VGA/SVGA) or Macintosh series, a separate cable is needed. Please contact your dealer for ordering information.
Notes:
- Connection to computers other than the recommended types may result in damage to the projector, the computer, or both.
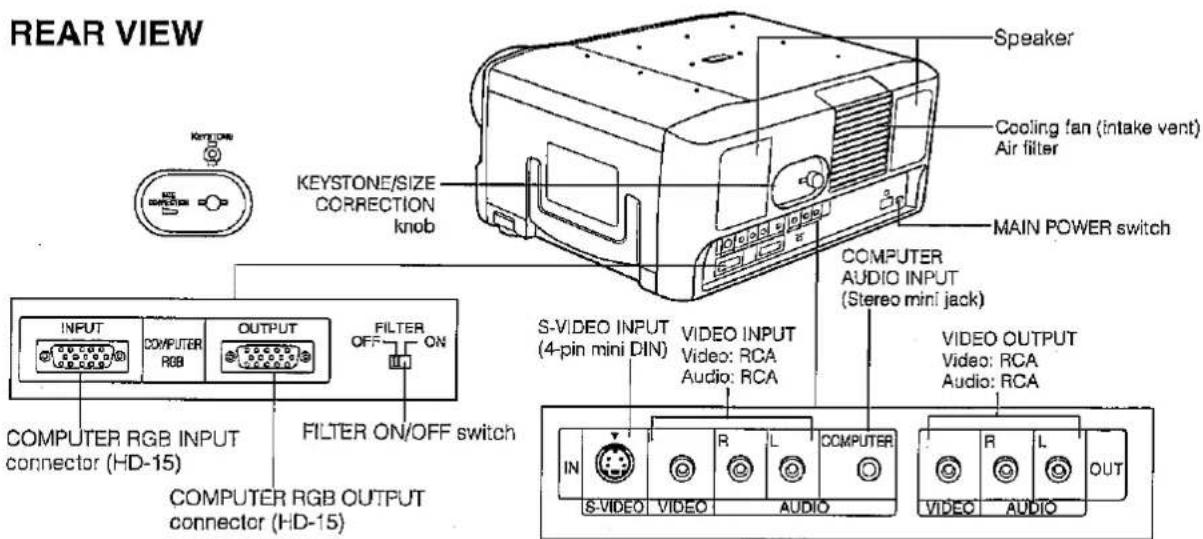
- Connect the audio from the computer to the COMPUTER AUDIO INPUT terminal.

flowchart
graph TD
    A["INPUT"] --> B["COMPUTER RGB"]
    B --> C["CUTPUT"]
    C --> D["FILTER OFF"]
    D --> E["ON"]
    F["External IBM-PC monitor"] --> G["Direct connection"]
    G --> H["or"]
    H --> I["Optional VGA/Mac adaptor cable"]
    I --> J["External Macintosh monitor"]
4. External monitor connection
Connect your computer monitor to the projector's COMPUTER RGB OUTPUT terminal to view images simultaneously on the external monitor and the projection screen.
Caution (Apple Macintosh)
Do not connect the COMPUTER RGB OUTPUT to any monitor except the following:
Apple Colour RGB Monitor: 13"/14" (640 x 480)
Note:
- When using the projector with an external IBM-PC monitor, connect the monitor using the supplied cable. When using the projector with a Macintosh monitor, an optional adaptor cable is required. Before using any other type of monitor, carefully check the monitor's interface specifications and make sure that they match the specifications of the projector's interface.
The external monitor output will only display an analog computer input signal. It will not display a digital or video input signal. To split the composite video signal, use a video distribution amplifier. This is available from your local dealer.
The computer RGB output will only loop through the same signal connected to the computer RGB input.
(VGA IN → VGA OUT, Mac IN → Mac OUT)
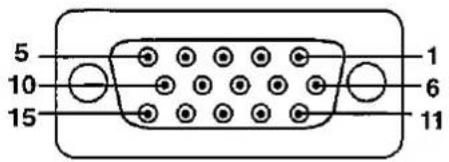
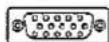
Analog RGB Signal Input and Output Connector
This unit uses a 15-pin mini D-sub female connector. Pin assignment is as shown on the left.
Computer Input
Analog
- Video input (red)
- Video input
(grean) - Video input
(blue) - Reserve input 1
- Composite sync
(Mac only) - Earth (red)
-
Earth (green)
-
Earth (blue)
- GND
- GND
- GND
- Reserve input 2
- Horizontal sync
signal - Vertical sync
signal - Réserve input 3
For IBM and Compatibles
Input signals: The video output signal timing of different types of video signals are shown below for reference.

For Apple Macintosh Series

| MODE | IBM | IBM | IBM | IBM | IBM | IBM | Apple | Apple | |||||||
| VGA | VESA | SVGA | SVGA | SVGA | SVGA | MacintoshTM Iisi | MacintoshTM LC | ||||||||
| TEXT | Graphic | Graphlc | Graphic | VESA Guideline | VESA Standard | VESA Standard | 13" Monitor | 13" Monitor | |||||||
| 720 dot | 640 dot | 640 dot | 800 dot | 800 dot | 800 dot | 800 dot | 640 dot | 640 dot | |||||||
| 550 line | 400 line | 350 line | 400 line | 480 line | 480 line | 600 line | 600 line | 600 line | 600 line | 480 line | 480 line | ||||
| VIDEO - | LEVEL | 0.7Vp-p 75Ω load | 0.7Vp-p 75Ω load | 0.7Vp-p 75Ω load | 0.7Vp-p 75Ω load | 0.7Vp-p 75Ω load | 0.7Vp-p 75Ω load | 1Vp-p max. 75Ω load | 0.7Vp-p max. 75Ω load | ||||||
| TYPE | R·G·B | R·G·B | R·G·B | R·G·B | R·G·B | R·G·B | R·G·B C.SYNC | R·G·B C.SYNC | |||||||
| HSYNC | FRONT PORCH a | dot | 17 | 14 | 24 | 24 | 40 | 56 | 16 | 64 | 78 | ||||
| SYNC b | dot | 106 | 96 | 40 | 72 | 128 | 120 | 80 | 64 | 62 | |||||
| BACK PORCH c | dot | 55 | 50 | 128 | 128 | 88 | 64 | 160 | 96 | 116 | |||||
| VIDEO PERIOD d | dot | 720 | 640 | 640 | 800 | 800 | 800 | 800 | 640 | 640 | |||||
| 1H (a+b+c+d) | dot | 900 | 800 | 832 | 1,024 | 1,056 | 1,040 | 1,056 | 864 | 896 | |||||
| μs | 31.7774 | 31.7776 | 26.413 | 28.444 | 26.400 | 20.800 | 21.333 | 28.5714 | 28.595 | ||||||
| 1 dot | ns | 35.3082 | 39.7219 | 31.746 | 27.777 | 25.000 | 20.000 | 20.202 | 33.0688 | 31.914063 | |||||
| 1/H | kHz | 31.4689 | 31.4688 | 37.860 | 35.156 | 37.879 | 48.077 | 46.875 | 35.0000 | 34.971149 | |||||
| 1/dot | MHz | 28.322 | 25.175 | 31.500 | 36.000 | 40.000 | 50.000 | 49.500 | 30.2400 | 31.334149 | |||||
| LEVEL | TTL | TTL | TTL | TTL | TTL | TTL | TTL | TTL | TTL | TTL | |||||
| SYNC POLARITY | +/- | + | - | + | - | - | - | +/- | + | + | + | - | - | ||
| VSYNC | FRONT PORCH w | H | 38 | 13 | 38 | 13 | 11 | 9 | 1 | 1 | 37 | 1 | 3 | 3 | |
| SYNC x | H | 2 | 2 | 2 | 2 | 2 | 3 | 2 | 4 | 6 | 3 | 3 | 3 | ||
| BACK PORCH y | H | 59 | 34 | 59 | 34 | 32 | 28 | 22 | 23 | 23 | 21 | 39 | 39 | ||
| VIDEO PERIOD z | H | 350 | 400 | 350 | 400 | 480 | 480 | 600 | 600 | 600 | 600 | 480 | 480 | ||
| 1V (w+x+y+z) | H | 449 | 449 | 449 | 449 | 525 | 520 | 625 | 628 | 666 | 625 | 525 | 525 | ||
| ms | 14.2681 | 14.2681 | 14.2681 | 14.2681 | 16.6832 | 13.735 | 17.776 | 16.579 | 13.853 | 13.333 | 15.00 | 15.00 | |||
| 1/v | Hz | 70.0866 | 70.0866 | 70.0863 | 70.0863 | 59.9405 | 72.809 | 56.250 | 60.317 | 72.188 | 75.000 | 66.67 | 66.67 | ||
| LEVEL | TTL | TTL | TTL | TTL | TTL | TTL | TTL | TTL | TTL | TTL | TTL | TTL | |||
| SYNC POLARITY | +/- | - | + | - | + | - | - | +/- | + | + | + | - | - | ||
Notes:
- When connecting a notebook to the data-projector for display on a (800 x 600) LCD screen, the screen may not show a full picture image. See page GB-17 "Computer Mode Memory Adjustments" for details.
- This projector may not be able to display images from notebook computers in simultaneous (CRT/LCD) mode. If this occurs, turn off the LCD display on the notebook computer and output the display data in "CRT only" mode. Details on how to change display modes can be found in your notebook computer's operation manual.
2

When displaying computer patterns which repeat every other dot (tiling, vertical stripes, etc.), interference may occur between the LCD pixels, causing flickering, vertical stripes, or contrast irregularities in portions of the screen. Should this occur, use the ADJUSTMENT ◀/▶ buttons on the remote control for HORIZONTAL (LEFT/RIGHT) and VERTICAL (UP/DOWN) POSITION ADJUSTMENTS to adjust for the optimum picture.
RGB INPUT ADJUSTMENTS (CLOCK, PHASE, V-POS and H-POS)
1. Select RGB with the INPUT SELECT button on the remote control and press the MENU button to select the RGB INPUT ADJ. mode.
With the MENU screen displayed, press the ▼/▲ buttons to select RGB INPUT ADJ. Then press the MENU button to display the RGB INPUT ADJ. screen.
2. Select the item you wish to adjust with the ▼/▲ buttons. Adjust the item with the ◀/▶ buttons.
3. Press the MENU button anytime to exit RGB INPUT ADJ.
Description of Adjustment Items
INITIAL RESET
- Used to reset the H-POS, V-POS, PHASE and CLOCK adjustments to their initial settings.
MODE ADJUSTMENT
Connecting to IBM-PC Computers
- Ordinarily, the type of input signal is detected and the correct resolution mode (Text or Graphics) is automatically selected. However, for the following signals, set MODE to ON or OFF to select the projector's resolution mode to match the computer display mode properly. 720 dots × 400 lines, 720 dots × 350 lines (Text Mode) 640 dots × 400 lines, 640 dots × 350 lines (Graphic Mode)
- For graphic mode, select MODE and set the MODE to ON.
- For text mode, select MODE again at this time, and set MODE to OFF. Connecting to Macintosh LC/II Series Computers
- When connecting to a Macintosh II with 30.24 MHz Dot Frequency, select MODE and set MODE to ON.
- When connecting to a Macintosh LC Series computer with 31.33 MHz Dot Frequency, set MODE to OFF.
- When connecting to third party video cards and other Macintosh computers, set MODE to ON or OFF to select the correct display mode.
- When the input signal is automatically detected or when there is no input signal, MODE (---) appears on the screen and the display mode cannot be changed.
PHASE ADJUSTMENT (UP/DOWN)
• Used to reduce image distortion or improve contrast.
HORIZONTAL POSITION ADJUSTMENT (LEFT/RIGHT)
- If on-screen images are too far to the left or right, they can be moved to the centre.
VERTICAL POSITION ADJUSTMENT (UP/DOWN)
- If on-screen images are too high or low, they can be moved to the center.
CLOCK SPEED ADJUSTMENT (FAST/SLOW)
• Used to reduce image distortion or improve contrast.
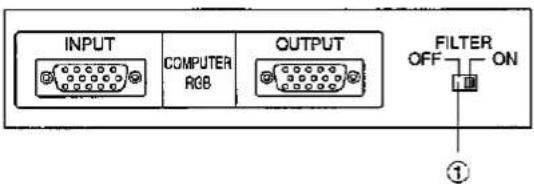
INPUT ADJUSTMENT
① Filter switch
In the case of very detailed computer patterns which repeat every other dot (tiling, vertical stripes, etc.), noise may appear on the screen. Should this occur, set the FILTER switch to ON. The pattern area will balance, and the noise will be reduced.
Notes:
1) Flickering, vertical stripes, or contrast irregularities may also occur when the image is reversed. Once again, use the ADJUSTMENT ◀/▶ buttons on the remote control for HORIZONTAL (LEFT/RIGHT) and VERTICAL POSITION ADJUSTMENTS (UP/DOWN) to adjust for the optimum picture.
2) Avoid displaying computer patterns which repeat every other line (horizontal stripes). (Flickering will occur, making the picture hard to see.)
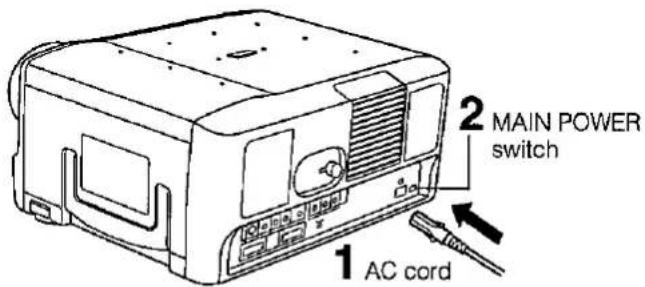
1. Connecting the AC cord
Connect the supplied AC cord to the socket.
2


3
Projector
ON/OFF

Remote control
ON/OFF


On-Screen Display

2. Turn ON the MAIN POWER.
Press the MAIN POWER switch on the rear of the projector. The POWER indicator lights red and the projector enters STANDBY mode.
3. Turn ON the POWER.
Press the POWER button on the projector or the remote control.
- When the power is turned off by pressing the POWER (ON/OFF) button, the POWER indicator will not turn off until the fan has stopped running.
• See page 24, "Lamp/Maintenance Indicators", for details.
Notes:
- When the POWER indicator is not lit, the remote control cannot be used to operate the projector.
- If the power is turned on immediately after it has been turned off, it may take a short while before the lamp turns on. (During this period the LAMP REPLACEMENT indicator flashes.)
- After the projector is unpacked and turned on for the first time, a slight odour may be emitted from the exhaust fan. This odour will disappear with use.
4. ON-SCREEN DISPLAY in 8 languages
The on-screen display is set to English at the factory. The language for the unit's ON-SCREEN DISPLAY can be set to English, German, Spanish, Dutch, Swedish, Italian, French or Japanese.
- Setting the ON-SCREEN DISPLAY language
1) Press the MENU button. The menu will appear on the screen.
2) Press the ADJUSTMENT ▼/▲ buttons until the ▶ mark is set to "LANGUAGE".
Press the MENU button to display the language menu.
3) Press the ADJUSTMENT ▼/▲ buttons until the ▶ mark matches the language desired, and then press the MENU button to set the language. The ON-SCREEN DISPLAY is now programmed to display in the language chosen.

flowchart
graph TD
    A["On-Screen Display"] --> B["VIDEO N358"]
    B --> C["RGB 500 x 600 72Hz"]
    C --> D["COMPUTER RGB"]
    D --> E["RGB 800 x 600 72Hz"]
    D --> F["RGB 640 x 480 60Hz"]
    G["Mac"] --> H["RGB 640 x 480 35 KHz"]
    G --> I["RGB 640 x 480 34.97 KHz"]

flowchart
graph TD
    A["The number of displayed segments increases or decreases as the volume is raised or lowered."] --> B["VOLUME"]
    B --> C["MUTE"]

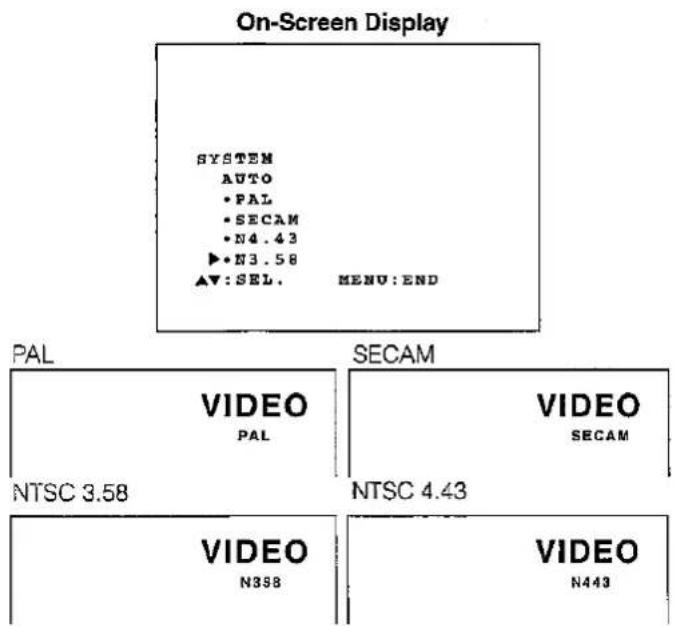
5. Changing the system mode
The video input system mode is set to AUTO at the factory, but it can be changed to a different mode.
1) Press the MENU button. The menu will appear on the screen.
2) Press the ADJUSTMENT ▼/▲ buttons until the ▶ mark is set to "SYSTEM".
Press the MENU button to display the system menu.
3) Press the ADJUSTMENT ▼/▲ buttons until the ▶ mark matches the video system desired and then press the MENU button to set the system.
Note:
- in AUTO mode, "PAL", "SECAM", "NTSC4.43" or "NTSC3.58" is displayed on the screen for a few seconds when the mode is charged with the INPUT SELECT button.
6. Select input.
Press the INPUT SELECT button to switch the picture input. When you press the button, the current input mode is displayed for about 4 seconds. If you press the button again while the input mode is displayed, the mode changes as shown on the left.
Confirm the selected input terminal, then press the INPUT SELECT button.
Notes:
- In VIDEO mode, the system being received will be indicated below the "VIDEO" display.
- When selecting RGB mode, the resolution being displayed will be indicated under "RGB," as shown on the left. (Refer to second example when connecting to Mac display.)
- When no signal is being received, "NO SIGNAL" will be displayed. When receiving a signal the projector is not preset to receive, "NON REG." will be displayed. (This display function does not operate in Video mode.)
7. Adjust the volume.
Press the Volume Up-Down buttons on the projector or on the remote control to adjust the volumes.
MUTE
- Press the MUTE button to temporarily turn off the sound.
- Press the button once again to turn the sound back on.
8. Turning off the power from the projector or remote control
The power can be temporarily turned off by pressing the POWER button on either the projector or remote control.
After the POWER indicator lights red and the cooling fan runs for 90 seconds, the power will turn off, and the projector will return to STANDBY mode.
The power can be turned on again either from the projector or remote control. When the power is turned on, the POWER indicator and LAMP REPLACEMENT indicator light green.
NOTE:
- When the MAIN POWER is off on the projector set, the power cannot be turned on from the remote control.
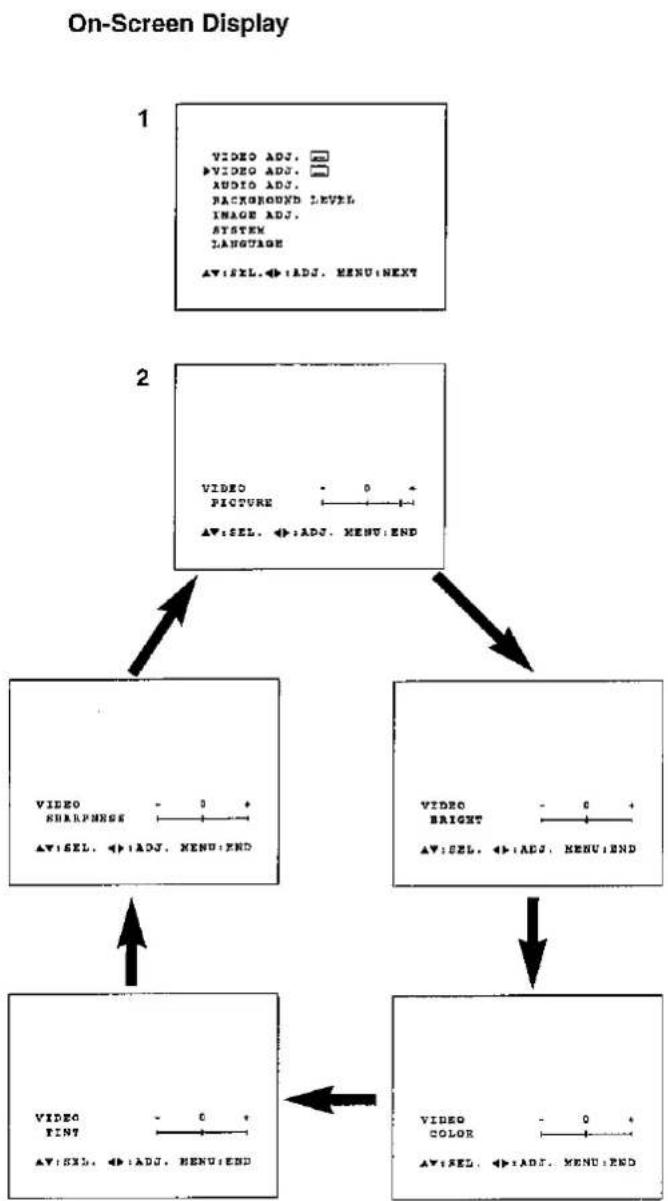
flowchart
graph TD
    A["1: VIDEO ADJ. 📄"] --> B["2: VIDEO PICTURE 📋:0 +"]
    B --> C["2: VIDEO SHARPNESS 📋:0 +"]
    C --> D["2: VIDEO TINT 📋:0 +"]
    D --> E["2: VIDEO COLOR 📋:0 +"]
    E --> F["2: VIDEO SEL 📋:ADJ. MENU:END"]
    F --> G["2: VIDEO BRIGHT 📋:6 +"]
    G --> H["2: VIDEO RESET 📋:ADJ. MENU:END"]
    H --> I["2: VIDEO RESET 📋:ADJ. MENU:END"]
• TINT: NTSC only
- This projector's picture is factory preset to standard settings. However, you can adjust it to suit your own preferences with the ADJUSTMENT buttons on the projector and the remote control.
- The adjustment can be memorized in VIDEO or RGB separately.
- Five picture modes can be adjusted: "PICTURE", "BRIGHT", "COLOR", "TINT" and "SHARPNESS".
Adjusting the Picture
1. Use the MENU button to select the mode to be adjusted.
- When the MENU button is pressed, the MENU mode is indicated for about 30 seconds. Press the ADJUSTMENT ▼/▲ buttons to select "VIDEO ADJ.☐", then press the MENU button.
2. Press the ADJUSTMENT ◀/▶ buttons.
- If the ADJUSTMENT ▼/▲ buttons are pressed while the mode is indicated on the screen, the MENU mode changes as shown.
- When the ADJUSTMENT (◀) or (▶) buttons are pressed while the mode you want to adjust is indicated, the "○" mark, which indicates the adjustment setting, can be moved.
- The adjustment mode is indicated for about 10 seconds.
Description of Adjustment Items
| Selected item | ADJUSTMENT ◀ button | ADJUSTMENT ► button |
| PICTURE | To decrease contrast | To increase contrast |
| BRIGHT | For less brightness | For more brightness |
| COLOR | For less colour intensity | For more colour intensity |
| TINT | Skin tones become purplish | Skin tones become greenish |
| SHARPNESS | For less sharpness | For more sharpness |
| RED | For weaker red | For stronger red |
| BLUE | For weaker blue | For stronger blue |
| RESET | All Video RGB Adjustment items are returned to the factory preset settings.Note:To reset all adjustment items, select RESET in "ADJ. [IMAGE]" mode. | |
On-Screen Display
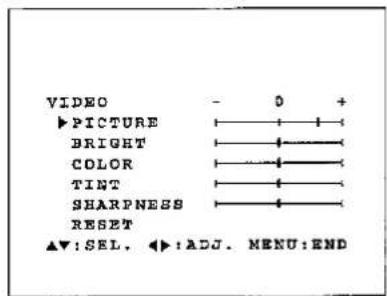
- TINT: NTSC only
When video mode is selected.
Notes:
- When an RGB signal input has been selected, only "PICTURE" "BRIGHT" "RED" and "BLUE" can be adjusted.
• TINT only appears in NTSC mode.
3. Press the MENU button anytime to exit VIDEO ADJ.
Checking Picture Adjustments
When the MENU button is pressed, the MENU mode is indicated for about 30 seconds. Press the ADJUSTMENT ▼/▲ buttons to select "VIDEO ADJ." , then press the MENU button.
- Each time you press the ADJUSTMENT ▼/▲ buttons while the display is shown, the ▶ mark will move to indicate the selected video status item for adjustment.
- When the ADJUSTMENT (◀) or (▶) buttons are pressed, the "○" mark moves.
• The adjustment mode is indicated for about 30 seconds.
Computer Mode Memory Adjustments
- The projector has been preset with different modes for use with VGA and other compatible computers. However, 2 memory positions are provided to store mode adjustments.
• Each memory position can be used to store mode adjustments to match the computer.
1 When RGB is selected.

1. Press the MENU button to select the Memory Adjustment mode.
- Press the MENU button. While the MENU screen is displayed, press the ADJUSTMENT ▼/▲ buttons to select "RGB ADJ." Press the MENU button. The MENU mode changes as shown.
- While the RGB adjustment menu is displayed, press the ADJUSTMENT ▼/▲ buttons to select "MEMORY SELECT", then press the ADJUSTMENT ◀/▶ buttons to select ON, and press the MENU button to change the image.
2

2. Press the ADJUSTMENT ◀/▶ buttons.
- There are 2 memory positions. Press the ADJUSTMENT ◀/▶ buttons to select the number of the memory you want to adjust. Press the ▶ button to select a higher number, and the ◀ button to select a lower number. If that memory position has not been set, "NON" will be displayed. If it has been set, "USE" will be displayed. MEMORY No. 0 cannot be set. It contains the fixed factory preset settings.
- To make or change a setting, press the ADJUSTMENT ▼/▲ buttons to move the cursor to "SEL." and press the ADJUSTMENT ◀/▶ buttons to choose "ADJ." (If you do not want to adjust any settings, select "END".) The item selected will be highlighted in purple. Then press the MENU button to go to the next screen.
- Select the item you want to adjust by pressing the ADJUSTMENT ▼/▲ buttons, then use the ADJUSTMENT ◀/▶ buttons to make the adjustments. When adjustments are completed, press the MENU button. The display disappears and the adjustments are stored in memory as a user mode. See page 13 for details on the adjustment items.
- When selecting RESET, ON will be displayed.
Automatic display mode priority
- To prioritize the computer memory modes, the order begins with the present mode and proceeds through the remaining modes in sequence.
For example, if set to Memory No. 2, the projector automatically proceeds through the following order to find the memory mode that matches the computer: Memory No. 2 → Memory No. 0 (factory preset mode) → Memory No. 1.
3. Press the MENU button anytime to exit RGB ADJ.
On-Screen Display

Audio adjustment
- The projector's audio is factory preset to the standard setting. However, you can adjust it to suit your own preference with the ADJUSTMENT buttons on the projector or the remote control.
- You can adjust the BALANCE, TREBLE and BASS.
Adjusting the audio
- Press the MENU button.
Select AUDIO with the ▼/▲ buttons. Then press the MENU button to change to the picture indicated on the left. - Select BALANCE, TREBLE or BASS with the ▼/▲ buttons. Adjust the mode you want with the ◀/▶ buttons.
- To return to the factory preset mode, press the ▼/▲ buttons to select RESET then press the ◀/▶ buttons.
- Press the MENU button to select the normal screen mode.
Description of Adjustment Items
| Selected items | ADJUSTMENT ◀ button | ADJUSTMENT ► button |
| BALANCE | Increased audio from the left speaker | Increased audio from the right speaker |
| TREBLE | Weaker treble | Stronger treble |
| BASS | Weaker bass | Stronger bass |
1 ON-Screen Display
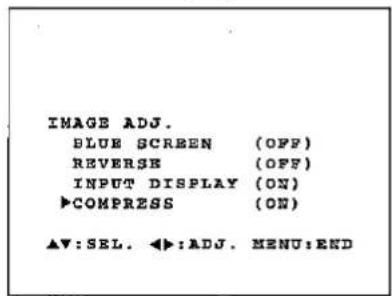
COMPRESS Function
This projector has an SVGA (800 x 600 dot) Compress mode which allows a compressed display from an SVGA signal. There is also a Panning mode which allows a 640 x 480 dot display when there is no compression.
1. Press the MENU button to select COMPRESS mode.
Press the MENU button. While the MENU screen is displayed, press the ADJUSTMENT ▼/▲ buttons to select IMAGE ADJ. Then press the MENU button to display the IMAGE ADJ. screen as shown. Press the ADJUSTENT ▼/▲ buttons to select COMPRESS, and press the ADJUSTMENT ◀/▶ buttons to select ON. Press the MENU button. When the SVGA (800 x 600 dot) signal is input, the projector will enter COMPRESS mode.
Notes:
- The COMPRESS button on the side of the projector can also be used to display COMPRESS mode. Press this button while the menu is displayed to turn COMPRESS ON and OFF.
COMPRESS (ON): COMPRESS MODE COMPRESS (OFF): PANNING MODE
- In the COMPRESS mode, a compressed image decreases the number of lines displayed, which may make characters difficult to read.

flowchart
graph LR
    A["NO COMPRESS (PANNING)"] --> B["COMPRESS"]
2. Press the COMPRESS button on the remote control.
The COMPRESS button on the remote control can be used to select COMPRESS and NO COMPRESS (PANNING) modes.
Note:
- In VGA INPUT mode, (---) appears, indicating that COMPRESS function does not operate in this mode.
3. Press the MENU button anytime to exit COMPRESS mode.

flowchart
graph TD
    A["Room 1"] --> B["Room 2"]
    B --> C["Room 3"]
    C --> D["Room 4"]
    D --> E["Room 5"]
    style A fill:#f9f,stroke:#333
    style B fill:#ccf,stroke:#333
    style C fill:#cfc,stroke:#333
    style D fill:#fcc,stroke:#333
    style E fill:#ffc,stroke:#333
PANNING Function
In NO COMPRESS mode, the ▼/▲ and ◀/▶ ADJUSTMENT buttons can be used to move the image of the display within the 640 x 480 dot screen.
- Press any one of the ▼/▲ and ◀/▶ ADJUSTMENT buttons to begin operation of this function.
(Remote control)
- Press the ◀/▶ ADJUSTMENT buttons first, then use the ▼/▲ and ◀/▶ ADJUSTMENT buttons to change the size of the display.
- If the ▼/▲ ADJUSTMENT buttons are pressed first, the volume display will appear on the screen.
Notes:
- COMPRESS and PANNING functions operate only in SVGA (800 x 600 dot) INPUT mode.
- COMPRESS and PANNING functions cannot be used when inputting a VGA signal in the RGB input mode. If the input signal is changed from VGA (640 x 480 dot) to SVGA (800 x 600 dot) in RGB input mode, COMPRESS and PANNING functions may not operate. Should this occur, press the MENU button. The projector will verify the SVGA (800 x 600 dot) input signal, then the COMPRESS and PANNING functions will operate.
- When connecting to some SVGA notebook computers, SVGA signal may be output even in VGA mode, thus enabling the COMPRESS/PANNING functions.
On-Screen Display

Background level
- The Background Level adjustment can be used to adjust the picture white balance for the selected Video Input Source.
- Optimal image quality can be achieved by adjusting the white portion of the picture to obtain the best colour for the selected source.
Adjusting the BACKGROUND LEVEL
- Press the MENU button.
Select BACKGROUND LEVEL with the ▼/▲ buttons. Then press the MENU button to change to the picture indicated on the left. - Select RED or BLUE with the ▼/▲ buttons.
Adjust the mode you want with the ◀/▶ buttons.
• To return to the factory preset mode, press the ▼/▲ buttons to select RESET then press the ◀/▶ buttons - Press the MENU button to select the normal screen mode.
Note:
- The Background Level is only adjustable for Video source. The Background Level must be adjusted for each source and is not stored in the status memory.
Using the Image Reverse Function
This projector is equipped with an image reverse function. The projected image can be reversed by using the MENU button on the projector or on the remote control.
On-Screen Display
1
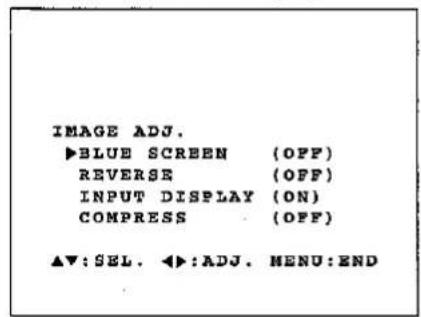
2

1. Press the MENU button.
With the MENU screen displayed, press the ▼/▲ buttons to select IMAGE ADJ. Then press the MENU button to display the IMAGE ADJ, screen.
- The last MENU screen selected is indicated for about 30 seconds.
2. Reversed Image Mode
In the IMAGE ADJ. menu, press the ▼/▲ buttons to select REVERSE. Then press the ◀/▶ buttons to select ON. The reversed image will appear.
3. Press the MENU button anytime to exit IMAGE ADJ.
Using the Black Screen Mode
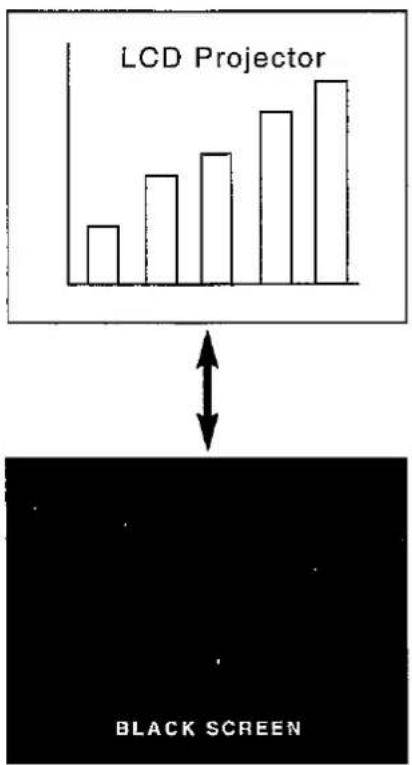
bar
LCD Projector | Category | Value | |---|---| | 1 | 2 | | 2 | 4 | | 3 | 5 | | 4 | 6 | | 5 | 7 | | 6 | 8 | | 7 | 9 |When the BLACK SCREEN button on the projector is pressed, a black screen will appear on the screen. This can be used to black out the presentation image. Each time the button is pressed, the screen will change back and forth between the presentation image and the black screen.
Using the Blue Screen Function
This projector is equipped with a Blue Screen function that will turn the screen blue when the video input terminal is not connected to anything, or the video component is turned off.
On-Screen Display
| IMAGE ADJ. | |
| BLUE SCREEN | (OFF) |
| REVERSE | (OFF) |
| INPUT DISPLAY | (ON) |
| COMPRESS | (OFF) |
▲▼:SEL. ◀:ADJ. MENU:END
On-Screen Display
REMAIN 5M

REMAIN 1M
| IMAGE ADJ. | |
| BLUE SCREEN | (OFF) |
| REVERSE | (OFF) |
| >INPUT DISPLAY | (OFF) |
| COMPRESS | (OFF) |
▲▼:SEL. ◀▶:ADJ. MENU:END
- Press the MENU button. While the MENU screen is displayed, press the ADJUSTMENT ▼/▲ buttons to select IMAGE ADJ. Then press the MENU button to display the IMAGE ADJ. screen as shown. Press the ADJUSTMENT ▼/▲ buttons to select "BLUE SCREEN", and press the ADJUSTMENT ◀/▶ buttons to select ON or OFF. Press the MENU button to return to the normal screen.
- When the Blue Screen function is on, the screen will turn blue when no video signal is being input through the video input terminal.
- When the Blue Screen function is on, and no video signal is input via the input terminal for more than 15 minutes, the power is automatically turned off.
- Five minutes and one minute before the power is turned off, the indicators appear as shown.
Notes:
- The Blue Screen Function does not operate in RGB mode.
- When the power is turned off, the POWER indicator will light red.
- To turn the power on again, press the POWER button to set it to OFF, then press it again to set it to ON.
Using the On-Screen Display Override Function
The On-Screen Displays ("VIDEO", etc.) that appear during input select can be turned off.
- Press the MENU button. While the MENU screen is displayed, press the ADJUSTMENT ▼/▲ buttons to select IMAGE ADJ. Then press the MENU button to display the IMAGE ADJ. screen as shown. Press the ADJUSTMENT ▼/▲ buttons to select "INPUT DISPLAY", and press the ADJUSTMENT ◀/▶ buttons to select ON or OFF, then press the MENU button.
- When OFF is selected, the On-Screen Display ("VIDEO", etc.) will not be displayed during input select.
Air Filter Maintenance
The air filter should be cleaned every 100 hours of use. Clean the filter more often when the projector is used in a dusty or smoky location.
■ Have your nearest Authorized Sharp Industrial LCD Products Dealer replace the filter (PFILD0048CEZZ) when it is no longer possible to clean it.

AIR FILTER unit

natural_image
Line drawing of a mechanical assembly with internal compartments and a lid (no text or symbols)
Cleaning and Replacing the Filter
| 1 Turn OFF the MAIN POWER. | 2 Remove the FILTER COVER. | 3 Remove the AIR FILTER. |
 Power indicator goes off.Unplug the power cord. Power indicator goes off.Unplug the power cord. |  | 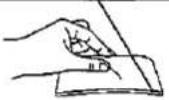 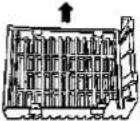  |
| 4 Clean the AIR FILTER. | 5 Replace the AIR FILTER. | 6 Replace the FILTER COVER. |
| Clean the dust off the air filter and cover with a vacuum cleaner.If the filter is very dirty, wash with a water-diluted neutral detergent.Leave the filter to dry in the sun. | Return the air filter to its original position in the filter cover. | Insert the two tabs on the end of the filter cover into the filter cover opening and press the filter cover into position. |
Note:
- Be sure the AIR FILTER COVER is securely installed. The power cannot be turned on unless it is correctly installed.
Lamp
■ The Lamp has a finite operating life.
- When the lamp is nearly burned out, the picture and color quality deteriorate. At this point, take your projector to the nearest Authorized Sharp Industrial LCD Products Dealer for repair.
- Intense light hazard. Do not attempt to look into the aperture and lens while the projector is operating.
Maintenance Indicators
■ The warning lights on the projector indicate problems inside the projector.
There are two warning lights—a TEMPERATURE indicator which warns that the projector is too hot, and a LAMP replacement indicator which lets you know when to change the bulb.
If a problem occurs, either the TEMPERATURE indicator or the LAMP replacement indicator will light up red, and the power will shut off. After turning off the power, follow the procedures given below.

| Warning Indicator | Symptom | Problem | Possible Solution |
| TEMPERATURE indicator | The internal temperature is abnormally high. | •Blocked air intake. | • Relocate projector to a proper location. |
| •Clogged air filter. | • Clean the filter.(See page 23.) | ||
| •Cooling fan breakdown.•Internal circuit failure. | • Take the projector to your nearest Authorized Sharp Industrial LCD Products Dealer for repair. | ||
| LAMP REPLACEMENT indicator | The lamp does not light up. | •Burnt-out lamp. | • Carefully change the lamp.• Take the projector to your nearest Authorized Sharp Industrial LCD Products Dealer for repair. |
| •Lamp circuit failure. |
Notes:
- If the TEMPERATURE indicator light comes on, after servicing, please wait until the projector has cooled down completely before turning the power back on. (At least 5 minutes.)
- When the power is turned off and then turned on again, as during a brief rest, the LAMP replacement indicator may be triggered, preventing the power from going on. When this happens, take the power plug out of the AC outlet and put it back in again.
Before Calling for Service
| Problem | Check |
| No picture and no sound. | The projector power cord is not plugged into the AC wall outlet.The main power switch is not pressed.The input is wrong. (See page 15.)Cables improperly connected to rear panel of the projector. (See pages 9, 10 and 11.)Remote control batteries have run down. (See page 5.) |
| Sound is heard but no picture appears. | Cables improperly connected to rear panel of the projector. (See pages 9, 10 and 11.)The BRIGHTNESS and PICTURE adjustments are set to minimum position. (See page 16.) |
| Colour is faded or poor. | Check that the COLOR and TINT adjustments are correct. (See page 16.) |
| Picture is blurred. | Adjust the focus. (See page 7.)The projection distance is too long or too short to allow for proper focus. (See page 6.) |
| Picture appears but no sound is heard. | Cables improperly connected to rear panel of the projector. (See pages 9, 10 and 11.)Volume is set to minimum. (See page 15.) |
| An unusual sound is occasionally heard from the cabinet. | If the picture is normal, the sound is due to cabinet shrinkage caused by temperature changes. This will not affect operation or performance. |
| Maintenance indicator lights up. | Refer to "Lamp/Maintenance Indicators" on page 24. |
| Product Type | LCD Projector |
| Model | XG-3785E |
| Video system | PAL/SECAM/NTSC 3.58/NTSC 4.43 |
| Display method | LCD panel × 1, RGB optical shutter method |
| LCD panel | |
| PANEL SIZE | 16.3 cm (6.4") (97.5 [H] × 130.0 [W] mm) |
| DISPLAY METHOD | Translucent TN liquid crystal panel |
| DRIVE METHOD | TFT (Thin Film Transistor) Active Matrix panel |
| No. OF PIXELS | 307,200 pixels (640 [H] × 480 [V]) |
| Lens | F5.5, f = 208 mm |
| Projection lamp | 275 W Metal halide |
| Contrast ratio | 100:1 |
| Video input signal | RCA Connector: VIDEO, composite video, 1 Vp-p, sync negative, 75 Ω terminal |
| RCA Connector: AUDIO, 0.5V rms less than 22K Ω | |
| S-video input signal | 4-pin mini DIN connector |
| Y (luminance signal): 1 Vp-p, sync negative, 75 Ω terminated | |
| C (chrominance signal): burst 0.286 Vp-p, 75 Ω terminated | |
| Video out put signal | RCA Connector: VIDEO, composite video, 1 Vp-p, sync negative, 75Ω terminal |
| RCA Connector: AUDIO, 0.5V rms less than 2.2K Ω | |
| Horizontal resolution | 500 TV lines (video input) |
| Audio output | 5 W + 5W (Stereo) |
| Computer RGB input signal | |
| VIDEO SIGNAL | 15 pin mini D-sub connector: RGB separate type analog input: 0.7 Vp-p, positive, 75 Ω terminated |
| AUDIO SIGNAL | Stereo Minijack: AUDIO, 0.5 Vrms, more than 22 kΩ (stereo) |
| HORIZONTAL SYNC. SIGNAL | TTL level (positive/negative) or composite sync (Apple only) |
| VERTICAL SYNC. SIGNAL | Same as above |
| Speaker system | 3" (8 cm) round |
| Rated voltage | AC 200 V - 240 V |
| Rated frequency | 60/50 Hz |
| Power consumption | 360 W |
| Standby consumption | 7.2 W |
| Operating temperature | 5°C to 40°C |
| Storage temperature | -20°C to 60°C |
| Cabinet | Plastic |
| Dimensions (W × D × H) | 386 × 313 × 176 mm |
| Weight | 7.4 kg |
| Supplied accessories | Remote control unit, Two AAA batteries, Extra air filter, VGA signal cable (3 m), Mac/VGA adaptor, AC cord, Lens cover (installed) |
| Replacement parts | Remote control, Air filter, VGA cable, Mac/VGA adaptor, AC cord |
Our projector uses an LCD (Liquid Crystal Display) panel. This very sophisticated panel contains 307,200 pixels. (RGB Trio) TFTs (Thin Film Transistors). As with any high technology electronic equipment such as large screen TVs, video systems and/or video cameras, there are certain acceptable tolerances that the equipment must conform to. Sharp's acceptable tolerances permit a total of 35 inactive
TFTs, which may result in illuminated or inactive dots on the picture screen.
This will not affect the picture quality or the life expectancy of the unit.
Specifications are subject to change without notice.

[Units: mm]
natural_image
Line drawing of a projector with ventilation grilles and front panel (no text or symbols)
- IMPORTANT
- Important Information
- WARNING
- WARNING:
- CAUTION:
- Outstanding Features
- DIRECT COMPUTER COMPATIBILITY
- KEYSTONE FUNCTION
- HIGH PICTURE QUALITY
- FLEXIBLE USE
- BUILT-IN STEREO SPEAKERS
- Contents
- SPECIAL NOTE FOR USERS IN THE U.K.
- ATTENTION: Please read all of these instructions before you operate your LCD Projector for the first time. Save these instructions for future reference.
- Inserting the Batteries
- Notes:
- Remote control positioning
- Note:
- Projector Distance and Picture Size Relationship
- Distance from screen
- Height of projector
- How to set up the projector and screen
- Caution: When setting up the projector
- Example of a reversed image setup
- Using the Focus, Keystone and Size Correction Functions
- Turn ON the POWER.
- Adjusting the Focus
- Controlling keystone effects
- Correcting the picture size
- Adjusting the Height of the Picture
- Cautions:
- Transporting the Projector
- Use the carrying handle when moving the projector
- Connecting to an IBM-PC (VGA, SVGA) Series computer — 800 x 600 maximum resolution
- Connecting to a Macintosh Series Computer
- - 640 x 480 resolution
- Connecting to other compatible computers
- External monitor connection
- Caution (Apple Macintosh)
- Analog RGB Signal Input and Output Connector
- Computer Input
- Analog
- For IBM and Compatibles
- RGB INPUT ADJUSTMENTS (CLOCK, PHASE, V-POS and H-POS)
- Select RGB with the INPUT SELECT button on the remote control and press the MENU button to select the RGB INPUT ADJ. mode.
- Select the item you wish to adjust with the ▼/▲ buttons. Adjust the item with the ◀/▶ buttons.
- Press the MENU button anytime to exit RGB INPUT ADJ.
- Description of Adjustment Items
- INITIAL RESET
- MODE ADJUSTMENT
- PHASE ADJUSTMENT (UP/DOWN)
- HORIZONTAL POSITION ADJUSTMENT (LEFT/RIGHT)
- VERTICAL POSITION ADJUSTMENT (UP/DOWN)
- CLOCK SPEED ADJUSTMENT (FAST/SLOW)
- INPUT ADJUSTMENT
- ① Filter switch
- Connecting the AC cord
- Turn ON the MAIN POWER.
- Turn ON the POWER.
- ON-SCREEN DISPLAY in 8 languages
- - Setting the ON-SCREEN DISPLAY language
- Changing the system mode
- Select input.
- Adjust the volume.
- MUTE
- Turning off the power from the projector or remote control
- Adjusting the Picture
- Use the MENU button to select the mode to be adjusted.
- Press the ADJUSTMENT ◀/▶ buttons.
- Press the MENU button anytime to exit VIDEO ADJ.
- Checking Picture Adjustments
- Computer Mode Memory Adjustments
- Press the MENU button to select the Memory Adjustment mode.
- Automatic display mode priority
- Press the MENU button anytime to exit RGB ADJ.
- Audio adjustment
- Adjusting the audio
- COMPRESS Function
- Press the MENU button to select COMPRESS mode.
- Press the COMPRESS button on the remote control.
- Press the MENU button anytime to exit COMPRESS mode.
- PANNING Function
- (Remote control)
- Background level
- Adjusting the BACKGROUND LEVEL
- Using the Image Reverse Function
- Press the MENU button.
- Reversed Image Mode
- Press the MENU button anytime to exit IMAGE ADJ.
- Using the Blue Screen Function
- On-Screen Display
- Using the On-Screen Display Override Function
- Air Filter Maintenance
- Lamp
- Maintenance Indicators
- Before Calling for Service
Brand : SHARP
Model : XG-3785E
Category : Video projector