
R227 - Radio SANYO - Free user manual and instructions
Find the device manual for free R227 SANYO in PDF.


User questions about R227 SANYO
0 question about this device. Answer the ones you know or ask your own.
Ask a new question about this device
Download the instructions for your Radio in PDF format for free! Find your manual R227 - SANYO and take your electronic device back in hand. On this page are published all the documents necessary for the use of your device. R227 by SANYO.
USER MANUAL R227 SANYO
TO PREVENT FIRE OR SHOCK HAZARD, DO NOT USE THIS PLUG WITH AN EXTENSION CORD, RECEPTACLE OR OTHER OUTLET UNLESS THE BLADES CAN BE FULLY INSERTED TO PREVENT BLADE EXPOSURE. TO PREVENT FIRE OR SHOCK HAZARD, DO NOT EXPOSE THIS APPLIANCE TO RAIN OR MOISTURE.

CAUTION
RISK OF ELECTRIC SHOCK DO NOT OPEN

CAUTION: TO REDUCE THE RISK OF ELECTRIC SHOCK, DO NOT REMOVE COVER(OR BACK). NO USER-SERVICEABLE PARTS INSIDE. REFER SERVICING TO QUALIFIED SERVICE PERSONNEL.(The Caution Marking and Rating Plate is located at the bottom enclosure of the unit.)

DANGEROUS VOLTAGE
The lightning fash with arrowhead symbol within an equilateral triangle is intended to alert the user to the presence of uninsulated dangerous voltage within the product's enclosure that may be of sufficient magnitude to constitute a risk of electric shock to persons.

ATTENTION
The exclamation point within an equilateral triangle is intended to alert the user to the presence of important operating and maintenance (servicing) instructions in the literature accompanying the appliance.
FCC WARNING:
This equipment may generate or use radio frequency energy. Changes or modifications to this equipment may cause harmful interference unless the modifications are expressly approved in the instruction manual. The user could lose the authority to operate this equipment if an unauthorized change or modification is made.
Changes or modifications to this unit not expressly approved by the party responsible for compliance could void the user's authority to operate the equipment.
Shielded cables must be used this unit to ensure compliance with Class B FCC limits.
Caution: To maintain compliance with the FCC's RF exposure guidelines place the base unit at least 20~cm from the nearby persons.
Use only the supplied antenna. Unauthorized antennas, modifications, or attachments could damage the transmitter and may violate FCC regulations.
SURGE PROTECTORS:
It is recommended to use a surge protector for AC connection. Lightning and power surges ARE NOT covered under warranty for this product.
INFORMATION:
This equipment has been tested and found to comply with the limits for a Class B digital device, pursuant to Part 15 of the FCC Rules. These limits are designed to provide reasonable protection against harmful interference in a residential installation. This equipment generates, uses and can radiate radio frequency energy and, if not installed and used in accordance with the instructions, may cause harmful interference to radio communications. However, there is no guarantee that interference will not occur in a particular installation. If this equipment does cause harmful interference to radio or television reception, which can be determined by turning the equipment off and on, the user is encouraged to try to correct the interference by one or more of the following measures:
Reorient or relocate the receiving antenna.
- Increase the separation between the equipment and receiver.
- Connect the equipment into an outlet on a circuit different from that to which the receiver is connected.
- Consult the dealer or an experienced radio / TV technician for help.
This device complies with Part 15 of the FCC Rules.
Operation is subject to the following two conditions:
(1) this device may not cause harmful interference, and
(2) this device must accept any interference received, including interference that may cause undesired operation.
IMPORTANT MESURES DE SECURITÉ
IMPORTANT SAFETY INSTRUCTIONS
1.) Read these instructions.
2.) Keep these instructions.
3.) Heed all warnings.
4.) Follow all instructions.
5.) Do not use this apparatus near water.
6.) Clean only with dry cloth.
7.) Do not block any ventilation openings. Install in accordance with the manufacturer's instructions.
8.) Do not install near any heat sources such as radiators, heat registers, stoves, or other apparatus (including amplifiers) that produce heat.
9.) Do not defeat the safety purpose of the polarized or grounding-type plug. A polarized plug has two blades with one wider than the other. A grounding type plug has two blades and a third grounding prong. The wide blade or the third prong is provided for your safety. If the provided plug does not fit into your outlet, consult an electrician for replacement of the obsolete outlet.
10.) Protect the power cord from being walked on or pinched particularly at plugs, convenience receptacles, and the point where they exit from the apparatus.
11.) Only use attachments/accessories specified by the manufacturer.
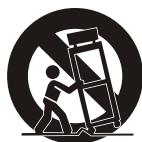
12.) Use only with a cart, stand, tripod, bracket, or table specified by the manufacturer, or sold with the apparatus. When a cart is used, use caution when moving the cart/apparatus combination to avoid injury from tip-over.
13.) Unplug this apparatus during lightning storms or when unused for long periods of time.
14.) Refer all servicing to qualified service personnel. Servicing is required when the apparatus has been damaged in any way, such as power-supply cord or plug is damaged, liquid has been spilled or objects have fallen into the apparatus, the apparatus has been exposed to rain or moisture, does not operate normally, or has been dropped.
15.) The apparatus shall not be exposed to dripping or splashing and that no objects filled with liquids, such as vases, shall be placed on apparatus.
16.) Main plug is used as disconnect device and it should remain readily operable during intended use. In order to disconnect the apparatus from the mains completely, the mains plug should be disconnected from the mains socket outlet completely.
When using your equipment, basic safety precautions should always be followed to reduce the risk of fire, electric shock and injury to persons, including the following:
17.) Avoid using a equipment during an electrical storm. There may be a remote risk of electric shock from lightning.
18.) Use only the power cord and batteries indicated in this manual. Do not dispose of batteries in a fire. They may explode. Check with local codes for possible special disposal instructions.
Introduction
Thank you for choosing this SANYO product which has been designed and manufactured to give you many years of trouble-free service.
Due to the relatively new concept of a standalone internet radio, please take time to read these instructions they have been written to ensure you get the very best from your purchase.
Patience
Internet Radio is a fast-growing but young phenomenon, and is only going to get better as time goes by. Sometimes a connection, station, or network glitch may frustrate you, but working through the issue will be well worth the effort.
Reach us toll-free Canada-wide at 800-263-2244, 9-5 eastern time, weekdays for assistance.
Power source
100-240VAC60/50Hz.
Servicing
This unit contains no user serviceable parts. Refer to qualified service personnel.
- Consult your dealer if you are ever in doubt about the installation, operation or safety of this product.
Contents
Introduction. 3
Contents. 4
Overview. 6
Internet radio front, side and rear view 6
Remote control top view 7
Summary of Controls. 7
Display overview 8
Installation 9
Remote Control Battery. 10
Configure menu. 10
Choosing the option you want from the Configure menu. 10
Internet Radio Connection Requirements 11
What you need before you can use your Internet radio. 11
Steps for connecting your Internet radio to your wireless network. 12
Step 1 - Power up the Internet radio. 12
Step 2 Scan for a wireless network connection. 12
Step 3 Connect to the wireless network. 13
Choosing a radio station to listen to 14
Changing the volume 14
Presetting your favorite internet radio stations 15
Playing a preset internet radio station. 15
Requesting a internet station that is currently unavailable. 15
Internet Station which enable you to choose what you listen to. 15
Troubleshooting 16
Media Player Operation 16
Set up your Windows PC to allow the radio to access your audio files via Windows Shares... 16
Locating audio files via Windows Shares 16
Listening to a single shared track. 17
Listening to a complete shared album. 17
Queuing up tracks for playback later. 17
Queuing up albums for playback later. 17
Controlling playback 17
Browsing the list of tracks currently queued up for playback. 18
Removing tracks from the queue. 18
Playing tracks in random order. 18
Playing tracks in the queue repeatedly. 18
Set up a Windows PC to allow the Internet radio to access your audio files via a Upnp server. 18
Locating and playing media files using the radio and Upnp. 19
Queuing up UPnP tracks for playback later 19
Queuing up UPnP albums for playback later. 19
Controlling playback later. 19
Browsing the list of tracks currently queued up for playback. 19
Removing UPnP tracks from the queue. 20
Playing UPnP tracks in random order 20
Playing UPnP tracks in the queue repeatedly 20
Setting the clock. 20
Setting the sleep timer. 21
Setting the alarms. 22
Playing FM Radio 24
Presetting your favorite FM radio stations 24
Playing a preset FM radio station 24
Optional Connections 25
Auxiliary Jack 25
Headphone Jack 25
Line Out Jack 25
Cabinet Cleaning. 25
Specifications. 26
License Information 26
Warranty 27
Overview
- SLEEP BUTTON
- SEEK▼ BUTTON
- LCD DISPLAY
- SEEK▲/BROWSE BUTTON
- BACK BUTTON
- RADIO P2/▶/II/RADIO P6 BUTTON
- RADIO P1/I / RADIO P5/ BUTTON
- SNOOZE BUTTON
- VOLUME + BUTTON
- VOLUME-B BUTTON
- HEADPHONE JACK
- REPLY BUTTON
- SELECT BUTTON / SCROLL▲/▼CONTROL
- RADIO P4/MEDIA MODE / RADIO P8 BUTTON
- RADIO P3/▶I/RADIO P7 BUTTON
- SHIFT BUTTON
- IR SENSOR
- STANDBY INDICATOR
- STANDBY/ON BUTTON
- SPEAKER
- FM ANTENNA
- NETWORK JACK
- AUX IN JACK
- LINE OUT JACK
- AC SOCKET
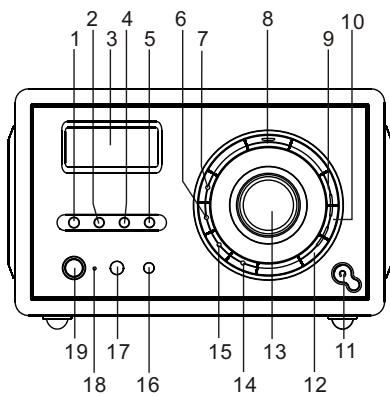
Internet radio front view
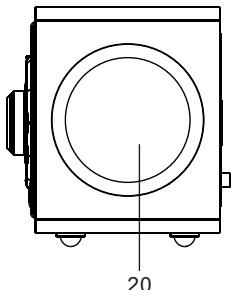
Internet radio side view
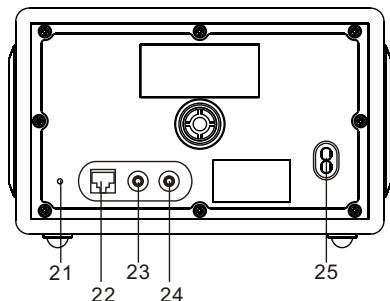
Internet radio rear view
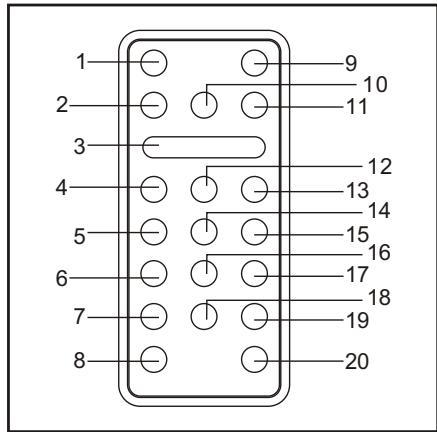
Remote control top view
- STANDBY/ON BUTTON
- BACK BUTTON
- SNOOZE BUTTON
- RADIO P1/I BUTTON
- RADIO P4/MEDIA MODE BUTTON
- RADIO P7 BUTTON
- SCROLL▲BUTTON
- SCROLL▼ BUTTON
- SLEEP BUTTON
- SELECT BUTTON
- REPLY BUTTON
- RADIO P2/▶/ II BUTTON
- RADIO P3/▶I BUTTON
- RADIO P5/■ BUTTON
- RADIO P6 BUTTON
- SEEK BROWSE BUTTON
- RADIO P8 BUTTON
- SEEK▼ BUTTON
- VOLUME + BUTTON
- VOLUME-B BUTTON
Remote sensor
To operate the unit with the remote control, point the remote at the Remote Sensor on the front of the main unit and press the appropriate button. The remote control has an effective operating range of approximately 20 feet and an angle of no more than 30^ .
NOTE: Bright sunlight may interfere with the operation of the remote control.
Summary of Controls - Unit and Remote
| Control | Internet Radio mode | Media Player mode |
| STANDBY/ON | Press to turn on/off the Internet Radio | |
| SELECT | Turn the knob to change options. Press the knob to SELECT | |
| SCROLL▲/▼ | Press ▲ or ▼ to select options when using the remote control | |
| Browse | No function | Display Queue information |
| Reply | For future applications. No function at present. | No function at present |
| Back | Go back to previous menu page | |
| P1 | Press and hold to save Preset station P1, Press to load preset station P1 | Previous Track |
| P2 | Press and hold to save Preset station P2, Press to load Preset station P2 | Play/Pause |
| P3 | Press and hold to save Preset station P3, Press to load Preset station P3 | Next Track |
| P4 | Press and hold to save Preset station P4, Press to load Preset station P4 | Repeat On/Off, Shuffle On/Off |
| P5 | Press and hold to save Preset station 5, Press to load Preset station P5 | Stop |
| P6 | Press and hold to save Preset station 6, Press to load Preset station P6 | |
| P7 | Press and hold to save Preset station 7, Press to load Preset station P7 | |
| P8 | Press and hold to save Preset station 8, Press to load Preset station P8 | |
| SHIFT | Press shift button then press P1 to change P1 or P5, P2 or P6..etc | |
| Vol +/- | Increase volume by pressing +, Decrease volume by pressing - | |
| Seek ▲ | Tune up FM radio station by pressing ▲, tune down by pressing ▼ | Browse |
| Seek ▼ | ||
| SLEEP | Press this button to set the sleep timer (15/30/60/90 min) | |
| SNOOZE | Press this button to turn on the snooze function (9 mins) | |
Most of the functions of this unit can be operated by pressing the buttons on the front panel or the corresponding buttons on the remote control handset.
Display overview
Icons are displayed on the bottom row of the display. The meaning of these icons is explained below.

Sleep timer.

Alarm set indicator

Internet Radio

Snoopze
11:00 AM


zz
Remarks:
Time will show in the middle of display (at its maximum size) when unit is turned Off. When unit is turn ON, the time information will be shown at the bottom of the display.
Display list:
| Stations |
| Media Player |
| Configure |
| Tuner |
| Auxiliary Input |
| Alarm Clock |
Installation
If this Internet radio has been moved from a cold place to a warm place, DO NOT plug it in for 2-3 hours (e.g. from a cold car to a warm room). There is a possibility that moisture may have condensed in the Internet radio, this can cause damage to your Internet radio. To avoid damage please unpack your Internet radio and allow it to stand at room temperature for 2-3 hours before use. This will help any moisture evaporate and prevent unnecessary damage to your Internet radio.
AC CONNECTION
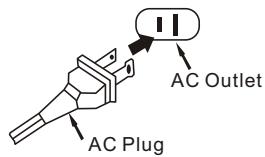
Unwind the AC cord and extend it to its full length. Insert the AC plug into any convenient 100-240V 60/50Hz household outlet. Please note that this unit is equipped with a polarized AC plug which has one blade wider than the other. This is a safety feature to reduce the likelihood of electric shock. This polarized AC plug will only fit in a polarized AC outlet. If you find that you cannot insert this plug into your outlet, you may have an obsolete non polarized outlet. Please do not try to defeat this safety feature by using a non-polarized adapter or by filing the wider blade to make it fit into your outlet. If this plug does not fit into your outlet, you should contact a qualified licensed electrician to replace your obsolete outlet.
IMPORTANT NOTES:
- Before moving or lifting the unit, make sure the AC plug is disconnected from the power source.
- In case of malfunction due to electrostatic discharge, just reset the product (reconnect of power source may be required) to resume normal operation. Should any trouble occur, remove the power source and refer to qualified personnel.
- If there is a power failure or the AC cord is disconnected for a short period of time, the clock time will not be kept. When the power is resumed or the AC cord is connected again, the clock time will be reset from the internet connection. If the internet connection is down or not available the clock can be set manually.
RJ-45 JACK (if not using a wireless router)
Insert the RJ-45 connector into the RJ-45 jack on the unit.
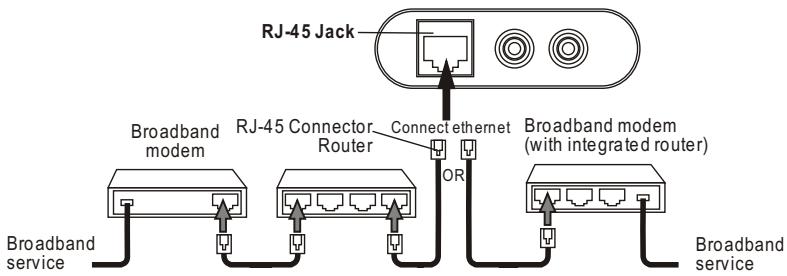
Use a commercially available straight LAN cable (Category 5/CAT 5 or better with RJ-45 connector).
Do not plug-in an ethernet cable if intending to use a wireless network, to avoid confusion to the circuitry. If intending to use an ethernet connection, attach cable to both modem/wired router and radio before powering up radio.
REMOTE CONTROL BATTERY
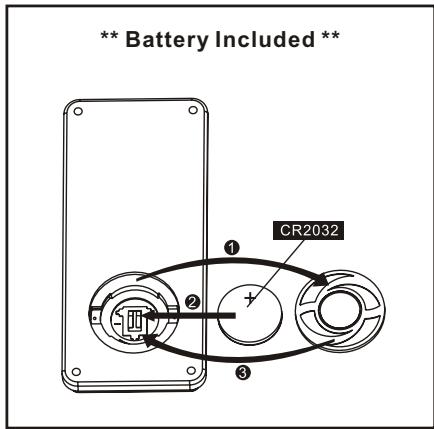
- Press firmly on the battery cover and then rotate it in counter clockwise direction, the cover will come off.
- Place the battery (CR2032) into the battery compartment according to the polarity markings, with the "+" sign facing up.
- Place back the battery cover, press down slightly and rotate it in clockwise direction until it is firmly closed.
Note: Remove the battery from the remote control if not in use for a long period of time. When the battery becomes weak, the remote control will not function properly. Replace with new battery.
BATTERY PRECAUTIONS
Follow these precautions when using a battery in this device:
- Warning -Danger of explosion if battery is incorrectly replaced. Replace only with the same or equivalent type.
- Use only the size and type of battery specified.
- Be sure to follow the correct polarity when installing the battery as indicated in the Battery Compartment. A reversed battery may cause damage to the device.
- If the device is not to be used for a long period of time, remove the battery to prevent damage or injury from possible battery leakage.
- Do not try to recharge a battery not intended to be recharged; it can overheat and rupture. (Follow battery manufacturer's directions.)
- Battery shall not be exposed to excessive heat such as sunshine, fire or the like.
Configure Menu
Choosing the option you want from the Configure menu
- Press the SELECT button.
(Note: if you make a mistake at any point, press the BACK button to go back to the previous screen.)
- Turn the knob until 'Configure' is displayed
- Press the SELECT button.
- Turn the knob until the display shows the option you want.
- Press the SELECT button to choose the option shown on the display. The options are explained below.
Enables you to scan again for connection to another wireless network, or to manually configure the network parameters. Use this if you take the Internet radio to another building where you want to use it.
Displays the version numbers of the various parts of software on your Internet radio.
Use this option to download new firmware for the radio from the Reciva portal on the Internet. If there is new firmware available, then the radio will prompt you if you want to download it or not.
Note, at this stage, you can press the radio's BACK button to cancel the radios, beginning a firmware upgrade. A firmware upgrade may take several minutes, so do not switch off the power to the radio until the operation is complete otherwise the radio may become permanently damaged.
Allows you to change the display language.
Puts all the settings back to their defaults as they were when they left the factory. If you perform a factory reset on your radio, you will lose all your presets and your wireless network connection.
This will display a key that can be used to register the radio (recommended) on the SANYO Reciva Customer portal: http://www RECiva.com/. Registering enables you to request a station or podcast to be added to just your unit.
Selecting this option can set the clock of the unit.
IMPORTANT: the first time you connect this internet radio to AC outlet, this unit will automatically set the time zone to Zone 2 which is the initial default setting. If you do not live in this time zone, you must change the default zone display to your own zone. You only do this one time and the unit will remember the new default zone.
Selecting this option enables you to choose the Internet radio's backlight brightness.
-
After selecting the 'Backlight' menu item, the radio will display its list of two menu modes:
-
The 'active' state is when the unit is "ON".
-
'Standby' is the state when the radio has been turned off.
-
Rotate the knob to highlight the desired menu mode and press SELECT.
- The radio will now display the current backlight value for this menu mode. You can alter this value by rotating the knob to increase or decrease it.
The strength of the WiFi signal will be displayed. Strength should be over 60% for stable streaming. Relocate this radio or re-orient the wireless router, or buy a wireless booster if necessary.
Internet Radio Connection Requirements
What you need before you can use your Internet radio
Before you can use your Internet radio, you need the following:
A broadband Internet connection.
- If wireless operation is desired - a wireless access point (Wi-Fi) connected to your broadband Internet, preferably via a router.
- If your wireless network is configured to use Wired Equivalent Privacy (WEP) or Wi-Fi protected Access (WPA) data encryption then you need to know the WPA passcode so you can get the Internet radio to communicate with the network.
- If your wireless network is configured for "trusted products" you will need to enter the radio's MAC address into your wireless access point. To find the radio's MAC address use menu items as follows: Configure->Network Config->View Config->MAC Address
- To enter the MAC address into your wireless access point, you must read the instructions supplied with the wireless access point.
The Internet radio should work anywhere within the specified range of the wireless access point device.
Before you continue, make sure that your wireless access point is powered up and connected to your broadband Internet. To get this part of the system working you must read the instructions supplied with the wireless access point.
Steps for connecting your radio to your wireless network
Step 1-Power up the radio
First, connect the AC power. In use, the radio can be switched on or off with the standby button, the display on the front of the radio will light up and say:
SANYO
After a few seconds, this will change to show:
Initializing network
After a few seconds, this will change to show:
Step 2 Scan for a wireless network connection
When the display says
(Note: if you make a mistake at any point, press the BACK button to go back to the previous screen.)
The radio will now scan for all available wireless networks and will display:
Scanning

If it can't find one then the display will say:
No networks Found
If this happens then you will have to get your wireless access point working. See the instructions supplied with it.
When the radio finds your wireless network, it displays the ESSID for the access point on the screen. This is a name that is allocated to the access point by the person who set up the network for example:
It is possible, and in some locations highly likely, that your radio will find more than one wireless access point, in which case you can choose which one you want to connect to. Turn the knob on the radio to see the ESSID of each access point the radio has found.
Step 3 Connect to the wireless network
When the ESSID for the access point you want is displayed on the screen, press the SELECT button. If your network is not configured to need an encryption code, the screen should say:
Connecting to network
Then:
Network OK
If the screen displays either:
Enter WEP key
Or:
Enter WPA key
Then the network is using one of the encryption systems: Wired Equivalent Privacy (WEP) or Wi-Fi Protected Access (WPA). You therefore need to enter the correct WEP or WPA code or "Key" into the radio to get it to communicate with your network.
Only the person who set up the network in the first place knows this code; if that person is not you then you need to find out what it is.
After 3 seconds, the display goes into the code entry mode. To enter the code, use the knob to select each character of the code in turn, pressing the SELECT button after each character. Note that WEP and WPA codes are sensitive to upper and lower case characters so you must enter them exactly.
Use the BACK button to erase incorrect characters.
After the final character, use the knob to select the
The radio should now be able to connect to the network. If the display shows "Invalid key" or "Network Error", an incorrect password has probably been entered.
Choosing a radio station to listen to
Quick-Listen: "WFUV" for Preset station 1 and "CKUA" for Preset station 2 were programmed at the factory - 1 each from the US and Canada for your immediate listening enjoyment. ( You can reset them at any time. See page 15.)
Station searching: Follow next steps.
- Press the SELECT button. Choose Stations and press SELECT button.
(Note: if you make a mistake at any point, press the BACK button to go back to the previous screen.)
< Stations >
Media Player
Configure
- Turn the knob to choose from
or .
- Press the SELECT button to choose the option you want.
- Turn the knob until the display shows the region you want (or select 'All' to display all countries),
- Press the SELECT button.
- Turn the knob until the display shows the country you want.
- Press the SELECT button.
- Turn the knob until the display shows the station you want.
- Press the SELECT button and wait until the radio connects to that station.
Note that some radio stations do not broadcast 24 hours per day, and some stations are not always on line.
If this station has on demand content (that is, it gives the option of listening to programs which have already been broadcast), see "Stations which enable you to choose what you listen to".
- Turn the knob until the display shows the type of content you want, then press the SELECT button.
- Turn the knob until the display shows the station you want.
- Press the SELECT button and wait until the radio connects to that station.
Changing the volume
When a radio station is playing, you can change the volume simply by using Volume + and Volume buttons located on the unit or on the remote control. The volume bar will appear on display to show the volume change level.
Presetting your favorite internet radio stations
Up to maximum 8 stations can be stored in memory with this unit.
While a radio station is playing, hold down one of the preset buttons (numbered 1 to 8) until the screen says
Assigned to preset #
Where # is the number of the button you held down.
Presents 1 and 2 were programmed at the factory and can be reset.
To assign a radio station to one of the presets numbered 5 to 8, press SHIFT and then press and hold one of the preset keys. When you are using the remote control, simply press and hold the desired preset number button.
Playing a preset internet radio station
When an internet radio is playing, briefly press the preset button (1 to 4) for the station you want or also press SHIFT button for station 5 to 8. (Note, do not hold the button down. If you do then the station currently playing will overwrite the one stored in the preset; be careful.)
Requesting an internet station that is currently unavailable
If you want to listen to a particular radio station which is currently not available online, you can visit the Reciva website at http://www RECiva.com/ and put in a request to add the station to the list.
Internet stations which enable you to choose what you listen to
Some internet radio stations can provide a number of options associated with their station; for example, some stations enable you to listen to programmes that have already been broadcast. When you select a radio station that has this facility, the station does not start playing immediately, but instead the display shows:
- Turn the knob to choose
or , then press the SELECT button.
If you choosethen the radio plays the current output from this station as normal.
If you choosethen more screens are displayed where you choose what you want to listen to.
What is displayed will depend on the station you have chosen the following steps are only a guide. - When you choose
, the display shows the names of the programmes. Turn the knob to choose the program you want, then press the SELECT button. - When you have chosen the programme you want to listen to, either it will just start playing, or the display may show a list of days for you choose from use the knob to set the day the programme was broadcast, then press the SELECT button.
- After you have chosen the day, you may be able to choose the Start Time. Set the Start Time using the knob and press the SELECT button.
- Programmes which enable you to choose the time also enable you to fast-forward and rewind to the part you want while the radio is playing. The elapse time is displayed. Using the Skip + (P3) or Skip - (P1) button to skip forward or backward in 30 second intervals.
Troubleshooting
You may find it useful to visit the help section on the webpage of our associates at Reciva: http://radio-reciva.com/
This model has a built-in wireless internet capability. If you have trouble connecting to your wireless network, these steps may help to resolve the problem:
- Confirm that a Wi-Fi connected PC can access the Internet (i.e. can browse the web) using the same network.
- Check that a DHCP server is available, or that you have configured a static IP address on the radio. To configure the DHCP, you must read the instructions supplied with the wireless access point.
- Check that your firewall is not blocking any outgoing ports. As a minimum the radio needs access to UDP and TCP ports 80,554,1755,5000 and 7070. To configure the Access Port Control, you must read the instructions supplied with the wireless access point.
- Check your access point does not restrict connections to particular MAC addresses. You can view the radio's MAC address using the menu item Configure-> Network Config-> View Config-> MAC address.
- If you have an encrypted network, check that you have entered the correct key or passphrase into the radio. Remember that text-format keys are case sensitive. See pages 19-20.
If your radio can connect to the network successfully, but is unable to play particular stations, it may be due to one of the following causes:
- The station is not broadcasting at this time of the day (remember it may be located in a different time zone).
- The station has reached the maximum allowed number of simultaneous listeners.
- The station is not broadcasting anymore.
- The link on the radio is out of date.
- The Internet connection between the server (often in a different country) and you is slow.
Try turning your radio off and on again. If unsuccessful, unplug and replug power cord. If still not helpful, use a PC (if available) to check play back of the stream via the broadcaster's web site.
If you can play back the station with a PC, use the form at http://www RECiva.com/stations/addstation.asp to notify us so that we can change the station data that is used by the radio.
Media Player
NOTE: This function is for more advanced users.
The built-in Media Player allows you to play unprotected audio files (AAC, AIFF, MP3, RM, WAV, WMA) including iTunes™, and playlists (M3U) stored on a networked PC(not Mac). It has been verified to work on Windows 2000 and Windows XP.
Set up your Windows PC to allow the radio to access your audio files via Windows Shares
- Please ensure that your PC is available on the network for your Internet radio, then, using Windows Explorer, locate the folder where your audio files are stored.
- Right click on the folder.
- Select 'Properties'.
- Click on 'Sharing'.
- Select "Share this folder on the network" and "Allow network user to change my files".
Locating audio files via Windows Shares
- Power up the radio.
- Wait for "Stations" to be displayed on the radio, or press the BACK button repeatedly until "Stations" is displayed.

- Turn the knob until the radio display shows "Media Player".
- Press the SELECT button and turn the knob until "Windows Shares" is displayed.
- Press the SELECT button, turn the knob until "Scan for PCs" is displayed and press SELECT again.
- The radio will now display "Finding PCs", once the radio has finished, turn the knob to highlight the correct PC.
- Press the SELECT button. The radio will search for shared folders.
- Turn the knob to highlight the correct shared folder and press SELECT.
- The radio will display 'File Scan...' as it scans through the media files in the shared folder. Text on the bottom row of the display will change to indicate that the file scan is in progress. If you have a large number of audio files this could take several minutes to complete.
- Once the radio has finished scanning, it will display 'By Album' You can now browse through the scanned media files, which will now be organized "By Album", "By Artist" and "Playlists" if available.
Note that the first time the file scan is done a file called 'reciva_media_cache' is written to the folder where the audio files are stored. This is in order to speed up subsequent file scans.
Listening to a single shared track
- Turn the knob until 'By Artist' is displayed.
- Press the SELECT button.
- Turn the knob until the required artist is displayed.
- Press the SELECT button.
- Turn the knob until the required album name is display.
- Press the SELECT button.
' will be displayed. - Turn the knob until the required track is displayed.
- Press the SELECT button. The track will begin playing.
Listening to a complete shared album
- Turn the knob until 'By Artist' is displayed.
- Press the SELECT button.
- Turn the knob until the required artist is displayed.
- Press the SELECT button.
- Turn the knob until the required album name is displayed.
- Press the SELECT button.
will be displayed. - Press the SELECT button. The album will begin playing.
Queuing up tracks for playback later
- Highlight the required track.
- Press the SELECT button. 'Track Added To Queue' will be displayed.
Queuing up albums for playback later
- Highlight the required album.
- Press the SELECT button
- Turn the knob until
' is displayed. - Press the SELECT button. 'Tracks Added to Queue' will be displayed.
Controlling playback
- Use the STOP button to stop playback.
- Use the PLAY / PAUSE button to either pause a currently playing track or to restart a currently paused track or to restart a stopped track.
- Use the SKIP TO PREVIOUS TRACK button to start playback of the previous track in the queue.
- Use the SKIP TO NEXT TRACK button to start playback of the next track in the queue.
Browsing the list of tracks currently queued up for playback
- Press the BROWSE button. The currently playing track name will be displayed.
- Turn the knob to see which tracks are queued up for playback.
- If you want to jump to a particular place in the queue then press the SELECT button when the required track is displayed.
Removing tracks from the queue
- Press the BROWSE button. The currently playing track name will be displayed.
- Turn the knob to select the track you want to remove from the queue.
- Press and hold the STOP button for 2 seconds and the radio will display: 'Delete Track?'
- Turn the knob to highlight 'Yes' or 'No'.
- Press SELECT to confirm whether you actually want to delete the track from the queue.
- If 'Yes' was selected then 'Removed From Queue' will be displayed.
- To remove all tracks from the queue, keep pressing BACK until the 'Media Player' menu item is selected, press SELECT and then turn the knob to select 'Clear Queue' and press SELECT again.
Playing tracks in random order
- Select the individual tracks as described previously.
- Navigate to top-level menu item 'Media Player' using the SELECT and BACK buttons.
- Press the SELECT button.
- Turn the knob until 'Playback Mode' is displayed.
- Press the SELECT button.
- Turn the knob until 'Shuffle' is display.
- Press the SELECT button.
- Turn the knob to select YES/NO to confirm that shuffle mode should be enabled.
Playing tracks in the queue repeatedly
- Select the individual tracks as described previously.
- Navigate to top-level menu item 'Media Player' using the SELECT and BACK buttons.
- Press the SELECT button.
- Turn the knob until 'Playback Mode' is displayed.
- Press the SELECT button.
- Turn the knob until 'Repeat' is displayed.
- Press the SELECT button.
- Turn the knob to select YES/NO to confirm that repeat mode should be enabled.
Set up a Windows PC to allow the radio to access your audio files via a UPnP server
- If your PC is running Microsoft Windows XP, then you can use Windows Media Connect to act as your UPnP (Universal Plug and Play) media server 1.0. Windows Media Player 11 may be downloaded from Microsoft's website and installed by following the instructions detailed in its installation wizard.
- Once installed, Windows Media Player 11 will create a library from all the media files available to it on your PC. To add new media files to the library, select "File>Add to Library..>Advanced Options", click "Add" and choose the files you wish to add and click "OK".
-
You will now need to connect your Internet radio to Windows Media Player 11 and configure it to allow the radio to access your media library. In order to do this, you will need to do the following:
a) Keep pressing BACK to get to the radio's top-level menu and then turn the rotary knob to select "Media Player".
b) Press SELECT and then turn the knob to highlight "UPnP Servers".
c) Press SELECT and the radio will scan for all available UPnP servers. Note, this may take a few seconds for the radio to complete its scan and before the scan has completed, the radio will display "EMPTY". The radio will continue to display "EMPTY" if no UPnP servers are found.
d) After a successful scan, select you UPnP server, by rotating the knob if there is more than one UPnP server, and then press SELECT (note, your radio will display "Access Denied" at this stage). -
Your PC will now prompt you that a device has attempted to connect to your UPnP server. In order to allow the radio to have access to the media files, you will need to click the "Library" tab from Windows Media Player 11 and select the "Media Sharing..." item to open the "Media Sharing" window.
- From the "Media Sharing" window, the radio will be listed as an unknown device. Click on the unknown device listed, then click the "Allow" button and then click "OK".
Locating and playing media files using the radio and UPnP
Once the UPnP server is configured to share media files with the Internet radio, you can play the files by doing the following on the radio:
a. Keep pressing BACK to get to the radio's top-level menu and then turn the knob to select 'Media Player'.
b. Press SELECT and then turn the knob to highlight 'UPNP Servers'.
c. Press SELECT and the radio will scan for all available UPnP servers. This may take a few seconds for the radio complete its scan and before the scan has completed, the radio will display '(Empty)'. The radio will continue to display '(Empty)' if no UPnP servers are found.
d. After a successful scan, select your UPnP server, by rotating the knob if there is more than one UPnP server, and then press SELECT.
e. The radio will now list the media categories available from the UPnP server, e.g. 'Music', 'Playlists' etc. Turn the knob to select which category you wish to browse, press SELECT and turn the knob to highlight a sub category and press SELECT again. For example, you could select 'Music' and then 'Album'
f. Turn the knob to highlight the media files that you wish to play and press SELECT.
g. The radio will display "Add to Queue", press SELECT and the radio will add the tracks to its queue and begin playing them automatically.
Queuing up UPnP tracks for playback later
- Highlight the required track.
- Press the SELECT button. 'Track Added To Queue' will be displayed.
Queuing up UPnP albums for playback later
- Highlight the required album.
- Press the SELECT button.
- Turn the knob until ' (Add To Queue)' is displayed.
- Press the SELECT button. 'Tracks Added to Queue' will be displayed.
Controlling playback
- Use the STOP button to stop playback.
- Use the PLAY/PAUSE button to either pause a currently playing track or to restart a currently paused track or to restart a stopped track.
Browsing the list of tracks currently queued up for playback
- Press the BROWSE button. The currently playing track name will be displayed.
- Turn the knob to see which tracks are queued up for playback.
- If you want to jump to a particular place in the queue then press the SELECT button when the required track is displayed.
- It is important to note here that media files scanned from the radio's "Windows Shares" function can also be added to the radio's queue.
- Use the SKIP TO PREVIOUS TRACK button to start playback of the previous track in the queue.
- Use the SKIP TO NEXT TRACK button to start playback of the next track in the queue.
Removing UPnP tracks from the queue
- Press the BROWSE button. The currently playing track name will be displayed.
- Turn the knob to select the track you want to remove from the queue.
- Press and hold the STOP button for 2 seconds.
- Turn the knob to highlight 'Yes' or 'No'.
- Press SELECT to confirm whether you actually want to delete the track from the queue.
- If 'Yes' was selected then 'Removed From Queue' will be displayed.
- To remove all tracks from the queue, keep pressing BACK until the 'Media Player' menu item is selected, press SELECT and then turn the knob to select 'Clear Queue' and press SELECT again.
Playing UPnP tracks in random order
- Select the individual tracks as described previously.
- Navigate to top-level menu item 'Media Player' using the SELECT and BACK buttons.
- Press the SELECT button.
- Turn the knob until 'Playback Mode' is displayed.
- Press the SELECT button.
- Turn the knob until 'Shuffle' is display.
- Press the SELECT button.
- Turn the knob to select YES/NO to confirm that shuffle mode should be enabled.
Playing UPnP tracks in the queue repeatedly
- Select the individual tracks as described previously.
- Navigate to top-level menu item 'Media Player' using the SELECT and BACK buttons.
- Press the SELECT button.
- Turn the knob until 'Playback Mode' is displayed.
- Press the SELECT button.
- Turn the knob until 'Repeat' is displayed.
- Press the SELECT button.
- Turn the knob to select YES/NO to confirm that repeat mode should be enabled.
Note:
- If the shared folders contain more songs than the Internet Radio memory limit, it will display "Too many files"
- Repeatedly pressing button P4 will toggle the Repeat and Shuffle modes.
Setting the clock
- Press the SELECT button. (Note: if you make a mistake at any point, press the BACK button go back to the previous screen.)
- Turn the knob until the display says
Stations
Media Player
< Configure
- Press the SELECT button.
- Turn the knob until the display says
Register
Clock Setup
Backlight
- Turn the knob until the display says
.
< Set Time/Date>
- Before setting Time and Date, you need to choose the correct time zone. There are 7 time zones to choose.
- After setting the time zone, you need to set the time.
- Press the SELECT button.
Set Time
10:30 AM
- Turn the knob until the hour setting is correct, then press the SELECT button.
Set Time
10:03 AM
- Turn the knob until the minute setting is correct, then press the SELECT button.
Set Date
01 Jan 2008
- Then we can continue to set the date, month and year.
Finally, the display returns to the Set Time/Date mode.
After finished setting, when the unit is turned on, the time information will always show on bottom right hand corner of the display. When the unit power is off, the time information will show in the middle of the display at its maximum size.
Setting Sleep Timer
Selecting this option will enable the radio to switch itself off after a set period.
- Press the Sleep button, the display will show "Sleep Timer 15 minutes" and the radio will continue to play as normal for 15 minutes and go into standby mode automatically.
- To increase the amount of time that the radio will play before shutting off, press the Sleep button again to change the display to the desired sleep time. When Sleep button is pressed each time, the sleep timer prolongs 15 minutes, up to a maximum of 90 minutes.
- To turn the radio on again, simply press the Standby button.
Setting the alarms
- Press the SELECT button. (Note: if you make a mistake at any point, press the BACK button to go back to the previous screen.)
- Turn the knob until the display says
.
Tuner Auxiliary Input Alarm Clock
- Press the SELECT button.
- Turn the knob until the display says
.
< Set Alarms
- There are three options to choose from:
Disable All : a quick way to disable both alarms, when choose this option, both alarm will be OFF
Alarm 1: for setting, enable or disable alarm 1, factory default is "1.OFF 12:00 AM"
Alarm 2: for setting, enable or disable alarm 2, factory default is "2 OFF 12:00 AM"
< Disable all >
- OFF 12:00 AM
-
OFF 12:00 AM
-
Press the SELECT button to confirm your selection.
Set Alarm
12:00AM
- Turn the knob until the hour setting is correct, then press the SELECT button.
Set Alarm
07:06AM
-
Turn the knob until the minute setting is correct, then press the SELECT button.
-
There are five alarm modes to select for either alarm. The alarm modes are:
Once: Alarm will turn on once
Everyday: Alarm will turn on all 7 days
Weekly: Alarm will turn on once every week
Weekdays: Alarm will only turn on Monday through Friday
Weekends: Alarm will only turn on Saturday and Sunday
Once
Every Day
Weekly
10.There are three wake up options for either alarm:
Wake to Buzzer
Wake to Internet Radio
Wake to FM Radio
Note:
- You are unable to choose wake to internet radio if there is no preset station being set or you are not currently listening to the internet radio
- Ensure the volume has been set to the desired level when choosing wake to internet radio or FM radio
Buzzer Internet Radio FM Tuner
Once information is all set, the alarm icon appears on bottom left hand side of the display.
Checking the Wake up Times and Alarm Mode
For checking the alarm information, select Alarm Clock, then Set Alarms. If alarm is set, information will be shown in following sequence "Alarm/ alarm time/alarm mode/wake up option".
For example, when alarm 1 is set at 9:30am, turns on everyday, wake to buzzer, alarm 2 is set at 10:30am, turns on everyday, wake to buzzer, display will show:
Disable All
1.9:30 AM Daily Buzzer
2.10:30 AM Daily Buzzer

Moreover, if alarm has been set, alarm icon is shown on the display during Standby mode. Clock information is shown at its maximum size during Standby mode.
Radio will play for about 1 hour after alarm start and then shut off. Press the standby button to stop earlier. Press again to turn on manually.
11:00 AM

Snoopze/Repeat Alarm
After the alarm turns "On" in the morning, you can press the Snooze button on unit's front panel or on remote control for a few extra minutes sleep.
The alarm will stop for approximately 9 minutes and then comes "On" again.
11:00 AM
Zz
Playing FM Radio
This Internet radio also has an FM tuner; you will be able to access standard FM stations from it.
- Press the SELECT button. (Note: if you make a mistake at any point, press the BACK button to go back to the previous screen.)
- Turn the knob until the display says
.
Media Player Configure Tuner
- Press the SELECT button.
Turn the knob to choose your desired station. When a strong FM stereo signal is received, Stereo appears on display. Or press Seek up/down to search for a strong signal station.
98.5 MHz Stereo
- Use VOLUME + or - buttons to adjust the desired volume level.
- Unravel the FM antenna wire at the back of the cabinet and position for best reception.
Presetting your favorite FM radio stations
Up to maximum 8 FM stations can be stored in memory with this unit.
While an FM radio station is playing, hold down one of the preset buttons (numbered 1 to 8) until the screen says
Assigned to preset #
Where # is the number of the button you held down.
To assign a FM radio station to one of the presets numbered 5 to 8, press SHIFT and then press and hold one of the preset keys.
Playing a preset FM radio station
When a FM radio stations is playing, briefly press the preset button (1 to 4) or together with the SHIFT button for the preset stations 5 to 8 for the FM station you want. (Note, do not hold the button down. If you do then the station currently playing will overwrite the one stored in the preset; be careful.)
Optional connections
AUXILIARY JACK
You can connect an external source to this unit, such as an MP3 or CD player, etc. Connect an audio cable (not included) from the AUX IN jack at the back of this unit to the external unit's AUX OUT jack. This will allow you to amplify the external unit's sound through this unit's speakers.
- Press the SELECT button. (Note: if you make a mistake at any point, press the BACK button go back to the previous screen.)
- Turn the knob until the display says
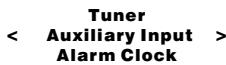
- Press the SELECT button.
Aux In
- Connect the external unit's AUDIO OUT jack on the rear of the unit via an audio cable (not included). Turn on the external unit, set its volume control (if there is one) to mid-position at first and operate it as usual. Distortion will result if the external unit's volume setting is too high.
- The sound will be heard through this unit's speaker.
- Use VOLUME + or - buttons on this unit to adjust the desired volume level.
- When finished listening, turn off the power of the external unit. Press SELECT or BACK button on this unit to go back to main menu for FM or Internet listening, especially if wake alarms are programmed.
NOTES:
- When connecting the external unit, refer to the owner's manual of the external unit, as well as this manual.
Examples of External Audio Sources that can be connected to this unit are: Portable MP3 Player, Cassette Player, Mini Disc Player, DVD player...etc
HEADPHONE JACK
For private listening, connect 3.5mm (32 ohm) stereo headphones (not included) to this jack. The speakers are automatically disconnected when the headphone plug is inserted in the jack.
IMPORTANT:
Excessive sound pressure from earphones and headphones can cause hearing loss.
LINE OUT JACK
A stereo line out jack is located on the back of the unit, which enables the connection to an external audio system.
Cabinet Cleaning
Use only a soft cloth on the high-gloss cabinet surface. Do not use a paper towel to avoid scratching.
Specifications
Power Supply: AC 100-240V~60/50Hz
Output Power: 2W x2
Unit Dimension: 220(L) x 112.5(W) x 135(H)mm
Weight: 1.9kg
Radio Section
Tuning ranges: FM 87.5 -108 MHz
Aerials: Wire antenna (FM)
General
Terminals-Output: 3.5mm stereo headphone
Line Out: 3.5mm Jack
Aux In: 3.5mm Jack
*** Specifications subject to change without notice ***
License Information
This product contains software licensed under version 2 of the GNU Public License and version 2.1 of the GNU Lesser Public License. The source code for this software is available from http://www(reciva.com/gpl
This product includes technology owned by Microsoft Corporation and under a license from Microsoft Licensing GP. Use or distribution of such technology outside of this product is prohibited without a license from Microsoft Corporation and/or Microsoft Licensing, GP as applicable.
SANYO COMFORT WARRANTY CONSUMERPRODUCTS
WARRANTY APPLICATION
New, unused SANYO products purchased through a SANYO authorized dealer in Canada are warranted against manufacturing defects in materials and workmanship for ONE YEAR from the date of purchase by the original retail purchaser for non-commercial use. This Warranty only applies in favour of the original retail purchaser of the warranted product.
SANYO CANADA INC.'S RESPONSIBILITY
During the warranty period, SANYO Canada Inc. will repair, or at our option, replace a product which shows evidence of a manufacturing defect in materials or workmanship. Replacement PARTS are warranted for the remaining portion of the warranty period.
WHAT IS NOT COVERED
(a) Products purchased outside Canada.
(b) Products purchased in a used condition.
(c) Problems due to product set up and installation.
(d) Adjustments that are outlined in the Operating Manual.
(e) Accessory items including antenna, batteries.
(f) Damage in or due to transportation.
(g) Damage due to improper maintenance, improper wiring, accident, abuse, misuse or negligence.
(h) Damage caused by lightning and power surges.
(i) The cost of removal and reinstallation of a product designed for automobile use.
(j) The rubber seal of the water-proof digital movie camera.
ORIGINAL RETAIL PURCHASER'S RESPONSIBILITY
You, the original retail purchaser, must present your original, dated bill of sale together with this Warranty to SANYO Canada Inc. or to an authorized SANYO Service Depot when you make a claim under this Warranty.
You, the original retail purchaser, are responsible for any costs of TRANSPORTING the product to and from SANYO Canada Inc. or an authorized SANYO Service Depot. You also are responsible for the cost of any MAINTENANCE necessary in respect of the product.
WARRANTY BECOMES VOID
This Warranty becomes void if the product's serial numbers are altered or removed or if any repair to the product is made other than by SANYO Canada Inc. or by an authorized SANYO Service Depot.
LIMITATIONS
(a) SANYO Canada Inc. reserves the right to change or improve the design of the model of the product warranted hereunder without incurring any obligation to make any modifications to or to install any improvement in or on the product.
(b) In no event shall SANYO Canada Inc. or any of its Authorized Dealers be liable for special or consequential damage arising from the use of this product.
STATUTORY WARRANTYIS
The above provisions do not preclude the operation of any applicable provincial statute which in certain circumstances may not allow some of the limitations and exclusions described in this Warranty. Where any terms of this Warranty are prohibited by such a statute, they shall be deemed null and void but the remainder of this Warranty shall remain in effect.
HOW TO OBTAIN WARRANTY SERVICE
Please contact SANYO at:
SANYO Canada Inc.
1-300 Applewood Cres.
Concord, Ontario L4K 5C7
1-800-263-2244
www.sanyo.ca
CONSIGNES DE SÉCURITÉ
POUR ÉVITER LES RISQUES D'INCENDIE OU DE SECOUSSE ÉLECTRIQUE, N'UTILISÉZ PAS LA FICHE AVEC UNE RALLYNGE, UNEPRISE MULTIPLE OU TOUTE AUTRE PRISÀ MOINS QUE LES LAMES PUSSENT S'Y INSERÉR À FOND. POUR ÉVITER LES RISQUESD'INCENDIE OU DE SECOUSSE ÉLECTRIQUE, N'EXPOSEZ PAS CET APPAREIL À LA PLUIE OU À L'HUMIDITÉ.

MISE EN GARDE
RISQUE DE SECOUSSÉ ELECTRIQUE NE PAS OUVIR

| Stations |
| Media Player |
| Configure |
| Tuner |
| Auxiliary Input |
| Alarm Clock |
Installation
Initializing network
Connecting to network
Puis ce qui suit :
Network OK
Assigned to preset #
Stations Media Player < Configure >
1.9:30 AM Daily Buzzer
2. 10:30 AM Daily Buzzer

Assigned to preset #