
HT32744 - Television SANYO - Free user manual and instructions
Find the device manual for free HT32744 SANYO in PDF.
| Product Type | High Definition Digital Television |
| Brand | SANYO |
| Model | HT32744 |
| Screen Size | 32 inches (diagonal) |
| Resolution | 1080i (interlaced scanning) |
| Dimensions (W x H x D) | 888 x 687 x 570 mm |
| Weight | 65.1 kg |
| Power Supply | 120 V AC, 60 Hz |
| Power Consumption | 140 W |
| Tuner | ATSC (digital) and NTSC (analog) |
| Audio | Dolby Digital, front speakers 6x12 cm (2) |
| Video Inputs | HDMI, component (x2), S-video (x2), composite (x2) |
| Audio Outputs | Optical digital, analog L/R |
| Main Features | PAP (picture-and-picture), V-Guide, analog/digital closed captioning, sleep timer, auto channel search |
| Remote Control | 52-key multimedia, programmable |
| Cabinet Care | Soft dry cloth |
| Screen Care | Soft cloth moistened with diluted non-alkaline soap solution |
| Safety | Do not expose to rain, do not open, use polarized plug, do not use unstable cart |
| Warranty | 1 year (USA and Canada) |
| Spare Parts | Not available for user (qualified service required) |
| Repairability | Refer to qualified service personnel (no user-serviceable parts) |
Frequently Asked Questions - HT32744 SANYO
User questions about HT32744 SANYO
0 question about this device. Answer the ones you know or ask your own.
Ask a new question about this device
Download the instructions for your Television in PDF format for free! Find your manual HT32744 - SANYO and take your electronic device back in hand. On this page are published all the documents necessary for the use of your device. HT32744 by SANYO.
USER MANUAL HT32744 SANYO
natural_image
Illustration of three CRT TVs labeled HT30744 and HT32744, showing different screen designs (no text beyond labels)HT27744
Owner's Manual
ENGLISH
Table of Contents ..... 3
"As an ENERGY STAR® Partner, Sanyo
Manufacturing Corporation has determined that this product meets the ENERGY STAR®
guidelines for energy efficiency."
"Read this manual before assembling (or using) this product."
Need assistance?
Visit our Web site at www.sanyoctv.com or
Call toll free 1-800-877-5032
Importado Por :
Col. Santa Cruz Acayucan
Printed in U.S.A. SMC, May 2004
Part No. / No. de Parte/
THIS SYMBOL INDICATES THAT THERE ARE IMPORTANT OPERATING AND MAINTENANCE INSTRUCTIONS IN THE LITERATURE ACCOMPANYING THIS UNIT.


WARNING: TO REDUCE THE RISK OF FIRE OR ELECTRIC SHOCK, DO NOT EXPOSE THIS APPLIANCE TO RAIN OR MOISTURE.
IMPORTANT SAFETY INSTRUCTIONS
CAUTION: PLEASE ADHERE TO ALL WARNINGS ON THE PRODUCT AND IN THE OPERATING INSTRUCTIONS. BEFORE OPERATING THE PRODUCT, PLEASE READ ALL OF THE SAFETY AND OPERATING INSTRUCTIONS. RETAIN THIS LITERATURE FOR REFERENCE. Follow all instructions...
Positioning the appliance
- Do not place your appliance on an unstable cart, stand, shelf or table. Serious injury to an individual, and damage to the appliance, may result if it should fall. Your salesperson can recommend approved carts and stands or shelf and wall mounting instructions. An appliance and cart combination should be moved with care. Quick stops, excessive force, and uneven surfaces may cause the appliance and cart combination to overturn.
- Slots and openings in the cabinet and in the back or bottom are provided for ventilation. To ensure reliable operation of the appliance and to protect it from overheating, these openings must not be blocked or covered. The openings should never be covered with a cloth or other material, and the bottom openings should not be blocked by placing the unit on a bed, sofa, rug, or other similar surface. This appliance should never be placed near or over a radiator or heat register. This appliance should not be placed in a built-in installation such as a bookcase unless proper ventilation is provided.
- Do not expose the appliance to rain or use near water . . . for example, near a bathtub, swimming pool, kitchen sink, in a wet basement, etc.
Hooking Up Outdoor Antenna
LIGHTNING PROTECTION FOR YOUR ANTENNA AND SET AS PER NATIONAL ELECTRICAL CODE INSTRUCTIONS.
4. If an outside antenna is connected to the receiver, be sure the antenna system is grounded so as to provide some protection against voltage surges and built up static charges. Article 810 of the National Electrical Code, ANSI/NFPA 70, provides information with respect to proper grounding of the mast and supporting structure, grounding of the lead in wire to an antenna discharge unit, size of grounding conductors, location of antenna discharge unit, connection to grounding electrodes, and requirements for the grounding electrode.
EXAMPLE OF ANTENNA GROUNDING ACCORDING TO NATIONAL ELECTRICAL CODE, ANSI/NFPA 70
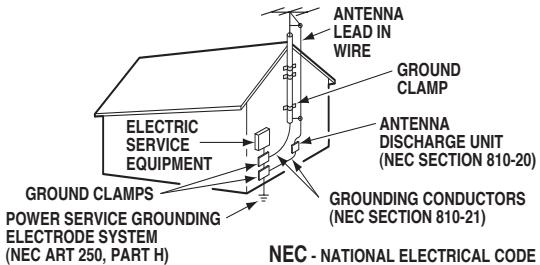
"Note to CATV system installer:
This reminder is provided to call the CATV system installer's attention to Article 820-40 of the NEC that provides guidelines for proper grounding and, in particular, specifies that the cable ground shall be connected to the grounding system of the building, as close to the point of cable entry as practical."
An outside antenna system should not be located in the vicinity of overhead power lines or other electric light or power circuits, or where it can fall into such power lines or circuits. When installing an outside antenna system extreme care should be taken to keep from touching such power lines or circuits as contact with them might be fatal.
Plug in the power cord
- This product should be operated only from the type of power source indicated on the marking label. If you are not sure of the type of power supply to your home, consult your product dealer or local power company. This product is equipped with a polarized alternating current line plug (a plug having one blade wider than the other). This plug will fit into the power outlet only one way. This is a safety feature. If you are unable to insert the plug fully into the outlet, try reversing the plug. If the plug should still fail to fit, contact your electrician to replace your obsolete outlet. Do not defeat the safety purpose of this polarized plug. Do not overload wall outlets, extension cords, or integral convenience receptacles as this can result in a risk of fire or electric shock.
- Power-supply cords should be routed so that they are not likely to be walked on or pinched by items placed upon or against them, paying particular attention to cords at plugs, convenience receptacles, and the point where they exit from the product.
Cleaning
- Before cleaning, unplug the unit from the wall outlet. Do not apply liquid cleaners or aerosol cleaners directly to the unit. Use a dry cloth for cleaning.
Service & Repair
- Unplug the appliance from the wall outlet and refer servicing to qualified service personnel under the following conditions:
A. If the power cord or plug is damaged or frayed.
B. If liquid has been spilled into the appliance.
C. If the appliance has been exposed to rain or water.
D. If the appliance has been dropped or the cabinet has been damaged.
E. If the appliance exhibits a distinct change in performance.
F. If the appliance does not operate normally by following the operating instructions, adjust only those controls that are covered in the operating instructions. Improper adjustment of other controls may result in damage and will often require extensive work by a qualified technician to restore the appliance to normal operation.
- Upon completion of any service or repair, request the service technician's assurance that only Factory Authorized Replacement Parts that have the same characteristics as the original parts were used, and that routine safety checks have been performed to determine that the appliance is in safe operating condition. Unauthorized substitutions may result in fire, electrical shock, or other hazards.
- Never add accessories that have not been specifically designed for use with this appliance as they may cause hazards.
- For added protection during a lightning storm, or when the set is left unattended and unused for long periods of time, unplug it from the wall outlet and disconnect the antenna. This will prevent damage to the set due to lightning or power line surges.
- Never push objects of any kind into this product through openings as they may touch dangerous voltage points or short-out parts that could result in a fire or electric shock. Never spill liquid of any kind on the product.
Positioning the TV
Do not position the TV in a confined area. Allow space for normal air circulation around electronic parts.
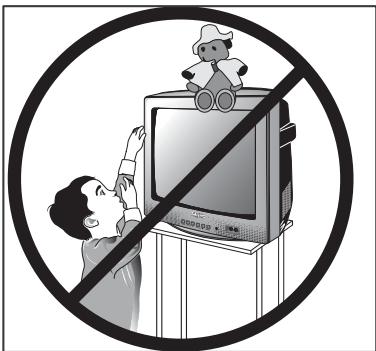
Child Safety
Sanyo is committed to making home entertainment safe and enjoyable. Always use an appropriate table or stand when positioning your TV. Use appropriate brackets, braces, or straps to anchor your furniture in place. But never screw anything directly to the television.
Do not place televisions on dressers, shelves, desks, carts, etc., where curious or excited children could pull, push, or otherwise cause the unit to fall and cause personal injury.
Never place toys or other items on top of the TV that could pique children's curiosity causing them to climb about the furniture.
Always use stands that are designed to support the size and combined weight of your television and other electronic devices.
natural_image
Black-and-white illustration of a person watching TV with a teddy bear on top, crossed out by a diagonal line (no text or symbols)Contents
Important Safety Instructions 2
Welcome to the World of Sanyo 3
Features 4
Specifications 4
Glossary 5
Getting Started 6
HDTV Back—Jacks Locations & Functions 6
Signal Connections
Analog (RF) Antenna Connection 7
Digital (DTV) Antenna Connection 7
Setting Up the TV 7
Digital A/V Connections
Connecting External Equipment to HDMI Input with HDCP 8
Connecting STB or DVD with DVI Output to HDMI Input With HDCP 8
Using the Component jacks to connect a DVD Player or Other digital equipment 9
Analog A/V Connections
Using the S-Video Jacks to connect a VCR or DVD Player to A/V jacks 9
Audio Connections
Connecting Digital Audio Output to a Stereo Amplifier .. 10
Connecting Analog Audio Output to a Stereo Amplifier .. 10
Typical Home Theater Connections ..... 11
Using the Multimedia Remote Control
Installing Batteries 12
Programming the Remote 13
Remote Program Codes (VCR/DVD/Satellite/Cable) .. 14\~15
Remote Program Key Functions Chart 15
TV Adjustment and Setup
How to Operate the On-Screen Menu 16
Menu Navigation Map 16
Channel Search 17
Digital Cable Search 17
Digital Add-On Search 17
Antenna Selection 17
Channel Scan Memory 18
Initial Channel 18
Closed-Captioning
How to View Captions 18
How to Customize Digital Captioning On-Screen Display ... 18
V-Guide (Parental Control) Operation
How to Block Movies or TV Programs 19
How to Temporarily Unblock Movies or TV Programs . . . 19
How to Unblock Movies or TV Programs ..... 19
Setup Menu
Setting the Clock Manually 20
Digital Audio Output 20
TV Speakers 20
Menu Language 20
Picture/Sound Adjustment
Adjusting the Picture/Sound Manually ..... 20
Color Enhancer 21
Scan Velocity 21
PAP (Picture and Picture)
Using the PAP Split Screen 21
Switching Between the Split Windows 21
Freezing the PAP Window 21
Operating PAP Screens with other features 21
Helpful Hints (Problems/Solutions) 22
Warranty (Mexico) 23
Warranty (U.S.A. and Canada) 24
Introduction
Welcome to the World of Sanyo
Thank you for purchasing this Sanyo High-Definition Digital Television. You made an excellent choice for Performance, Reliability, Features, Value, and Styling.
To The Owner
We are aware that you are eager to begin using your new HDTV. However, we also understand that to enjoy it fully you must first understand its many features. While this owner's manual is intended to fully acquaint you with the TV's operation, it is not meant to be read from cover to cover. Instead, it has been carefully arranged for easy use so you can find what you need, then move on quickly to enjoying your digital television.
Features
◆ 27" High-Definition Digital True Flat-screen television
◆ 30" High-Definition Digital True Flat Wide-screen television
◆ 32" High-Definition Digital True Flat-screen television
◆ Trilingual Menu Options
◆ Built-in Digital and Analog Tuners
◆ Automatic Channel Search
Auto Shut Off
◆ 3-D Digital Comb Filter (for better picture detail)
◆ Adjustable Scan Velocity Modulation
◆ V-Chip for Movies and TV guidelines rating limits (parental control)
◆ Closed-Captioning: Analog EIA-608B and Digital (EIA-708B)
◆ Audio Modes: DTV—Main and Sub NTSC—Stereo, Mono, and SAP
◆ Front Surround Sound
◆ Bass / Treble
◆ Front speakers 6 x 12 cm (two)
◆ Factory preset adjustments for picture/sound
◆ Picture shape: Letter box, Zoom, Normal, and Full (HT30744 only)
◆ Initial Channel (automatic selection)
◆ Receivable Formats: Two tuning system: with integrated ATSC digital tuner for terrestrial and nonscrambled (ClearQAM) cable channels. NTSC analog tuner for VHF/UHF or CATV
◆ Audio Format: Dolby™ Digital for DTV and Analog for NTSC
◆ PAP (Picture-and-Picture) split-screen
◆ Channel Scan Memory
◆ Color Enhancer
Auto Flesh Tone
◆ Receives 181 Analog Channels [VHF 2\~13 and UHF 14\~69; Cable TV 1, 14\~125]; and 99 Digital Channels
◆ RF Antenna Input Jacks: Digital and Analog
◆ HDMI (High-Definition Multimedia Interface) Input with HDCP (High-bandwidth Digital Content Protection)
◆ Component Video Input (Two Sets)
◆ Rear AV Input (Two Sets)
◆ S-Video Input (Two Sets)
◆ Optical Digital Audio Out
◆ Audio Out (Switchable)
◆ Clock (auto clock)
◆ XDS (Extended Data Services) displays station call letters, Title of show, and ratings when broadcast
◆ Sleep Timer (3 hours)
◆ 52-Key DTV Multimedia Remote Control
Specifications
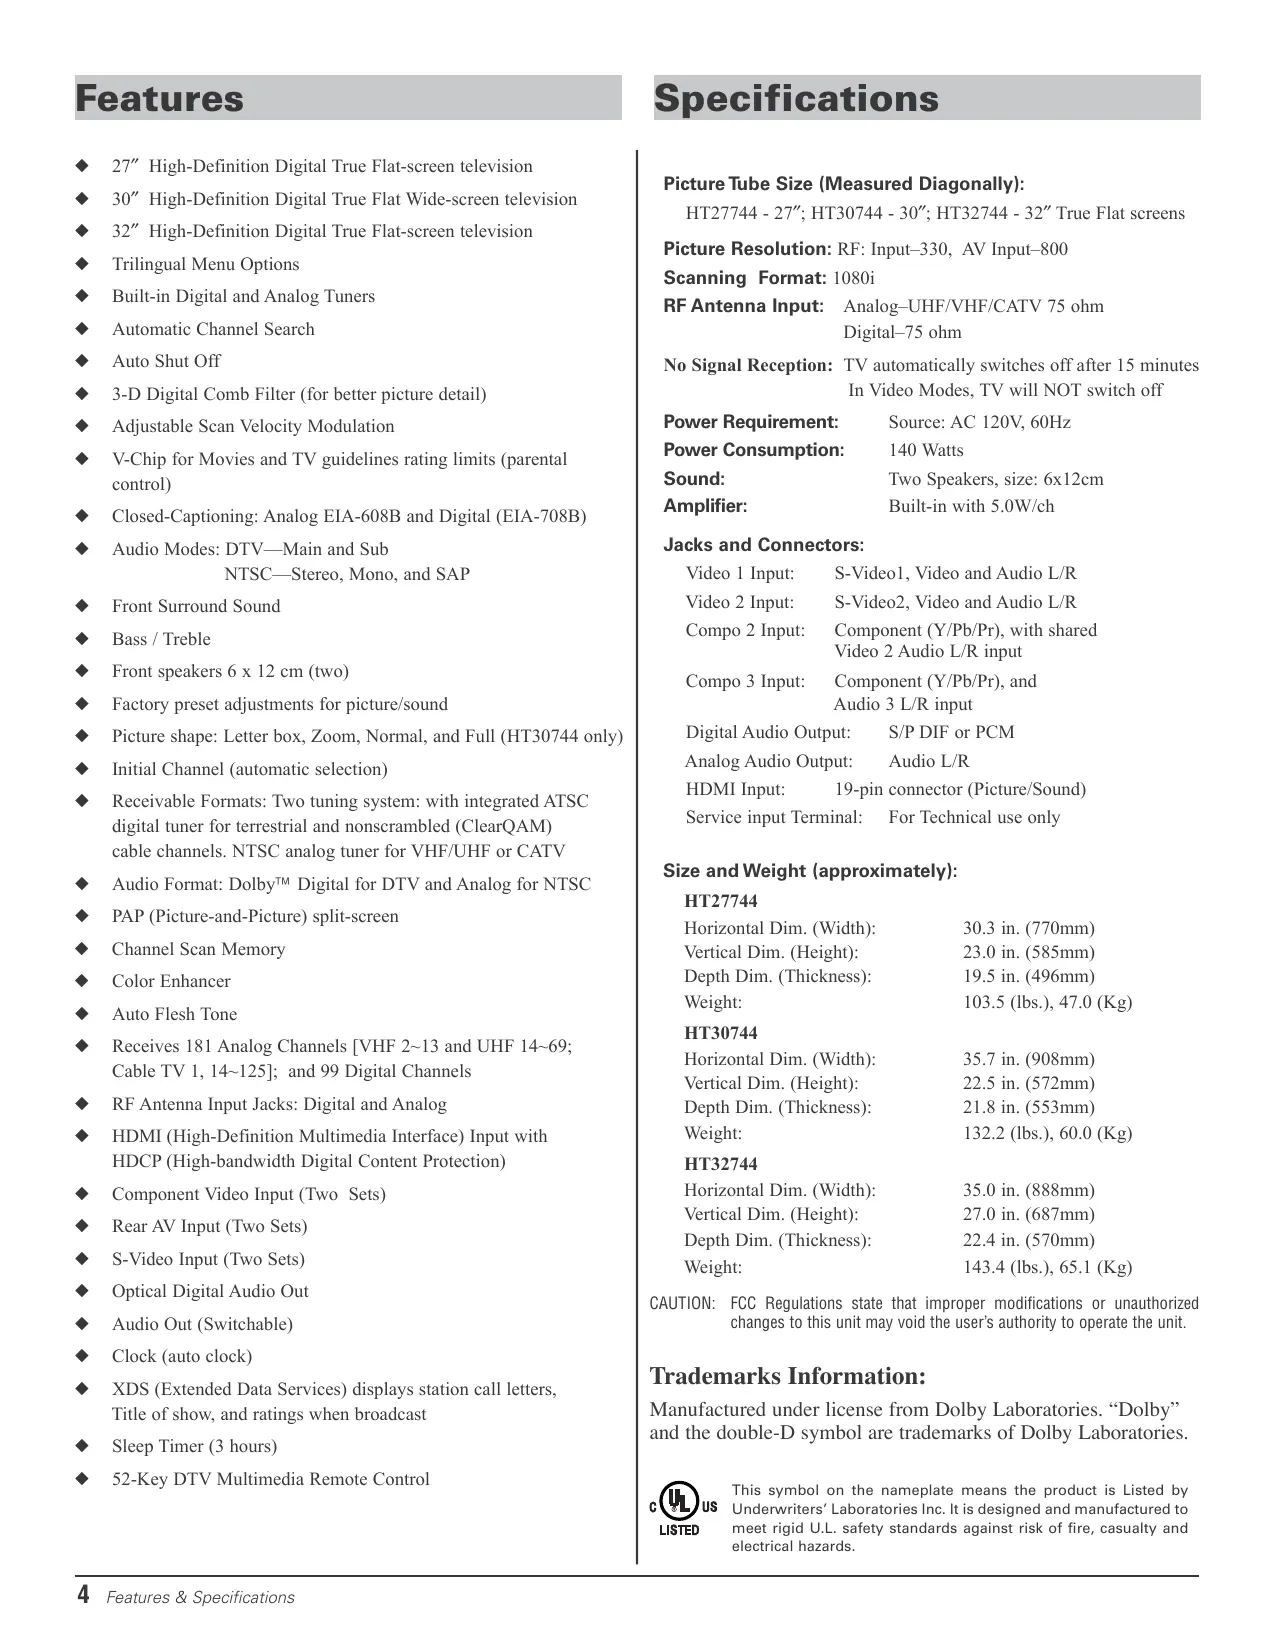
Picture Tube Size (Measured Diagonally):
HT27744 - 27"; HT30744 - 30"; HT32744 - 32" True Flat screens
Picture Resolution: RF: Input-330, AV Input-800
Scanning Format: 1080i
RF Antenna Input: Analog–UHF/VHF/CATV 75 ohm Digital–75 ohm
No Signal Reception: TV automatically switches off after 15 minutes In Video Modes, TV will NOT switch off
Power Requirement: Source: AC 120V, 60Hz
Power Consumption: 140 Watts
Sound: Two Speakers, size: 6x12cm
Amplifier: Built-in with 5.0W/ch
Jacks and Connectors:
Video 1 Input: S-Video1, Video and Audio L/R
Video 2 Input: S-Video2, Video and Audio L/R
Compo 2 Input: Component (Y/Pb/Pr), with shared Video 2 Audio L/R input
Compo 3 Input: Component (Y/Pb/Pr), and Audio 3 L/R input
Digital Audio Output: S/P DIF or PCM
Analog Audio Output: Audio L/R
HDMI Input: 19-pin connector (Picture/Sound)
Service input Terminal: For Technical use only
Size and Weight (approximately):
HT27744
| Horizontal Dim. (Width): | 30.3 in. (770mm) |
| Vertical Dim. (Height): | 23.0 in. (585mm) |
| Depth Dim. (Thickness): | 19.5 in. (496mm) |
| Weight: | 103.5 (lbs.), 47.0 (Kg) |
HT30744
| Horizontal Dim. (Width): | 35.7 in. (908mm) |
| Vertical Dim. (Height): | 22.5 in. (572mm) |
| Depth Dim. (Thickness): | 21.8 in. (553mm) |
| Weight: | 132.2 (lbs.), 60.0 (Kg) |
HT32744
| Horizontal Dim. (Width): | 35.0 in. (888mm) |
| Vertical Dim. (Height): | 27.0 in. (687mm) |
| Depth Dim. (Thickness): | 22.4 in. (570mm) |
| Weight: | 143.4 (lbs.), 65.1 (Kg) |
CAUTION: FCC Regulations state that improper modifications or unauthorized changes to this unit may void the user's authority to operate the unit.
Trademarks Information:
Manufactured under license from Dolby Laboratories. “Dolby” and the double-D symbol are trademarks of Dolby Laboratories.

This symbol on the nameplate means the product is Listed by Underwriters' Laboratories Inc. It is designed and manufactured to meet rigid U.L. safety standards against risk of fire, casualty and electrical hazards.
Glossary
Analog—Commonly refers to the current NTSC transmission standard for televisions.
Aspect Ratio—This term describes the ratio of the width to the height of a TV screen independent of the screen size (x units wide by x units high).
ATSC—Advanced Television Systems Committee (digital standards committee).
Bandwidth—The range of frequencies assigned to a broadcast channel. A TV channel is 6 MHz wide.
ClearQAM Digital Channels—Unscrambled digital cable channels. Cable companies may or may not choose to provide ClearQAM channels.
Dolby® Digital (Formally known as Dolby AC-3)—A 5.1 channel (Front L/R, Rear L/R, Center, and Bass) surround sound audio standard for digital television.
Downconverting—A process for decreasing the number of pixels in an image. Frame rate and/or scanning format may also change. Broadcasters may use this process to make room in their bandwidth for additional services.
DTV (Digital Television)—Comprises three elements, HDTV, EDTV, and SDTV.
DVI (Digital Video Interface)—Designed to accommodate both analog and uncompressed digital video signals with a single connector.
EDTV—Enhanced Definition Television (480p).
HDCP—High-bandwidth Digital Content Protection. A means of protecting copyrighted digital entertainment content.
HDMI—High Definition Multimedia Interface. HDMI is a new standard digital connection between A/V devices, such as a set-top box, DVD player or A/V receiver, and a digital television. HDMI offers exceptional video and audio quality with a single quick-disconnect connector. HDMI supports multi-channel digital audio transmissions and component video color spacing for true rendering of high-definition video. It supports the HDCP protection standard, allowing transmission of copy-protected digital content to your display.
HDTV—High Definition Television (1080i & 720p).
Interlaced Scanning—The process of scanning two fields of video then combining (interlacing) them to make one frame.
Letter Box—A widescreen 16:9 aspect ratio image being displayed on a 4:3 aspect ratio screen. Black borders appear at the top and bottom of the screen (image fails to fill screen vertically).

Multicasting—The dividing of a station's broadcast signal into subchannels of programming or data services.
NTSC—National Television Systems Committee (analog standards committee).
OSD—On Screen Display.
Pulse Code Modulation (PCM)—This is a binary digital signal format used for digitizing analog data.
Pillar Box—A 4:3 aspect ratio image being displayed on a 16:9 ratio screen. Black borders appear at the sides of the screen (image fails to fill screen horizontally).

Postage Stamp—This term is used to describe a 4:3 aspect ratio image that the broadcaster has up-coverted to a 16:9 aspect ratio image, then displayed on a 4:3 aspect ratio screen. Black borders appear at the top, sides, and bottom of the screen (image fails to fill screen both vertically and horizontally). (See Zoom definition below.)

Progressive Scanning—The process of scanning lines sequentially. One field produces one frame.
PSIP—Program and System Information Protocol is a collection of tables designed to operate within every transport stream for DTV broadcasts. PSIP includes instructions advising TVs that a change is about to occur and where virtual channel programming can be found.
Set-Top Box (STB)—A device that receives and converts signals for display on a television screen or monitor (can be digital or analog). Many digital STBs have cable and off-air tuners.
SDTV—Standard Definition Television (480i).
Simulcast—A broadcast station simultaneously broadcasting the same program on an analog channel and a DTV channel. This is required by the FCC during the transition from analog to digital.
Spectrum—A continuous band of frequencies.
S/P DIF—S/P DIF is a digital audio format that can transmit a Dolby Digital bit stream. By connecting this output to an AV receiver that includes a Dolby Digital decoder, the TV can reproduce up to 5.1 channels of surround sound. S/P DIF can also transmit PCM audio.
Surround Sound (Front)—This feature adds another dimension to the acoustic experience and helps to improve the movie-theater like sound.
Terrestrial Broadcast—An over-the-air broadcast to an antenna.
Tuner Indicator—The letters “D,” “C,” or “DC” will appear directly to the left of the channel number:
Off-air channels selected with the digital (DTV) tuner will have the prefix “D.”
Channels selected with the analog (NTSC) tuner will either have the prefix “C” (analog cable channels) or will be blank (for terrestrial, VHF/UHF channels).
ClearQAM digital cable channels will have the prefix "DC."
Tuner Key—This key is used to toggle from one tuning system to another, digital channels and analog channels.
Upconverting—A process for increasing the number of pixels in an image (may include changing the frame rate and scanning format). Additional pixels are inserted between existing pixels in an attempt to simulate HDTV. This process does not increase the resolution.
Virtual Channel—Channels broadcasted with major and minor information contained in the PSIP package. The number of virtual channels a broadcaster can send depends on the resolution of the programming.
Wide-Screen—Used to describe a 16:9 or greater aspect ratio. 16:9 is the standard aspect ratio for HDTV programming. Movies screens are sometimes slightly wider (often 2:1).
Zoom—Enlarges center of the image. For instance, if you have a postage stamp image shape, press this key to enlarge image.

Getting Started
This new high-definition digital television is capable of reproducing a crystal clear picture and exceptional sound. Just like being There!
To get the best performance from this HDTV you will need to...
- Choose the appropriate Signal Connection, "The Signal Makes the Difference," pages 7
- Connect External equipment, if desired, pages 8 \~ 11
- Install Batteries in the Remote, and Review the functions, pages 12\~13
- Program Remote to operate other equipment, if desired, pages 13\~15
- Follow the on-screen menu display to customize and setup features, pages 16\~21
Note: For additional assistance, reference the Quik 'N Easy Setup guide to learn how different signals and external equipment effect picture quality. Follow the examples there to ensure that you are getting the best possible picture, based on your external equipment's capability and your signal quality.
HDTV Back—Jacks Locations and Functions
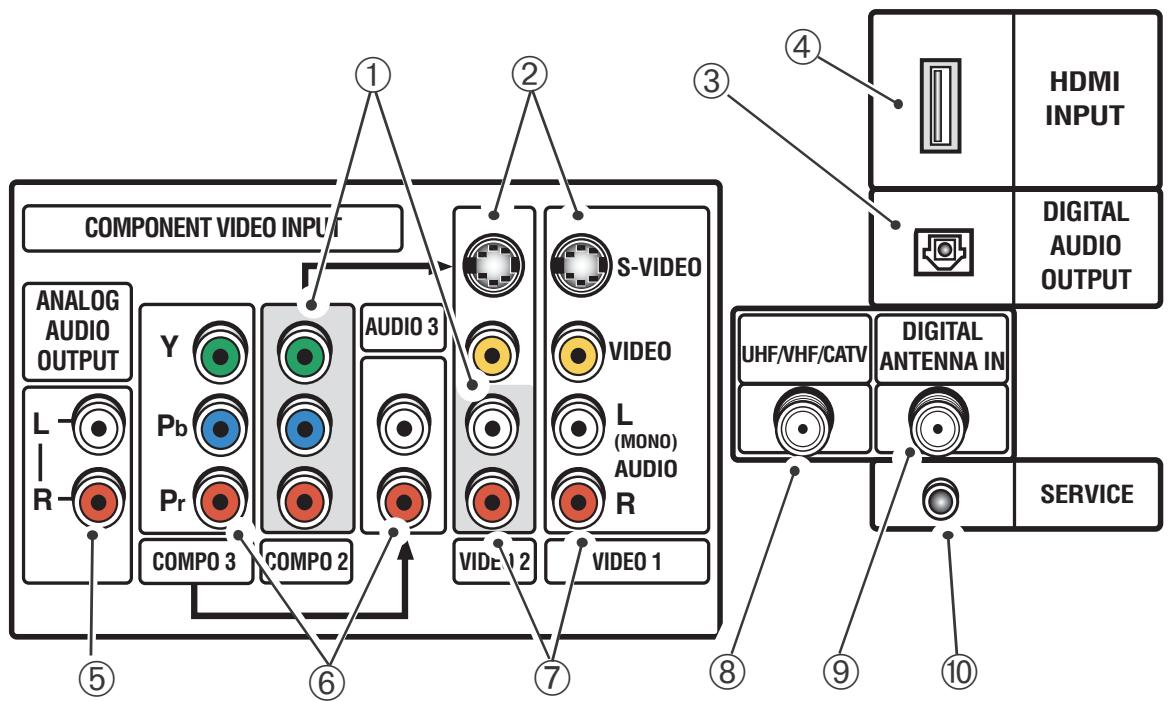
① Component Video Input (COMPO 2)—Connect digital video equipment to the Y, Pb, Pr and VIDEO 2 Audio L/R jacks. These jacks will automatically detect the type of signal being received (HDTV, EDTV, or SDTV).
② S-Video (Video 1 and 2) Input—To enhance video detail use the S-Video (Video 1/2) jacks instead of the Video jacks, if available on your external equipment. (S-Video connections will override connections to the Video 1/2 input jacks.)
③ Digital Audio Output—Optical connection for advanced Dolby™ Digital 5.1 stereo home theater systems.
④ HDMI (High Definition Multimedia Interface) Input—Connect digital video equipment to this jack. It only takes one high bandwidth cable (not supplied) to communicate between the video/audio equipment and this TV. This connection is compatible with DVI equipped devices. (Separate audio connection is required for DVI device.)
⑤ Analog Audio Out (L/R) Jacks—Connect external audio equipment here. (See page 10.)
⑥ Component Video Input (COMPO 3)—Connect digital video equipment to the Y, Pb, Pr and AUDIO 3 (L/R) jacks. (See page 9.) These jacks will automatically detect the type of signal being received (HDTV, EDTV or SDTV).
⑦ Audio/Video Input (AV1/AV2)—Connect standard video equipment here (see page 9).
Note: S-Video1/2 connections override the AV1/2 video composite connections.
⑧ Analog Antenna Input (UHF/VHF/CATV)—Connect an RF antenna, cable, or satellite receiver to this jack as shown on page 7.
⑨ Digital Antenna Input—Connect an RF antenna to this jack as shown on page 7.
⑩ Service Terminal—For technical use only.
Signal Connection
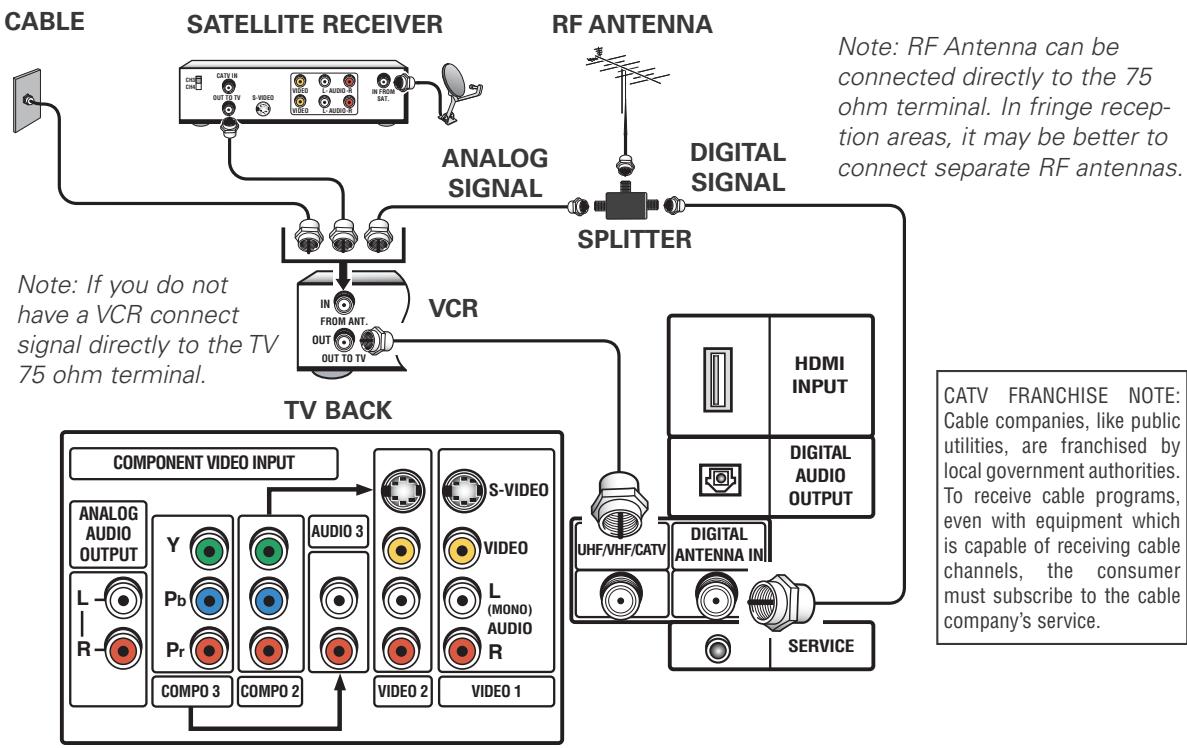
Analog RF Antenna Connection
Connecting Analog Cable service, RF antenna, or Satellite Receiver to the TV Analog (UHF/VHF/CATV) 75 ohm terminal.
Digital (DTV) Antenna Connection
Connect RF antenna to the splitter, then to the TV Digital Antenna In Terminal.
flowchart
graph TD
    A["CABLE"] --> B["SATELLITE RECEIVER"]
    B --> C["ANALOG SIGNAL"]
    C --> D["RF ANTENNA"]
    D --> E["SPLITTER"]
    E --> F["TV BACK"]
    F --> G["COMPONENT VIDEO INPUT"]
    G --> H["ANALOG AUDIO OUTPUT"]
    H --> I["Y"]
    H --> J["Pb"]
    H --> K["Pr"]
    H --> L["COMPO 3"]
    H --> M["COMPO 2"]
    G --> N["AUDIO 3"]
    G --> O["VIDEO 2"]
    G --> P["VIDEO 1"]
    G --> Q["S-VIDEO"]
    G --> R["VIDEO"]
    G --> S["L (MONO) AUDIO R"]
    G --> T["UHF/VHF/CATV"]
    G --> U["DIGITAL ANTENNA IN"]
    U --> V["HDMI INPUT"]
    U --> W["DIGITAL AUDIO OUTPUT"]
    U --> X["SERVICE"]
    style A fill:#f9f,stroke:#333
    style B fill:#ccf,stroke:#333
    style C fill:#cfc,stroke:#333
    style D fill:#fcc,stroke:#333
    style E fill:#cff,stroke:#333
    style F fill:#ffc,stroke:#333
    style G fill:#cfc,stroke:#333
    style H fill:#cfc,stroke:#333
    style I fill:#cfc,stroke:#333
    style J fill:#cfc,stroke:#333
    style K fill:#cfc,stroke:#333
    style L fill:#cfc,stroke:#333
    style M fill:#cfc,stroke:#333
    style N fill:#cfc,stroke:#333
    style O fill:#cfc,stroke:#333
    style P fill:#cfc,stroke:#333
    style Q fill:#cfc,stroke:#333
To connect a High-Definition cable or satellite set-top box, go to page 8.

QuickTips
■ The TV will automatically select an Antenna mode for the type of Analog RF signal you connect.
Use “Antenna Selection” in the Setup menu to change Antenna mode.
■ TV will switch off automatically after 15 minutes if there is no signal reception (cable out or station not broadcasting).
Exception—When a Video mode is selected, the TV will not automatically switch off when signal reception has stopped for 15 minutes.
■ If you move the TV to a new location, press the RESET key twice after connecting the signal and turning on the TV.
Need help?
Visit our Web site at
www.sanyoctv.com
or Call 1-800-877-5032
Setting Up the TV
NOTE: When the television is powered on for the first time, it automatically checks to make sure an RF input signal is connected. After you have made all necessary connections, continue as follows...
- Press the CHANNEL UP key to automatically search and scan for available channels: Digital (DTV) and Analog (NTSC). The Channel Search contains two processes that are executed simultaneously for digital and analog channels, therefore, this will take a few minutes.
NOTES:
The on-screen message for digital search will appear with the channel number, a progress bar, and percentile number displayed across the bottom of the screen (to indicate activity) as the search process continues. This may take some time, so please be patient.
Channel information found during the channel search is stored in the Channel Scan Memory database. The HD television will be tuned to the lowest Digital channel or lowest Analog channel if no digital channels are found.
- To change the initial analog tuning system setup (from antenna to cable or cable to antenna), use the on-screen menu. See “Antenna Selection” on page 17.
- After channel search is complete, the TV will begin Auto Clock setting. This feature searches for a local PBS station that is broadcasting an extended data service signal. This signal is used to automatically set the clock/day. (This may take several seconds.)
To cancel auto clock setting, press the CHANNEL UP key. (To set the clock manually, see page 20.)
First
Please connect all signals and antennas to jacks and the terminals on the back.
Then press the Channel UP key.
Please wait,
while your TV searches
for available channels.

Digital Antenna 35
Please wait,
Automatic clock setting.
Press Channel UP Key to cancel.

QuickTips
■ If the television HDMI pin configuration is different from the pin configuration on your set-top box, you will need to use an Adapter for Step 1 connection.
■ To connect DVI to HDMI, you will need to use a DVI to HDMI Cable or an adapter to make the connection in Step 1.
■ With a DVI connection, make sure you connect Audio out to the TV's Compo3 Audio in.
■ Because the Component (Compo3) audio jacks are used to receive the audio from the DVI device, the Compo3 video jacks cannot be used when a DVI device is connected.
Need help?
Visit our Web site at
www.sanyoctv.com
or Call 1-800-877-5032
IMPORTANT FACT: When using HDCP (High Definition Content Protection) you may not be able to copy material that is copyrighted by the content owner.
This is the best option for picture and sound! Using the HDMI connection, which has high-definition content protection, provides you with uncompressed digital video and audio. As Real As It Gets!
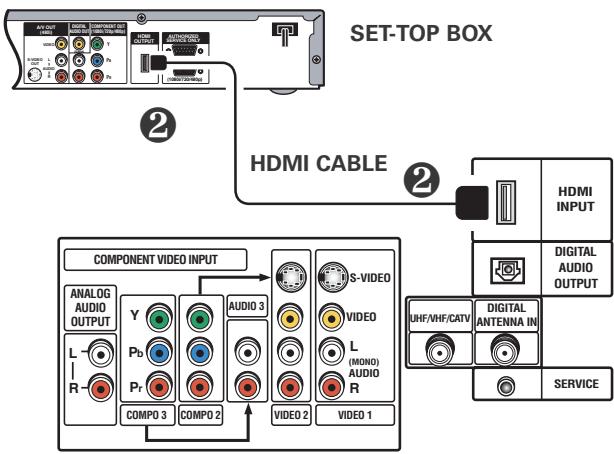
Connecting External Equipment to HDMI (Includes HDCP copy protection)
To avoid problems with some brands of external equipment, follow this procedure when connecting cables and powering on your equipment.
① Switch off TV and external equipment before connecting cable. (Cable is not supplied.)
② Connect the external equipment's high bandwidth HDMI Output to the TV's HDMI input. This connection requires only one cable, and includes uncompressed video and Dolby 5.1 or PCM sound.
③ The TV must be turned on first, press POWER.
④ Then turn on your external equipment.
⑤ Press INPUT to select HDMI to view digital program.
What you will need for connections:
② 19 Pin HDMI Digital Cable – 1
(Make sure you check the pin configuration of the cable plug-end*)
*Adapter may be required
flowchart
graph TD
    A["SET-TOP BOX"] --> B["HDMI CABLE"]
    B --> C["COMPONENT VIDEO INPUT"]
    C --> D["ANALOG AUDIO OUTPUT"]
    C --> E["VIDEO 1"]
    C --> F["VIDEO 2"]
    C --> G["VIDEO 3"]
    C --> H["S-VIDEO"]
    C --> I["L (MONO) AUDIO R"]
    C --> J["UHF/VHF/CATV"]
    C --> K["DIGITAL ANTENNA IN"]
    C --> L["SERVICE"]
    style A fill:#f9f,stroke:#333
    style B fill:#ccf,stroke:#333
    style C fill:#cfc,stroke:#333
    style D fill:#fcc,stroke:#333
    style E fill:#cff,stroke:#333
    style F fill:#ffc,stroke:#333
    style G fill:#cfc,stroke:#333
    style H fill:#fcc,stroke:#333
    style I fill:#ffc,stroke:#333
    style J fill:#fcc,stroke:#333
    style K fill:#cfc,stroke:#333
    style L fill:#fcc,stroke:#333
Connecting STB with DVI Output to HDMI Input (Includes HDCP copy protection)
Using a DVI to HDMI cable provides better picture quality than standard component or composite connections, but to receive sound, a separate audio connection is required.
To avoid problems with some brands of external equipment, follow this procedure when connecting cables and powering on your equipment.
① Switch off TV and STB before connecting cables. (Cables are not supplied.)
② Connect the STB’s DVI Output to a “DVI to HDMI Cable;” then connect the cable to the TV’s HDMI input.
Note: Check with your local electronic store for a DVI to HDMI Cable that matches your equipment and the TV.
③ Connect the STB's Audio L/R to the TV's Component Audio 3 L/R.
④ The TV must be turned on first, press POWER.
⑤ Then turn on your external equipment.
⑥ Press INPUT to select HDMI to view digital TV programs.
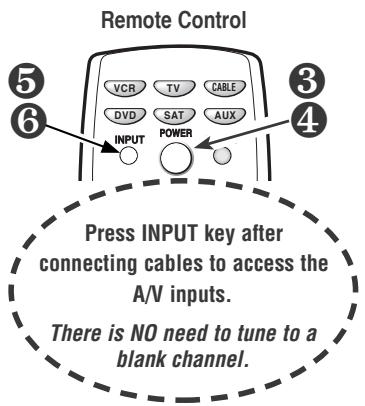
What you will need for connections:
② DVI to HDMI Cable - 1
③ Audio Cable – 1
flowchart
graph TD
    A["SET-TOP BOX"] -->|③| B["TV BACK JACKS"]
    A -->|②| C["DVI to HDMI CABLE"]
    B --> D["COMPONENT VIDEO INPL"]
    B --> E["S-VIDEO"]
    B --> F["VIDEO 1"]
    B --> G["VIDEO 2"]
    B --> H["VIDEO 3"]
    B --> I["ANALOG AUDIO OUTPUT"]
    B --> J["L - R"]
    B --> K["COMPO 3"]
    B --> L["COMPO 2"]
    B --> M["PY"]
    B --> N["Ps"]
    B --> O["PY"]
    style A fill:#f9f,stroke:#333
    style B fill:#ccf,stroke:#333
    style C fill:#cfc,stroke:#333
    style D fill:#fcc,stroke:#333
    style E fill:#cff,stroke:#333
    style F fill:#ffc,stroke:#333
    style G fill:#fcc,stroke:#333
    style H fill:#ffc,stroke:#333
    style I fill:#fcc,stroke:#333
    style J fill:#fcc,stroke:#333
    style K fill:#fcc,stroke:#333
    style L fill:#fcc,stroke:#333
    style M fill:#fcc,stroke:#333
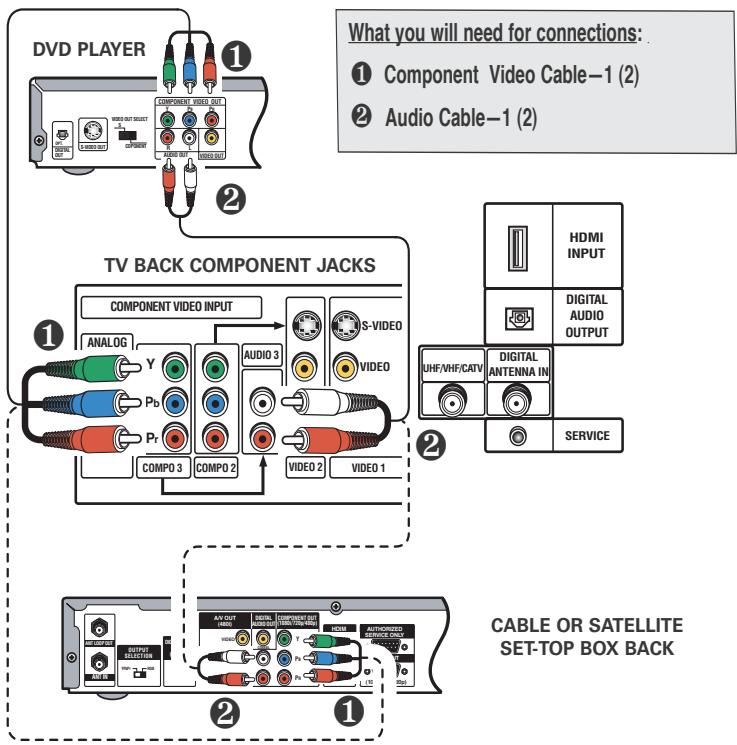
Using Component Jacks to connect a DVD Player or other digital equipment
The Component Video jacks will accept HDTV, EDTV, or SDTV video content.
Switch off TV and external equipment before connecting cables. (Cables are not supplied.)
Follow these steps to easily connect your STB or DVD to this HDTV:
1 Connect DVD Player or other digital equipment's Component Video Out to the TV Component Video (Compo 3) or (Compo 2) Input jacks.
② Connect DVD Player or other digital equipment's Audio Out to the TV Component Audio 3 or Audio (Video 2) 2 Input jacks.
③ Press POWER to turn on the TV. Turn on external equipment also.
④ Press the INPUT to select COMPONENT3 or COMPONENT2 to view the DVD program.
Note: To connect additional digital external equipment, use either set of component video audio jacks.
flowchart
graph TD
    A["1: DVD PLAYER"] --> B["2: TV BACK COMPONENT JACKS"]
    B --> C["3: COMPONENT VIDEO INPUT"]
    C --> D["4: ANALOG"]
    D --> E["5: Y"]
    D --> F["6: Pb"]
    D --> G["7: Pn"]
    D --> H["8: COMPO 3"]
    D --> I["9: COMPO 2"]
    D --> J["10: VIDE 2"]
    D --> K["11: VIDE 1"]

    L["2: CABLE OR SATELLITE SET-TOP BOX BACK"] --> M["3: HDMI INPUT"]
    M --> N["4: DIGITAL AUDIO OUTPUT"]
    N --> O["5: UHF/VHF/CATV"]
    O --> P["6: DIGITAL ANTENNA IN"]
    P --> Q["7: SERVICE"]
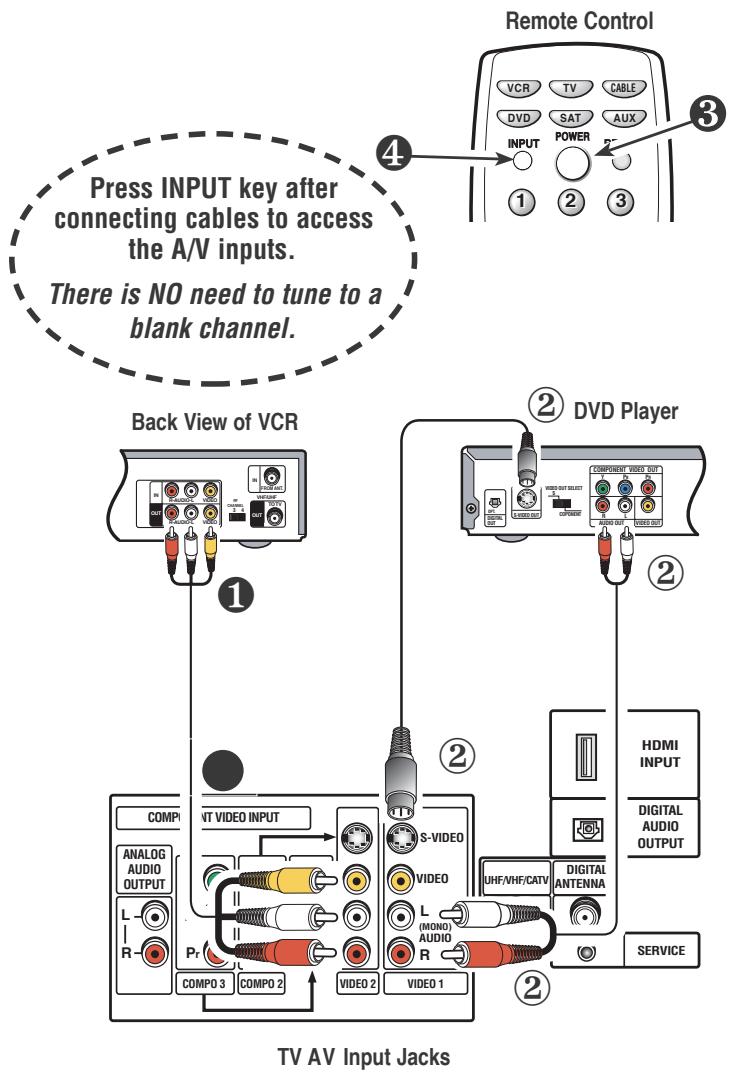
Analog A/V Connections
Using S-Video Jacks to connect a DVD Player and VCR to A/V jacks
Switch off TV and external equipment before connecting cables. (Cables are not supplied.) Follow these steps to easily connect your DVD or VCR.
1 Connect DVD Player or other equipment's S-Video Out to the TV S-Video In 1 or 2 Jacks.
Note: S-Video jacks override Video jacks.
② Optional
Connect VCR's Audio Video Out to the TV Audio Video 1 or 2 Input jacks.
For Mono VCR (Single Audio Jack) connect VCR Audio Out to TV Audio (L) Input.
③ Press POWER to turn on the TV. Turn on external equipment also.
4 Press the INPUT to select VIDEO 1 or VIDEO 2 to view the DVD or VCR program.
Notes:
AV1 and AV2 jacks have identical functions. Any compatible video device can be connected to either set of jacks.
A solid Blue screen with the word VIDEO1 or VIDEO2 displayed means that the Video mode is selected, but no signal is being detected at the Video jacks. Check connections and turn on external equipment.
Composite jacks offer only 480i (SDTV) resolution.
flowchart
graph TD
    A["Back View of VCR"] --> B["Compt"]
    B --> C["ANALOG AUDIO OUTPUT"]
    C --> D["L"]
    D --> E["R"]
    E --> F["COMPO 3"]
    F --> G["COMPO 2"]
    G --> H["VIDEO 1"]
    H --> I["VIDEO 2"]
    I --> J["VIDEO 3"]
    J --> K["MTV VIDEO INPUT"]
    K --> L["S-VIDEO"]
    L --> M["VIDEO"]
    M --> N["L (MONO) AUDIO R"]
    N --> O["VIDEO 1"]
    O --> P["HDMI INPUT"]
    P --> Q["DIGITAL AUDIO OUTPUT"]
    Q --> R["SERVICE"]
    R --> S["CONTROL Panel"]
    S --> T["Remote Control"]
    T --> U["VCR"]
    U --> V["TV"]
    V --> W["CABLE"]
    W --> X["DVD"]
    X --> Y["SAT"]
    Y --> Z["AUX"]
    Z --> AA["INPUT"]
    AA --> AB["POWER"]
    AB --> AC["①"]
    AC --> AD["②"]
    AD --> AE["③"]
    AE --> AF["④"]

    style A fill:#f9f,stroke:#333
    style B fill:#ccf,stroke:#333
    style C fill:#cfc,stroke:#333
    style D fill:#fcc,stroke:#333
    style E fill:#cff,stroke:#333
    style F fill:#ffc,stroke:#333
    style G fill:#cfc,stroke:#333
    style H fill:#fcc,stroke:#333
    style I fill:#cfc,stroke:#333
    style J fill:#fcc,stroke:#333
    style K fill:#ffc,stroke:#333
    style L fill:#cfc,stroke:#333
    style M fill:#fcc,stroke:#333
    style N fill:#cfc,stroke:#333
    style O fill:#fcc,stroke:#333
    style P fill:#cfc,stroke:#333
    style Q fill:#fcc,stroke:#333
    style R fill:#cfc,stroke:#333
    style S fill:#cfc,stroke:#333
    style T fill:#cfc,stroke:#333
    style U fill:#cfc,stroke:#333
    style V fill:#cfc,stroke:#333
    style W fill:#cfc,stroke:#333
    style X fill:#cfc,stroke:#333
    style Y fill:#cfc,stroke:#333
    style Z fill:#cfc,stroke:#333
    style AA fill:#cfc,stroke:#333
    style AB fill:#cfc,stroke:#333
    style AC fill:#cfc,stroke:#333
    style AD fill:#cfc,stroke:#333
    style AE fill:#cfc,stroke:#333
    style AF fill:#cfc,stroke:#333
    style AG fill:#cfc,stroke:#333
    style AH fill:#cfc,stroke:#333
Audio Connections

QuickTips
■ Position your TV at least 2 feet from stereo speakers. The magnets in the speakers may affect the picture quality.
Need help? Visit our Web site at www.sanyoctv.com or Call 1-800-877-5032
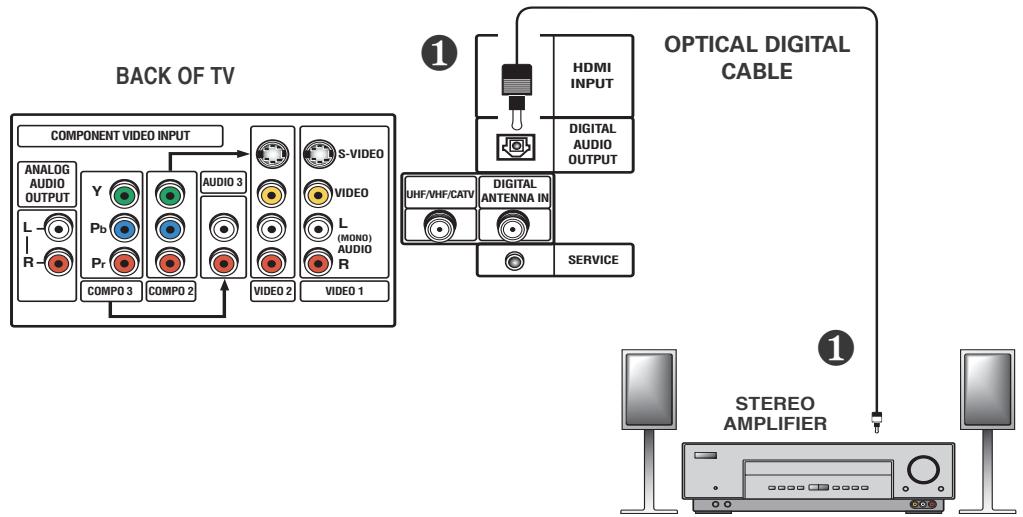
Connecting Digital Audio Output to an External Amplifier
Using this optical digital connection minimizes electrical noise to help assure high quality signal transfer. Switch off TV and external equipment before connecting cables. (Cables are not supplied.) Remove the protective cover before connecting cable to TV digital optical jack.
CAUTION: DO NOT look directly at the laser light.
① Connect one end of the optical cable to the TV Digital Audio Output and the other end to the Stereo Amplifier Optical Digital Input.
② Press POWER to turn on the TV. Turn on external equipment also.
Notes:
DO NOT connect external speakers directly to the TV.
When TV Speakers is in the ON mode, sound will be reproduced through your TV and stereo amplifier.
When TV Speakers is in the OFF mode, sound will be reproduced only through the stereo amplifier. (See page 20 to set TV speakers.)
What you will need for connections:
① Optical Digital Audio Cable – 1
flowchart
graph TD
    A["BACK OF TV"] --> B["COMPONENT VIDEO INPUT"]
    B --> C["ANALOG AUDIO OUTPUT"]
    B --> D["Y"]
    B --> E["Pb"]
    B --> F["Pr"]
    B --> G["COMPO 3"]
    B --> H["COMPO 2"]
    B --> I["AUDIO 3"]
    B --> J["VIDEO 2"]
    B --> K["S-VIDEO"]
    K --> L["VIDEO"]
    L --> M["L (MONO) AUDIO R"]
    L --> N["VIDEO 1"]
    O["OPTICAL DIGITAL CABLE"] --> P["HDMI INPUT"]
    O --> Q["DIGITAL AUDIO OUTPUT"]
    O --> R["UHF/VHF/CATV"]
    O --> S["DIGITAL ANTENNA IN"]
    O --> T["SERVICE"]
    U["STEREO AMPLIFIER"] --> V["TV Streaming Device"]
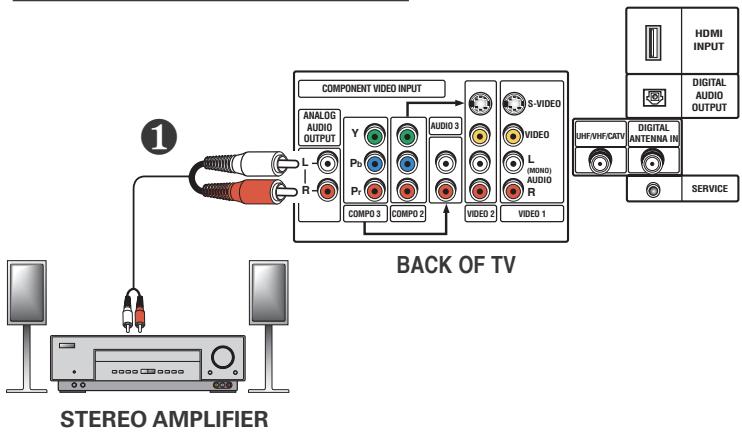
Connecting Audio Out Jacks to a Stereo Amplifier
Switch off TV and external equipment before connecting cables. (Cables are not supplied.)
① Connect the TV Audio Out (R/L) to the Stereo Amplifier In (R/L).
② Press POWER to turn on the TV. Turn on external equipment also.
Notes:
DO NOT connect external speakers directly to the TV.
When TV Speakers is in the ON mode, sound will be reproduced through your TV and stereo amplifier.
When TV Speakers is in the OFF mode, sound will be reproduced only through the stereo amplifier. (See page 20 to set TV speakers.)
What you will need for connections:
① Audio Cable – 1
flowchart
graph TD
    A["STEREO AMPLIFIER"] --> B["COMPONENT VIDEO INPUT"]
    B --> C["ANALOG AUDIO OUTPUT"]
    B --> D["VIDEO 1"]
    B --> E["VIDEO 2"]
    B --> F["VIDEO 3"]
    B --> G["S-VIDEO"]
    B --> H["L(MONO) AUDIO R"]
    B --> I["L(MONO) AUDIO P"]
    B --> J["Y"]
    B --> K["P"]
    B --> L["R"]
    B --> M["COMPO 3"]
    B --> N["COMPO 2"]
    B --> O["VIDEO 1"]
    style A fill:#f9f,stroke:#333
    style B fill:#ccf,stroke:#333
    style C fill:#cfc,stroke:#333
    style D fill:#cfc,stroke:#333
    style E fill:#cfc,stroke:#333
    style F fill:#cfc,stroke:#333
    style G fill:#cfc,stroke:#333
    style H fill:#cfc,stroke:#333
    style I fill:#cfc,stroke:#333
    style J fill:#cfc,stroke:#333
    style K fill:#cfc,stroke:#333
    style L fill:#cfc,stroke:#333
    style M fill:#cfc,stroke:#333
    style N fill:#cfc,stroke:#333
    style O fill:#cfc,stroke:#333
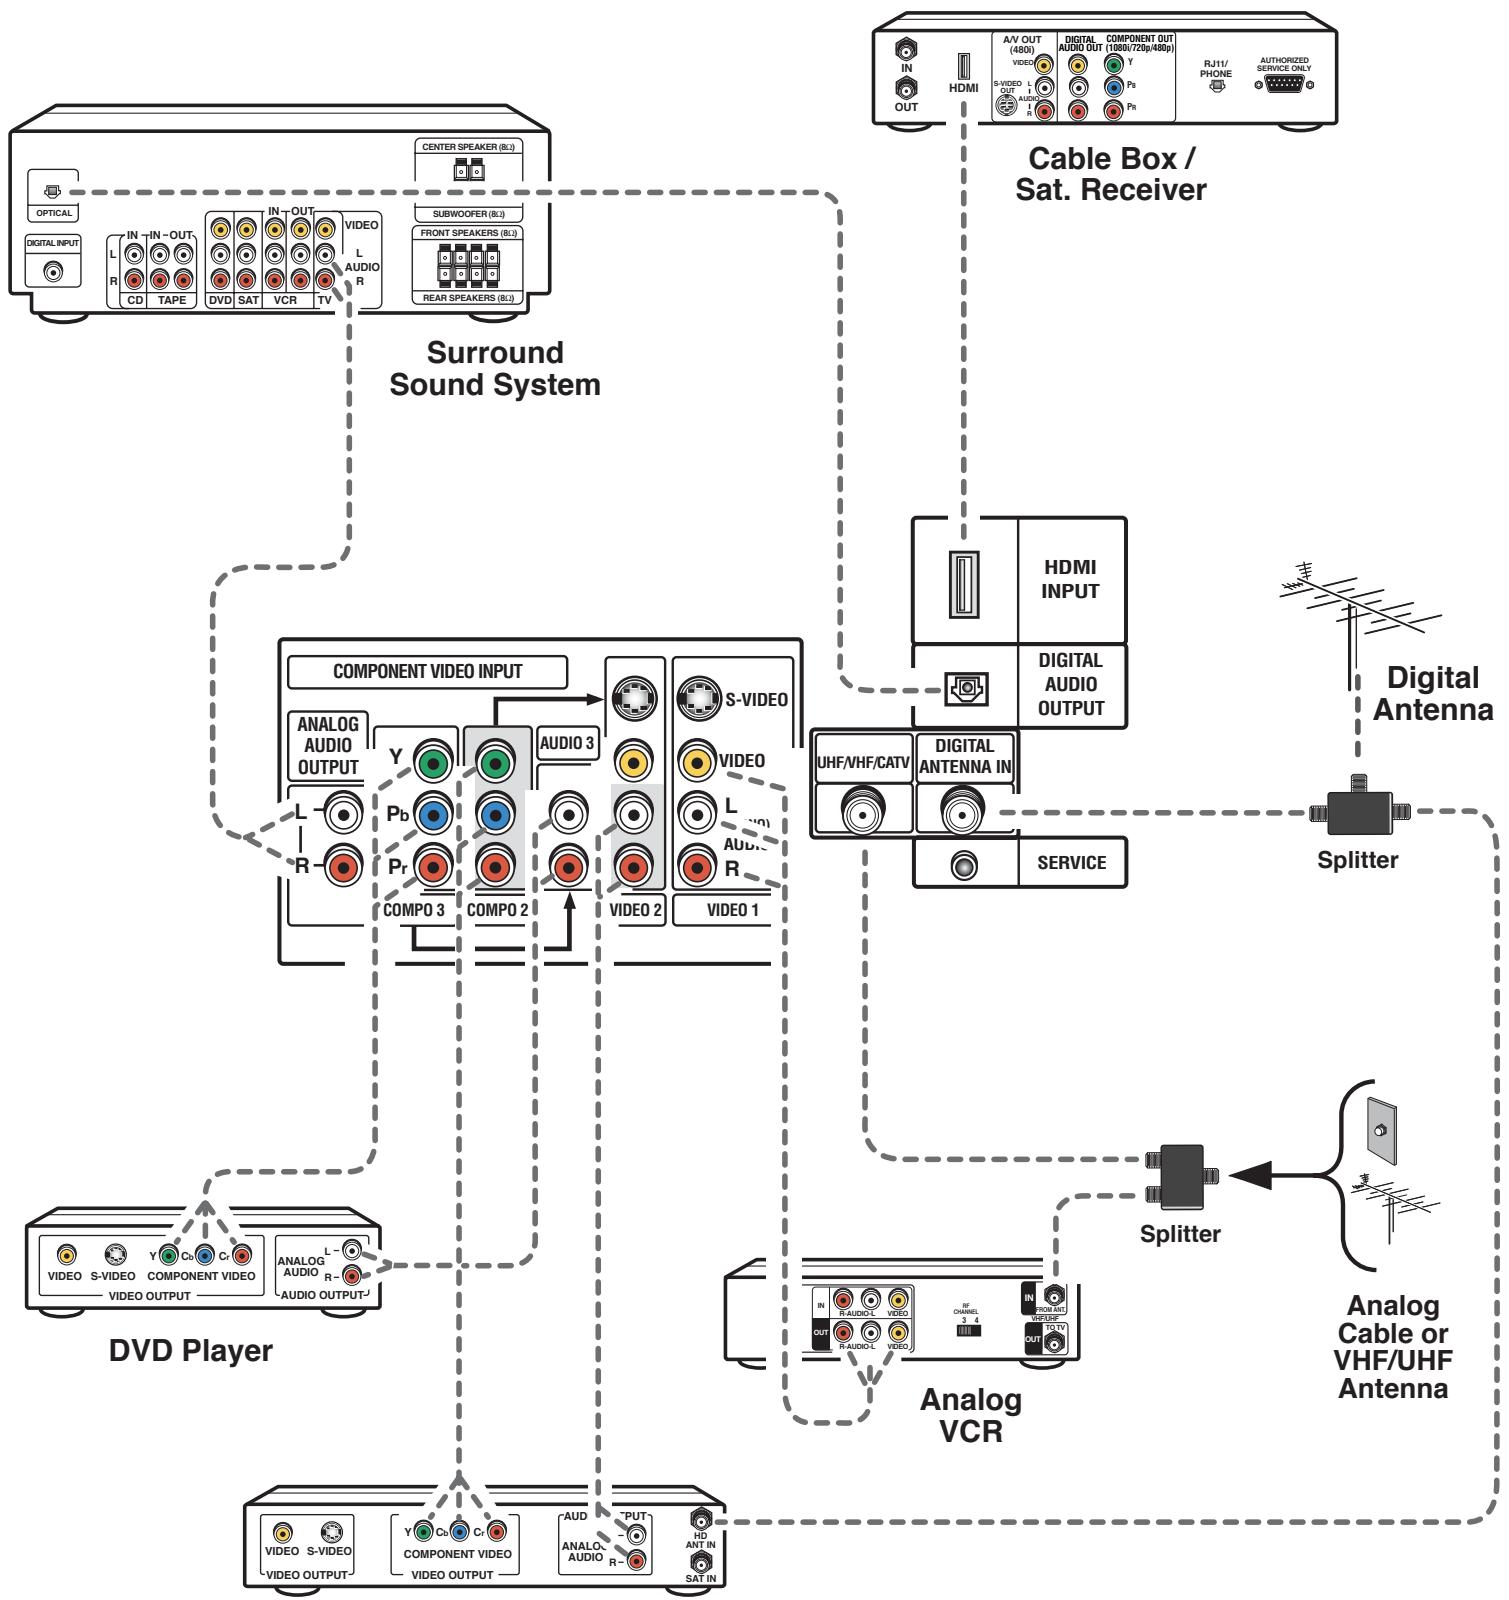
Typical Home Theater Connections
flowchart
graph TD
    A["DVDA Player"] --> B["Surround Sound System"]
    B --> C["Cable Box / Sat. Receiver"]
    C --> D["Analog VCR"]
    D --> E["Analog Cable or VHF/UHF Antenna"]
    E --> F["Splitter"]
    F --> G["Service"]
    G --> H["Digital Antenna"]
    H --> I["Digital Antenna"]
    I --> J["Switch"]
    J --> K["Video Output"]
    B --> L["Component Video Input"]
    L --> M["Analog Audio Output"]
    L --> N["Audio 3"]
    L --> O["S-VIDEO"]
    L --> P["VIDEO 2"]
    L --> Q["VIDEO 1"]
    L --> R["COMPO 3"]
    L --> S["COMPO 2"]
    L --> T["VIDEO 2"]
    L --> U["VIDEO 1"]
    L --> V["Audio R"]
    L --> W["Pb"]
    L --> X["R"]
    L --> Y["L"]
    L --> Z["Y"]
    style A fill:#f9f,stroke:#333
    style B fill:#ccf,stroke:#333
    style C fill:#cfc,stroke:#333
    style D fill:#fcc,stroke:#333
    style E fill:#cff,stroke:#333
    style F fill:#ffc,stroke:#333
    style G fill:#fcc,stroke:#333
    style H fill:#ffc,stroke:#333
    style I fill:#fcc,stroke:#333
    style J fill:#ffc,stroke:#333
    style K fill:#fcc,stroke:#333
    style L fill:#cff,stroke:#333
    style M fill:#fcc,stroke:#333
    style N fill:#fcc,stroke:#333
    style O fill:#fcc,stroke:#333
    style P fill:#fcc,stroke:#333
    style Q fill:#fcc,stroke:#333
    style R fill:#fcc,stroke:#333
    style S fill:#fcc,stroke:#333
Digital Video Recorder
Using the Multimedia Remote Control
It takes only one remote to operate your TV and other equipment. Simply follow the instructions on pages 13 \~ 15.
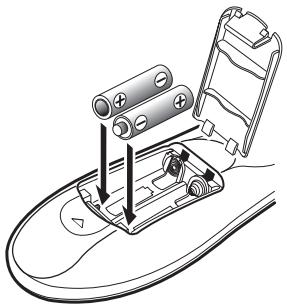
Install Batteries as shown (2 AA, not included)
Notes:
Do not mix old batteries with new ones or mix different types of batteries together.
Remove the batteries if the remote control will not be used for a month or more.
Weak batteries may leak and cause damage. (Normal battery life is roughly six months.)
natural_image
Diagram of a battery swap mechanism with no text or symbolsPoint towards TV / Equipment
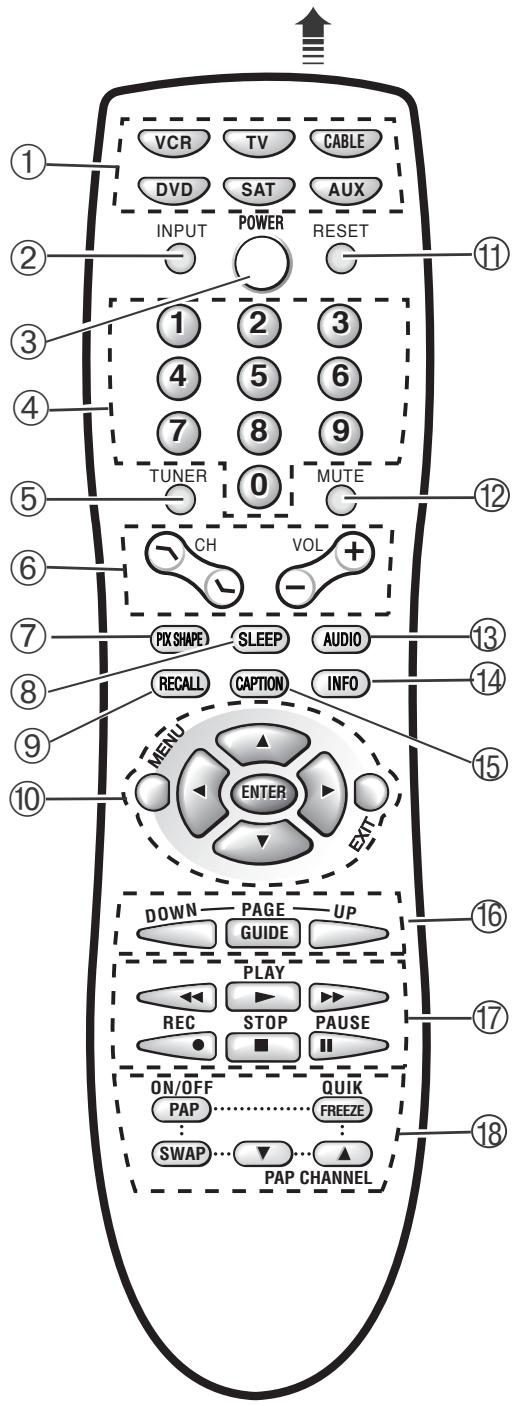
① Mode Keys—Use these keys to program the remote control and to select the operating mode (VCR, TV, CABLE, DVD, SAT, or AUX). To Operate Your... VCR—Press the VCR key; Television—Press the TV key; Cable Box—Press the CABLE key; DVD Player—Press the DVD key; and Satellite Receiver—Press the SAT key.
Note: Make sure you hold down the mode key while entering a code number, see page 13.
② Input Key—Press this key to change the input signal source as follows:
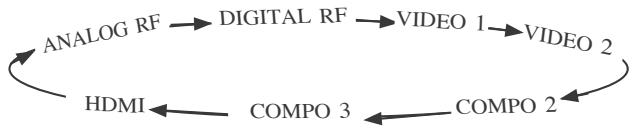
flowchart
graph TD
    A["ANALOG RF"] --> B["DIGITAL RF"]
    B --> C["VIDEO 1"]
    C --> D["VIDEO 2"]
    D --> E["COMPO 2"]
    E --> F["COMPO 3"]
    F --> G["HDMI"]
    G --> A
In the TV, DVD, Cable, and Satellite modes, this key selects the program source to display on the screen (TV signal or signal from equipment connected to the AV jacks). In the VCR mode, this key functions as a VCR's TV/VCR key.
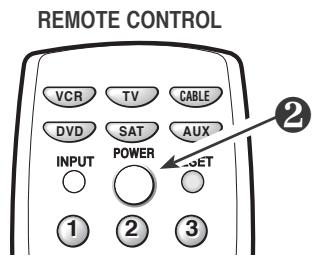
③ Power Key—Press to turn TV on or off.
④ Number Keys—Two keys must be pressed to select a direct channel. Example: Press 0 then 6 to select channel 6. For Analog channels above 100, press and hold the 1 key until C1— appears.
⑤ Tuner Key—Use this key to toggle from one tuning system to another, digital channels and analog channels.
⑥ Channel (CH up / down) and Volume (VOL -/+ ) Keys—Press Up/down keys to tune to the next higher or lower channel in the Channel Scan Memory database. Press the -/+ keys to adjust volume. The screen displays a left or right red arrow that blinks as many time as you press the Vol -/+ keys.
⑦ Pix Shape Key—Use this key to change the video display format. Available options depend on signal received and the broadcast aspect ratio: For HT27744/HT32744—Letter box, Zoom, and Normal. For HT30744—Full, Zoom1/2, and Normal. (See explanation of image shapes on page 5.) Note: If PAP feature is selected, this key is not operable.
⑧ Sleep Key—Press this key, then press the “0” key to set the Sleep Timer. The desired time can be set from 30 minutes up to 3 hours in 30 minutes increments. Sleep Timer will switch off the TV automatically.
Note: The Sleep Timer cancels when the TV is turned off or if a power failure occurs.
⑨ Recall Key—Select the first channel you want to watch; then select another channel using the number keys. Press Recall to easily switch between the channels without entering the channel numbers again.
Note: The Recall key can only toggle between channels within the same signal source. Recall between a Digital channel and an Analog channel will not work.
⑩ Menu selection and navigation keys—Use these keys as follows:
Menu key—Press this key to display the on-screen menu.
Cursor ▲ (up) /▼ (down) keys—Press these keys to move the cursor up and down within the menu.
Cursor ◀ (left) / ▶ (right) keys—Press these keys to move the cursor left and right within the menu.
Exit key—Press this key to exit from the menu system.
⑪ Reset Key—Press twice to restore factory settings.
The TV will automatically start Channel Search and clear all customized settings. These features will automatically reset:
- Picture/Sound Adjustments: Color, Tint, Contrast, Brightness, Sharpness, Color Enhancer, Bass, Treble, and Surround Sound
- Channel Memory
- Initial Channel to OFF
- Audio to Stereo
- Caption to OFF
• V-Guide to OFF
• TV Speakers to ON
• Digital Audio Output to Dolby Digital - Scan Velocity to HIGH
• Picture-And-Picture (PAP) to OFF - Menu Language to English
- Auto Clock and Sleep Timer (if previously set)
• Video to TV (if previously set)
If desired, personal settings can be made again using the menu options.
⑫ Mute Key—Press once to minimize the volume.
Press again to restore.
Note: When using the audio out jacks this key will not mute the sound.
⑬ Audio Key—Press to select the desired audio reception feature options (if available) for...
DIGITAL: Main, Sub1, Sub2, Sub3, etc.
ANALOG: Stereo, Mono, SAP.
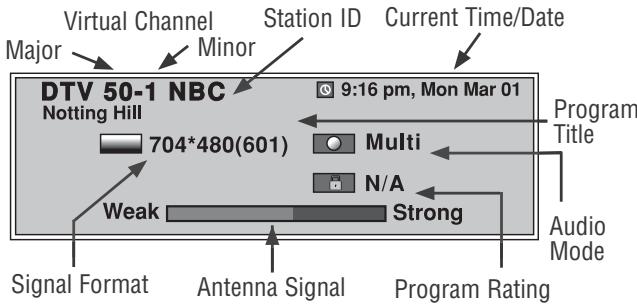
⑭ Info Key—Press to display the Digital and Analog Full Banner information:
Digital Full Banner display—Contains a two-part Channel Number (Major and Minor). If available the following is also included—Station ID, Program Title, Current Time & Date, Antenna Signal Strength, Signal Format, Program Rating, and Audio Mode.
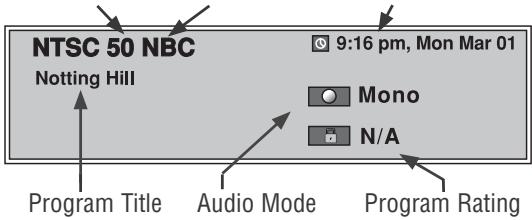
Analog Full Banner display-Contains Channel Number (analog antenna/cable), Current time & Date (if set), Station ID (if available), Program Title (if available) and Audio Mode.
Channel No. Station ID Current Time/Date
⑮ Caption Key—Press to select analog or digital caption. The Analog Caption modes are: CC1, CC2, Quikcap and OFF. The Digital Caption modes are: Digital CC1\~CC6, Quikcap and OFF.
Digital Captions can also be customized to change the text font type, size, style, background and edge colors. (See page 18.) Note: These feature are operable only when digital caption service is available.
⑯ Guide Keys—Press the following keys to operate your satellite receiver once the remote is programmed:
Page/Guide key—Press to display menu guide.
Up/Down key—Press the cursor up/down to move within the menu display.
⑰ VCR/DVD Keys—These keys control VCR or DVD functions for Fast Forward (▶), Rewind (◀), Play (▶), Record (REC), Stop (■), Tracking (−/+), and Pause.
⑱ PAP Keys—See page 21 for split-screen Picture-and-Picture.
PROGRAMMING THE REMOTE CONTROL
- Find your VCR, Cable Box, DVD Player, and Satellite Receiver brand codes in the charts on page 14.
- Press and hold the VCR, CABLE, DVD, SAT (Satellite Receiver) or AUX (Auxiliary) mode key while entering a three-digit code number. Then release the mode key.
If the code was accepted, the mode key will flash 5 times after it is released. If you entered an invalid code, the mode key will not flash. Check the code number and repeat Step 2.
After entering each code number check the unit's operation by pressing the Power and/or Channel keys. If these keys operate your equipment, you have probably entered the correct code number for that device. If not, follow Step 2 and enter another code, if available.
Perform Steps 1 and 2 for each piece of equipment you have.
The VCR, Cable Box, DVD, and Satellite modes will accept only each mode's specific code type.
The AUX mode will accept all code types, but only one code at a time.
After you have programmed the remote control and confirmed its operation, enter your codes in the spaces provided for easy reference.
| VCR Code: | |||
| Cable Box Code: | |||
| DVD Player Code: | |||
| Satellite Code: | |||
| AUX LIST DEVICE HERE |

QuickTips
■ Be sure batteries are installed correctly.
■ Point the remote control toward the equipment you want to operate. Objects between the remote control and the equipment may cause misoperation of the remote control function.
■ If the remote control does not work: Press TV key (see item 1).
■ The remote control must be programmed before it will operate your VCR, DVD Player, Satellite Receiver, or Cable Box.
Need help?
Visit our Web site at
www.sanyoctv.com
or Call 1-800-877-5032
DVD CODES
| Brand Name | Codes |
| Akai | 529 |
| Apex | 535, 534, 533, 525, 527, 528, 523 |
| Broksonic | 536 |
| Daewoo | 529 |
| Denon | 501, 520 |
| Emerson | 540, 521, 524, 527 |
| Fisher | 500 |
| GE | 541, 504 |
| Hitachi | 530 |
| JVC | 515, 510 |
| Kenwood | 507 |
| Koss | 522 |
| Lasonic | 544 |
| Magnavox | 508, 502 |
| Marantz | 508 |
| Mintek | 543 |
| Norcent | 532 |
| Onkyo | 516, 502 |
| Optimus | 511 |
| Orion | 526 |
| Oritron | 522 |
| Panasonic | 501, 518 |
| Philips | 508, 502 |
| Pioneer | 542, 537, 511, 505, 518 |
| Proscan | 504 |
| RCA | 539, 538, 504 |
| Samsung | 512 |
| Sanyo | 500, 526 |
| Sharp | 531, 517 |
| Sony | 506 |
| Sylvania | 524 |
| Symphonic | 524 |
| Technics | 501 |
| Theta Digital | 511 |
| Toshiba | 502, 526 |
| Yamaha | 501 |
| Zenith | 521, 514, 502 |
SATELLITE RECEIVER CODES
| Brand Name | Codes |
| AlphaStar | 431 |
| Echostar | 432, 410, 416 |
| ExpressVU | 432 |
| Fujitsu | 404 |
| GE | 426, 436, 437, 423 |
| General Instruments | 425, 427, 415, 435, 405 |
| Hitachi | 407, 421 |
| HTS | 432 |
| Hughes | 442, 407 |
| Janeil | 404 |
| Jerrold | 425, 427 |
| JVC | 432 |
| Magnavox | 429, 430 |
| Memorex | 430 |
| Next Level | 415 |
| Optimus | 430 |
| Panasonic | 441, 428, 400 |
| Philips | 439, 438, 429, 430, 432 |
| Primestar | 425, 427 |
| Proscan | 426, 436, 437, 423 |
| Radio Shack | 415 |
| RCA | 426, 436, 437, 423 |
| Samsung | 440 |
| Sony | 420 |
| Star Choice | 415, 435 |
| Toshiba | 422, 405 |
| Uniden | 429, 430, 406, 409, 412 |
| Video Pall | 404 |
| Viewstar | 418 |
| Zenith | 434, 404 |
VCR CODES
| Brand Name | Codes |
| Admiral | 234, 243, 247, 224, 229, 222, 215 |
| Adventura | 228 |
| Aiko | 205 |
| Aiwa | 228, 217 |
| Akai | 209, 215 |
| America Action | 205 |
| America High | 232 |
| Bell&Howell | 201 |
| Broksonic | 234, 243, 247, 227, 204 |
| Candle | 248, 222, 204, 205, 211, 217 |
| Canon | 232 |
| CCE | 205 |
| Cineral | 205 |
| Citizen | 222, 205, 211, 217 |
| Craig | 202, 219 |
| Craver | 204 |
| Curtis Mathes | 232, 236, 238, 248, 222, 228, 209, 211, 217 |
| Daewoo | 205, 211 |
| Daytron | 205 |
| Denon | 230 |
| Dynatech | 228 |
| Emerex | 214 |
| Emerson | 251, 228, 243, 234, 236, 247, 227, 201, 204, 205, 206, 210, 211, 217 |
| Fisher | 200, 201, 202, 211 |
| Fuji | 232 |
| Funai | 228, 217 |
| GE | 222, 246, 248, 232, 236, 226, 229, 224, 212 |
| Goldstar | 253, 238, 248, 226, 206, 215, 217 |
| Go Video | 248, 249, 212, 219 |
| Gradiente | 228 |
| Garrard | 228 |
| Harley Davidson | 228 |
| Headquarter | 200 |
| Hitachi | 228, 230, 246, 226, 222, 209, 217 |
| Hughes | 230 |
| JBL | 237 |
| Jensen | 209 |
| JVC | 220, 238, 226, 201, 209, 230 |
| KEC | 205 |
| Kenwood | 220, 226, 238, 201, 209 |
| Kodak | 232 |
| Lloyd's | 228 |
| Logik | 219 |
| LXI | 232, 228, 230, 201, 202, 206, 211, 217 |
| Magnasonic | 205, 219 |
| Magnavox | 204, 232, 228, 211, 217, 219, 220 |
| Marta | 206 |
| Matsushita | 232 |
| MEI | 232 |
| Memorex | 227, 232, 243, 245, 224, 228, 229, 230, 200, 201, 202, 206, 215 |
| Minolta | 230 |
| Mitsubishi | 244, 224, 226, 229, 210 |
| Motorola | 232, 229, 224 |
| Brand Name | Codes |
| MTC | 228, 217, 219 |
| Multitech | 228, 217 |
| NEC | 238, 226, 201, 206, 209, 215, 217, 248 |
| Olympus | 232 |
| Optimus | 245, 248, 224, 229, 201 |
| Orion | 243, 227, 234, 205, 206, 210, 211 |
| Panasonic | 245, 232, 236, 202, 211, 219 |
| Penny | 230, 232, 248, 211, 219 |
| Pentax | 238, 230 |
| Philco | 204, 232, 243, 228, 217 |
| Philips | 204, 232, 228, 211, 217 |
| Pioneer | 242, 204, 207, 220 |
| Proscan | 222, 241, 246, 230, 236, 226 |
| Proton | 219 |
| Pulsar | 248, 205, 217 |
| Quarter | 200 |
| Quartz | 200 |
| Quasar | 245, 232, 236 |
| Radio Shack | 228, 245 |
| RCA | 250, 222, 241, 246, 248, 230, 232, 236, 224, 226, 229, 201, 207, 210 |
| Realistic | 232, 248, 224, 228, 229, 200, 201, 202, 206, 217 |
| Samsung | 248, 211, 217, 222 |
| Samtron | 248 |
| Sansui | 243, 226, 228, 209, 219, 220 |
| Sanky | 229, 224 |
| Sanyo | 200, 201, 202 |
| Scott | 234, 247, 227, 211 |
| Sears | 232, 228, 230, 200, 201, 202, 206, 211, 217 |
| Semp | 211 |
| Shintom | 219, 227 |
| Sharp | 252, 229, 224 |
| Signature | 228, 217, 229, 224, 200 |
| Sony | 214, 218, 232, 237, 226, 228 |
| STS | 230 |
| Sylvania | 228, 232, 244, 204, 217 |
| Symphonic | 228, 217, 226, 202 |
| Yamaha | 238, 226 |
| Tatung | 226, 209 |
| Teac | 228, 209, 214, 217 |
| Technics | 232 |
| Teknika | 232, 228, 217 |
| Toshiba | 211, 244, 202, 205, 210 |
| Tomas | 228, 217 |
| Vector | 211 |
| Video Concept | 211 |
| Wards | 230, 232, 248, 224, 228, 229, 202, 204, 211, 217 |
| White Westinghouse | 243, 205 |
| XR-1000 | 228, 232 |
| Yamaha | 238, 226 |
| Zenith | 206, 215, 237, 243, 220, 228, 222 |
CABLE CODES
| Brand Name | Codes |
| ABC | 312, 304, 306, 309, 313, 314, 318, 319, 321, 324, 329 |
| AIM | 321 |
| Archer | 334 |
| Bell & Howell | 313, 314, 329 |
| Contec | 305, 302, 307, 309, 318, 320, 324 |
| CPI | 309, 323 |
| Diamond | 320 |
| Eagle | 313, 314, 329 |
| Emerson | 334 |
| Gemini | 334 |
| General Instruments | 303, 300, 309, 320, 321, 323 |
| Goldstar | 312 |
| Goodmind | 334 |
| Hamlin | 330, 320 |
| Hitachi | 309, 323 |
| Hytex | 318 |
| Jerrold | 300, 303, 309, 313, 314, 320, 321, 329 |
| Magnavox | 325, 301, 309, 313, 314, 323 |
| Memorex | 331, 332, 313, 314, 329 |
| Motorola | 338, 303, 300, 309, 320, 321, 323 |
| Movie Time | 306, 310, 314, 313, 329 |
| Northcoast | 316 |
| NSC | 305, 306, 314, 313, 329 |
| Oak | 305, 318, 320 |
| Paragon | 331, 313, 314, 329 |
| Panasonic | 331, 324, 302, 307, 317, 327 |
| Philips | 341, 325, 301, 309, 313, 314, 323 |
| Pioneer | 312, 335, 333, 317, 324 |
| Quasar | 331, 302, 307, 317 |
| RCA | 328, 302, 307 |
| Regal | 330, 307, 320 |
| Rembrandt | 305, 309, 323 |
| Radio Shack | 334 |
| Samsung | 312, 310 |
| Scientific Atlanta | 335, 307, 324 |
| Signal | 310 |
| Signature | 300, 309, 321, 323 |
| Sony | 340 |
| Sprucer | 302, 307, 316 |
| Starcom | 332, 309, 321, 323 |
| Stargate | 309, 310, 321, 334 |
| Teleview | 310 |
| Tocom | 300, 303, 305, 304, 306, 307 |
| Toshiba | 331, 309, 316, 323 |
| Unika | 314, 313, 329 |
| United Artists | 318 |
| United Cable | 309, 323 |
| U.S. Electronics | 309, 324 |
| Viewstar | 326, 313, 315, 314, 329 |
| Wards | 321, 309, 323 |
| Warner | 312 |
| Zenith | 331, 336, 337, 309, 316, 324 |
REMOTE CONTROL KEYS FUNCTIONS CHART
| REMOTE KEYS | TV MODE | VCR MODE | CABLE MODE | DVD MODE | SATELLITE MODE |
| POWER | Turns Unit On/Off | Turns Unit On/Off | Turns Unit On/Off | Turns Unit On/Off | Turns Unit On/Off |
| NUMBER KEYS (0 ~ 9) | Used to Select Channels | Used to Select Channels | Used to Select Channels | No Function | Used to Select Channels |
| INPUT | Selects TV/Video mode | Selects TV/VCR mode | No Function | No Function | Selects TV/DSS mode |
| RECALL | Selects Previous Channel | Selects Previous Channel | Selects Previous Channel | Select Repeat Function | Selects Previous Channel |
| MENU | Displays Setup Menu | Displays Setup Menu | Displays Setup Menu | Displays Setup Menu | Displays Setup Menu |
| CHANNEL (UP) | Channel Up | Channel Up | Channel Up | Next Ch. Up | Channel Up |
| CHANNEL (DOWN) | Channel Down | Channel Down | Channel Down | Previous Ch. Down | Channel Down |
| VOLUME – (DOWN) | Audio Down | Audio Down | Audio Down | Audio Down | Audio Down |
| VOLUME + (UP) | Audio Up | Audio Up | Audio Up | Audio Up | Audio Up |
| CURSOR (LEFT) | Cursor Left | Cursor Left | Cursor Left | Cursor Left | Cursor Left |
| CURSOR (RIGHT) | Cursor Right | Cursor Right | Cursor Right | Cursor Right | Cursor Right |
| CURSOR (UP) | Cursor Up | Cursor Up | Cursor Up | Cursor Up | Cursor Up |
| CURSOR (DOWN) | Cursor Down | Cursor Down | Cursor Down | Cursor Down | Cursor Down |
| MUTE | Switches TV sound Off/On | Switches TV sound Off/On | Switches TV sound Off/On | Switches TV sound Off/On | Switches TV sound Off/On |
| RESET | Operates TV ONLY | No Function | No Function | No Function | No Function |
| CAPTION | Operates TV ONLY | No Function | No Function | Accesses Audio Options | No Function |
| SLEEP | Operates TV ONLY | No Function | No Function | No Function | No Function |
| V-GUIDE | Operates TV ONLY | No Function | No Function | No Function | No Function |
| ENTER | Makes Selection | Makes Selection | Makes Selection | Makes Selection | Makes Selection |
| PLAY ( ▶ ) | Selects VCR/DVD Play Mode | Selects VCR Play | Selects VCR/DVD Play | Selects DVD Play | Selects VCR/DVD Play |
| FAST FORWARD ( ▶▶ ) | Operates VCR/DVD | Operates VCR | Operates VCR/DVD | Operates DVD | Operates VCR/DVD |
| REWIND ( ◀◀ ) | Operates VCR/DVD | Operates VCR | Operates VCR/DVD | Operates DVD | Operates VCR/DVD |
| STOP ( ■ ) | Selects VCR/DVD Stop | Selects VCR Stop | Selects VCR/DVD Stop | Selects DVD Stop | Selects VCR/DVD Stop |
| PAUSE (III) | Selects VCR/DVD Pause | Selects VCR Pause | Selects VCR/DVD Pause | Selects DVD Pause | Selects VCR/DVD Pause |
| RECORD (REC ●) | No Function | Selects VCR Record | No Function | No Function | No Function |
| TUNER | Operates TV ONLY | No Function | No Function | No Function | No Function |
| GUIDE | No Function | No Function | No Function | No Function | Display Guide Screen |
| PIX SHAPE | Operates TV ONLY | No Function | No Function | No Function | No Function |
| INFO | Displays Banner | Selects Program Display | No Function | Selects Zoom | Selects Program Display |
| EXIT | Ends Selection | Ends Selection | Ends Selection | Ends Selection | Ends Selection |
| PAP | Operates TV ONLY | No Function | No Function | No Function | No Function |
| MODE KEYS Press these keys (VCR/TV/CABLE/DVD/SAT/AUX) when programming the remote control and to choose an operating mode. | |||||
Notes:
Many of the keys on this remote control are multi-functional. Please refer to the chart for a generic description of the keys and their functions.
Refer to your original operating manuals for specific feature operation.
This remote control cannot add keys or features to your equipment. Your equipment's manufacturer must have provided them originally.
TV Adjustment and Setup
The on-screen menu provides the viewer with easy access to adjustments and settings. Just use the keys on the remote control and follow the on-screen instructions.
HOW TO OPERATE THE ON-SCREEN MENU
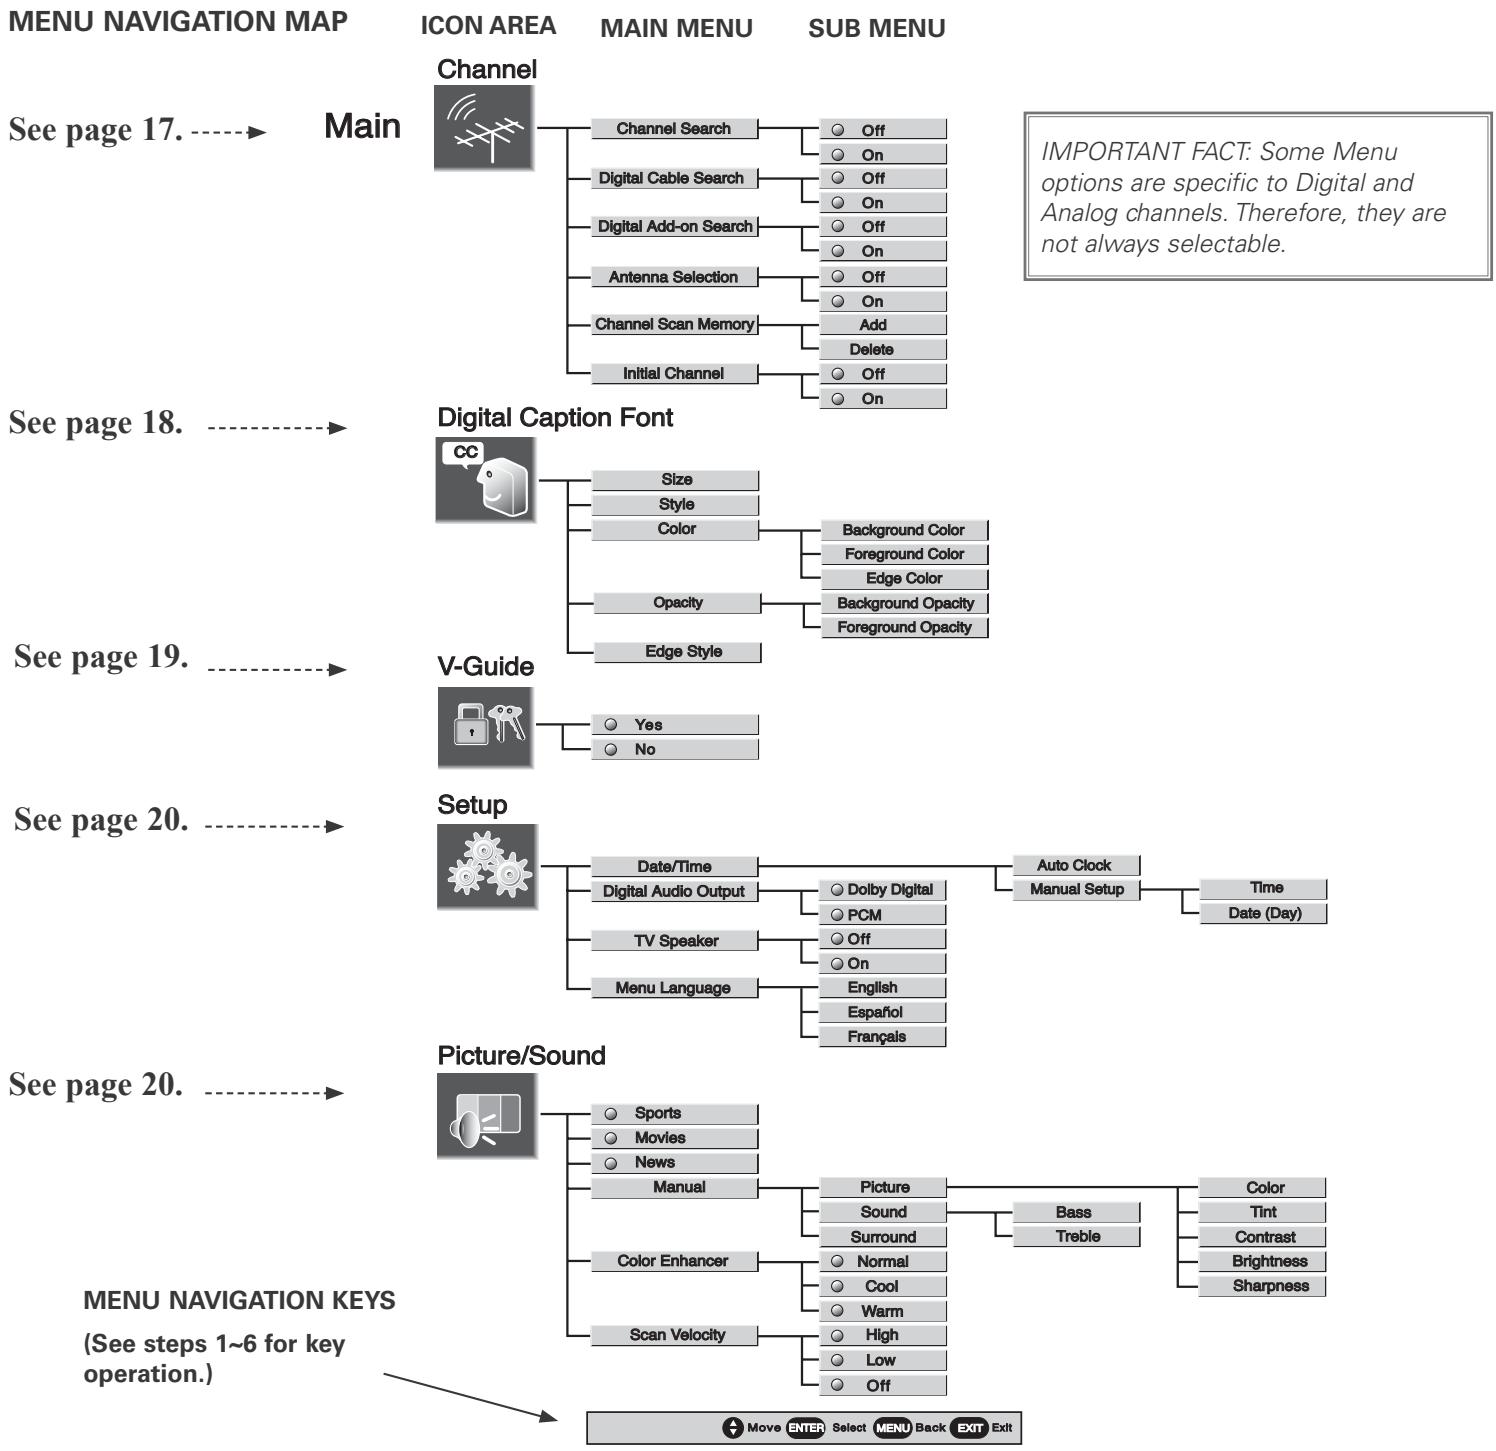
- Press MENU key, the Main Menu appears. Note: The Main Menu consists of the Icon Area and the Option Area. If no key is pressed after 30 seconds, the menu disappears from the TV screen.
- Use the ▲/▼ keys to move the Cursor to select options from the Icon Area.
- Press the ENTER key or ▶ right arrow to move Cursor from the Icon Area to the Menu Option area.
- Use the ▲/▼ keys to choose desired option in the Main and Sub Menus. (Selected item bar is highlighted in yellow.)
- Press the ENTER key to save the menu setting or to selected a different item.
- Press ◀ left arrow to move Cursor from the Menu Option area back to the Icon area or EXIT key to exit from the menu.
Note: Items with submenus require additional steps, basically follow the on-screen directions using the Arrow keys and ENTER key.
flowchart
graph TD
A["ICON AREA"] --> B["Channel"]
B --> C["Channel Search"]
B --> D["Digital Cable Search"]
B --> E["Digital Add-on Search"]
B --> F["Antenna Selection"]
B --> G["Channel Scan Memory"]
B --> H["Initial Channel"]
C --> I["Off"]
D --> J["On"]
E --> K["Off"]
F --> L["On"]
G --> M["Add"]
H --> N["Delete"]
O["SUB MENU"] --> P["Main Menu"]
P --> Q["Digital Caption Font"]
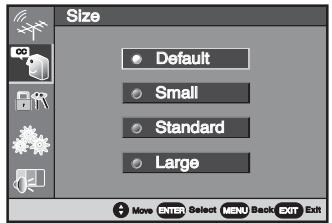
Q --> R["Size"]
Q --> S["Style"]
Q --> T["Color"]
Q --> U["Opacity"]
Q --> V["Edge Style"]
Q --> W["Background Color"]
Q --> X["Foreground Color"]
Q --> Y["Edge Color"]
Q --> Z["Background Opacity"]
Q --> AA["Foreground Opacity"]
AB["Setup"] --> AC["Date/Time"]
AC --> AD["Digital Audio Output"]
AD --> AE["TV Speaker"]
AD --> AF["Menu Language"]
AF --> AG["Auto Clock"]
AG --> AH["Manual Setup"]
AH --> AI["Time"]
AH --> AJ["Date (Day)"]
AK["Picture/Sound"] --> AL["Sports"]
AK --> AM["Movies"]
AK --> AN["News"]
AK --> AO["Manual"]
AO --> AP["Picture"]
AP --> AQ["Sound"]
AQ --> AR["Bass"]
AR --> AS["Tint"]
AR --> AT["Contrast"]
AR --> AU["Brightness"]
AR --> AV["Sharpness"]
AW["MENU NAVIGATION KEYS (See steps 1~6 for key operation.)"] --> AX["Move ENTER Select MENU Back EXIT Exit"]
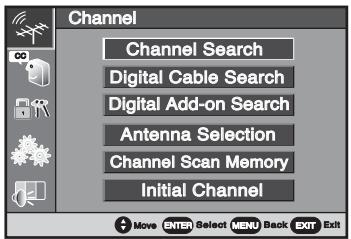
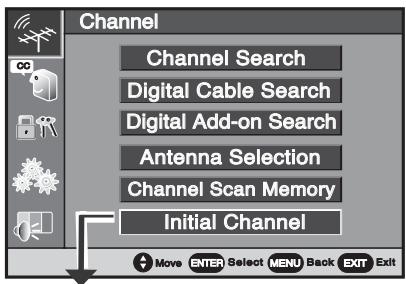
CHANNEL SEARCH
Channel Search is required only if additional channels become available, such as moving to another city or having a cable service installed.
- Press MENU.
- Use the ▲/▼ keys to highlight the Antenna icon. Press ENTER.
- Use the ▲/▼ keys to select Channel Search. Press ENTER.
- Use the ▼ key to select ON. Press ENTER.
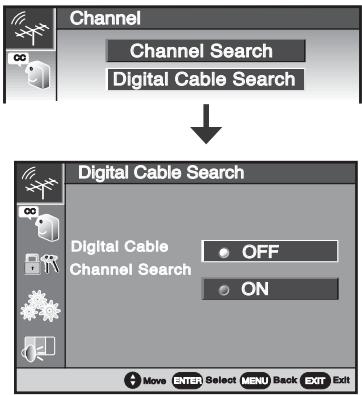
DIGITAL CABLE SEARCH (Optional)
This TV can receive unscrambled (ClearQAM) digital cable channels, when available. However, not all cable companies provide ClearQAM digital channels.
Searching for digital cable channels will take about 10 minutes, please be patient.
- Connect a Digital Cable signal directly to the TV Digital Antenna In jack.
- Press the TUNER key to select digital channels. Press MENU.
- Use the ▲/▼ keys to highlight the Antenna icon. Press ENTER.
- Use the ▲/▼ keys to highlight Digital Cable Search. Press ENTER.
- Use the ▼ key to choose ON. Press ENTER.
IMPORTANT FACT: This TV only maintains one database of digital channels. Therefore, when you search for ClearQAM digital cable channels, the database of antenna digital channels will be deleted. You will only be able to receive those ClearQAM channels your cable company provides.
Cable companies rearrange virtual channels as programming changes which may cause the program you are watching to move to another channel. This will appear briefly to notify you of this change. You have to relocate the program you were watching by scanning through the channels.
Program change from cable company
When a terrestrial broadcast station rearranges its virtual channels, data in the PSIP tables advises the TV of the change. This allows the TV to “follow” a program to its new virtual channel. The viewer should not even realize a change has occurred.
To restore the antenna digital channel database, reconnect the antenna and use the menu system to perform normal channel search.
flowchart
graph TD
    A["Channel"] --> B["Channel Search"]
    B --> C["Digital Cable Search"]
    C --> D["Digital Cable Search"]
    D --> E["Digital Cable Search"]
    E --> F["OFF"]
    E --> G["ON"]
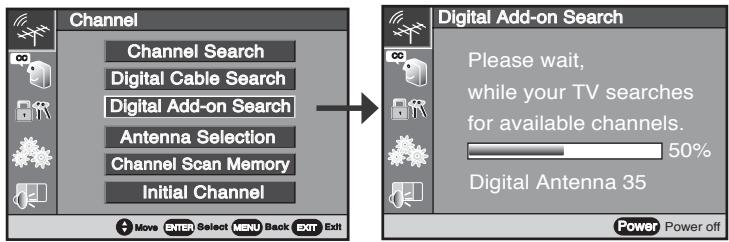
DIGITAL ADD-ON SEARCH
Use this feature to update the digital antenna channel map database to add new channels or to add channels when broadcast towers are in opposite directions from your location.
- Press the TUNER key to select digital channels. Press MENU.
- Use the ▲/▼ keys to highlight the Antenna Icon. Press ENTER.
- Use the ▲/▼ keys to highlight Digital Add-on Search. Press ENTER.
- Use the ▼ key to choose YES. Press ENTER.
Note: Turn your Antenna and repeat these steps for each direction in which there are transmitting towers.
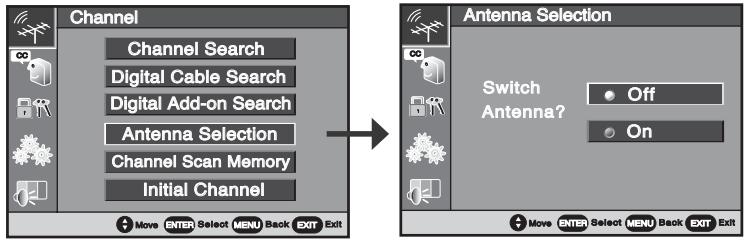
ANTENNA SELECTION
Use this feature to switch between analog terrestrial channels and analog cable channels.
- Press MENU.
- Use the ▲/▼ keys to highlight the Antenna Icon. Press ENTER.
- Use the ▲/▼ keys to select Antenna Selection. Press ENTER.
- Use ▼ key to select ON. Press ENTER.
flowchart
graph LR
    A["Channel"] --> B["Channel Search"]
    A --> C["Digital Cable Search"]
    A --> D["Digital Add-on Search"]
    A --> E["Antenna Selection"]
    A --> F["Channel Scan Memory"]
    A --> G["Initial Channel"]
    H["Antenna Selection"] --> I["Switch Antenna?"]
    I --> J["Off"]
    I --> K["On"]
(Continued on page 18.)
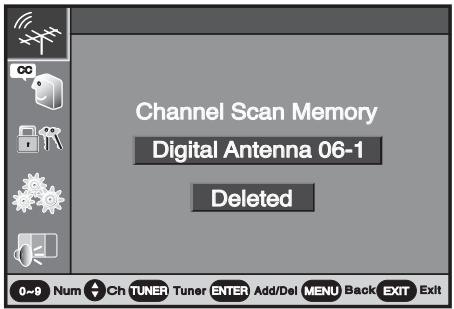
CHANNEL SCAN MEMORY
Channel scan memory is a list of active channels that you can scan through when using the Channel Scan (up/down) keys. This list can be customized by deleting unwanted channels.
- Press MENU.
- Use the ▲/▼ keys to highlight the Antenna Icon. Press ENTER.
- Use the ▲/▼ keys to select Channel Scan Memory. Press ENTER.
When the CH Scan Memory option is selected, the Channel Add/Delete menu appears.
The current channel number will also appear in the box.
- Press the TUNER key to select Digital or Analog.
- Use the CHANNEL Up/Down keys or numerical keys to select desired channel.
- Press the ENTER key to delete or add the channel.
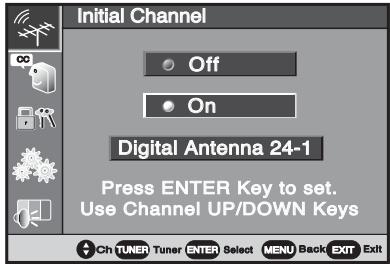
INITIAL CHANNEL
The television can be programmed to tune to your favorite channel each time it is powered on, such as your favorite news or sports channel.
- Press MENU.
- Use the ▲/▼ keys to highlight the Antenna Icon. Press ENTER.
- Use the ▲/▼ keys to select Initial Channel. Press ENTER.
- Use the ▼ key to select ON. Press ENTER.
- Press the TUNER key to choose Digital or Analog.
- Select your favorite channel using the CHANNEL Up/Down keys on the remote.
7 Press the ENTER key to set the initial channel, or to clear the channel if you would like to change the channel number. - Press MENU to return to the Main Menu or EXIT to exit from the menu.
Closed-Captioning

Captioning is textual information transmitted along with the picture and sound so it can be displayed on the TV screen. Because different types of captions can be transmitted with the TV signal, separate captioning modes are provided. The captioning modes recognized by this model are: Analog EIA-608B and Digital EIA-708B. Local broadcasters decide which caption signals to transmit.
To View Captions:
- Press the CAPTION key on the remote to select: Analog caption—CC1, CC2, QuikCap or Off. Digital caption—Digital CC1, Digital CC2, Digital CC3, Digital CC4, Digital CC5, Digital CC6, Quikcap, or Off.
- Using the Quikcap feature enables you to turn captioning on and off with the Mute function. Press the MUTE key on the remote control to block the TV sound; the captions display automatically. Press again to restore sound, captions will disappear.
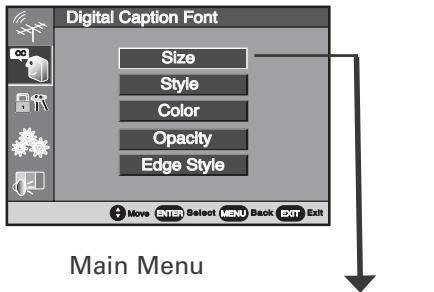
To Customize Digital Captioning On-screen Display:
This feature is designed to customize Digital Captioning only.
- Press the TUNER key to select Digital. Press MENU.
- Use the ▲/▼ keys to highlight the Caption icon. Press ENTER.
- Use the ▲/▼ keys to select desired options. Press ENTER.
- Use the ▲/▼ keys to make adjustment.
NOTE: The item customized will be highlighted with a yellow border and a bright yellow bullet to indicate selection.
- To adjust other options, repeat steps 3\~5.
- Press MENU to return to the Main Menu or press EXIT to exit from the menu.
IMPORTANT FACT: Receiving a true EIA 708B Digital Closed-Captioning... Some broadcasters upconvert 608B Analog Caption to include in their digital stream. These upconverted Analog captions may not respond to all the options for customized settings.

Analog Caption

Digital Caption
Sub-Menu
V-Guide (Parental Control) Operation
NOTE: THIS FEATURE IS DESIGNED TO COMPLY WITH THE UNITED STATES OF AMERICA'S FCC V-CHIP REGULATIONS. THEREFORE, IT MAY NOT FUNCTION WITH BROADCASTS THAT ORIGINATE IN OTHER COUNTRIES.
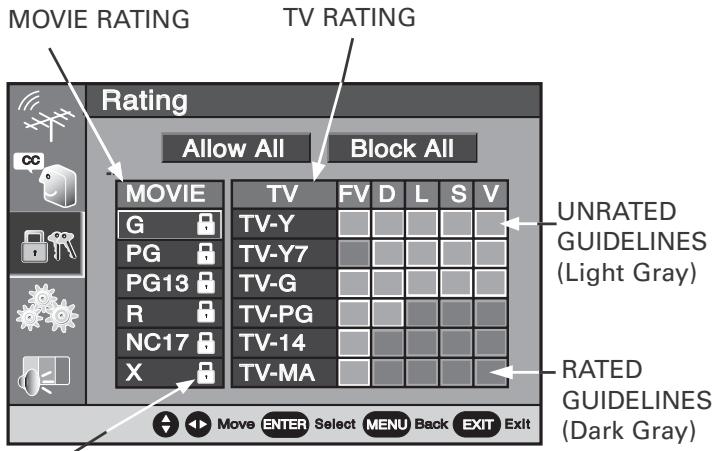
This Sanyo television is equipped with an electronic V-Chip to interpret MPAA and TV Parental Guidelines rating codes. When these codes are detected, the TV will automatically display or block the program, depending upon choices you make when setting up the V-Guide system. Content ratings are represented by the initials: FV (fantasy violence), D (suggestive dialog), L (adult language), S (sexual situations), and V (violence).

A rating icon will generally appear in the upper left hand corner of the TV screen for about fifteen seconds at the beginning of a program.
This television can be set to block programs automatically with content you deem as inappropriate for your children to view.
TO BLOCK MOVIE OR TV PROGRAM
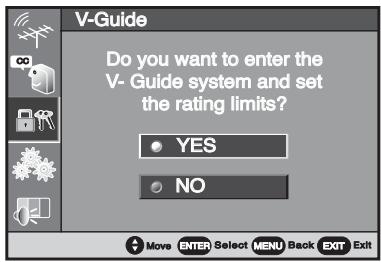
- Press MENU.
- Use the ▲/▼keys to highlight the V-Guide Icon [Locks & Keys]. Press ENTER.
- Use the ▲/▼ keys to select YES. Press the ENTER.
- Use the ▲/▼, ◀ / ▶ keys to select Movie or TV ratings.
- Press the ENTER key to active selected option.
For Movie Ratings: A lock symbol will appear beside the selected option indicating it is blocked.
For TV Ratings: A locked symbol appears in the rating boxes indicating blocked rating.
IMPORTANT FACT: The TV will automatically block (locked symbol) ratings above or unblock (no lock) ratings below selection. For example, if you block TV rating TV-G, the ratings TV-PG, TV-14 and TV-MA will be blocked automatically or if you block Movie rating PG-13, the ratings R, NC17 and X will be blocked automatically.
Blocking TVY7 does not block higher ratings.
- Press MENU to return to the Main Menu or press EXIT to exit from the menu.
TO TEMPORARILY UNBLOCK MOVIE OR TV PROGRAM
- Press MENU.
- Use the ▲/▼ keys to highlight the V-Guide Icon. Press ENTER.
- Select "NO" to temporarily unblock settings.
TO UNBLOCK MOVIE OR TV PROGRAM
- Press MENU.
- Use the ▲/▼ keys to highlight the V-Guide Icon. Press ENTER.
- Use the ▲/▼ keys to select “YES,” only if the option indicator (yellow bullet) is not highlighted. Press ENTER.
- Highlight the “ALLOW ALL” option using the ▲/▼, ◀/▶ keys, if needed. Press ENTER to clear all settings.
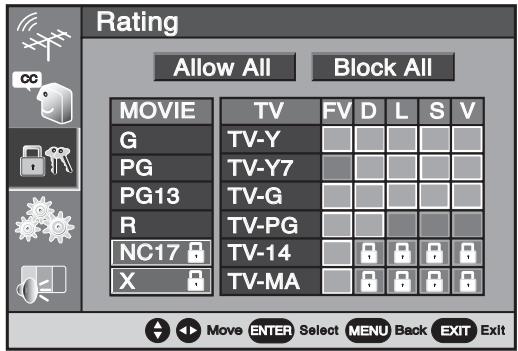
EXAMPLE: MOVIE RATING: NC17 & X (BLOCKED)
TV RATING: TV-14 & TV-MA-D, L, S, & V (BLOCKED)
V-GUIDE RATINGS—AT-A-GLANCE
LOCKED SYMBOL

QuickTips
■ The V-Guide menu display remains on screen for approximately 30 seconds. If it disappears, press the V-Guide key.
■ You can block a content rating such as TVPG-V and still be able to watch TVPG programs with ratings of S-L-D provided the TVPG is unblocked.
Need help?
Visit our Web site at
www.sanyoctv.com
or Call 1-800-877-5032
Setup Menu

QuickTips
■ Cursor will continue to move through the menu loop until the Exit key is pressed.
■ The Channel Banner (Full or Brief) Clock option will be blank if the clock/day has not been set.
■ Surround sound will be on automatically when Sports or Movie is selected. Surround expands the sound effect while receiving MTS stereo signals.
Need help? Visit our Web site at www.sanyoctv.com or Call 1-800-877-5032
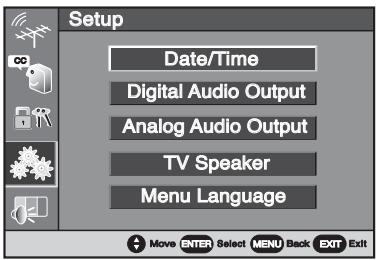
Setting the Clock Manually
- Press MENU.
- Use the ▲/▼ keys to highlight the Setup Icon. Press ENTER.
- Use the ▲/▼ keys to select Date/Time. Press ENTER.
- Use the ▲/▼ keys to select Manual Setup. Press ENTER.
- Use the ▲/▼ keys to select the correct Hour. Press ENTER to set hour. (The TV will go automatically to the next setting.)
- Use the ▲/▼ keys to select the correct Minutes. Press ENTER to set minutes. (The TV will go automatically to the next setting.)
- To set the other information, use the ▲/▼ keys to select the correct information. Press ENTER to set information.
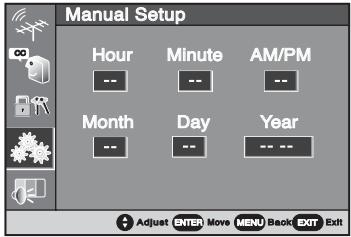
Digital Audio Output
Use this feature to choose the format of the audio output signal: Dolby Digital or PCM.
- Press MENU.
- Use the ▲/▼ keys to highlight the Setup Icon. Press ENTER.
- Use the ▲/▼ keys to highlight the Digital Audio. Press ENTER.
- Use the ▲/▼ keys to select Dolby Digital or PCM. Press ENTER.
Note: If you are watching an analog channel, or a signal connected to the Video 1/2 or Component jacks, the Digital Audio output setting is not available.
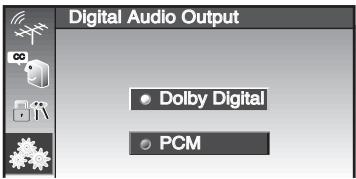
TV Speakers
- Press MENU.
- Use the ▲/▼ keys to highlight the Setup Icon. Press ENTER.
- Use the ▲/▼ keys to highlight the TV Speaker. Press ENTER.
- Use the ▲/▼ keys to select ON. Press ENTER.
NOTE: Sound will not be produced through your television speakers if the OFF mode is selected.
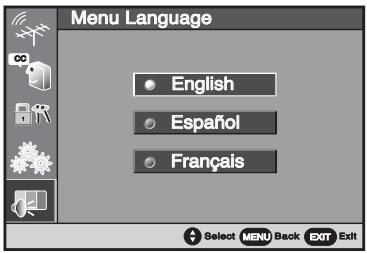
Menu Language
- Press MENU.
- Use the ▲/▼ keys to highlight the Setup Icon. Press ENTER.
- Use the ▲/▼ keys to highlight the Menu Language. Press ENTER.
- Use the ▲/▼ keys to select English, Español, or Français. Press ENTER.
- Press MENU to return to the Main Menu or EXIT to exit from the menu.
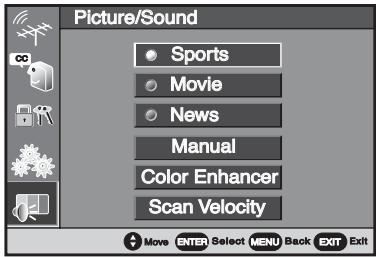
Picture/Sound Adjustment
When the Picture/Sound Option is selected, press the ENTER key to select the desired option and setting. To expand your viewing experience, select Sports, Movie, or News to match the program you are watching. The TV will automatically adjust the sound and picture.
- Press MENU
- Use the ▲/▼ keys to highlight the Picture/Sound Icon. Press ENTER.
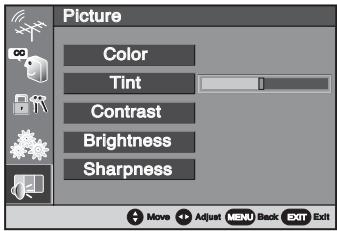
Adjusting the Picture/Sound Manually
- Use the ▲/▼ keys to select Manual. Press ENTER.
- Use the ▲/▼ keys to select Picture (Options: Color, Tint, Contrast, Brightness, Sharpness), Sound (Options: Bass or Treble), or Surround (Options: On or Off). Press ENTER.
- Use the ▲/▼ keys to select desired option setting. Then use the ◀/▶ keys to make adjustments.
- Press MENU to return to the Main Menu or EXIT to exit from the menu.
Color Enhancer
Use this feature to highlight the picture flesh tones and color highlights. Selecting WARM will deepen the picture red tints and COOL will highlight the picture blue tints.
Scan Velocity
This television has an electronic circuit that regulates the scan speed of the electron beam creating sharp transitions between the light and dark portions of the picture. The results are crisp edges and sharply-defined clarity. Select LOW or HIGH option to change settings.
- Press MENU
- Use the ▲/▼ keys to highlight the Picture/Sound Icon. Press ENTER.
- Use the ▲/▼ keys to highlight the Color Enhancer or Scan Velocity. Press ENTER.
- Use the ▲/▼ keys to select setting. Press ENTER.
- Press the MENU key to return to the Main Menu or EXIT to exit from the menu.
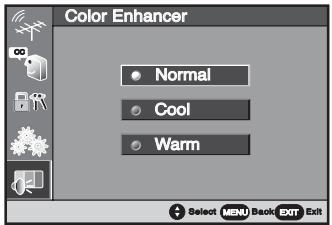
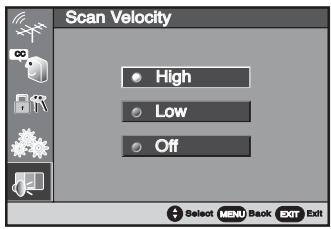
PAP (Picture-and-Picture) Operation
The PAP (Picture and Picture) feature divides the screen into two picture windows so you can easily watch two different programs at once. The left picture will always be the Main picture with audio. The right picture is considered the Sub picture with no sound available. The signal for one window must come from the Digital Tuner. The signal for the other window can be from the Analog Tuner or any of the audio/video inputs.
IMPORTANT FACT: The Viewer cannot use the DTV's Analog Tuner as one source and any audio/video jack connection (VCR, DVD Player, Cable Box, or Satellite Reciever) as the other source.
Using the PAP Split Screen
- Press the PAP ON/OFF key to split the screen.
- To change channels in the Left Window: Use the Channel Up/Down keys.
- To change channels in the Right Window: Use the PAP Channel Up/Down keys.
Switching between the Windows
- Press the SWAP key to switch between the Left picture and Right picture windows. Use this feature if you are viewing a program in the right window and desire to hear the audio, just press the SWAP key to quickly exchange it to the left window.
NOTE: This feature is operational only when PAP Split window is ON.
Freezing the PAP Window
- Press the QUIK FREEZE key to stop the action. Use this feature to hold an advertised phone number or address on the screen until you collect the information.
NOTE: This feature will not freeze a picture in the Left window.
IMPORTANT FACT: The QUIK FREEZE feature will freeze the Right window content if PAP is ON.

natural_image
Two black-and-white photos: one showing a person playing badminton, the other showing a cyclist in a field (no text or symbols visible)natural_image
Two black-and-white photos: one of a person riding a bicycle in a grassy field, the other of a person playing a badminton ball (no text or symbols visible)Operating PAP Split–Screen with the following features...
Captioning Setting
If Caption mode is ON and corresponding captioning data is available, it applies to the Left picture window only.
Sleep Timer Setting
If the Sleep timer is set, the display will show in the Right Window. It is not active in the Left window on-screen display.
V-Guide Setting
If the PAP Split Screen feature is on, the V-Guide control settings will affect the Left picture and Right picture windows individually.
If only the Left picture has the same or higher rating than the program rating limit, only the Left picture window is blocked.
If only the Right picture has the same or higher rating than the program rating limit, only the Right picture window is blocked.
If both the Left picture and the Right picture have the same or higher rating than the program rating limit, both the Left and Right pictures will be blocked.
IMPORTANT FACT: Even if the Left and Right picture windows are swapped, the V-Guide blocking feature will still be active until turned off or cleared.
Helpful Hints (Problems/Solutions)
Before calling for assistance, please check the condition that most closely resembles your problem in the following chart, then try the solutions for that condition. Visit our Web site at www.sanyoctv.com or call toll free 1-800-877-5032.
| Problem | Check these Conditions | Try these Solutions | Page No. |
| TV turns off automatically. | Check signal (Cable/Ant.) connection.Power surge protection feature.Press POWER key. | The sleep timer may have been set.Unplug TV momentarily. | 7 |
| No picture/sound (digital picture) | Check antenna/external equipment connections.May be station trouble, NO signal broadcast.May be MUTE function is on. | Adjust antenna.Try a different channel.Press RESET key or restart channel search.Adjust volume. | 8~1112~1320 |
| Cannot customize Caption. | Digital caption signal not broadcast. | Press CAPTION key to select Analog captioning. | 18 |
| No Captioning. | Check if station is broadcasting a Closed-Caption signal. Select another channel. | Press CAPTION key to select Captioning. | 18 |
| Poor Picture/sound (watching Analog) | Check if program is in color.Check antenna/external equipment connections.Color or Tint misadjusted.May be station trouble.May be MUTE function is on. | Try a different channel.Adjust antenna.Press RESET key to restart channel search.Adjust volume. | 1320 |
| Blue Screen with Video1, Video2, Component2, Component3, or HDMI displayed. | Check Audio/Video connections.Check external equipment connections.Check external equipment setting. | Press INPUT key.Switch on external equipment.Set external equipment output connections to match input connections. | 8~11 |
| No HDTV Stereo or SAP Sound | Check if station is broadcasting a true MTS stereo signal or a SAP signal. | Press AUDIO key. | 13 |
| Cannot select or scan some channels. | Channel may be removed from memory.Check antenna connections.No digital signal being broadcasted.V-Guide is set to block programming (see page 19). | Select CH. Scan Memory and manually add channels or start CH. (channel) search.Set V-Guide to ALLOW ALL or press RESET key to clear all settings and restart channel search. | 1819 |
| No Cable Channels above number 13. | Cable Channel indicator C should appear next to channel number. | Switch Antenna mode ON. | 17 |
| No UHF, VHF Channels OK. | Cable Channel indicator C should not appear next to channel number. | Switch Antenna mode ON. | 17 |
| Remote Control will not work TV or other equipment (VCR, Cable Box, Satellite Receiver, and DVD). | Press TV key to operate the TV.Press VCR key to operate the VCR, CABLE key to operate Cable Box, DVD key to operate DVD Player, and SAT key to operate Satellite Receiver.Check batteries; see if TV is plugged in.Check external equipment. | Replace batteries.Aim remote control at front of TV and external equipment.Re-enter brand code. | 1213~15 |
| Menu words seem misspelled | May be a different language is selected. | Reselect menu language choice using the on-screen menu. | 20 |
| Cabinet makes popping sound. | This is a normal condition during warm-up and cool down of the plastic cabinet parts. |
Mexico Guarantee
IMPORTADOR:
COMERCIALIZADORA MEXICO
AMERICANA, S.DE R.L. DE C.V.
AV. NEXTENGO N° 78
COL. SANTA CRUZ ACAYUCAN
DEL. AZCAPOTZALCO, MÉXICO, D.F. C.P. 02770
RFC: CMA9109119L0
DESCRIPTION: Television
BRAND: SANYO
MODELS: HT27744
HT30744
HT32744
GUARANTEE
THE APPARATUS THAT YOU HAVE ACQUIRED HAS A ONE YEAR GUARANTEE FOR MANUFACTURING DEFECTS AND A ONE YEAR SERVICE WARRANTY FROM THE DATE OF PURCHASE GRANTED BY:
COMERCIALIZADORA MEXICO-AMERICANA, S. DE R.L. DE C.V.
UNDER THE FOLLOWING CONDITIONS:
- TO MAKE THE GUARANTEE EFFECTIVE, SIMPLY SHOW THIS POLICY FILLED OUT BY THE STORE OR SUPPLIER UNIT OR THIS SALES INVOICE, WITH THE APPARATUS IN ANY OF THE SERVICE CENTERS INDICATED ON THIS GUARANTEE.
- IF THE FAULT IS ATTRIBUTED TO A MANUFACTURING DEFECT, THE APPARATUS WILL BE REPLACED OR YOUR MONEY REFUNDED. DURING THE 30 DAYS SUBSEQUENT TO THE PURCHASE THE GUARANTEE WILL BE VALID AT THE STORE WERE THE APPARATUS WAS PURCHASED, PRESENTING THE ABOVE DOCUMENTS.
- REPAIR TIME WILL NEVER BE MORE THAN 30 DAYS. IF THIS TIME HAS ELAPSED, AND THE PRODUCT ISN'T REPAIRED, COMERCIALIZADORA MEXICO AMERICANA, S. DE R.L. DE C.V. WILL PROCEED TO EFFECTUATE THE EXCHANGE FOR AN EQUIVALENT APPARATUS OR THE RETURN OF THE BUYING-SALE COST RESPECTIVELY.
- THIS GUARANTEE WILL COVER ITS TOTALITY OF PIECES, COMPONENTS AND SERVICE REPAIR OF PRODUCT, AND THE RESPECTIVE COST OF TRANSPORTATION.
THIS GUARANTEE WILL BE NULL AND VOID IN THE FOLLOWING CIRCUMSTANCES:
* WHEN PRODUCT HAS BEEN USED IN A DIFFERENT CONDITION THAN ITS NORMAL USE.
* WHEN PRODUCT HASN'T BEEN OPERATING CORRECTLY ACCORDING TO THE INSTRUCTIONS IN THIS MANUAL.
* WHEN PRODUCT HAS BEEN CHANGED OR REPAIRED BY PERSONS NOT AUTHORIZED FROM THE MANUFACTURER, IMPORTER, OR MERCHANT RESPONSIBLE RESPECTIVE.
CENTRO DE SERVICIO Y LUGAR DONDE OBTENER PARTES, COMPONENTES, CONSUMIBLES Y ACCESORIOS:
SUCURSAL VALLEJO
SUCURSAL MINERVA
STAMP, DATE AND SIGNATURE
OF
STORE
DESCRIPTION:
BRAND:
_MODEL:
CLIENT'S NAME:
ADDRESS:
EXTERIOR NUMBER:
INTERIOR NUMBER:
SUB DIVISION:
STATE/DELEGATION:
TELEPHONE:
United States and Canada Warranty
ONE-YEAR LIMITED WARRANTY
THIS LIMITED WARRANTY IS VALID ONLY ON SANYO TELEVISIONS PURCHASED AND USED IN THE UNITED STATES OF AMERICA, CANADA, AND PUERTO RICO, EXCLUDING THE UNITED STATES' OTHER TERRITORIES AND PROTECTORATES. THIS LIMITED WARRANTY APPLIES ONLY TO THE ORIGINAL PURCHASER, AND DOES NOT APPLY TO PRODUCTS USED FOR INDUSTRIAL OR COMMERCIAL PURPOSES.
FOR ONE YEAR from the date of purchase, Sanyo Manufacturing Corporation will replace any defective TV.
To insure proper warranty exchange, keep the original sales receipt for evidence of purchase. Return the defective TV to the retailer along with the receipt and the included accessories, such as the remote control. The defective TV will be exchanged for the same model, or a replacement model of equal value, if necessary. Replacement model will be contingent on availability and at the sole discretion of Sanyo Manufacturing Corporation.
THE FOREGOING WARRANTY IS EXCLUSIVE AND IN LIEU OF ALL OTHER WARRANTIES OF MERCHANTABILITY OR FITNESS FOR A PARTICULAR PURPOSE.
OBLIGATIONS
For one year from the date of purchase, Sanyo Manufacturing Corporation warrants this product to be free from defects in material and workmanship under normal use and conditions. Should replacement be necessary under this warranty for any reason due to manufacturing defect or malfunction during the first year from date of original purchase, Sanyo Manufacturing Corporation will provide a new TV via exchange at the retailer.
For customer assistance, whether during or out of the warranty period, call toll free 1-800-877-5032.
Weekdays 7:30 AM – 7:00 PM Central Time
Saturday 7:30 AM – 4:00 PM Central Time
This warranty expresses specific contractual rights; retail purchasers may have additional statutory rights which vary from state to state.
(EFFECTIVE: August 1, 2002)
For your protection in the event of theft or loss of this product, please fill in the information requested below and KEEP IN A SAFE PLACE FOR YOUR OWN PERSONAL RECORDS.
Model No. ____
Serial No. ____
(Located on back of unit)
Date of Purchase ____
Purchase Price ____
Where Purchased ____ ____

Sanyo Manufacturing Corp.
3333 Sanyo Road, Forrest City, AR 72335
Care and Cleaning
Cleaning the Cabinet
The surface of the cabinet can be damaged if not properly maintained. Many common household aerosol sprays, cleaning agents, solvents and polishes will cause permanent damage to the fine surface.
- Unplug the power cord before cleaning the television.
- Clean the cabinet with a soft dry cloth.
Cleaning the Television Screen

- Use a soft cloth moistened with a non-alkaline diluted soap solution. Gently rub surface until it is fully dry.
Notes: Never spray liquids on the screen because they can run down and drip onto the chassis. This may cause component failure not covered under Warranty.
Never try to polish away any stain or other blemish, or use an abrasive material on the screen surface as this action may permanently damage the surface of the picture tube.
Características
Please connect all signals and antennas to jacks and the terminals on the back.
Then press the Channel UP key.
Automatic clock setting.
Press Channel UP Key to cancel.
For Mono VCR (Single Audio Jack) connect VCR Audio Out to TV Audio (L) Input.

flowchart
graph TD
    A["COMPONENT VIDEO INPUT"] --> B["ANALOG AUDIO OUTPUT"]
    B --> C["L - R"]
    C --> D["COMPO 3"]
    C --> E["COMPO 2"]
    F["AUDIO 3"] --> G["Y"]
    G --> H["Pb"]
    H --> I["Pr"]
    I --> J["VIDEO 2"]
    K["S-VIDEO"] --> L["VIDEO"]
    L --> M["L (MONO) AUDIO R"]
    M --> N["VIDEO 1"]
    O["HDMI INPUT"] --> P["CABLE ÓPTICO DIGITAL"]
    Q["DIGITAL AUDIO OUTPUT"] --> P
    R["UHF/VHF/CATV"] --> S["DIGITAL ANTENNA IN"]
    T["SERVICE"] --> U["AMPLIFICADOR ESTEREOFÓNICO"]
natural_image
Diagram of a mechanical assembly with cylindrical components and a housing, no text or symbols presentTransmission Captada (Closed-Caption) CC
natural_image
Two black-and-white photos: one of a person riding a bicycle, the other of a woman playing badminton (no text or symbols visible)VENTANA
DERECHA
VENTANA
IZQUIERDA
Sanyo Manufacturing Corp.
3333 Sanyo Road, Forrest City, AR 72335
Cuidados y Limpieza
Mémoire balayage.... 64
PSIP (Program and System Information Protocol)
Please connect all signals and antennas to jacks and the terminals on the back.
Then press the Channel UP key.
Automatic clock setting.
Press Channel UP Key to cancel.
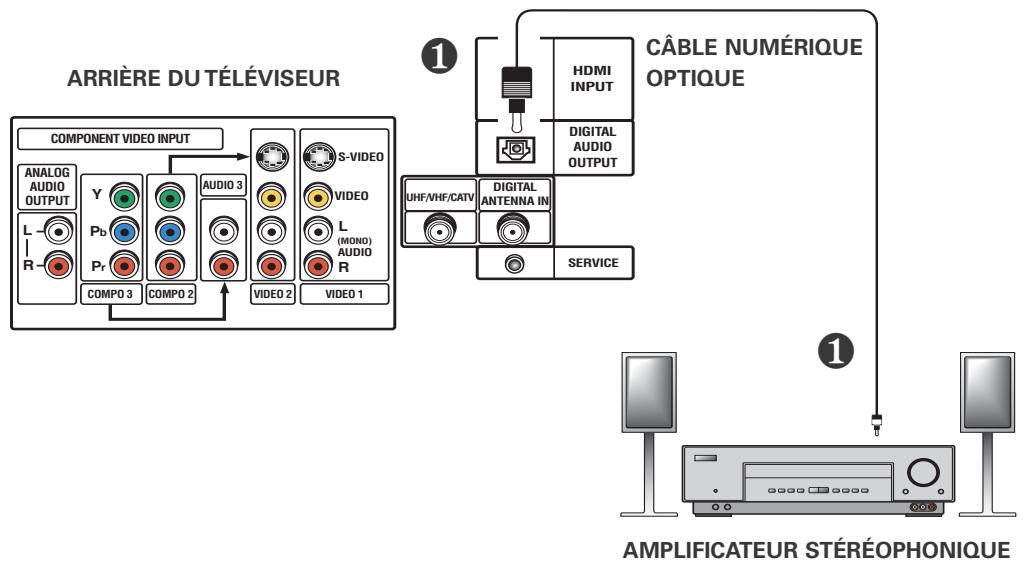
flowchart
graph TD
    A["ARRIÈRE DU TÉLÉVISEUR"] --> B["COMPONENT VIDEO INPUT"]
    B --> C["ANALOG AUDIO OUTPUT"]
    B --> D["Y"]
    B --> E["Pb"]
    B --> F["Pr"]
    B --> G["COMPO 3"]
    B --> H["COMPO 2"]
    B --> I["AUDIO 3"]
    B --> J["VIDEO 2"]
    B --> K["S-VIDEO"]
    B --> L["VIDEO"]
    B --> M["L (MONO) AUDIO R"]
    B --> N["VIDEO 1"]
    B --> O["HDMI INPUT"]
    B --> P["DIGITAL AUDIO OUTPUT"]
    B --> Q["CÂBLE NUMÉRIQUE OPTIQUE"]
    Q --> R["UHF/VHF/CATV"]
    Q --> S["DIGITAL ANTENNA IN"]
    Q --> T["SERVICE"]
    R --> U["AMPLIFICATEUR STÉRÉOPHONIQUE"]
    S --> U
    T --> U
natural_image
Diagram of a car gear shift lever assembly with battery and housing (no text or labels)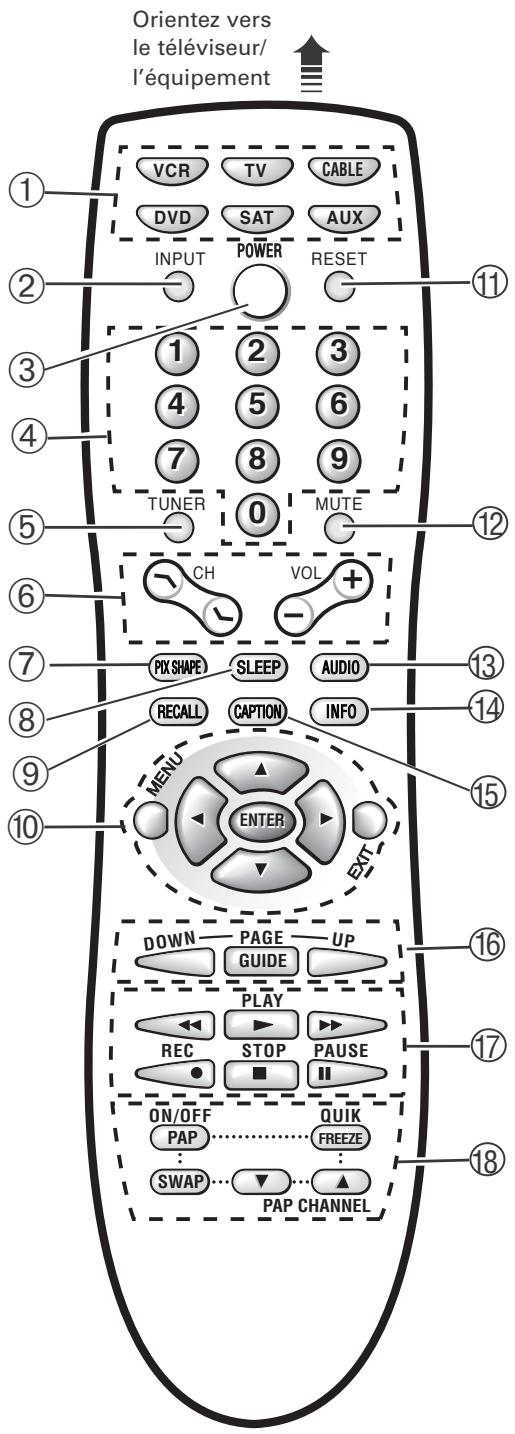
natural_image
Two black-and-white photos: one showing a person playing badminton, the other showing a cyclist in a field (no text or symbols visible)FENÊTRE DE GAUCHE/FENÊTRE DE DROITE

natural_image
Two black-and-white photos: one of a person riding a bicycle, the other of a person playing badminton (no text or symbols visible)FENÊTRE DE DROITE/FENÊTRE DE GAUCHE
GARANTIE LIMITÉE D'UN AN
LA PRÉSENTE GARANTIE LIMITÉE N'EST ACCORDÉE QU'AUX TÉLÉCOULEURS SANYO ACHETÉS ET UTILISÉS AU CANADA, AUX ÉTATS-UNIS ET À PORTO RICO, MAIS À L'EXCEPTION DES AUTRES TERRITOIRES ET PROTECTORATS DES ÉTATS-UNIS. CETTE GARANTIE LIMITÉE NE S'APPLIQUE QU'À L'ACHETEUR INITIAL; ELLE NE COUVRE PAS LES ARTICLES UTILISÉS À DES FINS INDUSTRIELLES OU COMMERCIALES.
Sanyo Manufacturing Corp.
3333 Sanyo Road, Forrest City, AR 72335
- IMPORTANT SAFETY INSTRUCTIONS
- Positioning the appliance
- Hooking Up Outdoor Antenna
- Plug in the power cord
- Cleaning
- Service & Repair
- Positioning the TV
- Child Safety
- Contents
- Introduction
- Welcome to the World of Sanyo
- To The Owner
- Features
- Specifications
- Picture Tube Size (Measured Diagonally):
- Jacks and Connectors:
- Size and Weight (approximately):
- Trademarks Information:
- Glossary
- Getting Started
- HDTV Back—Jacks Locations and Functions
- Signal Connection
- Analog RF Antenna Connection
- Digital (DTV) Antenna Connection
- QuickTips
- Setting Up the TV
- Connecting External Equipment to HDMI (Includes HDCP copy protection)
- Connecting STB with DVI Output to HDMI Input (Includes HDCP copy protection)
- Using Component Jacks to connect a DVD Player or other digital equipment
- Analog A/V Connections
- Using S-Video Jacks to connect a DVD Player and VCR to A/V jacks
- Audio Connections
- Connecting Digital Audio Output to an External Amplifier
- Connecting Audio Out Jacks to a Stereo Amplifier
- Using the Multimedia Remote Control
- Install Batteries as shown (2 AA, not included)
- PROGRAMMING THE REMOTE CONTROL
- TV Adjustment and Setup
- HOW TO OPERATE THE ON-SCREEN MENU
- CHANNEL SEARCH
- DIGITAL CABLE SEARCH (Optional)
- DIGITAL ADD-ON SEARCH
- ANTENNA SELECTION
- CHANNEL SCAN MEMORY
- INITIAL CHANNEL
- Closed-Captioning
- To View Captions:
- To Customize Digital Captioning On-screen Display:
- V-Guide (Parental Control) Operation
- TO BLOCK MOVIE OR TV PROGRAM
- TO TEMPORARILY UNBLOCK MOVIE OR TV PROGRAM
- TO UNBLOCK MOVIE OR TV PROGRAM
- V-GUIDE RATINGS—AT-A-GLANCE
- Setup Menu
- Setting the Clock Manually
- Digital Audio Output
- TV Speakers
- Menu Language
- Picture/Sound Adjustment
- Adjusting the Picture/Sound Manually
- Color Enhancer
- Scan Velocity
- PAP (Picture-and-Picture) Operation
- Using the PAP Split Screen
- Switching between the Windows
- Freezing the PAP Window
- Operating PAP Split–Screen with the following features...
- Captioning Setting
- Sleep Timer Setting
- V-Guide Setting
- Helpful Hints (Problems/Solutions)
- Mexico Guarantee
- GUARANTEE
- UNDER THE FOLLOWING CONDITIONS:
- CENTRO DE SERVICIO Y LUGAR DONDE OBTENER PARTES, COMPONENTES, CONSUMIBLES Y ACCESORIOS:
- United States and Canada Warranty
- ONE-YEAR LIMITED WARRANTY
- OBLIGATIONS
- Care and Cleaning
- Cleaning the Cabinet
- Cleaning the Television Screen
- Características
- Transmission Captada (Closed-Caption) CC
- Cuidados y Limpieza
- PSIP (Program and System Information Protocol)
- GARANTIE LIMITÉE D'UN AN
Brand : SANYO
Model : HT32744
Category : Television