
GX69 - Mouse Genesis - Free user manual and instructions
Find the device manual for free GX69 Genesis in PDF.


| Product Type | Wired Gaming Mouse |
| Model | Genesis GX69 |
| Connection Interface | USB 1.1/2.0 |
| Sensor Type | Optical |
| DPI Range | 400–4000 DPI (adjustable in steps) |
| Number of Buttons | 10 |
| Programmable Buttons | All 10 fully customizable (over 40 assignable functions) |
| Polling Rate | 125 / 250 / 500 / 1000 Hz |
| Lighting | RGB LED with Full Light and Breathing modes; selectable single color or cycling |
| Adjustable Length | Yes (via screw on palm rest, extends or shortens the mouse) |
| Weight Adjustment | Yes (removable weight blocks, up to 4 blocks in a case) |
| Dimensions (approximate) | 130 × 72 × 40 mm (adjustable length) |
| Weight (without cable, with all weights) | ~140 g (adjustable via weight removal) |
| Cable Length | 1.8 m (braided) |
| Operating System Support | Windows XP / Vista / 7 (also compatible with Windows 8/10/11 via generic drivers, but full features require driver) |
| Driver Software | Yes (included CD or download); allows button mapping, macro recording, DPI, lighting, and profile management |
| Profiles | Up to 5 stored in driver, unlimited saved to disk; automatic application detection possible |
| On-The-Go Function | Allows repeated presses of any button by holding On-To-Go key |
| Material | Plastic body with rubberized side grips |
| Warranty & Compliance | EU RoHS compliant; WEEE symbol indicates proper recycling required |
Frequently Asked Questions - GX69 Genesis
User questions about GX69 Genesis
0 question about this device. Answer the ones you know or ask your own.
Ask a new question about this device
Download the instructions for your Mouse in PDF format for free! Find your manual GX69 - Genesis and take your electronic device back in hand. On this page are published all the documents necessary for the use of your device. GX69 by Genesis.
USER MANUAL GX69 Genesis
EN - NATEC GENESIS GX69 - USER MANUAL
I. Introduction
Natec Genesis GX69 is a wired gaming mouse with 10 fully customizable buttons, high precision optical engine, adjustable length and comfortable design.
II. Features
- High-end optical engines, precise positioning
- Adjustable resolution up to 4000DPI
- Different LED indicator colors
- Two modes of LED lightning: full lightened and breathing.
- 10 fully programmable keys – more than 40 settings to choose for each
- Adjustable polling rate: 125/250/500/1000 Hz.
- Advanced profiles management
- Ergonomic design
- Adjustable length
- Removable weight blocks.
A. Adjusting length and weight
Genesis GX69 allows you to adjust the length and weight of the device to suit your demands.
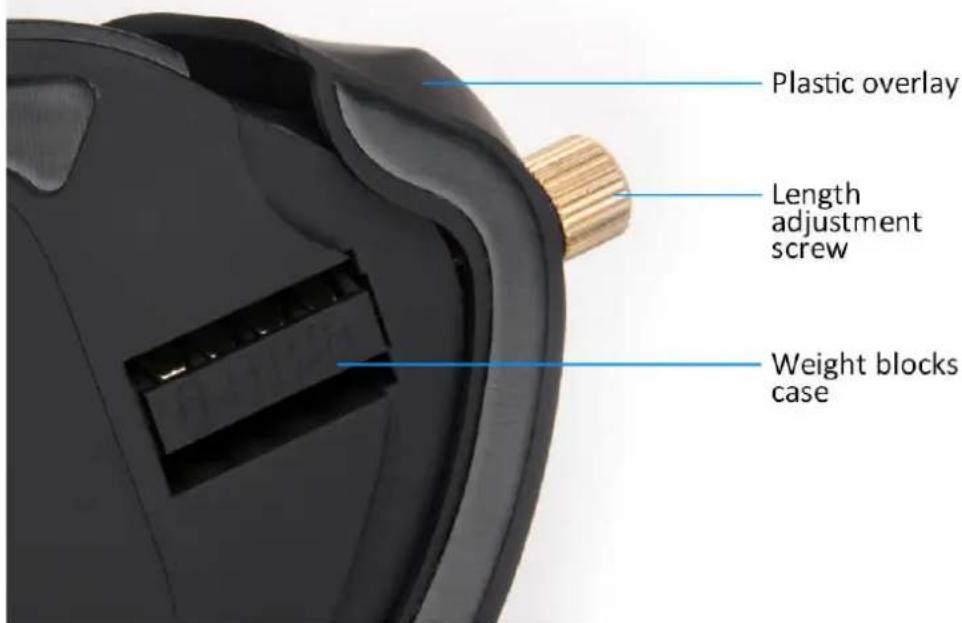
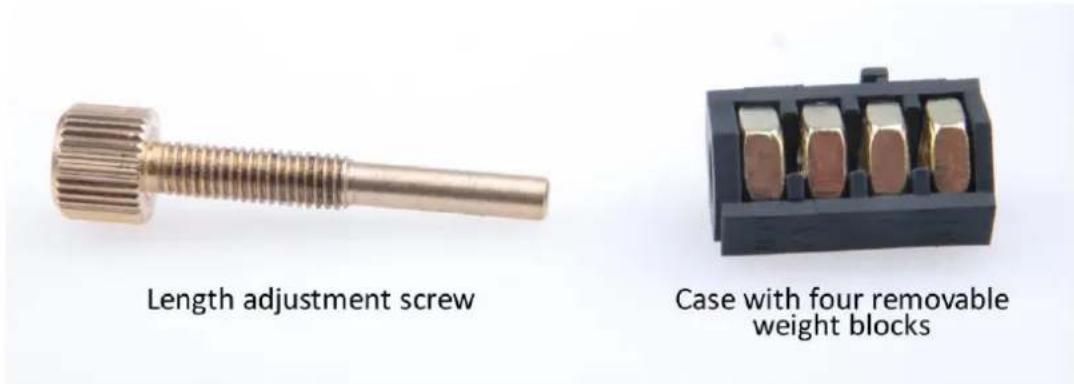
Adjusting length
Turn the screw on the palm rest:
- clockwise to move the plastic cover closer to the mouse, thus shorten the device,
- counterclockwise to lengthen the mouse.
Adjusting weight
- Keep turning the screw on the palm rest counterclockwise until you can completely remove it and the plastic overlay.
- Slide the weight blocks case to the unlocked position (marked with the open padlock)
- Pull the weight blocks case to remove it
- Remove/add the blocks from/to the case
- Insert the weight blocks case back in its compartment and slide the case to the locked position
- Place back the plastic cover and insert the screw, turning it clockwise.
III. Driver description
A. System
- Compatible with Windows XP/Vista/7 operation system
- USB (1.1/2.0) port
-
CD-ROM drive (for installing the driver from CD attached) / internet connection (for downloading the driver)
-
50 MB of hard disk space
- Screen resolution: minimum 1024x768
B. Windows XP/Vista/7 installation guide
- Insert the Genesis GX69 gaming mouse USB plug into the computer USB port
- Insert the Genesis GX69 driver CD into the CD-ROM drive (or download the driver from www.natec-europe.com)
- Launch the setup application and click next on the window displayed
- Select the install path, then click next
- Wait for the end of the installing process
- Click finish
- You are ready to use the device.
IV. Mouse configuration
A. Button settings
Button settings tab allows you to assign individual functions to each button.
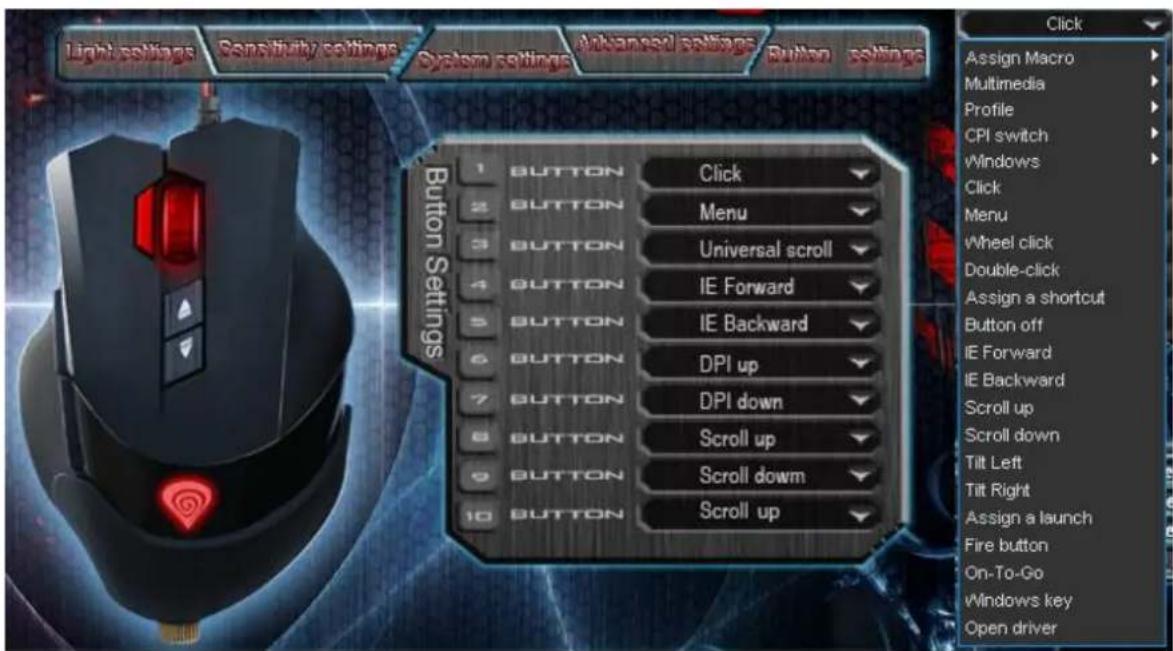
You can bind one of more than 40 functions to keys labeled by numbers on the schema above. In the right side of the window, you can see actual configuration of the buttons. Each position on the list is in fact a combo box, from which you can choose a preferred function for an individual button.
On-To-Go
The On-To-Go function works similarly to the fire button – but, as fire button simulates repeating presses of left button of the mouse, the On-To-Go can do so with any button of the mouse. To use this function:
- Assign On-To-Go to any button in the Button Settings
- Click Apply
- Hold down the On-To-Go button and the button that you want to press repeatedly.
Defining Macros
In brief speaking, a macro is a series of actions that you can bind to the mouse. More precisely, macro is a recorded sequence of key presses, releases and time delays between them. Output delays can be recorded or predefined by user.
To define a macro, you have to choose from available function list assign macro, and then macro manager.
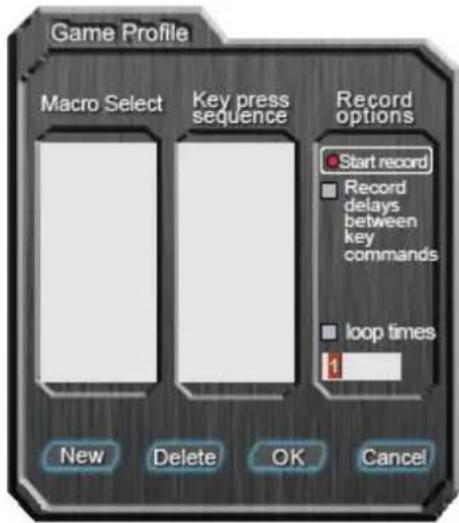
Adding a macro:
- Click new
- Choose name for your macro
- Click start record
- Press desired sequence of keys
- Press stop record
Now you can assign your macro to the key by selecting it from group assign macro on the list related to the programmed key.
Deleting macros:
- Open macro manager
- Choose a macro from the list
- Click delete
Additional options:
Record delays between key commands – you can choose whether to record time intervals between pressing and releasing the keys
Loop times - you can define how many times macro should be used after single button press.
B. Advanced Settings
In this tab, you can adjust advanced settings of the mouse.
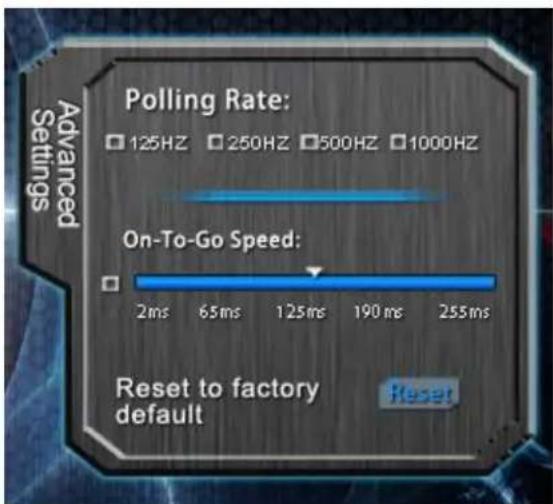
Polling rate – defines how often the mouse sends information of its position to the computer. Available options: 125/250/500/1000Hz
On-To-Go Speed - defines time intervals between key presses simulated by the On-To-Go function
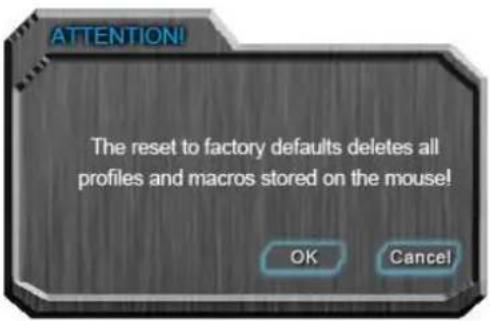
Restoring factory defaults
To restore factory defaults, click reset in the advanced settings tab. Warning – resetting the configuration will delete all settings and macros stored in the driver!
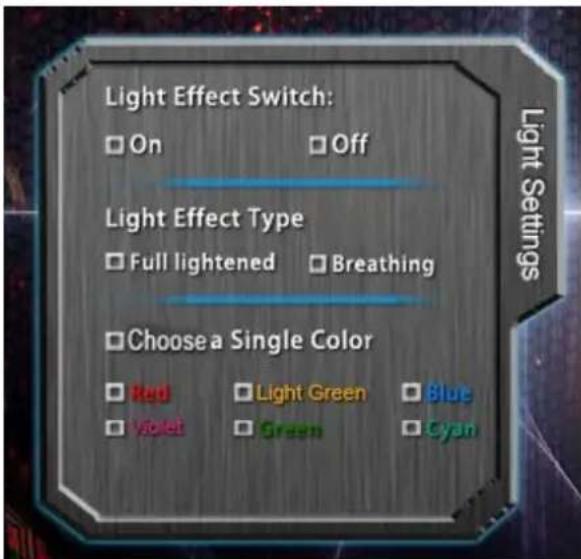
C. Light Settings
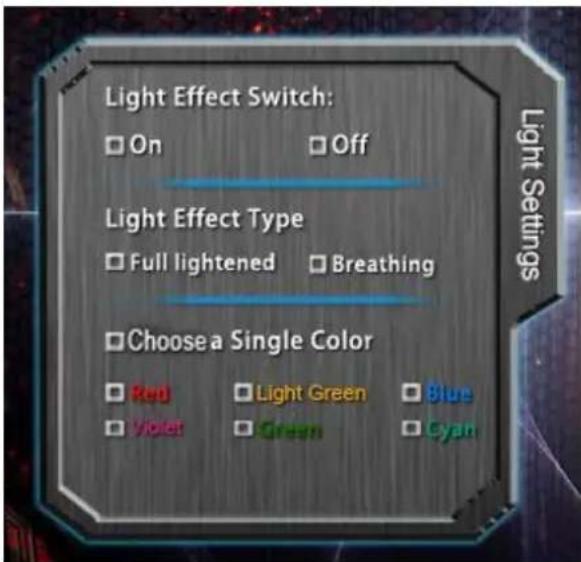
Light effect switch - turns on/off light effects on the mouse
Light effect type options – allows you to choose the type of LED effects of the mouse. Full lightened option causes constant luminance of diode while color changing; breathing setting means that the diode will slowly pulse.
Choose a Single Color - allows you to manually set single desired color of luminance. If turned off, the color of diode constantly changes.
D. Sensitivity settings
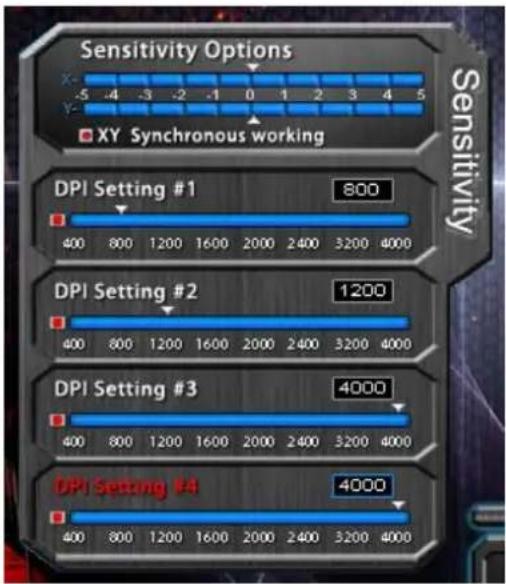
Sensitivity options - using the sliders you can adjust sensitivity for axis X and Y at once (when X / Y synchronous working box is checked) or separately (if unchecked).
DPI Setting – defines the resolution (DPI – dots per inch) of the mouse. Available options – 400-4000 DPI. It is possible to predefine up to four DPI profiles (don't confuse them with gaming profiles), which then can be switched "on the fly" using the mouse buttons. Unchecking the box on the left side of each slider will exclude that specific setting from available adjustments, without erasing it.
E. System Settings
The settings here are related rather to an operation system, than to hardware itself. System settings allow you to change the way your system interprets signals from the mouse.
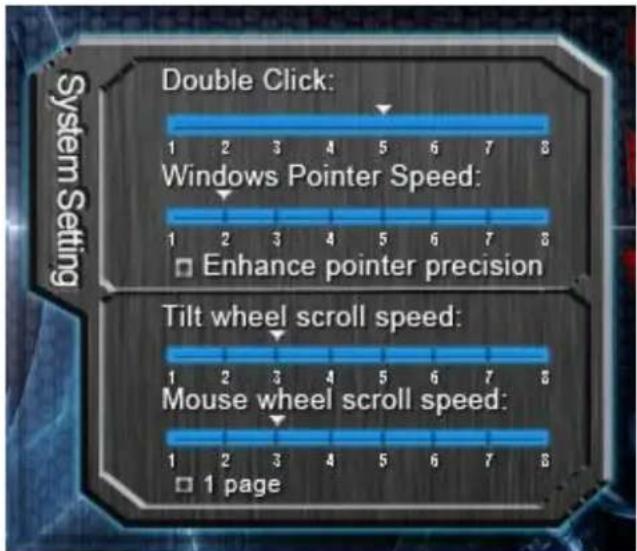
Double click – defines how long the time interval between two clicks should be to interpret them as a double click
Windows pointer speed – allows you to change the speed of the screen cursor Enhance pointer precision – provides slight support in precise movement of the cursor
Tilt wheel scroll speed - defines the speed of horizontal scrolling
Mouse wheel scroll speed – defines the speed of vertical scrolling. You can adjust using the slider or choose option 1 Page, which will activate full pages scrolling.
F. Profile management
Natec Genesis GX69 allows you to create different gaming profiles of settings and assign them to individual games or applications. Up to five profiles can be stored in the driver – other have to be saved to your hard disk. Switching between profiles is possible by the driver interface, mouse buttons with assigned profile-related functions or automatically – by launching an application linked to the profile.

Creating a profile
- Click create in the driver interface
- Type the name for the profile
- In the path to executable box insert path to the executable file (.exe) of the application you want to be assigned to the profile
Editing a profile
- Click edit on the driver interface
- Edit the name and path to assigned application accordingly to your needs
Saving a profile
- Click save on the driver interface
- Choose the folder you want to save profile to and name for the file
Loading a profile
- Click load on the driver interface
- Choose the file with the profile you need
V. General
- Non-authorized repairs or taking the device to pieces make the warranty void and may cause the product damage.
- Do not use the product in low and high temperatures and in the dusty atmosphere.
- Do not connect / disconnect the product to / from a computer when it is on.
- The safe product, conforming to the EU requirements.
- The product is made in accordance with RoHS European standard. The standard was issued in order to decrease the amount of the electronic and electrical waste emitted into the atmosphere.
- The WEEE symbol (the crossed-out wheeled bin) using indicates that this product in not home waste. You protect the environment when you recycle hazardous waste appropriately. In order to get detailed information about recycling this product please contact your retailer or a local authority.

PL – NATEC GENESIS GX69 – INSTRUKCJA OBSŁUGI
I. Wstęp
natural_image
Close-up of a metallic threaded component with evenly spaced teeth (no text or symbols visible)natural_image
Close-up of four metallic cylindrical components arranged in a black plastic housing (no visible text or symbols)Dodawanie makra:
B. Advanced Settings
C. Light Settings
Tworzenie profilu


- EN - NATEC GENESIS GX69 - USER MANUAL
- Introduction
- Features
- Adjusting length and weight
- Adjusting length
- Adjusting weight
- Driver description
- System
- Windows XP/Vista/7 installation guide
- Mouse configuration
- Button settings
- On-To-Go
- Defining Macros
- Adding a macro:
- Deleting macros:
- Advanced Settings
- Restoring factory defaults
- Light Settings
- Sensitivity settings
- System Settings
- Profile management
- Creating a profile
- Editing a profile
- Saving a profile
- Loading a profile
- General
- PL – NATEC GENESIS GX69 – INSTRUKCJA OBSŁUGI
- Wstęp
- Dodawanie makra:
- Tworzenie profilu
Brand : Genesis
Model : GX69
Category : Mouse