
Detail Sander AJ56 - Sander Workzone - Free user manual and instructions
Find the device manual for free Detail Sander AJ56 Workzone in PDF.


| Product Type | Detail Sander |
| Brand | Workzone |
| Model | AJ56 |
| Power Supply | 230 V ~ 50 Hz |
| Power Consumption | 130 W |
| No-Load Speed | 6000 - 12000 OPM (variable) |
| Sanding Pad Shape | Triangular (93 x 93 x 93 mm) |
| Dust Collection | Integrated dust box with vacuum adapter |
| Weight | 0.8 kg |
| Dimensions (L x W x H) | 200 x 100 x 100 mm |
| Included Accessories | 3 sanding sheets (P80, P120, P240), dust box |
| Safety Features | Double insulation, lock-on button for continuous operation |
| Variable Speed | Yes, adjustable via thumbwheel |
| Maintenance | Clean dust ports regularly; replace sanding pad when worn |
| Repairability | Brush-replaceable motor; spare parts available |
Frequently Asked Questions - Detail Sander AJ56 Workzone
User questions about Detail Sander AJ56 Workzone
0 question about this device. Answer the ones you know or ask your own.
Ask a new question about this device
Download the instructions for your Sander in PDF format for free! Find your manual Detail Sander AJ56 - Workzone and take your electronic device back in hand. On this page are published all the documents necessary for the use of your device. Detail Sander AJ56 by Workzone.
USER MANUAL Detail Sander AJ56 Workzone


Contents · Contenido
Getting Started 01
Safety Symbols.... 02
Safety Instructions.... 03
Application.... 08
Technical Data.... 09
Assembly.... 10
Operation.... 12
Maintenance.... 14
Troubleshooting.... 15
Para comenzar 16
Identify all the parts packaged in the carton against the parts list. Remove all protective materials and place parts on a non-abrasive surface to avoid scratching. Please contact our customer service center (Monday-Friday 8:30AM-5:00PM ET) at 1855 399 9415 if anything is missing.

WARNING! Potential risks are possible even when you use this electrical tool according to the instructions. The following hazards exist during use of this power tool:
- Lung damage when a suitable dust mask is not used.
- Damage to hearing when suitable ear protection is not used.
- Health damage resulting from hand/arm vibrations when the device is used over a long period of time or is not used and maintained properly.

WARNING! Some dust created by power sanding, sawing, grinding, drilling and other construction activities contains chemicals known to the State of California to cause cancer, birth defects or other reproductive harm.
Some examples of these chemicals are: Lead from lead-based paints, Crystalline silica from bricks and cement and other masonry products, and Arsenic and chromium from chemical-treated rubber.
Your risk from these exposures varies, depending on how often you do this type of work. To reduce your exposure to these chemicals: work in a well ventilated area, and work with approved safety equipment, such as those dust masks that are specially designed to filter out microscopic particles.
CAUTION
Read all the instructions before assembly. Failure to do so may result in faulty assembly and potential injury! Assemble product on a soft, non-abrasive surface such as carpet or cardboard to avoid damaging the item.
Safety Symbols
IMPORTANT: Please read all of the safety and operating instructions carefully before using this tool. Some of the following symbols may be used on your tool. Please pay particular attention to all sections of this User Guide that carry warning symbols and notices. Proper interpretation of these symbols will allow you to safely operate the tool.


V
A
Hz
\~
n0
.../min or ...min -1


-
To reduce the risk of injury, operator must read and understand User Guide before using this tool.
-
This symbol indicates there is a danger of serious personal injury or death if you do not observe the warning.
-
Volts
-
Amps
-
Hertz
-
Alternating current
-
No-load speed
-
Revolutions or oscillations per minute
-
Do not expose to rain or use in damp locations.
-
Always wear safety goggles or safety glasses with side shields and a full face shield when operating this tool.
-
Wear dust mask.
-
Wear ear protection.
-
Always wear nonslip, heavy-duty protective gloves when operating this tool.
-
Always wear nonslip safety footwear when operating this tool.
-
Double insulation
-
WARNING! Always turn the tool off and disconnect the electrical power before conducting inspection, cleaning and maintenance. Remove the plug from the outlet immediately if the cord is damaged or cut.
Safety Instructions

General Power Tool Safety Warnings
WARNING! Read all safety warnings and all instructions. Failure to follow all instructions listed below may result in electric shock, fire and/or serious injury.
Save All Warnings and Instructions for Future Reference.
The term "power tool" in all of the warnings listed below refers to your electric (corded) power tool.
1) Work area safety
a) Keep work area clean and well lit. Cluttered and dark areas invite accidents.
b) Do not operate power tools in explosive environments, such as in the presence of flammable liquids, gases or dust. Power tools create sparks which may ignite the dust or fumes.
c) Keep children and bystanders away while operating a power tool. Distractions can cause you to lose control.
2) Electrical safety
a) Power tool plugs must match the outlet. Never modify the plug in any way. Do not use any adapter plugs with grounded power tools. Unmodified plugs and matching outlets will reduce risk of electric shock.
b) Avoid body contact with grounded surfaces such as pipes, radiators, ranges and refrigerators. There is an increased risk of electric shock if your body is grounded.
c) Do not expose power tools to rain or wet conditions. Water entering a power tool will increase the risk of electric shock.
d) Do not abuse the cord. Never use the cord for carrying, pulling or unplugging the power tool. Keep the cord away from heat, oil, sharp edges or moving parts. Damaged or entangled cords increase the risk of electric shock.
e) When operating a power tool outdoors, use an extension cord suitable for outdoor use. Use of a cord suitable for outdoor use reduces the risk of electric shock.
f) If operating a power tool in a damp location is unavoidable, use a Ground Fault Circuit Interrupter (GFCI) protected supply. Use of a GFCI reduces the risk of electric shock.
g) Double insulated tools are equipped with a polarized plug (one prong is wider than the other). The plug will fit in a polarized outlet only one way. If the plug does not fit fully in the outlet, reverse the plug. If it still does not fit, contact a qualified electrician. Do not modify the plug in any way. Double insulation eliminates the need for the three wire grounded power cord and grounded power supply system. Before plugging in the tool, be certain the outlet voltage supplied is within the voltage marked on the nameplate. Do not use AC-Only rated tools with a DC supply.
3) Personal safety
a) Stay alert, watch what you are doing and use common sense when operating a power tool. Do not use a power tool while you are tired or under the influence of drugs, alcohol or medication. A moment of inattention while operating power tools may result in serious personal injury.
b) Use safety equipment. Always wear eye protection. Safety equipment such as dust masks, non-skid safety shoes, a hard hat, or hearing protection used for appropriate conditions will reduce personal injuries.
c) Avoid accidental starting. Ensure the switch is in the off position before plugging in. Carrying power tools with your finger on the switch or plugging in power tools that have the switch on invites accidents.
d) Remove any adjusting key or wrench before turning the power tool on. A wrench or a key left attached to a rotating part of the power tool may result in personal injury.
e) Do not overreach. Keep proper footing and balance at all times. This enables better control of the power tool in unexpected situations.
f) Dress properly. Do not wear loose clothing or jewelry. Keep your hair, clothing and gloves away from moving parts. Loose clothes, jewelry or long hair can be caught in moving parts.
g) If devices are provided for the connection of dust extraction and collection, ensure these are connected and properly used. Use of these devices can reduce dust-related hazards.
h) Only use safety equipment that has been approved by an appropriate standards agency. Unapproved safety equipment may not provide adequate protection. Eye protection must be ANSI-approved and breathing protection must be NIOSH-approved for the specific hazards in the work area.
4) Power tool use and care
a) Do not force the power tool. Use the correct power tool for your application.
b) Don't power the power tool if the switch does not turn it on and off.
cannot be controlled with the switch is dangerous and must be repaired by an authorized service center.
c) Disconnect the plug from the power source before making any adjustments, changing accessories, or storing power tools. Such preventive safety measures reduce the risk of starting the power tool accidentally.
d) Store power tools out of the reach of children and do not allow persons unfamiliar with the power tool or these instructions to operate the power tool. Power tools are dangerous in the hands of untrained users.
e) Maintain power tools. Check for misalignment or binding of moving parts, breakage of parts and any other condition that may affect the power tool's operation. If damaged, have the power tool repaired before use. Many accidents are caused by poorly maintained power tools.
f) Use the power tool, accessories and attachments in accordance with these instructions and in the manner intended for the particular type of power tool, taking into account the working conditions and the work to be performed. Use of the power tool for applications different from those intended could result in a hazardous situation.
5) Service
Have your power tool serviced by an authorized service center using only manufacturer replacement parts. This will ensure that the safety of the power tool is maintained and keep the tool in compliance with the warranty.
6) Specific safety warnings
a) Hold power tools by insulated gripping surfaces when performing an operation where the tool may contact hidden wiring or its own cord. Contact with a "live" wire will make exposed metal parts of the tool "live" and shock the operator.
b) Unplug the sander before changing accessories. Accidental start-ups may occur if sander is plugged in while changing an accessory.
c) Use clamps or another practical way to secure and support the work piece to a stable platform. Holding the work by hand or against your body leaves it unstable and may lead to loss of control.
d) Your tool is equipped with a dust bag, empty frequently during use and before storing the sander. Be extremely careful of dust disposal, materials in fine particle form may be explosive. Do not throw sanding dust on an open fire. Combustion from mixture of varnishes, lacquers, polyurethane, oil or water with dust particles can occur if there is a static discharge, spark introduced in the box, or excessive heat.
e) Always wear eye protection and a dust protection mask for dusty applications and when sanding above your head. Sanding particles can be absorbed by your eyes and inhaled easily and may cause health complications.
f) Use special precautions when sanding chemically pressure treated lumber, paint that may be lead based, or any other material that may contain carcinogens. A suitable breathing respirator and protective clothing must be worn by all persons entering the work area. Work area should be sealed by plastic sheeting and persons not protected should be kept out until work area is thoroughly cleaned.
g) Do not wet sand with this sander. Liquids entering the motor housing is an electrical shock hazard.
h) Do not use sandpaper intended for larger baseplates. Larger sandpaper will extend beyond the baseplate causing snagging, tearing of the paper or kick-back. Extra paper extending beyond the baseplate can also cause serious lacerations.
(Continued on page 7)
i) Material containing asbestos should not be sanded. Asbestos is considered to be a carcinogen.
j) Ensure that bystanders are not endangered by flying sparks. Remove combustible materials from the immediate vicinity. Flying sparks are produced when metals are sanded.
k) CAUTION! DANGER OF FIRE! Ensure that the work piece and the sander itself do not overheat. Always empty the dust container before taking a work break. Sanding dust in the dust bag (or in the filter of a vacuum cleaner) can ignite automatically under unfavorable conditions, such as flying sparks when sanding metal. There is a particular hazard if the sanding dust is mixed with paint or polyurethane residues or other chemical substance and work piece is hot after being sanded on for a prolonged period.
1) When working for extended periods on wood and, in particular, materials that produce dusts that are hazardous to health, connect the tool to an appropriate external suction device.
m) Provide for sufficient ventilation when sanding plastics, varnishes and paints.
n) Keep your workplace clean. Material mixtures are particularly dangerous. Light metal dust can burn or explode.
o) Only use an approved extension cord suitable for the power input of the tool. The minimum conductor size is 18 AWG. When using a cord reel always unwind the reel completely.
Table A
| Length/AMP RATING | Total Extension Cord Length (in Feet) | |||
| 0'-25'(0-7.6m) | 26'-50'(7.6-15.2m) | 75'(15.2-30.4m) | 100'(30.4-45.7m) | |
| 0-6 | 18Gauge | 16Gauge | 16Gauge | 16Gauge |
| 6-10 | 18Gauge | 16Gauge | 16Gauge | 16Gauge |
| 10-12 | 16Gauge | 16Gauge | 14Gauge | 12Gauge |
| 12-16 | 14Gauge | 12Gauge | Not Recommended | |

WARNING: Some dust created by power sanding, sawing, grinding, drilling and other construction activities contains chemicals known to the state of California to cause cancer, birth defects or other reproductive harm. Some examples of these chemicals are:
- lead from lead-based paints
• crystalline silica from bricks and cement and other masonry products, and arsenic and chromium from chemically-treated lumber (CCA).
Your risk from these exposures varies, depending on how often you do this type of work. To reduce your exposure to these chemicals: work in a well ventilated area, and work with approved safety equipment, such as dust masks that are specially designed to filter out microscopic particles.
Avoid prolonged contact with dust from power sanding, sawing, grinding, drilling, and other construction activities. Wear protective clothing and wash exposed areas with soap and water. Allowing dust to get into your mouth, eyes, or lay on your skin may promote absorption of harmful chemicals.

WARNING: Use of this tool can generate and/or disperse dust, which may cause serious and permanent respiratory or other injury. Always use NIOSH/OSHA approved respiratory protection appropriate for the dust exposure. Direct particles away from face and body.

WARNING: ALWAYS wear proper personal hearing protection that conforms to ANSI S12.6 (S3.19) during use. Under some conditions and duration of use, noise from this product may contribute to hearing loss.

WARNING: ALWAYS use safety glasses. Everyday eyeglasses are NOT safety glasses. Also use a face or dust mask if tool operation is dusty. ALWAYS WEAR CERTIFIED SAFETY EQUIPMENT:
• ANSI Z87.1 eye protection (CAN/CSA Z94.3),
• ANSI S12.6 (S3.19) hearing protection,
• NIOSH/OSHA/MSHA respiratory protection.
Application
Intended Use
This power tool is suitable for dry sanding of wood, plastic, metal, filler and coated surfaces. The tool is approved solely for non-commercial use in dry areas. Please observe the information relating to the types of sandpaper that can be used with this product. Any other use or modification of the tool constitutes improper use and poses a serious risk of accidents. The manufacturer is not liable for damage caused by improper use of the tool.
Packing list
- 1pc detail sander
- 1pc dust bag
- 3pcs sandpaper (120 grit)
- User Guide
Carefully remove the sander and any accessories from the box. Make sure that all items listed in the packing list are included. Check the device and accessories for visible damage. In the event of damage of any kind, the device may not be operated under any circumstances. Do not discard the packing material until you have carefully inspected and satisfactorily operated the tool. If any parts are damaged or missing, please call 1855 399 9415 for assistance (Monday-Friday 8:30AM-5:00PM ET).
Product Information (Fig. 1)
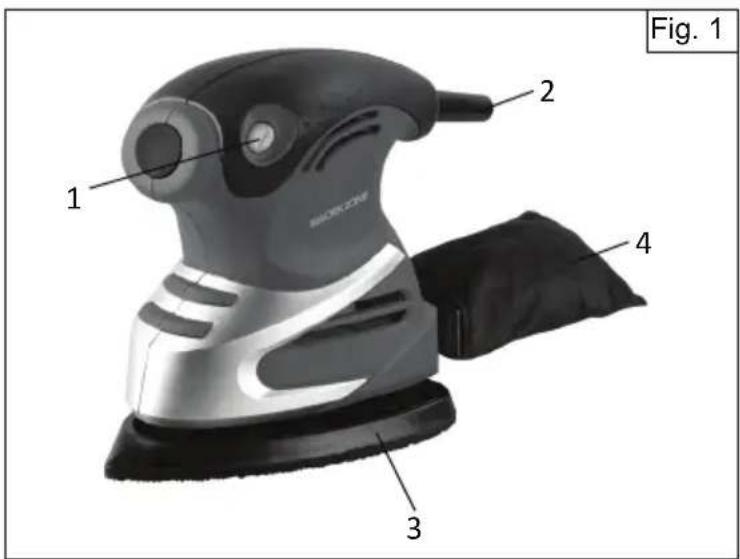
- On/Off switch
- Power cord
- Sanding baseplate
- Dust bag
Technical Data
| Product Code 47561 | |
| Rated Voltage 120V AC, 60Hz | |
| Rated Amperage 1.6 Amp | |
| No Load Speed | 15,000 OPM (Oscillations per Minute) |
| Dust Collection System Built-in | |
Conforms to UL Std. 60745-1, 60745-2-4
Certified to CAN/CSA Std. C22.2 No. 60745-1, 60745-2-4
Assembly

Read the ENTIRE IMPORTANT SAFETY INFORMATION section at the beginning of this guide including all text under subheadings therein before set up or use of this product.

WARNING: TO PREVENT SERIOUS INJURY FROM ACCIDENTAL OPERATION. Disconnect the plug from the power source before making any assembly, adjustments or changing accessories.
Note: For additional information regarding the parts listed in the following pages, refer to Parts List and Schematic Diagram on page 2.
Installing and Removing Dust Bag
To install dust bag, align the notches on both sides of dust bag with the buckles on both sides of dust port and push the dust bag completely onto place over the dust port on the back of the sander (Fig. 2).
To remove dust bag, simply pull away from the tool.
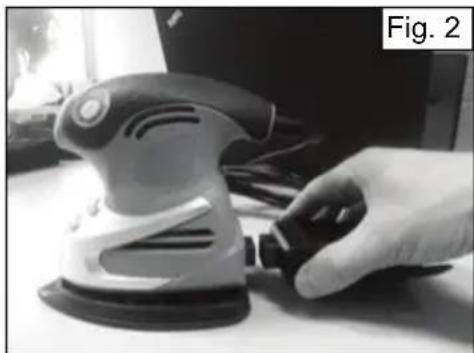
Note: The sander's dust collection system will only work if the sandpaper has holes that line up with the dust collection holes in the baseplate (there are 4 other holes in the baseplate for the screws).

WARNING: Your tool is equipped with a dust bag, empty it frequently during use and before storing the sander.
Be extremely careful of dust disposal, materials in fine particle form may be explosive. Do not throw sanding dust on an open fire. Combustion from mixture of varnishes, lacquers, polyurethane, oil or water with dust particles can occur if there is a static discharge, spark introduced in the box, or excessive heat.
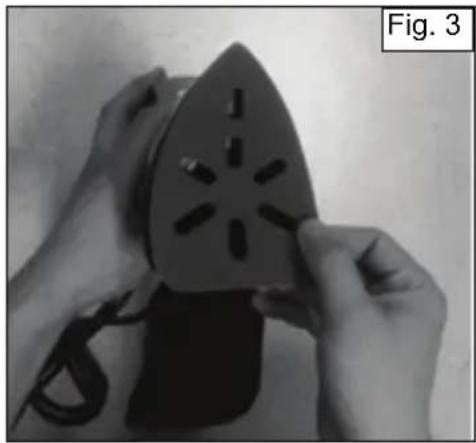
Attaching Sandpaper (Fig. 3)
- Make sure that the perforations in the paper correspond with those on the sanding baseplate.
- Press the paper firmly on the sanding baseplate.
- The sandpaper must be placed firmly on the sanding baseplate and should not come loose.
Replacement Sandpaper
Uses universal Velcro 3 7/8 in. x 5 1/2 in. detail sanding sheets with hook and loop backing found in most home improvement stores. Sanding sheets can have holes, removable discs or slots.
Operation

Read the ENTIRE IMPORTANT SAFETY INFORMATION section at the beginning of this guide including all text under subheadings therein before set up or use of this product.

WARNING: TO PREVENT SERIOUS INJURY FROM ACCIDENTAL OPERATION. Disconnect the plug from the power source before making any assembly, adjustments, cleaning or changing accessories.
Always hold the sander off the work piece when turning the switch on or off. Contact the work piece after the sander has reached its full speed and remove it from the work before turning the switch off. Operating in this manner will prolong the tool life and will greatly increase the quality of your work.
Before Use
- Use the dust bag for dust collection
- Note: the use of dust extraction works only with perforated sandpaper.
- Sanding dust is only partially absorbed. Some dust remains on the work piece.
Operating On/Off Switch
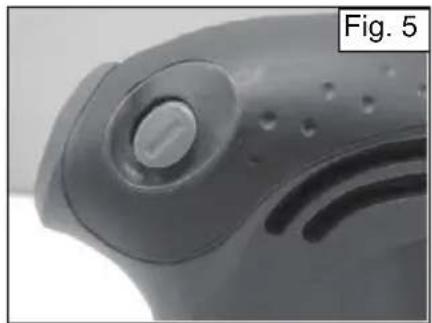
Make sure that the switch is in the off position (the "O" position, Fig. 4), then plug in the tool. TO TURN THE TOOL ON: press the switch to the on position (the "I" position, Fig. 5).
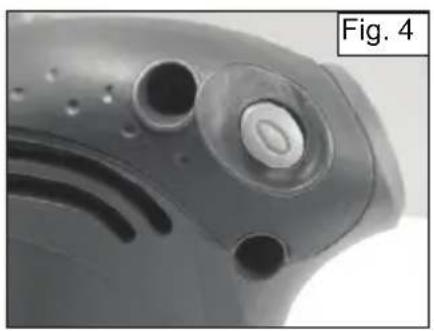

TO TURN THE TOOL OFF: press the switch to the off position (the "O" position, Fig. 4).
Always hold the sander off the work piece when turning the switch on or off. Run the sander for a few seconds before contacting the work piece and remove it from the work piece before
turning the switch off.
Contact the work piece with minimal pressure. If the sander is not removing enough material, try a heavier grit piece of sandpaper.
Note:
- To minimize sanding marks, keep the sander moving slowly while it is touching the work piece.
• Occasionally stop the sander and check the sandpaper for tears, wear, or fraying. If necessary, replace the sandpaper. - Empty the dust bag regularly in order to ensure the optimum removal of dust by suction.
- From time to time, clean the dust exhaust opening with a dry brush.
- Clean the housing only with a damp cloth, do not use any solvents!
- To prevent accidents, turn off the tool and unplug it after use. Clean, then store the tool indoors and out of children's reach.
Maintenance
Make sure that the sander is not connected to a power source when performing maintenance or cleaning.
Cleaning
Keep the ventilation slots of the sander clean to prevent overheating of the motor. Regularly clean the tool housing with a soft cloth, preferably after each use. Keep the ventilation slots free from dust and dirt. If the dirt does not come off use a soft cloth moistened with soapy water. Never use solvents such as acetone, alcohol, ammonia, etc. These solvents may damage the plastic parts.
Lubrication
The sander requires no additional lubrication.
Faults
Should a fault occur, e.g. after wear of a part, please contact the customer service center on the warranty card.
Environment
To prevent damage during transport, this tool is delivered in packaging which consists largely of reusable material. Therefore please make use of options for recycling the packaging.
Warranty
Please refer to the separately provided warranty card for details of the warranty provision.
Troubleshooting

WARNING: Read User Guide first! Follow all safety precautions whenever diagnosing or servicing the tool. Disconnect power supply before service.
| Problem | Possible cause | Fault correction |
| Tool will not start. | Cord not connected. | Check that cord is plugged in. |
| No power at outlet. | Check power at outlet. If outlet is unpowered, turn off tool and check circuit breaker. If breaker is tripped, make sure circuit is right capacity for tool and circuit has no other loads. | |
| Tool's thermal reset breaker tripped (if equipped). | Turn off tool and allow to cool. Press reset button on tool. | |
| Internal damage or wear. (Carbon brushes or switch, for example.) | Have a authorized service center service tool. | |
| Tool operates slowly. | Extension cord too long or wire size too small. | Eliminate use of extension cord. If an extension cord is needed, use shorter/heavier gauge cord. See Table A on page 7. |
| Performance decreases over time. | Sandpaper is worn or damaged. | Replace as needed. |
| Carbon brushes worn or damaged. | Have a authorized service center replace brushes. | |
| Excessive noise or rattling. | Internal damage or wear. (Carbon brushes or bearings, for example.) | Have authorized service center service tool. |
| Overheating | Forcing tool to work too fast. | Allow tool to work at its own rate. |
| Accessory misaligned. | Check and correct accessory alignment. | |
| Sandpaper is worn or damaged. | Replace as needed. | |
| Blocked motor housing vents. | Wear ANSI-approved safety goggles and NIOSH-approved dust mask / r espirator while b lowing dust out of motor using compressed air. | |
| Motor being strained by long or small diameter extension cord. | Eliminate use of extension cord. If an extension cord is needed, use one with the proper diameter for its length and load. See Table A on page 7. |
Para comenzar

DISTRIBUTED BY · DISTRIBUIDO POR: ALDI INC., BATAVIA, IL 60510 www.aldi.us
AFTER-SALES SUPPORT • SERVICIO POSVENTA

USA 1855 399 9415

support@sumec-na.com
MODEL: AJ56
PRODUCT CODE: 47561
06/2017

YEAR WARRANTY AÑOS DE GARANTÍA




- CONTENTS · CONTENIDO
- CAUTION
- SAFETY SYMBOLS
- SAFETY INSTRUCTIONS
- SAVE ALL WARNINGS AND INSTRUCTIONS FOR FUTURE REFERENCE
- WORK AREA SAFETY
- ELECTRICAL SAFETY
- PERSONAL SAFETY
- POWER TOOL USE AND CARE
- SERVICE
- SPECIFIC SAFETY WARNINGS
- APPLICATION
- INTENDED USE
- PACKING LIST
- ASSEMBLY
- INSTALLING AND REMOVING DUST BAG
- ATTACHING SANDPAPER (FIG. 3)
- REPLACEMENT SANDPAPER
- OPERATION
- BEFORE USE
- OPERATING ON/OFF SWITCH
- NOTE
- MAINTENANCE
- CLEANING
- LUBRICATION
- FAULTS
- ENVIRONMENT
- WARRANTY
- TROUBLESHOOTING
- PARA COMENZAR
Brand : Workzone
Model : Detail Sander AJ56
Category : Sander