
WZDS 75 K - Sander Workzone - Free user manual and instructions
Find the device manual for free WZDS 75 K Workzone in PDF.


| Product Type | Sander |
| Brand | Workzone |
| Model | WZDS 75 K |
| Power Supply | 230-240 V ~ 50 Hz |
| Power Consumption | 120 W |
| Orbit Diameter | 2.0 mm |
| Speed (No Load) | 12000 - 24000 rpm |
| Sanding Sheet Size | 75 x 100 mm (hook & loop) |
| Weight | 1.5 kg |
| Dimensions (L x W x H) | 200 x 120 x 150 mm |
| Noise Level | 80 dB(A) |
| Vibration Level | 5.0 m/s² |
| Dust Extraction | Integrated dust box with microfilter |
| Protection Class | II (Double insulated) |
| Maintenance | Clean dust box regularly; replace sanding sheets when worn |
| Spare Parts Available | Sanding pads, dust boxes, carbon brushes |
| Repairability | Designed for easy brush replacement; other repairs by qualified technician |
Frequently Asked Questions - WZDS 75 K Workzone
User questions about WZDS 75 K Workzone
0 question about this device. Answer the ones you know or ask your own.
Ask a new question about this device
Download the instructions for your Sander in PDF format for free! Find your manual WZDS 75 K - Workzone and take your electronic device back in hand. On this page are published all the documents necessary for the use of your device. WZDS 75 K by Workzone.
USER MANUAL WZDS 75 K Workzone
You have made an excellent choice with the purchase of this quality Workzone® product.
By doing so you now have the assurance and peace of mind which comes from purchasing a product that has been manufactured to the highest standards of performance and safety, supported by the high quality standards of ALDI.
We want you to be completely satisfied with your purchase so this Workzone® product is backed by a comprehensive manufacturer's 3 year warranty and an outstanding after sales service through our dedicated Helpline.
We hope you will enjoy using your purchase for many years to come.
If you require technical support or in the unlikely event that your purchase is faulty please telephone our Helpline for immediate assistance. Faulty product claims made within the 3 year warranty period will be repaired or replaced free of charge provided that you have satisfactory proof of purchase (keep your till receipt safe!). This does not affect your statutory rights. However, be aware that the warranty will become null and void if the product is found to have been deliberately damaged, misused or disassembled.
CE
Declaration of conformity (see chapter 'Declaration of conformity'). Products marked with this symbol meet all applicable Community regulations for the European Economic Area.
The Declaration of Conformity for the Workzone® 75W Detail Sander – WZDS 75 K is printed on page 49 of this User Manual.
General information
Reading and storing the Original instructions manual

This instruction manual accompanies this detail sander. It contains important information on start-up and handling.
For improved readability, the 'Original instruction manual' will be referred to only as the 'Instruction manual'.
Before using the detail sander, read the instruction manual carefully. This particularly applies for the safety notes. Failure to heed this instruction manual may result in severe injury or damage to the detail sander.
The instruction manual is based on the standards and rules in force in the European Union. When abroad, you must also observe country-specific guidelines and laws. Store the instruction manual for future use. If you pass the detail sander on to third parties, please be absolutely sure to include this instruction manual.
Explanation of symbols
The following symbols and signal words are used in this instruction manual, on the detail sander or on the packaging.
DANGER!
WARNING!
CAUTION!
NOTICE!
This signal symbol/word indicates a hazard with high risk that, if not avoided, results in death or a severe injury.
This signal symbol/word designates a hazard with moderate degree of risk which may lead to death or severe injury if not avoided.
This signal symbol/word designates a hazard with low risk that, if not avoided, may result in minor or moderate injury.
This signal symbol/word warns against potential damages to property.

This symbol provides you with useful supplementary information on assembly or operation.

www.einhell.co.uk
AFTER SALES SUPPORT

0151 649 1500
1890 94 62 44
Use and storage of the user guide
In terms of the Detail sander, this instruction manual provides the information necessary to understand how to safely:
- Assemble the peel-off sanding sheets to the oscillating plate.
- Fitting the polishing pad.
- Fitting the rust removing pad.
- Fitting the finger sanding attachment to the oscillating plate, and securing with the screw.
- Fitting the peel-off finger sanding pieces.
- The intended use, and how to use it for grinding/sanding/polishing of wood, iron, plastic and similar materials using the appropriate grinding/sanding paper, rust-removing pad and polishing pad.
- How to store it.
- Simple maintenance and fault finding.
- If necessary, contacting about repairs, spare parts and warranty claims.

WARNING!
Read all safety regulations and instructions. Any errors made in following the safety regulations and instructions may result in fire and/or serious injury. Keep all safety regulations and instructions in a safe place for future use.
Proper Use
This 75W DETAIL SANDER is designed for dry grinding/sanding/polishing of wood, iron, plastic and similar materials using the appropriate grinding/sanding paper, rust-removing pad and polishing pad. The equipment is not suitable for wet grinding/sanding/polishing.
The operating instructions as supplied by the manufacturer must be obeyed to ensure that the equipment is used properly & the manufacturer cannot be held liable for damage or injury caused by improper or incorrect usage.
The equipment is to be used only for its prescribed purpose & any use which is not expressly permitted in these instructions may result in damage to the equipment and place the user in serious danger. Be sure to observe the restrictions in the safety information.
Please note that our equipment has not been designed for use in commercial, trade or industrial applications. Our warranty will be voided if the equipment is used in commercial, trade or industrial businesses or for equivalent purposes.
DANGER!
When using ensure that any dry dust, etc., will not become close to any: Burning materials, smouldering ash and cigarette buts, combustible, caustic, inflammable or explosive substances, vapour or liquids. There is a risk of burns injury, or burning damage to the detail sander parts. For safety reasons, the equipment is not allowed to be used as a drive unit for other tools or products of any kind.
The equipment is allowed to be used only for its intended purpose. Any other use is deemed to be a case of misuse.
The user/operator and not the manufacturer will be liable for any damage or injuries of any kind resulting from such misuse.
Reasonably foreseeable misuse
- Not reading the Instructions and Safety advice in this User Guide, before using the product.
- Damage/Injury caused by not switching the electric motor off.
- Damage/Injury caused by the user pulling the cable, to remove the 13A plug out of the socket, instead of pulling on the 13A plug (Risk of electrocution).
- Damage/Injury caused by positioning the detail sander too close to adjacent objects, which may then be sucked into the holes in the base of the oscillating plate.
- Damage/Injury caused by positioning the detail sander or finger sanding attachment too close to adjacent objects, which may then become damaged due to the abrasive action of the grinding/sanding sheets or pads fitted on the detail sander.
- Damage/Injury caused by not guiding the power cable away from the back of the detail sander.
The reprinting or reproduction by any other means, in whole or in part, of documentation and papers accompanying products is permitted only with the express consent of Einhell UK Ltd.
Subject to technical changes.
Safety
Explanation of the symbols and types of instructions used (See Fig. 2)
1
WARNING!
Read the user manual and follow the warnings and safety instructions.
2
CAUTION!
Wear ear-muffs. The impact of noise can cause damage to hearing.
3
CAUTION!
Wear a breathing mask. Dust which is injurious to health can be generated when working on wood and other materials. Never use the device to work on any materials containing asbestos!
4
CAUTION!
Wear safety goggles. Sparks generated during working or splinters, chips and dust emitted by the device can cause loss of sight.
Fig. 2


www.einhell.co.uk
AFTER SALES SUPPORT

0151 649 1500
1890 94 62 44
Explanation of the pictograms for handling on the machine (See Fig. 3)
! DANGER!
1 Warning! Read the user manual and follow the warnings and safety instructions.
Fig. 3

Safety devices (Fig. 4a - 4b)
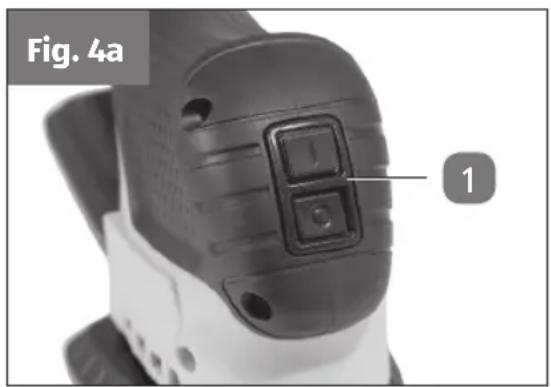
1 The ON/OFF 2-button switch (Fig. 4a -item 1) operates in the following way.
- The detail sander is OFF, when the ON button (I) is above the surface of the sander body, and the OFF (0) button is below the surface of the detail sander body. Push the ON button (I) to start the sander motor.
- The detail sander is ON, when the OFF button (0) is above the surface of the sander body, and the ON (1) button is below the surface of the detail sander body. Push the OFF button (0) to stop the sander motor.
To STOP the detail sander when it is working, press the OFF (0) button!
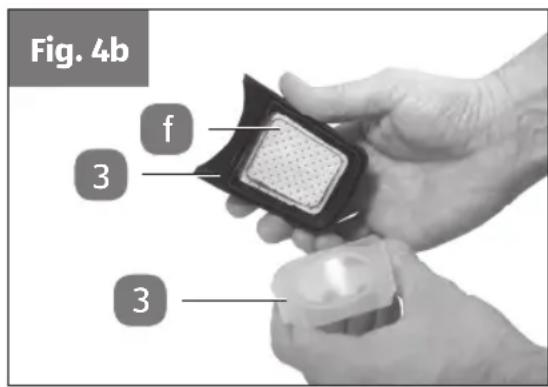
f There is a filter (Fig. 4b - item f) fitted underneath the top of the dust collection box 3 to help reduce the amount of dust produced in the atmosphere during use.
Safety instructions
WARNING!
Read all safety warnings designated by the Symbol and all instructions.
Save all warnings and instructions for future reference. The term "power tool" in the warnings refers to your mains-operated (corded) power tool or battery-operated (cordless) power tool.
WARNING!
General Power Tool Safety Warnings
1) Work area safety
a) Keep work area clean and well lit. Cluttered or dark areas invite accidents.
b) Do not operate power tools in explosive atmospheres, such as in the presence of flammable liquids, gases or dust. Power tools create sparks which may ignite the dust or fumes.
c) Keep children and bystanders away while operating a power tool. Distractions can cause you to lose control.
d) Keep pets and animals away while operating a power tool. Distractions can cause you to lose control.
e) Make sure that the workpiece is sufficiently secured so that it cannot slip. Failure to do this may result in a distractions causing you to lose control, or the loose workpiece may cause an accident leading to an injury.
DANGER!
General Power Tool Safety Warnings
2) Electrical safety
a) Power tool plugs must match the outlet. Never modify the plug in any way. Do not use any adapter plugs with earthed (grounded) power tools. Unmodified plugs and matching outlets will reduce risk of electric shock.
b) Avoid body contact with earthed or grounded surfaces, such as pipes, radiators, ranges and refrigerators. There is an increased risk of electric shock if your body is earthed or grounded.
c) Do not expose power tools to rain or wet conditions. Water entering a power tool will increase the risk of electric shock.
d) Do not abuse the cord. Never use the cord for carrying, pulling or unplugging the power tool. Keep cord away from heat, oil, sharp edges or moving parts. Damaged or entangled cords increase the risk of electric shock.
e) When operating a power tool outdoors, use an extension cord suitable for outdoor use. Use of a cord suitable for outdoor use reduces the risk of electric shock.
f) If operating a power tool in a damp location is unavoidable, use a residual current device (RCD) protected supply. Use of an RCD reduces the risk of electric shock.
g) Before you connect the equipment to the mains supply make sure that the data on the rating plate matches that of your local supply. Failure to do this may result in an electric shock, fire and/or serious injury and/or damage to the machine due to an incorrect supply rating.
WARNING!
General Power Tool Safety Warnings
3) Personal safety
a) Stay alert, watch what you are doing and use common sense when operating a power tool. Do not use a power tool while you are tired or under the influence of drugs, alcohol or medication. A moment of inattention while operating power tools may result in serious personal injury.
b) Use personal protective equipment. Always wear eye protection. Protective equipment such as dust mask, non-skid safety shoes, hard hat, or hearing protection used for appropriate conditions will reduce personal injuries.
c) Prevent unintentional starting. Ensure the switch is in the off-position before connecting to power source and/or battery pack, picking up or carrying the tool.
Carrying power tools with your finger on the switch or energising power tools that have the switch on invites accidents.
d) Remove any adjusting key or wrench before turning the power tool on. A wrench or a key left attached to a rotating part of the power tool may result in personal injury.
e) Do not overreach. Keep proper footing and balance at all times. This enables better control of the power tool in unexpected situations.
f) Dress properly. Do not wear loose clothing or jewellery. Keep your hair, clothing and gloves away from moving parts. Loose clothes, jewellery or long hair can be caught in moving parts.
g) If devices are provided for the connection of dust extraction and collection facilities, ensure these are connected and properly used. Use of dust collection can reduce dust-related hazards.
h) Do not let familiarity gained by frequent use of tools allow you to become complacent and ignore safety principles. A careless action can cause severe injury within a fraction of a second.
WARNING!
General Power Tool Safety Warnings
4) Power tool use and care
a) Do not force the power tool. Use the correct power tool for your application. The correct power tool will do the job better and safer at the rate for which it was designed.
b) Do not use the power tool if the switch does not turn it on and off. Any power tool that cannot be controlled with the switch is dangerous and must be repaired.
c) Disconnect the plug from the power source and/or the battery pack from the power tool before making any adjustments, changing accessories, or storing power tools. Such preventive safety measures reduce the risk of starting the power tool accidentally.
d) Store idle power tools out of the reach of children and do not allow persons unfamiliar with the power tool or these instructions to operate the power tool. Power tools are dangerous in the hands of untrained users.
e) Maintain power tools and accessories. Check for misalignment or binding of moving parts, breakage of parts and any other condition that may affect the power tool's operation. If damaged, have the power tool repaired before use. Many accidents are caused by poorly maintained power tools.
f) Keep cutting tools sharp and clean. Properly maintained cutting tools with sharp cutting edges are less likely to bind and are easier to control.
g) Use the power tool, accessories and tool bits etc. in accordance with these instructions, taking into account the working conditions and the work to be performed. Use of the power tool for operations different from those intended could result in a hazardous situation.
h) Keep handles and grasping surfaces dry, clean and free from oil & grease. Slippery handles and grasping surfaces do not allow safe handling and control of the tool in unexpected situations.
i) Children must not be allowed to operate power tools. Power tools are dangerous in the hands of children.
j) Always guide the cord away from the back of the detail sander. Damaged or entangled cords increase the risk of electric shock hazard.
k) Hold the equipment by the insulated body because the grinding/sanding sheet may touch the equipment's own power cord. Damaging a live cord may make the metal parts of the equipment live and cause an electric shock hazard.
WARNING!
General Power Tool Safety Warnings
5) Service
a) Have your power tool serviced by a qualified repair person using only identical replacement parts. This will ensure that the safety of the power tool is maintained.
b) Disconnect the plug from the power source before making any repairs, or cleaning power tools. Such preventive safety measures reduce the risk of starting the power tool accidentally.
WARNING!
Safety Warnings
6) Detail Sander Use
a) Contact or inhalation of dusts generated when working with the detail sander may be harmful or toxic and can endanger the health of the operator and bystanders.
DANGER!
b) Never use the detail sander on asbestos, painted surfaces which contain lead, or woods and metals which when sanded can create harmful or toxic dusts. Risk of poisoning and dust-related hazards.
c) Always wear personal protective equipment when carrying out grinding/sanding work, or if you are in the vicinity of someone carrying out grinding/sanding work. Protective equipment such as goggles and a dust mask, will reduce personal injuries.
d) If operating the detail sander in a workshop ensure that a suitable dust extraction system is available and functioning correctly to reduce the exposure to wood dust to as low as is `reasonably practicable'. Dust extraction systems will reduce dust-related hazards.
e) Never sweep up or use compressed air lines as this will disturb the dust and allow it to become inhaled. Always clean up using a vacuum cleaner suitable for fine dust particles. A suitable vacuum cleaner will reduce dust-related hazards.
f) Never eat, drink or smoke at the workplace. Risk of dust-related hazards.
g) Never use a detail sander whilst barefoot or wearing sandals. Risk of injury related hazards.

WARNING!
Before using
When using equipment, a few safety precautions must be observed to avoid injuries and damage. Please read the complete operating manual with due care. Keep this manual in a safe place, so that the information is available at all times. If you give the equipment to any other person, give them these operating instructions as well. We accept no liability for damage or accidents which arise due to non-observance of these instructions and the safety information.
Additional Safety instructions
WARNING!
Read all safety warnings designated by the Symbol and all instructions.
WARNING!
Additional Safety Warnings
1) Work area safety
a) Make sure of your footing, particularly when working on ladders and platforms. Failure to do this may result in causing you to slip, or lose control, which may cause an accident leading to an injury.
! DANGER!
Additional Safety Warnings
2) Electrical safety
a) The electric circuit must be protected at your Distribution Board by at least a 16A fuse.
WARNING!
Additional Safety Warnings
3) Personal safety
a) Use the detail sander only for the purpose specified in these operating instructions.
b) When the motor is running, keep your head, hair and body away from the motor & fan vents v oscillating plate 4, finger sanding attachment 6 or any accessories attached to either the oscillating plate 4, or the finger sanding attachment 6 (See Fig. 5a - c).
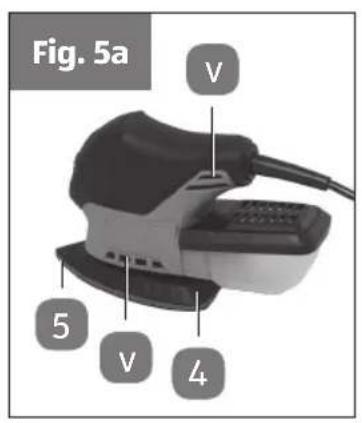
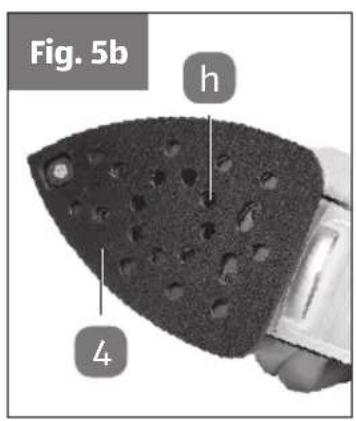
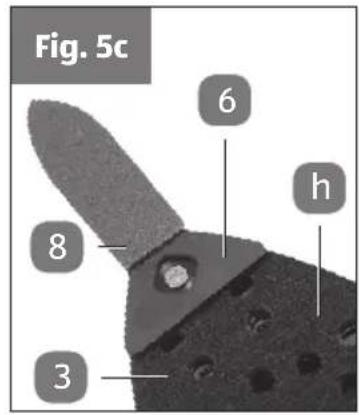
c) When the motor is running, do not position your hands, head, hair, or other body parts or clothing into the vicinity of the oscillating plate 4, finger sanding attachment 6 or accessories attached to either the oscillating plate 4, or the finger sanding attachment 6 (See Fig. 5a - c).
d) To detect signifi cant damage or defects, the equipment must be inspected each time before use and each time after being dropped or suffering other shocks. Do not use the detail sander and accessories if any damage has occurred as a result of dropping. Risk of injury/death.
e) Avoid an abnormal posture. Maintain a safe position and keep your balance at all times. This will allow you to have better control of the detail sander in the event of unexpected situations.
f) Danger for children and persons with impaired physical, sensory or mental capacities (e.g. partially disabled persons, older persons with reduced physical and mental capacities) or lack of experience and knowledge.
g) The operator must be at least 18 years of age.
h) Children should be supervised to ensure that they do not play with the detail sander. Cleaning and user maintenance must not be performed by children.
i) Do not allow children to play with the packaging wrapper. They may get caught in it when playing and suffocate.
j) Make sure that children do not insert any objects into the detail sander.
WARNING!
Additional Safety Warnings
4) Power tool use and care
a) Keep the air vents clear of dirt. Risk of smoke and fire hazards if the motor overheats.
b) If the machine is blocked, switch off the motor and pull out the mains plug before you start the cleaning procedure.
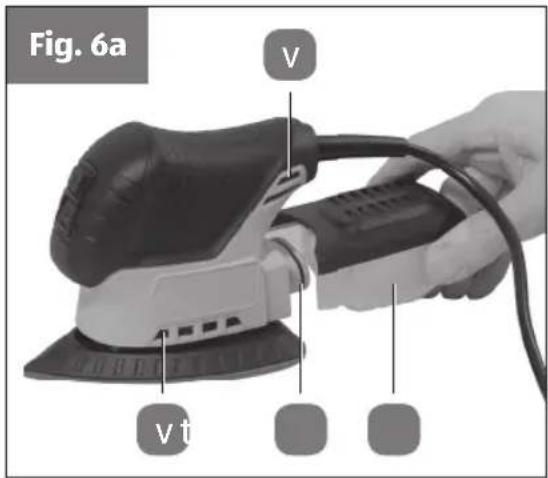
Ensure that the motor vents v and the waste output throat to the dust collection box 3 are clear of waste and other accumulations to protect the motor from suffering damage or possibly catching fire. (See Figs. 6a - b).

www.einhell.co.uk
AFTER SALES SUPPORT

0151 649 1500
1890 94 62 44


WARNING!
Additional Safety Warnings
5) Service
a) After use, unplug the machine and check it for damage.
b) Check the screws regularly to see that they are properly tightened.
c) Examine the equipment for signs of wear or damage each time before you use it and after any impacts. Have essential repairs carried out without delay.
d) Use only original replacement parts for repair and maintenance purposes.
e) Never use replacement parts or accessories which are not approved or recommended by the manufacturer.
f) Allow the equipment to cool before carrying out any maintenance work, adjustments, etc.
g) Never clean the equipment with solvents.
WARNING!
Additional Safety Warnings
6) Detail Sander Use
a) Before starting the machine, check all screws, nuts, bolts and other fastening materials to ensure that they are secure and that all covers and guards are in good working order, and in position.
b) If foreign bodies become stuck in a motor vent V, or hole in the base of the oscillating plate 4, or the machine generates unusual noises or vibrates in a strange way, switch off the detail sander immediately and allow the motor to come to a standstill. Do not use the detail sander again until it has been examined for damage and / or any foreign bodies removed, and the dust collection box 3 is emptied and the filter F underneath the top of the dust collection box 3 is cleaned (See Fig. 6a - b on page 23).
WARNING!
c) Risks associated with using the detail sander. If used improperly or in a negligent manner, the detail sander and accessories can inflict serious injury!
- Carefully read through the instructions on proper handling, preparatory steps, maintenance, starting and switching off the detail sander and accessories.
- Familiarise yourself with the switch as well as proper use of the detail sander.
7. Safety features (Fig. 7a - 7c)
- There is an internal fi Iter f fi tted inside the top of the dust collection box 3 (see Fig. 7 Item f ), to reduce the amount of fi ne dust generated by the detail sander in the atmosphere of the working area.
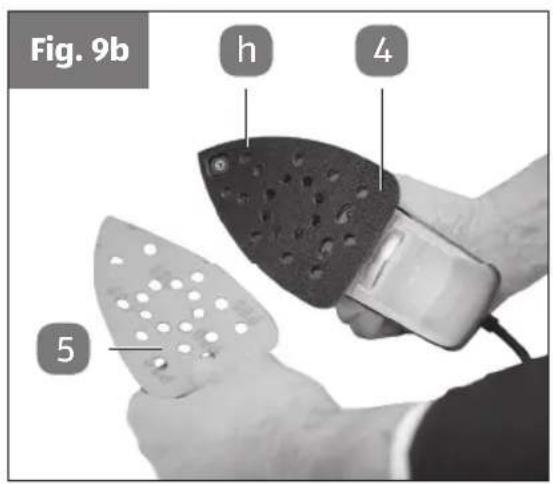
- There are holes h in the base of the detail sander oscillator plate 4 which provide dust extraction from the working surface, into the collection box 3 when a correct grinding/sanding sheet is fitted, with corresponding holes through the sheet. The best dust extraction will occur when the holes in the grinding/sanding sheet 5 are aligned correctly with the holes in the oscillating plate 4 (see Fig. 7b).
- Some dust extraction will also occur through the holes h, if the finger sanding attachment 6 and sanding finger piece 8 are fitted, instead (see Fig. 7c).
- The maximum dust extraction will occur if the dust collection box 3 is empty, and the internal filter inside the top of the dust collection box 3, is clean.


8. Safe operation (See Fig. 8)

Study your detail sander and be familiar with its parts, accessories and operation.
- The appliance must be used correctly.
- The machine must be correctly maintained and the dust collection box 3 emptied (and the filter cleaned) or replaced as necessary.
- The safety, working and maintenance notes of the manufacturer as well as the information specified in the technical data must be complied with.
- Never remove debris from the machine, while the electric motor is running.
- To remove any dust from the dust collection box 3, switch OFF the detail sander, and unplug the 13A plug & cable 12 from the mains supply. Then remove the dust collection box 3 from the rear of the detail sander body, and remove the dust into a dustbin or
waste container. (See Fig. 8). A vacuum cleaner can also be used to extract the dust from the mouth of the dust collection box.
9. Residual risks
Despite being used properly, certain residual risk factors cannot be completely ruled out. The following risks associated with the design and construction of the detail sander may apply:
- Damage to hearing if no suitable ear protection is used.
- Inhaling of work material particles or dust. (Danger of poisoning or lung damage).
- Health damage caused by hand-arm vibrations if the equipment is used over a prolonged period or is not properly guided during use or not maintained properly.
- Only the correct dust collection box 3 with the integral filter f fitted on the inside top of the dust collection box must be fitted to the detail sander (See Fig. 7a on page 25). The filter must be in a good condition, with no holes in the material.
10. Safety and protective equipment
- There is an internal filter f fitted inside the top of the dust collection box 3 (See Fig. 9a item f on page 28), to reduce the amount of fine dust generated by the detail sander in the atmosphere of the working area.
-Thereareholes h in the base of the detail sander oscillator plate 4 which provide dust extraction from the working surface, into the collection box 3 when a correct grinding/sanding sheet is fitted, with corresponding holes through the sheet. (The best dust extraction will occur when the holes in the grinding/sanding sheet 5 are aligned correctly with the holes in the oscillating plate 4 (See Fig. 9b on page 28).
- Some dust extraction will also occur through the holes h, if the finger sanding attachment 6 and sanding finger piece 8 are fitted, instead (see Fig. 9c).
- The maximum dust extraction will occur if the dust collection box 3 is empty, and the internal filter inside the top of the dust collection box 3, is clean.


Set up
Before starting the equipment
This detail sander is delivered with some parts inside the box which may need to be removed or assembled, before use.
CAUTION!
Check that all parts of the detail sander are in the box (the screw 7 should already be fitted to the sander oscillating plate 4), before starting to assemble, or use.
1. First Use
Checking the detail sander and product contents (See Fig. 1)
- Carefully take the detail sander out of the packaging (The screw secured into the threaded hole in the oscillating plate 4).
7 is already - Check to make sure that the delivery is complete (see Fig. 1 on Page 3).
- Check whether the detail sander or any of the parts/accessories exhibit any damage.
- In the event of damages or missing parts, do not use the detail sander. Contact the manufacturer via the service address indicated on the warranty card, or by using the After Sales Support contact information.
- If possible, please keep the packaging until the end of the guarantee period.
NOTICE!
The equipment and packaging material are not toys. Do not let children play with plastic bags, or small parts. There is a danger of swallowing or suffocating!
WARNING!
The dust collection box must be fitted at all times during the use of the detail sander.
2. Assembling the detail sander and accessories
WARNING!
Before start-up, ensure that any sanding/grinding pads, polishing pads or the finger sanding attachment with finger sanding sheets are fitted and secured properly and completely, with the correct grade of sanding sheet fitted to suit the work material.
- Only once you have removed the screw from the oscillating plate and fitted a grinding/sanding sheet/rust-removing pad/polishing, or completed the assembly of the sanding finger and fitted a sanding finger piece, may you insert the mains plug in the socket.
You will also need the following tools for assembly:
- PH2 star-headed screwdriver
Before starting the equipment
- Before you connect the equipment to the mains supply make sure that the data on the rating plate matches that of your local supply.
- Always pull out the power plug before making adjustments to the equipment.
WARNING!
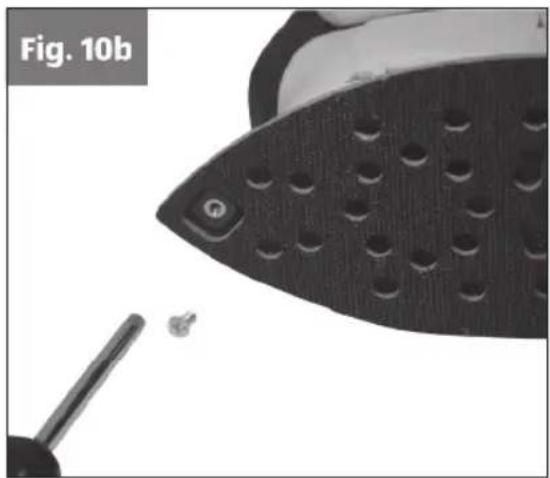
- The delta sander is supplied with the screw 7 already fitted in the threaded hole in the oscillating plate 4. Ensure that you use a PH2 star-headed screwdriver (not supplied) to remove the screw (see Figs. 10a - 10b), before:
- Fitting any of the grinding/sanding sheets 5, rust-removal pad 11 or polishing pad 10.
- Fitting the finger sanding attachment 6, securing it with the screw 7, and then fitting a sanding finger piece 8. When the screw 7 is loose, be careful is does not become lost. (Keeping it together with the sander accessories is a good idea).

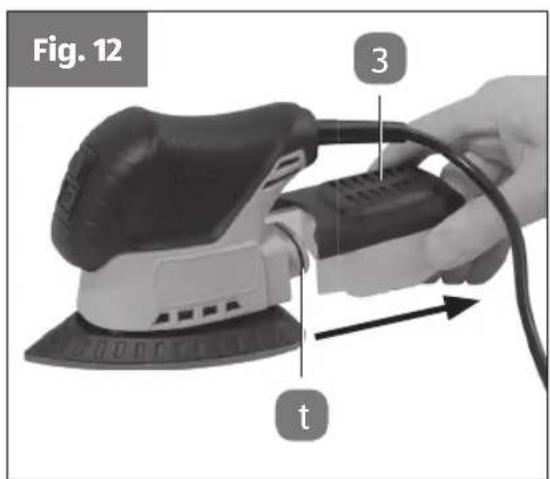
1. Fitting & removing the dust collection box (Fig. 11 & Fig.12)
- Ensure that the dust collection box 3 is correctly fitted onto the rear throat of the body of the detail sander.
- The dust is extracted directly through the holes in the grinding/sanding sheet and the oscillating pad, into the dust collection box.
- To empty the dust collection box 3 remove it from the rear throat of the body of the detail sander, open it as shown in Fig. 12. Then position it over a waste bin and carefully tap it to remove the contents.

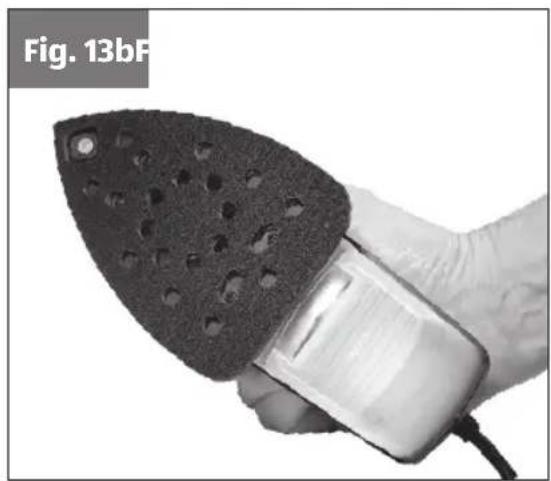
2. Hook & Loop fi tting of the accessories (Fig. 13a & 13b)
- The underneath surface of both the oscillating plate 4, and an area of the underneath surface of the finger sanding attachment 6, are covered with miniature hooks. (These hooks will grip onto woven materials).
- The grinding/sanding sheets 5, rust-removing pad 11 and polishing pad 10 and sanding finger piece 8 have one woven surface which can be gripped securely by these hooks (This method of fitting surfaces together is called 'hook & loop', and the material surface may be peeled off the hooks for replacement).
AFTER SALES SUPPORT

0151 649 1500
1890 94 62 44

www.einhell.co.uk
3. Fitting a grinding/sanding sheet (Fig. 13a & 13b)
CAUTION!
- Only use grinding/sanding sheets of the correct size and which have suitable perforations.
- With the power plug & cable 12 removed from the mains supply, turn the detail sander upside down and align the holes and edges of the grinding/sanding sheet 5 to the holes and edges of the oscillating plate 4, and fit together, with the woven material on the grinding/sand sheet 5 in contact with the oscillating plate 4 (See Fig. 13a & 13b).
CAUTION!
Ensure that the surface of the grinding/sanding sheet is fitted flat!

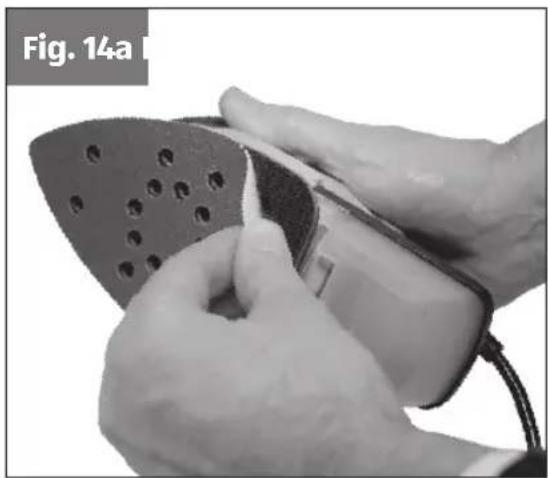
4. To remove the grinding/sanding sheet (Fig. 14a & 14b)
- Starting at one of the rear corners of the grinding/sanding sheet 5, carefully peel the sheet away from the oscillating plate (See Fig. 14a & 14b).
CAUTION!
Ensure that there is no residue of the sanding sheet left on the oscillating plate 4 surface (See Fig. 14b).
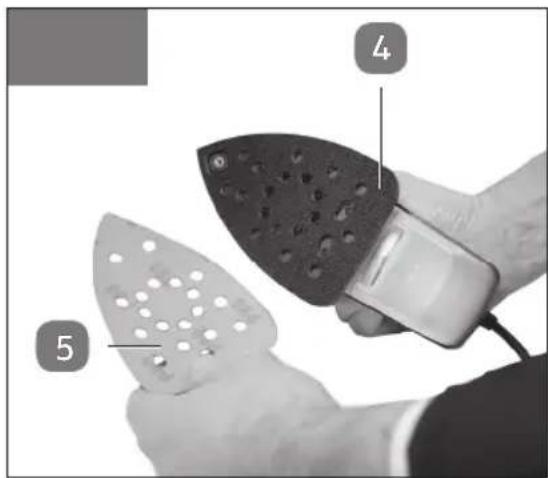
- Fitting the polishing pad 10 or rust-removing pad 11 (See Fig. 14a - 14b)

CAUTION!
- Only use a polishing pad 10, or rust-removing pad 11 of the correct size.
- With the power plug & cable 12 removed from the mains supply, turn the detail sander upside down and align the edges of the polishing pad 10, or rust-removing pad 11 to the edges of the oscillating plate f, and fi t together, with the woven material in contact with the oscillating plate 4 (See Fig. 13a & 13b).
- Remove the pad, by starting at one of the rear corners and carefully peel the pad away from the oscillating plate 4 (See Fig. 14a & 14b).

CAUTION!
Ensure that there is no residue of the pad left on the oscillating plate 4 surface (See Fig. 14b).
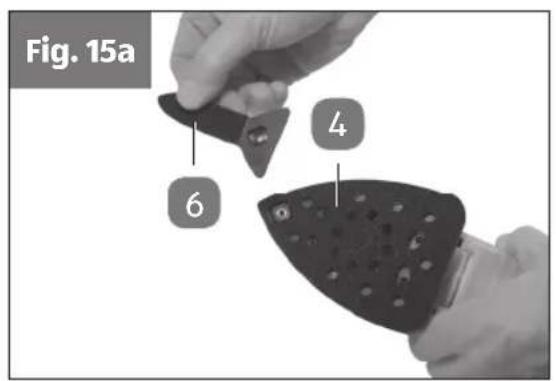
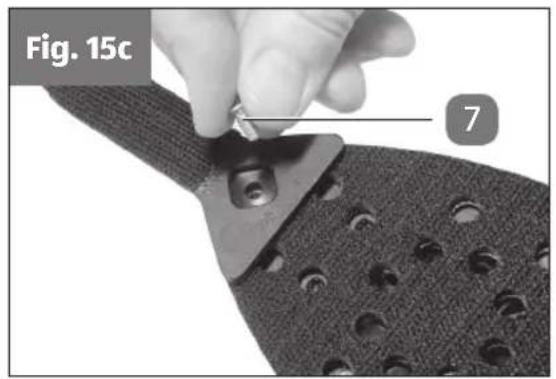
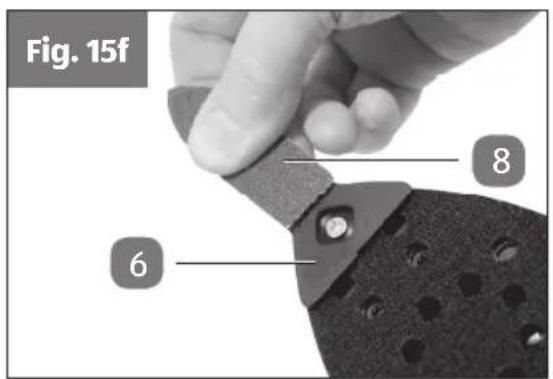
- Fitting the Finger sanding attachment 6 and Sanding finger piece 8 (See Fig. 15a - 15g)
CAUTION!
Ensure that there is no residue of a grinding/sanding sheet, or a pad left on the oscillating plate 4 surface (See Fig. 15a).
- With the power plug & cable 12 removed from the mains supply, turn the detail sander upside down.
- Ensure that the screw 7 is not fitted into the hole in the oscillating plate 4 and that there is nothing else fitted on the oscillating plate 4 surface and that there is no residue left behind on the oscillating plate 4 surface.
- Align and fit the finger sanding attachment 6 onto the oscillating plate 4 (See Fig. 15a - Fig. 15b).
- Align and fit the screw through the finger sanding attachment 6 into the threaded hole in the oscillating plate 4, and tighten the screw, using a PH2 star-headed screwdriver (not supplied) (See Fig. 15c - Fig. 15d).
- Only use a sanding finger piece of the correct size.
- Align a sanding finger piece 8 with the finger sanding attachment 6 and fit by pressing together (See Fig. 15e - Fig. 15f).
CAUTION!
Ensure that the surface of the sanding finger piece is fitted flat!
- Remove a sanding finger piece 8 by gripping with the fingers and peeling off the finger sanding attachment 6 (See Fig. 15g).




Use
Description of components and control elements
Proper use
This 75W DETAIL SANDER is designed for grinding/sanding/polishing of wood, iron, plastic and similar materials using the appropriate grinding/sanding paper, rust-removing pad and polishing pad. The equipment is not suitable for wet grinding/sanding/polishing.
The equipment is to be used only for its prescribed purpose. Any other use is deemed to be a case of misuse. The user/operator and not the manufacturer will be liable for any damage or injuries of any kind caused as a result of this.
Please note that our equipment has not been designed for use in commercial, trade or industrial applications. Our warranty will be voided if the machine is used in commercial, trade or industrial businesses or for equivalent purposes.
Operation
Please note that the statutory regulations governing noise abatement may differ from one location to another.
Each time before use, check the following:
- That the equipment is in perfect condition and that the safety devices are complete.
- That all screws are securely fastened.
1. Connecting up the machine and switching it on (Fig. 1)
-Connectthe13Aplug 12 on the detail sander power cable (Fig. 1) either to a 13A socket on the mains supply or via a 13A, 3-core extension power cable to a 13A socket on the mains supply.
2. The ON/OFF 2-button switch (Fig. 4a-item 1) operates in the following way.
- The detail sander is OFF, when the ON button (I) is above the surface of the sander body, and the OFF (0) button is below the surface of the detail sander body. Push the ON button (I) to start the sander motor.
- The detail sander is ON, when the OFF button (0) is above the surface of the sander body, and the ON (1) button is below the surface of the detail sander body. Push the OFF button (0) to stop the sander motor.
Press the ON (I) button to START the detail sander.
Press the OFF (0) button to STOP the detail sander.


3. Working with the grinding/sanding sheets fitted (See Fig. 17)
- Large areas: Ensure that the whole of the sheet is on the work surface.
- Switch the detail sander ON and move it with a gentle pressure over the work surface using completely circular movements, or moving it to and fro and up and down. Switch OFF after use.
- Detail work: ensure that as much as possible of the sheet is on the work surface.
- Switch the detail sander ON and move it with a gentle pressure over the work surface moving it to and fro or up and down. Using the delta shape of the sheet rotate the detail sander to get the best position into the shape of the work surface. Switch OFF after use.
- Use a coarse paper for coarse sanding and a fine paper for finish sanding. Test the grinding/sanding sheets to determine which is the most suitable on the material of the work piece.
4. Working with the rust-removing pad fitted (See Fig. 17)
- Large areas: Ensure that the whole of the pad is on the work surface.
- Switch the detail sander ON and move it with a gentle pressure over the work surface using completely circular movements, or moving it to and fro and up and down. Switch OFF after use.
- Detail work: ensure that as much as possible of the pad is on the work surface.
- Switch the detail sander ON and move it with a gentle pressure over the work surface moving it to and fro or up and down. Using the delta shape of the pad rotate the detail sander to get the best position into the shape of the work surface. Switch OFF after use.
5. Working with the polishing pad fitted (See Fig. 17)
- Using a soft cloth, apply some polish over all of the work surface which is to be polished (Avoid surfaces which are not to be polished).
- Large areas: Ensure that the whole of the pad is on the work surface.
- Switch the detail sander ON and move it with a gentle pressure over the work surface using completely circular movements, or moving it to and fro and up and down. Switch OFF after use.
- Detail work: ensure that as much as possible of the pad is on the work surface.
- Switch the detail sander ON and move it with a gentle pressure over the work surface moving it to and fro or up and down. Using the delta shape of the pad rotate the detail sander to get the best position into the shape of the work surface. Switch OFF after use.
- Only use a small amount of polish, until you can determine how much is required to suit the work surface being polished.
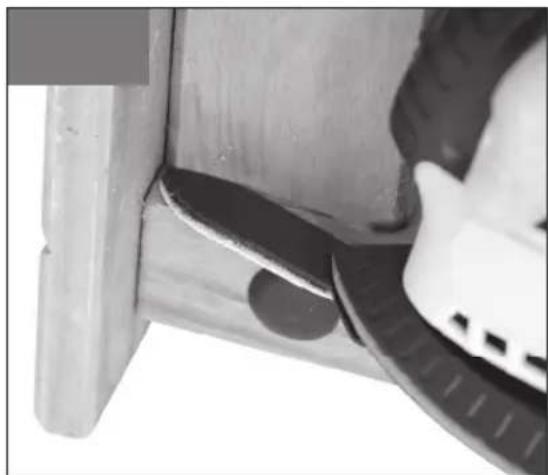
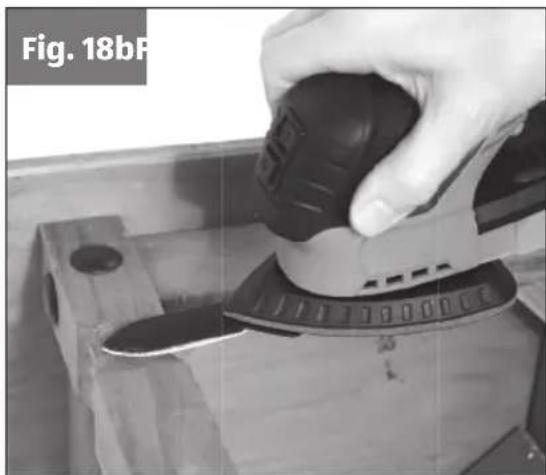
6. Working with the finger attachment & sanding piece fitted (See Fig. 18a - Fig. 18b)
- Detail work: ensure that as much as possible of the sanding piece is on the work surface.
- Switch the detail sander ON and move it with a gentle pressure over the work surface moving it to and fro or up and down. Using the delta shape and edges of the sanding piece, rotate the detail sander to get the best position into the shape of the work surface. Switch OFF after use.
- The finger sanding piece is only available as a fine paper for finish sanding.

www.einhell.co.uk
AFTER SALES SUPPORT

68151 649 1500
1890 94 62 44
NOTICE!
- Be sure to observe the safety instructions (see pages 10 - 28).
Malfunction and remedy (FAQ)
| Problem Problem | Cause Corrective Action | |
| The detail sander does not work | No power at the plug. | Check the power at the plug cable and fuse. |
| Detail Sander is switched off. Switch the detail sander on. | ||
| Grinding/sanding performance unsatisfactory | The dust collection box 3 may be full, or the filter fitted on the inside top of the dust collection box could be blocked. | Remove the dust collection box 3 and empty it, and/or clean the filter fitted on the inside top of the dust collection box 3 . |
| The grinding/sanding sheet 5 , rust-removing pad 11 , polishing pad 10 or the sander finger 8 piece may be worn. | Remove the existing grinding/sanding sheet 5 , rust-removing pad 11 , polishing pad 10 or the sander finger piece 5 and replace with a new one. | |
Cleaning
CAUTION!
Always set the On/Off switch 1 to Stop (0) & disconnect the 13A plug from the mains supply, before starting any cleaning and maintenance work! (See Fig. 1). Risk of electric shock.
Carrying out any cleaning work
- Clean the machine regularly. We recommend that you clean the detail sander immediately after you use it. This will help to keep the machine in good working order and is the basis for a long working life. Wipe the detail sander with a clean moist cloth.
- Keep all safety devices, air vent slots and the motor unit free from dust and debris as far as possible while you work.
1. Cleaning the motor unit
- Clean the plastic body and other plastic parts with a mild household cleaning agent and a damp cloth. Do not use any aggressive agents or solvents for cleaning purposes as these may be aggressive to the plastic parts of the equipment. Never clean the detail sander by spraying it with water.
2. Cleaning the oscillating plate 4
- The underneath surface of the oscillating plate 4, is covered with miniature hooks. (These hooks will grip onto woven materials so some debris may accumulate in the hooks.)
- With the power plug & cable 12 removed from the mains supply, turn the detail sander upside down and use your fingers or tweezers to remove as much of the debris and fibres as you can from the oscillating plate 4. Then use a hard bristled brush (like a dry toothbrush) to brush between the rows. Brush in a direction parallel to the rows of hooks.
Clean your electric tool carefully. Check whether moving parts are functioning properly and not jamming, whether parts are broken or damaged enough that the functioning of this electric tool is affected. Have damaged parts repaired before using the appliance. Many accidents are caused by badly maintained electric tools.
CAUTION!
Prevent water getting inside the motor unit of the detail sander at all cost. Risk of electric shock.
Emptying the dust collection box and cleaning the filter on the underside of the top of the dust collection box (See Fig. 19a – Fig. 19b)
- Switch OFF the detail sander, and unplug the 13A plug & cable 12 from the mains supply. Then remove the dust collection box 3 from the rear of the detail sander body, and remove the dust into a dustbin or waste container. (See Fig. 19). A vacuum cleaner can also be used to extract the dust from the mouth of the dust collection box.
- Open the dust collection box 3 & then clean the fi lter f in the top part of the box 3, by using a vacuum cleaner, or place the top part of the box 3 (and fi lter f) over a waste bin and tap the dust into the bin, or use a hard bristled brush (like a dry toothbrush) on the inside of the fi lter f, to remove any dust from the fi lter f into the bin.


Maintenance and servicing
Maintenance and Storage
CAUTION!
Always set the On/Off button switch 1 to Stop (0) & disconnect the 13A plug from the mains supply, before starting any cleaning and maintenance work! (See Fig. 1).
Risk of electric shock.
Maintenance and ordering of spare parts
CAUTION!
Always set the On/Off button switch 1 to Stop (0) & disconnect the 13A plug from the mains supply, before starting any cleaning and maintenance work! (See Fig. 1).
Risk of electric shock.
Maintenance
Pull out the mains plug and carry out the following work:
- Check the machine for signs of damage.
- Check that all the parts are secure and tighten them if necessary.
- Have any damaged parts replaced or repaired, but use only spare parts of the same type and equivalent quality.
- Carbon Brushes: In case of excessive sparking, have the carbon brushes checked by a qualified electrician.
CAUTION!
The carbon brushes should not be replaced, other than by a qualified electrician.
- There are no parts inside the detail sander which require additional maintenance. Risk of electric shock.
Storing the equipment
- Clean the detail sander & accessories before storage in the supplied storage bag (See Fig. 1).
- Store the detail sander & accessories in a dry room at above freezing temperatures. The ideal storage temperature is between 5°C and 30°C.
- Store the detail sander & accessories out of reach of children.
Transport
CAUTION!
Always set the On/Off button switch 1 to Stop (0) & disconnect the 13A plug from the mains supply, before transporting the detail sander! (See Fig. 1). Risk of electric shock or injury.
When the 13A plug is disconnected gather the mains cable together and relocate the detail sander to the new location before reconnecting the 13A plug to the power supply.
CAUTION!
Ensure that the 13A plug is clear of the ground and does not drag along the ground or surfaces, during relocation or transport. Risk of electric shock or fire if the 13A plug is damaged.
Environmental protection
Dispose of soiled maintenance material and operating materials at the appropriate collection point. Recycle packaging material, metal and plastics.
Ordering replacement parts
Please quote the following data when ordering replacement parts:
- Type of machine (WZDS 75 K)
- Article number of the machine (4460595)
- Identification number of the machine (11016)
- Replacement part number or description of the part required
- Optional pack sanding sheets – Not supplied (446059501800 - 6 piece pack. 2x 80 G, 3x 120 G, 1x 180 G. Sheet size - 132 x 132 x 93 mm)
- Optional pack finger sanding pieces – Not supplied (446059501801 - 10 piece pack. 10x 180 G. Sheet size - 31.5 x 92 mm)
For our latest prices and information please go to www.einhell.co.uk
44

www.einhell.co.uk
AFTER SALES SUPPORT

0151 649 1500
1890 94 62 44
Replacing the power cable
If the power cable for this equipment is damaged, it must be replaced by the authorised after-sales service personnel such as a qualified electrician or similarly trained person to avoid danger.
CAUTION!
Always set the On/Off button switch 1 to Stop (0) & disconnect the 13A plug from the mains supply, before starting any cleaning and maintenance work! (See Fig. 1).
Risk of electric shock.
Technical data
Mains connection 230V \~ 50Hz
Power input 75W
Oscillations 11000 min
Abrasive paper & pad size 132 x 132 x 93 mm
Abrasive finger paper size 22 x 68 mm
Protection class II /
Weight 0.79 Kg

Sound and vibration
Sound and vibration values were measured in accordance with EN62841.
L sound pressure level 58 dB(A)
Kµ uncertainty 3 dB(A)
L sound power level 69 dB(A)
Kµα uncertainty 3 dB(A)
- The declared vibration total value and the declared noise emission value have been measured in accordance with a standard test method and may be used for comparing one tool with another.
- The declared vibration total value and the declared noise emission value may also be used in a preliminary assessment of exposure.
CAUTION!
Wear ear defenders. The impact of noise can cause damage to hearing.
Total vibration values (vector sum of three directions) determined in accordance with EN 62841.
Vibration emission value ah = 3.15 m/s2
K uncertainty = 1.5 m/s 4
46

www.einhell.co.uk
AFTER SALES SUPPORT

0151 649 1500
1890 94 62 44
CAUTION!
- The vibration and noise emissions during actual use of the power tool can differ from the declared values depending on ways in which the tool is used especially what kind of workpiece is processed.
- There is a need to identify safety measures to protect the operator that are based on an estimation of exposure in actual conditions of use (taking account of all parts of the operating cycle such as the times when the tool is switched off and when it is running idle in addition to the trigger time).
Service information
We have competent service partners within the UK, whose contact details can be found on the www.einhell.co.uk website. These partners can help you with all service requests such as repairs, spare and wearing part orders or the purchase of consumables.

Please note that the following parts of this product are subject to normal or natural wear and that the following parts are therefore also required for use as consumables.
| Category Example | |
| Wear parts* None. | |
| Consumables* | Grinding/sanding sheets, rust removing pads, polishing pads, sanding finger pieces, etc. |
*Not necessarily included in the scope of delivery.
In the event of defects or faults, please register the problem on the Internet at www.einhell.co.uk or by telephone to one of the After Sales Support telephone numbers. Please ensure that you provide a precise description of the problem and answer the following questions in all cases:
- Did the equipment work at all or was it defective from the beginning?
- Did you notice anything (symptom or defect) prior to the failure?
- What malfunction does the equipment have in your opinion (main symptom)? Describe this malfunction.

www.einhell.co.uk
AFTER SALES SUPPORT

0151 649 1500
1890 94 62 44
Declaration of conformity
Declaration of Conformity
D erklärt folgende Konformität gemäß EU-Richtlinie und Normen für Artikel
GB explains the following conformity according to EU directives and norms for the following product
F déclare la conformité suivante selon la directive CE et les normes concernant l'article
I dichiara la seguente conformità secondo la direttiva UE e le norme per l'articolo
NL verklaart de volgende overeenstemming conform EU richtlijn en normen voor het product
E declara la siguiente conformidad a tenor de la directiva y normas de la UE para el artículo
P declara a seguinte conformidade, de acordo com as diretiva CE e normas para o artigo
DK attesterer folgende overensstemmelse i medfor af EU-direktiv samt standarder for artikel
S förklarar följande överensstämmelse enl. EU-direktiv och standarder för artikeln
FIN vakuuttaa, että tuote täyttää EU-direktiivin ja standardien vaatimukset
EE töendab toote vastavust EL direktiivile ja standarditele
CZ vydává následující prohlásení o shodě podle směrnice EU a norem pro výrobek
SLO potrjuje sledečo skladnost s smernico EU in standardi za izdelek
SK vydáva nasledujúce prehlásenie o zhode podl'a smernice EÚ a noriem pre výrobok
H a cikkekhez az EU-irányvonal és Normák szerint a következő konformitást jelenti ki
PL deklaruje zgodność wymienionego poniżej artykułu z następującymi normami na podstawie dyrektywy WE.
BG декларира съответното съответствие съгласно
Директива на ЕС и норми за артикул
LV paskaidro šādu atbilstību ES direktīvai un standartiem
LT apibūdina šj atitikimą EU reikalavimams ir prekes normoms
RO declară următoarea conformitate conform directivei UE și normelor pentru articolul
GR δηλώνει την ακόλουθη συμμόρφωση σύμφωνα με την Οδηγία ΕΚ και τα πρότυπα για το προϊόν
HR potvrđuje sljedeću usklađenost prema smjernicama EU i normama za artikl
BIH potvrđuje sljedeću usklađenost prema smjernicama EU i normama za artikl
RS potvrđuje sledeću usklađenost prema smernicama EZ i normama za artikal
RUS следующим удостоверяется, что следующие продукты соответствуют директивам и нормам EC
UKR проголошує про зазначену нижче відповідність виробу директивам та стандартам ЄС на виріб
MK ја изјавува следната сообрэност согласно
ЕУ-директивата и нормите за артикли
TR Ürünü ile ilgili AB direktifleri ve normlan gereğince aşağıda açıklanan uygunluğu belirtir
N erklærer følgende samsvar i henhold til EU-direktivet og standarder for artikel
IS Lýsir uppfyllingu EU-regina og annarra staðla vöru
Electric Detail Sander WZDS 75 K (Workzone)
2014/29/EU
2005/32/EC_2009/125/EC
2014/35/EU
2006/28/EC
X 2014/30/EU
2014/32/EU
2014/53/EC
2014/68/EU
□ 90/396/EC_2009/142/EC
□ 89/686/EC_96/58/EC
X 2011/65/EU
X 2006/42/EC
□ Annex IV
Notified Body:
Notified Body No.:
Reg. No.:
□2000/14/EC_2005/88/EC
□ Annex V
□ Annex VI
Noise: measured LWA = dB(A) ; guaranteed LVA = dB(A)
P = KW; L/∅ = cm
Notified Body:
2012/46/EU
Emission No.:
Standard references: EN 62841-1; EN 62841-2-4; EN 55014-1; EN 55014-2; EN 61000-3-2; EN 61000-3-3
Yang/Product-Management
First CE:17
Art.-No.: 44.605.95 I.-No.: 11016
Subject to change without notice
Archive-File/Record: NAPR015088
Documents registrar: Patrick Willnecker
Wiesenweg 22, D-94405 Landau/Isar
Warranty
Warranty FAQ's
| How do I claim for a warranty matter? | 1. Fill in the Warranty card and send to the Einhell UK Ltd Address.2. Contact Einhell UK Ltd, using one of the Telephone numbers for AFTER SALES SUPPORT.3. Or contact via the Einhell UK Ltd website. |
| How do I obtain spare parts (not covered by the warranty)? | Make sure you have the information from the product data label, or page 44 of this manual, and then: -1. Contact Einhell UK Ltd, using one of the Telephone numbers for AFTER SALES SUPPORT, and choose the option for Spare Parts.2. Or contact via the Einhell UK Ltd website, where spares information & prices are available. |

www.einhell.co.uk
AFTER SALES SUPPORT

0151 649 1500
1890 94 62 44
WORKZONE®
GB IRE
WARRANTY CARD
75W DETAIL SANDER
Your details:
Name ____
Address ____

Email:
Date of purchase* ____
*We recommend you keep the receipt with this warranty card
Location of purchase
Description of malfunction:

If after contacting the manufacturer you are requested to return the faulty product please return the completed warranty card together with it.
Einhell UK Ltd
Unit 9, Stadium Court
Wirral International Business Park
Plantation Road
Bromborough
CH62 3QG
AFTER SALES SUPPORT

01516491500 1890946244

www.einhell.co.uk
MODEL: WZDS 75 K PRODUCT CODE: 77014 07/2017
Aftersales support available:
Monday - Thursday: 8:45am - 5pm
Friday: 8:45am - 3pm
The Aldi warranty offers you extensive benefits in addition to your statutory rights:
Warranty period: 3 years from date of purchase.
Costs:Freerepair/exchange.
No transport costs.
Hotline: 0151 649 1500 (or from Rep. Ireland 1890 94 62 44).
ADVICE:
Please contact our service hotline by phone or email. This allows us to provide support in the event of possible operator errors.
In order to make a claim under the warranty, please send us:
- A copy of the original purchase receipt and the completed warranty card.
The warranty does not cover damage caused by:
- Accident or unanticipated events (e.g. lightening, water, fire).
• Improper use or transport. - Disregard of the safety and maintenance instructions.
- Other improper treatment or modification.
After the expiry of the warranty period, you still have the possibility to have your product repaired at your own expense. If the repair or the estimate of costs is not free of charge you will be informed accordingly in advance.
This warranty does not affect you statutory rights. The period of the warranty can only be extended in accordance with a legal standard. In countries where a (compulsory) warranty and/or spare part storage and/or a system for compensation are/is required by law, the statutory minimum conditions apply. In the event that a product is received for repair, neither the service company nor the seller will assume any liability for data or settings possibly stored on the product by the customer.





- GENERAL INFORMATION
- READING AND STORING THE ORIGINAL INSTRUCTIONS MANUAL
- EXPLANATION OF SYMBOLS
- DANGER
- WARNING
- CAUTION
- NOTICE
- USE AND STORAGE OF THE USER GUIDE
- PROPER USE
- THE EQUIPMENT IS ALLOWED TO BE USED ONLY FOR ITS INTENDED PURPOSE. ANY OTHER USE IS DEEMED TO BE A CASE OF MISUSE
- REASONABLY FORESEEABLE MISUSE
- SAFETY
- EXPLANATION OF THE SYMBOLS AND TYPES OF INSTRUCTIONS USED (SEE FIG. 2)
- 1
- 2
- 3
- 4
- EXPLANATION OF THE PICTOGRAMS FOR HANDLING ON THE MACHINE (SEE FIG. 3)
- SAFETY DEVICES (FIG. 4A - 4B)
- TO STOP THE DETAIL SANDER WHEN IT IS WORKING, PRESS THE OFF (0) BUTTON
- SAFETY INSTRUCTIONS
- GENERAL POWER TOOL SAFETY WARNINGS
- WORK AREA SAFETY
- ELECTRICAL SAFETY
- PERSONAL SAFETY
- POWER TOOL USE AND CARE
- SERVICE
- SAFETY WARNINGS
- DETAIL SANDER USE
- BEFORE USING
- ADDITIONAL SAFETY INSTRUCTIONS
- ADDITIONAL SAFETY WARNINGS
- AFTER SALES SUPPORT
- SAFETY FEATURES (FIG. 7A - 7C)
- SAFE OPERATION (SEE FIG. 8)
- RESIDUAL RISKS
- SAFETY AND PROTECTIVE EQUIPMENT
- SET UP
- BEFORE STARTING THE EQUIPMENT
- FIRST USE
- CHECKING THE DETAIL SANDER AND PRODUCT CONTENTS (SEE FIG. 1)
- ASSEMBLING THE DETAIL SANDER AND ACCESSORIES
- FITTING & REMOVING THE DUST COLLECTION BOX (FIG. 11 & FIG.12)
- HOOK & LOOP FI TTING OF THE ACCESSORIES (FIG. 13A & 13B)
- FITTING A GRINDING/SANDING SHEET (FIG. 13A & 13B)
- TO REMOVE THE GRINDING/SANDING SHEET (FIG. 14A & 14B)
- USE
- DESCRIPTION OF COMPONENTS AND CONTROL ELEMENTS
- OPERATION
- EACH TIME BEFORE USE, CHECK THE FOLLOWING
- CONNECTING UP THE MACHINE AND SWITCHING IT ON (FIG. 1)
- THE ON/OFF 2-BUTTON SWITCH (FIG. 4A-ITEM 1) OPERATES IN THE FOLLOWING WAY
- WORKING WITH THE GRINDING/SANDING SHEETS FITTED (SEE FIG. 17)
- WORKING WITH THE RUST-REMOVING PAD FITTED (SEE FIG. 17)
- WORKING WITH THE POLISHING PAD FITTED (SEE FIG. 17)
- WORKING WITH THE FINGER ATTACHMENT & SANDING PIECE FITTED (SEE FIG. 18A - FIG. 18B)
- CLEANING
- CARRYING OUT ANY CLEANING WORK
- CLEANING THE MOTOR UNIT
- CLEANING THE OSCILLATING PLATE 4
- PREVENT WATER GETTING INSIDE THE MOTOR UNIT OF THE DETAIL SANDER AT ALL COST. RISK OF ELECTRIC SHOCK
- MAINTENANCE AND SERVICING
- MAINTENANCE AND STORAGE
- MAINTENANCE AND ORDERING OF SPARE PARTS
- MAINTENANCE
- STORING THE EQUIPMENT
- TRANSPORT
- ENVIRONMENTAL PROTECTION
- ORDERING REPLACEMENT PARTS
- REPLACING THE POWER CABLE
- TECHNICAL DATA
- SOUND AND VIBRATION
- SERVICE INFORMATION
- DECLARATION OF CONFORMITY
- ELECTRIC DETAIL SANDER WZDS 75 K (WORKZONE)
- WARRANTY
- WARRANTY FAQ'S
- WORKZONE®
- WARRANTY CARD
- 75W DETAIL SANDER
- YOUR DETAILS
- ADVICE
- IN ORDER TO MAKE A CLAIM UNDER THE WARRANTY, PLEASE SEND US
- THE WARRANTY DOES NOT COVER DAMAGE CAUSED BY
Brand : Workzone
Model : WZDS 75 K
Category : Sander