
56749XM - Dash cam PHILIPS - Free user manual and instructions
Find the device manual for free 56749XM PHILIPS in PDF.


| Type of product | Dash cam |
| Brand | Philips |
| Model | 56749XM |
| Dimensions | Approximately 6.5 x 3.8 x 2.5 cm |
| Weight | Approximately 55 g |
| Power supply | 5V DC via cigarette lighter adapter |
| Video resolution | 1080p Full HD at 30 fps |
| Lens angle | 140 degrees wide angle |
| Storage | MicroSD card up to 32 GB (Class 10 or higher) |
| Loop recording | Yes, automatically overwrites oldest files |
| G sensor | Built-in impact sensor locks files on collision |
| Night vision | Low light enhancement with LED |
| Display | 2 inch LCD screen |
| Mounting | Suction cup or adhesive mount to windshield |
| Main functions | Continuous recording, event recording, parking mode (if supported) |
| Maintenance and cleaning | Wipe lens gently with a microfiber cloth; clean housing with damp cloth |
| Safety recommendations | Use only the supplied charger; do not install in front of airbags |
| Spare parts and repairability | Replacement suction mount and USB cable available; contact Philips support |
| General information | User manual available for free download at notice-facile.com |
Frequently Asked Questions - 56749XM PHILIPS
User questions about 56749XM PHILIPS
0 question about this device. Answer the ones you know or ask your own.
Ask a new question about this device
Download the instructions for your Dash cam in PDF format for free! Find your manual 56749XM - PHILIPS and take your electronic device back in hand. On this page are published all the documents necessary for the use of your device. 56749XM by PHILIPS.
USER MANUAL 56749XM PHILIPS
User Manual Automotive Driving Recorder
natural_image
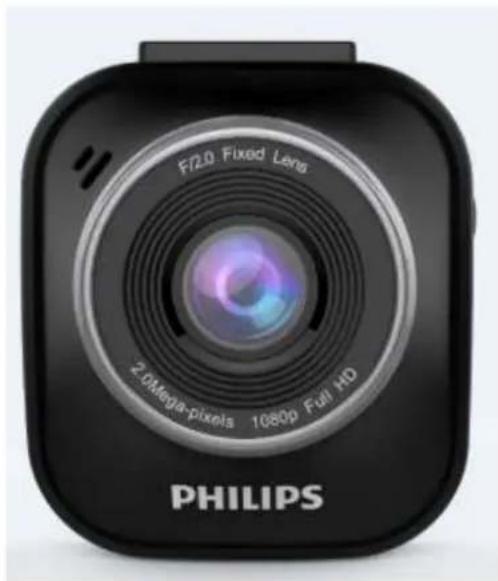
Black Philips fixed lens with visible lens and control buttons (no text beyond branding)Contents
- Product overview .... 3
- Installation instructions....4
- User interface....6
- System settings....7
- Operating instructions....8
5.1 Power on/off and reset button....8
5.1.1 Automatic power on/off 8
5.1.2 Manual power on/off....8
5.1.3 Reset the device....8
5.2 Shortcut buttons....8
5.2.1 Emergency recording button ....8
5.2.2 Menu button....8
5.2.3 Enter video play mode 8
5.2.4 Exit video play mode....9
5.3 Record video....9
5.3.1 Normal video recording....9
5.3.2 Emergency recording....9
- Additional functions....10
6.1 Driver fatigue alert....10
- Updating the device's firmware 10
7.1 Firmware download....10
7.2 How to update firmware....10
- Technical specifications....11
1. Product overview
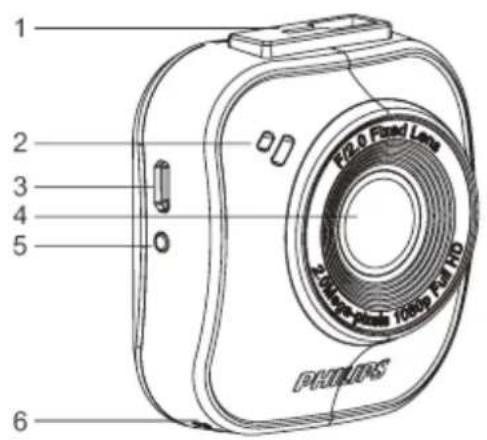
- Suction cup holder
- Speaker
- Micro USB port
- Lens
- Reset button
- Microphone
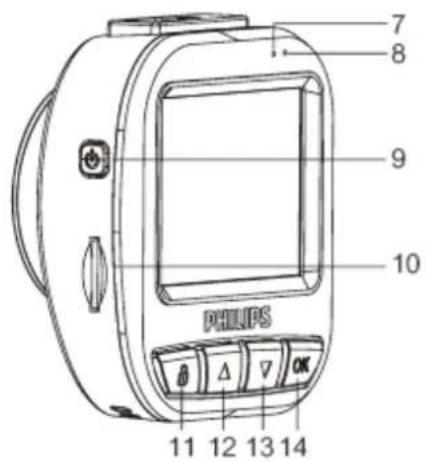
-
Status indicator
-
Power indicator
- Power button
- Micro SD card slot
- Emergency/Return button
- Up button
- Down button
- Enter/OK button
natural_image
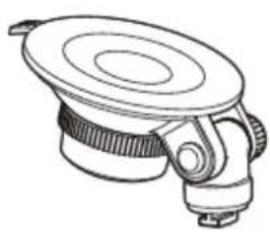
Technical line drawing of a mechanical component with no visible text or symbolsBracket for suction mount x 1
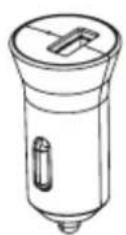
Charger x 1
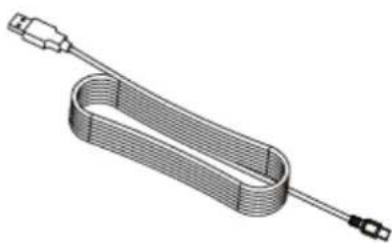
natural_image
3D illustration of a U-shaped cable with connectors (no text or symbols)USB cable x 1
2. Installation instructions
Insert SD Memory Card
Insert the memory card with the golden contacts side of the card facing the back of the camera.
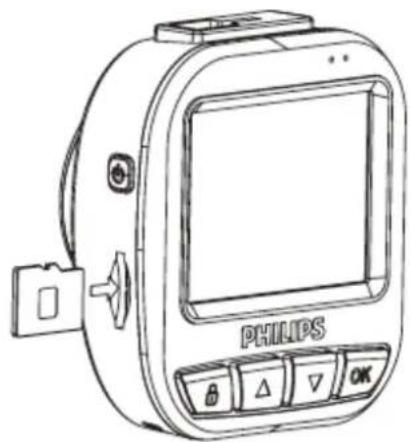
natural_image
Line drawing of a Philips medical device with control buttons and a door (no text or symbols on the device itself)About the Micro SD card
- Please use a Micro SD card with a capacity of at least 16GB, Class 10 (maximum 64GB)
- Format your Micro SD card before first use by selecting "format SD card" in the system settings of your GoSure device.
- The relationship between card capacity and recording time is given below.
| Micro SD Card Capacity | 1080P/30fps | 720P/30fps |
| 16GB | 160 minutes | 260 minutes |
| 32GB | 320 minutes | 520 minutes |
| 64GB | 640 minutes | 1040 minutes |
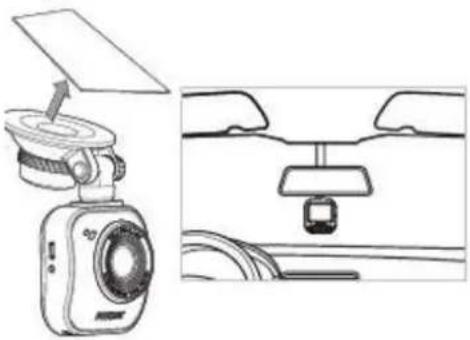
- Install the suction cup onto the device.
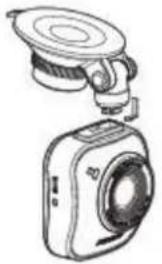
natural_image
Line drawing of a camera with a mounted sensor or camera module (no text or symbols)- Find a suitable position on your windshield and lock the suction cup.
natural_image
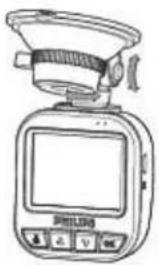
Diagram showing a car rearview camera and its rearview mirror, with no visible text or symbols.- Adjust the position of the device within the mount to ensure you're recording a clear view of the road.
natural_image
Line drawing of a handheld electronic device with a screen and antenna (no text or symbols)-
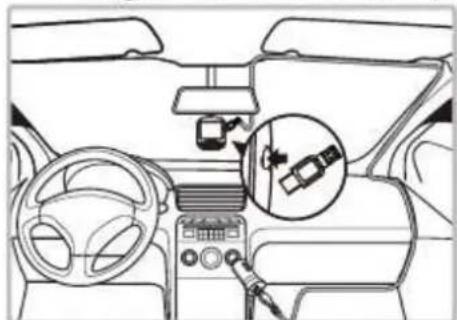
Connect the USB cable to the Micro USB socket on the device.
-
Plug the other end of this supplied car charger into the 12-24V DC outlet of your vehicle (running the wire
under the glove box and around the edge of the windshield).
natural_image
Interior view of a car dashboard with steering wheel and gear shift (no text or symbols)-
Set the correct date and time on the device.
-
Your Philips GoSure dash cam will automatically power on and start recording once you start your engine, and will stop recording only when you turn the engine off again.
Note:
-
Please use our dedicated car charger to avoid any device incompatibility issues.
-
To avoid damaging the video recording, please unplug your device before inserting or removing your SD memory card.
-
To remove the SD card, simply press down on the card and it will eject from the card slot automatically.
-
If the car power supply doesn't turn off automatically, it is recommended that you disconnect the device's charger cable manually, to avoid draining your car's battery.
3. User interface
Description of display icons and indicators below :
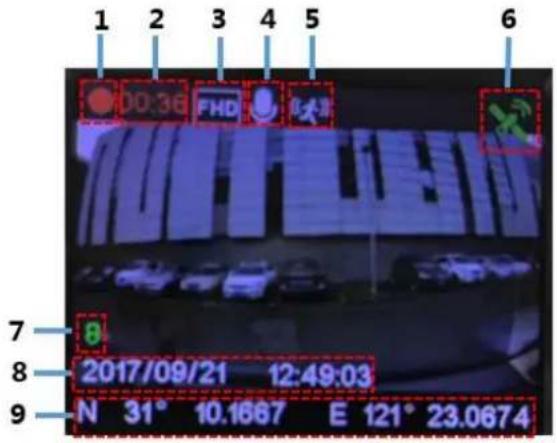
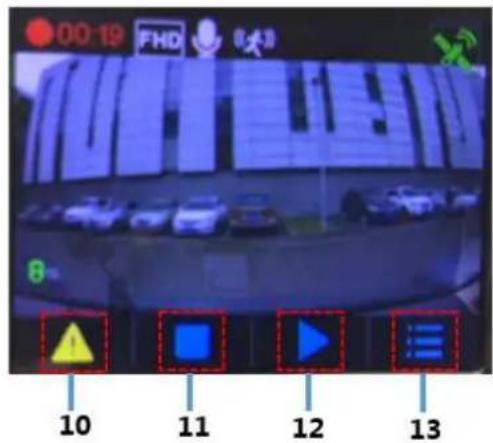
| No. Function Description | ||
| 1 | Recording status indicator | Light blinks when recording begins. |
| 2 | Current record time Displays length of the current recording. | |
| 3 | Resolution indicator Displays video resolution status. | |
| 4 | Voice recording indicator | Indicates if voice recording is on or off. |
| 5 | Motion detection indicator | The icon appears when the motion detection function is switched on. |
| 6 | GPS status indicator This displays GPS status:Gray: GPS offYellow: GPS not locatedGreen: GPS locatedThe GPS module is optional (sold separately) | |
| 7 | Fatigue index display The driver fatigue rating will be displayed here when this feature is switched on. | |
| 8 | Date and time display Displays the system date and time. | |
| 9 | Location information display | Displays the location coordinates. |
| 10 | Emergency Press the Emergency button to lock a video file. | |
| 11 | Start/Stop | Press the Start/Stop button to start or stop the video recording. |
| 12 | Playback | Press the Playback button to preview recorded video. |
| 13 | Menu | Press the Menu button to enter menu settings. |
4. System setting
Press the menu button to see the list of adjustable system settings below.
| No. | Function Description | |
| 1 | Resolution Set the resolution to: 1080p 30fps, or 720p 30fps. | |
| 2 | WDR Turn the WDR (Wide Dynamic Range): on/off. | |
| 3 | Video Length Set the length of video clip recording time: 1 min, 3 min, or 5 min. | |
| 4 | Voice Recording Turn voice recording function on/off. | |
| 5 | Date Stamp Turn the date and time stamp on the recording on/off. | |
| 6 | EV Value Manually adjust the exposure level: -2.0, -1.0, +0.0, +1.0, or +2.0. | |
| 7 | Driver Fatigue Alert | Turn driver fatigue alert function on/off. |
| 8 | Headlight Reminding | Turn headlight reminding function on/off. |
| 9 | Motion Detection In standby mode, the device will start recording automatically after detecting a moving object in front of the camera within the effective range. If the device detects no more movement, it will stop recording. If the object in front of camera starts moving once again, the device will start recording again. | |
| 10 | Collision Detection Set the collision detection level to Off, High, Middle, or Low. | |
| 11 | Language Adjust the language setting (English is default). | |
| 12 | Clock Set the system date, time and time zone. | |
| 13 | Volume Set the system volume to High, Medium, Low, or Mute. | |
| 14 | Display Auto Off | Set how long before the device's display will turn off automatically: 30sec, 3 min, 5 min, or always on. |
| 15 | GPS | Turn the GPS function on/off.The GPS module is optional (sold separately) |
| 16 | Format | Format Micro SD memory card. |
| 17 | Default Reset all device settings to the factory default. |
| 18 | About Information on the current firmware version. |
5. Operating instructions
5.1 Power on/off and reset button
5.1.1 Automatic power on/off
Your dash cam will automatically turn on when you switch on the vehicle engine. If you disconnect the car charger or the cable plugged into the device, the camera will automatically turn off.
5.1.2 Manual power on/off
To turn on the device, press the “power” button. To turn the device off, press and hold the “power” button for three seconds.
5.1.3 Reset device
If the device crashes or you're unable to operate it, press the "reset" button to reboot the device, this should mean it now works normally.
5.2 Shortcut buttons
5.2.1 Emergency recording button
Press the emergency button to trigger an emergency file recording. This is a recording that is protected from being overwritten.
Note: Emergency files occupy up to 30% of the SD memory card capacity.
5.2.2 Menu button
Press the "OK" button to enter the main settings menu.
5.2.3 Enter video play mode
Press the ▼ button to enter the recording playlist, then press the up button ▲ to enter the video play mode. You can then use the up button ▲ or down button ▼ to select which video to play.
5.2.4 Exit video play mode
To exit the video playback mode, press the emergency button and you will enter video recording mode.
5.3 Record video
5.3.1 Normal video recording
When you switch on your vehicle, the device automatically turns on and starts continuously recording. When you switch your vehicle engine off, the camera will stop recording automatically. A normal video recording file is saved in a folder named with the system date, and the file name within that folder will contain the system time (hour, minute, second) as a prefix.
5.3.2 Emergency recording
An emergency file will be automatically generated when you either press emergency button (see 5.2.1) or the device detects a collision above a certain force threshold. This will have a file name containing the system time (hour, minute and second) and will be saved in an emergency folder.
6. Additional functions
6.1 Driver fatigue alert
To help drivers keep track of how tired they might be getting, the device comes with a fatigue alert. This takes into account various physiological and journey related parameters; for example, it considers the time of day and the time spent driving. The device will alert you every two hours of driving, to remind you that fatigue could be becoming an issue.
As well this alert, there is also a fatigue indicator on the device's display. With a low fatigue rating below 60, the indicator is green. When the fatigue rating is between 60 and 80 the indicator is yellow. When the fatigue rating reaches 80, the indicator turns red. When you switch on this driver fatigue feature, it's important that you set correct system time (so it knows at what time of day you're driving). If you have this feature switched off, the fatigue rating will not be displayed on the screen.
7. Updating the device's firmware
7.1 Firmware download
To update the firmware (the device's in-built software), please download the latest file version from Philips.com or contact Philips Consumer Care for assistance.
7.2 How to update firmware
- Copy the firmware file (ADR620EU.bin) directly to your SD memory card.
- Then insert the memory card into the device, before plugging in the power cable to the device.
- A red LED will then blink, indicating the device is updating automatically.
-
When the device restarts it means the update was successful, please enter the menu and check the firmware version in "About".
-
Technical specifications
| Functions | Automatic video recordingCollision detection & emergency file protectionSeamless loop recordingAuto exposureAuto white balanceDate and time stampAuto LCD offDriver fatigue alert and fatigue index displayWide angle video recordingHeadlight reminding |
| Image sensor | 2 Mega-pixels CMOS |
| Video resolution | Full HD(1920x1080p)@30fpsHD Premium(1280x720p)@30fps |
| Display | 2.0" LCD |
| Aperture range | F/#2.0 |
| Fixed lens | 6G lens, FOV 120 (Diagonal) |
| File format | .MOVH.264 video compression |
| Random accessmemory | 64MB DDR1 SDRAM |
| Internal memory | 32Mb SPI flash |
| Recording media | MicroSD card ( at least 16GB, Class 10 or higher ) |
| Recording time | 320min @32GB for full HD |
| Operatingtemperature | -10°C ~ 60°C |
| Storage temperature | -20°C ~ 70°C |
| Accessories | Car charger, cable, Suction cup Bracket, Quick Start Guide |
| Interface | Micro USB 2.0 port, MicroSD Slot, Microphone, Speaker |
| Languages | Simplified Chinese, English |
| Power | 12V to 5V/1.5A car charger |
| Dimension(L x W x H) | 57.2 x 64.8 x 33.4mm |

Lumileds is the warrantor of this product. The Philips trademarks are used under license from Koninklijke Philips N.V. (2017). © Lumileds Holding B.V. 2017. All rights reserved.
Document order number: 3211 008 21298

- User Manual Automotive Driving Recorder
- Contents
- Product overview
- Installation instructions
- Insert SD Memory Card
- About the Micro SD card
- Note:
- User interface
- System setting
- Operating instructions
- Power on/off and reset button
- Automatic power on/off
- Manual power on/off
- Reset device
- Shortcut buttons
- Emergency recording button
- Menu button
- Enter video play mode
- Exit video play mode
- Record video
- Normal video recording
- Emergency recording
- Additional functions
- Driver fatigue alert
- Updating the device's firmware
- Firmware download
- How to update firmware
Brand : PHILIPS
Model : 56749XM
Category : Dash cam