
CLT-2422 - Cordless phone SANYO - Free user manual and instructions
Find the device manual for free CLT-2422 SANYO in PDF.


User questions about CLT-2422 SANYO
0 question about this device. Answer the ones you know or ask your own.
Ask a new question about this device
Download the instructions for your Cordless phone in PDF format for free! Find your manual CLT-2422 - SANYO and take your electronic device back in hand. On this page are published all the documents necessary for the use of your device. CLT-2422 by SANYO.
USER MANUAL CLT-2422 SANYO
2.4 GHz Cordless Telephone with Caller ID
CLT-2418 CLT-2422
Instruction Manual
Important Charge the handset battery for 12 continuous hours prior to first use.
SANYO Canada Inc.
www.sanyocanada.com
Pnnpn Pnnpn Pnnpn Pnnpn Pnnpn Pnnpn Pnnpn Pnnpn Pnnpn Pnnpn Pnnpn Pnnpn Pnnpn Pnnpn Pnnpn Pnnpn Pnnpn Pnnpn Pnnpn Pnnpn Pnnpn Pnnpn Pnnpn Pnnpn Pnnpn Pnnpn
8ε 3NEH SOS 9ε 1N4N4N4N4N4N4N4N4N4N4N4N4N4N4N4N4N4N4N4N4N4N4N4N4N4N4N4N4N4N4N4N4N4N4N4N4N4
E E E E E E E E E E E E E E E E E E E E E E E E E E E E E E E E E E E E E E E E E E E E E E E E E E E E E E E E E E E E E E E E E E E E E E E E E E E E E E E E E E E
08 62 62 62 62
62 62 62 82
LZ .. . . . . . . . . . . . . . . . . . . . . . . . . . . . . . . . . . . . . . . . . . . . . . . . . . . . . . . . . . . . . . . . . . . . . .. .. .. .. .. .. .. .. .. .. .. .. .. .. .. .. .. .. .. .. .. .. .. .. .. .. .. .. .. .. .. .. .. .. .. .. .. .. .. .. .. .. .. .. .. ... .. .. .. .. .. .. .. .. .. .. .. .. .. .. ... ... ... ... ... ... ... ... ... ... ... ... ... ... ... ... ... ... ... ... ... ... ... ... ... ... ... ... ... ... ... ... ... ... ... ... ... ... ... ... ... ... ... ... ... ... ... ... ... ... ... ... ... ... ... ... ... ... ... ... ... ... ... ... ... ... ... ... ... ... ... ... ... ... ... ... ... ... ... ... ... ... ... ... ... ... ... ...
92. 92. 92. 92. 92. 92. 92. 92. 92. 92. 92. 92. 92. 92. 92. 92. 92. 92. 92. 92. 92. 92. 92. 92. 92. 92.
2
2 2 2 2 2 2 2 2 2 2 2 2 2 2 2 2 2 2 2 2 2 2 2 2 2 2 2 2 2 2 2 2 2 2 2 2 2 2 2 2 2 2 2 2 2 2 2 2 2 2
C 22 68
22 68
LZ 68
LZ 68
LZ 68
SLNNEON00E0E384
INTRODUCTION
Congratulations on your purchase of this Sanyo cordless telephone.
Your Sanyo 2.4 GHz cordless telephone is a fine-quality home
communications product. It is carefully designed and produce
proper maintenance and care , it will provide you with years of
enjoyment and convenience.
Main Features
2.4 GHz Technology
Superior Range -The use of 2.4 GHz frequency band for signal
transmission between base and handset means greater com-fication range compared to conventional 43- 49 MHz cordless
telephones.
Ultra-Low Noise -The high frequency communication has also signifi
cantly reduced noise level.
40-Channel Auto Scan -Your new telephone uses one of 40 channels
every time you receive or place a call on the handset.
COMPANDER PLUS Noise Reduction
This fourth generation of the Sanyo's original noise reduction technology now filters out more background noise.
-
Caller ID on Handset and base
-
Speakerphone and dialing keypad on the base
Compatible with Caller ID and Visual Call Waiting
40 name/number caller ID list: name/number, time and date
3-line trilingual display with backlit LCD screen
Lighted handset keypad (CLT-2422 only)
- Dial back from Caller ID list
IMPORTANT: To use all of the features of this telephone, you must subscribe.
Waiting Service from your telephone company. To know who is calling
Waiting Service.
GETTING STARTED
Make sure your package includes the ite

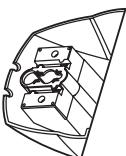
Wall mount bracket

AC adaptor (U120030D)
Replacement battery order
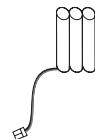
W
Telephone
line cord battery
Modular jack
You need an RJ11 type modular phone jack. If you do not have a
modular jack, call your local phone company to find out how to getone installed .
one installed.
Some cordless telephones operate at frequencies that may cause
Some cordless telephones operate at frequencies that may cause interference to nearby TVs microwave ovens, and VCRs. To minimize or
prevent such interference, the base of the cordless telephone should
not be placed near or on top of a IV, microwave ovens, or VCR. If suchinterferences continue, move the cordless telephone farther away from
these appliances.
Certain other communications devices may also use the 2.4 GHz
interfere with each other and/or your new telephone. If you are
concerned with interference, please refer to the owner's manual for these devices on how to properly set channels to avoid interference.
Typical devices that may use the 2.4 GHz frequency for communication
include wireless audio/video senders , wireless computer networks, multi-handset cordless telephone systems , and some long-range
cordless telephone systems.
eeppeeppeeppeeppeeppeeppeeppeeppeeppeeppeeppeeppeeppeeppeeppeeppeeppeeppeeppeeppeeppeeppeeppeeppeeppeeppeeppe
eRMeOd eonrnnnnepe 04 06nId
eae eae eae eae eae eae eae
00 000000000000000000000000000000
5 Press FLASH/PROGRAM to confirm.
- Press CD or key to select AM or PM
3 Enter the hour and minutes using the numt
SET TIME shows on the screen.
2. Press FLASH/PROGRAM on the base five
1. Phone must be OFF (not in TALK mode).
nne nnnnne nee eae
The time and date are programmed automatically when Caller ID
Time setting
- Press FLASH/PROG to confirm:
the desired finger tone.
- Press CID ▲ or ▼, or press the 1, 2, or 3 r
SET RINGER TONE shows on the screen.
- Press FLASHPROG two times.
- Make sure the phone is OFF (not in TALK)
On the handser:
- Press FLASH/PROGRAM to confirm.
- Make sure the phone is OFF (not in TALK) 2. Press FLASHPROG two times. SET BRITEE THEO abouts on the ooeep
On the handset:
- Press FLASHPROGRAM to confirm.
the desired ginger tone.
3. Press CD or , or press the 1, 2, or 3 number keys to se
shows on the screen.
1. Make sure the phone is OFF (not in TALK mode). 2. Press FLASH/PROGRAM four times SET RINGER TONE
On the base:
Ringer tone setting
-
Enter your 3-digit area code using the number keys. 4. Press FLASHPROGRAM to confirm.
-
Press FLASH/PROGRAM three times. SET ARER CODE SHOWS on sCReen.
- Make sure the phone is OFF (not in TALK mode).
For proper Caller ID operation, you must enter your area code. This setting can only be done from the base.
Area code setting
INITIAL PROGRAMMING
dn bueuy ouiege kovkovkovkssesd
AeK 11111111111111111111111111111111
e 1
11e e 6nKeW
dn bueuy ouiebe HReVdS ssed 2
aouyduayeaed aseaq bns
dn s6uey Aieeone
aon
eq of tbe 345454545454545454545454545454545454545454545454545454545454545454545454545454545454545454545454545454
Prrnne nnnnne eannnne ennnnne ennnnne ennnnne ennnnne ennnnne ennnnne ennnnne ennnnne ennnnne ennnnne ennnnne ennnnne ennnnne ennnnne ennnnne ennnnne ennnnne ennnnne ennnnne ennnnne ennnnne ennnnne ennnnne ennnnne ennnnne enennnne ennnnne ennnnne ennnnne ennnnne ennnnne ennnnne ennnnne ennnnne ennnnne ennnnne ennnnne ennnnne ennnnne ennnnne ennnnne ennnnne ennnnne ennnnne ennnnne ennnnne ennnnne ennnnne ennnnne ennnnne en
Peppepepepepepepepepepepepepepepepepepepepepepepepepepepepepepepepepepepepepepepepepepepepepepepepepepepepepepepepepepepepepepepepepepepepepepepepepepepepepepepepepepepepepepepepepepepepepepepepepepepepe pe
INN

BASICS
Using base speakerphone:
2. Dial the phone number. The screen shows:
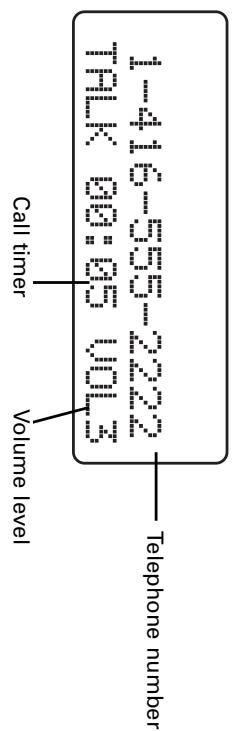
- Press SPEAKER again to hang up.
Volume adjustment
The VOLUME keys on the handset adjusts the volume level of the handset's earmpiece. The VOLUME keys on the base controls the base
speaker. There are four levels.
Speakerphone volume
1. Make sure the speakerphone is ON (SPEAKER key is lit).
- Press VOLUME ▲ or √, on the base. The volume lever shows on screen.
Handset volume
- Make sure the handset is in TALK mode.
- Press the VOLUME or key on the side of the handset
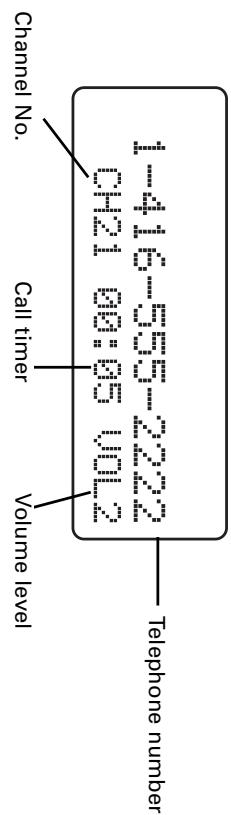
The volume level shows on screen.
BASICS
Ringer switch and volume Handset ringer:
The RINGER switch must be on for the handset to ring during
incom ing
Base ringer:
-
Make sure the speakerphone is OFF (SPEAKER key is not lit).
-
To increase the ringer volume to the highest level, press
VOLUME ▲.
-
To decrease the ringer volume level, press VOLUME
-
To turn off the ringer, press VOLUME until RINGER OFF
shows on screen.
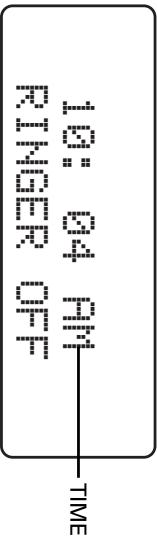
Speakerphone use For best speakerphone performance, avoid the following:
- Areas with high background noise. (The microphone might pick up these sounds and prevent the speakerphone from going into
the receiving mode when you finish talking.)
Surfaces affected by vibration.
- Recessed areas such as in a corner, under a
cabinet, which can generate an echo effect.
Tips:
The speakerphone works similar to a 2-way radio. You can only listen or talk one at a time.
- Stay reasonably close to the phone so you can be heard clearly.
The SPEAKER key lights up when the speakerphone is in use.

BASICS
Predialing 1. Make sure the phone is OFF (not in TALK model).
-
Enter the telephone number: The telephone number shows on
-
Press TALK/CALL BACK on the handset or press SPEAKER or
rreses
Note: You may enter up to 32 pre-dial digits.
Changing the predial number 1. Make sure the phone is OFF (not in TALK mode).
2 Enter the telephone number.
- Re-enter the number:
Rreding
-
Make sure the phone is OFF (not in IALN mode). 2. Press TALK/CALL BACK on the handset or SPEAKER on the
-
Press REDIADEL to redial the last number (up to 32 digits).
Fast redialing
-
Press TALK/CALL BACK on the handset or SPEAKER on the base.
-
Enter the telephone number you want to dial:
line for two seconds and redials the number.
Switching between speakerphone and handset
number or anytime during a conversation.
from the cradle on the base. You are automatically connected to
Note: if the handset is already off the cradle when you put the call on hold, press TALKCALL BACK to connect to the caller.
BASICS
Houh Hooohn Hooohn Hooohn Hooohn Hooohn Hooohn Hooohn Hooohn Hooohn Hooohn Hooohn Hooohn Hooohn Hooohn Hooohn Hooohn Hooohn Hooohn Hooohn Hooohn Hooohn Hooohn Hooohn Hooohn Hooohn Hoooh
speakerphone.
Irrrnnnne nnnnne nnnnne nnnnne nnnnne nnnnne nnnnne nnnnne nnnnne nnnnne nnnnne nnnnne nnnnne nnnnne nnnnne nnnnne nnnnne nnnnne nnnnne nnnnne nnnnne nnnnne nnnnne nnnnne nnnnne nnnnne
The intercom feature of your cordless phone allows you to have a 2-
y
you can still receive incoming calls. You can also use this feature for
e e
rannnnne
- Press INT on the handset. A paging tone sounds at the base and
PONNTANNNNNEA
- Wait for the person near the base to press PAGET/INTERCOM: if
eannnnnne nnnnnnne aennnnne
- When finished, press INT on the handset or PAGE/INTERCOM
on the base to stop using the intercom.
aenrnnnne aennnne nnnnne ennnnne eannnne
on the handset screen.
rreee
-
Make sure the phone is OFF (not in TALK mode).
-
Press PAGE/INTERCOM. A paging tone sounds at the handset
aannnnnne aannnnnne
3 Wait for the person with t
Note: The handset must be
rnnnne nnnnne nnnnne nnnnne nnnnne nnnnne nnnnne nnnnne nnnnne nnnnne nnnnne nnnnne nnnnne nnnnne nnnnne nnnnne nnnnne nnnnne nnnnne nnnnne nnnnne nnnnne nnnnne nnnnne nnnnne nnnnne
3 soft beeps from the base unit:
Use the FLASH/PROGRAM key on the handset or base to activate custom calling services such as Call Waiting or Call Transfer, which are available through your local phone company.
saaee
CONE
4 Press SPEAKER
TINERCOM shows on screen.
- Press PAGE/INTERCOM on the base.
P RIGING and HOLD shows on screen.
- Press IALYCALL BACK TO speak to the remote party.
rnnnne rannnne
aannnnn nnnnne
CUNF RE NCE shows on screen: Start 3 way
- Press TALK/CALL BACK on the handset
sation with the handset user.
I I I
- Press INT on the handset.
- Press SPEAKER to speak to the caller:
rreee
Conferencing after the intercom conversation
on the handset, press SPEAKER.
Tip: if you want to hang up the speakerphone and continue talking
SPEAKER on the base
- When finished, press TALK/CALL BACK on the handset and
and handset screens.
- Press SPEAKER on the base. CONFERENCE shows on the bases
on screen.
-
Dial the number you want to call. The telephone number shows
-
Press TALK/CALL BACK
Cerereee eae rreee eeee
BAS
Conference calling You can use the speakerphone and handset at the same time for a 3-way conversation with a third party. Conferencing from the base: 1. Press SPEAKER. 2. Dial the number you want to call. The number shows on screen. 3. Press TALKCALL BACK on the handset. CONFERENCE shows on the base and handset screens. When finished, press TALKCALL BACK on the handset and SPEAKER on the base. Tip: if you want to hang up the handset and continue talking on the speakerphone, press TALKCALL BACK.
- Press PAGEMARK on the base. The line is put on hold, and
- Press INT on the handset and INTERCOM shows in the base screen.
- Press PAGEMARK on the base to return to TALK mode. Note: When the handset is holding a call on intercom, you may transfer the call to the base by pressing TALKCALL BACK on the handset. When the base is holding a call in the intercom, you may transfer the call to the handset by pressing SPEAKER on the base.
Using the intercom while you are on a call You may want to use the intercom feature while you are on a call. From the handset (in TALK mode): 1. Press INT on the handset. The line is put on hold, and you will hear a paging tone at the base and handset. 2. Press PAGETI/ERCOM on the base and INTERCOM shows in the handset screen. 3. Press INT on the handset to return to TALK mode. From the base (in speakerphone mode):
BASICS
CIT-2422E-NEW 7/16/02 9:08 AM Page 18

BASICS
Tip: Do not use TALK/CALL BACK (or SPEAKER on base) to activate custom calling services such as Call Waiting, or you will hang
CHAN (Channel) key
aenrnnnne nnnnne ennnnne ennnnne ennnnne ennnnne ennnnne ennnnne ennnnne ennnnne ennnnne ennnnne ennnnne ennnnne ennnnne ennnnne ennnnne ennnnne ennnnne ennnnne ennnnne ennnnne ennnnne ennnnne ennnnne ennnnne ennnnne
HOLD key
Peeepnneeppeeppeeppeeppeeppeeppeeppeeppeeppeeppeeppeeppeeppeeppeeppeeppeeppeeppeeppeeppeeppeeppeeppeeppeeppeeppeeppeeppeeppeeppeeppeeppeeppeeppeeppeeppeeppeeppeeppeeppeeppeeppeeppeeppeeppeeppeeppeeppeeppeeppeep
Press CANCEL to cancel certain commands you initiated. Press CANCEL to hang up after finishing a call.
TONE key
aee aee eae ee aee
-
Call the bank's information line
-
Press TONE after your call is answered
-
Hang up when finished. The phone returns to Pulse service
Hnssrnnnne
Taaee aae eae aae aeae aae aae
Prrnne aenrnnnne ene eannnnnne ennnnne ennnnne ennnnne ennnnne ennnnne ennnnne ennnnne ennnnne ennnnne ennnnne ennnnne ennnnne ennnnne ennnnne ennnnne ennnnne ennnnne ennnnne ennnnne ennnnne ennnnne ennnnne ennnnne ennnnne ennnnne
you press any key on the handset:
Note: You can still page the handset with the finger of.
BASICS
To have a private, off-line conversation, use the MUTE feature. The
carker on the other end of the line cannot hear you, but you can still
hear them.
To mute the microphone.
-
Press MUTE on the handset or the base.
-
Press MUTE again to return to your phone conversation. If you
are using the handset, the incoming call indicator flashes: if you
are using the speakerphone, the MOIE key on the base hashes
FUTE shows in either
oow wannn
aannnne aannnnnne annnnnne annnnnne annnnnne annnnnne annnnnne
on screen.
VOICE MAIN USE indicator
- Flashes when you have a new voice mail
Lights when the handset is in use.
When your subscribe to a voice mail service offered by your phone
cne aee eae aeae aeae aeae aeae aeae aeae aeae aeae aeae aeae aeae aeae aeae aeae aeae aeae aeae aeae aeae aeae aeae aeae aeae aeae aeae aeae aeae aeae aeae aeae aeae aeae aeae aeae aeae aeae aeae aeae aeae aeae aeae aeae aeae aeae aeae aeae aeae aeae aeae aeae aaee
eannnnnne nnnnne eannnnnne ennnnne
mll is received. The VOICE MALIN USE indicator on the base
flashes to indicate there is a voice mail waiting. After the voice mail
haas has been reviewed hsd what it is 100f reports on screen and the
VOCICMALIN USE indicator stops flashing. - This indicator does not work with your answering machine.
Note: The phone will only work with an FSK type of VMM system. It
will not work with the Stutter Dial Tone type of VMW system.
Aepepepepepepepepepepepepepepepepepepepepepepepepepepepepepepepepepepepepepepepepepepepepepepepepepepepepepepepepepepepepepepepepepepepepepepepepepepepepepepepepepepepepepepepepepepepepepepepepepe pe
Peppepepepepepepepepepepepepepepepepepepepepepepepepepepepepepepepepepepepepepepepepepepepepepepepepepepepepepepepepepepepepepepepepepepepepepepepepepepepepepepepepepepepepepepepepepe pe
Daling a Caller ID number 1. Make sure the phone is OFF (not in TALK mode).
3 1e the 2-10-11 key to show the phone number in proper dits
9. if necessary:
4. Pres the TALK/CALL BACK on the hand the base. The number dials automatically
e e e e e e e e e e e e e e e e e e e e e e e e e e e
eerrnne eee
separately. Note: Deletin Cder ID entries on the handset and base is done
Delet ing the displayed entry
1. Make sure the phone is OFF (not in TALK mode). 2. Use the CID or keys to find the entry you want to delete.
3. While the entry is displayed, press REDIA/LDEL
4. Press REDIALDEL again to delete the entry.
e e
2. Use the CD or keys to display any entry
3. Press and hold REDIALDEL
4. DELETE ALL-2 shows on screen.
Press REDIALDEL again to erase all entries
No CALLS shows on screen.
- Press MEM again to store the number.
To view your directory, press MEM and use CID ▲ or ▼ to scroll.
Storing a name/number in the directory The phone must be OFF (not in TALK model).
Prrnne Prrnnnne Prrnnnne Prrnnnne Prrnnnne Prrnnnne Prrnnnne Prrnnnne Prrnnnne Prrnnnne Prrnnnne Prrnnnne Prrnnnne Prrnnnne Prrnnnne Prrnnnne Prrnnnne Prrnnnne Prrnnnne Prrnnnne Prrnnnne Prrannne Prrnnnne Prrnnnne Prrnnnne Prrnnnne Prrnnnne Prrnnnne Prrnnnne Prrnnnne Prrnnnne Prrnnnne Prrnnnne Prrnnnne Prrnnnne Prrnnnne Prrnnnne Prrnnnne Prrnnnne Prrnnnne Prrnnnne Prrnnnnne Prrnnnne Prrnnnne Prrnnnne Prrnnnne Prrnnnne Prrnnnne Prrnnnne Prrnnnne Prrnnnne Prrnnnne Prrnnnne Prrnnnne Prrnnnne Prrnnnne Prrnnnne Prrnnnne Prrnnnne Prrnnnne Prrnnnne Prrnn - Press the desired memory location (0 through 9) or use the
- Press MEM. The screen shows ENTER NAME
- For example, to enter the name Alice
Prrnne aenrnnnne nnnnne ennnnne
Prrnne aee
Prrrreee eae
Prrnne aen ene e ane ene ene ene ene ene ene ene ene ene ene ene ene ene ene ene ene ene ene ene ene ene ene ene ene ene
nne nne nee eae ene nee nee nee nee nee nee nee nee nee nee nee nee nee nee nee nee nee nee nee nee nee nee nee nee nee nee nee nee nee nee nee nee nee nee nee nee nee nee nee nee nee nee nee nee nee nee nee nee nee nee
when another number key is pressed. - Press MEM to save the name.
- Press MEM again. The screen shows MEM # and ENTER TEL NUMBER
- Use the number keypad to enter the telephone number you want to store (up to 24 digits), MEMO # and the telephone number you
- Press MEM again to store the number.
DIRETCY
- Make sure the phone is ON by pressing TALK on the hat SPEAKER on the base. 2. Press MEM. 3. Press a number (0 - 9) for the desired memory location. The number dials automatically.
Tip: Wait for the access tones before pressing the next memory key, or your call might not go through.
-
When you hear the access tone, press MEM and then press 8. 4. At the next access tone, press MEM and then 9.
-
Make sure the phone is in TALK mode.
Frequently called long distance number 9
- Press REDIALDEL again to delete the entry DELETED shows on
entry. The screen shows DELETE?
nne nee nne nee nee nee nee nee nee nee nee nee nee nee nee nee nee nee nee nee nee nee nee nee nee nee nee nee nee nee nee nee nee nee nee nee nee nee nee nee nee nee nee nee nee nee nee nee nee nee nee nee nee neee
nne nnnn nnnn nnnn nnnn nnnn nnnn nnnn nnnn nnnn nnnn nnnn nnnn nnnn nnnn nnnn nnnn nnnn nnnn nnnn nnnn nnnn nnnn nnnn nnnn nnnn nnnn nnnn nnnn nnnn nnnn nnnn nnnn nnnn nnnn nn
aee aae eae aee
Prrnnnne
Make sure the phone is OFF (not in JALK mode).
DIBECTORY
( x - 1) ( x + 3) = 0
Reviewing and deleting directory contents
Reviewing and deleting directory contents
aee aee eae aee aee aee aee aee aee aee aee aee aee aee aee aee aee aee aee aee aee aee aee aee aee aee aee aee aee aee aee aee aee aee aee aee aee aee aee aee aee aee aee aee aee aee aee aee aee aee aee aee aee aeee
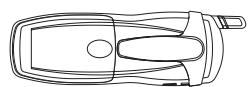
Belt clip installation Attrib the belt clin by insooing the sides of
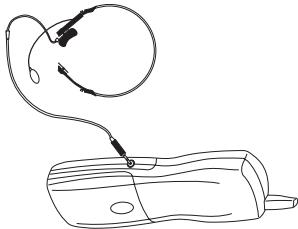
Heaedset connection (Headset not included) For hands free conversation, connect the headset (not included) to the HEADSET jack. The handset headset is connected.
HEADSET JACK AND BELT GLIP
After a power outage, place the handset in the base for about 20 seconds to reset the digital security code.
divee calls with the telephone.
POWER FAILURE
out and mail the enclosed Battery Order form. Caution:
Plese take your used battery pack to a store that recycles Ni:MH batteries.
NICKEL-METAL HYDRIDE BATTERIES MUST BE DISPOSED OF PROPERLY.
RECYCLING NICKEL-METAL HYDRIDE BATTERIES
recharged, please replace the battery.
Batty
CHANGING THE BATTERY
TELEPHONE No dial tone
- Is the base power cord connected to a working outlet?
- Is the telephone line cord connected to the base unit and the wall jack?
- Disconnect the base from the wall jack and connect another phone to the same jack. If there is no dial tone in the second phone, the problem might be your wiring or local service.
- Make sure the battery is properly charged (12 continuous hours).
Check installation:
-Is the bas - is the teke?
Disconnne
phone to the same jack. If there is no dial tone in the second
phone, the problem might be your wiring or local service - Is the handset out of range of the base?
- Make sure the battery is properly charged.
aee aee eae ee eee
Is the base power cord connected to a working outlet?
is the teke)
- Disconn the base from the wall jack and connect another
phone to the same jack. If there is no dial tone in the second
tone
ton
BCKED NAMBERS BLOCKED ,NAMES BLOCKED CALLER
ege of the hnn ne on the nannnset
N NNNNE
PAGING
or the inormation was not sent.
UNKNOWN NUMBER\`UNKNOWN NPMPE\`UNKNOWN COLLER
NNNNNNN NNNNNNN NNNNNNN NNNNNNN NNNNNNN
NBER`INKNONN NBEVE`INKNONN CER
Indicates call or calls have not been reviewed.
1
EONNNE
o the pinnone is excesxivviny.
贝
P
The following indicators show the status of a message or of the
LCD SCREEN MESSAGES
SOUND SIGNALS
A long warbling tone
Sns n an incmng call
Sns n an
A long warbling tone
A long warbling tone
A long warbling tone
A long warbling tone
A long wabbling tone
A long warbling tone
A long warbling tone
A long warbling tone
A long warbling tone
The following indicators show the status of a message or of the
SOUND SIGNALS
SOUND SIGNAL
LCD SCREEN MESSAGES SOUND SIGNALS The following indicators show the status of a message or of the A long warbling tone
A
A
- 实验原理
- 实验原理
TROUBLESH
4 short beeps every 7 seconds
THee short beeps
SOUND SIGNALS
to keep your telephone working and looking good, follow these guidelines: - Avoid putting the phone near heating appliances and devices that generate electrical noise (for example, motors or fluorescent lamps). Do not expose to direct sunlight or moisture. - Avoid dropping the phone, and other rough treatment to the phone. - Clean the phone with a soft cloth. - Never use a strong cleaning agent or abrasive powder because this will damage the finish. Periodically clean the charge contacts on the handset and base with a clean pencil eraser. - Retain the original packaging in case you need to ship the phone at a later date.
MAINTENANCE
MAINTENANCE
household appliance:
Chanee aee
hnnnne nnnnne nnnnne nnnnne nnnnne nnnnne nnnnne nnnnne nnnnne nnnnne nnnnne nnnnne nnnnne nnnnne nnnnne nnnnne nnnnne nnnnne nnnnne nnnnne nnnnne nnnnne nnnnne nnnnne nnnnne nnnnne
Babymonitorisusing the same frequency
-
Rae is installed in the basement or lower floor of the house
Atmospheric conditions, such as strong storms.
P 1
Heating ducts and other metal construction can shield radio sig
o aannn nnnnne annnnnne
Aluminum siding
Causes of poor reception
been reviewed.
is a message waiting.
indicatior flashes when
aee aee
rnnnne nnnnne
VOCHE MAIL/IN USE indicator e
VOCIE MAIL/IN USE indicator on the base flashes
( x - 1) ( x + 3) = 0
IROBULESFOUING
1
TROUBLESHOOTING
At Sanyo, fulfilling the needs of our customers is a priority. That's why we created our SOS customer service program that guarantees satisfaction.
NATIONWIDE CUSTOMER SUPPORT
SOS is there to help you. Our friendly and knowledgeable product specialists will quickly answer your questions about setup and use of Sanyo telephone products. Simply call toll free from anywhere in Canada to connect to our no-charge, SOS support and service network:
1-800-263-2244
between 8:30 am - 7:00 pm EST
Or visit our website at www.sanyoservice.com, and click the Customer Relations button to get access to our FAQ's (Frequently Asked Questions) and other helpful features.
It's a nuisance making another trip to the store when you're stuck. Now with SOS, all that's necessary is a quick call from your home for product assistance.
HASSLE-FREE EXCHANGE
Should your Sanyo telephone require servicing due to a manufacturing defect during the warranty period, SANYO Canada will ship
prepaid a replacement unit* within two business days after receivingyour defective unit . Consumers are responsible for the shipping costs
of the unit back to Sanyo.
- For older, non-current models, replacement unit case our regular warranty conditions will apply.
GUARANTEED QUALITY
All SOS replacement sets are checked and serviced by factory
SOS means you never have to worry.
C.O.D. and/or Collect shipments will not be accepted.
Unit must be returned to Sanyo in its original box with all accessories, i.e.: owner's manual, battery, adaptor, telephone cord, etc.