
CLT-W10 - Cordless phone SANYO - Free user manual and instructions
Find the device manual for free CLT-W10 SANYO in PDF.


| Product Type | 2.4 GHz Digital Cordless Phone |
| Brand | SANYO |
| Model | CLT-W10 |
| Frequency | 2.4 GHz with Frequency Hopping Spread Spectrum (FHSS) |
| Range | Greater than 43-49 MHz phones (up to several tens of meters depending on environment) |
| Number of Handsets Included | 2 handsets with additional charger |
| Maximum Number of Registrable Handsets | 4 |
| Directory Capacity | 70 names and numbers |
| Caller ID Memory | 30 entries |
| Base Power Supply | AC adapter 120 V AC / 9 V DC (model A10920) |
| Battery Type | Ni-MH 3.6 V, 750 mAh |
| Talk Time | Up to 7 hours |
| Initial Charge Time | 15 hours continuous |
| Main Features | Caller ID, Call Waiting, 3-way conference, intercom, directory, redial, mute, handset locator, keypad lock, ring tone selection |
| Display | Backlit LCD with status messages |
| Headset Jack | Yes, 2.5 mm jack (optional headset) |
| Belt Clip | Yes, included |
| Care and Cleaning | Clean with a soft cloth; do not use abrasive products; periodically clean charging contacts with an eraser |
| Safety | Use only the supplied SANYO adapter; specific battery (3.6 V, 750 mAh); do not throw into fire |
| Repairability | Battery replaceable by user; for other repairs, contact a SANYO authorized service center |
| Warranty | 1 year parts and labor (Canada) |
Frequently Asked Questions - CLT-W10 SANYO
User questions about CLT-W10 SANYO
0 question about this device. Answer the ones you know or ask your own.
Ask a new question about this device
Download the instructions for your Cordless phone in PDF format for free! Find your manual CLT-W10 - SANYO and take your electronic device back in hand. On this page are published all the documents necessary for the use of your device. CLT-W10 by SANYO.
USER MANUAL CLT-W10 SANYO
INSTRUCTION MANUAL CLT-W10
2.4 GHz
Digital Cordless Telephone with
2 Caller ID Handsets and Extra Charger
Important
Charge the handset battery for 15 continuous hours prior to first use.
SANYO Canada Inc.
www.sanyocanada.com
TABLE OF CONTENTS
INTRODUCTION. 4
GETTING STARTED. 5
Checking package contents. 5
Modular jack. 5
Choosing a location for the base unit and handset cradle 6
Connecting the base unit. 6
Connecting the handset cradle 7
Batteries 7
Charging the handset batteries. 8
NAMES AND CONTROLS. 9
Handset. 9
Base unit 10
INITIAL PROGRAMMING 11
Language 11
Handset name 11
Dial mode 11
Flash time 12
Key lock. 12
Key tone. 12
Handset ring tone 12
Handset ring volume level 13
Earpiece volume level. 13
Auto answer on / off. 13
Clear message waiting 14
BASICS 14
Standby mode 14
Receiving a call 14
Making a call 15
Correcting a dialing error 15
Redialing 15
Returning missed calls. 15
Mute key "C" 16
Handset locator (page key) 16
Low battery warning 16
Voice mail indicator 16
CALLER ID FEATURES 17
Caller ID with Call Waiting 17
TABLE OF CONTENTS
Caller ID list. 17
Reviewing Caller ID list. 17
Deleting entries from the Caller ID list. 18
DIRECTORY 18
Storing a name / number in the directory 18
Making calls from the directory 20
Deleting an entry 20
Changing a stored entry 20
Storing Caller ID entries in the directory. 20
MULTI-HANDSET CONFIGURATION 21
Registering a handset. 21
Identifying a handset on the network 21
Intercom (internal) call 21
Intercom ring tone 22
Calltoggling. 22
3-way conference call 23
Call waiting. 23
Transferring call between handsets 23
Call back 24
CHANGING THE HANDSET BATTERY 24
RECYCLING NICKEL-METAL HYDRIDE BATTERIES. 25
HEADSET JACK AND BELT CLIP 25
POWER FAILURE 26
LCD SCREEN MESSAGES 26
LIGHT SIGNALS. 27
SOUND SIGNALS 28
TROUBLESHOOTING 28
TELEPHONE 28
MULTI-HANDSET USE 29
CALLER ID. 30
CAUSES OF POOR RECEPTION 30
MAINTENANCE 31
MAXIMIZE BATTERY PERFORMANCE 31
TECHNICAL INFORMATION 33
SANYO COMFORT WARRANTY 34
SOS HELP LINE 36

The exclamation point within the triangle is a warning sign alerting you of important instructions accompanying the product.
INTRODUCTION
Congratulations on your purchase of this Sanyo digital cordless telephone. Your Sanyo 2.4 GHz digital cordless telephone is a fine-quality home communications product. It is carefully designed and produced by a world leader of consumer and industrial electronic equipment. With proper maintenance and care, it will provide you with years of enjoyment and convenience.
Main Features
2.4 GHz Technology
Superior Range – The use of 2.4 GHz frequency band for signal transmission between base and handset means greater communication range compared to conventional 43-49 MHz cordless telephones.
Ultra-Low Noise - The high frequency communication also has significantly reduced noise level.
Hopping spread spectrum - 2.4-GHz, Digital frequency hopping spread spectrum technology automatically selects a clear channel every time you receive or place a call on the handset.
COMPANDER PLUS Noise Reduction
This fourth generation of the Sanyo's original noise reduction technology now filters out more background noise.
Other features
- Caller ID memory holds up to 30 numbers
Electronic telephone book holds up to 70 numbers - Recognition of up to 4 additional handset units for making intercom (handset to handset) and 3-way calls. Two handsets are included with this product.
- Microphone mute function
- Adjustable ring tones, volume levels, language display, handset IDs, and low battery / out of range warning signals
- Rechargeable batteries and up to 7-hours of talk time
IMPORTANT: To use all of the features of this telephone, you must subscribe to either the standard Name / Number Caller ID Service or Caller ID with Call Waiting Service from your telephone company. To know who is calling while you are on the phone, you must subscribe to Caller ID with Call Waiting Service.
Checking package contents
Make sure your package includes the items shown here.
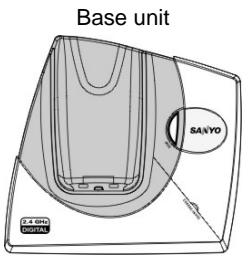
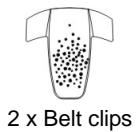
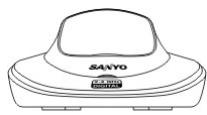
Handset cradle
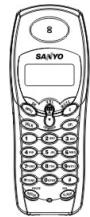
Telephone line cord
2 x Handsets
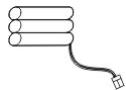
2 x Batteries
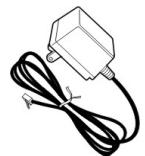

2xAC Adaptors
(A10920)

Battery order sheet
Modular jack
You need an RJ11 type modular phone jack. If you do not have a modular jack, call your local phone company to find out how to have one installed.
Installation tips
Some cordless telephones operate at frequencies that may cause interference to nearby TV, microwave ovens, and VCRs. To minimize or prevent such interference, the base of the cordless telephone should not be placed near or on top of a TV, microwave oven, or VCR. If such interference continues, move the cordless telephone farther away from these appliances.
Certain other communications devices may also use the 2.4 GHz frequency for communication and if not set properly these devices may interfere with each other and/or your new telephone. If you are concerned with interference, please refer to the owner's manual for these devices on how to properly set channels to avoid interference. Typical devices that may use the 2.4 GHz frequency for communication include wireless audio/video senders, wireless computer networks, multi-handset cordless telephone systems, and some long-range cordless telephone systems.
Choosing a location for the base unit and handset cradle
The base unit records and displays the indoor temperature, when selecting a location, observe the following guidelines:
- Choose a location that provides easy access to a 120-volt AC power source.
- Choose a location that will allow the telephone cable to reach a telephone jack. You can use an extension jack or cable if necessary.
- Place the base unit as high as possible to get a better radio frequency range with the handset. You may need to try several locations – such as upstairs, or near a first-floor landing – to find the best range. Solid structures such as walls and doors may reduce the signal strength.
- Do not place the base unit near a sink, bathtub, or shower.
- Do not place the base unit near objects that may cause radio interference, such as another telephone, large metal objects such a mirror or filing cabinet, or electrical appliances such as an electric stove, washing machine, microwave oven, television, and fluorescent lights.
- Do not place the unit near heat sources such as radiators or air ducts, or in a place subject to direct sunlight.
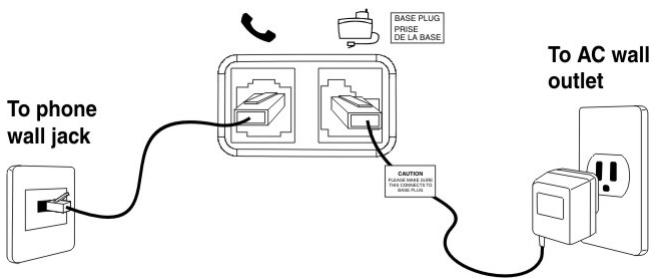
Connecting the base unit
- Plug the AC adaptor into the power jack at the back of the base. Plug the other end into an electrical outlet.
- Plug the telephone line cord into the tel. line jack at the back of the base. Plug the other end into a modular phone jack.
Note: Two adapters are shipped with this product. Please check the label on the adapter to make sure you are using the right one.
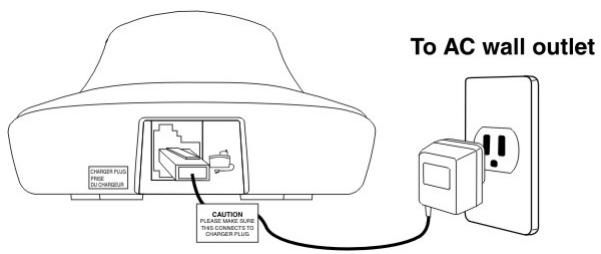
Connecting the handset cradle
Batteries
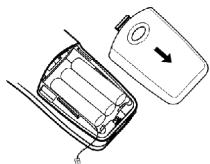
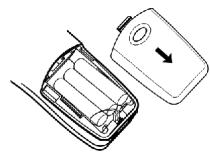
- Open the battery compartment located at the back of the handset unit.
- Plug the battery connector into the socket.
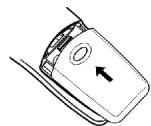
- Replace the battery compartment by sliding it in the direction shown by the arrow in the diagram to the right. The lid clicks into place when it is secured.
Charging the handset batteries
You must charge the handset batteries for 15 continuous hours the first time you use them. NOTE: When the icon appears empty and "CHARGE BATTERY" shows on the LCD screen, or if you hear a warning beep during a call, please:
End the call as soon as possible.
- Charge the handset by putting it back on the base cradle with the keypad facing outwards. The green CHARGE LED on the base unit lights up steadily to indicate that the handset is charging.
It is normal for the handset and base to get warm when the handset is charging in the base.
Caution: Use only the Sanyo AC adaptor that is supplied with this phone. Using another AC adaptor may damage the phone.
Handset
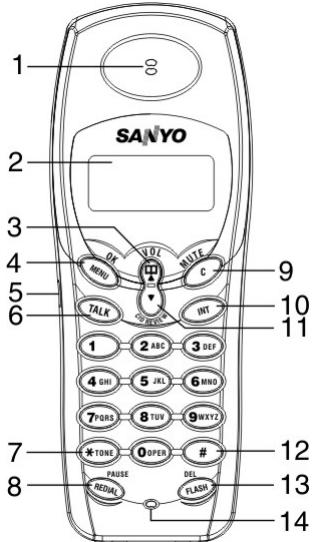
- Earpiece
- Display
- Up (▲) / Volume up / phone book
- MENU/OK
- Headset jack (head set optional)
- TALK
-
*TONE
-
REDIAL/PAUSE
- (C) Cancel / MUTE
- INT (intercom)
- Down (▼)/CID REVIEW
-
- FLASH/DEL
- Microphone
NAMES AND CONTROLS
Base unit
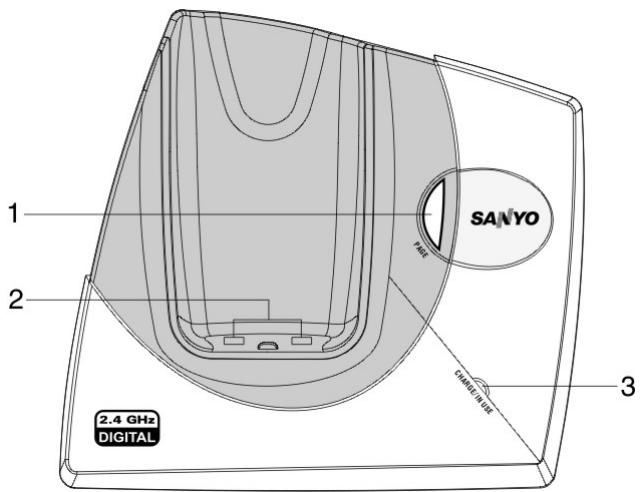
- PAGE key
- Charging contacts
- CHARGE/IN USE LED
INITIAL PROGRAMMING
Before using this telephone, the following initial settings must be completed: volume level, ring volume, ring tone, auto answer, key tone, key lock, handset name, language, phone book, call log, message waiting, and dial mode. The last 4 settings are stored on the base unit and control all handsets. The other settings must be set for each handset individually.
Language
- Press MENU/OK to enter the options menu.
- Scroll or until you see "LANGUAGE."
- Press MENU/OK to enter settings.
- Press or to select the desired language (English, Spanish, or French). The default is English.
- Press MENU/OK to confirm.
Handset name
You can use up to 16 characters to name a handset, the name will appear on the handset display screen in standby mode. To name your handset:
- Press the MENU/OK key.
- Press or to select "HANDSET NAME".
- Press MENU/OK to begin settings, "NAME" will appear.
- Enter a name for your handset.
Note: refer to Storing a name / number in the directory section for details about how to input characters on page 18.
- Press MENU/OK to save the name.
Dial mode
This phone is compatible with pulse-dialing (rotary) and tone-dialing (DTMF) systems. If you have a touch-tone service, do nothing as your phone has been set to touch-tone by default prior to shipment. If you do not know which type of service you have, contact your local telephone company. The default setting is DTMF.
- Press the MENU/OK key.
- Press or to select "DIALING" from the options.
- Press the MENU/OK key.
- Press or to select "DIAL METHOD" from the menu.
- Press MENU/OK.
- Press or to select "PULSE" or "DTMF" mode.
- Press MENU/OK to confirm your selection.
- To return to standby mode, press C repeatedly.
Flash time
Consult your telephone company before changing the Flash time setting. Changing this setting may cause your telephone company service such as call waiting to not work properly.
- Press the MENU/OK key.
- Press or to select "DIALING" from the options.
- Press the MENU/OK key.
- Press or to select "FLASH TIME" from the menu.
- Press MENU/OK.
- Press or to select "LONG" or "SHORT". The default setting is LONG.
- Press MENU/OK to confirm your selection.
Key lock
You can lock the keypad to prevent keys from accidentally being pressed. To lock the keypad:
- Press MENU/OK.
- Press or to scroll to "KEY LOCK".
- Press MENU/OK to enter the "KEY LOCK" sub menu.
- Press or to select (ON).
- Press MENU/OK to confirm settings. The default setting is OFF.
To unlock the keypad:
Press 1,5,9 to unlock the keypad.
Key lock is disabled in the event of an incoming call, but returns to key lock when the call ends.
Key lock is disabled after an emergency call.
Note: To dial an emergency number while the keypad is locked, press TALK followed by the emergency number (000,110,112,119,911,999).
Key tone
Turn this feature on to hear a click every time a key is pressed on the keypad. This option is not available when the keypad is locked. To activate the key click option:
- Press MENU/OK.
- Press or to scroll to "KEY CLICK".
- Press MENU/OK.
- Press or to select on or off.
- Press MENU/OK to confirm settings. The default setting is ON.
Handset ring tone
You have a choice of 10 ring tones for internal or external incoming calls so you can tell from the sound of the ring whether the call is coming from an external or internal source. To select a ring tone:
INITIAL PROGRAMMING
- Press the MENU/OK key.
- Press or to select "RING PATTERN" from the options,
- Press MENU/OK to select.
- Select the ring tone you wish to change (internal or external) by pressing or .
- Press MENU/OK to enter the ring tone selection submenu.
- Press or or number keys (0-9) to choose a ring tone sound (0-9).
- Press MENU/OK to confirm settings. The external ring default setting is 0. The internal ring default setting is 1.
Tip: To return to standby mode, press C repeatedly.
Handset ring volume level
To change the ring volume level while the handset is in standby mode:
- Press the MENU/OK key.
- Press or to select "RING VOLUME" from the options.
- Press MENU/OK to enter settings.
- Press (to increase) (to decrease) volume. Or press number keys (0-6) to select the desired ring level.
- Press MENU/OK to confirm settings. The default setting is 4.
Tip: You can turn the ringer off by setting the volume level to zero, the icon will be displayed on the handset display in standby mode.
Earpiece volume level
To change the volume level while the handset is in standby mode:
- Press the MENU/OK key.
- Press or to select "HANDSET VOLUME" from the menu.
- Press MENU/OK to enter settings.
- Press (to increase) (to decrease) volume. Or press number keys (0-7) to select the desired volume level.
- Press MENU/OK to confirm settings. The default setting is 4.
Tip: To change the volume while a call is in progress, press or until you reach the desired level.
Auto answer on / off
The auto-answer feature allows you to answer a telephone call as soon as you lift the handset from the cradle in the base unit.
- Press the MENU/OK key.
- Press or to find "AUTO ANSWER" from the options.
- Press MENU/OK to enter settings.
- Press or to select off or on.
- Press MENU/OK to confirm your selection. The default setting is OFF.
INITIAL PROGRAMMING
Clear message waiting
- Press the MENU/OK key.
- Press or to select "CLEAR MSG WAIT".
- Press MENU/OK. The screen will show "CONFIRM?"
- Press MENU/OK again to confirm or press C repeatedly to return to standby mode.
BASICS
When you first set your unit up, you may hear a beeping tone and see "OUT OF SERVICE" on the handset display area. This is normal, and means that the handset needs to synchronize with the base unit before you can use it. Place the handset on the charger for a few seconds until "READY" appears on the handset display.
Note: You can assign a name to the handset, When you do this your name will appear instead of "READY". For instructions on how to assign a name to a handset, refer to the Handset name section on page 11 for more information.
Standby mode
If the handset is synchronized with the base unit and is not "in use" or in "programming mode", "READY" (or a name if entered) will appear on the LCD display.
Receiving a call
When an incoming call is received the handset will ring, "EXTERNAL CALL" will show on the display, and the in-use LED on the base unit will flash*. If you are already on the line, a beep will announce you have a call waiting.
-
If you subscribe to a Caller ID service from your phone company, Caller ID information shows on the display instead of "EXTERNAL CALL".
-
Press TALK/ any key (0-9) * or # to answer a call.
Note: If the handset is in the base cradle, remove it from the base before pressing the TALK key.
If "AUTO ANSWER" is enabled, you can accept an incoming call by simply lifting the handset off the base. See the Auto answer section on page 13 for more information.
- Press TALK again to hang up.
Note: If you place the handset back to the base cradle, the handset will automatically hang up.
Making a call
- Press TALK to get a dial tone then enter the number, OR dial the number first (up to 24 digits) then press TALK.
- To end the call, press TALK again or place the handset on the base cradle, the handset will automatically hang up. "ENDED" will appear on the display to confirm that the call has ended.
Tip: The handset will display the total amount of time elapsed for each call.
Note: You can use this telephone with a PABX (Private Automatic Branch Exchange) or local telephone network. Use of your telephone with a modern system does not require special adjustment; however, with certain older systems, you may need to insert a pause between the prefix and the rest of the number. Enter a dial pause of 3 seconds by pressing REDIAL / PAUSE. A “P” will be entered after the number to show that a pause has been inserted.
Correcting a dialing error
You can correct a dialing error before the number has been dialed i.e. before pressing talk. To correct a dialing error you can do one of the following:
Press the FLASH/DEL key to clear the digits one by one.
- Press and hold FLASH/DEL to clear all the digits at once.
Press C to clear all the digits at once
Redialing (up to 24 digits)
To redial one of the last 5 numbers called, you can do one of the following:
- Make sure the phone is OFF (not in TALK mode).
- Press REDIAL/PAUSE repeatedly to select a desired last number, then press TALK to radial the last number.
OR
- Make sure the phone is ON by pressing TALK.
- Press REDIAL/PAUSE repeatedly to scroll through a list of numbers, then press MENU/OK to radial the last number.
Returning missed calls
If you subscribe to a Caller ID service through your local network provider this telephone can keep track of missed call information. When you miss a call, the handset will display "New Calls" along with the number of calls you missed. To review a call history with Caller ID information, press . Then press or to review. To dial the selected number, press the TALK key.
BASICS
MUTE key "C"
To have a private, off-line conversation, use the mute feature. The caller on the other end of the line cannot hear you, but you will be able to hear them. To mute the microphone:
- While a call is in progress, press C on the handset "MIC MUTE" will appear on the handset display.
- Press C again to return to your phone conversation, "EXTERNAL CALL" will be shown on the handset display.
Handset locator (page key)
To locate a misplaced handset, press the PAGE key on the base unit. All handsets will beep and the screen shows "PAGING". To end a page, do one of the following:
- Press TALK or any key (0-9) * or # on the handset.
- Press PAGE on the base unit.
Low battery warning
- If the battery is low and the phone is in TALK mode, a warning tone consisting of 2 short beeps will sound from the handset earpiece every 15 seconds. "CHARGE BATTERY" shows on screen.
- If the battery is low and the phone is in STANDBY mode, a warning tone consisting of 2 short beeps will sound from the handset every 15 seconds, and "CHARGE BATTERY" shows on screen.
Voice mail indicator
When you subscribe to a voice mail service offered by your phone company, the phone alerts you when voice mail has been received.MESSAGE WAITING appears on screen when a voice mail is received. The LED (orange) on the base flashes slow to indicate there is a voice mail waiting. After the voice mail has been reviewed, you can remove the message indicator. Please see the Clear message waiting section on page 14 for more information.
Note: The indicator does not work with your answering machine. The phone will only work with an FSK type of VMWI System. It will not work with the Stutter Dial Tone type of VMWI System.
CALLER ID FEATURES
This phone receives and displays incoming call information transmitted by your local phone company, provided you subscribe to Voice Mail, Caller ID, and/or Call Waiting services. This information can include the phone number and/or the name, date and time. The phone can store up to 30 calls for later review.
Caller ID with Call Waiting
When you subscribe to Caller ID with Call Waiting (Visual Call Waiting™) service from your phone company, you are able to see who is calling when you hear the Call Waiting tone. Caller identification information appears on screen after you hear the tone.
Press FLASH/DEL to put the current call on hold so that you can answer the incoming call. The following information is shown.
Tip: Do not use TALK to activate custom calling services such as Call Waiting, or you will hang up the phone.
- Caller number (up to 16 digits).
- Caller name (up to 15 characters) - If this is stored in the phonebook or supplied by your telephone network provider.
The date and time of the last call made from the number.
To return to the call, press FLASH/PROG again. - IMPORTANT: To use these features you must subscribe to either the standard Name / Number Caller ID Service or Caller ID with Call Waiting Service.
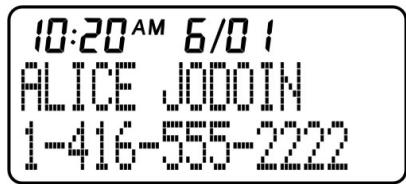
Caller ID list
The incoming caller information transmitted from the phone company is received by your phone between the first and second rings and stored in the Caller ID list. If you answer a call before the second ring, the caller information may not be stored. When the Caller ID list memory is full, a new call automatically replaces the oldest call in memory. “!” appears on screen for calls received that have not been reviewed.
Note: Check with your local phone company regarding name service availability.
Reviewing Caller ID list
All incoming calls with valid caller ID information are stored in a call log, an exclamation mark (!) to the far right of the name means that that number has not been reviewed. A call log number shown to the right of the telephone number marks the number of calls in the order that they are received (1 = the most recent). Each time a new call is received, the call log will be resorted to display the most recent call. To review the caller ID log:
CALLER ID FEATURES
- Press MENU/OK to enter the menu.
- Press MENU/OK to select "CALL LOG".
- Press to scroll through the Caller ID list from the most recent to the oldest.
- Press to scroll through the Caller ID list from the oldest to the most recent.
- Press C to exit the call log.
Tip: 1. Press in standby mode to enter call log quickly.
2. Press TALK to dial the number currently displayed.
Note: "CALL LOG EMPTY" will show if there are no calls.
Deleting entries from the Caller ID list
All handsets share a common call log that is stored in the base station memory. When more than one handset is registered to a base unit, a call log deleted in one handset will affect all handsets.
Deleting the displayed entry:
- Make sure the phone is OFF (not in TALK mode).
- Press keys to find the entry you want to delete.
- Press FLASH/DEL while the number you wish to delete is displayed. "DELETE?" shows on screen.
- Press MENU/OK to confirm the deletion or C to cancel the deletion.
Deleting all entries
- Make sure the phone is OFF (not in TALK mode).
- Press keys to display any entry.
- Press and hold FLASH/DEL. "DELETE ALL?" shows on screen.
- Press MENU/OK to confirm the deletion or C to cancel the deletion.
DIRECTORY
This telephone can store up to 70 names and telephone numbers. Names are limited to 15 characters and numbers are limited to 16 digits (including pauses 'P') and all handsets share a common phone book that is stored in the base station memory. When more than one handset is registered to a base unit, any entry stored or deleted in one handset will affect all handsets.
NOTE: Shared configurations are available where individual handsets are sold. Please check with your local distributor to find out if this option is available in your area.
Storing a name / number in the directory
-
Press MENU/OK in standby mode.
-
Press or select "PHONEBOOK", then press MENU/OK.
DIRECTORY
- Press or select "STORE", then press MENU/OK.
- At the "STORE NUMBER" display, enter number using the keypad, including any prefixes or country codes. If you make a mistake, press FLASH/DEL to delete a digit one at a time, then enter the correct digits. If you wish to add a pause, press REDIAL/PAUSE once at the desired location. Each pause counts as 1 digit in the dialing sequence.
- Press MENU/OK.
- At the "STORE NAME" display, enter the name using the keypad. The cursor advances 1 space after each key press. Within 1 second, you can press the same key again to select another character. If you make a mistake, press FLASH/DEL to delete a character one at a time, then enter the correct character. Use the chart below as a guide.
- Press MENU/OK to confirm. A beep tone will confirm that the number has been saved.
| Key | key of times pressed | ||||||||
| 1st | 2nd | 3rd | 4th | 5th | 6th | 7th | 8th | 9th | |
| 1 | Space | 1 | |||||||
| 2 | A | B | C | 2 | a | b | c | ||
| 3 | D | E | F | 3 | d | e | f | ||
| 4 | G | H | I | 4 | g | h | i | ||
| 5 | J | K | L | 5 | j | k | l | ||
| 6 | M | N | O | 6 | m | n | o | ||
| 7 | P | Q | R | S | 7 | p | q | r | s |
| 8 | T | U | V | 8 | t | u | v | ||
| 9 | W | X | Y | Z | 9 | w | x | y | z |
| 0 | 0 | ||||||||
| * | * | ? | ! | / | ( | ) | |||
| # | # | , | - | . | & | ||||
Tip:
- Press FLASH/DEL to clear the last character, press and hold FLASH/DEL to clear all.
To return to "STANDBY MODE", press C repeatedly.
Note: If you try to store a new number in the phonebook when it is full, a message “PHONEBOOK FULL” is displayed and the phone returns to the phonebook menu after 5 seconds. You should delete some numbers to free up the phonebook memory so that you may store new numbers.
DIRECTORY
Making calls from the directory
- Press MENU/OK, Press or to select "PHONE BOOK", then press MENU/OK.
- Press or to select "RECALL", then press MENU/OK.
- Press or or enter the first character of the name to select the desired phonebook entry.
- Press TALK to call. Tip: Press in standby mode to enter phonebook log quickly.
Deleting an entry
To delete an entry from the telephone book:
- Press MENU/OK, Press or to select "PHONE BOOK", then press MENU/OK.
- Press or to select "RECALL", then press MENU/OK.
- Press or or enter the first character of the name to select the desired phonebook entry.
- Press FLASH/DEL. "DELETE?" shows on screen.
- Press MENU/OK to confirm or C to go back. Result: Confirmation tone can be heard and the menu steps to the next entry.
Changing a stored entry
To change an entry in the telephone book:
1. Press MENU/OK then select "PHONE BOOK" by pressing or
2. Press MENU/OK
3. Press or to select "RECALL", then press MENU/OK.
4. Press or or enter the first character of the name to find the desired phonebook entry.
5. Press MENU/OK to edit the number, "STORE NUMBER" will appear.
6. Press FLASH/DEL or to erase a digit. Press and hold FLASH/DEL to erase the entire number, then enter the correct number.
7. Press MENU/OK to edit the name, "STORE NAME" will appear.
8. Press FLASH/DEL or to erase a character. Press and hold FLASH/DEL to erase the entire name, then enter the correct name.
9. Press MENU/OK to confirm the change.
Result: A beep will sound to confirm that the change has been saved.
Storing caller ID entries in the directory
You can store received numbers into your phonebook memory. Before you save an entry, make sure the number appears in proper digits for your dialing area. If not, change it using the REDIAL/PAUSE key. For example, if the caller ID number
DIRECTORY
The REDIAL/PAUSE key lets you select how many digits of the number are displayed:
7 7-digit telephone number.
10 3-digit area code + 7-digit telephone number.
11 Long distance code 1 + 3-digit area code + 7-digit telephone number.
- Press in standby mode to enter call log quickly.
- Press or to select desired Caller ID entry.
- Press REDIAL/PAUSE to rearrange the format of the number displayed.
- Press MENU/OK, "STORE NUMBER" will appear.
- Edit the number if necessary.
- Press MENU/OK to edit the name, "STORE NAME" will appear.
- Edit the name if necessary.
- Press MENU/OK to confirm the change.
Result: A beep will sound to confirm the changes.
MULTI-HANDSET CONFIGURATION
Registering a handset
The original handsets provided are automatically registered the first time you set up the telephone. You may need to register handsets under the following if you are replacing a faulty handset. (See the Troubleshooting section on page 29 if you are experiencing problems with the handset).
Note: If you register a handset to more than one base, you will need to rename the handset for that base. Otherwise, the base will recognize it as "Handset 1".
To register handset:
- Press the MENU/OK key.
- Press or to select "REGISTER", then press MENU/OK to confirm.
- When the handset display shows "PLEASE WAIT", press and hold PAGE on the base until IN USE LED (red) flashes fast.
- If the registration is successful "SUCCEED" will show on the handset display.
Note: If the registration is unsuccessful "FAIL" will show on the handset display. In this case, you should try again.
Identifying a handset on the network
You can identify each handset by assigning a name to it. Please see the Handset Name Setting section on page 11 for more information.
Intercom (internal) call
MULTI-HANDSET CONFIGURATION
- Press INT on the first handset.
- Press or to select the desired handset or choose "CALL ALL".
- Press TALK to place the call. The selected handset will ring. If you select "CALL ALL", all other handsets registered to the base unit will ring. If the selected handset is not available (off hook, on another call), "BUSY" shows.
- To accept the intercom call on the handset, press TALK.
- To exit intercom mode on the first handset, press TALK.
Note: During the first handset calls the other handsets, there may be an incoming call in which the first handset will hear a call waiting tone and the other handset will return to normal incoming call tone.
Intercom ring tone
You can change the ring tone for an intercom call to differentiate internal from external calls. To change the ring tone please see the Handset Ring Tone Setting section on page 12 for more information.
Call toggling
This feature only works if you have 2 handsets registered to the base unit. The feature allows you to put an external call on hold while you place an intercom call to another handset. Only the handset that initiates call toggling can place callers on hold or end the call.
- Establish contact with an external party by either placing a call or answering an incoming call.
- Press INT to put the external call on hold and enter intercom mode.
- Press the number (1-4) for the handset you wish to select, or use the or keys to select the handset.
- Press TALK to place an intercom call to the selected handset. "H" shows on the display to indicate the external call is on hold.
- Press INT key on the handset that initiates call toggling to place the intercom on hold and return to the external call.
- Press TALK key on the selected handset to end the intercom call and return to the external call.
Note: If the selected handset is not available, "BUSY" shows and then a callback is generated. "CALL BACK" is displayed on the handset display. You can press TALK to return to the caller.
MULTI-HANDSET CONFIGURATION
3-way conference call
If you have 2 handsets registered with the base unit, you can make 3-way conference calls between an external call party and two internal handset holders. To initiate a 3-way conference call:
- Establish contact with the external party by either placing a call to that person, or answering an incoming call.
- Press INT then press or to choose a handset name, press TALK to connect to the selected handset.
Result: The handset you paged rings. The internal party can answer the call by pressing the TALK key.
- The caller who made the conference call should press and hold INT for approximately 2 seconds until "CONFERENCE CALL" shows on the display and you hear a confirmation beep on the earpiece.
Result: All three parties are connected and can talk together.
Tip: You can end a 3-way conference call exactly as you would any other call. Just press TALK. The connection continues between the remaining handset and the external party.
Tip: If a handset is connected to an external line, you can initiate a conference call from another handset by simply picking up the handset and pressing TALK. The first handset can hear a beeping sound and "CONFERENCE CALL" shows on the display.
Call Waiting
If you receive an external call while you are talking to someone through the intercom, you will hear a call waiting tone. To end the intercom call and answer the external call, press TALK key on any handset. The other handset will beep and "BUSY" will show on the screen. To end the intercom call without answering the external call, press and hold INT for several seconds. Please also see the Caller ID with Call Waiting section on page 17 for more information.
Transferring call between handsets
You can transfer an external call from one handset to another if you have 2 handsets registered with the base unit. To transfer a call:
- During a telephone conversation, press the INT key to place the caller on hold.
- Press or to choose the handset name to which you wish to transfer the call.
-
Press TALK. Then wait for the other handset to answer. The handset you paged will ring, with "INTERNAL CALL" showing on the LCD display. Another party can answer the call by pressing TALK.
-
Then press TALK key on the first handset, and another handset will connect to the external line. If there is no answer, press INT again to return to the caller. OR
MULTI-HANDSET CONFIGURATION
- During a telephone conversation, press the INT key to place the caller on hold.
- Press or to choose the handset name to which you wish to forward the call.
- Press TALK to connect to the selected handset. Then press TALK again or place the handset in the charger. You do not need to wait for the other handset to answer.
- The selected handset will ring and "FORWARDED CALL" will show on the LCD display. Another party can answer the call by pressing TALK.
Note: If you forward call to all handsets, all of them (including the one from which you are making the call) ring at the same time.
Call back
After a call forward function has been executed, a call back is generated in the forwarding handset if the forwarding call is not answered within 30 seconds. If no caller ID information is available, "CALL BACK" is displayed on the handset display. Press TALK to return to the call.
Note: If the returned call is not answered within 30 seconds the call automatically goes off the hook.
CHANGING THE HANDSET BATTERY
Battery replacement and handling
When the handset operating time becomes short even after a battery has been recharged, please replace the battery.
With normal usage, your battery should last about one year.
For a replacement battery, please contact your place of purchase or fill out and mail the enclosed form.
Caution:
Use only the specified battery type (3.6V, 750mAh).
Do not remove the battery from the handset to charge it.
Never throw the battery into a fire, disassemble it, or heat it.
Do not remove or damage the battery casing.
Remove the battery if you are storing the phone for more than 30 days.
Replacing the battery
- Make sure the telephone is turned off.
- Slide off the battery compartment cover.
CHANGING THE HANDSET BATTERY
- Disconnect the battery plug from the jack in the compartment and remove the battery pack.
- Insert the new battery pack and connect the cord into the jack.
Note: Please refer to the pictures in the Getting started section on page 7
- Put the battery compartment cover back on.
- Place handset on the base to charge for 15 hours.
Note: Charge the handset battery for 15 continuous hours prior to first use. The initial battery charge is important to ensure best performance.
Caution: To reduce the risk of fire or personal injury, use a 3.6 V, 750mAh battery. Replacement part number: GESPC3F03.
RECYCLING NICKEL-METAL HYDRIDE BATTERIES
NICKEL-METAL HYDRIDE BATTERIES MUST BE DISPOSED OF PROPERLY.
Please take your used battery pack to a store that recycles Ni-MH batteries.

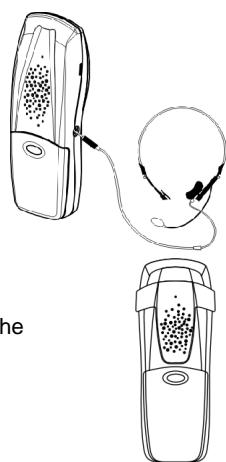
HEADSET JACK AND BELT CLIP
Headset connection (headset not included)
An optional headset can be used with your telephone for hands free conversation. To use a headset, plug it into the HEADSET jack located on the side of the handset. When the headset is connected, the handset earpiece and microphone are disabled. While the headset is connected, press TALK to answer or place a call.
Belt clip
To attach the belt clip to the back of the handset:
- Slide the belt clip over the back of the handset until the ventilation holes are aligned.
- Gently push the belt clip until it clicks into place.
POWER FAILURE
When power is off, you will not be able to make or receive calls with the telephone.
After a power outage, it may take a few seconds for the handset to reconnect to the base unit.
LCD SCREEN MESSAGES
The following indicators show the status of a message or of the phone.
| BASE PAGING | Someone has pressed PAGE on the base unit |
| BUSY | The dialed number or handset is busy |
| CALL ALL | An intercom call has been placed to all registered handsets |
| CALL BACK | A forwarded call was not answered |
| CHARGING | Battery is charging |
| CONFERENCE CALL | 2 handsets are on a conference call |
| ENDED | The call has ended. The elapsed time for the call also shows. |
| EXT IN USE | Another handset is already on an external call |
| EXTERNAL CALL | A call was received with no Caller ID information provided |
| FAIL | Registration did not occur |
| H | A call has been placed on hold |
| INTERNAL CALL | An intercom call has been placed from the displayed handset |
| HANDSET # / HANDSET NAME | |
| MIC MUTE | The handset is in mute mode |
| PRIVATE # / NAME / CALLER | Some or all of the Caller ID information was blocked |
| READY | Phone is charged and ready to make or receive calls |
| TALK | Phone is in Talk mode (ready to place a call or on a call). If on a call, the duration of the call also shows |
| UNKNOWN # / NAME / CALLER | Some or all of the Caller ID information was not sent with the call |
| FORWARD CALL | A call has been forwarded |
| DELETE? | Prompt asking you if you want to erase the current Caller ID entry or a directory entry that is shown on screen |
| DELETE ALL? | Prompt asking you if you want to erase all Caller ID information |
| MESSAGE WAITING | Caller has left a message (you must subscribe to voice mail service offered by your local phone company for this to work) |
| STORE NUMBER | Prompt telling you to enter a telephone number in the directory |
| STORE NAME | Prompt telling you to enter a name in the directory |
| PHONEBOOK EMPTY | There is no record stored to the selected directory location |
| CALL LOG EMPTY | There is no record stored to the selected call log location |
| NO LINE | Telephone line is disconnected from base unit |
| KEY LOCKED | The keypad is locked |
| OUT OF SERVICE | When the handset is out of range or the base unit power failure |
| CHARGE BATTERY | When the battery is low |
| PLACE IN CHARGER | The battery voltage is too low |
| RINGER OFF | The ringer is switched off |
LIGHT SIGNALS
The charge/in use indicator will change under the following conditions.
CHARGE/IN USE LED on the base
| Talking | Lit steadily (red) |
| Charging | Lit steadily (green) |
| Incoming call | Flashes in same pattern as telephone ring (red) |
| Voice mail | Flashes every 2 seconds (red) |
| No telephone line | Flashes every 1 seconds (red) |
SOUND SIGNALS
| A long warbling tone | Signals an incoming call |
| Single tone | A key is pressed |
| Two short beeps | Call waiting / MIC mute |
| One long beep | Confirmation tone / Page signal / Call back |
| Three short beeps | Error tone / Out of range |
| Two short beeps every 15 seconds | Low battery warning |
TROUBLESHOOTING
TELEPHONE
No dial tone
Check installation:
- Is the base unit plugged into the telephone line and AC power source? If the telephone line is not properly connected to the base unit NO LINE will appear on the handset display.
Is the AC power source turned on at the socket?
Are the batteries properly installed in the handset?
Dial tone is OK, but cannot dial out
Try moving the handset closer to the base unit.
- If this doesn't work, try a different position for the base unit. Typically, the higher you place the base unit, the better the reception.
- The battery charge level may be low. Check the LCD display for the low battery-warning signal. If the battery is low, place the handset in the base unit's charging cradle to charge.
- Check the power connection by switching off the power at the main socket, waiting a few seconds, then switching it back on.
- Check to make sure that the phone and base unit are with in transmission range.
- The handset may be unable to find the base unit. Try moving the handset closer to the base unit. If the problem persists, try moving the base unit in a suitable position nearer to the handset.
- If you have registered additional handsets to the same base unit, make sure they are not already on a call. The LCD display on your handset will display the EXT IN USE symbol if the line is engaged.
- The dial mode setting may be incorrect. See the Dial mode section on page 11 for more information.
TROUBLESHOOTING
Handset does not ring
- Check that you have not turned off the ringer volume level. Refer to Handset ring volume level section on page 13 for more information.
- You may have too many extension phones on your line. Try unplugging some phones.
Call was disconnected
Please move the handset closer to the base unit. You may want to consider moving the base unit to achieve a greater transmission range.
Keys do not work / O-Ti shows on screen
The symbol means that the keypad lock feature has been activated. See the Keylock section on page 12 for more information.
Phone beeps
- The battery may need to be recharged. Put the handset into the charging cradle of the base unit. It may take up to 15 hours to fully recharge the battery.
- Your handset may temporarily lose its synchronization with the base unit due to radio interference in your area. When this happens, "OUT OF SERVICE" shows on handset LCD. You can move closer to the base unit to help reduce your telephone's susceptibility to radio interference. If you do not wish to hear the beep tone, you can turn it off following the instructions under the Key tone section on page 12.
Low battery warning
If you just recharged the batteries, but keep getting a low battery warning, the batteries may need to be replaced. Rechargeable batteries gradually lose their ability to store a charge the older they get. Replace the battery with a new one.
MULTI-HANDSET USE
Cannot register handset
- Sometimes it helps to unplug and then reconnect your base unit to its AC power source before you start the registration procedure.
- You may have already registered 4 handsets to the base unit.
- If you are replacing a faulty handset, make sure you have fully removed the faulty one before registering the new one. Refer to the Registering a handset section on page 21 for more information.
TROUBLESHOOTING
If you are still experiencing problems, you may need to reset all the registrations then start over.
Cannot dial out
Only one outside call and one intercom call can take place at the same time. Make sure no one else is already using the phone; if so, you will see the EXT IN USE symbol on the handset display area.
All handsets show "OUT OF SERVICE" and telephone will not work
Reset your telephone, and then try the registration process again. If you are still experiencing problems, reset and then re-register all your handsets one-by-one.
CALLER ID
No Caller ID display
- You must subscribe for caller ID services through your telephone network provider for the caller ID to display on this telephone. Please check with your provider.
- If the caller's number does not exactly match what you have entered in your phone book, including the STD code and any prefixes, the phone book cannot match the name to the caller ID. Check the phone book to make sure the full number is stored there in the correct sequence.
Is battery fully charged? Try recharging or replacing the battery. - Make sure that the base is connected to a non-switched AC outlet. Disconnect the base from the plug and plug it in again.
Caller ID error message
- The phone displays this message if it detects anything other than valid Caller ID information during the silent period after the first ring. This message indicates either the presence of noise on the line, or that an invalid message has been sent from the telephone company.
CAUSES OF POOR RECEPTION
Aluminum siding.
- Foil backing on insulation.
Heating ducts and other metal construction can shield radio signals.
You are too close to appliances such as microwaves, stoves, or computers.
- Atmospheric conditions, such as strong storms.
TROUBLESHOOTING
- Base unit is installed in the basement or lower floor of the house.
- Base unit is plugged into an AC outlet with other electronic devices.
- Baby monitor is using the same frequency.
Handset battery is low.
You are out of the base unit's transmission range.
MAINTENANCE
To keep your telephone working and looking good, following these guidelines:
- Avoid putting the phone near heating appliances and devices that generate electrical noise (for example, motors or fluorescent lamps).
- Do not expose to direct sunlight or moisture.
- Avoid dropping the phone, and other rough treatment to the phone.
Clean the phone with a soft cloth. - Never use a strong cleaning agent or abrasive powder because this will damage the finish.
Periodically clean the charge contacts on the handset and base with a clean pencil eraser. - Retain the original packaging in case you need to ship the phone at a later date.
MAXIMIZE BATTERY PERFORMANCE
The freedom that your cordless telephone can offer is fully dependent on the performance of the rechargeable battery in the handset. To maximize the battery performance, follow these guidelines:
Charge the battery for a full 15 continuous hours
Before initial use of your new battery, charge it for 15 hours continuously. The proper initial charging is very important to maximize the battery performance.
Keep the contacts clean
You can never fully recharge the battery if the contacts are dirty. Clean all the contacts (two at the bottom of handset and two in the base cradle) periodically using a pencil eraser.
MAXIMIZE BATTERY PERFORMANCE
Do not replace the handset in the base after each call
Repeated short charging creates a memory effect in the battery. Once a rechargeable battery acquires this "short memory", it sends a "CHARGE BATTERY" signal even when it is almost fully charged. The battery then needs to be charged frequently. To avoid this, leave the handset away from the cradle until it really needs recharging.
Refresh battery
If your battery seems to need recharging more often than usual, it may have lost part of its charging capacity because of premature recharges. To bring back its full capacity, try "refreshing" the battery:
- First discharge the battery by leaving the handset in TALK mode until Battery Low indication turns on. (Disconnect the base from the telephone line, so that your line is not busy all the time.)
- Then charge it for 15 continuous hours.
- Repeat the above once more.
REN Number:
The Ringer Equivalence Number (REN) assigned to each terminals device provides an indication of the maximum number of terminal allowed to be connected to a telephone interface.
The REN number of this phone is located on the bottom of the base unit. The termination on an interface may consist of any combination of device subject only to the requirement that the sum of the Ringer Equivalence Numbers of all the devices does not exceed 5.
CAUTION
This product is intended for use in CANADA only. Sale or use in other countries may violate local laws.
Cordless telephones use radio frequencies to allow mobility. This affects performance of your phone.
1. NOISE
Electrical pulse noise is present in most homes at one time or another. This is most intense during electrical storms. Certain kinds of electrical equipment, such as light dimmers, fluorescent bulbs, motors, fans, etc., also generate pulse noise.
Because radio frequencies are susceptible to this, you may on occasion hear pulse noise through the handset. This is usually only a minor annoyance and should not be interpreted as a defect of the phone.
2. RANGE
Because radio frequencies are used, the location of the base station can affect the operating range of the phone. Try several locations and choose the one that gives the clearest signal to the handset. (Turning in a circle while
holding the handset may also increase the operating range.)
3. INTERFERENCE
Electronic circuits activate a relay to connect the unit to your telephone line. These electronic circuits operate in the radio frequency spectrum. While several protection circuits are used to prevent unwanted signals, there may be periods when these unwanted signals enter the base station. You may hear a click or hear the relay activate when you are not using the cordless handset. If this occurs frequently, you can minimize or eliminate the problem by lowering the height of the base station or relocating the base station. It may also be helpful to change the operating channel and/or the security code setting.
Operation is subject to the following two conditions: (1) this device may not cause interference, and (2) this device must accept any interference, including interference that may cause undesired operation of the device.
NOTICE:
Privacy of communications may not be ensured when using this telephone. Other devices, including other cordless telephones, may interfere with the operation of this cordless telephone or cause noise during operation. Units without coded access may be accessed by other radio communication systems. Cordless telephones must not cause interference to any licensed radio service.
The Industry Canada Label identifies certified equipment. This certification means that the equipment meets certain telecommunications network protective, operational and safety requirements. The ministry does not guarantee that the
equipment will operate to the user's satisfaction.
Before installing this equipment, users should ensure that it is permissible to be connected to the facilities of the local telecommunications company. The equipment must also be installed using an acceptable method of construction. In some cases, the company's inside wiring associated with single-line individual service may be extended by means of a certified connector assembly (telephone extension cord). The customer should be aware that compliance with the above conditions may not prevent degradation of service in some situations.
Repairs to certified equipment should be made by an authorized Canadian maintenance facility designated by the supplier. Any repairs or alterations made by the user to this equipment, or equipment malfunctions, may give the telecommunications company cause to request that the user disconnect the equipment.
The user should ensure for his own protection that the electrical ground connections of the power utility, telephone lines and internal metallic water pipe system, if present, are connected together. This precaution
may be particularly important in rural areas.
CAUTION
Users should not attempt to make such connections themselves, but should contact the appropriate electrical inspection authority, or electrician, as appropriate.
The exclamation point within an equilateral triangle is intended to alert the user to the presence of important operating and maintenance (servicing) instructions in the literature accompanying the product.
This symbol on the product is used to identify the following important information. Use only with specified SANYO power adaptor.
NOTICE: This equipment meets the applicable Industry Canada Terminal Equipment Technical Specifications. This is confirmed by the registration number. The abbreviation, IC, before the registration number signifies that registration was performed based on a Declaration of Conformity indicating that Industry Canada technical specifications were met. It does not imply that Industry Canada approved the equipment.
SANYO COMFORT WARRANTY
WARRANTY APPLICATION
Sanyo Communications products purchased new, unused in Canada through a Sanyo Authorized Dealer are warranted against manufacturing defects in materials and workmanship for ONE YEAR covering parts and labour, from the date of purchase by the original retail purchaser. This warranty only applies in favour of the original
retail purchaser of the warranted product.
SANYO CANADA INC.'S RESPONSIBILITY
During the warranty period, SANYO Canada Inc. will repair, or at our option, replace a Communications product which shows evidence of a manufacturing defect in materials or workmanship. Replacement PARTS are
warranted for the remaining portion of the warranty period.
WHAT IS NOT COVERED
a. Communications products purchased outside Canada.
b. Communications products purchased in a used condition.
c. Communications products purchased from non Sanyo-authorized dealer.
d. Communications products not intended for Canadian usage or products without appropriate Canadian regulatory approvals.
e. Problem due to product set-up and installation.
f. Adjustments that are outlined in the Operating Manual.
g. Accessory items including antenna and batteries.
h. Damage in or due to transportation.
i. Damage due to improper maintenance, accident, abuse, misuse or negligence.
j. Damage caused by lightning and power surges.
ORIGINAL RETAIL PURCHASER'S RESPONSIBILITY
You, the original retail purchaser, must present your original, dated bill-of-sale together with this warranty to SANYO Canada Inc. or to an authorized Sanyo Service Depot when you make a claim under this warranty.
You, the original retail purchaser, are responsible for any costs of TRANSPORTING the product to and from SANYO Canada Inc. or an authorized Sanyo Service Depot. You also are responsible for the cost of any MAINTENANCE necessary in respect of the product.
WARRANTY BECOMES VOID
This warranty becomes void if the product's serial numbers are altered or removed or if any repair to the product is made other than by SANYO Canada Inc. or by an authorized Sanyo Service Depot.
LIMITATIONS
a. SANYO Canada Inc. reserves the right to change or improve the design of the model of the product warranted hereunder without incurring any obligation to make any modifications to or to install any improvement in or on the product.
b. In no event shall SANYO Canada Inc. or any of its Authorized Dealers be liable for special or consequential damage arising from the use of this product.
STATUTORY WARRANTY
The above provisions do not preclude the operation of any applicable provincial statute which in certain circumstances may not allow some of the limitations and exclusions described in this warranty. Where any terms of this warranty are prohibited by such a statute, they shall be deemed null and void but the remainder of this warranty shall remain in effect.
HOW TO OBTAIN WARRANTY SERVICE
Please contact the Sanyo Authorized Dealer from whom the product was purchased, or contact us directly at:
SANYO Canada Inc.
1-300 Applewood Cres.
Concord, Ont. L4K 5C7
(905) 760-9944
1-800-263-2244
SOS HELP LINE
At Sanyo, fulfilling the needs of our customers is a priority. That's why we created our SOS customer service program that guarantees satisfaction.
NATIONWIDE CUSTOMER SUPPORT
SOS is there to help you. Our friendly and knowledgeable product specialists will quickly answer your questions about setup and use of Sanyo telephone products. Simply call toll free from anywhere in Canada to connect to our no-charge, SOS support and service network:
1-800-263-2244 between 8:30 am - 7:00 pm EST
Or visit our website at www.sanyoservice.com, and click the Customer Relations button to get access to our FAQ's (Frequently Asked Questions) and other helpful features.
It's a nuisance making another trip to the store when you're stuck. Now with SOS, all that's necessary is a quick call for your home for product assistance.
HASSLE-FREE EXCHANGE
Should your Sanyo telephone require servicing due to a manufacturing defect during the warranty period. SANYO Canada will ship prepaid a replacement unit* within two business days after receiving your defective unit. Consumers are responsible for the shipping costs of the unit back to Sanyo.
For older, non-current models, replacement units may not be available, in which case our regular warranty conditions will apply.
GUARANTEED QUALITY
All SOS replacement sets are checked and serviced by factory-authorized technicians before being sent out.
SOS means you never have to worry.
C.O.D. and/or Collect shipments will not be accepted.
Unit must be returned to Sanyo in its original box with all accessories, i.e.: owner's manual, battery, adaptor, telephone cord, etc.
- INSTRUCTION MANUAL CLT-W10
- GHz
- Digital Cordless Telephone with
- Caller ID Handsets and Extra Charger
- Important
- TABLE OF CONTENTS
- INTRODUCTION. 4
- GETTING STARTED. 5
- NAMES AND CONTROLS. 9
- INITIAL PROGRAMMING 11
- BASICS 14
- CALLER ID FEATURES 17
- DIRECTORY 18
- MULTI-HANDSET CONFIGURATION 21
- CHANGING THE HANDSET BATTERY 24
- RECYCLING NICKEL-METAL HYDRIDE BATTERIES. 25
- HEADSET JACK AND BELT CLIP 25
- POWER FAILURE 26
- LCD SCREEN MESSAGES 26
- LIGHT SIGNALS. 27
- SOUND SIGNALS 28
- TROUBLESHOOTING 28
- MAINTENANCE 31
- MAXIMIZE BATTERY PERFORMANCE 31
- TECHNICAL INFORMATION 33
- SANYO COMFORT WARRANTY 34
- SOS HELP LINE 36
- INTRODUCTION
- Main Features
- GHz Technology
- COMPANDER PLUS Noise Reduction
- Other features
- Checking package contents
- Modular jack
- Installation tips
- Choosing a location for the base unit and handset cradle
- Connecting the base unit
- Connecting the handset cradle
- Batteries
- Charging the handset batteries
- NAMES AND CONTROLS
- Base unit
- INITIAL PROGRAMMING
- Language
- Handset name
- Dial mode
- Flash time
- Key lock
- Key tone
- Handset ring tone
- Handset ring volume level
- Earpiece volume level
- Auto answer on / off
- Clear message waiting
- BASICS
- Standby mode
- Receiving a call
- Making a call
- Correcting a dialing error
- Redialing (up to 24 digits)
- OR
- Returning missed calls
- MUTE key "C"
- Handset locator (page key)
- Low battery warning
- Voice mail indicator
- CALLER ID FEATURES
- Caller ID with Call Waiting
- Caller ID list
- Reviewing Caller ID list
- Deleting entries from the Caller ID list
- Deleting the displayed entry:
- Deleting all entries
- DIRECTORY
- Storing a name / number in the directory
- Tip:
- Making calls from the directory
- Deleting an entry
- Changing a stored entry
- Storing caller ID entries in the directory
- MULTI-HANDSET CONFIGURATION
- Registering a handset
- To register handset:
- Identifying a handset on the network
- Intercom (internal) call
- Intercom ring tone
- Call toggling
- 3-way conference call
- Call Waiting
- Transferring call between handsets
- Call back
- CHANGING THE HANDSET BATTERY
- Battery replacement and handling
- Caution:
- Replacing the battery
- RECYCLING NICKEL-METAL HYDRIDE BATTERIES
- HEADSET JACK AND BELT CLIP
- Headset connection (headset not included)
- Belt clip
- POWER FAILURE
- LCD SCREEN MESSAGES
- LIGHT SIGNALS
- CHARGE/IN USE LED on the base
- SOUND SIGNALS
- TROUBLESHOOTING
- TELEPHONE
- No dial tone
- Check installation:
- Dial tone is OK, but cannot dial out
- Handset does not ring
- Call was disconnected
- Keys do not work / O-Ti shows on screen
- Phone beeps
- MULTI-HANDSET USE
- Cannot register handset
- Cannot dial out
- All handsets show "OUT OF SERVICE" and telephone will not work
- CALLER ID
- No Caller ID display
- Caller ID error message
- CAUSES OF POOR RECEPTION
- MAINTENANCE
- MAXIMIZE BATTERY PERFORMANCE
- Charge the battery for a full 15 continuous hours
- Keep the contacts clean
- Do not replace the handset in the base after each call
- Refresh battery
- REN Number:
- CAUTION
- NOISE
- RANGE
- INTERFERENCE
- NOTICE:
- SANYO COMFORT WARRANTY
- WARRANTY APPLICATION
- SANYO CANADA INC.'S RESPONSIBILITY
- WHAT IS NOT COVERED
- ORIGINAL RETAIL PURCHASER'S RESPONSIBILITY
- WARRANTY BECOMES VOID
- LIMITATIONS
- STATUTORY WARRANTY
- HOW TO OBTAIN WARRANTY SERVICE
- SOS HELP LINE
- NATIONWIDE CUSTOMER SUPPORT
- 1-800-263-2244 between 8:30 am - 7:00 pm EST
- HASSLE-FREE EXCHANGE
- GUARANTEED QUALITY
Brand : SANYO
Model : CLT-W10
Category : Cordless phone