
Turbo - Controller Sven - Free user manual and instructions
Find the device manual for free Turbo Sven in PDF.


| Product Type | Game Controller |
| Model | Turbo |
| Brand | Sven |
| Connectivity | Wireless (2.4 GHz) |
| Compatible Platforms | PC, PlayStation, Xbox, Nintendo Switch |
| Battery Type | Rechargeable Li-ion, 600 mAh |
| Battery Life | Up to 10 hours |
| Charging Port | USB-C |
| Dimensions (L x W x H) | 160 x 110 x 65 mm |
| Weight | 250 g |
| Main Functions | Analog sticks, D-pad, action buttons, shoulder buttons, turbo mode, vibration feedback |
| Turbo Mode | Configurable rapid-fire for any button |
| Vibration | Dual motor dual rumble |
| Motion Controls | 6-axis gyroscope |
| Programmable Buttons | 2 extra back paddles |
| Wireless Range | Up to 10 m |
| Materials | ABS plastic, rubberized grip |
| Maintenance | Clean with a soft dry cloth. Avoid liquids. |
| Safety | Do not disassemble. Keep away from heat and moisture. |
| Spare Parts | Battery selection, thumbsticks, faceplates (not included) |
| Repairability | User-replaceable thumbsticks and battery (screwdriver required) |
| Warranty | 1 year limited |
Frequently Asked Questions - Turbo Sven
User questions about Turbo Sven
0 question about this device. Answer the ones you know or ask your own.
Ask a new question about this device
Download the instructions for your Controller in PDF format for free! Find your manual Turbo - Sven and take your electronic device back in hand. On this page are published all the documents necessary for the use of your device. Turbo by Sven.
USER MANUAL Turbo Sven
natural_image
Black and white photo of a motor driver's steering wheel and control panel (no visible text or symbols)natural_image
Technical line drawing of a mechanical clamp or clamping device (no text or symbols)Рис. 1. Вид спереди
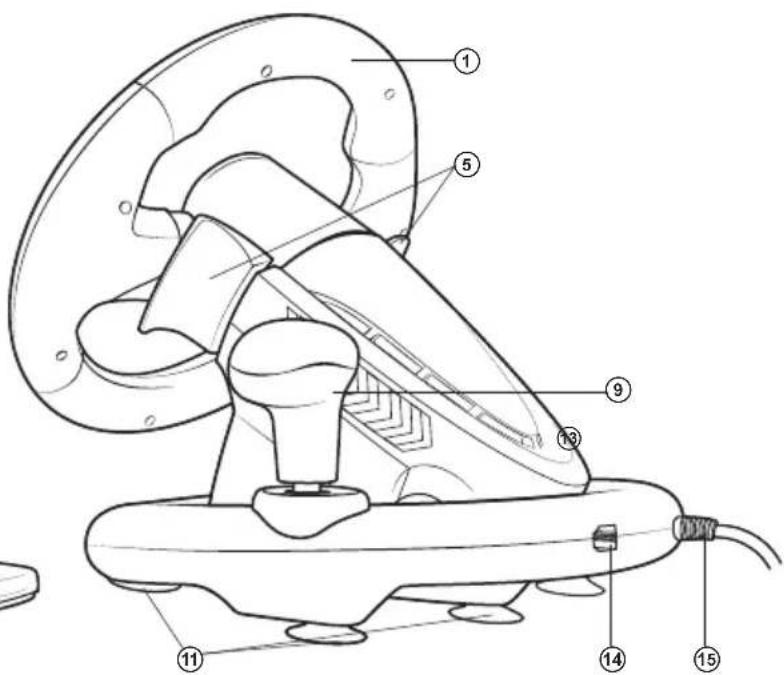
Рис. 4. Вид сзади
Рис. 5
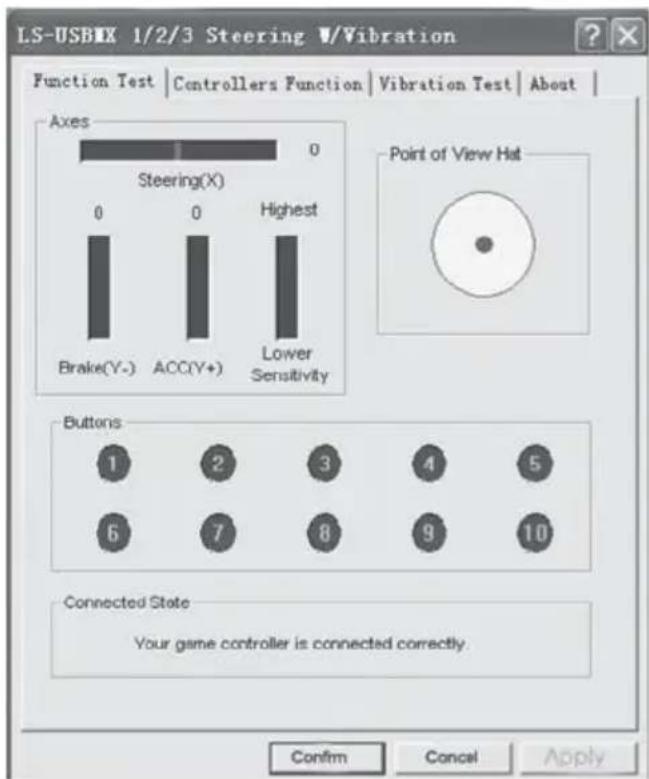
Рис. 7
Рис. 9
natural_image
Black and white photo of a motor driver's steering wheel and control panel (no visible text or symbols)natural_image
Technical line drawing of a mechanical clamp or clamping device (no text or symbols)Мал. 5
Мал. 7
Мал. 9
natural_image
Black and white photo of a motor driver's steering wheel and control panel (no visible text or symbols)Operation Manual
TURBO
Congratulations on the purchase of Sven product!
Please read this Operation Manual before using the unit and retain this Operation Manual in safe place for future reference.
COPYRIGHT
© 2014. SVEN PTE. LTD. Version 1.0 (V 1.0).
This manual and information contained in it are copyrighted. All rights reserved.
TRADEMARKS
All trademarks are the property of their legal holders.
NOTICE OF RESPONSIBILITY RESTRICTION
Despite the exerted efforts to make this Manual more exact, some discrepancies may occur. The information of this Manual is given on “as is” terms. The author and the publisher do not bear any liability to a person or an organization for loss or damages which have arisen from the information, contained in the given Manual.
UNPACKING
Unpack the device carefully. Make sure there are no accessories left in the box. Check up the device for damages; if the product was damaged during transportation, address the firm which carried out the delivery; if the product functions incorrectly, address the dealer at once.
CONTENTS
RUS 1
UKR....7
ENG 14
- DESCRIPTION 16
- SAFETY PRECAUTIONS 16
- PACKAGE CONTENTS ...... 16
- SPECIAL FEATURES 16
- SYSTEM REQUIREMENTS ...... 16
- DESCRIPTION OF THE CONSTRUCTION 17
- CONNECTION AND INSTALLATION 18
- TROUBLESHOOTING 20
1. DESCRIPTION
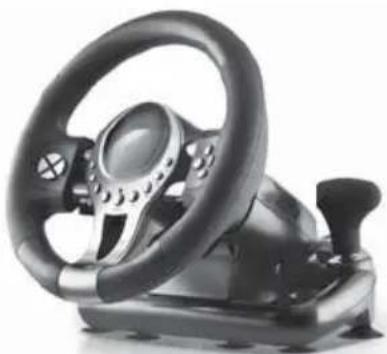
NITRO Game Racing Wheel is specially designed for PC. Ergonomic design with rubber coating and built-in vibration feedback mechanism ensures realistic driving in an autosimulator. Effect of vibration feedback imparts a feeling of speed and uneven road surface, vibration at swerves, collisions and crashes in games. Panel with brake and acceleration pedals makes it possible to gain speed or brake in a flash. Rubber suction caps and/or fixation stand provide secure fixation of TURBO to the table ensuring steadiness during games.
2. SAFETY PRECAUTIONS
- Do not disassemble or repair the device on your own. Maintenance and repairs should be carried out by qualified staff of the service centre only.
- Protect the device from direct impact of high humidity, dust, strong magnetic fields, vibrations, high temperatures, toxic liquids and gases.
- Instructions for device maintenance: for cleaning the case of the device please use clean soft cloth. Do not use such solvents as gasoline or spirit for cleaning, since these solvents can damage the surface of the device.
- Do not drop the device not to have it damaged.
3. PACKAGE CONTENTS
• Game Racing Wheel — 1 pc
- Pedal unit — 1 pc
- Fixation stand — 1 pc
- Software CD disk —1 pc
• Operation manual — 1 pc
- Warranty card — 1 pc
4. SPECIAL FEATURES
- Ergonomic design of game racing wheel
- Wheel diameter – 10" (254 mm)
- Steering angle – 180 degrees
• Supports: Windows XP/Vista/7/8 - USB Interface
• Built-in Vibration feedback for more realistic effect - Two axes, D-Pad, Tiptronic lever for changing gears, 12 additional keys
- Rubber coating of the wheel for comfortable driving
- Rubber suction caps and fixation stand for secure fixation on the table
• Digital and Analog Modes available - Foot pedal unit included
5. SYSTEM REQUIREMENTS
- USB port available
- Operational System Windows XP/Vista/7/8
Operation Manual
TURBO
6. DESCRIPTION OF THE CONSTRUCTION
① Racing wheel
② Rubber coating
③ D-Pad
④ Buttons 5, 7, 9, 11
⑤ Paddle shifters
⑥ MODE button
⑦ Buttons 1-4
⑧ Buttons 6, 8, 10, 12
⑨ Lever for changing gears
⑩ ON/OFF MODE indication
⑪ Rubber suction caps
⑫ Brake pedal
⑬ Acceleration pedal
⑭ Foot pedal port
⑮ USB Cable
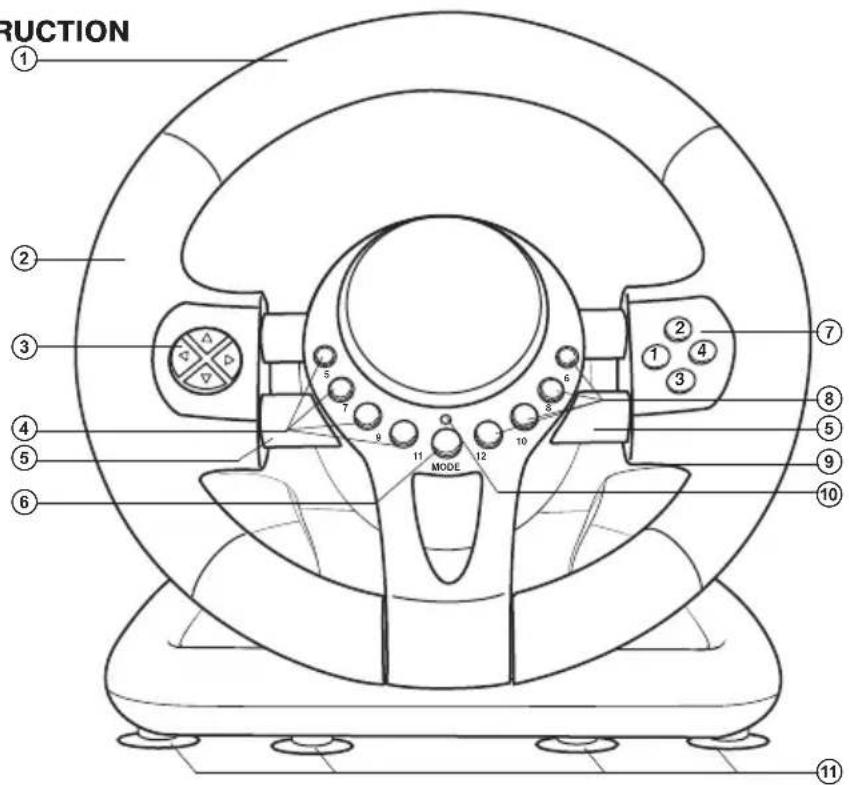
Fig. 1. Front view
natural_image
Technical line drawing of a mechanical clamp or clamping device (no text or symbols)Fig. 3. Foot pedal unit
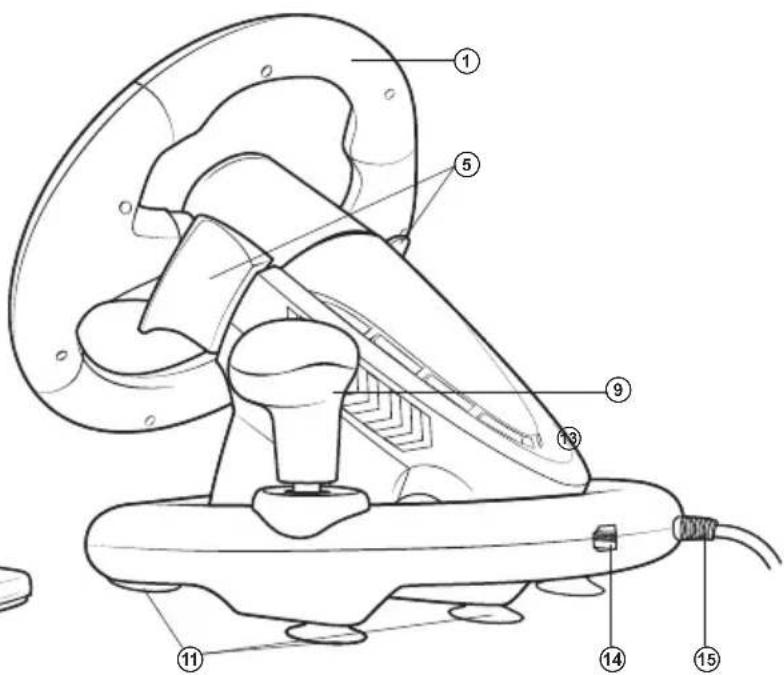
Fig. 4. Back view
7. CONNECTION AND INSTALLATION
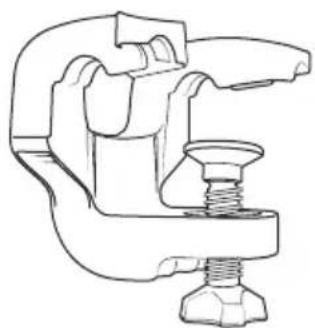
• Install the device on even surface (for example, on a table) on its 5 suction caps. If necessary fasten it with the fixation stand (see Fig. 2).
- Connect pedal unit to the device (Fig. 3) via cable of the pedal unit to RJ-11 jack ⑭, then connect USB cable ⑮ of the device to the USB port of the computer.
- Insert Software CD disk into the disk drive of your PC and launch setup.exe to install drivers on your PC. There should automatically appear Game Controller window on Desktop of your PC (Fig. 5). Also, there will open up icon LS-USBMX 1 2 3 Steerin... (Fig. 6) which is convenient for further adjustments.
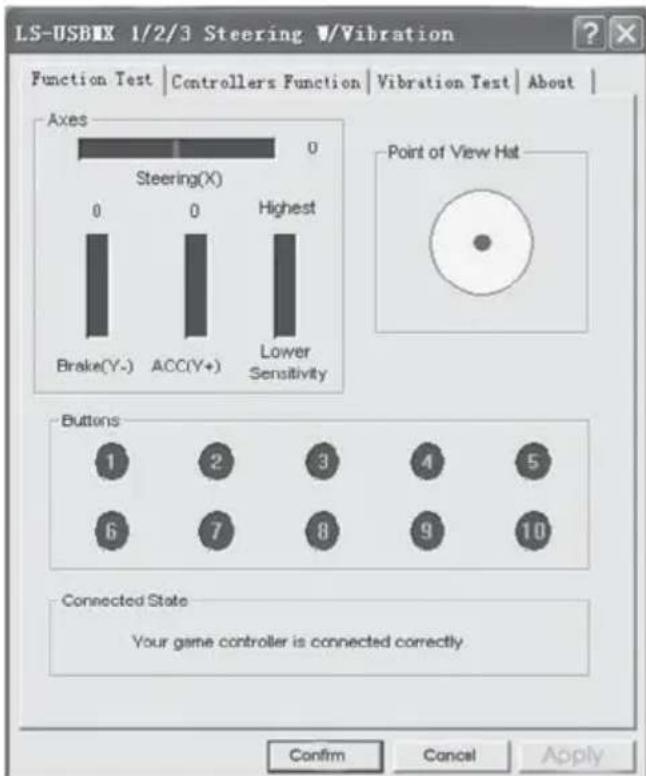
- Press Test (Fig. 5), and on the display of your PC there will appear LS- USBMX 1/2/3 Steering window (Fig. 7). Here you can make main settings of axes and keys.
- Choose Controllers to set axes and keys (see Fig. 8).
- Setting of axes and keys (not compatible with OS Vista 64)
- Dead Zone setup: controller will not respond to a slight touch of acceleration pedal (Accelerate Y+), or brake pedal (Brake Y-), or turns of the wheel (Steering X), therefore necessary adjustments should be made by cursors (Fig. 8);
- Sensitivity setup: the higher sensitivity is, the swifter and more efficient response of controller
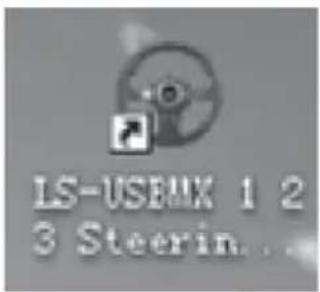
Fig. 6
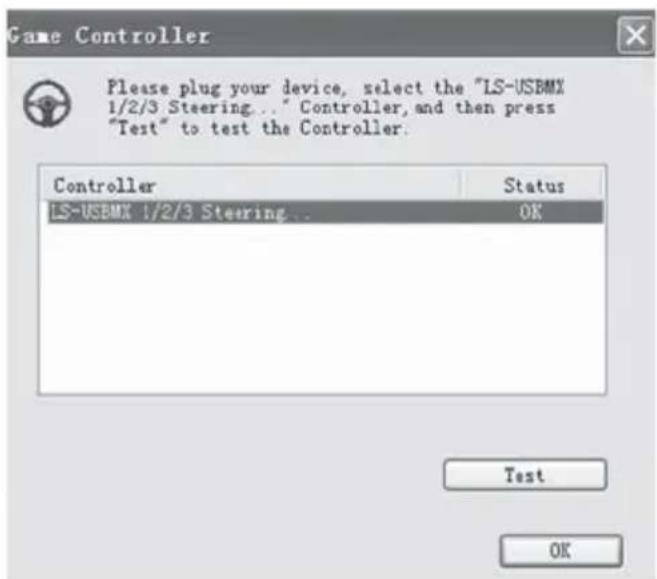
Fig. 5
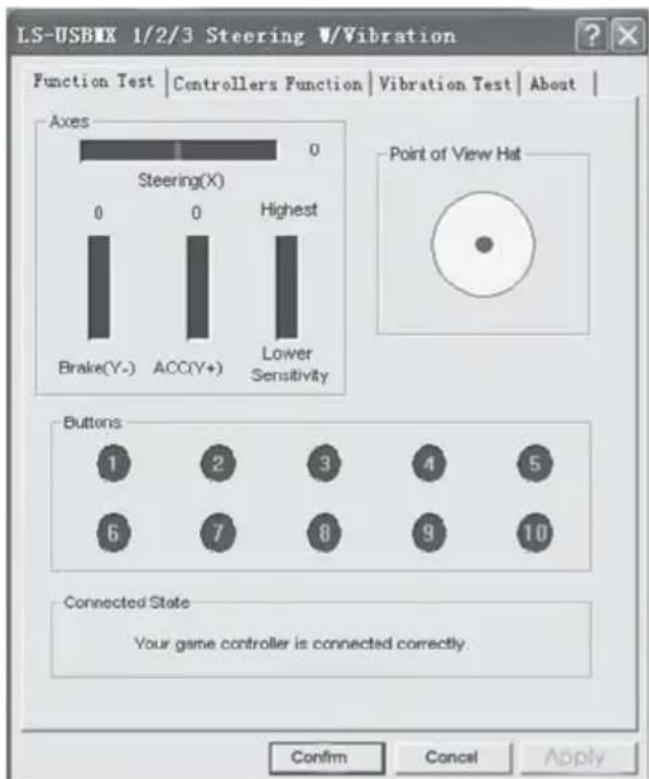
Fig. 7
Operation Manual
TURBO
to pressing of pedals and turns of the wheel will be, therefore necessary adjustments within Lower to Higher range should be made by cursors (Fig. 8);
• KeyMap Setup reprograms functional keys: there should be chosen new necessary assignment against the key designation (Fig. 8);
- after installation of the driver, the controller can be automatically centered by pressing MODE button ⑥.
ATTENTION! During automatic calibration do not press any buttons.
- Choose Vibration test (Fig. 9) to check and set vibration feedback:
a) moving cursor in Vibration strength increases or reduces force of vibration feedback, for example, in Fig. 9 vibration feedback is 85%;
b) pressing buttons Left force, Both force or Right force allows to check vibration feedback (Fig. 9);
c) after setting and checking, press Confirm in the bottom of the window.
NOTE! Games supporting Force Feedback can have further setup of feedback in different situations: crashes, collisions against obstacles or road signs etc. For further setup it is necessary to make corresponding adjustments in the setup window against Stick Volume, Road Effects, Collision, Engine etc.
- Switching modes. Game racing wheel is equipped with MODE button ⑥ for switching between Digital/Analog modes, i.e. switching from Digital to Analog mode and vice-versa. When in Digital mode the wheel is turned and pedals are pressed, there is static maximum switching ON/OFF of corresponding axes, i.e. there is only ON/OFF position. In Analog Mode the signal is sent dependent on steering angle of the wheel and extent to which the pedal was pressed, i.e. smoothly.
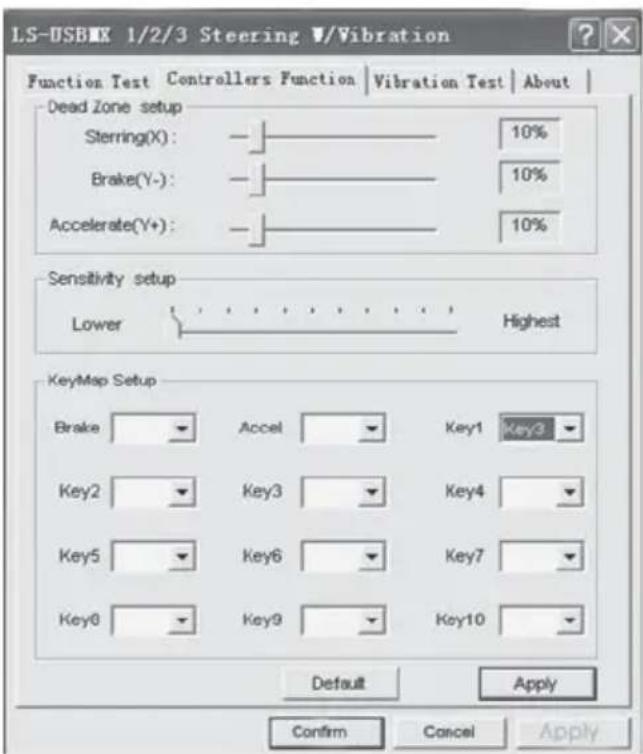
Fig. 8
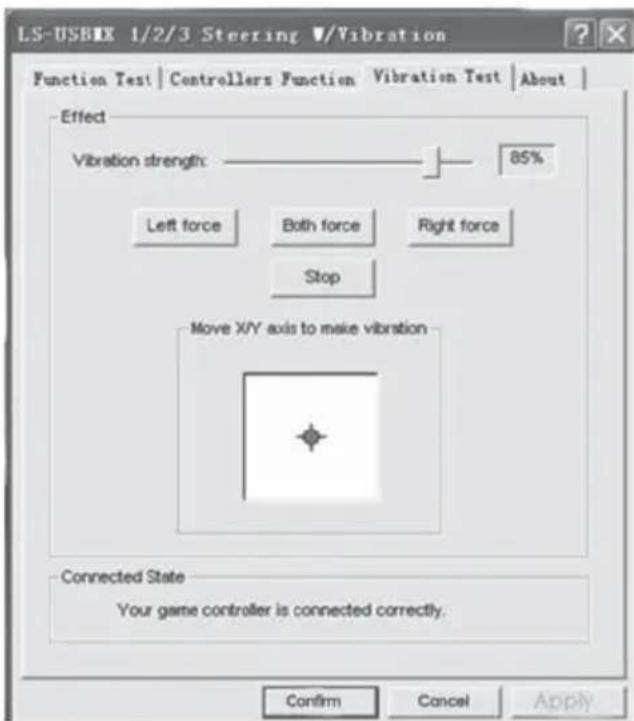
Fig. 9
- Operation without pedal unit. Game racing wheel is equipped with paddle shifters ⑤ that substitute acceleration and brake pedals: the left paddle shifter functions as a brake pedal, while the right paddle shifter functions as an acceleration pedal.
- TROUBLESHOOTING
| Problem | Solution |
| After installation of the software, game controller does not work normally. | A. Check whether the controller's link cable is strongly connected to PC.B. Make sure that status indication for Game Controller after installation is Confirm.C. Check whether controller's settings have no conflicts with other peripherals' settings.D. Restart your PC, if the controller still doesn't work normally. |
| Driving program can't be installed on your PC or the test of controller has no response after installing it. | DirectX version is too low. It requires version 7.0 and up. |
| Motors have no vibration function in a racing game. | After exiting the game, disconnect the controller from the USB port and connect it again. If it still can't work normally, please restart the computer. |
| After entering game, some analog axis will automatically operate. | The steering wheel hasn't been calibrated or hasn't been confirmed after calibrations. Enter Option – Controllers – Dead Zone to adjust the range of the dead zone, and make sure the axes are in the range of the dead zone.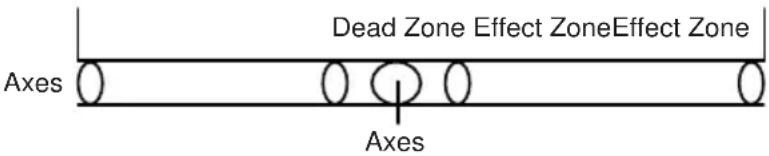 |
| After entering the game, vibration feedback operates automatically. | Enter Force Feedback and calibrate it. |
| During the game vibration feedback is insufficient. | Enter Force Feedback and set force of feedback. |
If none of the above mentioned solutions removes the problem, please refer to nearest authorized service center for consultation by qualified specialist. Never try to repair the device on your own.
natural_image
Black and white photo of a car steering wheel and robotic platform (no visible text or symbols)Модель: Turbo
Manufacturer: SVEN PTE. LTD, 176 Joo Chiat Road, N° 02-02, Singapore, 427447. Produced under the control of Oy Sven Scandinavia Ltd. 15, Kotolahdentie, Kotka, Finland, 48310. Made in China.
® Registered Trademark of Oy SVEN Scandinavia Ltd. Finland.
- Operation Manual
- TURBO
- Congratulations on the purchase of Sven product!
- COPYRIGHT
- TRADEMARKS
- NOTICE OF RESPONSIBILITY RESTRICTION
- UNPACKING
- CONTENTS
- DESCRIPTION
- SAFETY PRECAUTIONS
- PACKAGE CONTENTS
- SPECIAL FEATURES
- SYSTEM REQUIREMENTS
- DESCRIPTION OF THE CONSTRUCTION
- CONNECTION AND INSTALLATION
- ATTENTION! During automatic calibration do not press any buttons.
- Модель: Turbo
Brand : Sven
Model : Turbo
Category : Controller