
CLT-2420 - Cordless phone SANYO - Free user manual and instructions
Find the device manual for free CLT-2420 SANYO in PDF.


User questions about CLT-2420 SANYO
0 question about this device. Answer the ones you know or ask your own.
Ask a new question about this device
Download the instructions for your Cordless phone in PDF format for free! Find your manual CLT-2420 - SANYO and take your electronic device back in hand. On this page are published all the documents necessary for the use of your device. CLT-2420 by SANYO.
USER MANUAL CLT-2420 SANYO
with Call Manager Features

CALL MANAGER

GHz

DIGITAL
SPREAD SPECTRUM
IMPORTANT
Charge the handset battery pack for a full 15 hours before using your cordless handset for the first time.
www.sanyocanada.com
Introduction
Congratulations on your purchase of the CLT-2420 cordless telephone.
This phone is designed for reliability, long life, and outstanding performance utilizing the latest in 2.4 GHz Digital Spread Spectrum technology.
Note: Some illustrations in this manual may differ from the actual unit for explanation purposes.
Features
● 2.4 GHz Digital Spread Spectrum Technology
- Call Manager Features*: Caller ID, Caller ID on Call Waiting and Call Waiting with Options
*Each feature works with your network service. A subscription required.
● 50-Number Caller ID List
● Programmable Network Service Key
● Voice Message Waiting Indicator
● 3-Line, 16-Character Backlit Handset Display
● Lighted Handset Keypad and TALK/END Key
● 20-Name/Number Directory
● Last 3-Number Redial
● HandsFree Speakerphone in the Handset
● 7-Day Standby Battery Life/6-Hour Talk Time
● 30-Channel Auto/Manual Scan
- Call Time Display
- Pulse/Tone Dialing
● Page/Handset Locator
● Handset Earpiece and Ringer Volume Control
- Belt Clip and Headset Jack
● Wall-Mountable
● Hearing Aid Compatible
2.4-GHz Digital Spread Spectrum Technology utilizes a "wider frequency band" vs. a "single narrow band" used in standard digital transmissions. The result is the clarity of digital sound, extended range and a secure conversation with virtually no interference from other 2.4 GHz cordless phones or radio transmission devices.
The clearest channel is automatically selected for each transmission. The phone selects one of over 65,000 digital security codes for the handset and base.
These features enhance your phone's security and also prevent unauthorized calls as a result of your phone being activated by other equipment.
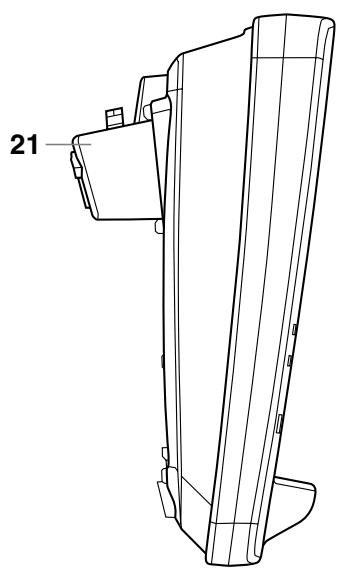
Controls and functions
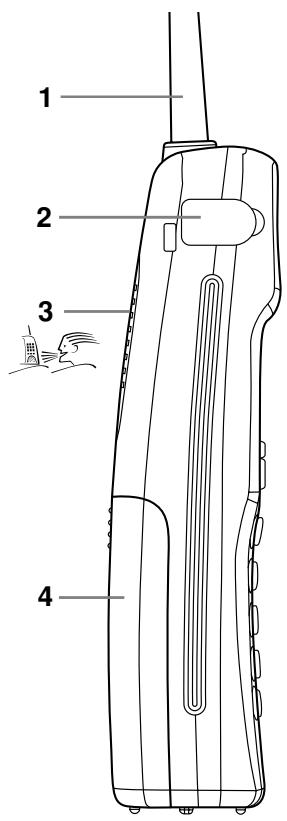
text_image
1 2 3 4- Handset antenna
- Headset jack cover
- HandsFree speaker
- Battery compartment
- Earpiece speaker
- LCD display
- MEMORY key
- TALK/END key
- CALL REVIEW/VOLUME (down) key
- Left cursor key (TONE/*/ ▶)
- SERVICE MENU key
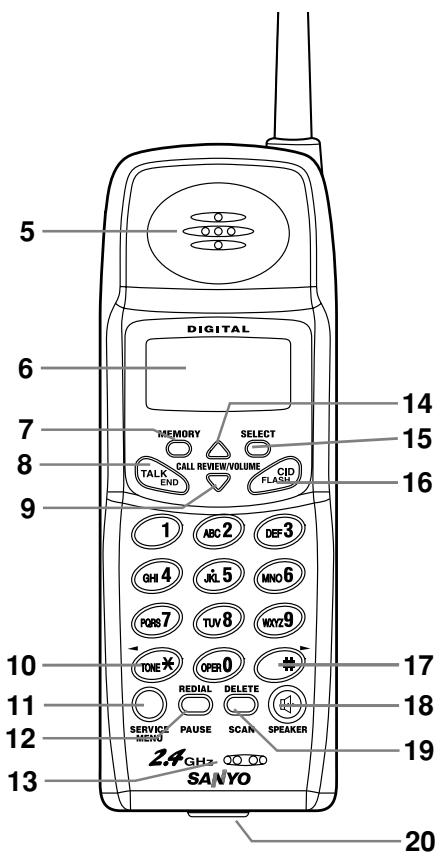
text_image
5 DIGITAL 6 7 MEMORY SELECT 14 15 8 TALK END CALL REVIEW/VOLUME CID FLAM 9 1 ABC 2 DEF 3 GHI 4 JL 5 MNO 6 PORS 7 TUV 8 XYZ 9 TONE OPER 0 10 11 REDIAL DELETE SERVICE MENU SAUSE SCAN SPEAKER 12 13 24 GHz SANYO 20- REDIAL/PAUSE key
- Microphone
- CALL REVIEW/VOLUME (up) key
- SELECT key
- CID/FLASH key
- Right cursor key ( #/▶ )
- SPEAKER key
- DELETE/SCAN key
- Handset charging contacts
natural_image
Technical line drawing of a mechanical component with labeled part '21' (no text or symbols beyond label)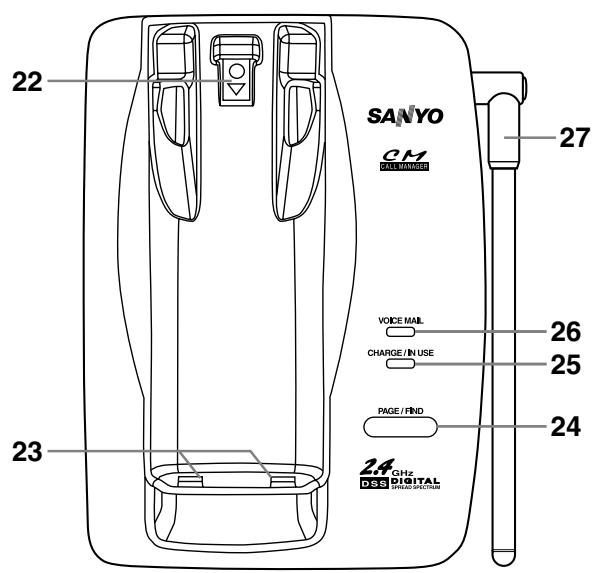
text_image
22 SANYO CM FULLWINDER 27 VOICE MAIL 26 CHARGE / IN USE 25 PAGE / FIND 24 23 24 GHz DSS DIGITAL SPRING SPECIFIC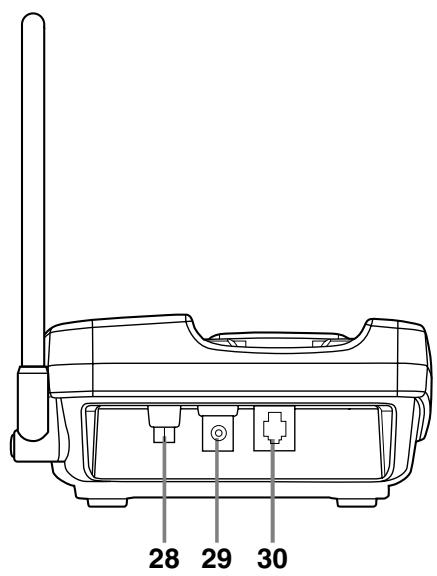
text_image
28 29 30- Bottom bracket
- Handset retainer
- Base charging contacts
- PAGE/FIND key
- CHARGE/IN USE indicator
- VOICE MAIL indicator
- Base antenna
- Pulse-Tone switch
- DC power input
- Phone jack
CONTENTS
Introduction/Features.....inside front cover
Controls and Functions.....inside front cover
Getting started
Read this first....E2
Step 1: Checking the package contents....E3
Step 2: Setting up the base unit.....E4
Desktop use....E5
Mounting the base unit on a wall....E7
Step 3: Preparing the battery pack....E9
Basics
Making a call....E11
HandsFree speakerphone ....E12
Receiving a call....E13
Call Waiting ......E13
Lighted keypad....E14
Scanning ....E14
Adjusting the ringer and earpiece volume.....E14
Redialing a call....E15
Directory
Storing phone numbers and names....E17
Making calls from the directory....E19
Editing a stored name and/or phone number ....E21
Erasing a stored name and phone number ....E23
Caller ID features
Caller ID....E24
When the telephone rings....E26
Viewing the Caller ID list.....E27
Deleting information from the Caller ID list.....E28
Using the Caller ID list....E30
Using Caller ID on Call Waiting service....E32
Advanced calling features
List of features....E33
Voice mail access ....E34
Paging ......E35
Accessing calling features ....E36
Pre-programmed calling features.....E37
Adding new features....E38
Call Waiting with Options....E40
Additional Information
Changing the digital security code....E41
Installing the beltclip....E42
Headset installation ....E42
Note on power source.....E43
Maintenance.....E43
Troubleshooting.....E44
Technical Information.....E45
Warranty ....E46
Sanyo-On-Site (SOS) Information.....E47
Getting Started
Basics
Directory
Caller ID
Features
Advanced Calling Features
Additional
Information
GETTING STARTED
Read this first
This cordless telephone must be set up before use. Follow these steps:
Step 1 (page E3)
Unpack and check the telephone and accessories.
Step 2 (page E4 to E8)
Choose the best location to set up the base unit.
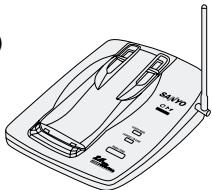
natural_image
Line drawing of a Siemens 12.5 air conditioner unit with ventilation slots and antenna (no text or symbols)Base unit
Step 3 (page E9 to E10)
Insert the battery pack into the handset. You must charge the battery pack for a full 15 hours before using the phone.
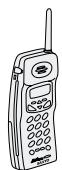
Handset
About the digital security code
This cordless telephone uses a digital security code to prevent unauthorized access to your base unit. This security code prevents other cordless handsets from making calls through your base unit.
A random security code will be assigned automatically between your base unit and handset when you charge the battery pack for the first time.
If you want to reset the security code, see page E41.
GETTING STARTED
Checking the package contents
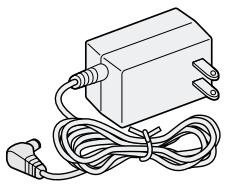
Make sure you have received the following items in the package.
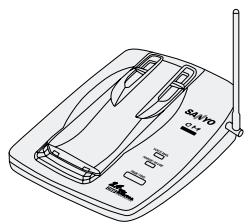
natural_image
Line drawing of a Siemens 712 air conditioner unit with no visible text or symbols- Base unit
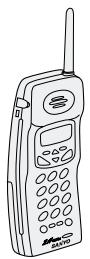
- Handset
natural_image
Line drawing of a rectangular electronic component with coiled cable and plug (no text or symbols)• AC adaptor (AD-210)
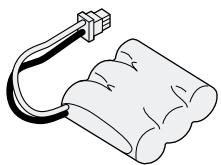
- Rechargeable battery pack (SANYO 3KR-600AAL)
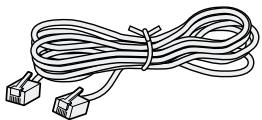
• Telephone line cord (1)
• This Owner's Manual
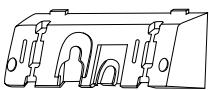
- Bottom bracket for desktop use and wall-mounting
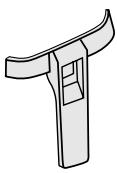
- Belt clip
GETTING STARTED
Setting up the base unit
Avoid places near electrical equipment such as refrigerators, computers, TVs, microwaves or fluorescent lamps. These may cause interference or reduce the operating range of the cordless telephone.
Do the following steps:
- Choose the best location
- Connect the base unit
- Choose the dialing mode
Notes:
- The location should be close to both a phone jack and a continuous power outlet which is not switchable.
- Be sure there is sufficient space to raise the base antenna fully to a vertical position.
- The base can be placed on a desk, tabletop or mounted on a standard wall plate.
GETTING STARTED
Desktop use
Connect the base unit
If you want to install the base unit on the wall, see page E7.
text_image
1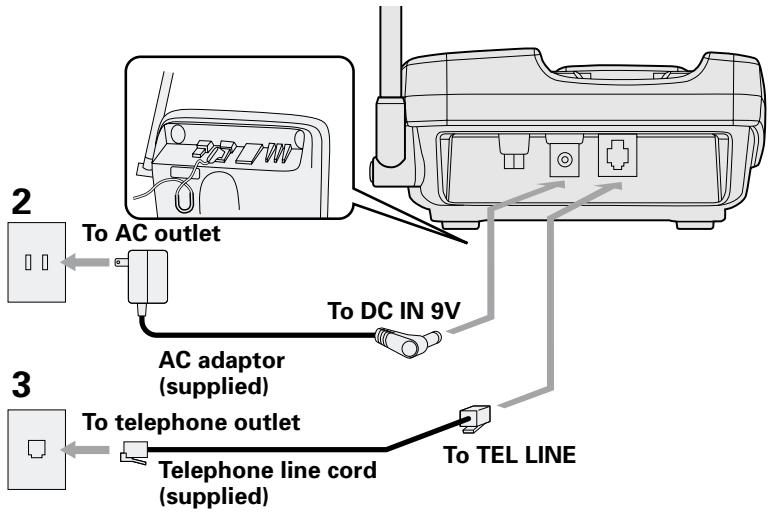
text_image
2 To AC outlet 3 AC adaptor (supplied) To DC IN 9V 3 To telephone outlet Telephone line cord (supplied) To TEL LINENote:
When connecting the power cord, make sure it does not create a trip or fire/electrical hazard. Avoid places where it could become chafed.
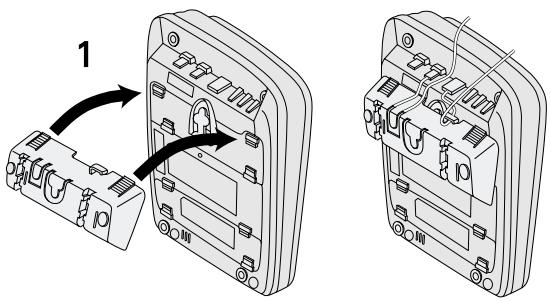
1 Snap the bottom bracket into the notches on the base.
2 Connect the AC adaptor to the DC IN 9V jack and to a standard 120-V AC wall outlet. Then raise the antenna to a vertical position.
3 Connect the telephone line cord to the TEL LINE jack and to a telephone outlet.
Note:
To assure proper handset charging, the bottom bracket must be attached.
GETTING STARTED
Notes:
- Use only the supplied AD-210 AC adaptor. Do not use any other AC adaptor.
- Connect the AC adaptor to a continuous power supply.
- Place the base unit close to the AC outlet so that you can unplug the AC adaptor easily.
- If your telephone outlet is not modular, contact your telephone company for assistance.
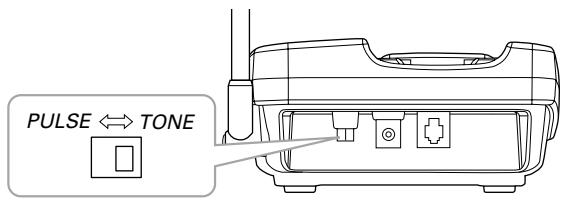
Choose the dialing mode
text_image
PULSE ↔ TONEDepending on your dialing system, set the PULSE-TONE switch as follows:
| If your dialing system is | Set the switch to |
| Tone | TONE |
| Pulse | PULSE |
If you are not sure of your dialing system
Make a trial call with the PULSE-TONE switch set to TONE.
If the call connects, leave the switch as is; otherwise, set to PULSE.
GETTING STARTED
Mounting the base unit on a wall
Standard wall plate mounting
This phone can be mounted on any standard telephone wall plate.
1
natural_image
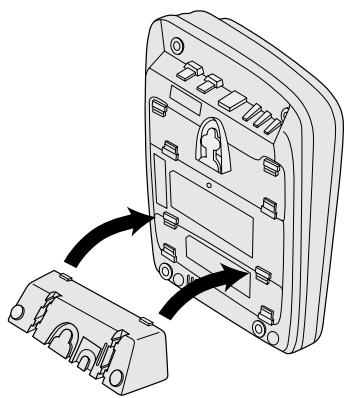
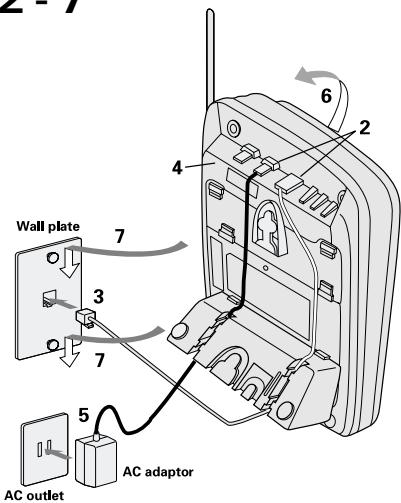
Diagram showing two electronic components with arrows indicating connection (no text or symbols present)1 Attach the bottom bracket to the base as shown. Make sure all tabs snap into the notches on the base.
2 Plug the telephone line cord to the TEL LINE jack and the small plug of the AC adaptor to the DC IN 9V jack.
3 Plug the telephone line cord into the telephone outlet.
4 Fit the AC adaptor cord into the molded groove. Then wrap the cord around the strain relief notch.
5 Plug the AC adaptor into a standard 120-V AC wall outlet.
6 Raise the antenna to a vertical position.
7 Align the mounting slots on the base with the mounting posts on the wall. Push in and down until the phone is firmly seated.
2 - 7
text_image
2 - 7 Wall plate 7 3 7 5 AC outlet AC adaptor 4 6 2 6GETTING STARTED
text_image
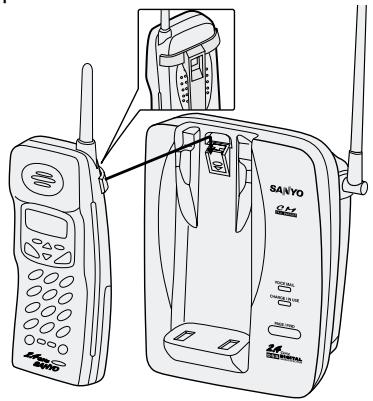
Handset retainer SANYONote:
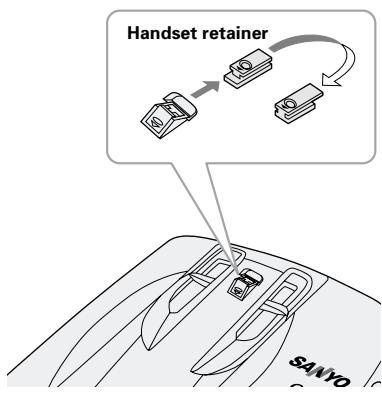
When the phone is mounted on the wall, the handset belt clip must be attached to hold the handset in the charging position. Do not place the handset with the display facing inside.
8 On the base unit, pull the handset retainer out of the slot. Rotate it clockwise 180 degrees.
9 Flip the retainer. Slide it back into the slot so that the lip of the retainer is up and the points down. The retainer holds the handset in place.
text_image
Technical diagram of a SAWYO mobile phone with labeled components and connection detailsDirect wall-mounting
If you do not have a standard wall plate, you can still mount your phone directly to the wall. Before doing this, consider the following:
- Avoid electrical cables, pipes, or other items behind the mounting location, that could cause a hazard when inserting screws into the wall.
- Try to mount your phone within 10 – 15 feet (3 – 4.5 m) of a working phone jack to avoid excessive cord lengths.
- Make sure the wall material is capable of supporting the weight of the base and handset.
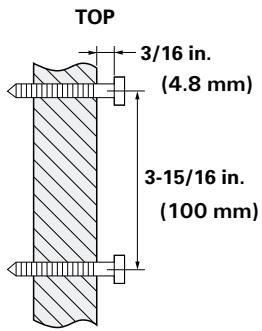
- Use #10 screws with anchoring devices suitable for the wall material where the base unit will be placed.
E8
text_image
TOP 3/16 in. (4.8 mm) 3-15/16 in. (100 mm)1 Insert two mounting screws with a minimum length of 1-3/8 inches (35.5 mm) into the wall, 3-15/16 inches (100 mm) apart. Allow about 3/16 of an inch (4.8 mm) between the wall and screwheads for mounting the phone.
2 Refer to steps 1 through 9 on page 7 and 8 to mount the telephone.
GETTING STARTED
Preparing the battery pack
Charge the battery pack for a full 15 hours before you start using your phone.
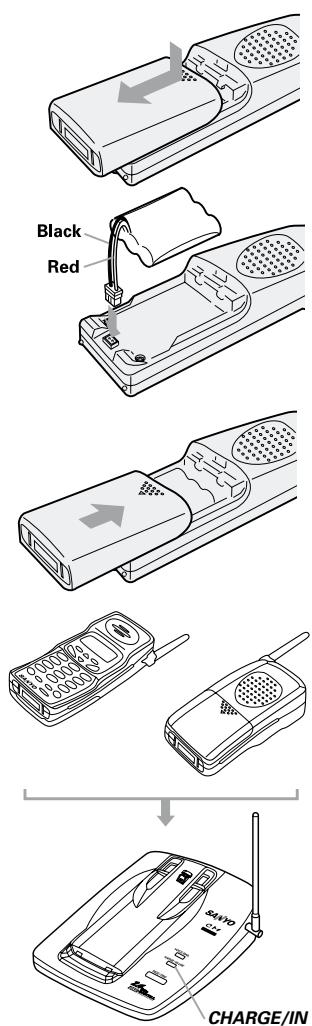
1 Press on the battery cover and slide the cover down until it comes off.
2 Plug the battery pack connector with the correct polarity (black and red wires), then insert the battery pack into the battery compartment.
3 Slide the battery cover on until it snaps into place.
4 Place the handset on the base.
5 Make sure that the CHARGE/IN USE indicator lights. If the indicator does not light, check to see that the AC adaptor is plugged in and that the handset makes good contact with the base charging contacts.
Note:
Use only battery pack supplied or the specified Sanyo types with your phone.
Type: SANYO 3KR-600AAL or SANYO/GE GES-PCF01
GETTING STARTED
Battery use time (per charge)
With a fully charged battery:
- Six hours continuous use.
- Seven days when the handset is in the standby mode.
When the battery charge level becomes low
When the voltage of the battery pack in the handset is very low and needs to be charged, the phone is programmed to stop functioning in order to save power.
Low Battery
If the phone is not in use, Low Battery flashes and none of the keys will operate. If the phone is in use, Low Battery flashes and the handset beeps. Complete your conversation as quickly as possible and return the handset to the base unit for charging.
Cleaning the battery contacts
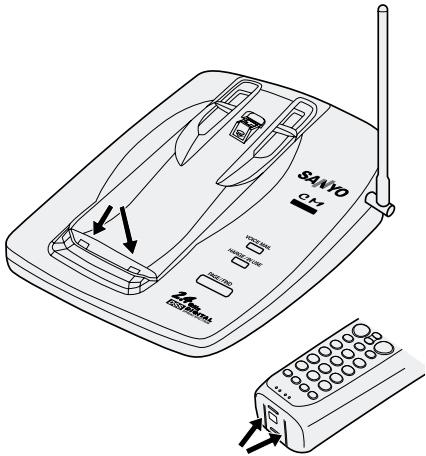
To maintain a good charge, it is important to clean the battery contacts with a dry cloth on the handset and base unit about once a month.
Do not use any liquids or solvents.
text_image
SANYO G17Note:
Repeated short charging may cause memory effect in the battery pack, which reduces use time of the battery. It is recommended not to replace the handset to the base unit after each call.
BASICS
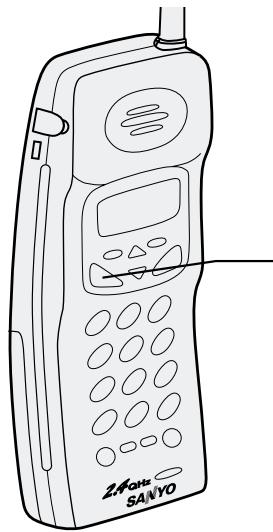
Making a call
natural_image
Line drawing of a vintage mobile phone with control panel and keypad (no text or symbols on device body)Dialing from standby mode
1 Enter the phone number. (Up to 32 digits.) Example: Enter 9057609944
9857609944
2 Press TALK/END. Talk flashes in the display.
Talk 9057609944
The volume setting is displayed. For example, if the volume is set to high, the display shows:
Talk
3 The number is dialed. The call time display appears about 5 seconds after line connection.
Talk 0:00 9057609944
4 To hang up, press TALK/END (or place the handset on the base). The call time display remains for about 5 seconds after disconnection.
5:15
Notes:
- Press DELETE/SCAN if you enter a wrong number at step 1.
- Press and hold DELETE/SCAN to delete all numbers at once.
- You must press a key within 20 seconds or the phone will return to standby.
Other Operations
| When you want to: | Do this: |
| Adjust the earpiece volume | Press △ or ▽ during the call. |
| Temporarily switch to tone dialing(When the base is set to pulse mode) | Press TONE/※/◀. The subsequent numbers dialed will be sent as tone dialing. |
| Enter a pause in the dialing sequence | Press REDIAL/PAUSE. |
BASICS

natural_image
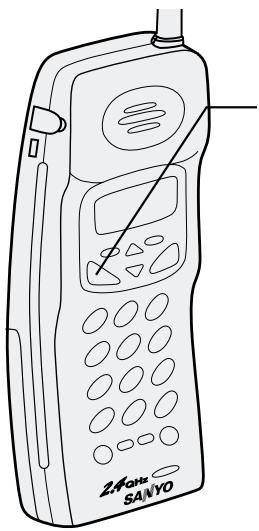
Line drawing of a vintage mobile phone with control panel and keypad (no text or symbols)Dialing from talk mode
1 Press TALK/END. Talk flashes on the display.
Talk
The volume setting is displayed.
For example, if the volume is set to high, the display shows:
Talk
The call-time display appears.
2 Dial the phone number.
Example: Enter 9057609944
Talk 0:17 9057609944
3 To hang up, press TALK/END (or place the handset in the base). The call time display remains for about 5 second after disconnection.
10:03
HandsFree Speakerphone in the Handset
- Press SPEAKER during a call to switch to handsfree conversation using the handset speakerphone.
- Press SPEAKER again to end the call.
- Press TALK/END to return to normal conversation using the earpiece speaker.

BASICS
Receiving a call
text_image
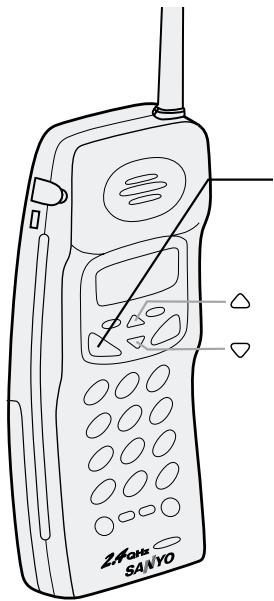
24GHz SANYO1 The phone rings. Incoming call appears.
Incoming Call
2 Press TALK/END. Talk, the call time display and volume setting appear.
Talk 0:00
If you subscribe to Caller ID service, the display may show caller's name/number. (See E24)
3 Talk with the caller.
Talk 0:02
4 To hang up, press TALK/END. The call time display remains for about 5 seconds after disconnection.
5:15
Any key answer when ringing
When the handset is off the base, press any handset key to answer the incoming call.
AutoTalk when ringing
When the AutoTalk setting is on, you can simply lift the handset from the base to answer the phone. See "Setting Caller ID options" on page E24 for more details.
Call Waiting
Note: You must subscribe to Call Waiting service to use this feature.
When a call is received during a telephone call already in progress, you hear a beep. Press CID/FLASH to switch to the new call.
If you also subscribe to Caller ID on Call Waiting (Visual Call Waiting), you will see the name and number of the second caller. (See page E32.)
BASICS
Lighted keypad
The dialing keypad and the TALK/END key on the handset light up when you press any key on the keypad. The light turns off if no key is pressed for 5 seconds.
Scanning
Your phone automatically selects the clearest possible channel every time you receive or place a call. Should you wish to switch channels during a call, the handset provides a DELETE/SCAN button.
Adjusting the ringer and earpiece volume
Ringer volume
In the standby mode, press CALL REVIEW/VOLUME △ or ▽ on the handset to set the handset ringer volume.
The phone has two ringer tones, each with two volume levels.
Ringer A High
△ ↓ ↑ △
Ringer A Low
△ ↓ ↑ △
Ringer B High
▽ ↓ ↑ △
Ringer B Low
Earpiece volume/handset speaker volume
Pressing CALL REVIEW/VOLUME △ or ▽ during a telephone call will change the earpiece volume/handset speaker volume. This setting will remain in effect even after you hang up the telephone.
△ ↓ ↑ △
△ ↓ ↑ △
△ ↓ ↑ △
When you press △ in Loud mode or press ▽ in Normal mode, a beep sounds.
BASICS
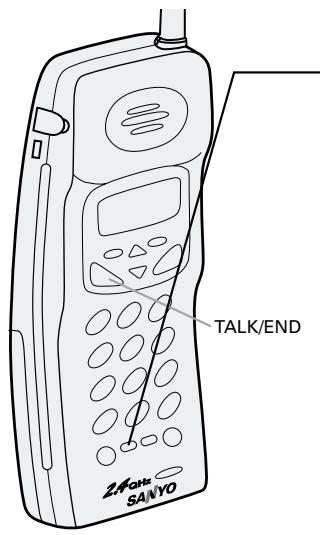
Redialing a call
The last three phone numbers dialed can be quickly redialed.
text_image
TALK/END 240H SANYORedialing from standby mode
1 Press REDIAL/PAUSE.
The phone number that was last dialed appears in the display.
2 Press REDIAL/PAUSE again.
Each press of REDIAL/PAUSE will display one of the last three numbers dialed.
Most recent
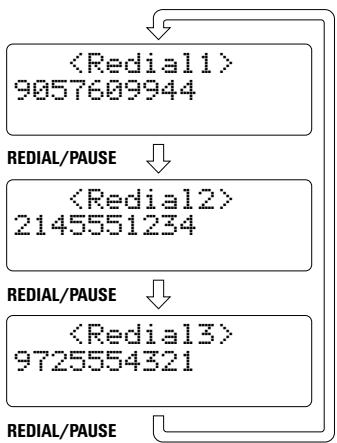
flowchart
graph TD
    A["<Redial1> 9057609944"] --> B["REDIAL/PAUSE"]
    B --> C["<Redial2> 2145551234"]
    C --> D["REDIAL/PAUSE"]
    D --> E["<Redial3> 9725554321"]
    E --> F["REDIAL/PAUSE"]
3 Press TALK/END. Talk appears in the display, then the volume setting is displayed.
4 Then the selected number is dialed. The call time display appears 5 seconds after line connection.
5 To hang up, press TALK/END (or place the handset on the base). The call time display remains for about 5 seconds.
Note:
- If the dialed number exceeds 32 digits, only the first 32 digits are retained for redialing.
- If no numbers have been dialed using this phone, you hear an error beep and no redialing will be made.
BASICS

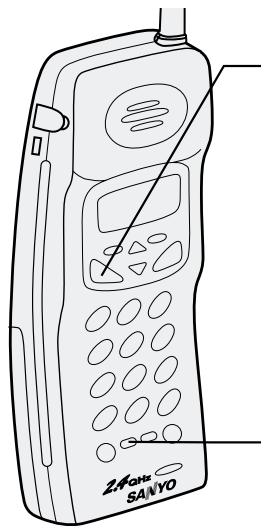
text_image
2.6GHz SANYORedialing from talk mode
1 Press TALK/END. Talk appears on the display.
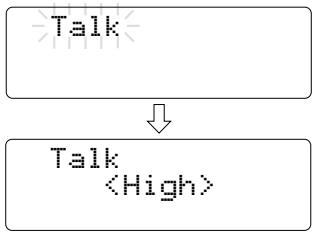
flowchart
graph TD
    A["Talk"] --> B["↓"]
    B --> C["Talk <High>"]
2 Press REDIAL/PAUSE.
The last number dialed will be displayed. Only the last number dialed can be accessed while in talk mode.
3 To hang up, press TALK/END (or place the handset on the base).
Note:
- Only the last number dialed can be accessed after TALK/END has been pressed.
- If no numbers have been dialed using this phone, you hear an error beep and no redialing will be made.
DIRECTORY
Storing phone numbers and names
The directory allows you to store up to 20 phone numbers/names in its memory. You can dial a number in the directory using just a few key strokes.
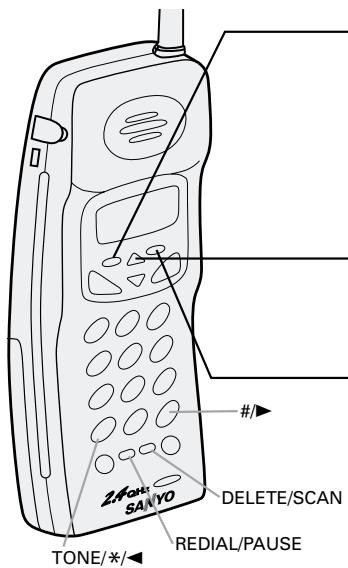
text_image
260th SANYO DELETE/SCAN REDIAL/PAUSE TONE/*/1 Press and hold MEMORY for about 3 seconds until Memory Store is displayed. A beep sounds.
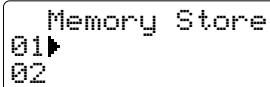
2 Use △ or ▽, or enter a two-digit number (01–20) to select the memory location where you would like to store the number.
3 Press SELECT.
The following screen appears and a cursor flashes indicating that you can now enter the name.
Store Name
Note:
In memory dialing operation, you must press a key within 20 seconds, or the phone will return to standby. If you return the handset to the base, it will return to standby, too.
If the following screen appears, the selected location is already occupied. Then you can either change the entry in this location, clear the location, or select Go Back to choose another location.
▶ Edit Memory07 Delete Memory07 Go Back
4 Use △, ▽ or TONE/*/◄, #/► or DELETE to enter the name.
The name cannot exceed 13 characters.
- Use △ or ▽ to scroll through the character menu. It contains upper and lower case letters and various characters.
- Use #/▶ and TONE/✗/◀ to move the cursor to the desired location.
- Press briefly DELETE/SCAN to delete a character.
- Press and hold DELETE/SCAN to delete all numbers and characters at once.
DIRECTORY
5 Press SELECT.
Store Number is displayed.
The cursor flashes indicating that you can now enter the number.
Store Number
6 Use the number keypad or REDIAL/PAUSE to enter the phone number.
The phone number cannot exceed 20 digits.
Store Number 9057609944
- Use REDIAL/PAUSE to enter a pause in the dialing sequence.
The display shows a P.
Note:
The pause feature is useful for long distance calling, credit card dialing, or sequences that require a pause between certain digits.
- Use DELETE/SCAN to delete digits as needed.
- Press and hold DELETE/SCAN to delete digits all together.
7 Press SELECT.
The handset beeps and displays the confirmation screen.
Memory storage is complete.
For example, if you store a name and number into memory location number 07, the display shows Memory07 Stored. After about 2 seconds, Memory Store is displayed.
Memory07 Stored
Memory Store 07▶SANYO 08
8 Press MEMORY to return to standby mode.
DIRECTORY
Making calls from the directory
text_image
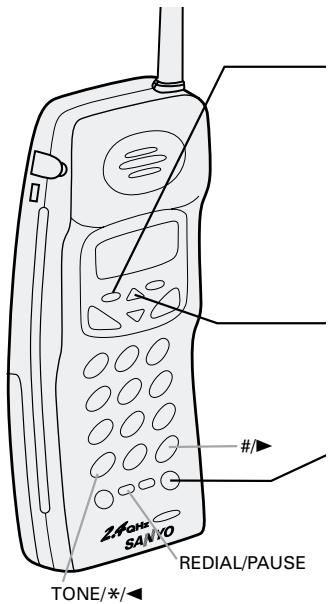
24Q4He SANYO TONE/*/ #/ REDIAL/PAUSEMemory dialing from standby mode
1 Press MEMORY.
The handset displays your programmed memory locations.
A beep sounds.
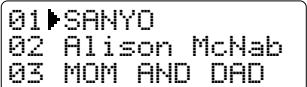
2 Press △ and ▽, or enter a two-digit number (01–20) to select the memory location you would like to dial.
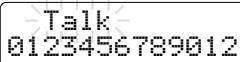
3 Press TALK/END or SPEAKER. Talk and the volume setting appears on the display. Then the displayed number is dialed.
Press TALK/END
Press SPEAKER




Notes:
- If you press SELECT before TALK/END, you can confirm the name and number stored in the selected memory location.
- To exit the memory function without dialing, press MEMORY. The handset returns to standby.
DIRECTORY
Display a programmed number
Use #/▶ and TONE/✗/◀ to toggle between the name display and the number display.
Name display
| 01#SANYO02 Alison McNab03 MOM AND DAD | ← ▶ → | 01#905760994402 545293003 8175551212 |
Note:
When the stored phone number has 14 or more digits, “→” is displayed next to the 12th digit. Press #/▶ to see the extra digits and TONE/✗/◀ to return.
| 01#011813554329+0203 | ←→ | +300000 |
| ←←= |
Memory dialing from Talk mode
1 Press TALK/END or SPEAKER.
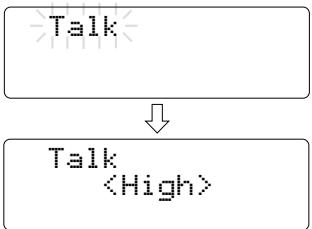
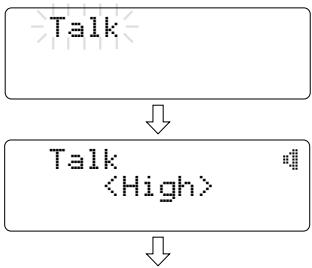
Talk and the volume setting appears.
Press TALK/END
flowchart
graph TD
    A["Talk"] --> B["↓"]
    B --> C["Talk <High>"]
Press SPEAKER
flowchart
graph TD
    A["Talk"] --> B["↓"]
    B --> C["Talk <High>"]
    C --> D["↓"]
2 Press MEMORY.↓
| Talk | 0:00 |
| Talk 0:00 |
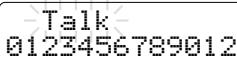
3 Enter a two-digit number (01–20) to select the memory location of the desired phone number.
The selected phone number is displayed. Then the number is dialed.
| Talk 0:350123456789012 |
DIRECTORY
Editing a stored name and/or phone number
text_image
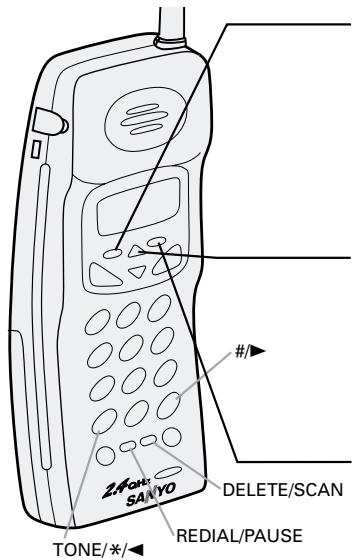
2.4 Fold SANYO DELETE/SCAN REDIAL/PAUSE TONE/*/1 Press and hold MEMORY until the display shows the memory screen and any stored name/number. A beep sounds.
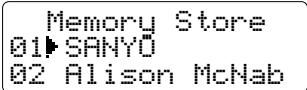
2 Press △ and ▽, or enter a two-digit number (01–20) to select the memory location you would like to edit.
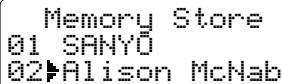
3 Press SELECT. The following screen appears with the memory location number that you have selected in the display.
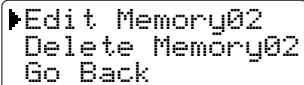
4 Press the △ or ▽ to select
Edit Memory, then press SELECT.
The following screen appears.
The cursor flashes indicating that the name can be edited. When a name has not been stored, the cursor appears at the beginning of the second line.
Store Name Alison McNab
5 Press △, #/▶, TONE/*/◀ or DELETE/SCAN
to edit the name. (See page E17.)
To edit only the phone number, skip this step.
6 Press SELECT.
The following screen appears.
The cursor flashes indicating that the display is ready for the number to be edited.
Store Number 5452930
DIRECTORY
7 Use the number keys, REDIAL/PAUSE or DELETE/SCAN to edit the phone number. The phone number cannot exceed 20 digits. (See page E18.) When the phone number will not be edited, skip this step.
8 Press SELECT.
The handset beeps and displays the confirmation screen. The memory storage is complete. For example, if you store a name and number into memory location number 02, the display shows Memory02 stored. After about 2 seconds, Memory Store is displayed.
Memory02 Stored
Memory Store 01 SANYO 02▶Alison McNab
9 Press MEMORY or place the handset on the base to return to standby mode.
Display a programmed number
Use #/▶ and TONE/✗/◀ to switch between the name display and the number display.

text_image
Name display Memory Store 01 SANYO 02#Alison McNab Number display Memory Store 01 9057609944 02#5452930- When the stored phone number has 14 or more digits, “→” is displayed next to the 12th digit. Press #/▶ to see the extra digits and TONE/✗/◀ to return.

text_image
Memory Store 01#011813554329# 02 ← ▶ → Memory Store +300000DIRECTORY
Erasing a stored name and phone number
text_image
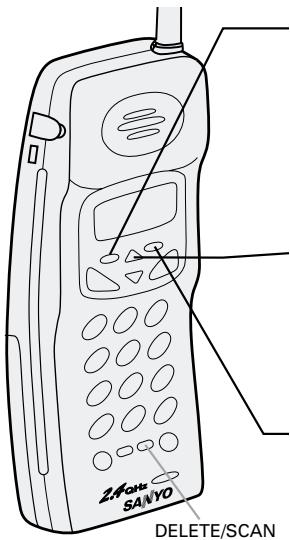
Z-600 SANYO DELETE/SCAN1 Press and hold MEMORY until the display shows the memory screen and any stored name/number. A beep sounds.
Memory Store 01▶SANYO 02 Alison McNab
2 Press △ and ▽, or enter a two-digit number (01–20) to select the memory location you would like to delete.
Memory Store 01 SANYO 02▶Alison McNab
3 Press SELECT. The following screen appears with the memory location number that you have selected in the display.
▶Edit Memory02 Delete Memory02 Go Back
4 Press ▽ to move the cursor down to Delete Memory command line.
Edit Memory02 ▶ Delete Memory02 Go Back
5 Press SELECT. The following confirmation screen appears.
Delete Memory02? Yes ▶No
6 Press △ to move the cursor to Yes.
7 Press SELECT or DELETE/SCAN. There is a confirmation tone and the entry is deleted. The following screen appears.
Memory02 Deleted
8 After a few seconds the display returns to the Memory Store screen. You may select another number to delete (return to step 4) or press MEMORY to return to standby.
Memory Store 01 SANYO 02
CALLER ID FEATURES
Caller ID
Caller ID services are provided by local telephone companies. To use this service, you must subscribe with your telephone company.
When the telephone rings, the Caller ID feature allows you to view the caller's name and phone number on the display before you answer the phone.
When you review the Caller List, the handset displays the phone number of the incoming calls, the caller's name, time called, and the number of calls received. You can dial the displayed number and store the information in the directory for memory dialing.
Note:
You must subscribe to Caller ID on Call Waiting (Visual Call Waiting) if you want to see the name/number of the second caller while you are already on the phone. (See page E32.)
Setting Caller ID options
There are four Caller ID setup options available:
AutoTalk On/Off,
CIDCW (Caller ID on Call Waiting) On/Off/Opt,
Area Code and
Language (English or French).
See next page for more detailed instructions.
AutoTalk On/Off allows you to turn on or off the Auto Talk feature that automatically turns the handset into talk mode when you pick it up from the base. The factory default setting is Off.
Note:
When you subscribe to Caller ID service, you may not want to answer every incoming call before you know who is calling. When AutoTalk is set to off, you must press TALK/END to answer the call.
Caller ID on Call Waiting (CIDCW) performs the same as regular Caller ID on a second call. You must subscribe to this service (Visual Call Waiting, for example) from your phone company in order to use this feature.
The Area Code option can be used to program your area code in the Caller ID memory. When an incoming call has the same area code as yours, the phone automatically recognizes it as a local number and drops the area code when dialing or storing the number directly from the Caller ID list. You may wish to enter your local area code before you use this phone for the first time or if you move to a new area.
Language option can be used to choose a language of your display. You can choose either English or French.
Note:
If your calling area requires 10-digit dialing, skip this step.
CALLER ID FEATURES
To change your Caller ID options:
1 Press SERVICE MENU. The following screen appears:
Select Service
1▶Voice Mail
2 Network Svc
2 Press ③ (or ▽ twice) to select Option, then press SELECT. The following screen appears:
1 Auto Talk: Off
2 CIDCw : On
3 Area Code:
3 Use △ or ▽ to move the cursor to the selection that you would like to change. Press SELECT to switch between On and Off for Auto Talk. Press SELECT to switch between On, Off and Opt for CIDCW.
4 To program your Area Code, press ▽ to move the cursor to select Area Code. Then press SELECT and enter the 3 digits area code by using the number keypad ① - ⑨ . After entering your Area Code, press SELECT.
5 To set up the language of your display, press ▽ to move the cursor to 4 Language. Press SELECT to select Eng (English) or Fr (French).
2 CIDCW :On
3 Area Code:
4Language :Eng
6 After you have made your selections, press SERVICE MENU to return to standby.
Note:
CIDCW Settings
- When you subscribe to Call Waiting or Visual Call Waiting service, select On.
- When you subscribe to Call Waiting with Options service (Call Director), select Opt. Please see page E40 for more information.
CALLER ID FEATURES
When the telephone rings
1 When a call is received, the display shows the caller's phone number, along with the date and time. The incoming call information is stored in the Caller ID list. If the Caller ID service includes the caller's name, it appears on the display (up to 15 letters).
Number of calls from the same phone number
| The date and time received | 5/11 12:30PM 01 |
| Caller's name | SANYO |
| Caller's phone number | 905-760-9944 |
Here are some typical displays:
When the phone number and name data are received
| 5/11 12:30PM 01 |
| SANYO |
| 905-760-9944 |
When a private name is received
| 5/11 12:30PM 01 |
| Private Name |
| 905-760-9944 |
When an unknown name is received
| 5/11 12:30PM 01 |
| Unknown Name |
| 905-760-9944 |
When invalid data is received
Incomplete Data
When a private number is received
| 5/11 12:30PM 01 |
| SANYO |
| Private Number |
When an unknown number is received
| 5/11 12:30PM 01 |
| SANYO |
| Unknown Number |
2 When you answer the call, the display changes to Talk. (See page E13.)

Data errors appear as "■".
| 5/11 12:30PM 01 |
| SAN-0 |
| 905-7-9944 |
Notes:
- If you answer a call before the Caller ID data is received (Example: before the second ring), the Caller ID display will not appear.
- When the call is via a private branch exchange (PBX), the caller's phone number and name may not appear.
- When the call is received via a telephone company that does not offer Caller ID service, the caller's phone number and name do not appear. (This includes international calls.)
CALLER ID FEATURES
Viewing the Caller ID list
The Caller ID list stores information for up to 50 incoming calls including unanswered calls.
text_image
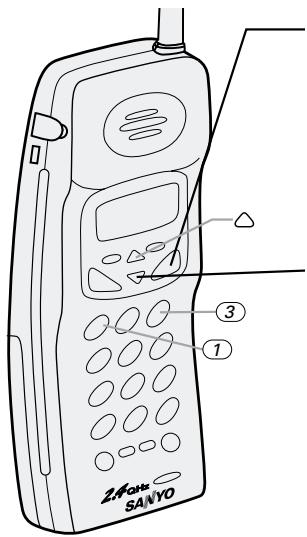
24GHz SANYO1 Press CID/FLASH.
The summary screen appears.
The screen shows the number of new calls and total calls.
New :01 Total:02
2 Press ▽ to display the latest caller information.
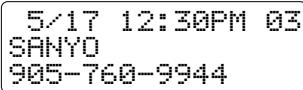
5/17 12:30PM 03 SANYO 905-760-9944
3 Press ▽ to see the next caller.
Or press △ to see the previous caller.
4 Press CID/FLASH to return to standby.
Note:
- In Caller ID operation, if no key is pressed for more than 20 seconds, an error tone sounds and the telephone returns to the standby mode.
Long distance number and area code setting
To call back a long distance number from the Caller ID list, press ① while the number is displayed in step 2. The prefix 1 – will be displayed at the beginning of the phone number. (When the phone number is 15 digits or longer, only 1 is displayed.)
5/17 12:30PM 03 SANYO 1-905-760-9944
Press ① again to remove the long distance prefix 1-.
Press ③ to add or delete the area code from the displayed phone number.
Note:
The phone numbers and names of caller list can be up to 15 characters each.
CALLER ID FEATURES
Deleting information from the Caller ID list
The Caller ID list of the CLT-2420 stores up to 50 entries. If the phone receives the 51st call, the oldest one in the list is automatically deleted.
Any Caller ID entry can be deleted manually.
Deleting a Caller ID entry
text_image
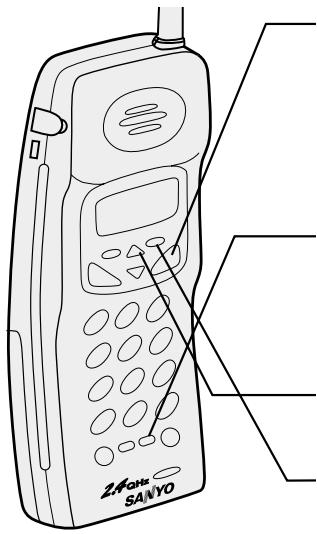
24GH SANYO1 Press CID/FLASH.
Display the name/number to be deleted from the Caller ID list by pressing △ or ▽.
2 Press DELETE/SCAN.
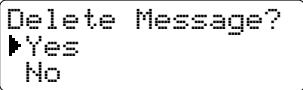
3 Press △ or ▽ to select Yes or No.
4 Press SELECT or DELETE/SCAN.
When the pointer is at Yes:
A beep tone sounds and the next Caller ID name/number is displayed.
When the pointer is at No:
The display returns to the Caller ID display.
Note:
If you receive an incoming call, the deleting operation is cancelled.
CALLER ID FEATURES
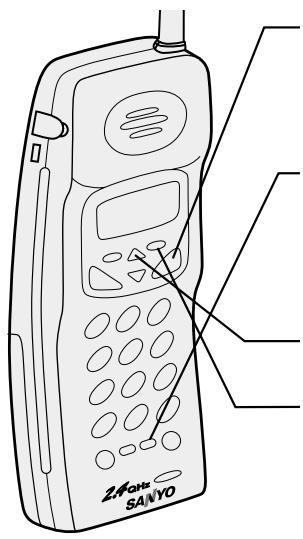
Deleting all Caller ID names/numbers
text_image
ZA'QATE SANYO1 Press CID/FLASH.
New :01 Total:02
2 Press DELETE/SCAN.
Delete All? Yes ▶No
3 Press △ or ▽ to select Yes or No.
4 Press SELECT or DELETE/SCAN.
When the pointer is at Yes:
A beep tone sounds and all stored Caller ID entries are deleted.
Total:00
When the pointer is at No:
The display returns to the summary screen.
New :01 Total:02
Note:
If you receive an incoming call, the deleting operation is cancelled.
CALLER ID FEATURES
Using the Caller ID list
Calling a party from the Caller ID list
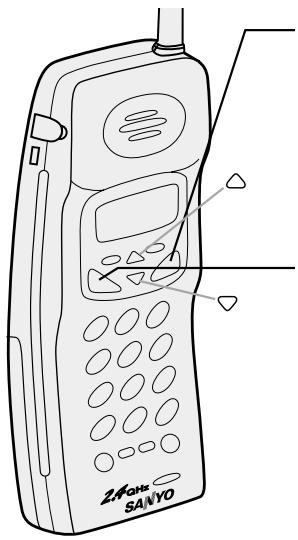
You can place a call from the Caller ID list.
text_image
ZAHOH SANYO1 Press CID/FLASH.
Select the phone number that you want to dial by pressing △ or ▽.
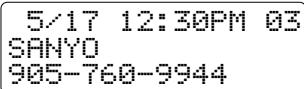
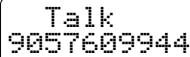
2 Press TALK/END.
The displayed phone number dials automatically.
Notes:
- When a long distance number is selected, 1 appears in the display.
- You cannot make a call from the Caller ID list if your CLT-2420 is connected to private branch exchange (PBX).
Long distance numbers
Press ① to add or remove the long distance prefix 1 - from the displayed number in step1.
Area code setting
Press ③ to add or remove the area code from the displayed number.
Number editing
Press SELECT after step 1 to edit the displayed phone number.
CALLER ID FEATURES
Storing a Caller ID entry in the directory memory
Names and numbers shown in the Caller ID list can be stored in the directory memory.

text_image
Z4962 SAN/YO1 Press CID/FLASH.
Select the phone number to be stored from the Caller ID list by pressing △ or ▽.
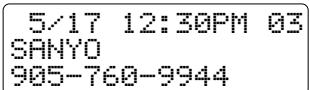
2 Press MEMORY.

3 Press △ or ▽ to select the memory location.
Or press the dial button (0 - 9) and select the number (01-20).
4 Press SELECT.
A beep tone will sound. The number is stored in memory, and the display returns to the Caller ID list.
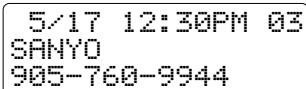
Notes:
- You cannot store a Caller ID entry that includes no phone number.
- If there is an incoming call or page during memory storing, the operation is cancelled and the telephone is set to receive the incoming call or page.
NOTE
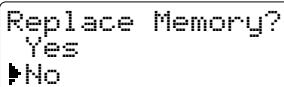
If a number has
already been stored in
the selected memory
location of the directory,
a confirmation screen is displayed. Press △ to select Yes.
Press SELECT to overwrite. The display returns to the Caller ID list.
CALLER ID FEATURES
Using Caller ID on Call Waiting service
Caller ID and Call Waiting are separate services. Caller ID on Call Waiting (CIDCW or Visual Call Waiting, for example) performs the same as regular Caller ID on a waiting call. You must subscribe to the Caller ID on Call Waiting service before you can use the following features. The Call Waiting service can also be used independently. Please contact your telephone company for details.
natural_image
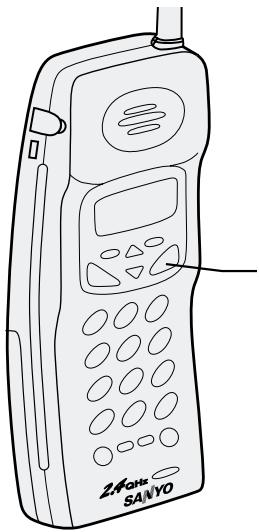
Line drawing of a vintage mobile phone with control panel and keypad (no text or symbols)1 When an incoming call arrives while you are already on the phone, you hear a beep and the phone number and name of the new caller is displayed.
Talk 10:30 SANYO 905-760-9944
2 Press CID/FLASH. You will be able to talk with the second caller. The first caller will be put on hold.
3 To return to the first caller, press CID/FLASH again.
Note:
When you subscribe to Call Waiting with Options service and CIDCW is set to Opt. in the Caller ID setup menu, you can press the CID/FLASH key after receiving a call waiting signal and view a list of options for handling the new call. Choose an option using the △ and ▽ keys and press SELECT to activate. (See pages E25 and E40.)
ADVANCED CALLING FEATURES
You can access a list of calling services provided by your local telephone company by pressing the SERVICE MENU key on the handset. You may be required to subscribe to these services before they can be used. Please contact your local telephone company for more details or subscription. Availability of these services varies.
Note:
A subscription may be required and fees may apply for using each of the features listed below. Contact your local telephone company for more details or subscription.
List of features
Voice Mail\* Access (page E34)
Many telephone companies offer an electronic mailbox service. When you subscribe to this service, your callers can leave messages for you. The CLT-2420 allows you to program your Voice Mailbox access number into its memory for quick retrieval of your message.
Network Features (page E36)
The following calling features offered by many telephone companies are pre-programmed for easy access.
- Last Call Return
- Busy Call Return
- Cancel Call Waiting
- Call Screen
- Select Blocking
Call Waiting with Options (page E40)
The following options are pre-programmed to use with Call Waiting with Options (Call Director) service.
- Switch/FLASH
- Ask to hold
- Take Message
- Tell Busy
- Conference
- Answer/Drop 1st
- Drop first
- Drop Last
ADVANCED CALLING FEATURES
Voice Mail access
If you subscribe to voice mail service, you can use your CLT-2420 to access your voice mailbox. The VOICE MAIL indicator on the base of your phone flashes whenever you have messages waiting in your voice mailbox.
Programming your access number
1 Press and hold SERVICE MENU. The display shows:
Edit Service 01▶Voice mail 02 Network Svc
2 Press SELECT to select Voice mail. The display shows:
Store Number
If you have previously stored a number, the display will show:
▶ Edit Number Delete Number Go Back
3 Enter your Mailbox access number.
4 Press SELECT. You will hear a long beep and the display shows:
Number Stored
Note:
You must subscribe to a voice mail service from your telephone company in order to use this feature.
Retrieving your voice mail messages
The VOICE MAIL indicator on the base will flash when you have received new voice messages.
1 To access your Voice Mailbox, press SERVICE MENU and select Voice mail.
2 Then press TALK/END or SPEAKER.
ADVANCED CALLING FEATURES
text_image
SANTO CKT VOICE M PAGE/FIND KeyResetting message waiting indicator
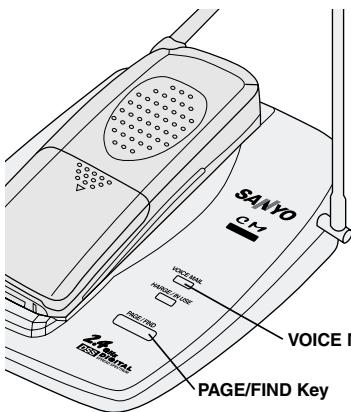
You may need to occasionally reset the VOICE MAIL indicator if it remains on after you have retrieved your messages.
To reset the indicator, put the handset to the base then press and hold the PAGE/FIND key for two seconds, or until the indicator stops flashing.
Paging
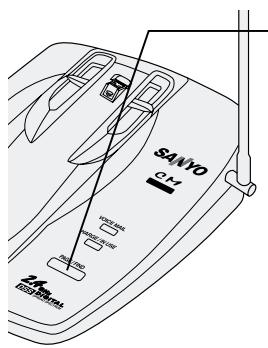
To locate the handset
text_image
SAWO 24mm/100mm 3.5mm/100mm1 Press PAGE/FIND on the base less than 2 seconds.
2 The handset beeps for 5 seconds. The following screen appears:
3 Press any key on the handset to stop paging.
Notes:
- By holding PAGE/FIND for more than 2 seconds and up to 60 seconds, the handset beeps for 60 seconds. If you press and hold for more than 60 seconds, the handset beeps until you release the key.
- When a call is received during paging, paging stops and the handset rings.
- If you press TALK/END during paging, the handset turns into talk mode.
- Paging cannot be performed while the handset is in use.
ADVANCED CALLING FEATURES
Accessing calling features
To access the Network calling features programmed into your phone, follow the instructions below. General descriptions of each service are given in the following section. For complete instructions for using each service, please contact your local telephone company.
text_image
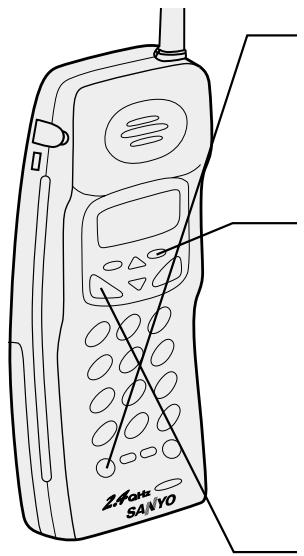
240Hz SANYO1 Press SERVICE MENU.
The following screen appears.
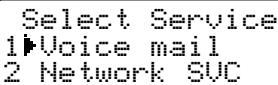
2 Use ▽ or press ② to select Network SVC and then press SELECT.
The display shows the pre-programmed calling features.
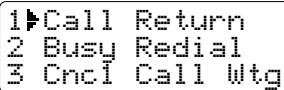
3 Use the △ and ▽ or enter a two-digit number (01-12) to select the feature you would like to use.
4 Press TALK/END. Talk and the volume setting appears for a few moments. The display then shows the activation code being dialed.

Note:
You must select a service from the menu before pressing TALK/END.
Notes:
- When using certain calling features, local toll or long distance charges may apply.
- Certain calling features may not be used on some long distance calls or from certain types of business lines.
ADVANCED CALLING FEATURES
Pre-programmed calling features
The following calling features and activation codes are pre-programmed in the CLT-2420. Activation codes may vary depending on local telephone company. See next page to reprogram a different code of any of these features.
| No. | Calling features | Display | Preprogrammed activation codes |
| 01 | Last Call Return | Call Return | *69 |
| 02 | Busy Call Return | Busy Redial | *66 |
| 03 | Cancel Call Waiting | Cncl Call Wtg | *70 |
| 04 | Call Screen | Call Screen | *60 |
| 05 | Select Blocking | Select Block | *67 |
Displaying the pre-programmed activation codes
Use the TONE/*/◀ and #/▶ keys to switch between the calling feature and its activation code.

flowchart
graph LR
    A["01 Call Return"] --> B["02 Busy Redial"]
    B --> C["03 CncI Call Wtg"]
    D["01*69"] --> E["02 *66"]
    F["03 *70"] --> G["← ←"]
Descriptions of calling features
The following descriptions are typical and may vary depending on local calling area and service availability. For complete instructions, please contact your telephone company.
Last Call Return remembers the number of the person who called you last and automatically dials that number. This feature is useful if you just missed an incoming call.
Busy Call Return continually redials a busy number for you. When a number is busy, Busy Redial monitors the busy number and lets you know when the line is free.
Cancel Call Waiting temporarily cancels call waiting service. This feature is useful if you have call waiting service, but don't want to be disturbed during a call.
Call Screen screens out all calls from certain phone number of your choice.
Select Blocking allows you to block your caller ID information from being displayed to the party you are calling. Select this option before dialing.
ADVANCED CALLING FEATURES
Adding new features
The last seven calling feature locations are available for you to program new features into your CLT-2420. You may also reprogram features in any of the other locations or restore the pre-programmed service at any time.
Add or edit a service
1 Press and hold SERVICE MENU. The following screen appears.
Edit Service 01 Voice mail 02▶Network Svc
Use ▽ or press ② to select Network SVC.
2 Press SELECT and the edit menu is displayed.
Select to Edit 01 Call Return 02 Busy Redial
3 Use the △ and ▽ or enter a two-digit number (01–20) to select the feature location you would like to edit
Select to Edit 01 Call Return 02▶Busy Redial
4 Press SELECT.
The following screen appears with the service location number that you have selected in the display.
You can restore a feature to its original pre-programmed service. Just select Restore Svc02 and follow the instructions below.
If you have selected Restore Svc02, the following display appears:
Restore Svc02? Yes No
Select Yes to restore Busy Redial. The following display appears. The phone returns to step2.
Service Setting Restored
ADVANCED CALLING FEATURES
5 Press SELECT to edit the feature stored in location two.
The following screen appears:
Service Name Busy Redial
The cursor flashes indicating that the name can be edited. Use the ◀ and ▶, and
△ and ▽ keys to enter a new name.
Press DELETE/SCAN to delete a character.
Press and hold DELETE/SCAN to delete all characters at once.
6 Press SELECT when you have entered a new name.
The following screen appears:
Service Number *66
The cursor flashes indicating that the code can be edited or entered. Use the keypad to enter a new code.
If you enter a wrong digit, press DELETE/SCAN.
To delete wrong digits all together, press and hold DELETE/SCAN.
7 Press SELECT. The following screen appears:
Service02 Stored
8 Press SEREVICE MENU to return to standby mode.
ADVANCED CALLING FEATURES
Call Waiting with Options
This feature gives you more options for Caller ID on Call Waiting (Visual Call Waiting). At the touch of a button, you can ask the waiting caller to hold, send the caller to your voice mail service or have a conference with both first and second callers. You may be required to subscribe to a voice mail service, Call Waiting and Call Waiting with Options to use these features. Not all features are available in all areas. Check with your local telephone company for details.
Selecting an option
1 When you receive a call waiting signal, you may see the caller's name/number in the display. Press CID/FLASH for a list of options.
2 Press the ▽ or enter a number (1–8) to select an option.
1▶Switch/FLASH 2 Ask to Hold 3 Tell Busy
3 Press SELECT. A confirmation screen appears.
Talk 0:15 Call Holding
Your CLT-2420 is pre-programmed with 8 call waiting options.
| No. | Option | Message |
| 1 | Switch/FLASH | Press CID/FLASH to switch callers |
| 2 | Ask to Hold | Pre-recorded message asks 2nd caller to hold |
| 3 | Tell Busy | Pre-recorded message tells 2nd caller you are busy |
| 4 | Take Message | Asks 2nd caller to leave a voice message |
| 5 | Answer/Drop 1 | Disconnects the 1st caller and answer the 2nd |
| 6 | Conference | Starts a 3-way conference call with both callers |
| 7 | Drop first | Disconnects 1st caller |
| 8 | Drop Last | Disconnects 2nd caller |
Check with your local telephone company for a full list of options.
ADDITIONAL INFORMATION
Changing the digital security code
The digital security code is an identification code used to connect the handset and the base unit. Normally, setting the code is not necessary.
The first time you charge your handset, the security code is automatically set. (See page E2.)
In the rare situation that you suspect another cordless telephone is using the same security code, you can change the code.
text_image
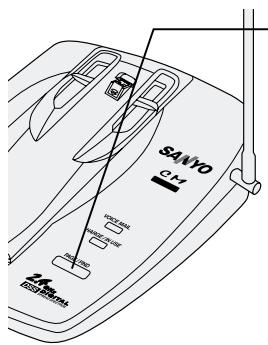
SANYO CH 12.5 GB 12.5 GB 12.5 GB ZH 869999999999999999999999999999999999999999999999999999999999999999999999999999999999999999999999999999 12.5 GB 12.5 GB 12.5 GB 12.5 GB 12.5 GB 12.5 GB 12.5 GB 12.5 GB 12.5 GB 12.5 GB 12.5 GB 12.5 GB 12.5 GB 12.5 GB 12.5 GB 12.5 GB 12.5 GB 12,5 GB 12,5 GB 12,5 GB 12,5 GB 12,5 GB 12,5 GB 12,5 GB 12,5 GB 12,5 GB 12,5 GB 12,5 GB 12,5 GB 12,5 GB 12,5 GB 12,5 GB 12,5 GB 12,5 GB 74.8 GB 74.8 GB 74.8 GB 74.8 GB 74.8 GB 74.8 GB 74.8 GB 74.8 GB 74.8 GB 74.8 GB 74.8 GB 74.8 GB 74.8 GB 74.8 GB 74.8 GB 74.8 GB 74.8 GB 73.8 GB 73.8 GB 73.8 GB 73.8 GB 73.8 GB 73.8 GB 73.8 GB 73.8 GB 73.8 GB 73.8 GB 73.8 GB 73.8 GB 73.8 GB 73.8 GB 73.8 GB 73.8 GB 73.8 GB1 Remove the handset from the base unit. Press and hold PAGE/FIND.
2 While holding PAGE/FIND, return the handset on the base unit. The paging stops.
Leave the handset on the base more than 5 seconds.
A new security code is set.
Note:
If the handset battery pack is completely discharged or the battery pack is removed, the digital security code will be lost. If this happens, a new security code is set automatically the next time the battery pack is charged.
ADDITIONAL INFORMATION
Installing the belt clip
To attach the belt clip
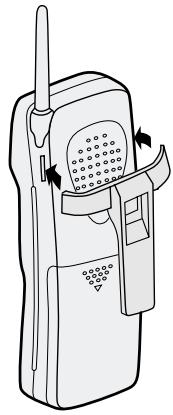
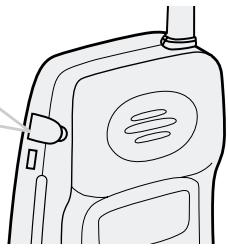
Insert the belt clip into the holes on each side of the handset. Press down until it clicks.
natural_image
Line drawing of a mobile phone with antenna and door (no text or symbols)To remove the belt clip
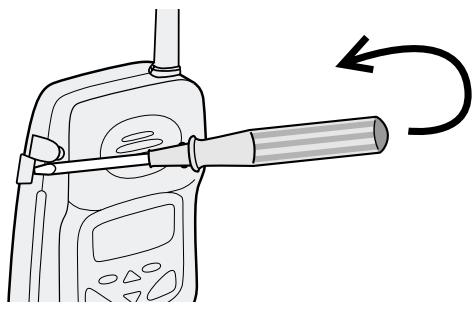
Insert a standard flat head screwdriver into a notch of the belt clip, then remove the belt clip as shown below.
natural_image
Illustration of a walkie-talkie with a hand operating the lever, showing motion direction (no text or symbols)Note:
If you have wall-mounted the base, you must install the belt clip to hold the handset in the proper charging position. Do not hang the handset with the display facing inside.
text_image
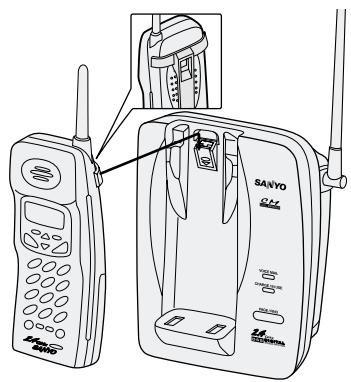
Technical diagram of a SANYO mobile phone with labeled ports and internal components, showing front and side views.Headset installation
Your phone may be used with an optional headset. To use this feature, simply plug a standard shielded headset with a 2.5-mm plug into the headset jack. Your phone is ready for hands-free conversation.
Note:
Not all headsets are the same. Some headsets may lower volume levels or performance of the phone.
headset jack
natural_image
Line drawing of a mobile phone with a handle and keypad (no text or symbols)ADDITIONAL INFORMATION
Note on power source
Battery replacement and handling
When the operating time becomes short, even after a battery is recharged, please replace the battery.
With normal usage, your battery should last about one year.
For a replacement battery, please contact your place of purchase or fill out the attached order form and mail it.
RECYCLING NICKEL-CADMIUM BATTERIES

NICKEL-CADMIUM BATTERIES MUST BE DISPOSED OF PROPERLY.
Ni-Cd
Nickel-cadmium cells are used in the battery pack. Please take your used nickel-cadmium battery packs to a store that recycles nickel-cadmium batteries.
Power Failure
During the period that the power is off, you will not be able to make or receive calls with the telephone.
Caution
- Use only the specified battery pack. (See page E9.)
- Do not remove the battery from the handset to charge it.
- Never throw the battery into a fire, disassemble it, or heat it.
- Do not remove or damage the battery casing.
Maintenance
When slightly dirty
Wipe with a soft, dry cloth.
When very dirty
Wipe with a soft cloth that has been dampened with diluted, neutral detergent. Dry with a dry cloth.
When the charging terminals become dirty
Wipe with a dry cloth.
Caution
Do not use paint thinner, benzene, alcohol, or other chemical products. Doing so may discolor the surface of the telephone and damage the finish.
TROUBLESHOOTING
If your phone is not performing to your expectations, please try these simple steps first.
| Symptom | Suggestion |
| The CHARGE/IN USE indicator won't come on when the handset is placed in the base unit. | Make sure the AC adaptor is plugged into the base unit and wall outlet.Make sure the handset is properly seated in the base unit.Make sure the charging contacts on the handset and base unit are clean. |
| Weak and/or scratch sound | Make sure that the base unit antenna is in a vertical position.Interference by other electronics equipment such as TVs, computers, microwaves, fluorescent lighting, etc.Move the handset and or base unit to a different location away from metal objects or appliances and try again.Make sure that you are not too far from the base. |
| Can't make or receive calls. | Check both ends of the base unit telephone line cord.Make sure the AC adaptor is plugged into the base unit and wall outlet.Disconnect the AC adaptor for a few minutes, then reconnect it.Reset the digital security code (See page E41).Make sure TALK/END is pressed. |
| The handset doesn't ring or receive a page. | The battery pack may be weak. Charge the battery on the base unit for at least 15 hours.If the handset still does not work, you may need to replace the battery.The handset may be too far away from the base unit.Place the base unit away from appliances or metal objects.Reset the digital security code (See page E41). |
| The Caller ID does not display. | The call was answered before the second ring.The call was placed through a switchboard.Call your local telephone company to verify your Caller ID service is current. |
TECHNICAL INFORMATION
REN Number:
The Ringer Equivalence Number (REN) assigned to each terminal device provides an indication of the maximum number of terminals allowed to be connected to a telephone interface. The REN number of this unit is located on the bottom of the base unit. The termination on an interface may consist of any combination of devices subject only to the requirement that the sum of the Ringer Equivalence Numbers of all the devices does not exceed 5.
CAUTION
This Product is intended for use in CANADA only. Sale or use in other countries may violate local laws.
Cordless telephones use radio frequencies to allow mobility. This affects the performance of your unit.
- NOISE
Electrical pulse noise is present in most homes at one time or another. This is most intense during electrical storms. Certain kinds of electrical equipment, such as light dimmers, fluorescent bulbs, motors, fans, etc., also generate pulse noise.
Because radio frequencies are susceptible to this, you may on occasion hear pulse noise through the handset. This is usually only a minor annoyance and should not be interpreted as a defect of the unit.
- RANGE
Because radio frequencies are used, the location of the base station can affect the operating range of the unit. Try several locations and choose the one that gives the clearest signal to the handset. (Turning in a circle while holding the handset may also increase the operating range.)
- INTERFERENCE
Electronic circuits activate a relay to connect the unit to your telephone line. These electronic circuits operate in the radio frequency spectrum. While several protection circuits are used to prevent unwanted signals, there may be periods when these unwanted signals enter the base station. You may hear click or hear the relay activate when you are not using the cordless handset. If this occurs frequently, you can minimize or eliminate the problem by lowering the height of the base station or relocating the base station. It may also be helpful to change the operating channel and/or the security code setting.
Operation is subject to the following two conditions:(1) this device may not cause interference, and (2) this device must accept any interference, including interference that may cause undesired operation of the device.
NOTICE:
Privacy of communications may not be ensured when using this telephone. Other devices, including other cordless telephone telephones, may interfere with the operation of this cordless telephone or cause noise during operation. Units without coded access may be accessed by other radio communication systems. Cordless telephones must not cause interference to any licensed radio service.
The Industry Canada Label identifies certified equipment. This certification means that the equipment meets certain telecommunications network protective, operational and safety requirements. The ministry does not guarantee that the equipment will operate to the user's satisfaction.
Before installing this equipment, users should ensure that it is permissible to be connected to the facilities of the local telecommunications company. The equipment must also be installed using an acceptable method of construction.
In some cases, the company's inside wiring associated with single-line individual service may be extended by means of a certified connector assembly (telephone extension cord). The customer should be aware that compliance with the above conditions may not prevent degradation of service in some situations.
Repairs to certified equipment should be made by an authorized Canadian maintenance facility designated buy the supplier. Any repairs or alterations made by the user to this equipment, or equipment malfunctions, may give the telecommunications company cause to request that the user disconnect the equipment.
The user should ensure for his own protection that the electrical ground connections of the power utility, telephone lines and internal metallic water pipe system, if present, are connected together. This precaution may be particularly important in rural areas.
CAUTION
Users should not attempt to make such connections themselves, but should contact the appropriate electrical inspection authority, or electrician, as appropriate.
The exclamation point within an equilateral triangle is intended to alert the user to the presence of important operating and maintenance (servicing) instructions in the literature accompanying the product.
This symbol on the product is used to identify the following important information. Use only with specified SANYO power adaptor.
THE SANYO COMFORT WARRANTY
WARRANTY APPLICATION
Sanyo Communications products purchased new, unused in Canada through a Sanyo Authorized Dealer are warranted against manufacturing defects in materials and workmanship for ONE YEAR covering parts and labour, from the date of purchase by the original retail purchaser. This warranty only applies in favour of the original retail purchaser of the warranted product.
SANYO CANADA INC.'S RESPONSIBILITY
During the warranty period, SANYO Canada Inc. will repair, or at our option, replace a Communications product which shows evidence of a manufacturing defect in materials or workmanship. Replacement PARTS are warranted for the remaining portion of the warranty period.
WHAT IS NOT COVERED
(a) Communications products purchased outside Canada.
(b) Communications products purchased in a used condition.
(c) Communications products purchased from non Sanyo-authorized dealer.
(d) Communications products not intended for Canadian usage or products without appropriate Canadian regulatory approvals.
(e) Problems due to product set-up and installation.
(f) Adjustments that are outlined in the Operating Manual.
(g) Accessory items including antenna, and batteries,
(h) Damage in or due to transportation.
(i) Damage due to improper maintenance, accident, abuse, misuse or negligence.
(j) Damage caused by lightning and power surges.
ORIGINAL RETAIL PURCHASER'S RESPONSIBILITY
You, the original retail purchaser, must present your original, dated bill-of-sale together with this warranty to SANYO Canada Inc. or to an authorized Sanyo Service Depot when you make a claim under this warranty.
You, the original retail purchaser, are responsible for any costs of TRANSPORTING the product to and from SANYO Canada Inc. or an authorized Sanyo Service Depot. You also are responsible for the cost of any MAINTENANCE necessary in respect of the product.
WARRANTY BECOMES VOID
This warranty becomes void if the product's serial numbers are altered or removed or if any repair to the product is made other than by SANYO Canada Inc. or by an authorized Sanyo Service Depot.
LIMITATIONS
(a). SANYO Canada Inc. reserves the right to change or improve the design of the model of the product warranted hereunder without incurring any obligation to make any modifications to or to install any improvement in or on the product.
(b). In no event shall SANYO Canada Inc. or any of its Authorized Dealers be liable for special or consequential damage arising from the use of this product.
STATUTORY WARRANTIES
The above provisions do not preclude the operation of any applicable provincial statute which in certain circumstances may not allow some of the limitations and exclusions described in this Warranty. Where any terms of this Warranty are prohibited by such a statute, they shall be deemed null and void but the remainder of this warranty shall remain in effect.
HOW TO OBTAIN WARRANTY SERVICE
Please contact the Sanyo Authorized Dealer from whom the product was purchased, or contact us directly at:
SANYO Canada Inc.
300 Applewood Cres.
Concord, Ont. L4K 5C7
(905) 760-9944
1-800-263-2244

text_image
SOS 1-800-263-2244At Sanyo, fulfilling the needs of our customers is a priority. That's why we created our Sanyo On Site (SOS) customer service program that guarantees satisfaction. We're so confident about the quality of our products that we're expanding our warranty to include the following exceptional, new level of service.
SOS guarantees you:
Nationwide Customer Support
SOS is there to help you. Our friendly and knowledgeable product specialists will quickly answer your questions about setup and use of Sanyo telephone products. Simply call toll free from anywhere in Canada to connect to our no-charge, SOS support and service network.
1-800-263-2244 between 10:00 AM - 7:00 PM EST
Stay-At-Home Convenience
It's a nuisance making another trip to the store when you're stuck. Now with SOS, all that's necessary is a quick call from your home for product assistance or exchange. SOS – it's the ultimate in convenience.
Hassle-Free Exchange
Should your Sanyo telephone/telephone with answering system require servicing during the warranty period, SOS will have a free replacement unit at your door within 48 hours.* For security reasons, you will be asked to give us your credit card number (VISA or MasterCard).
Guaranteed Quality
All SOS replacement sets are checked and serviced by factory-authorized technicians before being sent out. SOS means you never have to worry.
With SOS, we've got you covered!
* Two business days required

text_image
SANYO
Covered under one or more of the following U.S. patents:
4,511,761 4,523,058 4,595,795 4,797,916 5,381,460
5,426,690 5,434,905 5,491,745 5,533,010 5,574,727
5,650,790 5,660,269 5,661,780 5,663,981 5,671,248
5,717,312 5,754,407 5,768,345 5,787,356 5,838,721
2000 SANYO All rights reserved
UCZZ01681DZ
Printed in China