721-342 - Saw Meec Tools - Free user manual and instructions
Find the device manual for free 721-342 Meec Tools in PDF.


| Product Type | Circular Saw |
| Brand | Meec Tools |
| Model | 721-342 |
| Power Source | Corded Electric |
| Power Consumption | 1500 W |
| No-Load Speed | 5000 RPM |
| Blade Diameter | 185 mm (7-1/4 in) |
| Arbor Size | 20 mm |
| Cutting Depth at 90° | 64 mm |
| Cutting Depth at 45° | 45 mm |
| Dimensions (L x W x H) | 400 x 250 x 300 mm |
| Weight | 4.5 kg |
| Main Functions | Rip cuts, cross cuts, bevel cuts |
| Bevel Capacity | 0° – 45° |
| Laser Guide | Yes |
| Dust Collection Port | Yes, 35 mm |
| Safety Features | Blade guard, electric brake, safety switch |
| Maintenance | Clean dust after use; lubricate gears periodically |
| Cleaning | Wipe with dry cloth; do not use solvents |
| Spare Parts Availability | Blades, carbon brushes, power cord, switch |
| Reparability | User-replaceable carbon brushes and blades |
| Warranty | 2 years |
| Certifications | CE, EAC |
Frequently Asked Questions - 721-342 Meec Tools
User questions about 721-342 Meec Tools
0 question about this device. Answer the ones you know or ask your own.
Ask a new question about this device
Download the instructions for your Saw in PDF format for free! Find your manual 721-342 - Meec Tools and take your electronic device back in hand. On this page are published all the documents necessary for the use of your device. 721-342 by Meec Tools.
USER MANUAL 721-342 Meec Tools

natural_image
Red and white electric chainings with a black metal bar, displayed against a plain background (no text or symbols visible on the device itself)EN - Operating instructions in original
Date of production: 2015-08-12
© Jula AB
SVENSKA....7
SÄKERHETSANVISNINGAR....7
BULLER 7
VIBRATION 7
SÄKER ANVÄNDNING 8
FÖRE ANVÄNDNING 9
FÖRSIKTIGHETSÅTGÄRDER FÖR ATT UNDVIKA KAST 10
SYMBOLER 11
TEKNISKA DATA....13
BESKRIVNING 14
MONTERING 17
MONTERA SVÄRD OCH SÅGKEDJA 17
HANDHAVANDE 18
BRÄNSLE 19
KEDJEOLJA 20
STARTA 20
STOPPA....21
KONTROLLERA OLJETILLFÖRSELN AV KEDJEOLJA 22
KONTROLLERA KOPPLINGENS FUNKTION 22
JUSTERA FÖRGASAREN 22
KEDJEBROMS 22
FÖRE SÄGNING 23
SKYDD MOT KAST 24
TRÄDFÄLLNING 25
SÄGA STAM 25
SÄGA GRENAR 26
UNDERHÅLL 27
EFTER VARJE ANVÄNDNINGSTILLFÄLLE 27
REGELMESSIG VEDLIKEHOLD....59
OPPBEVARING 64
KASSERING OG MILJ∅VERN 64
FEILS∅KING....65
POLSKI 67
ZASADY BEZPIECZEŃSTWA 67
HATAS 67
DRGANIA 67
BEZPIECZNE UŻYTKOWANIE 68
PRZED UŻYCIEM 69
ŚRODKI OSTROŻNOŚCI W CELU UNIKNIĘCIA ODBICIA ....70
SYMBOLE 71
DANE TECHNICZNE ....73
OPIS 74
MONTAŻ....75
MONTOWANIE PROWADNICY I ŁAŃCUCHA 75
OBSŁUGA 78
PALIWO....78
OLEJ ŁAŃCUCHOWY 79
URUCHAMIANIE 80
ZATRZYMYWANIE 82
SPRAWDZANIE SMAROWANIA ŁAŃCUCHA 82
KONTROLA DZIAŁANIA SPRZĘGŁA 82
REGULACJA GAŹNIKA 82
HAMULEC LANCUCHA....82
SAFETY INSTRUCTIONS....97
NOISE 97
VIBRATION 97
SAFE USE. 98
BEFORE USE 99
SAFETY PRECAUTIONS FOR AVOIDING KICKBACK 100
SYMBOLS 101
TECHNICAL DATA....103
DESCRIPTION 104
ASSEMBLY....107
ASSEMBLING GUIDE BAR AND SAW CHAIN 107
OPERATION....108
FUEL 108
CHAIN OIL 109
STARTING 109
STOPPING....111
CHECKING SUPPLY OF OIL TO CHAIN....111
CHECKING THE FUNCTION OF THE CLUTCH 112
ADJUSTING CARBURETTOR 112
CHAIN BRAKE 112
BEFORE SAWING....113
PROTECTION AGAINST KICKBACK 114
FELLING A TREE 114
LOGGING 115
SAWING BRANCHES 116
MAINTENANCE 117
AFTER EACH USE 117
REGULAR MAINTENANCE 119
STORAGE....124
WASTE DISPOSAL AND ENVIRONMENTAL PROTECTION 124
TROUBLESHOOTING 125
SÄKERHETSANVISNINGAR
natural_image
Illustration of a hand using a chain to cut a saw, showing motion direction (no text or symbols)natural_image
Illustration of a fuel pump with a container and bottle pouring liquid (no text or symbols)Fyll på bränsle
natural_image
Illustration of hands operating a manual lawn tool on a mechanical device (no text or symbols visible)natural_image
Line drawing of a person using a chain to cut a tree stump (no text or symbols)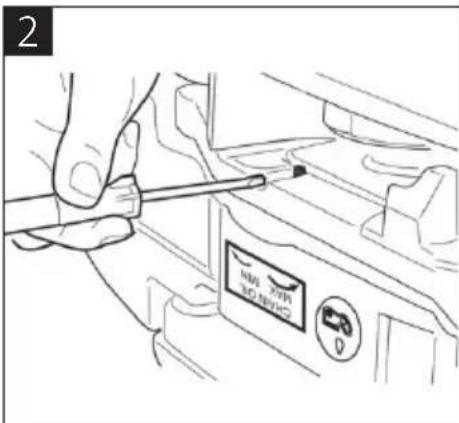
-
Främre handtag
-
Inaktivera bromsen
-
Aktivera bromsen
-
Främre handskydd/kedjebroms
Kontroll av broms
natural_image
Illustration of a person using a chainsaw to cut tree stump, showing mechanical components and a downward arrow (no text or symbols)FÖRE SÅGNING
natural_image
Illustration of a person using a chain to cut a tree stump with a circular cutterhead (no text or symbols)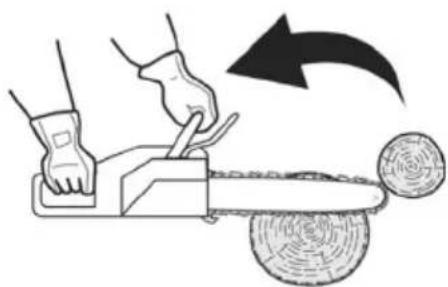
natural_image
Illustration of a person using a chain mill to cut tree roots, with a black arrow indicating the process (no text or symbols present)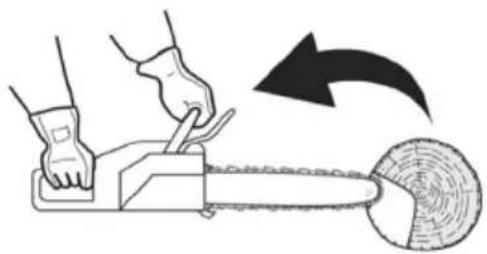
natural_image
Illustration of a person using a chain mill to cut a tree ring, with an arrow indicating the process (no text or symbols present)Risk för kast.
TRÄDFÄLLNING
natural_image
Simple line drawing of a tree with a hammer striking a fallen tree trunk, no text or symbols present- Fällsnitt
SÅGA STAM
WARNING!
natural_image
Two identical line drawings of a tree with a ladder and crossbar, showing no text or symbols.natural_image
Technical line drawing of a camera module with attached components and a close-up view of the internal panel (no text or symbols present)Oljeöppning
natural_image
Technical line drawing of a mechanical device with internal components (no text or symbols)Bränslefilter
Oljetank
natural_image
Simple line drawing of a mechanical clamp or clip assembly (no text or symbols)natural_image
Simple line drawing of a trash bin with no text or symbolsVärna om miljön!
A. Sagkjede
B. Sverd
C. Fremre håndbeskyttelse/kjedebrems
D. Starthåndtak
E. Luftfilterdekselet
H. Sperre for gassregulering
I. Bakre håndtak
J. Gassregulering
K. Motorstrømbryter
L. Drivstofftank
M. Oljetank
N. Fremre håndtak
O. Beskyttelse for kjedesverd
P. Drivstoffpumpe
natural_image
Illustration of a hand using a chain-linking tool to lift a chainsaw, showing motion arrows (no text or symbols)natural_image
Illustration of a fuel pump with a bottle pouring liquid into a container (no text or symbols)Fyll på drivstoff
natural_image
Illustration of hands operating a manual lawn saw machine outdoors (no text or symbols)Varmstart
natural_image
Line drawing of a person using a chain to cut a tree stump (no text or symbols)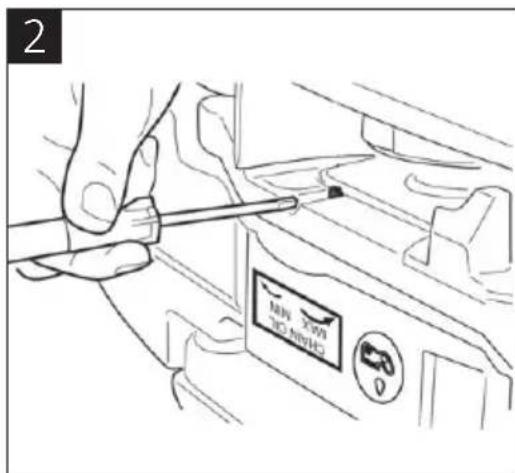
- Fremre håndtak
- Inaktivere bremsen
- Aktivere bremsen
- Fremre håndbeskyttelse/kjedebrems.
MERK!
natural_image
Line drawing of a person using a chainsaw to cut a tree stump (no text or symbols)VED SAGING
natural_image
Illustration of a person using a power tool to cut a tree stump with a circular cutterhead (no text or symbols)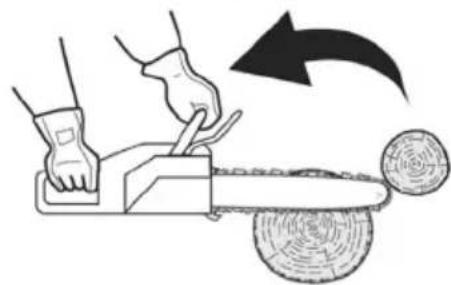
natural_image
Illustration of a person using a chain mill to cut a circular object, with an arrow indicating the process (no text or symbols present)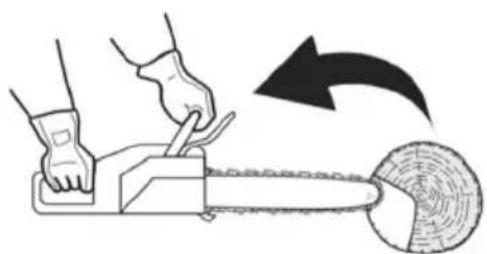
natural_image
Illustration of a person using a chain mill to cut a tree trunk, with an arrow indicating the process (no text or symbols present)Fare for kast.
TREFELLING
natural_image
Simple line drawing of a tree with a hammer striking a surface, no text or symbols presentSAGE STAMME
ADVARSEL!
natural_image
Two identical line drawings of a person climbing a tree branch with a ladder, crossed by diagonal lines (no text or symbols)Kviste et felt tre
natural_image
Technical line drawing of a camera module with internal components and a close-up view of the component being held by hands (no text or symbols present)Oljeåpning
REGELMESSIG VEDLIKEHOLD
Sylinderflenser
natural_image
Technical line drawing of a mechanical device with internal components (no text or symbols)Drivstofffilter
Oljetank
natural_image
Simple line drawing of a mechanical clamp or bracket (no text or symbols)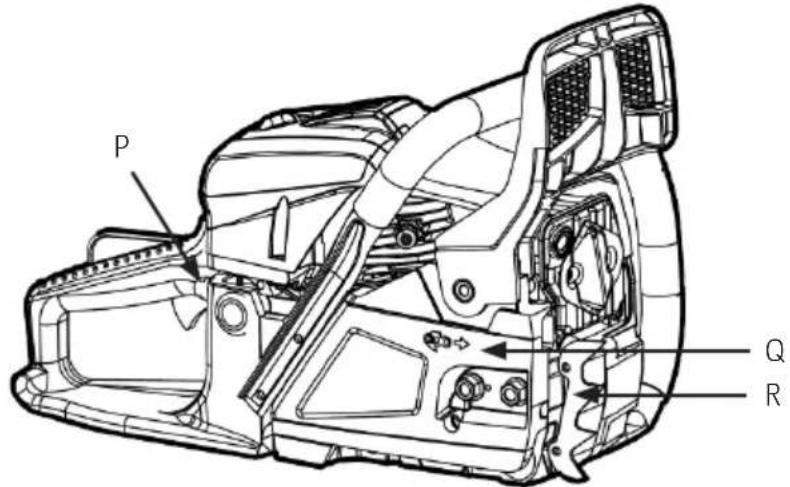
natural_image
Illustration of a hand using a chain-linking tool to cut a chain, showing motion direction (no text or symbols)natural_image
Illustration of fuel injection into a gas pump with icons (no text or labels)Uzupełnianie paliwa
natural_image
Technical line drawing of a mechanical device with no visible text or symbols- Ssanie
natural_image
Illustration of hands operating a manual lawn pusher machine outdoors (no text or symbols)natural_image
Line drawing of a person using a chain to lift a tree stump (no text or symbols)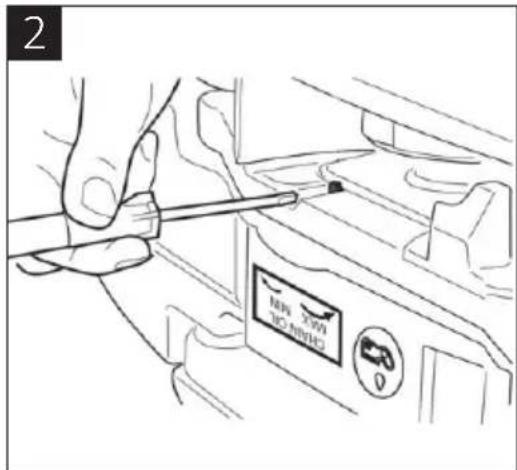
natural_image
Illustration of a hand using a power tool to cut a tree stump with a circular cutterhead nearby (no text or symbols)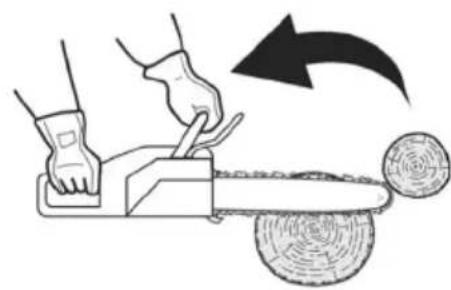
natural_image
Illustration of a hand using a tool to cut a chain or tree with leaves, showing a curved arrow indicating motion (no text or symbols)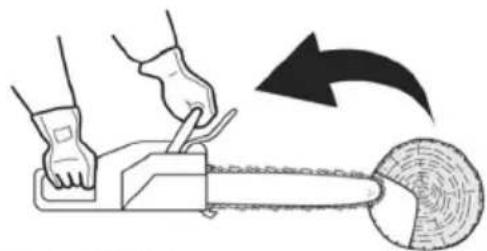
natural_image
Illustration of a person using a chain mill to cut a circular saw (no text or symbols present)natural_image
Simple line drawing of a tree with a hammer and stick, no text or symbols present- Średnica ścinania
OSTRZEŻENIE!
natural_image
Two identical line drawings of a person climbing a ladder to cut a tree trunk, each with a cross mark (no text or symbols)natural_image
Technical line drawing of a camera module with internal components and a close-up view of the component being held by hands (no text or symbols present)Otwór smarujący
natural_image
Technical line drawing of a mechanical device with internal components (no text or symbols)Filtr paliwa
natural_image
Simple line drawing of a mechanical clamp or clip assembly (no text or symbols)natural_image
Pure electrical circuit lines without any symbolsDBAJ O ŚRODOWISKO!
Read the operating instructions carefully before use!
Save these instructions for future reference.
• Always keep these operating instructions together with the chainsaw.
- Follow the safety instructions in order to prevent accidents which could lead to serious injury or death.
- Follow the safety instructions in order to avoid damage to the product.
- Familiarise yourself with the saw's controls so that you are able to operate it safely.
• Always observe all local safety regulations when operating your chainsaw.
- Incorrect handling can lead to serious injury.
- Even when correctly used, the saw constitutes a certain risk. The nature of the saw means that the following risks should be taken into account:
- Contact with the unprotected sawing chain (cuts).
– Unexpected, sudden movement of the guide bar (cuts).
– Hearing damage, if no ear protection used. - Breathing in harmful particles or exhaust gases from the engine.
- Skin contact with petrol.
NOISE
WARNING Risk of hearing damage. Wear ear protection. Under normal operating conditions, this device can expose the operator to a noise level of 80 dB (A) or more.
- Some noise from the machine is unavoidable.
- Noisy work should be limited to certain periods.
- Take frequent breaks, and it might be necessary to restrict working hours to a minimum.
- The user should wear ear protection, and others in the vicinity might need to do the same.
VIBRATION
WARNING
- The vibration value during actual use of the saw may differ from the value specified in the operating instructions. This can be due to the following factors:
- Whether the saw is used correctly.
- Whether sawing is performed correctly and in suitable material.
- Whether the saw is used according to the instructions
- Whether the saw chain is sufficiently sharp
– Whether the handles are fitted correctly.
- If you notice an unpleasant sensation or skin discolouration during use of the machine, stop using it.
- Take regular breaks. Vibration injuries can arise if you do not take frequent breaks of sufficient length.
SAFE USE
- Always take great care when handling fuel. Always wipe up spillage and move the chainsaw at least three metres away from the fuelling point before starting the engine.
- Eliminate all sources of sparks or flame (i.e. smoking, open flames or tools that can cause sparks) in the areas where fuel is mixed, poured, or stored.
- It is absolutely forbidden to smoke while handling fuel or operating the chainsaw.
- Unauthorised persons must not be in the vicinity of the chainsaw when it is started or in use. Keep bystanders and pets out of the work area. Unauthorised persons should be a minimum of 10 metres away when the saw is started or in use.
- Never start cutting until you have a clear work area, secure footing, and a planned retreat path from the falling tree.
- Always hold the chainsaw firmly with both hands when the engine is running. Make sure to keep a firm grip round both handles.
- Keep a safe distance from the saw chain when the engine is running. Before starting the engine, make sure the saw chain is not touching anything.
- Always carry the chainsaw with the engine stopped, the guide bar and saw chain to the rear, and the muffler away from your body.
- Always inspect the chain for worn, loose, or modified parts before each use. Never operate a chainsaw that is damaged, improperly adjusted, or is not
- completely and securely assembled. Ensure that the saw chain stops moving immediately when the throttle is released.
- All chainsaw servicing, other than the items listed in these operating instructions, should be performed by a competent chainsaw technician. (Improper servicing, especially of the flywheel, can result in serious accidents and destruction of the chainsaw.)
• Always shut off the engine before putting the chainsaw on the ground.
- Be very careful when sawing bushes and saplings, as they can become caught in the saw chain and be whipped towards you or cause you to lose your balance.
- When sawing a branch that is held under tension, take care to ensure that the branch does not hit you at the moment when it is sawn off completely.
- Keep the handles dry, clean and free of oil or fuel.
- Guard against kickback. If the saw chain at the tip of the guide bar comes into contact with an object, the whole chainsaw is thrown upwards with high speed and energy. This is a kickback, and can cause you to completely lose control of the chainsaw.
- When transporting your chainsaw, always make sure the guide bar scabbard is in place.
- Position the chainsaw carefully before transporting it, so that no fuel can leak out and the chainsaw itself cannot be damaged.
BEFORE USE
- Never operate the chainsaw when you are tired, ill, upset, or under the influence of alcohol, drugs or medication.
- Only use the chainsaw in well-ventilated areas. Never start or run the engine indoors. The exhaust fumes contain lethal carbon monoxide.
- Never cut in high wind, bad weather, when visibility is poor or in very high or low temperatures. Always check the tree for dead branches which could fall during the felling operation.
- Use slip-resistant safety footwear, snug-fitting clothing, ear protection, protective glasses and a helmet. Also use protective anti-vibration gloves.
-
The following precautionary measures are recommended to reduce the risk of injury. Even taking these precautionary measures does not guarantee that injury will be avoided.
-
Keep your body warm, especially the head, neck, feet, ankles, hands and wrists.
- Stimulate blood circulation by taking regular breaks to stretch your arms.
- Do not smoke.
- Keep the saw chain sharp and ensure that the whole chainsaw is well maintained. A blunt chain will increase cutting time, and pressing a blunt chain through wood increases the vibrations transmitted to your hands. A saw with loose components or with damaged or worn
AV buffers will also tend to have higher vibration levels.
- Do not use the saw for too long at a time.
SAFETY PRECAUTIONS FOR AVOIDING KICKBACK
- Kickback may occur if the tip of the guide bar touches an object, or if the guide bar becomes caught in the tree (often because the cut is not deep enough). In unfortunate cases, a kickback can throw the guide bar upwards and backwards at lightning speed, towards the operator. If the saw chain pinches along the top of the guide bar, it may push the guide bar rapidly back towards the operator. Either of these events can cause you to completely lose control of the saw, which can result in serious injury.
-
Do not rely exclusively on the safety devices built into your saw. As a chainsaw user, you yourself must take a number of safety precautions to avoid accidents:
-
If you learn how kickback works, you can avoid being surprised when it happens. It is often the element of surprise that causes an accident.
- Hold the chainsaw firmly with both hands. As soon as the engine is running, keep the right hand on the rear handle, and the left hand on the front handle. Always keep a firm grip round the handles, using all your fingers. A firm grip will help you to cope with kickback and maintain control of the saw. Never let go.
- Check that the area in which you are cutting is free from obstructions. Do not let the tip of the guide bar come into contact with hidden logs, branches or other obstructions while you are working.
- Cut quickly.
— Never hold the chainsaw too far away from you, and never hold it above shoulder height.
– Follow the manufacturer's sharpening and maintenance instructions for the saw chain. - Only use replacement bars and chains recommended by the manufacturer.
SYMBOLS
 | Read, understand and follow all warnings. |
 | Warning! Danger of kickback. Take care and avoid chainsaw kickback. Do not saw with the tip of the bar. |
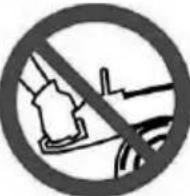 | Never use the chainsaw with only one hand. |
 | Always use both hands to grip the saw. |
 | Use ear protection, protective glasses and a helmet. |
 | Read the instruction manual before operating the chainsaw. |
 | Wear safety gloves which also dampen vibrations. |
 | Wear safety shoes with slip-resistant soles. |
The chainsaw is marked with imprinted symbols for safe operation and maintenance. Be aware of these symbols:
 | Port for refilling fuel fixturePosition: near the fuel cap |
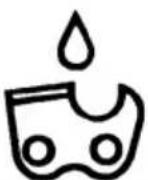 | Port for refilling chain oilPosition: near the oil cap |
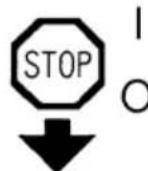 | Engine switchFlip the switch to the "O" position to stop the engine immediately.Position: to the left of the rear handle |
 | Operating the choke knobPull out the choke knob to close it, push in the choke to open it.Position: Air filter cover |
 | Adjusting the oil pumpUse a screwdriver to turn the screw towards "MAX" to increase the amount of chain oil or towards "MIN" to reduce the amount of chain oil.Position: On the bottom of the engine |
 | The screw under "H" adjusts the fuel mixture for high sawing speed. |
 | The screw under "L" adjusts the fuel mixture for low sawing speed. |
 | The screw under "T" adjusts the idling speed.Position: on the upper-left of the rear handle |
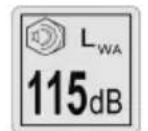 | Guaranteed sound power level |
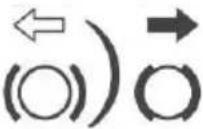 | Shows in which direction the chain brake is released (white arrow) and activated (black arrow). Position: Front of the clutch cover |
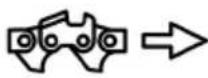 | Shows the direction of the saw chain installation. Position: Front of the clutch cover |
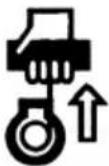 | Manual engine start. |
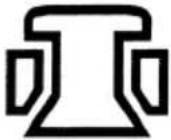 | Decompression valve (if applicable) Push in the decompression valve button to open the valve. |
TECHNICAL DATA
Engine
| Displacement 49.3 cc | |
| Max. engine power 2.2 kW | |
| Fuel Mixture (40 parts unleaded petrol/1 part two-stroke oil) | |
| Fuel tank capacity 550 ml | |
| Chain oil VG-100 | |
| Oil tank capacity 260 ml | |
| Carburettor Diaphragm type | |
| Fuel consumption at maximum engine power 480 g/kWh | |
| Idle speed, rpm 3,000±300 rpm | |
| Max. revs with cutting accessories 11,000 rpm | |
| Maximum chain speed 21.2 m/s | |
| Ignition system C.D.I. with timing advance function | |
| Spark plug CHAMPION RCJ7Y | |
| Oil feeding system Mechanical plunger pump with adjuster | |
| Drive cogs x pitch 7T×0.325 inch | |
| Dimensions (L x W x H) | 410×250×285 mm |
| Dry weight (without guide bar and chain, empty tanks) | 5.1 kg |
| Sound pressure level, LpA | 101 dB(A), K=3 |
| Measured sound power level, LwA | 113,4 dB(A), K=3 |
| Guaranteed sound power level, LwA 115 dB(A), K=3 | |
Vibration Value (EN ISO 22867)
| Front handle 9.9 m/s2 |
| Rear handle 9.9 m/s2 |
| K factor (2006/42/EC) 1.5 m/s2 |
| Cutting device guide barType Sprocket nose |
| Size 16 inch |
| Cutting length 390 mm |
| Saw chainPitch 0.325 inch |
| Gauge 0.058 inch |
| Approved combinations of guide bar/saw chain Oregon 168PXBK095/ Oregon 21BPX066X |
Always use ear protection!
DESCRIPTION
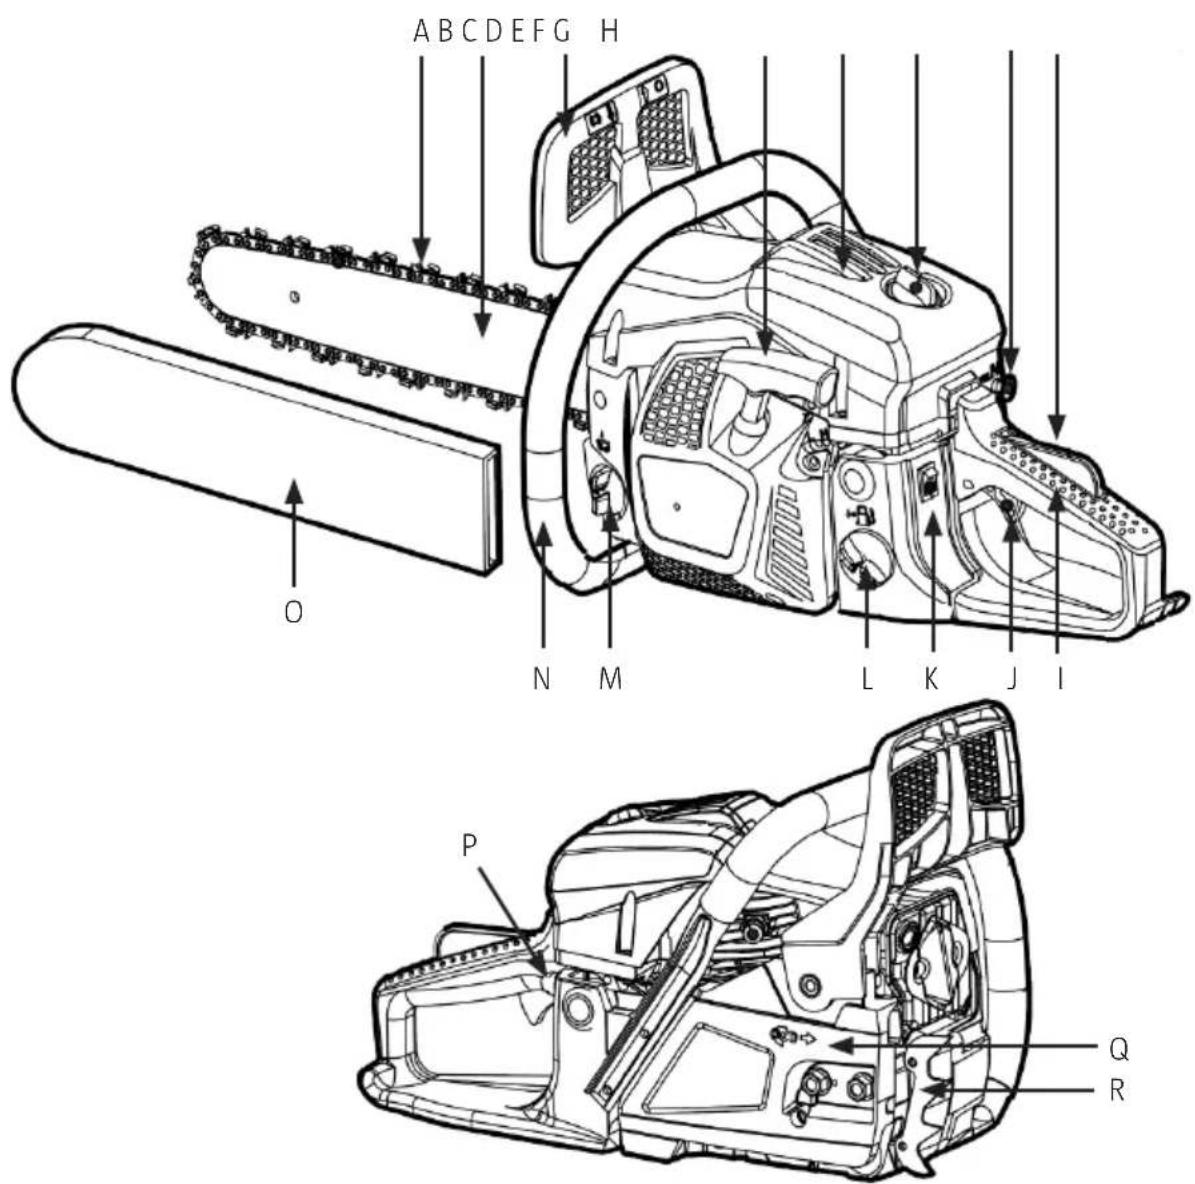
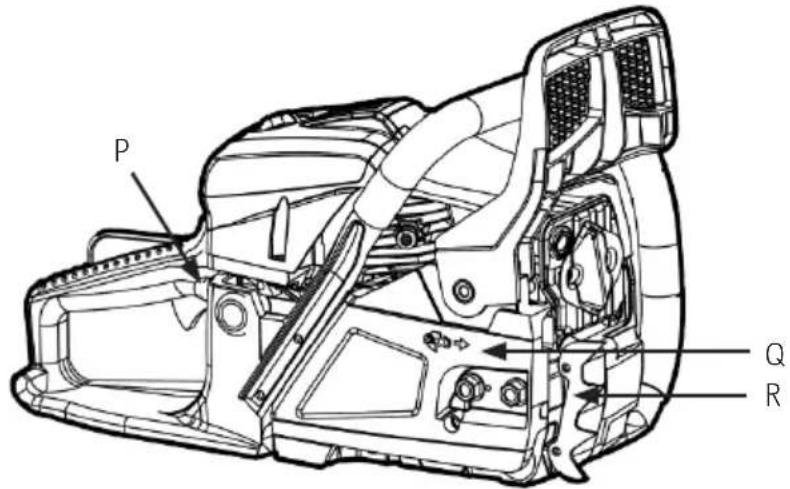
A. Saw chain
B. Guide bar
C. Front hand guard/chain brake
D. Starter handle
E. Air filter cover
F. Air filter lock nut
G. Choke knob
H. Trigger lock-out
I. Rear handle
J. Throttle
K. Engine switch
L. Fuel Tank
M. Oil tank
N. Front handle
O. Guide bar scabbard
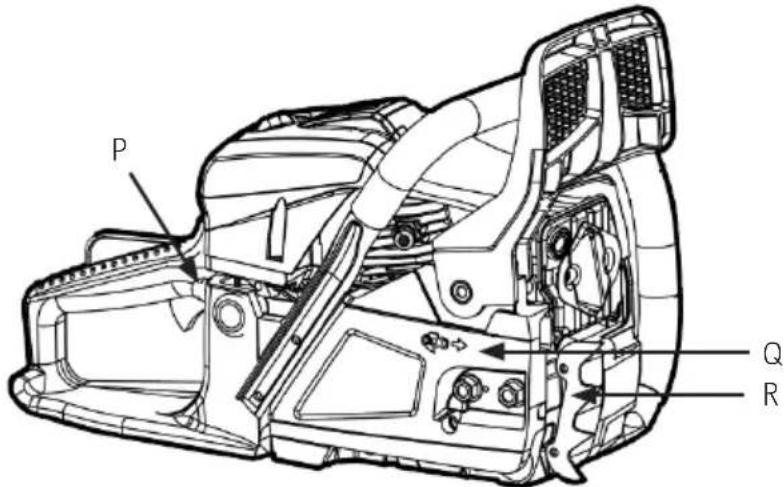
P. Fuel pump
Q. Clutch cover
R. Spiked bumper
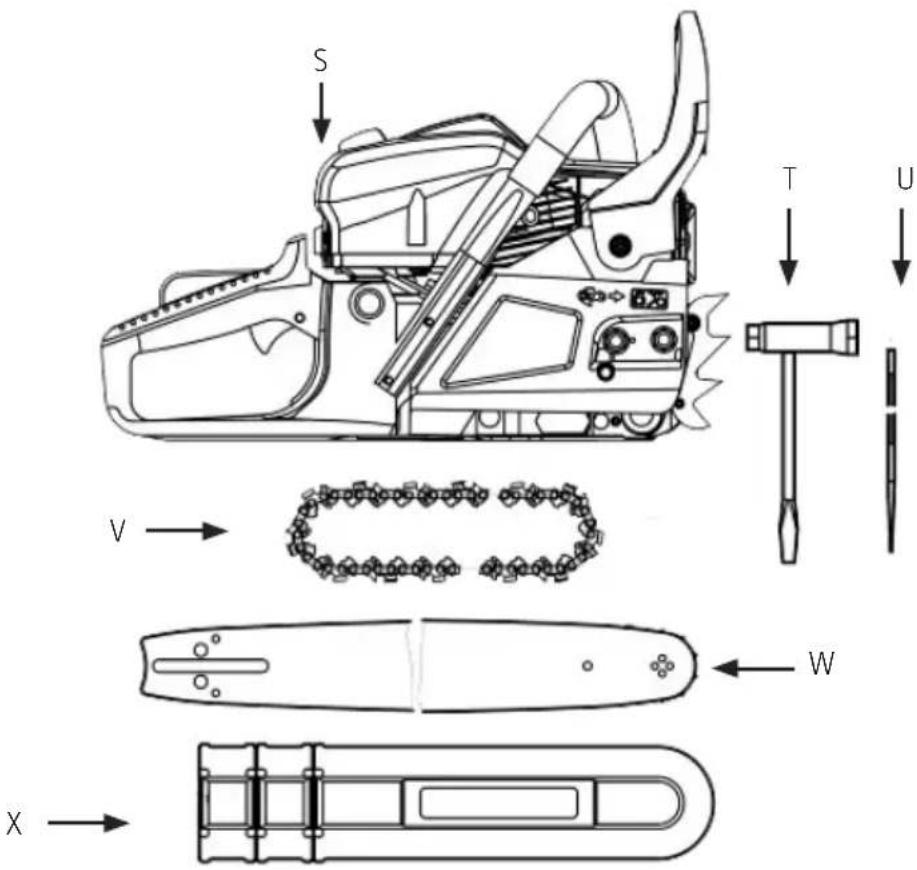
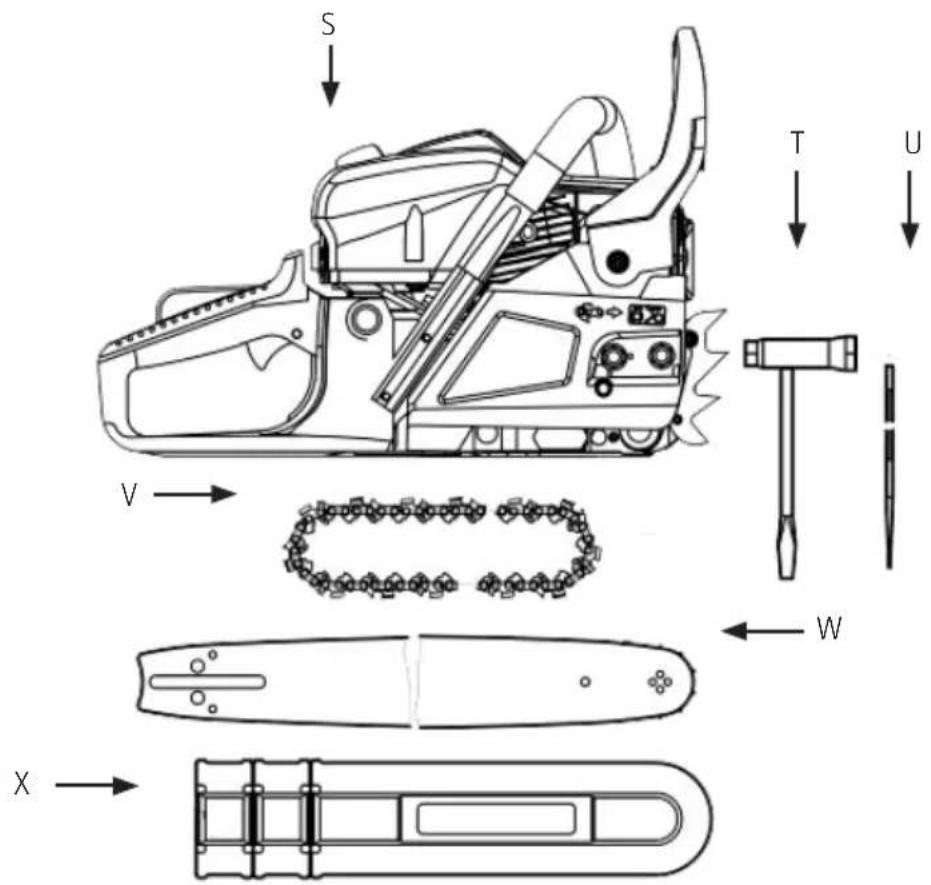
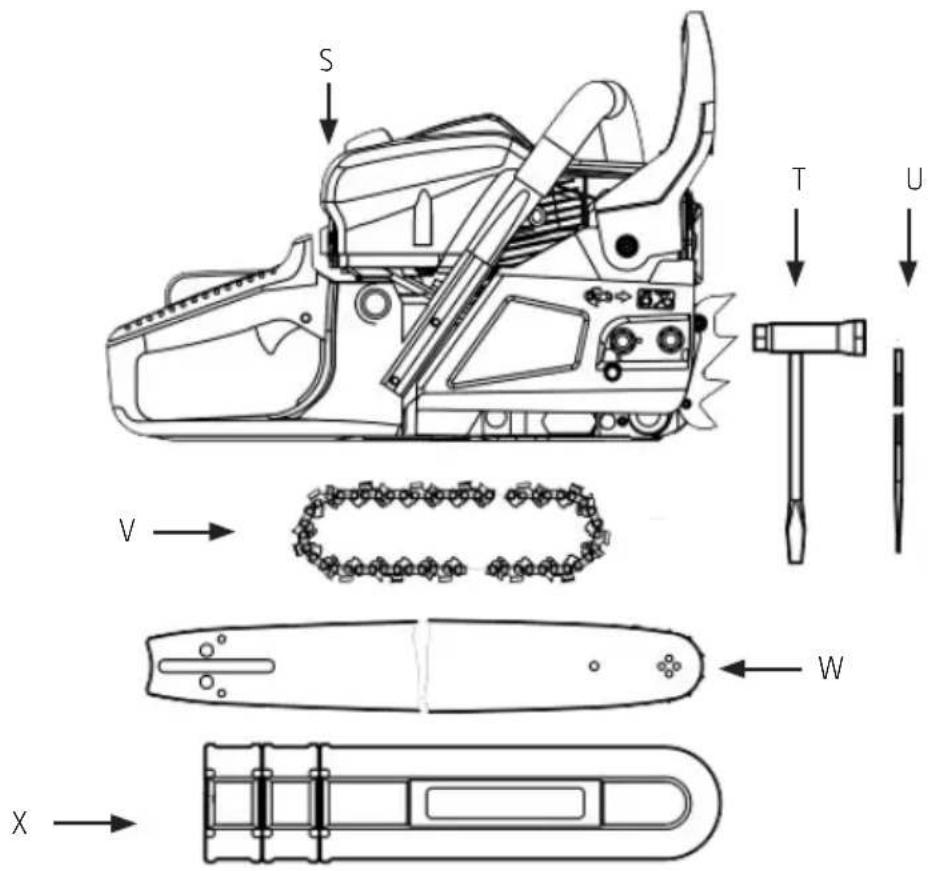
S. Engine
T. Spark plug wrench
U. File
V. Saw chain
W. Guide bar
X. Guide bar scabbard
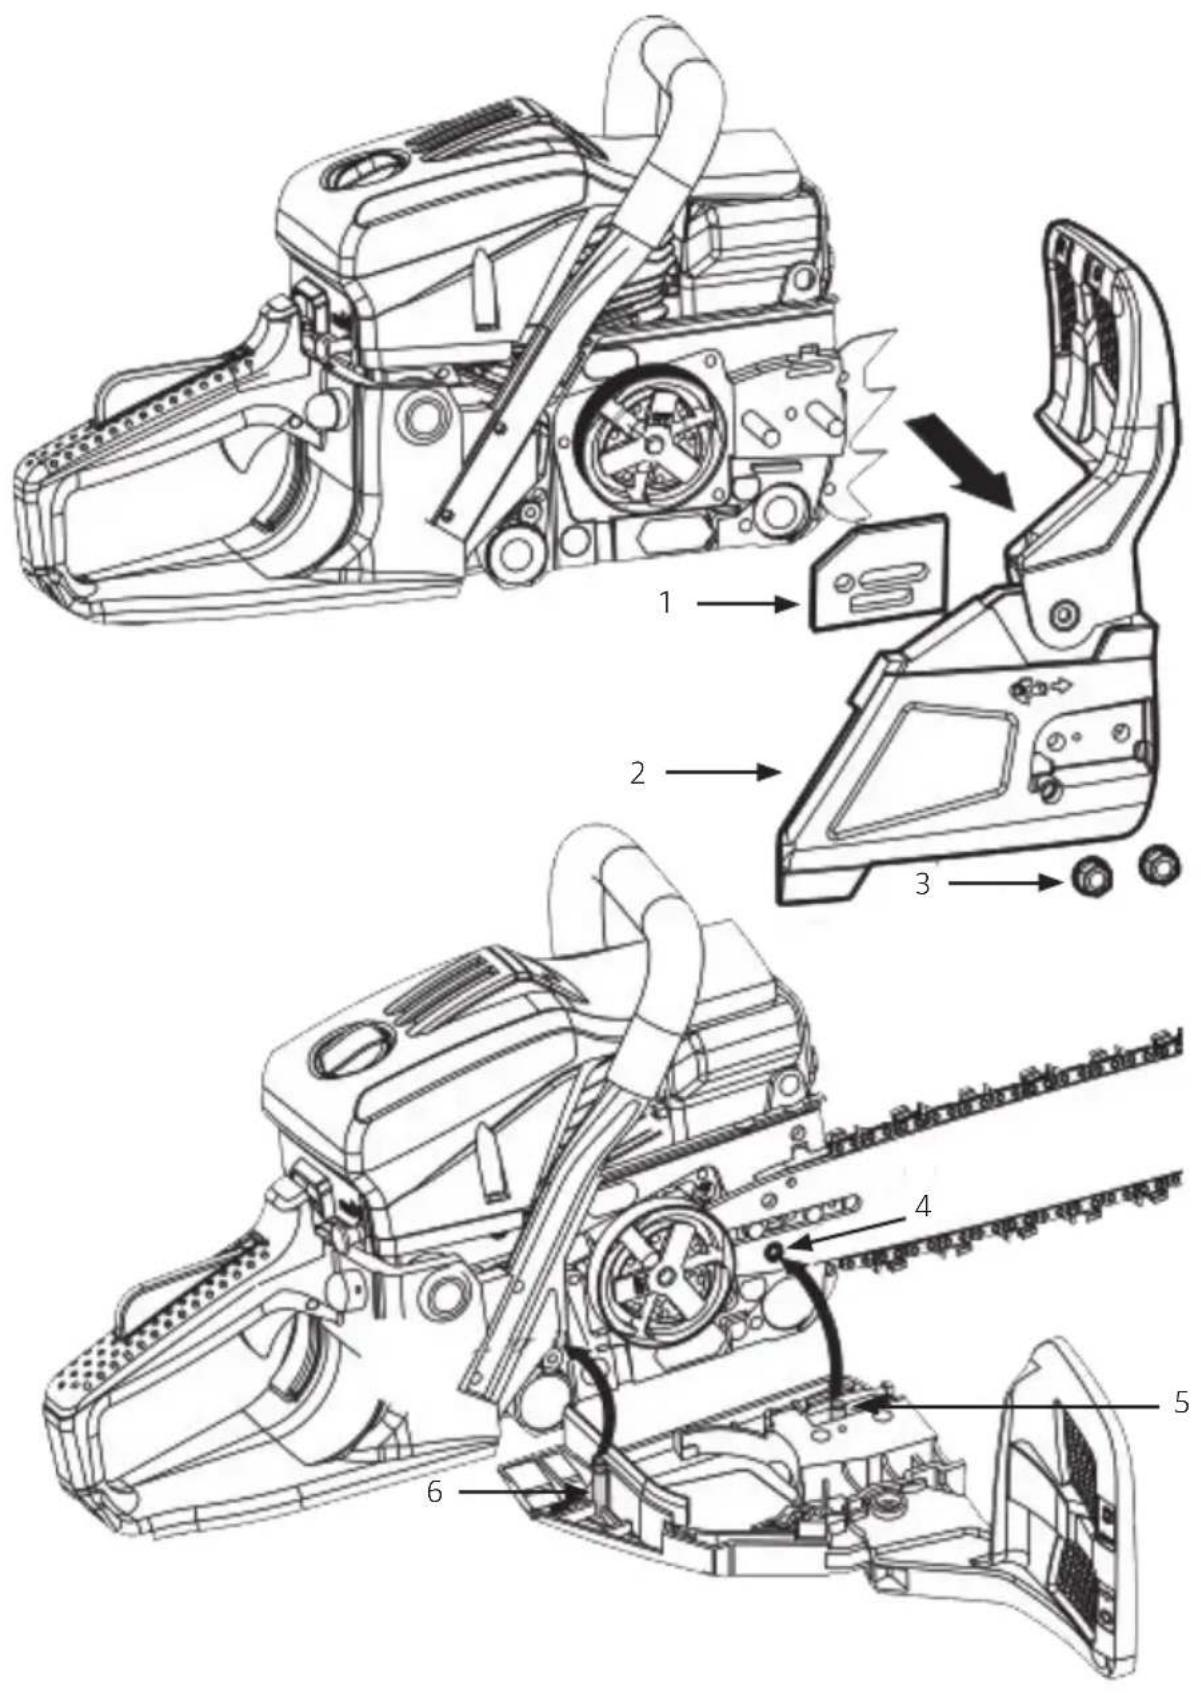
-
Spacer
-
Nuts
-
Chain tension nuts
-
Clutch cover
-
Hole
-
Pin
ASSEMBLY
ASSEMBLING GUIDE BAR AND SAW CHAIN
WARNING The saw chain is very sharp. Wear safety gloves.
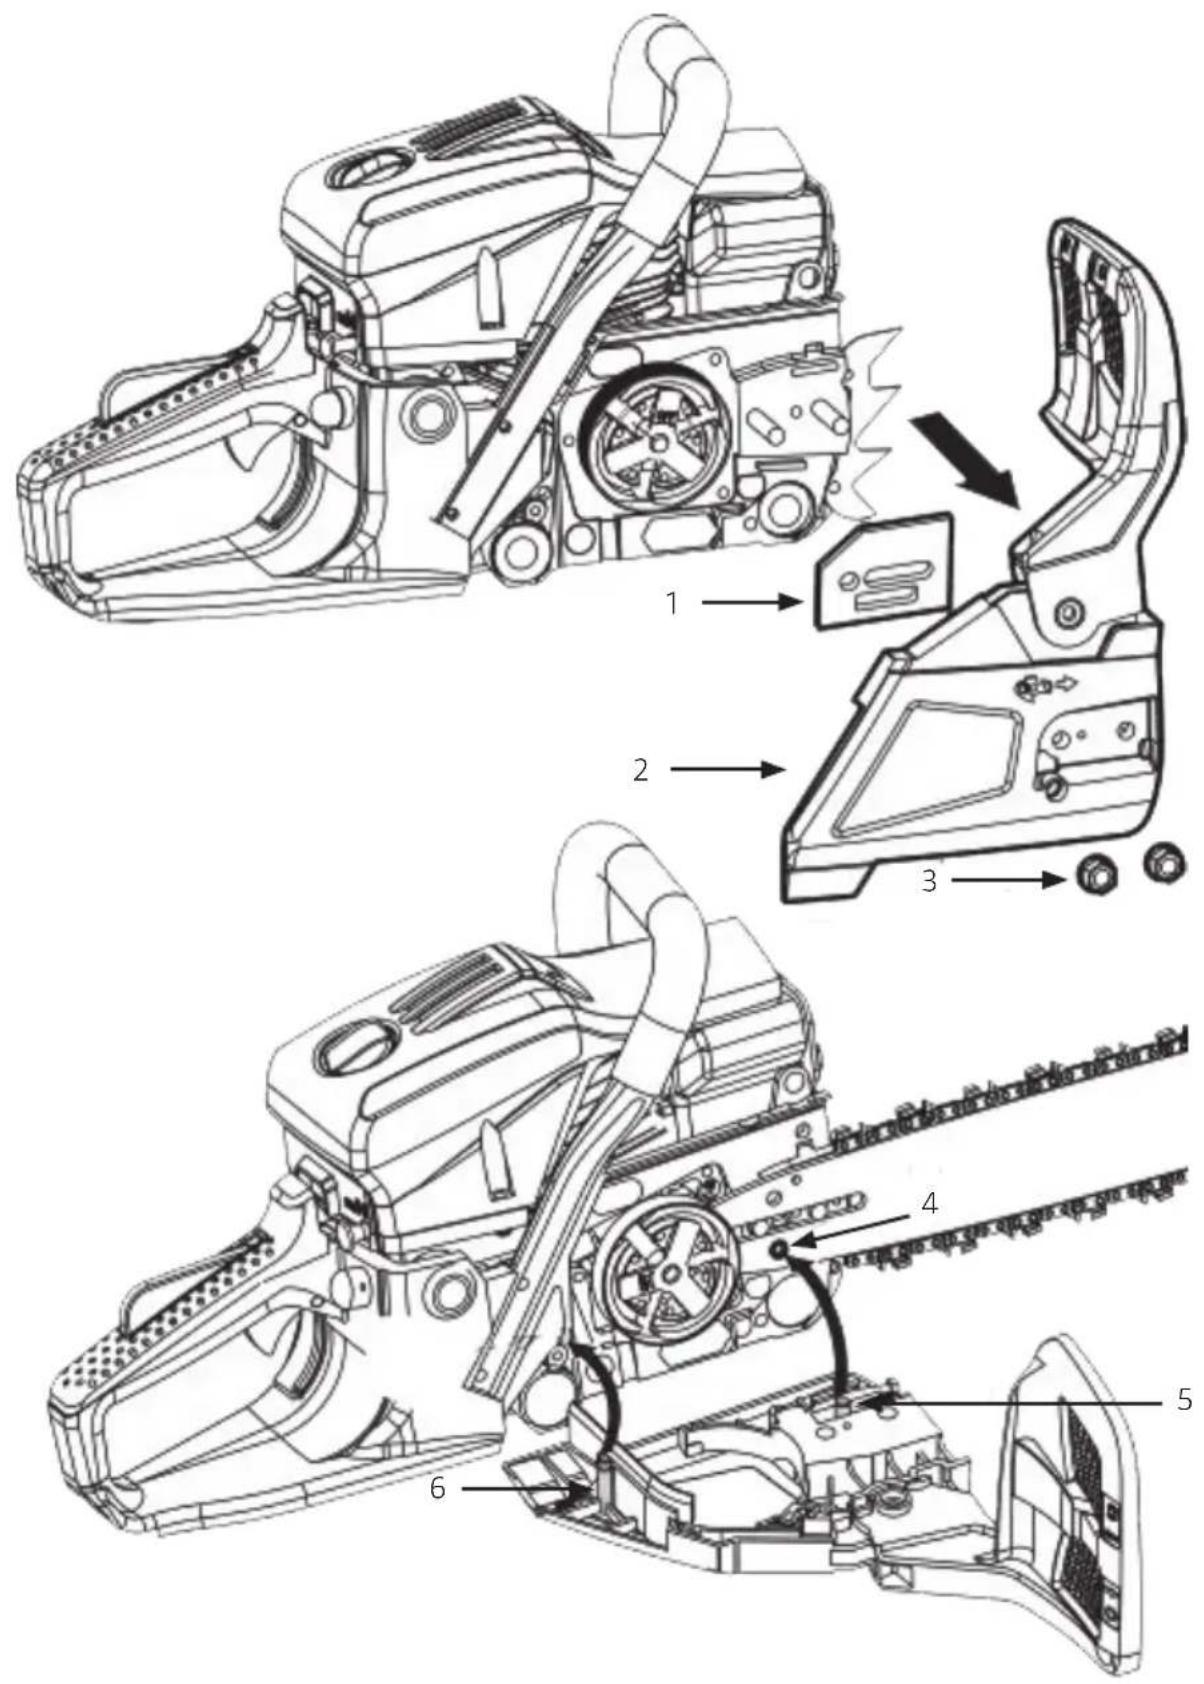
- Pull the front handle guard/chain brake towards the front handle to check that the chain brake is not on.
- Loosen two nuts, then remove the clutch cover and the spacer.
- Hook the chain onto the sprocket. While fitting the saw chain around the guide bar, mount the guide bar to the power unit.
- Fit the chain tensioner nut into the lower hole of the guide bar, then install the clutch cover and fasten the mounting nut to finger tightness. Make sure the pin on the clutch cover has been inserted in the hole on the engine base.
- Make sure to fit the saw chain in the correct direction.
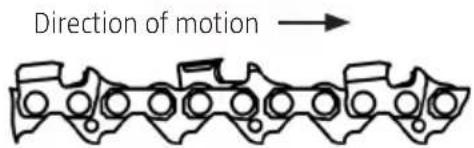
Tighten the chain against the guide bar
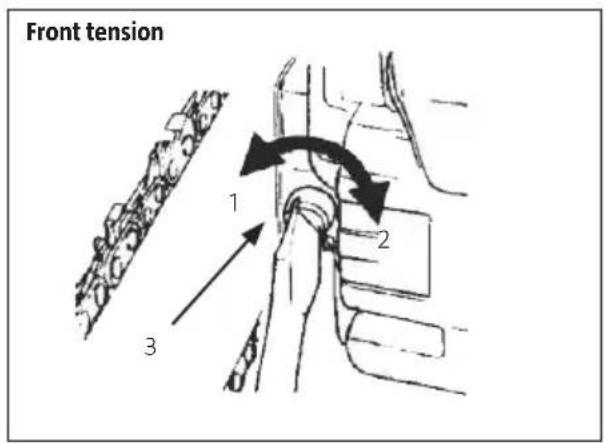
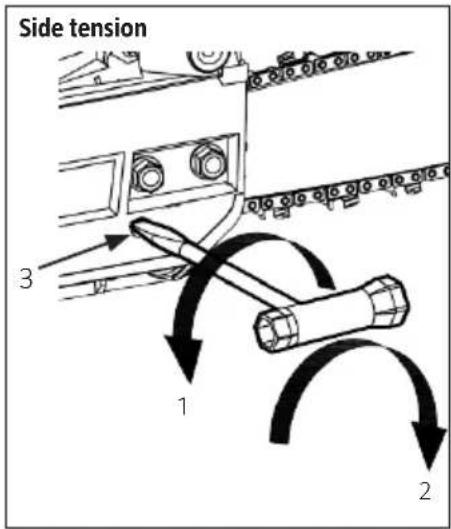
NOTE: It is very important that the chain has the correct tension. Incorrect chain tension makes the guide bar wear out quickly and can cause the chain to come off. It is especially important to take care with a completely new saw chain, as it stretches somewhat when first used.
natural_image
Diagram of a hand operating a mechanical tool with a rotating track and directional arrows (no text or symbols)- Loosen
- Tighten
-
Chain tension adjusting screw
-
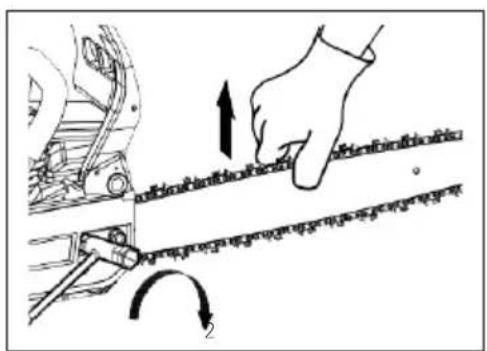
Point the tip of the bar upwards and, at the same time, adjust the chain tension by turning the tensioner screw until the chain just touches the bottom side of the guide rail.
- With the bar tip still pointing upwards, tighten the two nuts securely (12 - 15 Nm).
- Then check the chain for smooth movement and proper tension by moving it round by hand. If necessary, readjust with the clutch cover removed.
- The spiked bumper must always be used. Screw the spiked bumper firmly onto the chainsaw before using it for the first time. Screw the spiked bumper on with two screws, at the very front of the chainsaw.
OPERATION
NOTE:
- The chainsaw can be used to cut tree trunks, logs and branches, according to the length of the guide bar.
- Only use the chainsaw to cut wood.
- Appropriate personal protection equipment must be used.
- This product is designed for use by an experienced operator to prune and fell trees.
- Damage or injuries due to incorrect use are the responsibility of the user, not the manufacturer.
- Suitable saw chain/guide bar combinations should be used, in accordance with these operating instructions.
- Proper use also entails the user following the safety instructions as well as all operating instructions.
- All persons who handle the saw must familiarise themselves with this product and consider all possible risks. All reasonable precautionary measures must be taken. General safety instructions should also be observed.
- Any modifications to the chainsaw annul the manufacturer's liability and invalidate the warranty.
- The chainsaw is designed for use in a normal garden.
FUEL
WARNING
- The fuel is highly flammable. Do not smoke or bring any flame or sparks near fuel.
NOTE:
- Fuel with no oil – i.e. raw petrol – rapidly causes serious damage to the engine.
- Four-stroke oil or oil for water-cooled two-stroke engines can damage the spark plug, block the exhaust system or cause the piston rings to seize.
- The engine is lubricated with oil specially formulated for air-cooled 2-stroke engines. If such oil is not available, use oil with an antioxidant additive which is specifically intended for air-cooled 2-stroke engines.
Recommended mixing ratio
40 parts petrol: 1 part oil (JASO FC or ISO EGC grade for air-cooled, two-stroke engines)
| 2.5 % (1:40) | |
| Petrol, litres Two-stroke oil, millilitres | |
| 1 | 25 |
| 5 125 | |
| 10 250 | |
| 20 500 | |
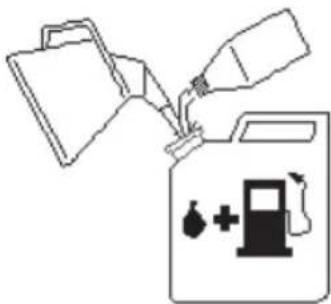
Mixing fuel
- Measure out the quantities of petrol and oil to be mixed.
- Put some of the petrol into a clean, approved fuel container.
- Pour in all of the oil and mix well.
- Pour in the rest of the petrol and mix again, this time for at least one minute.
- Mark the petrol can clearly, to avoid mixing it up with other containers.
natural_image
Simple line drawing of a fuel pump with a bottle and valve, no text or symbols presentRefilling
- Remove the fuel cap and oil cap. Place the caps in a dust-free location.
- Pour the fuel mixture into the fuel tank and fill the oil tank to 80% of capacity.
- Replace the caps securely and wipe up any spillage.
CHAIN OIL
Always use oil specifically intended for chainsaws.
NOTE: Do not use waste or regenerated oil as it can damage the oil pump.
STARTING
WARNING
- Before starting the engine, make sure the saw chain is not touching anything. The chain brake must always be activated before the saw is started.
- When running, the machine must always be held firmly in both hands. Even if you are
left-handed, you must have your left hand on the front hand-grip and the right hand on the rear hand grip.
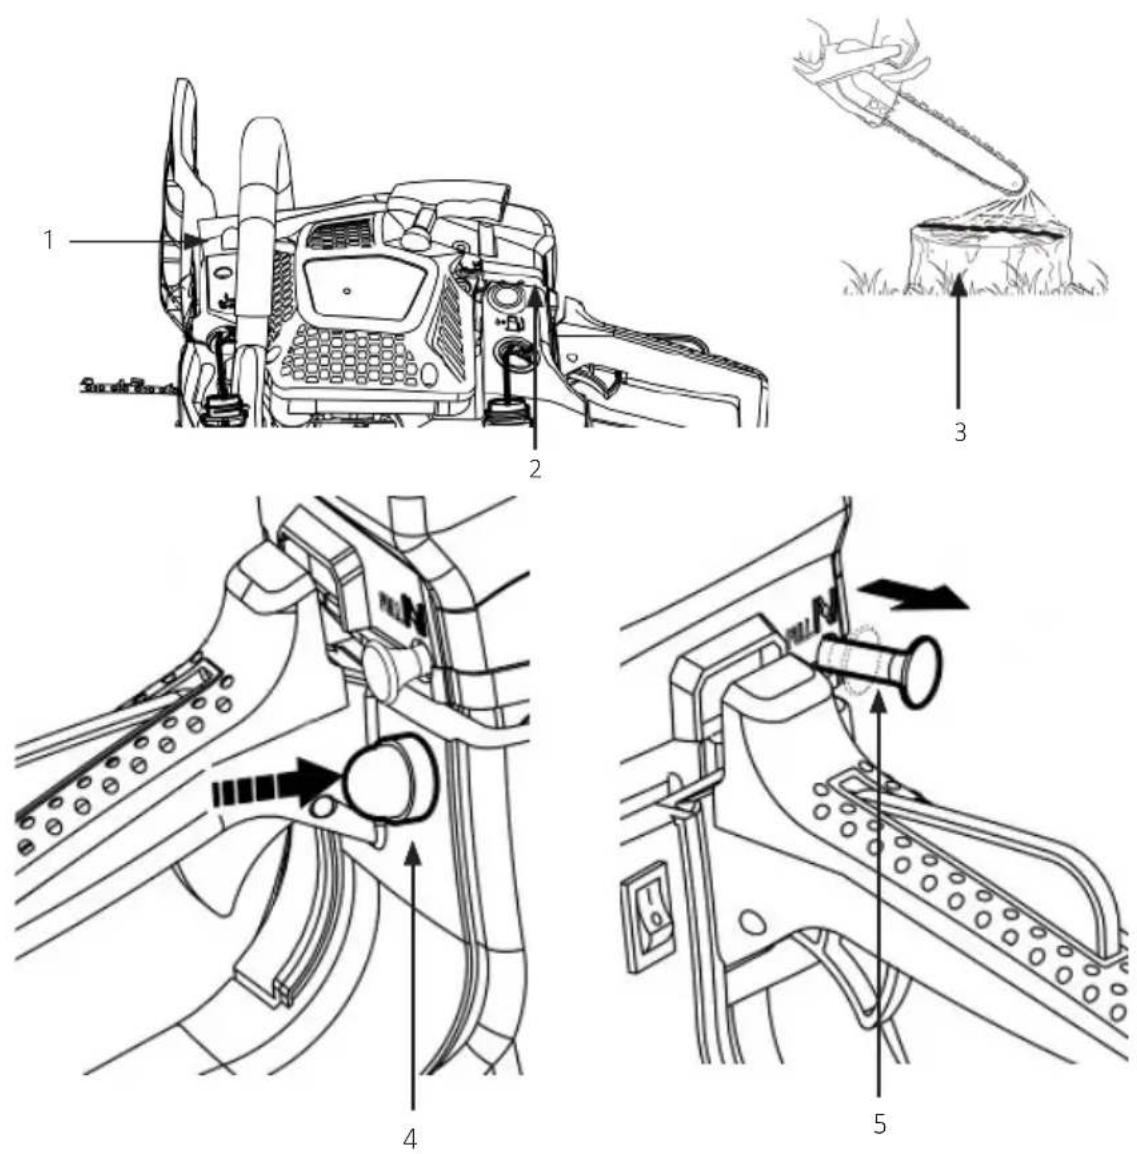
-
Chain oil
-
Fuel pump
-
Fuel
-
Choke knob
-
Engine switch
Cold start
-
Put the switch to the "I" position.
-
Push the fuel pump until you see that fuel is coming through.
-
Pull out the choke knob. The choke will close and the throttle lever will then be set in the starting position.
-
Push the front handle guard/chain brake downwards and towards the front to activate the chain brake.
-
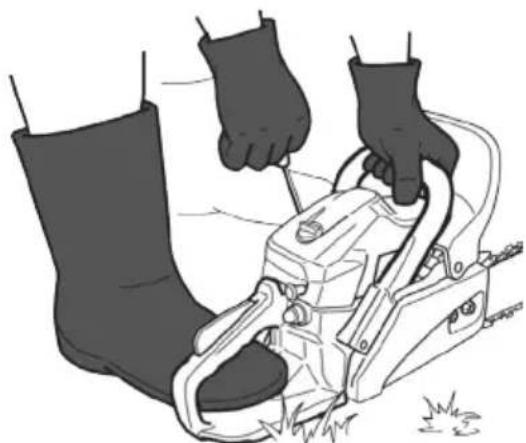
While holding the saw securely on the ground, pull the starter handle vigorously.
-
When the engine fires, press the throttle to reset the choke and pull the starter handle again to start the engine.
natural_image
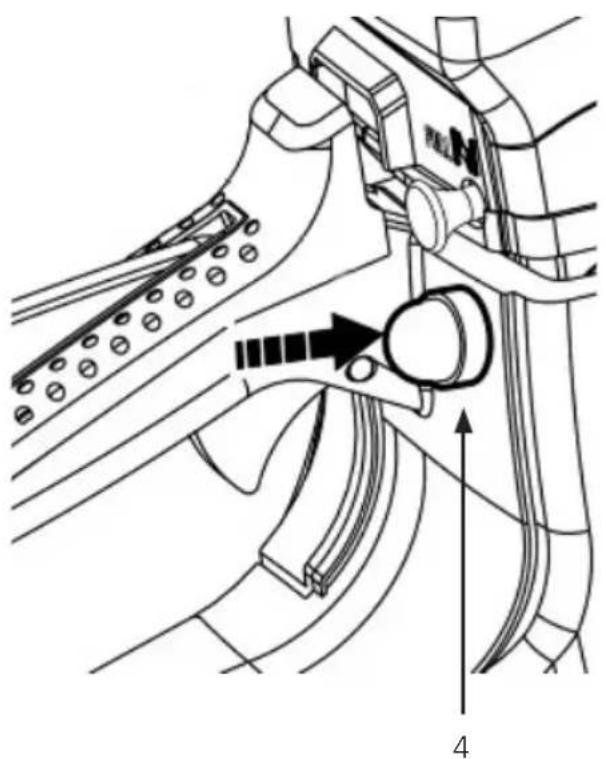
Illustration of hands operating a mechanical tool with a foot and base, no text or symbols present- Pull up the front handle guard/chain brake towards the actual handle to release the brake. When the engine starts, allow the engine to warm up with the throttle pulled slightly.
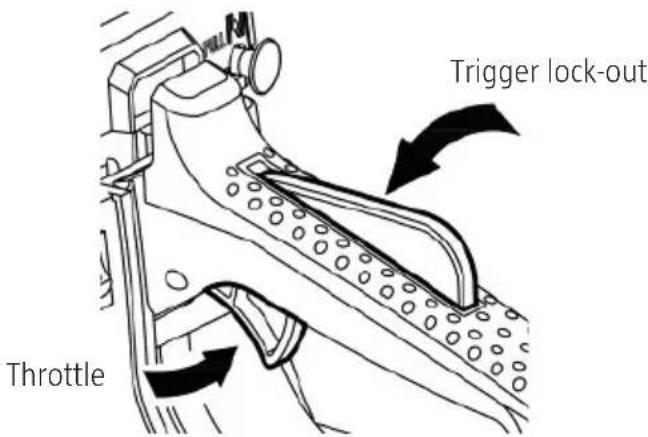
Warm start
- When restarting immediately after stopping the engine: set choke in the open position.
Once the choke has been pulled out, it will not return to normal operating position and it cannot be pressed in by hand. - Press the throttle to return the choke to the operating position.
- Follow the instructions for cold start, beginning with point 4.
STOPPING
- Release the throttle and allow the engine to idle for a few minutes.
- Set the power switch to "O".
CHECKING SUPPLY OF OIL TO CHAIN
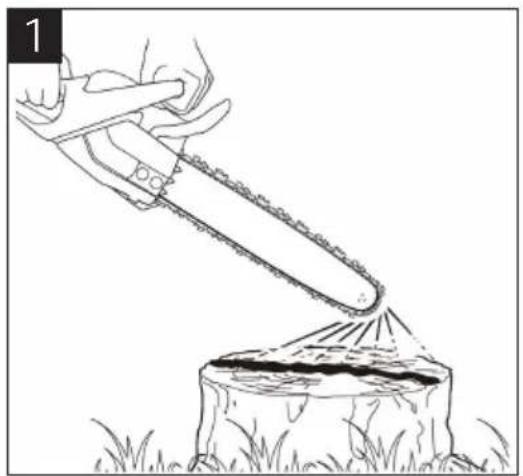
- After starting the engine, run the chain at medium speed to check whether chain oil is distributed as shown in figure 1.
- The chain oil flow can be adjusted by inserting a screwdriver in the hole at the bottom of the clutch side and adjusting the chain oil screw (fig. 2). Adjust the flow to suit the work you are going to do.
– Turn the screw anticlockwise to increase the flow.
- Turn the screw clockwise to decrease the flow.
natural_image
Line drawing of a person using a chain to cut a tree stump (no text or symbols)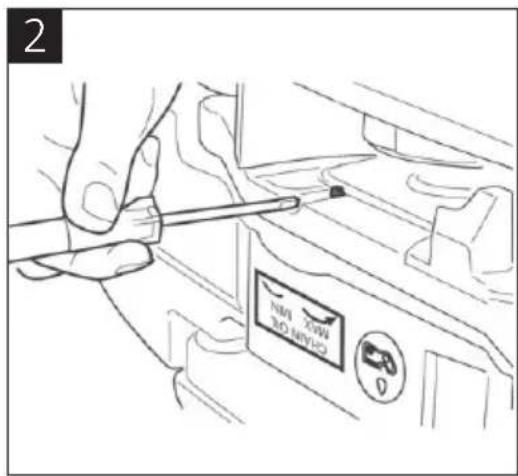
NOTE: The oil tank should be empty at roughly the same time as the fuel tank. Remember to refill the oil tank at the same time as refuelling the saw.
CHECKING THE FUNCTION OF THE CLUTCH
Before each use, check that there is no chain movement when the chainsaw runs at idling speed.
ADJUSTING CARBURETTOR
The carburettor may only be adjusted by an authorised repair centre.
CHAIN BRAKE
- The chain brake is a safety device which stops the chain instantaneously if the chainsaw recoils due to kickback.
- The brake is normally activated automatically through inertial force. It can also be activated manually by pushing the brake lever/front handle guard down towards the front.
- When the brake is active, a white cone protrudes from the base of the brake lever.
- To release the brake, pull up the front handle guard/chain brake towards the front handle until it clicks into place.
- When the brake is activated, release the throttle lever to slow down the engine speed.
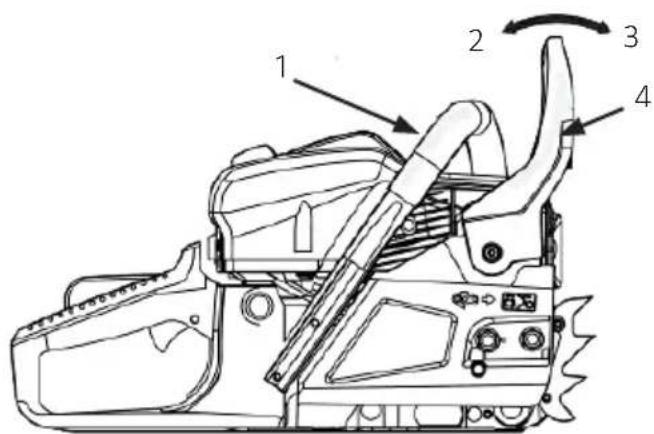
- Front handle
- Release brake
- Activate brake
- Front hand guard/chain brake
NOTE:
- Continuous operation with the brake engaged will generate heat from the clutch and may cause problems.
• Always check that the brake is working before using the saw.
Checking the brake
-
Turn off the engine.
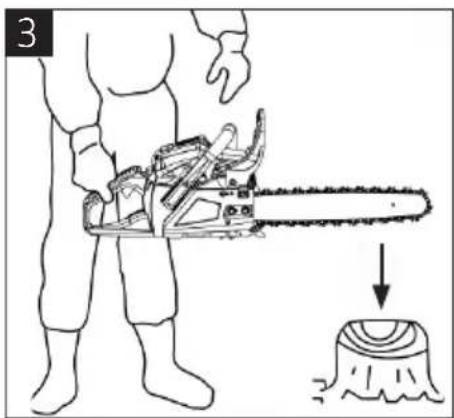
-
Holding the chainsaw horizontally, release the front handle and hit the tip of the guide bar against a stump or other piece of wood (fig. 3). The brake should now be activated. How long this takes depends on the bar size.
natural_image
Line drawing of a person using a chainsaw to cut tree bark (no text or symbols)BEFORE SAWING
- Firstly, read the "Safe use" section. Always follow all safety regulations.
- The first time you use the chainsaw you should choose a simple task. This will help you to get accustomed to your new saw.
- The chainsaw must only be used for cutting wood. Never cut any other material. Vibrations and kickback vary with different materials, and the safety regulations do not then have the intended effect.
- Never use the chainsaw lever for lifting, moving or cutting objects.
- Never mount it on a stand. No accessories other than those specified by the manufacturer may be fitted on the saw, and it must not be used for purposes other than those intended.
- It is never necessary to force the saw into the cut. Only apply light pressure while running the engine at full throttle.
- The saw should be inspected if it has been dropped or subject to other incidents which may have caused damage, as well as before each use.
• Racing the engine with the chain seized in a cutaway can damage the clutch system.
- If the saw chain is stuck, never try to force it out. Instead, use a wedge or similar to open the cut.
NOTE:
- The spiked bumper must always be in place on the saw. Push the spiked bumper into the tree trunk by using the rear handle. Push the front handle in the direction of the cutting line. If necessary, the spiked bumper should remain to facilitate further sawing. Use the spiked
bumper when cutting trees and thick branches, as it enhances safety and reduces vibrations.
- If you detect an obstacle between tree and chainsaw, turn off the machine. Wait until it stops completely. Wear safety gloves and remove the obstacle. If the chain has to be removed, follow the relevant instructions in the operating instructions. A trial run must be conducted after the chain has been cleaned or put on again. In the event of vibration or unusual noises, stop using the saw immediately and contact Julia's service department.
PROTECTION AGAINST KICKBACK
- The saw has a chain brake which, if it operates correctly, will stop the chain in the event of a kickback.
- You must check the chain brake operation before each usage: run the saw at full throttle for 1 to 2 seconds, then push the front hand guard forwards. The chain should stop immediately with the engine at full speed. If the chain is slow to stop or does not stop at all, then replace the brake band and clutch drum before use.
- It is extremely important that the chain brake is checked for proper operation before each use, and that the chain is sufficiently sharp (figure 6), as this significantly reduces the risk of kickback (figure 7). Removal of the safety devices, inadequate maintenance, or incorrect replacement of the bar or chain significantly increases the risk of serious injury due to kickback.
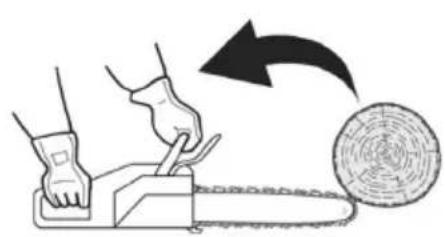
natural_image
Illustration of a hand using a power saw to cut a circular object with a blade, showing mechanical motion (no text or symbols)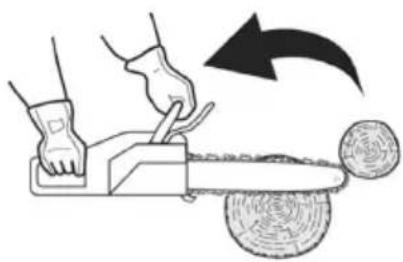
natural_image
Illustration of a hand using a cutting tool to cut a circular object, with an arrow indicating rotation (no text or symbols)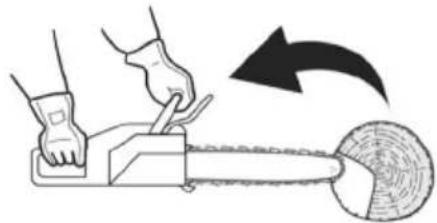
natural_image
Illustration of a person using a chain mill to cut a circular saw (no text or symbols present)Danger of kickback.
FELLING A TREE
WARNING Prior to felling, be sure to warn everybody in the vicinity.
-
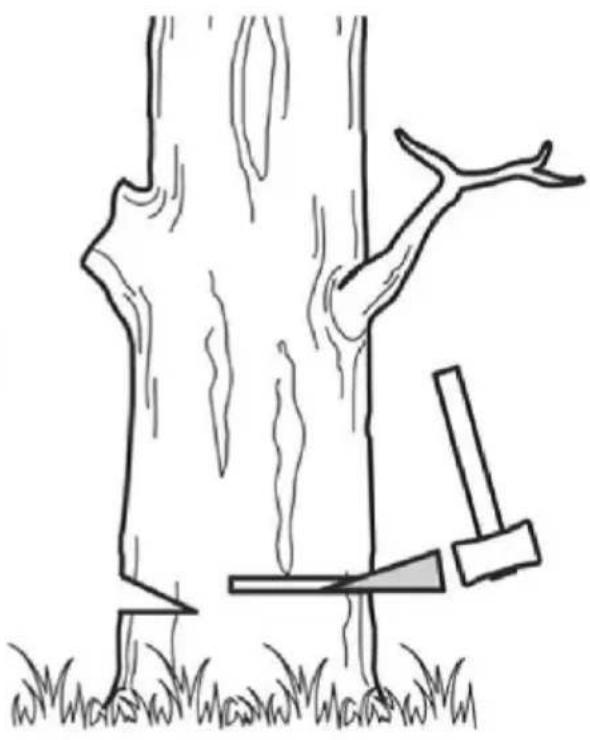
Decide which direction the tree is to fall in, taking into account wind strength, wind direction, the lean of the tree, the location of heavy branches, good location for clearing up after felling, etc.
-
First clear the area around the tree and decide which direction you will go in when the tree starts to fall.
-
Make a notch cut one-third of the way into the tree on the felling side.
-
Make a felling cut from the opposite side of the notch, slightly higher up than the bottom of the notch.
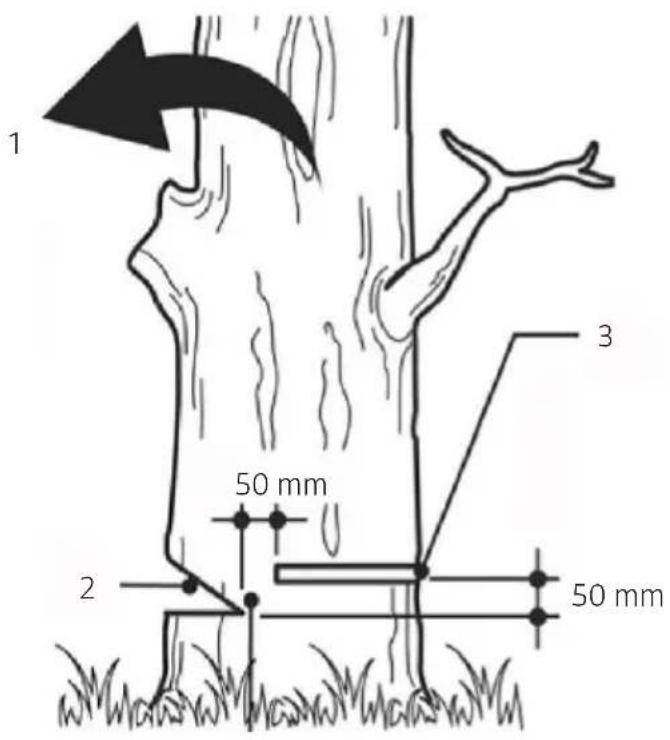
- Felling direction
- Notch cut
- Felling cut
natural_image
Simple line drawing of a tree with a hammer striking a fallen tree trunk, no text or symbols presentLOGGING
WARNING
• Make sure that you have a good foothold and that the tree is lying in a stable position.
- Be alert to the fact that cut logs can overturn or roll away.
- Read the instructions in the "Safe Operation" section to avoid kickback.
- Before starting work, check the direction of bending force inside the log to be cut.
- Always finish cutting in the opposite direction to the bending force, to prevent the guide bar from being caught in the cutaway.
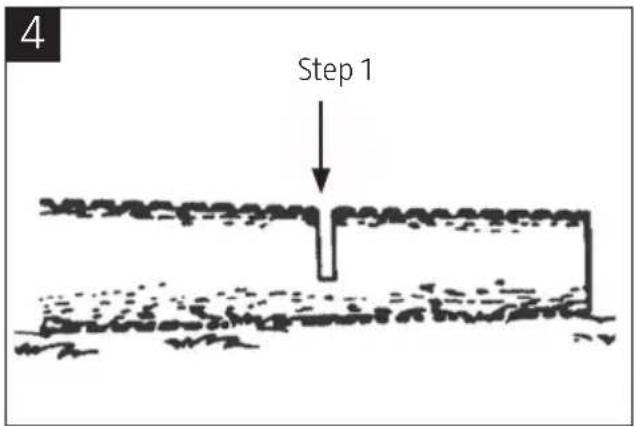
Cutting an unpillowed log
- Saw down halfway, then roll the log over and cut the rest from the opposite side (fig. 4).
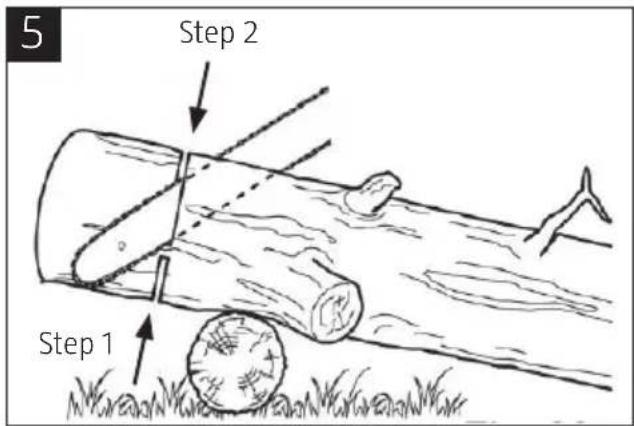
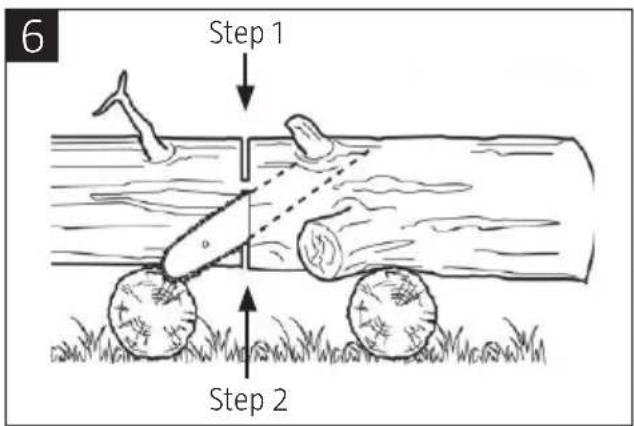
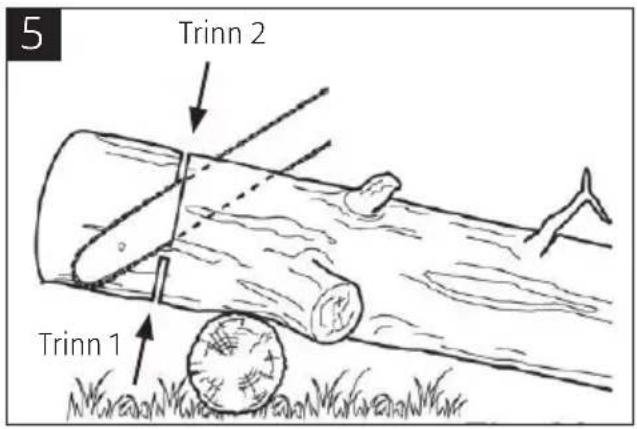
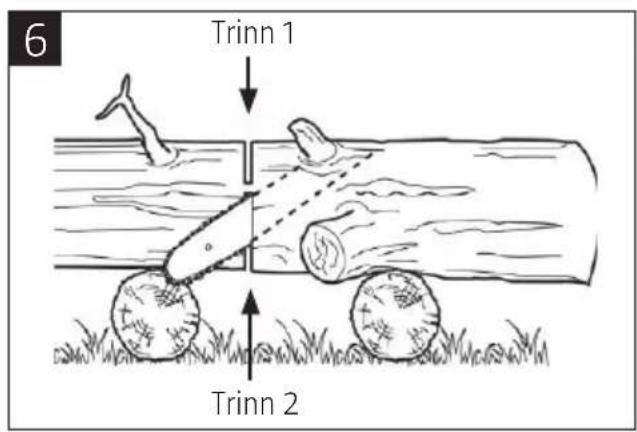
Cutting a pillowed log
- Saw a third from the bottom upwards, and finish by sawing from the top downwards (fig. 5).
- Saw a third from the top downwards, and finish by sawing from the bottom upwards (fig. 6).
SAWING BRANCHES
WARNING
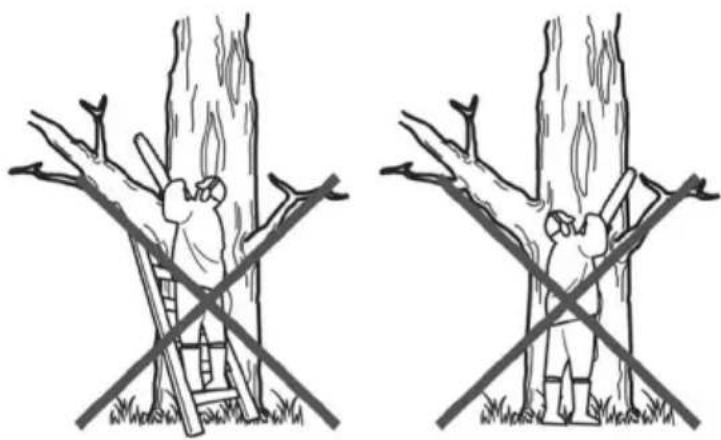
• Make sure you always have a secure foothold, and never stand on a ladder, etc. while you are sawing.
- Do not overreach.
- Never cut above shoulder height.
• Always use both hands to grip the saw.
natural_image
Two identical line drawings of a tree with a person climbing a ladder, crossed by diagonal lines (no text or symbols)Limbing a felled tree
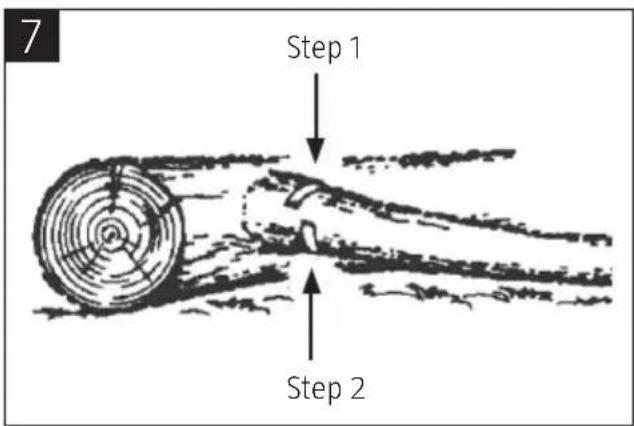
- First check which way the branch is bent.
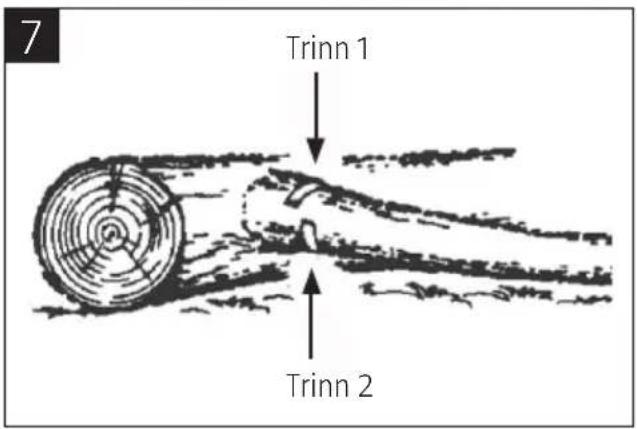
- Then make a shallow cut into the compressed side - this will prevent the branch from whipping back (fig. 7).
- Cut through the branch from the tensed side.
WARNING Be prepared for the branch to spring back.
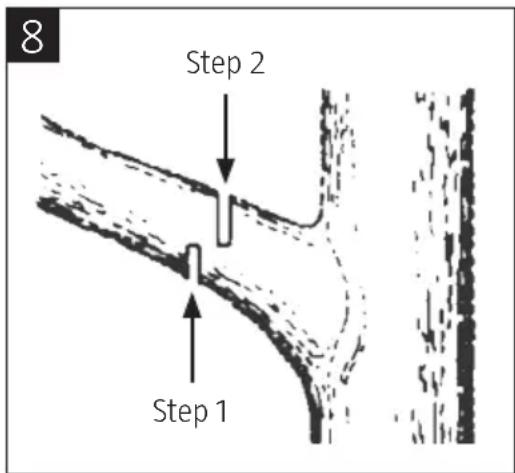
Pruning
Saw from the bottom upwards, and finish by sawing from the top downwards (fig. 8).
MAINTENANCE
WARNING
- Only use spare parts specified in this manual.
• Using other spare parts can cause serious injury. - Follow the instructions for care and maintenance. If the chainsaw is not maintained in accordance with the instructions it may break down.
- Before cleaning, inspecting or repairing the chainsaw, make sure that engine has stopped and cooled down.
- Disconnect the spark plug to prevent accidental starting.
AFTER EACH USE
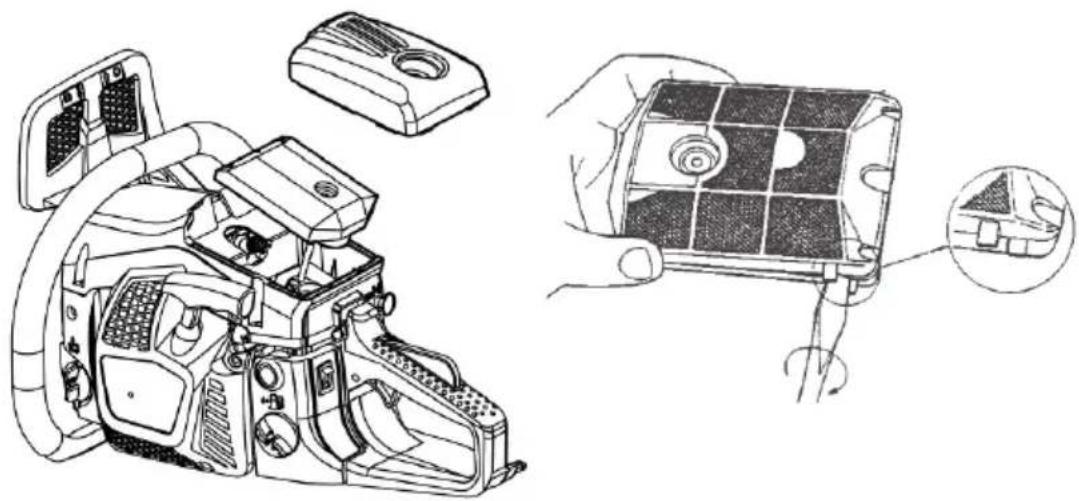
Air filter
- Dust on the surface of the filter's casing can be removed by tapping it against a hard surface.
- To clean dirt from the filter itself, first open the filter casing and then brush the filter clean. You can also blow the filter clean (from the inside) with compressed air.
- To reassemble the filter casing, press the rims until the two halves click together.
natural_image
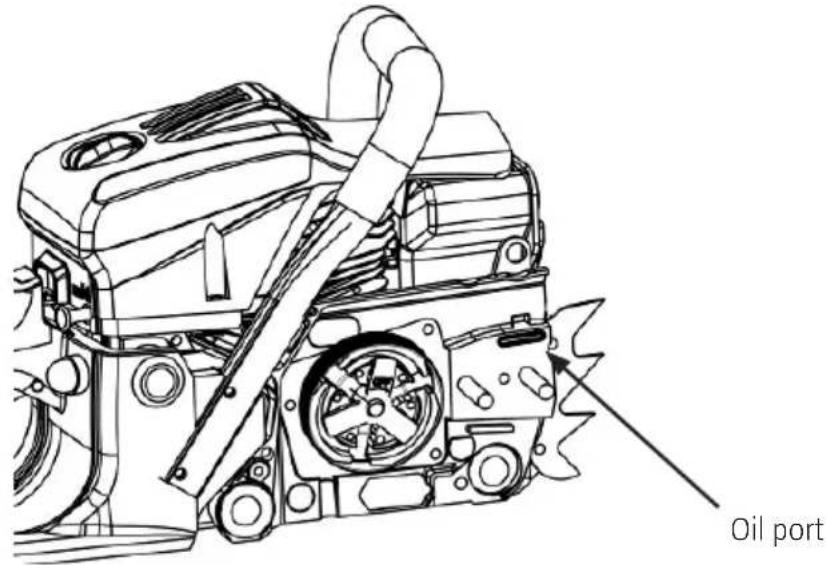
Technical line drawing of a camera module with internal components and a close-up view of the component (no text or symbols present)Oil port
Remove the guide bar and check the oil port for clogging.
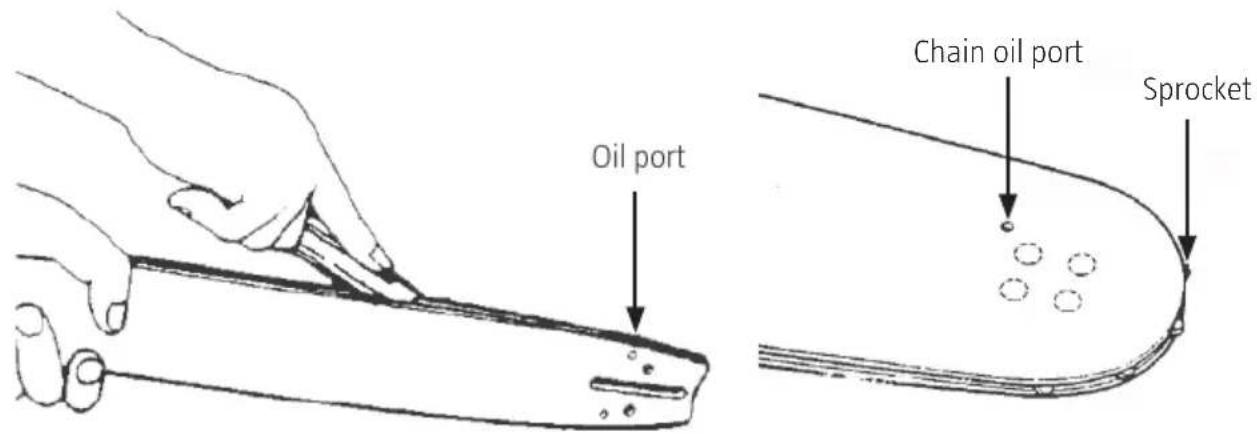
Guide bar
- With the guide bar removed, remove sawdust from the bar groove and the oil port.
- Grease the nose sprocket via the chain oil port on the tip of the bar.
Miscellaneous
- Check for fuel leakage and loose fastenings and damage to major parts, especially handle joints and guide bar mounting.
- If any defects are found, they must be repaired before the saw is used again.
REGULAR MAINTENANCE
Cylinder fins
- Dust clogging between the cylinder fins will cause overheating of the engine. Check and clean the cylinder fins regularly.
- First remove the air filter casing and cylinder cover. When replacing the cylinder cover, make sure that switch wires and grommets are positioned correctly.
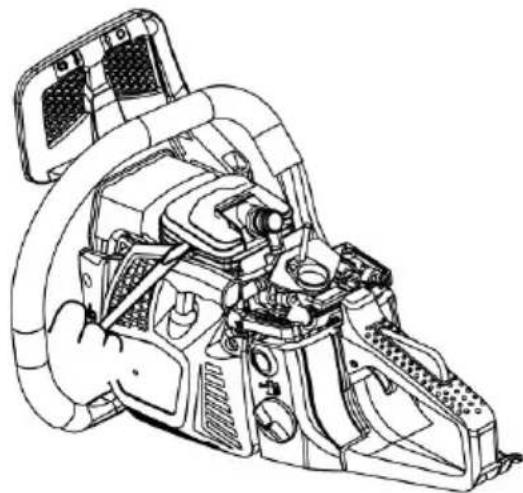
natural_image
Technical line drawing of a mechanical device with internal components (no text or symbols)Fuel filter
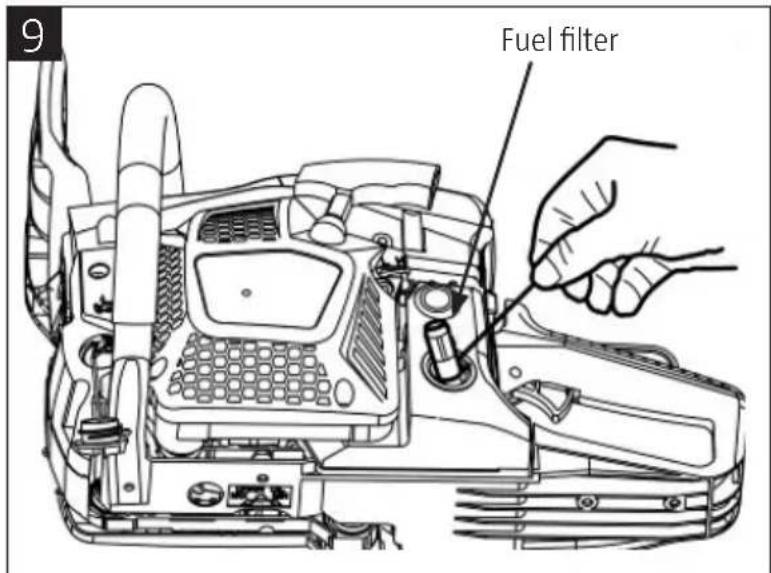
- Use a wire hook to remove the filter from the filler port (fig. 9).
- Dismantle the filter and clean with petrol, or replace with a new one if needed.
NOTE:
• After removing the filter, use a pinch to hold the end of the suction pipe.
- When assembling the filter, take care not to allow fibres or dust into the suction pipe.
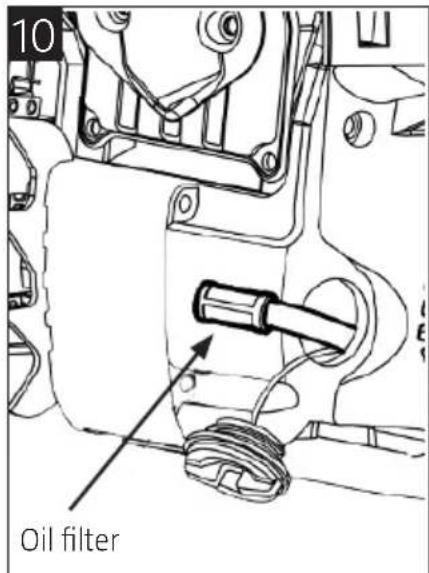
Oil tank
- Use a wire hook to remove the filter from the oil filler port and clean it with petrol (fig. 10).
- When putting the filter back into the tank, make sure that it is placed in the front right-hand corner.
• Also clean dirt from the tank.
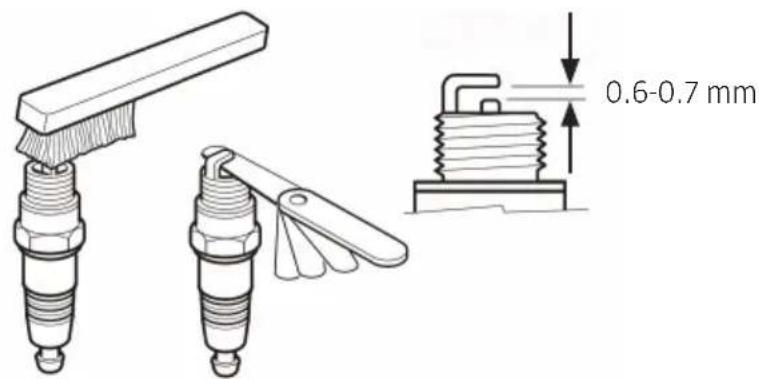
Spark plug
Clean the electrodes with a wire brush and reset the gap to 0.65 mm if necessary.
Sprocket
- Check the sprocket for cracks and excessive wear. If there is considerable wear, replace it with a new one.
- Never fit a new chain on a worn sprocket, or vice versa.
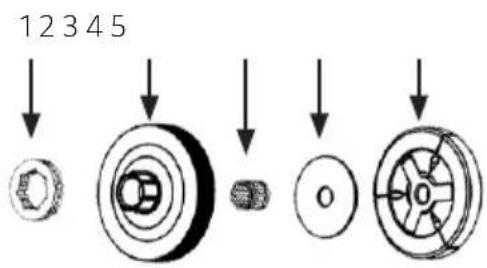
- Sprocket
- Clutch drum
- Needle bearing
- Washer
- Clutch block
Front and Rear dampers
- Replace if the attachment starts to loosen or its rubber starts to crack.
Decompression valve (if applicable)
-
After extended period of use the decompression valve may not close, or may not open because of deposits inside the cylinder.
• To remove the deposits: -
Remove the air filter cover, cylinder cover, spark plug and decompression valve from the engine.
-
Clean the electrodes with a wire brush. Look in through the spark plug hole and crank down the piston to its lowest position by slowly pulling the recoil starter.
-
Prepare a 2 to 2.3 mm diameter drill bit.
-
Lay down the engine with the valve mounting hole turned downwards so that the deposits cannot drop into the cylinder when they are removed.
-
Use the drill bit to scrape off the deposits. Let it rotate very slowly.
-
Remove the drill bit and pull the recoil starter several times.
-
Reassemble the motor.
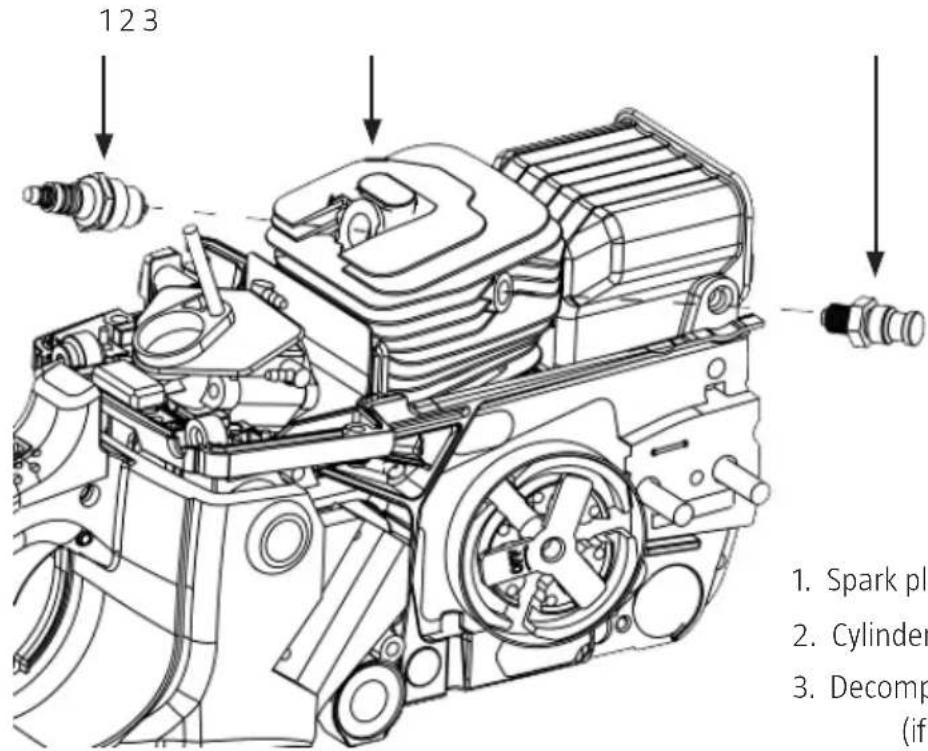
-
Spark plug
-
Cylinder
-
Decompression valve (if applicable)
NOTE: Only use spare parts specified in this manual. Using other spare parts can cause serious injury.
Sharpening saw chain cutters
WARNING
- Wear safety gloves.
- Be sure to round off the front edge to reduce the chance of kickback or chain break.
NOTE:
- It is very important that the chain's cutters are always sharp.
-
Use a round file of proper size to sharpen the chain.
• The saw blades need to be sharpened when: -
sawdust becomes powder-like.
- you need extra force to saw.
- it is difficult to make a straight cut.
- vibration increases.
– fuel consumption increases.
• Make sure the engine is stopped.
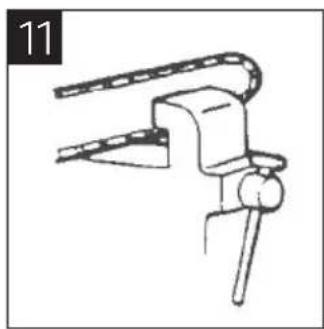
• Make sure the saw chain is held securely (fig. 11).
natural_image
Simple line drawing of a mechanical clamp or bracket assembly (no text or symbols)- Place the round file against the cutters and push straight forward.
- Hold the file as shown in the table.
- After every cutter has been sharpened, check the depth gauge and file it to the proper level, as shown in the table. Make sure that every cutter has the same length and is angled in the same way, as shown in the table.
| Filediameter 4.8 mm |  |
| Upper angle | 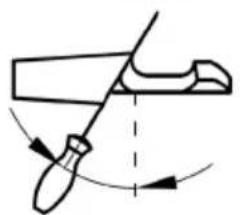 |
| Downward angle | 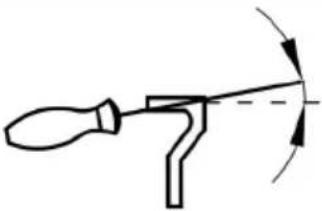 |
| Head angle 55° | 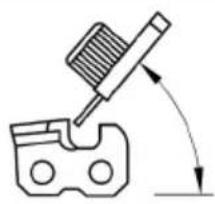 |
| Depth measurement 0.64 mm | 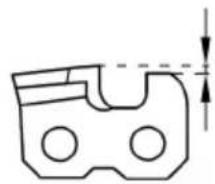 |
| Vice rotation 30° | 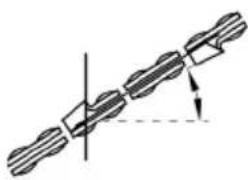 |
| Vice tilt 0° | 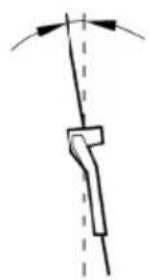 |
| Side angle 80° | 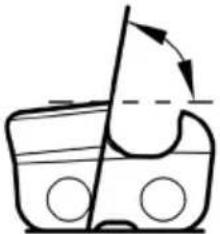 |
| Depth measurement | 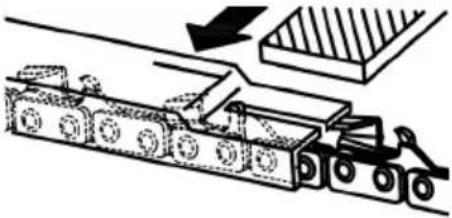 |
| File | 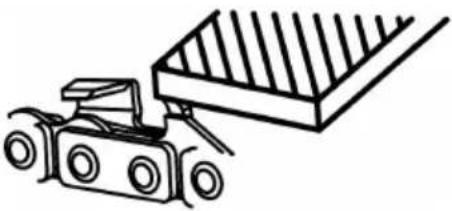 |
Guide bar
- Reverse the bar at regular intervals to reduce wear.
- The bar rail should always be absolutely straight.
- Check for wear of the bar rail. Apply a ruler to the bar and the outside of a cutter. If a gap is observed between them, the rail is normal. Otherwise, the bar rail is worn. A worn-out bar must be corrected or replaced.
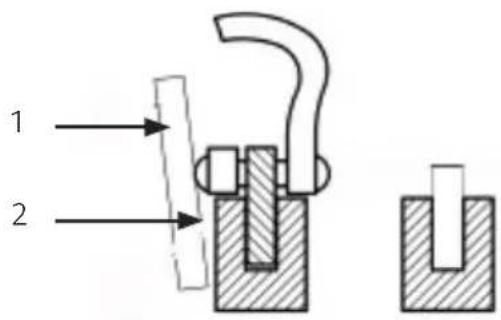
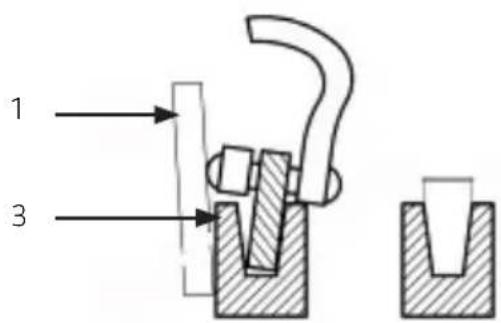
- Ruler
- Gap
- No gap
NOTE: The table below shows all approved combinations of bar and chain. For replacement, only bars and chains from the table below may be used. Use of non-approved combinations may cause serious injury and damage to the chainsaw.
| Pitch Guide bar Chain | ||||
| Zoll Length (cm) Width (mm) Code Code | ||||
| 0.325" 40 | cm 1.5 mm Oregon | 168PXBK095 | Oregon 21BPX066X | |
STORAGE
- Empty the fuel tank and run the engine out of fuel.
- Empty the oil tank.
- Clean the entire chainsaw.
- Store the unit in a dry place out of the reach of children.
WASTE DISPOSAL AND ENVIRONMENTAL PROTECTION
- Never pour excess chain oil or fuel mixture into a drain or into the ground, but take it to an appropriate recycling facility.
- If the chainsaw is to be disposed of, it must not be thrown away with normal domestic refuse, but must be taken to an appropriate recycling facility.
• Empty all oil and fuel from the chainsaw, and take the oil and fuel to an environmental station. - Also dispose of the chainsaw correctly. If the chainsaw is disposed of correctly, plastic and metal parts can be separated and recycled. Information concerning the disposal of materials and devices is available from your local authority.
TROUBLESHOOTING
| Problem Cause | Remedy | ||
| Won’t startWARNINGMake sure the frost protection is not activated | Check fuel for water or whether it is poor quality/incorrectly mixed. | Replace with properly mixed fuel. | |
| Check for engine flooding. Remove and dry the spark plug.Then pull the starter handle again, with no choke. | |||
| Check the plug sparks. Replace with a new plug. | |||
| Poor power/poor acceleration/irregular idling | Check fuel for water or whether it is poor quality/incorrectly mixed. | Clean. | |
| Check whether the carburettor is incorrectly adjusted. | Adjust the revs. | ||
| No oil comes out Check the oil’s quality. Replace. | |||
| Check whether the oil port or oil pipe is clogged. | Clean. | ||
Contact Julia's service department if problems remain.
Jula reserves the right to make changes. In the event of problems, please contact our service department. www.jula.com
natural_image
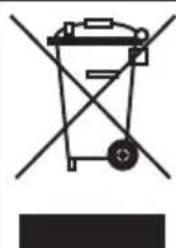
Symbol of a trash bin crossed with no text or labels, representing waste sorting or disposal (no text present)Care for the environment!
Must not be discarded with household waste!
This product contains electrical or electronic components that should be recycled.
Leave the product for recycling at the designated station e.g. the clocal authority's recycling station.
CE
EC DECLARATION OF CONFORMITY
EG FÖRSÄKRAN OM ÖVERENSSTÄMMELSE
EF SAMSVARSERKLAERING
DEKLARACJA ZGODNOŚCI WE

Jula AB, Box 363, SE-532 24 SKARA, SWEDEN
certify that the design and manufacturing of this product
Machinery Directive 2006/42/EC
EN ISO 11681-1:2011
Electromagnetic Compatibility Directive 2004/108/EC
EN ISO 14982:2008
Outdoor Noise Directive 2000/14/EC, amended by 2005/88/EC
Where applicable, the number of the EC type-examination certificate:
This product was CE marked in year -14
Name and address of the person authorised to compile the technical file:
- SVENSKA....7
- SÄKERHETSANVISNINGAR....7
- SÄKERHETSANVISNINGAR
- Fyll på bränsle
- Kontroll av broms
- FÖRE SÅGNING
- TRÄDFÄLLNING
- SÅGA STAM
- WARNING!
- Oljeöppning
- Bränslefilter
- Oljetank
- Värna om miljön!
- Fyll på drivstoff
- Varmstart
- MERK!
- VED SAGING
- TREFELLING
- SAGE STAMME
- ADVARSEL!
- Kviste et felt tre
- Oljeåpning
- REGELMESSIG VEDLIKEHOLD
- Sylinderflenser
- Drivstofffilter
- Uzupełnianie paliwa
- OSTRZEŻENIE!
- Otwór smarujący
- Filtr paliwa
- DBAJ O ŚRODOWISKO!
- Read the operating instructions carefully before use!
- NOISE
- VIBRATION
- WARNING
- SAFE USE
- BEFORE USE
- SAFETY PRECAUTIONS FOR AVOIDING KICKBACK
- SYMBOLS
- TECHNICAL DATA
- ASSEMBLY
- ASSEMBLING GUIDE BAR AND SAW CHAIN
- Tighten the chain against the guide bar
- OPERATION
- NOTE:
- FUEL
- Recommended mixing ratio
- Mixing fuel
- Refilling
- CHAIN OIL
- STARTING
- Cold start
- Warm start
- STOPPING
- CHECKING SUPPLY OF OIL TO CHAIN
- CHECKING THE FUNCTION OF THE CLUTCH
- ADJUSTING CARBURETTOR
- CHAIN BRAKE
- Checking the brake
- BEFORE SAWING
- PROTECTION AGAINST KICKBACK
- FELLING A TREE
- LOGGING
- Cutting an unpillowed log
- Cutting a pillowed log
- SAWING BRANCHES
- Limbing a felled tree
- Pruning
- MAINTENANCE
- AFTER EACH USE
- Air filter
- Oil port
- Guide bar
- Miscellaneous
- REGULAR MAINTENANCE
- Cylinder fins
- Fuel filter
- Oil tank
- Spark plug
- Sprocket
- Front and Rear dampers
- Decompression valve (if applicable)
- Sharpening saw chain cutters
- STORAGE
- WASTE DISPOSAL AND ENVIRONMENTAL PROTECTION
- TROUBLESHOOTING
- Care for the environment!
- CE
- EC DECLARATION OF CONFORMITY
- EG FÖRSÄKRAN OM ÖVERENSSTÄMMELSE
- EF SAMSVARSERKLAERING
- DEKLARACJA ZGODNOŚCI WE
- This product was CE marked in year -14
Brand : Meec Tools
Model : 721-342
Category : Saw