CDM8:4 mkV - Blender Citronic - Free user manual and instructions
Find the device manual for free CDM8:4 mkV Citronic in PDF.


| Product Type | Blender |
| Model | CDM8:4 mkV |
| Brand | Citronic |
| Power Consumption | 1200 W |
| Motor Speed | Variable up to 25,000 RPM |
| Speed Settings | 4 preset speeds + pulse |
| Jar Capacity | 1.5 L |
| Jar Material | BPA-free Tritan |
| Blade Material | Stainless steel |
| Base Material | ABS plastic |
| Dimensions (W x D x H) | 20 cm x 18 cm x 42 cm |
| Weight | 3.2 kg |
| Cord Length | 1.2 m |
| Voltage / Frequency | 220-240 V / 50-60 Hz |
| Safety Features | Overload protection, non-slip feet, lid lock |
| Cleaning | Dishwasher-safe jar (except lid) |
| Warranty | 2 years |
| Certifications | CE, RoHS |
| Repairability | Replaceable blade assembly and jar |
Frequently Asked Questions - CDM8:4 mkV Citronic
User questions about CDM8:4 mkV Citronic
0 question about this device. Answer the ones you know or ask your own.
Ask a new question about this device
Download the instructions for your Blender in PDF format for free! Find your manual CDM8:4 mkV - Citronic and take your electronic device back in hand. On this page are published all the documents necessary for the use of your device. CDM8:4 mkV by Citronic.
USER MANUAL CDM8:4 mkV Citronic
Order ref: 172.776UK
User Manual
Version 1.1

Caution: Please read this manual carefully before operating
Damage caused by misuse is not covered by the warranty
Introduction
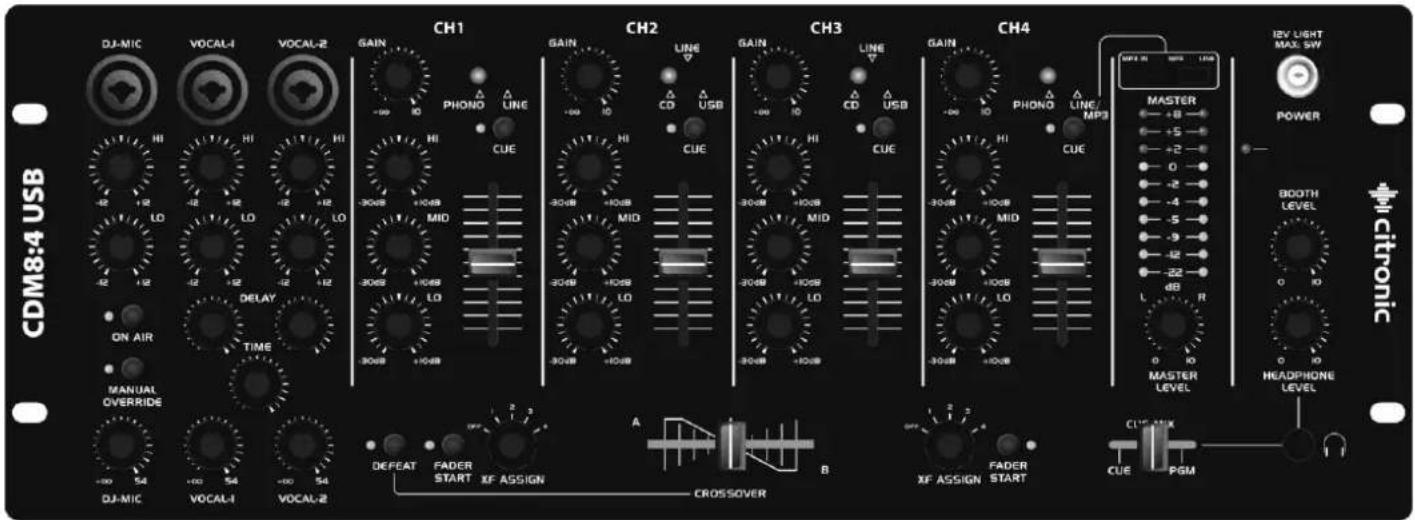
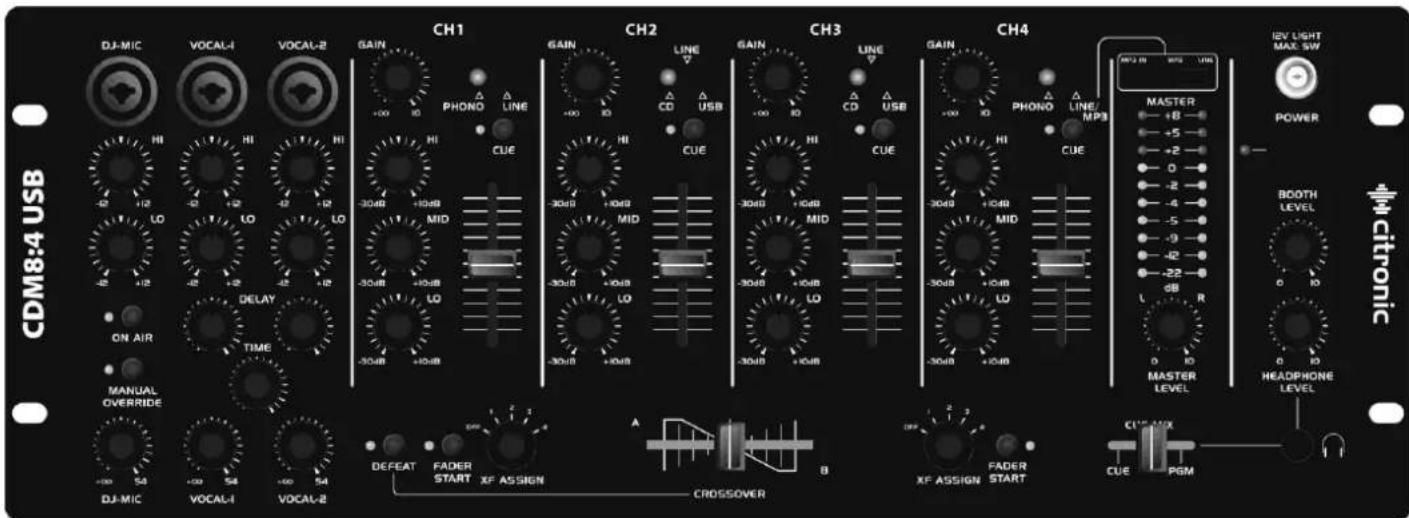
Thank you for purchasing the Citronic CDM8:4 USB Rackmount DJ Mixer.
This product is intended to give long term, reliable service in normal usage.
Please read these instructions before use to avoid incorrect operation and to help outline the functions and controls.
Maintenance
No user serviceable parts inside, refer all servicing issues to qualified service personnel. Clean with a lint-free dry or damp cloth. To replace crossfader, disconnect mains and undo the 2 securing screws slightly, lift the crossfader and disconnect from the in-line connector (noting the correct orientation). Connect the new crossfader, reposition and secure with the 2 screws.
Packing Contents
- IEC Mains cable
• CDM8:4 USB 19" DJ Mixer - Instruction Manual
Controls
Microphone Section:
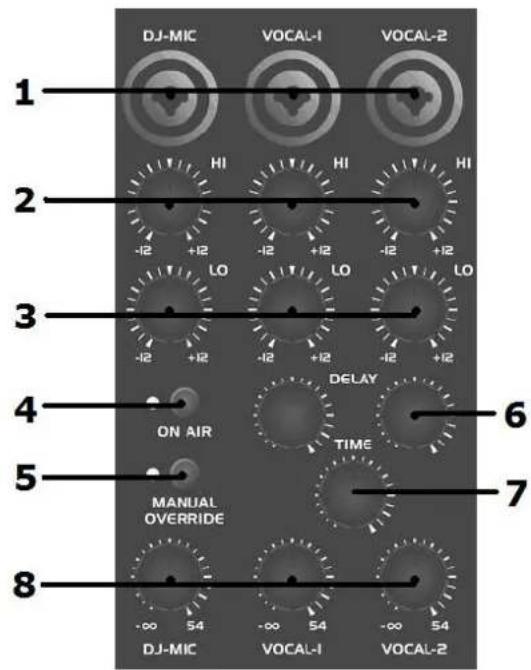
- MICROPHONE - Combo XLR and 6.3mm jack inputs for DJ mic and 2 Vocal mics
- Hi EQ – High frequency cut/boost for mic inputs
- Lo EQ – Low frequency cut/boost for mic inputs
- ON AIR – Switches on or mutes DJ Mic
- MANUAL OVERRIDE – Reduces music level to allow DJ mic talk-over
- DELAY – Delay effect level for Vocal mics 1 + 2
- TIME – Time setting for vocal delay effect
- MIC LEVELS – Individual level for DJ mic and 2 vocal mics
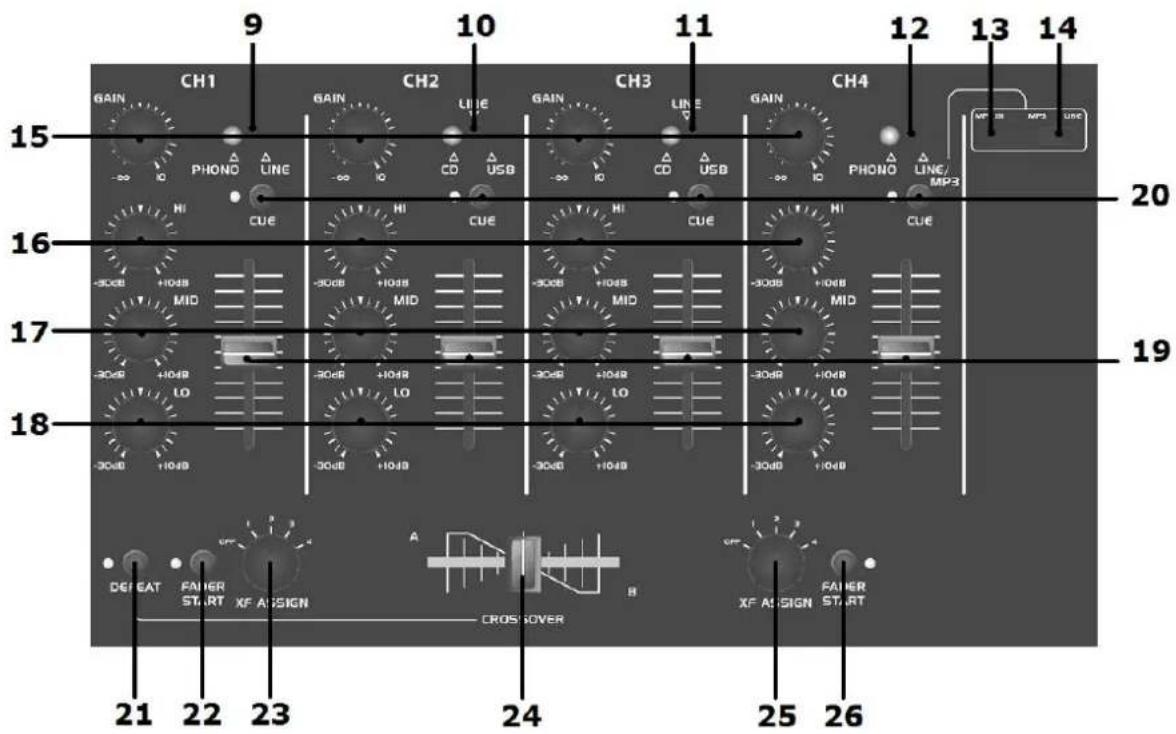
Stereo Section:
-
CH.1 PHONO/LINE – Input selector for channel 1, turntable or line input
-
CH.2 CD/LINE – Input selector for channel 2, CD player or line input
-
CH.3 CD/USB1/LINE – Input selector for channel 3, USB, CD player or line input
-
CH.4 PHONO/USB2/LINE/MP3 – Input selector for channel 4, USB, turntable or line/MP3 player
-
MP3 IN - 3.5mm stereo jack socket for personal MP3 player or other portable source
-
MP3 - LINE - Slide switch to select MP3 input or rear panel line input for channel 4
-
GAIN – Individual gain controls for each stereo channel for matching input levels
-
Hi EQ – High frequency cut/boost for each stereo channel
-
Mid EQ – Middle frequency cut/boost for each stereo channel
-
Lo EQ – Low frequency cut/boost for each stereo channel
-
Fader – Individual volume fader for each stereo channel
-
CUE – Routes channel to meters and headphones for monitoring and cueing tracks
-
DEFEAT – Disables crossfader control over stereo channels
-
FADER START – Activates fader start for the channel assigned to the left side of the cross fader.
-
ASSIGN – Selects channel 1, 2, 3 or 4 for left side of crossfader
-
Crossfader – Allows seamless fading between 2 assigned channels
-
ASSIGN – Selects channel 1, 2, 3 or 4 for left side of crossfader.
-
FADER START – Activates fader start for the channel assigned to the right side of the cross fader.
Master Section:
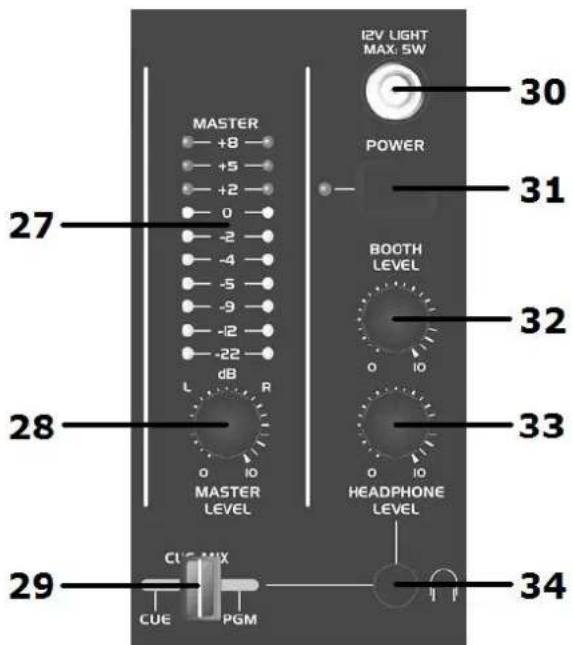
-
VU Meters – Dual 10-segment LED volume meters
-
LEVEL– Master volume level rotary control
-
CUE MIX – Varies headphones signal between cue selected channel(s) and main programme output
-
12 LIGHT - BNC connector providing 12Vdc for console light up to 5W output
-
POWER – Main power switch and LED indicator
-
BOOTH LEVEL – Level control for BOOTH OUTs (39)
-
Headphones LEVEL – Headphone volume control
-
Headphones - 6.3mm stereo jack socket for headphones output
Rear Panel:
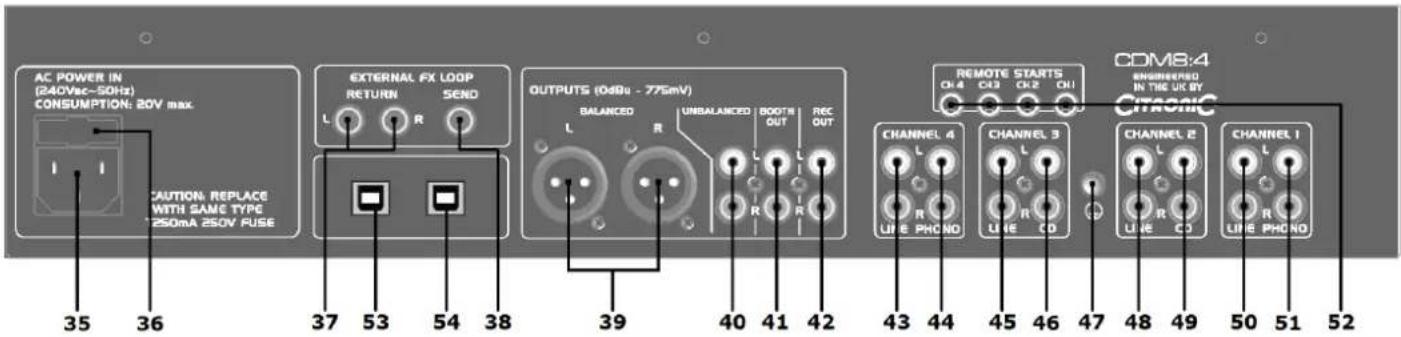
-
Mains inlet – IEC connector to connect to mains using the supplied lead
-
Fuse Holder - 20mm mains fuse holder - please note correct rating when replacing
-
RETURN L+R – When these 6.3mm jacks are connected to the outputs of an external processor, the output of the external unit will override the internal digital delay effect for Vocal mics 1 + 2.
-
SEND – Mono 6.3mm jack to connect to the input of external processors, sending the effect mix from Vocal mics 1 + 2.
-
OUTPUTS BALANCED - Balanced XLR L + R main mix outputs
-
OUTPUTS UNBALANCED – Unbalanced RCA main mix outputs
-
BOOTH OUT - RCA outputs governed by BOOTH LEVEL control (30)
-
REC OUT – High frequency cut/boost for each stereo channel
-
CHANNEL 4 LINE – RCA L+R inputs for line level source (CD, DVD, MP3, PC etc.) (this input is switchable with the top panel 3.5mm stereo MP3 input)
-
CHANNEL 4 PHONO - RCA L+R phono inputs for turntable
-
CHANNEL 3 LINE - RCA L+R inputs for line level source (CD, DVD, MP3, PC etc.)
-
CHANNEL 3 CD - RCA L+R inputs for CD player (or other line level source)
-
Ground (earth) – Screw terminal for grounding equipment to the case of the CDM8:4 USB. Attach turntable ground spade connectors here.
-
CHANNEL 2 LINE – RCA L+R inputs for line level source (CD, DVD, MP3, PC etc.)
-
CHANNEL 2 CD - RCA L+R inputs for CD player (or other line level source)
-
CHANNEL 1 LINE - RCA L+R inputs for line level source (CD, DVD, MP3, PC etc.)
-
CHANNEL 1 PHONO - RCA L+R phono inputs for turntable
- REMOTE STARTS – 3.5mm mono jack outputs sending "start" trigger signals from channel faders 1 to 4 to start play on compatible CD players automatically when the fader is moved upward from the lowest point.
- USB IN/OUT – USB B Input/Output for Channel 4
- USB IN/OUT - USB B Input/Output for Channel 3
Connection Guide:
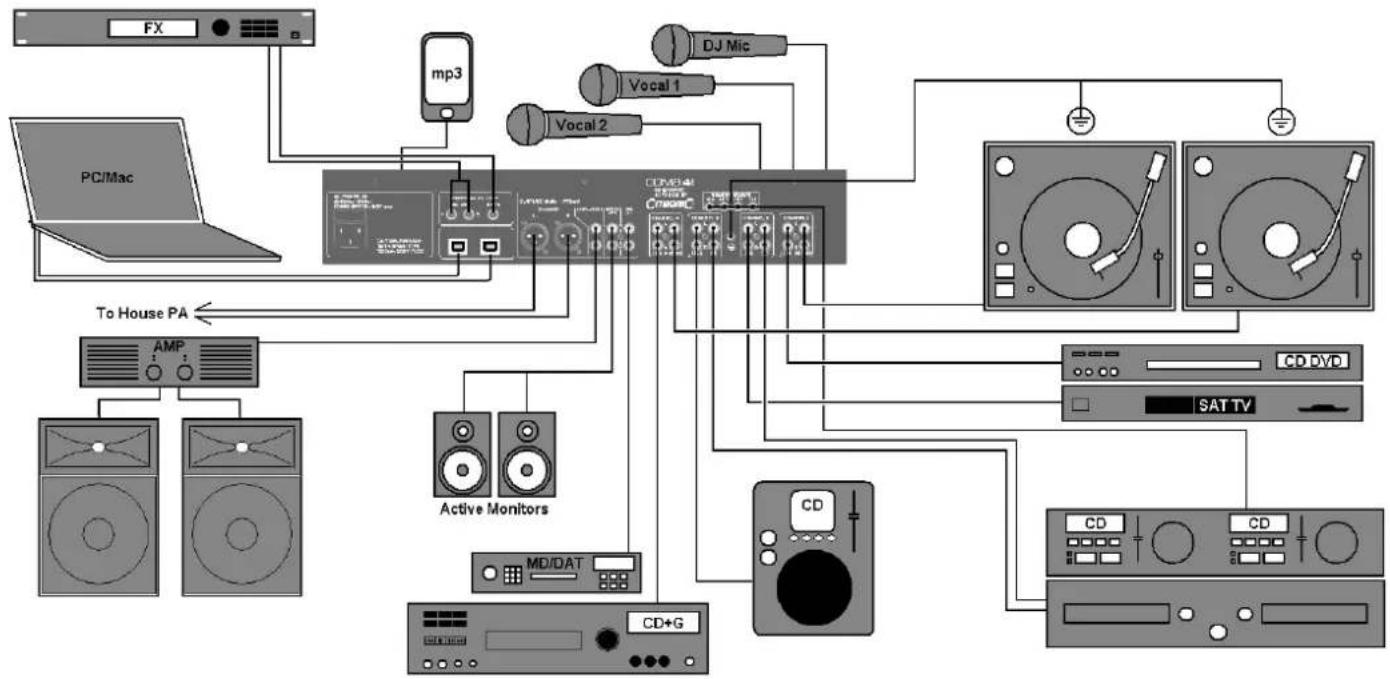
flowchart
graph TD
    PC/Mac["PC/Mac"] -->|To House PA| AMP["AMP"]
    PC/Mac -->|To House PA| CDs["CD"]
    CPU["FX"] --> MP3["mp3"]
    CPU --> Vocal1["Vocal 1"]
    CPU --> Vocal2["Vocal 2"]
    MP3 --> CD+G["CD+G"]
    Vocal1 --> CD+G
    Vocal2 --> CD+G
    CDs --> CD+G
    CDs --> CD/DVD["CD DVD"]
    CDs --> SAT_TV["SAT TV"]
    CDs --> CD["CD"]
    CDs --> CD+G["CD+G"]
    MP3 --> MD/DAT["MD/DAT"]
    MP3 --> ActiveMonitors["Active Monitors"]
    Vocal1 --> CD+G
    Vocal2 --> CD+G
    CD+G --> MD/DAT
    CD+G --> ActiveMonitors
    CD+G --> MD/DAT
    CD+G --> ActiveMonitors
    CD+G --> MD/DAT
    CD+G --> ActiveMonitors
    CD+G --> MD/DAT
    CD+G --> ActiveMonitors
    CD+G --> MD/DAT
    CD+G --> ActiveMonitors
    CD+G --> MD/DAT
    CD+G --> ActiveMonitors
    CD+G --> MD/DAT
Operation:
- Check mains for correct voltage as indicated near to the IEC mains inlet on the rear panel.
- Connect to mains supply using the IEC cable provided.
- Connect the Main unbalanced RCA and/or balanced XLR outputs to the main PA and ensure that the volume levels are turned down to avoid damage.
- Connect the BOOTH outputs to powered booth monitors or separate PA zone.
- Connect any turntables to the RCA PHONO inputs on ch.1 and ch.2.
• Earth turntables to the case grounding point on the rear panel
- Connect CD players or other line output sources to the CD inputs.
- Connect CD, CD+G, laptop, TV decoder, DVD or MP3 players to LINE inputs.
- Connect DJ mic and Vocal mics 1 + 2 to the top panel jack/XLR combo sockets
• If required, connect personal MP3 player to top panel 3.5mm input
- Connect headphones to the HEADPHONE jack
- With MASTER LEVEL down, switch the power on.
- Ensure microphone levels are turned down
• Gradually increase MASTER LEVEL and channel levels to check input signals.
- Be aware that the CROSSFADER also operates across assigned channels - this can be bypassed by pressing DEFEAT.
- To use crossfader, select channels using the ASSIGN levers, ensure DEFEAT is off and the crossfader will then seamlessly blend between these 2 channels.
• Gradually increase microphone channel levels to check microphone signals.
• Monitor each stereo channel via headphones selecting using the CUE switches
- Whilst a channel is on CUE, adjust the GAIN so that LED meters show a full signal without showing "in the red" (overload)
- Adjust Hi, Mid and Lo EQ settings to the desired tonal effect
- When using the DJ mic, push the ON AIR switch and if required, push MANUAL OVERRIDE to drop the music level by a fixed amount whilst talking.
- Adjust Hi and Lo EQ and DJ MIC level settings to suit.
- For singers and karaoke, increase the levels of Vocal mics 1 + 2 and adjust Hi and Lo EQ settings to suit.
- For each vocal mic, adjust DELAY level to the desired amount, variation in the time between delay repeats can be adjusted via the TIME rotary.
- Should a different effect (eg. Reverb, compression, DSP) be required, connecting SEND on the rear panel to an external processor's input and the processor's output(s) to the rear panel RETURNS will serve as an effects loop, overriding the internal delay effect. The DELAY controls will now act as an external effects mix.
- When not being used, turn down the Vocal mic levels to avoid unwanted noise.
Troubleshooting
NO OUTPUT -
Check mains power is on
Check leads and connections
Check MASTER LEVEL and mic or channel fader is turned up
Check CROSSFADER by trying the DEFEAT switch
DISTORTED OUTPUT -
Check line input isn't connected to PHONO
Check channel and MASTER faders are not too high
Check volume control of amplifier, active speakers or recording equipment
MICROPHONE FEEDBACK
Eliminate "line-of-sight" between mic(s) and speakers
Check DELAY is not set too high
Adjust Hi or Lo EQ and/or level controls
MICROPHONE OUTPUT
No output – check if mic switched off
No output – check if phantom power source is required
Low output – ensure mic is not switched to "pad" or "Hi Z"
Quiet vocals – ask singer to sing closer to mic.
DELAY EFFECT
Metallic effect but no delay – increase TIME control to produce more natural echo
No delay effect – increase DELAY controls, check nothing is plugged into RETURNS
TOO QUIET -
Check turntable is not connected to line input
Check channel and MASTER faders are not too low
Check for volume control on sound source
Specifications
Parameter Mic Phono Line/CD
Sensitivity -53dBu 46dBu 0dBu
S/N Ratio 68dB 73dB >87dB
Freq Response 25Hz to 30KHz RIAA < 10Hz to 24 KHz
THD 0.042% < 0.005%
Microphone Equalisation
Lo = ± 12dB @ 80Hz
Mid = ± 12dB @ 600Hz
Hi = ± 12dB @ 6KHz
Music Channel Equalisation
Lo = ± 12dB @ 100Hz
Mid = ± 12dB @ 1KHz
Hi = ± 12dB @ 10KHz
Noise Floor
Main L, R Output: < -100dBu
Mic Pre-Amp T.E.I.N. - 118dBu
Headphones
Load: 32 Ohms MIN
Power: 112mV @ 32 Ohms
Freq Response. 11Hz to 25KHz
S/N 81dB
Output
Master L, R Output: Balanced XLR: 0 dBu (775mV rms)
Unbalanced Phono: 0 dBu (775mV rms)
Booth, Aux Outputs: Unbalanced Phono: 0 dBu (775mV rms)
Dimensions: Width: 483mm (19") Height: 177mm (4U) Depth: 95mm
Weight: 5kg
Cut-out required: Width: 440mm Height: 165mm
Brand : Citronic
Model : CDM8:4 mkV
Category : Blender