11800 - Washing machine Creda - Free user manual and instructions
Find the device manual for free 11800 Creda in PDF.


| Product Type | Freestanding Washing Machine |
| Loading Type | Front Load |
| Capacity (kg) | 6.0 |
| Maximum Spin Speed (rpm) | 1200 |
| Energy Class | A+ |
| Dimensions (H x W x D) cm | 85 x 60 x 55 |
| Weight (kg) | 65 |
| Power Supply | 220-240 V / 50 Hz |
| Programs | Cotton, Synthetics, Delicates, Quick Wash, Rinse & Spin |
| Temperature Settings | Cold to 90°C |
| Extra Functions | Delay Start, Prewash, Extra Rinse |
| Drum Material | Stainless Steel |
| Noise Level (Wash/Spin dB) | 58 / 76 |
| Water Consumption per Cycle (L) | 48 |
| Annual Energy Consumption (kWh) | 175 |
| Door Opening Angle | 180° |
| Display Type | LED |
| Child Lock | Yes |
| Self-Cleaning | No |
| Spare Parts Availability | Official Creda / Indesit service centers |
Frequently Asked Questions - 11800 Creda
User questions about 11800 Creda
0 question about this device. Answer the ones you know or ask your own.
Ask a new question about this device
Download the instructions for your Washing machine in PDF format for free! Find your manual 11800 - Creda and take your electronic device back in hand. On this page are published all the documents necessary for the use of your device. 11800 by Creda.
USER MANUAL 11800 Creda
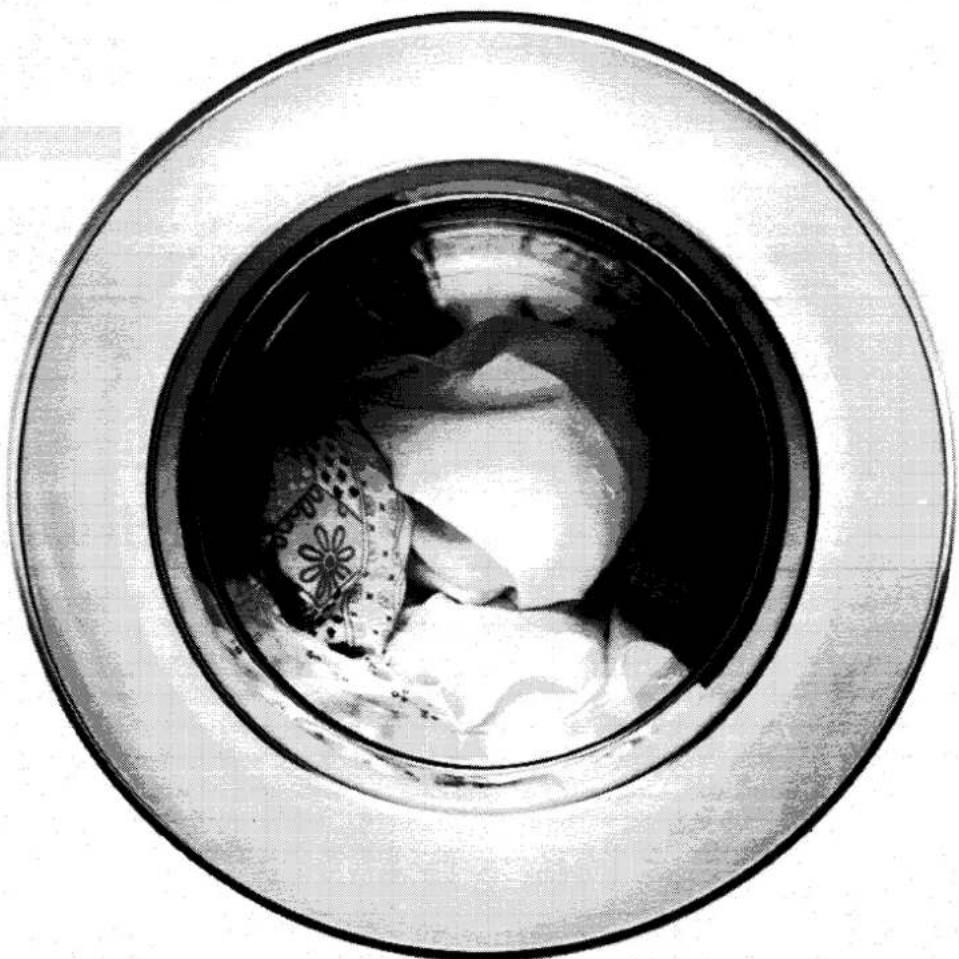
Creda debonair
super electronic
natural_image
Black-and-white photo of a circular frame with a textured interior and patterned fabric, no visible text or symbols.How to get the best out of your Creda Debonair Super Electronic washing machine
It is essential that you read through this Instruction book carefully before your first wash
Creda Debonair Super Electronic
Now that you are the owner of a Creda Automatic washing machine, it is important that you read this book carefully. This book will tell you how to get the best from your new Creda washing machine to ensure that you always obtain the cleanest, freshest wash possible. You must read it through carefully before your first wash.
IMPORTANT
To protect your new washing machine during transit several internal components have been secured with transit packing. This packing must be removed before using the machine. For unpacking, installation, and plumbing, please see the additional installation instruction sheet.
Never remove the rear panel whilst the machine is plugged into the electricity supply.
C
TI Creda Limited, P.O. Box No. 5, Blythe Bridge, Stoke-on-Trent, ST11 9LJ Telephone Blythe Bridge 2281 (STD 07818-2281)

A member of the TI Group.
Contents
| Electrical Requirements | 4 |
| Know your Machine | 4 |
| Controls | 5-6 |
| To Carry out a Simple White Wash | 6 |
| ITCL Wash Codes | 7-8 |
| Variations on a Simple Wash | 8 |
| Detergents, Conditioners, Water Hardness | 9 |
| Stain Removal | 10 |
| Dyeing | 11-12 |
| Care & Cleaning | 13 |
| Optional Extras | 13 |
| Spare Parts | 13 |
| Something Wrong With Your Machine | 14 |
| CredaCover Your Guarantee | 15 |
| How to Obtain Service | 15 |
| Service Addresses | Back Cover |
Electrical Requirements
WARNING — THIS APPLIANCE MUST BE EARTHED. SUITABLE FOR USE ON 240V AC.
The flexible mains lead is supplied connected to a B.S. 1363 fused plug having a fuse of 13 amp capacity. After replacement of a fuse in the plug, the fuse cover must be refitted. If the fuse cover is lost, the plug must not be used until a replacement cover is obtained. The colour of the correct replacement fuse cover is that of the coloured insert in the base of the plug. Fuse covers may be obtained from:
Spares Department, TI Creda Limited, P.O. Box 5, Blythe Bridge, Stoke-on-Trent ST11 9LJ.
13 amp replacement fuses which are ASTA approved to B.S. 1362 should be fitted.
Should this plug not fit the socket outlets in your home, it should be cut off and replaced with a suitable plug, following the procedure outlined below:—
Note: Such a plug cannot be used for any other appliance and should therefore be properly disposed of and not left where children might find it and plug it into a supply socket — with the obvious consequent danger.
IMPORTANT: The wires in the mains lead fitted to this appliance are coloured in accordance with the following code:
As the colours of the wires in the mains lead of this appliance may not correspond with the coloured markings identifying the terminals in your plug, proceed as follows:—
The wire which is coloured green and yellow must be connected to the terminal in the plug which is marked with the letter E or by the earth symbol 12 or coloured green or green and yellow.
The wire which is coloured blue must be connected to the terminal which is marked with the letter N or coloured black.
The wire which is coloured brown must be connected to the terminal which is marked with the letter L or coloured red.
When wiring the plug, ensure that all strands of wire are securely retained in each terminal. Do not forget to tighten the mains lead clamp on the plug. If your electricity supply point has only two pin socket outlets, or if you are in doubt, consult a qualified electrician.
Should the mains lead ever require replacement, it is essential that this operation be carried out by a qualified electrician.
N.B. We recommend the use of good quality plugs and wall sockets that can be switched off when the machine is not in use.
Note: Socket outlets are not permitted in bathrooms, neither should any provision be made for connecting moveable electrical appliances. No stationary appliance is to be installed within reach of a person using bath or shower.
This appliance conforms to B.S. 800: 1977 and EEC directive 76/889 regarding suppression of radio and television reception interference.
Know your machine
natural_image
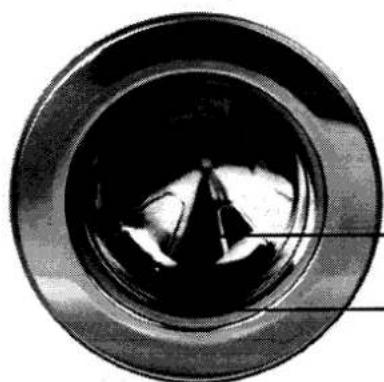
Close-up of a circular mechanical component with internal reflection and a pointed tip (no visible text or symbols)Approximate High Water Level
Approximate Low Water Level

natural_image
Completely black image with no visible content or text.Controls
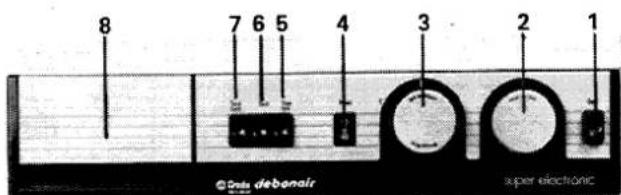
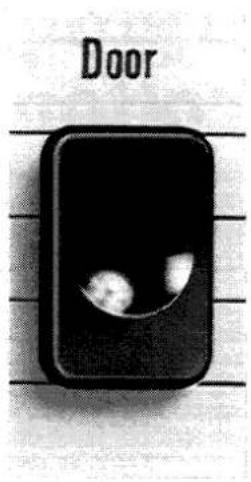
Door Lock
Press the door release button to open the door. The door n be opened only when the Programme Selector is set to 'O'.
THE DOOR SHOULD NEVER BE OPENED WHEN THE WATER LEVEL IS VISIBLE IN THE DOOR WINDOW.
The Programme Selector may be moved forward manually to 'O' during your wash but a short time delay will prevent the door from being opened immediately.
Programme Selector On/Off Switch
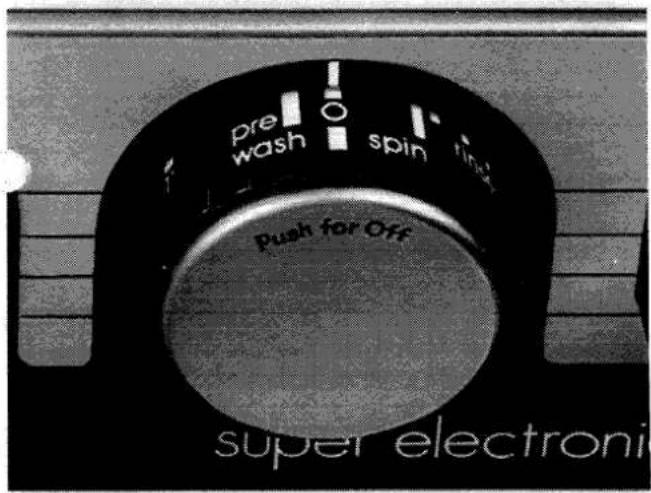
The Programme Selector is marked to give Pre-Wash, and the nine ITCL (International Textile Care Label) wash programmes for the various care code labels found on clothing. The selector should be turned in a clockwise direction only and pulled out to switch the machine on. It should never be turned when it is in the On position i.e. pulled out.
Indicator Light
This light will glow when the machine is plugged in and the electricity is switched on.
Variable Temperature Control
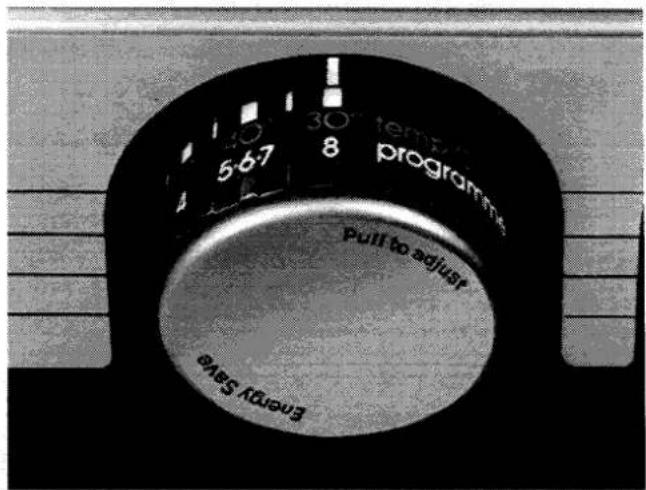
The variable temperature control is used in conjunction with the programme selector and should be set to the temperature that is shown on the Care Labels on the garments to be washed. It can also be used to vary the wash programmes to your particular needs. For example, large and bulky items such as cotton bedspreads could be washed at programme 6 (which gives a higher water level wash) with a temperature setting suitable for the colour of the item concerned. (95°C for white cotton. 60°C for fast coloured cotton). It is also very helpful where the garments do not have Care Label Code numbers or where mixed loads have to be washed — you are able to select your own wash temperature.
It is always safe to wash at a lower temperature than the temperature indicated by the ITCL number. Some of the ITCL programmes are the same except for the temperature indicated. The important things to remember are to wash at a temperature not higher than recommended, as colours may run or materials may shrink or be damaged, and to set the slow spin switch if this is necessary.
You may also wish to wash all loads at temperatures slightly lower than recommended in order to save electricity. This can be satisfactory in certain cases where materials are lightly soiled or generally easy to get clean. Almost unlimited programmes can be devised using the variable temperature control in conjunction with programme selector and slow spin switch. The use of a temperature significantly below those recommended, however, may result in gradual deterioration of whiteness and will necessitate periodic washing at the correct temperature to restore brightness.
It is operated by pulling out and rotating to required temperature.
Hold Switch
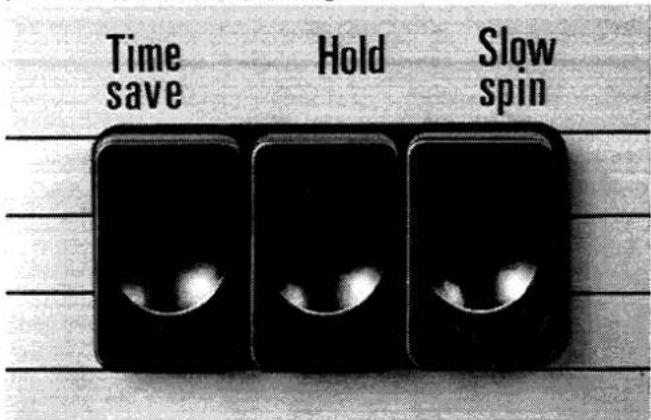
When pressed In the clothes will stay immersed and suspended in the final rinse water and the machine will stop. This is essential when washing delicate or synthetic articles if they are going to be left in the drum for a long time after final spindrying, as they will then become heavily creased. To start the machine again for the finishing spin, simply switch Off the hold switch. The drum will revolve to distribute the clothing and continue into spin.
Time Save Switch
When pressed In it eliminates one rinse fill, and the whole of the rhythm spin, by indexing the programme selector forward. This saves approximately 11 minutes.
Slow Spin Switch
When pressed In it reduces final spin from 1000rpm to 600rpm. It should always be used on programmes 6, 8 and 9 or permanent creasing may result. On programmes 3 and 4 it should be used if you do not intend to tumble dry and you wish to minimise creasing.
Detergent Dispenser
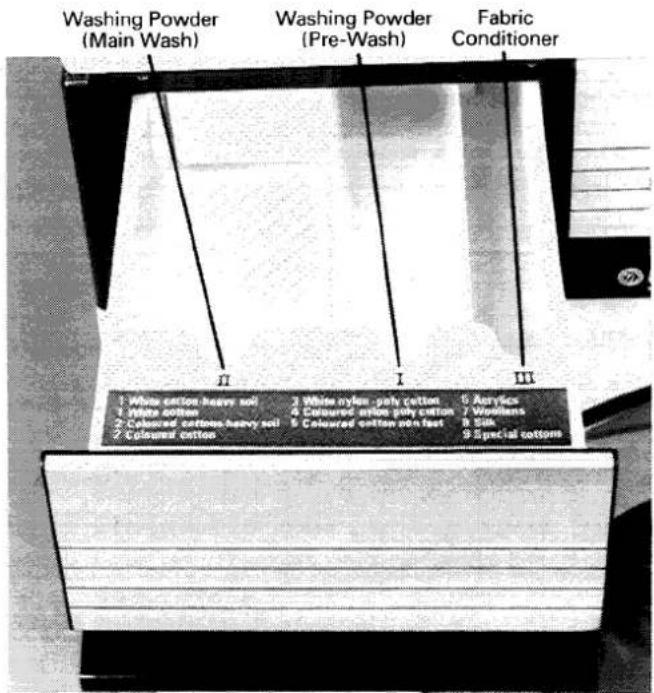
The detergent dispenser has three compartments, two for washing powder, and one for fabric conditioner. Reading from left to right the compartments are numbered II, I, III i.e. Pre-wash and programme 8, I. Main washes 1-7 and 9, II. Fabric conditioner III.
To carry out a simple white cotton wash
1) First ensure that your 13 amp plug from the machine is plugged in, and power is switched on at the mains socket, and that the water supply is on. Make sure that the Programme Selector is at the 'O' position and pushed in.
2) If the machine is not plumbed in remember you must first hook the drain hose into the standpipe or over the sink, ensuring that the sink plug has been removed and the sink grille is clear. Connect the red inlet hose to your hot supply and the grey inlet hose to the cold supply and turn the taps on. Do Not use your sink for other purposes at the same time as your washing machine is in use, as the discharge water could be very hot.
3) The drum of your machine will take up to a maximum load of 4kg./9lbs. dry weight of cotton (do not exceed this). Sort the clothes into batches and select items marked 1/95°C. Always ensure that pockets are emptied, and it is advisable to loosely tie apron and pyjama strings and do up zips. Badly soiled or stained clothes should be specially treated before washing (see pre-wash page 8). With the Programme Selector at 'O' press the door button to open the door, and load the machine. Clothes should be placed into the drum separately. Then close the door. If your water is of average hardness and you are washing a full load of clothes, add two cupfuls of detergent to the main wash compartment (marked II) in the detergent dispenser. To do this pull the dispenser drawer out as far as possible and add the powder. Ensure that the dispenser drawer is fully closed as otherwise leaks will occur. Only low lather powders suitable for front loading automatic machines should be used, and we recommend the use of Persil Automatic.
4) Pull out and set the variable temperature control to 95°C programme 1, then set the Programme Selector to Programme 1 (Turning clockwise) and pull the Programme Selector out to switch the machine On.
5) When wash programme is finished, press the Programme Selector in and press the door button to open the door. A short time-delay device will prevent the door from being opened immediately. Remove the clothes, turn off the water taps and the electricity at the wall switch. Turn the variable temperature control to its lowest setting — this may avoid accidental washing at too high a temperature on the next wash.
6) After completing your initial white wash, you can now proceed to successfully follow any of the other main wash programmes with complete confidence and knowledge of your machine.
International Textile care label codes
The Control Settings on your machine correspond with the International Textile Care Label numbers, which give the correct wash programme for the various fabrics. Selection of the wash programme is therefore simple and straight forward. Look for the wash code numbers
on the garment and select the same number on the Programme Selector and Independent Temperature Control. Where there are no numbers on garments, the following guide will help you select the right programme.
| Care Label | Fabric and Soiling | Maximum Load | Select Programme | Maximum Temperature to Select | Select Slow Spin | Select Hold | Select Time Save |
| Pre-wash | Any machine washable fabric except Wool, Silk, Denim, Printed Acetate Colour fast at 40°C. Heavy soil and requiring pre-wash. Then select main wash programme | Dependent on material | Pre-wash | 40°C | - | - | - |
 | Cotton and Linen. White or colour fast to boiling. Normal soil | 4kg 9lbs | 1 | 95°C | No | Optional | Optional |
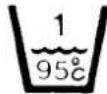 | Cotton and Linen. White or colour fast to boiling. Light soil | 4kg 9lbs | 1 | 75°C | No | Optional | Optional |
 | Cotton and Linen. Colour fast at 60°C | 4kg 9lbs | 2 | 60°C | No | Optional | Optional |
 | Nylon and Polyester. Cotton - white | 1.8kg 4lbs | 3 | 60°C | Optional* | Optional | Optional |
 | Nylon and Polyester. Cotton - coloured | 1.8kg 4lbs | 4 | 50°C | Optional* | Optional | Optional |
 | Cotton and Linen. Colour fast at 40°C but not at 60°C | 4kg 9lbs | 5 | 40°C | No | Optional | Optional |
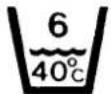 | Delicate synthetics, Acrylics, Man-made fibre blankets. | 1.8kg 4lbs | 6 | 40°C | Yes | Optional | Optional |
 | Woollens (labelled Machine Washable) and Wool Mixtures | 1.5kg 3lbs | 7 | 40°C | No | No | Optional |
 | Silk, Denim, Printed Acetate Colours not fast at 40°C | 1.8kg 4lbs | 8 | 30°C | Yes | Optional | Optional |
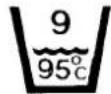 | Cotton articles with special finishes capable of being boiled, but requiring drip dry. Normal soil | 1.8kg 4lbs | 9 | 95°C | Yes | Optional | Optional |
(continued overleaf)
International Textile care label codes
(continued from previous page)
| Care Label | Fabric and Soiling | Maximum Load | Select Programme | Maximum Temperature to Select | Select Slow Spin | Select Hold | Select Time Save |
| Cotton articles with special finishes capable of being boiled, but requiring drip dry. Light soil | 1.8kg 4lbs | 9 | 75°C | Yes | Optional | Optional | |
| Rinsing and Spinning | Any machine washable fabric requiring rinsing and spinning only | Final Rinse | — | Optional * | Optional | Optional | |
| Any fabric requiring spinning only | Spin | — | Optional * | — | Optional |
*See paragraph describing slow spin switch on page 6
Variations on a simple wash
Pre-Wash
The pre-wash can be used before programmes 1 to 5 and 9 to loosen heavy soiling or certain types of stains. It should not be used for programmes 6, 7 or 8 as these programmes only require a short wash period. Set the variable temperature control dial to 40°C. When pre-wash is finished, the machine will stop. At the end of the pre-wash the door can be opened and clothes added or taken out. Push in the programme selector and re-select for the main wash, and re-select on the variable temperature control the temperature or number required for the main wash.
Energy Save
On the Independent Variable Temperature Control there is a special energy save temperature of 75^ C for programmes 1 and 9. This programme may be used for lightly soiled articles. Occasional washing at a high temperature should be carried out to restore brightness.
Using the machine for spindrying articles washed by hand
One rinse and spin dry
Set the programme selector to the final rinse, if short spin is desired press the slow spin switch In. If you wish to bypass rhythm spin, press the time save switch. The machine will now rinse and spin dry. Fabric conditioner can be added.
Spin dry only
Set the programme selector to final spin. If short spin is desired, press slow spin switch In.
Detergents Conditioners Water hardness
Washing Powder
Do use a low lather powder for front loading automatic machines, such as Persil Automatic. This type of powder is specially made to suit front loading automatic washers and can be used in hard or soft water. Other powders produce so much lather you may be unable to use as much as you need for good results. If you do not reduce the amount, there will be so much lather that clothes will not tumble freely or be properly washed and you may even get lather overflow.
Do use enough powder. To get your clothes clean it is essential that enough powder is used in the machine. The correct amount will depend on a number of things — the hardness of the water, the size of load and the amount of soiling present. As a guide we suggest you follow the table below and adjust the amounts in the light of your personal experience. You may find it helps to use a cup to measure the right amount at first.
How much to use in your Creda machine
| Programmes using the Pre-wash | Programmes not using the Pre-wash | |||
| Pre-wash | Main-wash | Total | ||
| HARD WATER | ||||
| Full load or heavy soiling | 1 cup | 2 cups | 3 cups | 2 cups |
| Small load or light soiling | 1 cup | 1 cup | 2 cups | 112 cups |
| SOFT WATER | ||||
| Full load or heavy soiling | 1 cup | 1 cup | 2 cups | 112 cups |
| Small load or light soiling | 12 cup | 12 cup | 1 cup | 34 cup |
Fabric Conditioner
A fabric conditioner, such as Comfort is strongly recommended. When added it will give a fresh softness to your washing and eliminate the problem of static cling from synthetics.
Fabric conditioner and washing powder can be put in the dispenser compartment at the same time. Add three caps full of Comfort fabric conditioner to the dispenser at the beginning of every wash and your machine will automatically add it to the final rinse.
The use of Comfort in your washing machine will also be beneficial in the drying process if you own a tumble dryer. Not only will the problem of static be eliminated but your clothes will be softer, and creasing will be even more reduced.
Water Hardness
The tabulation below reproduced by kind permission of Lever Brothers, shows the water hardness throughout the country. Total water hardness distribution by water authorities. In some areas water hardness is variable.
There is an accepted standard of measure for classifying the relative hardness of any water:
| Key | Parts per million as CaCO_3 | Degrees Clark | Degrees French | |
| Soft | S | 0-50 | 0-3.5 | 0-5 |
| Moderately Soft | MS | 50-100 | 3.5-7.0 | 5-10 |
| Slightly Hard | SH | 100-150 | 7.0-10.5 | 10-15 |
| Moderately Hard | MH | 150-200 | 10.5-14.0 | 15-20 |
| Hard | H | 200-300 | 14.0-21.0 | 20-30 |
| Very Hard | VH | over 300 | over 21.0 | over 30 |
| Area | Authority | Water Hardness | Area | Authority | Water Hardness | Area | Authority | Water Hardness |
| Argyll | Scotland | S | Invernesshire | Scotland | S-MH | Salop | Severn-Trent | H |
| Ashborne | Severn-Trent | MS-H | Ireland Eastern | - | S-H | Scilly Isles | - | MH |
| Avon and Dorset | Wessex | H | Ireland Northern | - | MS | Scotland-Mid | Scotland | S-MH |
| Ayrshire | Scotland | S | Ireland Southern | - | S-VH | Scotland-North | Scotland | S-VH |
| Birmingham | Severn-Trent | S-VH | Ireland Western | - | MS | Scotland-North East | Scotland | S |
| Bolton | North West | S | Isle of Wight | - | SH-H | Scotland-South East | Scotland | S-H |
| Bournemouth | Wessex | H | Jersey | - | MH | Scotland-South West | Scotland | S-MH |
| Bristol | Wessex | H-VH | Kent | Southern | H | Sherwood | Severn-Trent | MH-VH |
| Cambridge | Anglia | SH-H | Kent East | Southern | H | Somerset | Wessex | S-VH |
| Carlisle | North West | MS | Kent Mid | Southern | SH-VH | Stafford | Severn-Trent | H-VH |
| Cheshire-Mid | North West | MS-H | Kent West | Southern | MS-H | Staffordshire-South | Severn-Trent | H-VH |
| Chester | North West | SH-H | Lakes & Lune | North West | S | St. Helens | North West | SH |
| Chiltern | Thames | VH | Lambourne | Thames | SH-VH | Stockport | North West | S |
| Clyde-Lower | Scotland | S | Lanarkshire | North West | S-VH | Sunderland & | ||
| Colne Valley | North West | H-VH | Lancashire | North West | S-VH | South Shields | Northumbrian | MS-VH |
| Corby & District | North West | H | Lee Valley | Thames | VH | Surey East | Thames | MS |
| Cumbria South | North West | S-MH | Leicester | Severn-Trent | MH-VH | Surrey North | Thames | H-VH |
| Cumbria West | North West | S | Liverpool | North West | S-SH | Sussex | Southern | H |
| Derbyshire-North | Severn-Trent | S-H | Loch Lomond | Scotland | S | Sussex East | Southern | MS |
| Derbyshire-South | Severn-Trent | MH | Loch Turret | Scotland | S | Sussex Mid | Southern | S-H |
| Derwent Valley | Severn-Trent | S | London-Metropolitan | Thames | MH-VH | Sussex North West | Southern | MS-VH |
| East Anglia | Anglia | H-VH | Lune Valley | North West | S-SH | Sutton District | Thames | SH |
| Eastbourne | Southern | SH-VH | Macclesfield | North West | MS-H | Tees | Northumbrian | S-MS |
| Eden | North West | S-MH | Makerfield | North West | S-MH | Tendring Hundred | Anglia | H |
| Exeter | South West | S-H | Manchester | North West | S | Truro | South West | S-SH |
| Fife & Kinross | Scotland | S-VH | Mersey Valley | North West | S-VH | Vales | Thames | MS-VH |
| Folkestone & District | Southern | S-VH | Montgomery | Severn-Trent | S-MH | Warwickshire | Severn-Trent | MH-VH |
| Folkestone & District | Southern | S-VH | Newcastle & Gateshead | Northumbrian | MH | Wear | Northumbrian | S |
| Fylde | North West | S-SH | Nottingham | Severn-Trent | MS-MH | Wiltshire | Thames | H |
| Gloucester | Severn-Trent & Thames | MH-VH | Northumberland & Tyne | Northumbrian | SH | Wolverhampton | Severn-Trent | SH-VH |
| Nuneaton | Severn-Trent | SH-VH | Worcestershire-North | Severn-Trent | S-VH | |||
| Guernsey | - | SH | Pennine-West | North West | S-MS | Worcestershire-South | Severn-Trent | MS-H |
| Hampshire Central | Southern | H | Plymouth | South West | S-SH | Wrexham & East | ||
| Hampshire North | Southern | H | Preston & District | North West | S | Denbighshire | Welsh | SH |
| Hampshire West | Southern | H | Rickmansworth & | York | Yorkshire | H | ||
| Hartlepool | Northumbrian | H-VH | Uxbridge Valley | Thames | H-VH | Yorkshire North | Yorkshire | S-VH |
Stain removal
1) Always treat as soon as possible. Rinse in cold water or warm solution before washing.
2) Never rub a stain, "pinch out" as much as you can, using a clean cloth or paper tissue.
3) Some stains need special treatment (see below).
4) Absorbent pad method.
With grease solvents work from outside towards centre of stain, holding an absorbent pad underneath the cloth behind the stain.
5) Do not use Amyl Acetate on acetate or triacetate.
Note:
Take great care with poisonous chemicals and flammable liquids.
Only use grease solvents in a well ventilated place.
Keep chemicals, flammable liquids and grease solvents out of reach of children.
Stubborn Stain Guide
| Carbon paper | Methylated Spirits | Absorbent pad method | |
| Chewing gum | Methylated Spirits | Absorbent pad method | Or rub with ice and pick off by hand |
| Glue | Cold Water or Amyl Acetate | Wash in cold solution for soluble glues | Waterproof glue should be treated with Amylacetate using absorbent pad method |
| Grass | Methylated Spirits | Sponge with methylated spirits | |
| Grease/Oil | Proprietary grease solvent | Absorbent pad method | |
| Ink (biro, felt tip) | Methylated Spirits | Absorbent pad method | |
| Lipstick and face creams | Proprietary grease solvent | Absorbent pad method | |
| Mildew/white cottons and linens | Chlorine bleach | Soak white cottons and linens in 1 part bleach in 100 parts water | Coloureds cannot be treated except for regular washing |
| Mildew (all other white fabrics) | Hydrogen peroxide | Soak other white fabrics in 1 part hydrogen peroxide 20 vol. to 4 parts water | Rinse well. There is no safe home treatment for coloureds but regular washing will reduce marks |
| Nail varnish | Amyl Acetate | Absorbent pad method | |
| Paint: Emulsion | Water | Sponge immediately with cold water | Dried stains are permanent |
| Paint: Oil | Turpentine, or Amyl Acetate | Absorbent pad method | |
| Perspiration | Hydrogen peroxide | Rinse immediately in cold water and wash. If stain remains soak in 1 part hydrogen peroxide 20 vol. 4 parts water and wash | Colour removed by perspiration cannot be restored |
| Rust/iron mould (for all fabrics) | Lemon juice | Soak stains in lemon juice and iron under damp cloth. Repeat if necessary | |
| Rust/iron mould (for white cottons and linens) | Oxalic acid (very poisonous) | Use 1⁄2 teaspoon of oxalic acid in 1⁄2 pint of hot water | |
| Shoe polish | Glycerine and proprietary grease solvent | Lubricate with glycerine and use solvent with absorbent pad method | |
| Tar | Proprietary grease solvent | Scrape off surplus, soften with butter and wipe off, apply solvent and wash immediately |
Dyeing in your Creda washing machine
Instructions for the use of Dylon dyes in a Creda Washing Machine.
Note: (1) Do not dye wool in a washing machine.
(2) Do not treat more than half the recommended wash load for that material.
Dyes must be used according to their instructions. Below are instructions for specific Dylon dyes.
Dygon
- Put garments to be dyed into the Washing Machine and close door.
- Select pre-wash (40°C) and start the machine — Do not use any detergent.
- Dissolve Dygon in 1 pint of boiling water.
- When Pre-wash cycle is complete, open door, move garments to one side and add Dygon solution. Close door.
- Select Programme 1 (95°C) and start the machine cycle.
- When completed add detergent to the main wash compartment of the dispenser. Select the recommended wash programme for the garments as shown on the label or as indicated by the tabulation in the washing machine instruction book or on the detergent packet. Start machine.
- At the end of the programme remove the garments and clean the machine as detailed below.
Nash'n Dye
- Put dyeing powder in the washing machine drum.
- Put dry, unfolded garments to be dyed into the drum.
- Select programme 1 (95°C) and start machine. (Do not use any detergent).
- At the end of the programme remove the garments and clean the machine as detailed below.
Multi-purpose (minimum load 1kg. 2lbs.)
- Dissolve dye by mixing to a smooth paste with a little cold water, then add 12 litre (1 pint) of boiling water. Stir well and pour it into the drum. Add 1 tablespoon of salt for each tin of dye used.
- Put wet garments into drum.
- Select programme 1 (95°C) and start machine. (Do not use any detergent).
- At the end of the programme remove dyed garments and clean machine as detailed below.
Liquid Dye
- Pour liquid dye into drum. Add 7 tablespoons of salt for each kilogram (2 lb) of dry fabric.
- Put clean, wet garments into drum.
- Select programme 1 (95°C) and start machine. (Do not use any detergent).
- At the end of the programme remove dyed garments and clean machine as detailed below.
Cold Dye (minimum load 1kg. 2lbs.)
- Dissolve dye by mixing it to a smooth paste with a little cold water, then add 12 litre (1 pint) of warm water. Pour dye into drum. Add 75grm drum of Dylon cold dye fix. Then cover dye and cold fix powder with 600g (1 lb. 6oz.) of salt making sure the salt covers all the area where the dye and cold fix powder have been placed.
- Put clean wet fabric in drum.
- Set programme selector to the second rinse position and fill to high level with cold water.
- When fill is complete reset to programme 2 and allow machine to run through the complete programme.
- When completed add detergent to the main wash compartment of the dispenser. Select the recommended wash programme for the garments as shown on the label or as indicated by the tabulation in the washing machine instruction book or on the detergent packet. Start the programme.
- At the end of the programme remove the garments and clean the machine as detailed below.
To Clean Machine
- Add 1 cup of household bleach and a little detergent to drum.
- Select programme 1 and start cycle.
- Leave to run through the full programme.
Fabric—dye guide
| Fabric Name | Fabric Group | Multi-purpose Liquid | Wash 'n Dye | Cold |
| Acetate | Acetate | ** | ** | o |
| Acrilan | Acrylic | o | o | o |
| Bri-nylon | Nylon | *** | *** | o |
| Canvas | Natural | *** | *** | *** |
| Cashmilon | Acrylic | o | o | o |
| Celon | Nylon | *** | *** | o |
| Cotton | Natural | *** | *** | *** |
| Courtelle | Acrylic | o | o | o |
| Crimplene | Polyester | # # | o | o |
| Dacron | Polyester | # # | o | o |
| Dacron/cotton | Polyester mixture | # # | # # | # # |
| Dicel | Acetate | ** | ** | o |
| Diolon | Polyester | # # | o | o |
| Dralon | Acrylic | o | o | o |
| Elaston | Polynosic | *** | *** | *** |
| Enkalon | Nylon | *** | *** | o |
| Enkashier | Nylon | *** | *** | o |
| Evlan | Viscose | *** | *** | *** |
| Fibreglass | Glass Fibre | o | o | o |
| Helanca | Nylon/Polyester | ** | ** | o |
| Leacril | Acrylic | o | o | o |
| Linen | Natural | *** | *** | *** |
| Lycra | Elastomeric | ** | ** | ** |
| Neo-spun | Acrylic | o | o | o |
| Nylon | Nylon | *** | *** | o |
| Orlon | Acrylic | o | o | o |
| Perlon | Nylon | *** | *** | o |
| Sarille | Viscose Rayon | *** | *** | *** |
| Silk | Natural | *** | *** | # # |
| Spanzelle | Elastromeric | ** | ** | ** |
| Tendrelle | Nylon | *** | *** | o |
| Tergal | Polyester | # # | o | o |
| Terlenka | Polyester | # # | o | o |
| Terylene | Polyester | # # | o | o |
| Terylene/Cotton | Polyester/Cotton | # # | # # | # # |
| Terylene/Wool | Polyester/Wool | o | o | o |
| Trevira | Polyester | # # | o | o |
| Tricel-pleated | Triacetate | o | o | o |
| Tricel-unpleated | Triacetate | # # | # # | o |
| Vincel | Viscose Rayon | *** | *** | *** |
| Viscose Rayon | Viscose Rayon | *** | *** | *** |
| Vilott | Viscose Rayon | *** | *** | *** |
| Wool | Natural | ** | ** | # # |
KEY:
*** Excellent result. Full strength colour.
** Good result but follow special instructions. Full strength colour.
# Good result but only reduced shades can be obtained. Follow special instructions.
o Do not dye.
For Dygon see instructions with dye.
Care & Cleaning
After the final use of the appliance press in Programme Selector to switch off. Remove plug.
- Remove the detergent dispenser drawer from the detergent box. This can be done by pulling the drawer fully out then squeezing in the sides to release the catches.
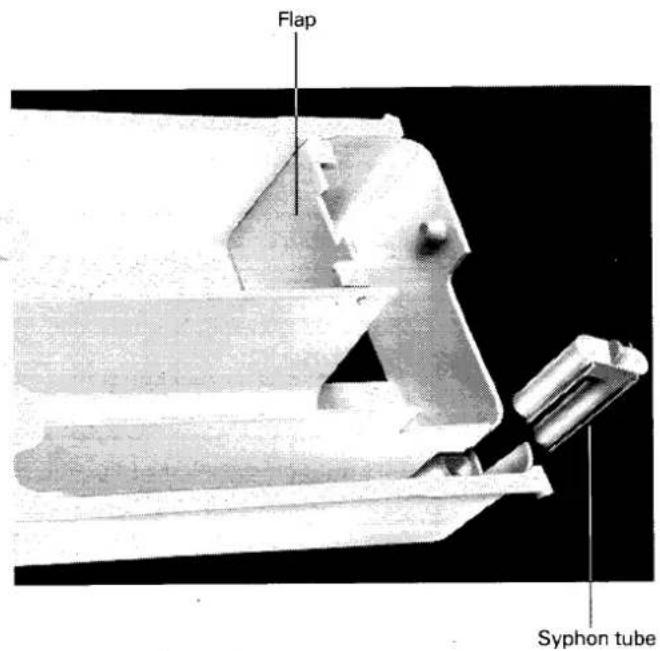
Clean any powder deposit from inside the box. Remove the syphon tube from the drawer and wash in clean water. Replace the syphon ensuring that it is fitted correctly, with the longest section outside the drawer. Replace the drawer into the box.
b) Open the door, clean and dry the rubber door seal and porthole, close the door.
c) Wipe the cabinet and top with a clean damp cloth. A cleaner may be used, but should not contain any abrasive that could damage the paintwork. We recommend that you use Handy Andy.
Optional extras
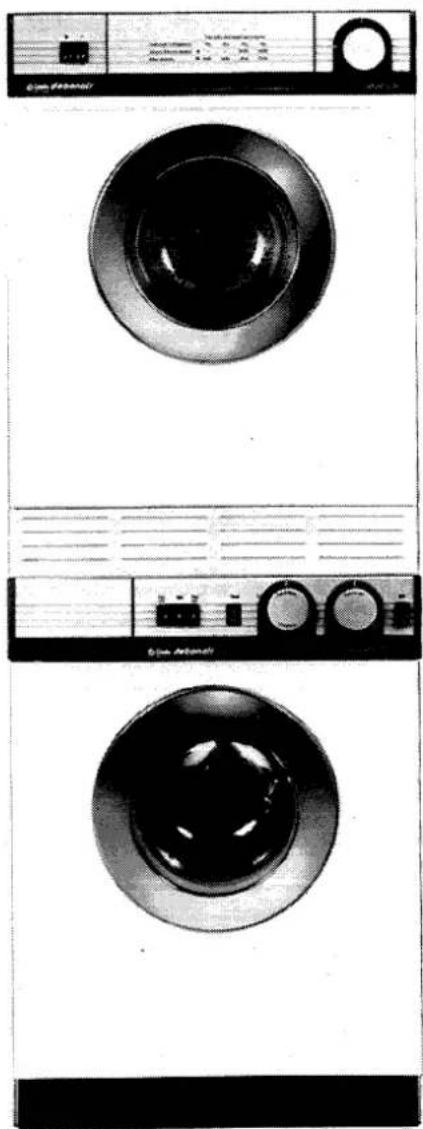
To give a complete laundry, a complementary Creda Tumble Dryer can be stacked with this machine. The stacking kit is an optional extra.
To ensure that you obtain the correct Stacking Kit, the model names/numbers of your washing machine and tumble dryer should be quoted. These can be found on the rating plate on the back of the machine.
You will need a special adaptor if only a cold water supply is available, this too is available as an optional extra.
These can be obtained from your local retailer or Sales Order Department, TI Creda Ltd., P.O. Box No. 5, Blythe Bridge, Stoke-on-Trent, ST11 9LJ.
SPARE PARTS
TI Creda Ltd., Spare Parts Department, P.O. Box No. 5, Blythe Bridge, Stoke-on-Trent, ST11 9LJ.
natural_image
Front and back views of a two-wheeled laundry machine (no visible text or labels)Something wrong with your machine
Before calling out a TIDAS, (TI Domestic Appliance Service) engineer have a quick look through the following fault finding list — it could save a lot of time and trouble.
| SYMPTOMS | POSSIBLE CURE |
| It won't start | Is it switched on? Is there a fuse in the plug and if so has it blown? Are all the wires in the plug correctly secure?Is the Programme Selector knob fully pulled out?Is the door properly shut? |
| It doesn't fill | Are the taps and stop cocks turned on?Are the water inlet hoses kinked?Have you switched the machine on? |
| It's slow to fill | Check that the water pressure is correct (see separate installation sheet) and that the water filters are clean.Are water taps in use elsewhere in the house? |
| It won't empty | Is the drain hose kinked?Has the programme selector dial been inadvertently pushed in? |
| It takes a long time to heat up | Your own hot water supply may not be hot enough so that it takes the machine longer to heat the water to the right temperature.Check fill hose Connections, they may be the wrong way round. |
| Drum keeps on stopping and starting | It should do as this is the normal washing action. |
| Clicking from the machine | Don't worry, it should. This is the Programme Selector going through the wash sequence. In one particular instance, if the Time Save switch is in use the timer will click continually as it by-passes the Rhythm Spin period. During this period the drum will start and stop in quick succession. This is not a fault but part of the normal cycle. |
| Machine stops near end of the rinse period | Have you accidentally pressed in the Hold Switch? If so repress and the cycle will continue. |
| Suds are over-flowing | You could be using the wrong type of powder or too much (see page 9).To remove the suds, advance the programme selector to the first rinse and allow cycle to complete. |
| SYMPTOMS | POSSIBLE CURE |
| Water is leaking out | Are the hot and cold water inlet hose connections to the machine tight enough and are the seal washers in position?Is the detergent dispenser drawer fully closed?Is the flap correctly located in the holes at the rear of the 'main wash' compartment of the detergent drawer?Is the outlet from the detergent dispenser blocked? (Remove the Detergent Dispenser to check this). |
| The clothes come out wet | Have you incorrectly pressed in the Slow Spin Switch. |
| It makes a noise when it spins | Some noise is unavoidable with all machines. However it helps if the machine is standing on a flat surface and not touching anything. If persistent check that transit packing has been removed properly. (See Installation Sheet). |
| Machine continually emptying | This is probably as a result of the end of the outlet hose not being 46cm 18ins. from the floor. (See installation instructions). |
| Power Cut/ Failure | If you have a power failure while washing and wish to open the door.FIRST SWITCH OFF THE ELECTRICITY SUPPLY AT THE SOCKET AND REMOVE THE PLUG.If the water level can be seen in the door window it must first be drained. This can be done by lowering the drain hose into a bucket or bowl. Take care however as the water could be very hot and fill more than one bowl. You can completely empty the machine of water in this way. When drained turn the programme selector to 'O' and push in. The door can now be opened. |
If, you have been through the above and your machine still is not working properly you should call your nearest TIDAS (TI Domestic Appliance Service) office, see back cover.
CredaCover — Your Guarantee
As first year guarantee, Creda offer you FREE CredaCover — a fully comprehensive maintenance scheme which starts the day u buy your new Creda Appliance.
By returning the Purchase Registration Card you will receive your CredaCover contract card together with the telephone number and address of your local TI Service Depot. CredaCover can be continued beyond the initial one year guarantee period, if desired, for a small annual payment. We will write to you when your first year CredaCover expires offering you an annual contract.
This CredaCover guarantee is offered as an extra benefit and does not affect your legal rights.
All equipment sold by TI Creda is guaranteed by the Company via CredaCover for one year against faulty material or workmanship. If any part is found to be defective within twelve months of the date of purchase or hire purchase agreement we or our authorised service agent, will replace or at our option repair that part without charge for materials, labour or transportation provided the equipment:—
a) Has been used solely in accordance with the instruction book.
b) Has been properly connected to a suitable supply voltage as stated on the rating plate attached to the equipment.
c) Has not been subject to misuse or accident or been modified or repaired by any person other than the authorised employee or agent of TI.
d) Has been satisfactorily installed.
CredaCover Five
This is an important option open to you whereby CredaCover benefits are extended to a total of FIVE years on receipt of your CredaCoverFive payment. Applications for CredaCoverFive must be made within 30 days of your Creda Purchase. A once-and-for-all payment at this time will cover your machine for the next 5 years, i.e. the initial FREE guarantee period for one year, PLUS four more worry-free years of CredaCover.
Electrical and mechanical parts found to be defective due to faulty material or workmanship during the four year extension period will be repaired or replaced free of charge. Decorative, external painted parts and cables are excluded and the appliance must remain in the possession of the original purchaser.
How to obtain after sales service quickly
Make a note of your nearest TIDAS depot telephone number here:
The receptionist will need the answer to certain questions so to save you time and money please have the following information ready in case you have to call us.
Your name and address
Telephone number
Name of the appliance
Is the machine part of a stacked pair
Model number
The serial number (shown on the rating plate, on the back panel)
Name and Branch of shop from whom you bought the appliance
Date of purchase
If free service under guarantee is required, please have available proof of date of purchase when our engineer calls.
- The receptionist will then advise you of the proposed date of our engineer's visit, and, if you so request, will offer you an a.m. or p.m. call.
- All chargeable work is on a cash basis and our service engineer will issue a receipt. He will accept a cheque supported by a cheque card.
- Our service engineers carry identity cards with a photograph.
CredaCover
Service areas by postcode:
| POST CODE | POSTAL AREA | TIDAS SERVICE CENTRES | POST CODE | POSTAL AREA | TIDAS SERVICE CENTRES |
| AB | Aberdeen | Edinburgh | LE | Leicester | Nottingham |
| AL | St. Albans | London | LL | Llandudno | Liverpool |
| B | Birmingham | Birmingham | LN | Lincoln | Nottingham |
| BA | Bath | Bristol | London | London | London |
| BB | Blackburn | Preston | LS | Leeds | Leeds |
| BD | Bradford | Leeds | LU | Luton | Luton |
| BH | Bournemouth | Bournemouth | M | Manchester | Manchester |
| BL | Bolton | Manchester | ME | Medway | Crawley |
| BN | Brighton | Crawley | MK | Milton Keynes | Milton Keynes |
| BR | Bromley | London | ML | Motherwell | Glasgow |
| BS | Bristol | Bristol | NE | Newcastle-upon- | |
| BT | Belfast | Belfast | Tyne | Sunderland | |
| CA | Carlisle | Carlisle | NG | Nottingham | Nottingham |
| CB | Cambridge | Cambridge | NN | Northampton | Northampton |
| CF | Cardiff | Cardiff | NP | Newport | Cardiff |
| CH | Chester | Liverpool | NR | Norwich | Norwich |
| CM | Chelmsford | Cambridge | OL | Oldham | Manchester |
| CO | Colchester | Cambridge | OX | Oxford | Oxford |
| CR | Croydon | London | PA | Paisley | Glasgow |
| CT | Canterbury | Crawley | PE (912+20:25 inc.) | Peterborough | Northampton |
| CV | Coventry | Coventry | PE (All others) | Peterborough | Cambridge |
| CW | Crewe | Crewe | PH | Perth | Glasgow |
| DA | Dartford | London | PL | Plymouth | Plymouth |
| DD | Dundee | Edinburgh | PO | Portsmouth | Southampton |
| DE | Derby | Nottingham | PR | Preston | Preston |
| DG | Dumfries | Glasgow | RG | Reading | Reading |
| DH | Durham | Sunderland | RH | Redhill | Crawley |
| DL | Darlington | Middlesbrough | RM | Romford | London |
| DN (All others) | Doncaster | Leeds | S | Sheffield | Sheffield |
| DN (21.22 only) | Doncaster | Nottingham | SA | Swansea | Swansea |
| DT | Dorchester | Bournemouth | SG | Stevenage | Luton |
| DY | Dudley | Birmingham | SK | Stockport | Manchester |
| EH | Edinburgh | Edinburgh | SL | Slough | Abingdon |
| EN | Enfield | London | SN | Swindon | Bristol |
| EX | Exeter | Plymouth | SO | Southampton | Southampton |
| FK | Falkirk | Glasgow | SP | Salisbury | Southampton |
| FY | Blackpool | Preston | SR | Sunderland | Sunderland |
| G | Glasgow | Glasgow | SS | Southend-on-Sea | Southend |
| GL | Gloucester | Bristol | ST | Stoke on-Trent | Stoke on-Trent |
| GU | Guildford | Crawley | SY | Shrewsbury | Birmingham |
| HA | Harrow | London | TA | Taunton | Bristol |
| HD | Huddersfield | Leeds | TD | Galashiels | Edinburgh |
| HG | Harrogate | Leeds | TF | Telford | Birmingham |
| HP | Hemel Hempstead | Abingdon | TN | Tunbridge Wells | Crawley |
| HR | Hereford | Bristol | TQ | Torquay | Plymouth |
| HU | Hull | Hull | TR | Truro | Plymouth |
| HX | Halifax | Leeds | TS | Cleveland | Middlesbrough |
| IG | Ilford | London | TW | Twickenham | London |
| IP | Ipswich | Cambridge | UB | Southall | London |
| IV | Inverness | Glasgow | WA | Warrington | Liverpool |
| KA | Kilmarnock | Glasgow | WD | Watford | London |
| KT | Kingston-upon-Thames | London | WF | Wakefield | Leeds |
| WN | Wigan | Liverpool | |||
| KW | Kirkwall | Glasgow | WR | Worcester | Birmingham |
| KY | Kirkcaldy | Edinburgh | WS | Walsall | Tamworth |
| L | Liverpool | Liverpool | WV | Wolverhampton | Birmingham |
| LA | Lancaster | Preston | YO | York | Leeds |
| LD | Llandrindod Wells | Cardiff |
TI Domestic Appliance Service Ltd.
Head Office: Radiation House, North Circular Road, London NW10 0JP. Tel: 01-459 1234.
SERVICE CENTRES
| ABINGDON:Tel: 0235 21196 | GLASGOW:Tel: 041-429 5225/6/7 | OXFORD:Tel: 0865 42924 & 41989 |
| BELFAST:Tel: 0232 56558/9/0 | HULL:Tel: 0482 223441 | PLYMOUTH:Tel: 0752 20938 |
| BIRMINGHAM:Tel: 021-440 3911 (4 lines) | LEEDS:Tel: 0532 461881 | PRESTON:Tel: 0772 57282 |
| BOURNEMOUTH:Tel: 0202 294878 | LIVERPOOL:Tel: 051-525 2342/3 & 051 521 3388 | READING:Tel: 0734 590087 & 51987 |
| BRISTOL:Tel: 0272 613111/2 | LONDON:Tel: 01-451 0011 | SHEFFIELD:Tel: 0742 25400 |
| CAMBRIDGE:Tel: 0223 354503 & 352815 | LUTON:Tel: 0582-410701 | SOUTHAMPTON:Tel: 0703 28651/2 |
| CARDIFF:Tel: 0222 492535 & 492585 | MANCHESTER:Tel: 061-236 7866/7 | SOUTHEND-ON-SEA:Tel: 0702 335196 |
| CARLISLE:Tel: 0228 43036 | MIDDLESBROUGH:Tel: 0642 223350 | STOKE-ON-TRENT:Tel: 0782 49086 |
| COVENTRY:Tel: 0203 28245 | MILTON KEYNES:Tel: 0908 566919 | SUNDERLAND:Tel: 0783 653921/2/3 |
| CRAWLEY:Tel: 0293 542111 | NORTHAMPTON:Tel: 0604 35348 | SWANSEA:Tel: 0792 469367 |
| CREWE:Tel: 0270 586622 | NORWICH:Tel: 0603 615 391 | TAMWORTH:Tel: 0827 280588 |
| EDINBURGH:Tel: 031-225 2030 | NOTTINGHAM:Tel: 0602 223648/9 | WASHINGTON:Tel: 0632 473500 |
THE SERVICE CENTRE
Key Contacts
After Sales Service
Over 1100 trained specialists, directly employed by us, ensure that you have complete confidence in both the appliances and services we offer.
Repair Service
UK: 08709 066 066
(Open 8 to 8 Mon - Fri, 8 to 6 Sat & 10 to 4 Sun)
www.theservicecentre.co.uk
Republic of Ireland: 1850 302 200
Note: Our Service Operators will require the following information:
Model Number
Serial Number
Extended Warranties
UK: 08709 088 088
(Open 8 to 6 Mon - Fri)
www.theservicecentre.co.uk
Republic of Ireland: 1850 502 200
Genuine Parts and Accessories
UK: 08709 077 077
(Open 8-30 to 5-30 Mon - Fri, 8-30 to 12 Sat)
www.theservicecentre.co.uk
Republic of Ireland: (01) 842 6836
- How to get the best out of your Creda Debonair Super Electronic washing machine
- Creda Debonair Super Electronic
- IMPORTANT
- Contents
- Electrical Requirements
- Know your machine
- Controls
- Door Lock
- Programme Selector On/Off Switch
- Indicator Light
- Variable Temperature Control
- Hold Switch
- Time Save Switch
- Slow Spin Switch
- Detergent Dispenser
- To carry out a simple white cotton wash
- International Textile care label codes
- Variations on a simple wash
- Pre-Wash
- Energy Save
- Using the machine for spindrying articles washed by hand
- Detergents Conditioners Water hardness
- Washing Powder
- Fabric Conditioner
- Water Hardness
- Stain removal
- Note:
- Dyeing in your Creda washing machine
- Dygon
- Nash'n Dye
- Multi-purpose (minimum load 1kg. 2lbs.)
- Liquid Dye
- Cold Dye (minimum load 1kg. 2lbs.)
- To Clean Machine
- Fabric—dye guide
- # Good result but only reduced shades can be obtained. Follow special instructions.
- Care & Cleaning
- Optional extras
- SPARE PARTS
- Something wrong with your machine
- CredaCover — Your Guarantee
- CredaCover Five
- How to obtain after sales service quickly
- CredaCover
- THE SERVICE CENTRE
- Key Contacts
- After Sales Service
Brand : Creda
Model : 11800
Category : Washing machine