W1002W - Washing machine Creda - Free user manual and instructions
Find the device manual for free W1002W Creda in PDF.


| Product Type | Freestanding Washing Machine |
| Brand | Creda |
| Model | W1002W |
| Capacity | 6 kg |
| Maximum Spin Speed | 1200 rpm |
| Energy Class | A+ |
| Dimensions (H × W × D) | 85 cm × 60 cm × 55 cm |
| Weight | 65 kg |
| Power Supply | 220-240 V ~ 50 Hz |
| Water Connection | Cold water only |
| Programs | Cotton, Synthetics, Delicates, Wool, Quick Wash, Rinse & Spin |
| Display | LED with remaining time indicator |
| Delay Start | Up to 24 hours |
| Noise Level (Wash/Spin) | 56 dB / 76 dB |
| Safety Features | Child lock, overflow protection, unbalanced load detection |
| Maintenance | Clean lint filter every 10 cycles; check drain pump filter monthly |
| Spare Parts Availability | Common parts available through authorized service centers |
| Reparability | Modular design for easy service; support for main PCB, motor, pump |
Frequently Asked Questions - W1002W Creda
User questions about W1002W Creda
0 question about this device. Answer the ones you know or ask your own.
Ask a new question about this device
Download the instructions for your Washing machine in PDF format for free! Find your manual W1002W - Creda and take your electronic device back in hand. On this page are published all the documents necessary for the use of your device. W1002W by Creda.
USER MANUAL W1002W Creda
Genuine Spares Mail Order Hotline
UK: 08709 077 077
Republic of Ireland: (01) 842 8636
For more information on our exciting product range ring
Creda Answer Centre 08701 54 64 74

GENERAL DOMESTIC APPLIANCES LTD
Morley Way, Peterborough. PE29JB
Web, http://www.creda.co.uk
In line with continuing policy of research and development, and in the interests of everyone, we reserve the right to amend model specifications as services without notice. Colour reproductions of products in this brochure are as accurate as printing will allow.
© Copyright Creda Limited 1997

Installation and user instruction book
natural_image
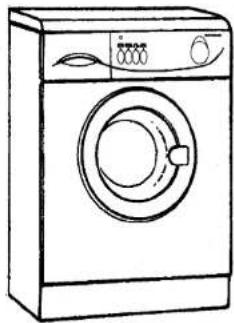
Line drawing of a front-loading washing machine (no text or symbols)Washing Machine
W0801W - W1001W - W1002W
Retention of this Instruction Book
Keep this book in a handy place for reference. It contains important details on the safe and proper use of your appliance. If you sell the appliance, pass it on to someone else, move house or leave it behind, make sure that you provide this book so that the new owner can become familiar with the appliance and safety warnings.
Please remember your new appliance is a complex piece of equipment. DIY repairs or unqualified and untrained service people may put you in danger, could damage the appliance and might mean you lose cover under Creda's Part Guarantee.
df Has been correctly installed.
e/ Has been used solely for domestic purposes and is on domestic premises. Your guarantee is only applicable in the U.K. and the Republic of Ireland.
If you suspect a fault with your appliance, to avoid unnecessary inconvenience and expense please ensure that the checks detailed on 'Something wrong with your appliance' on page 8 have been carried out before contacting the SERVICE NETWORK
Should you require service our receptionist will require the following information:
- Your post code, name and adress, type of appliance, model number, (found on the appliance rating plate or in the handbook). Guarantee/Contranct/Insurance Policy Details, Date of Purchase, and where you a purchased it from
EASY PAYMENT METHODS... You can pay for our services offered either by Credit Card (VisaMasterCard), Cheque and Debit Card. Or in installments by Direct Debit provided you include a Creda Care Plus scheme.
CREDA REPAIR SERVICE U.K.
08709 066 066 Monday • Friday 8am • 8pm. Saturday • 8am • 6pm. Sunday 10am • 4pm
REPUBLIC OF IRELAND
1850 302 200 Monday • Friday 6am • 5.30pm, Saturday 9.00 - 12.30pm
For the Republic of Ireland call 1850 302 200, Monday - Friday 8am - 5.30am, Saturday 9.00am-12.30pm.
This is the largest appliance manufacturer service team in Europe. Trained specialists covering all our appliances (and directly employed by us).
If contacted before 10am, we try to offer a service call the same day where required or the next working day. (Monday to Friday). On request, your service call can be the first or last of the day with am or pm timings always available. We can also cater to meet your specific needs ie, avoiding school hours whenever we can.
A chargeable service is offered on the basis of payment on completion to our service engineer, who will issue a receipt.
Creda service engineer drive recognisable vans, wear uniforms and carry identity cards.
Creda Service Engineers will only fit genuine Creda parts. CREDA ANSWER CENTRE
Information and advice regarding specific appliance features and pricing on any Creda appliance, before or after purchase. From anywhere in the U.K. telephone 08701 54 64 74 from 8.45am-5.30pm, Monday-Friday.
CREDA SPARE PARTS NATIONAL MAIL ORDER HOTLINE
The spare Parts Mail Order Hotline enables you to order parts directly from the manufacturer over the phone. A wide range of parts and accessories are available for your Creda appliance.
Telephone:08709 077 077
Republic of Ireland Parts Telephone:01 842 6836 Fax: 08709 076 076
Monday - Friday 8.30am - 5.30pm, Saturday 8.30am - 12noon.
Ring quoting your appliance model number and we will help you get the right parts. National Warehouse comprehensively stocks over 33,000 parts lines. Parts stocked for all models. Parts carried for all appliances up to 10 years old. (15 on Creda Heating appliances). Optional 24 hour express courier service. (Additional charge).
CARE FOR THE DISABLED
We offer a range of accessories which enable our blind arthritic or disabled customers to use most of our appliances. Simply call 08709 077 077
All the above are offered as an extra benefit and do not affect your statutory rights.
Service Cover
THANK YOU FOR CHOOSING CREDA...
We appreciate you choosing this quality appliance from Creda and are sure that it will give you many years of excellent service. Now that you've chosen Creda, not only have you bought a first class appliance, you've also bought a commitment from us to look after your appliance. We believe our Creda Care Service is the best in the business and yet another good reason you'll be glad you chose Creda.
Every Creda appliance has been designed and manufactured to the highest standards. However, in the event of any problem developing, our trained professional engineers are just a phone call away with one real objective - to satisfy your by providing an efficient, effective and courteous service, at a time convenient to you
CREDA - your GUARANTEE...
The guarantee is subject to the provision(s) that the appliance:
al Has been used solely in accordance with the instruction book.
b) Has been properly connected to a suitable electricity supply voltage as stated on the rating plate attached to the equipment
c) Has not been subjected to misuse or accident or been modified or repaired by any person other than an authorised employee or agent of Creda.
CREDA CARE - HIGH QUALITY AFTER SALES SERVICE LEVELS
• IN GUARANTEE (Year 1)
All appliances carry a FREE fully inclusive 12 months parts and labour guarantee.
If service under your Year 1 Guarantee is required please have available evidence of your date of purchase when the engineer calls.
• OUT OF GUARANTEE (Years 2-10)
Once an appliance is over 12 months old, and goes out of guarantee Creda offer you a very simple choice of service levels:
CREDA CARE LEVEL 1: No advance fee payable, no registration necessary.
Should a repair be needed in years 2-10 (i.e. over 12 months old) your Creda Regional Service Centre will advise you of the fixed labour charge we will make. Although this charge will vary according to your location and the type of Creda appliance you own. It is fixed regardless of the time taken or the number of visits needed to complete the repair.
The cost of parts where required will be charged in additional to the fixed labour charge, but again this cost will have a maximum level of which you will be advised by your regional Service Centre. The repair itself is fully guaranteed for 12 months.
CREDA CARE LEVEL 2. Annual fee payable all inclusive cover provided.
You may prefer the peace of mind of an all-inclusive type of cover: this is provided by our Creda Care Plus Scheme which, for an annual fee covers the cost of any parts or labour. This applies on appliances up to 10 years old. For your convenience this fee can be paid in installments by Direct Debit. Payments can also be made by Credit Card (Visa, MasterCard) Cheque and Debit Card.
CREDA CARE LEVEL 3: Creda kitchen Cover
For an extra fee, you can also purchase Kitchen Cover for all you Creda appliances provided they are under 10 years old. To join simply call 08709 088 088 and register.
CREDA EASY ACCESS REPAIR SERVICE
One number - 08709 066 066 connects you automatically to your U.K. Local Service Centre to arrange for your local engineers to call. Office opens 7 days a week, 364 days a year, Monday-Friday 8am-8pm, Saturday 8am-6pm, Sunday 10am-6pm.
INSTRUCTION
AND
MAINTENANCE
BOOKLET
Contents
Getting to know your Washing Machine 3
Preliminary Warnings 3
Description of your Washing Machine 3
Using the Selector Control ....3
Stop/Sart Button 4
Additional Function Buttons 4
Loading the Machine 4
Adding Detergent and Additives 5
Selecting the Wash Programme 5
Programme Tables 6-7
Cleaning your Washing Machine before use 8
Starting your Machine 8
Practical advice for a better wash 8
General hints 10
Troubleshooting Guide 11
natural_image
Abstract geometric line drawing with rectangles and horizontal lines, no text or symbols presentFig. 5
natural_image
Diagram showing two hoses connecting a wall-mounted electrical outlet, labeled Fig. 8 (no text or symbols on the diagram itself)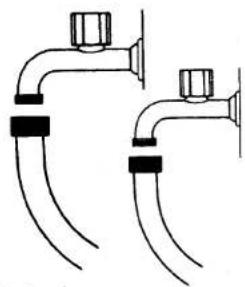
natural_image
Pure diagram of two identical pipe fittings with black connectors, no text or symbols presentFig. 9
Getting to know your Washing Machine
Before doing anything else you should get to know your washing machine perfectly. To help you recognise all the different features and controls which your machine is equipped with, we have included some diagrams. These can be found at the back of the BOOKLET, inside the back cover. See page 16 to 19
Please study the diagrams carefully. They will help you to understand the machine and instructions and to locate all the features on your machine.
IMPORTANT
We have equipped this washing machine with an intake for preheated water, which will enable you to make significant savings in water and electricity.
Preliminary Warnings
Installation
It is essential that the installation of your WASHING MACHINE be carried out in accordance with current standards. Installation instructions can be found in the INSTALLATION MANUAL SUPPLIED WITH THIS MACHINE.
Before starting your washing machine, it is absolutely essential to remove the INTERNAL FIXING SCREWS, used for transit. To do this, consult the installation manual.
Technical specifications table
With your WASHING MACHINE, inside the
door you not your will find a RATING PLATE, which gives the technical and identification information for your machine
THIS LABEL SHOULD BE READ BEFORE MAKING ANY ELECTRICAL CONNECTIONS.
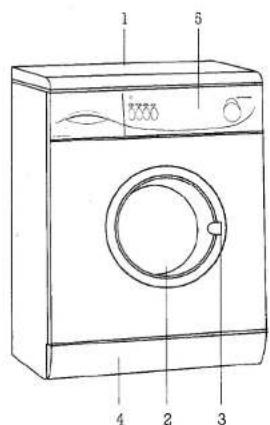
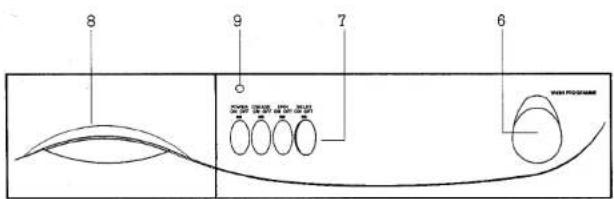
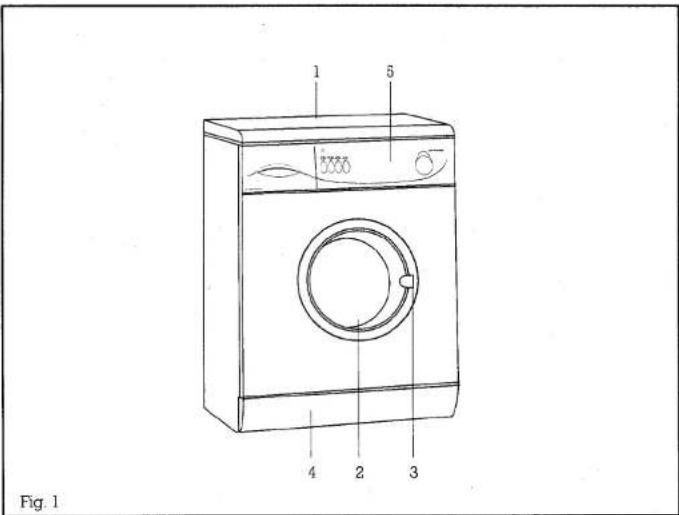
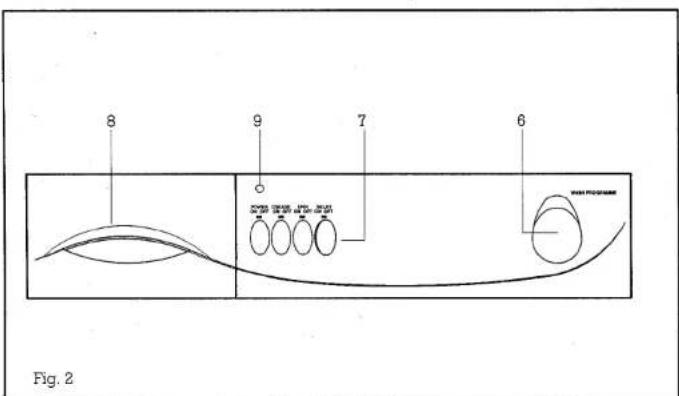
Description of your Washing Machine. See page 16. Fig. 1 and 2.
- Top
- Loading door
- Handle
- Plinth
- Control Panel
- Programme selector control knob
- Additional function buttons
- Detergent dispenser
- «ON» light
Using the Selector Controls
Programme Selector Control
To select the Wash Programme you require turn the control knob clockwise, until the indicator coincides with the number of the programme required. NEVER TRY TO FORCE THE KNOB in the opposite direction.
Wash Phase Display
Use the DISPLAY located above the programme selector control knob to see, where the wash cycle has reached at any given moment. To do this, just check which symbol, corresponding to the different wash phases, is shown in the indication.
Stop/Start Button
Once you have selected the programme you require, press this button to start your washing machine (the button sticks out from the control panel). The «ON» light will come on after a few seconds, during this time the Door Safety device is activated.
If the programme is completed without interruptions, you can open the loading door once the programme is completed and the Door Locking Safety device is deactivated (about 2 minutes). The «ON» light will go off to indicate that you can open the door.
Additional Function Buttons
By pressing these buttons you can include a series of additional functions and features in the wash programme you have selected. These functions and features will enable you to select the wash for your particular needs and requirements.
These functions are activated when the button sticks out from the control panel, enabling you to see the symbol printed on it.
Depending on the model, your washing machine will have some of the following functions.
No Spin
Press this button to eliminate the Spin phase from any programme selected. This will help to avoid creasing when washing special fabrics
Spin Selector
Press this button to reduce the spin speed. This function is specially recommended for washing clothes which are delicate or have a special finish.
Creasecare
Press this button to interrupt the last rinse and hold the clothes immersed in water inside the drum to avoid creasing. Press the button again to complete the programme. Or select the drain-only programme to avoid the spin cycle.
Loading the Machine
Opening the door
In order to open the door, pull the handle outwards. (Figure 1-3).
Loading the drum
When loading clothes into the drum, you should bear the following points in mind:
- Make sure all the pockets are empty.
- Stretch out and unfold each item.
- Put the items into the drum one by one, so that they do not get tangled up together. Make sure that the smallest items go to the back of the drum.
- Do not push them in the drum all together.
- Take into account the recommended load size for each programme.
- Check wash labels.
- When washing towels, try not to wash them on their own. Mix them in with other clothes.
- Limit the load of towels to 3 kg.
- Pretreat stains before washing
- Close zips, tie belts, strings, etc. and press studs to prevent tangling.
- Clothes will not wash properly if you overload the machine.
Once you have loaded the drum, close the door by pressing on it until it is properly closed. Make sure that no clothes get trapped between the door and the rubber seal.
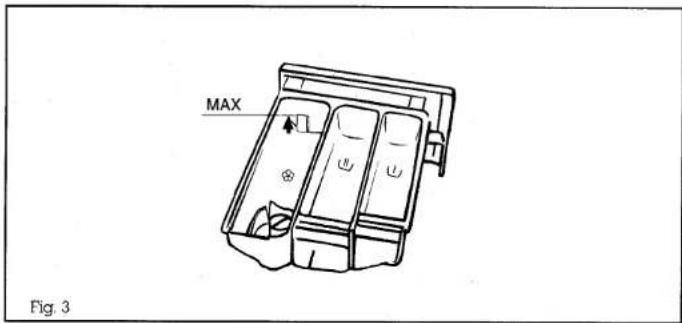
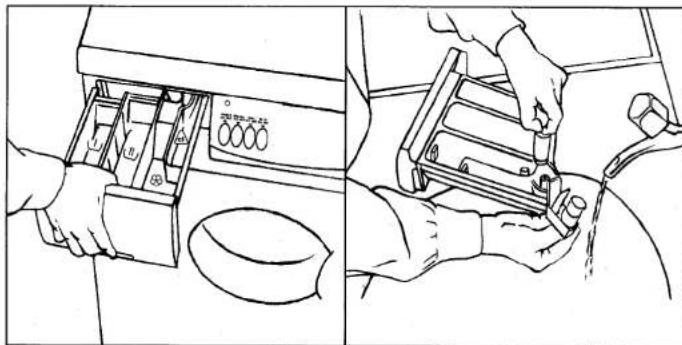
Fig. 4
Adding detergent and additives
Before starting the wash programme, add the detergent or additive to the detergent dispenser (Figure 3). Depending on the model, the detergent dispenser in your washing machine has three or four compartments marked with the following symbols:

compartment:
For the PREWASH detergent

compartment:
For the MAIN WASH detergent.

compartment:
For additives like fabric conditioner, starch, etc., if required.
Note: The level of liquid should never exceed the MAX LEVEL (Figure 3).
Do not slam the detergent drawer shut
Detergent
Only use detergents suitable for automatic washing machines -good quality detergents which do not produce too much lather. When washing woollen garments, only use neutral detergents. Suitable for washing woollens.
Detergent Guide
Remember that the amount of detergent to be used always depends on:
- The size of the load
- The type of clothes to be washed.
- How dirty the clothes are.
- The hardness of the water.
NOTE: Do not under dose as you will not achieve a clean wash for your clothes.
Do not use the drawer to dispense powers or liquids intended for use with a dosing ball. For wash programmes without a prewash, it is best to use detergents which can be put straight in the drum. In any case, we recommend that you follow the detergent manufacturing instructions.
Selecting the Wash Programme
Your washing machine offers you a wide range of programmes which will enable you to wash all types of clothing.
It has 2 types of PROGRAMME:
- NORMAL WASH PROGRAMMES, for cotton fabrics.
- DELICATE WASH PROGRAMMES, for delicate fabrics.
The Wash systems included in your washing machine are ideal for washing both cotton and synthetic garments, as well as woollen, silk or acrylic garments.
Basically, what varies between PRO-GRAMMES is the drum rotation speed, temperature, wash time and water level.
Programme Tables
Please consult the programme details on page 6 as they will provide you with information about the different wash programmes which your washing machine offers.
Depending on the model, these tables also appear in abbreviated form on the front panel of the detergent dispenser or on a card found inside the dispenser.
Programme Guide
vigorous wash programmes
Resistant fabrics: Cotton, resistant synthetics, etc.
Recommended max. load size: 4,5 kg.
| PROGRAMME SETTING | PROGRAMME DESCRIPTION | MAX. TEMP. | DETERGENT DESPENSER COMPARTMENTS | CARE LABEL SYMBOL | FABRIC TYPE | Approximate Duration |
| 1 | Prewash, followed by a vigorous wash, rinses with automatic absorption of additives if required and final spin. | 90° | For highly soiled garments made of white resistant fabrics (cotton, linen, etc.) | |||
| 2 | Vigorous wash, rinses with automatic absorption of additives if required and final spin. | 90° | For garments made of white resistant fabrics (cotton, linen, etc.). | |||
| 3 | Vigorous wash, rinses with automatic absorption of additives if required and final spin. | 60° | For dark colour-fast garments, normal soil. | |||
| 4 | Vigorous wash, rinses with automatic absorption of additives if required and final spin. | 40° | For slightly soiled colour-fast garments. | |||
| 5 | Rinses with automatic absorption of additives if required and final spin. | Whitener and/or fabric conditioner treatments for garments made of resistant fabrics. | ||||
| 6 | Long spin and draining | Spin drying for garments made of resistant fabrics. |
Connecting the electricity
This machine should only be connected to the voltage shown on the rating plate.
WARNING THIS APPLIANCE MUST BE EARTHED.
Important- The wiress in the mains lead are coloured in accordance with the following code:
Green & yellow - Earth
Blue - Neutral
Brown - Live
Ensure the fuse in your plug or fuse box is 13 or 15 amp. capacity.
As the colours of the mains lead may not correspond with the markings in your plug proceed as follows.
Green & yellow must be connected to the terminal marked with the letter E or by the earth symbol or coloured green or green and yellow.
Blue must be connected to the terminal marked with the letter N or coloured black.
Brown must be connected to the terminal marked with the letter L or coloured red symbol «L».
The manufacturer will not be held responsible if these installation instructions have not been carried out.
Positioning and levelling
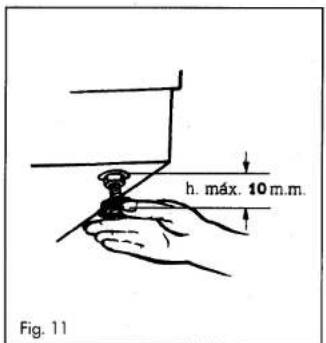
The washing machine has adjustable feet and can be levelled by screwing the feet in or out as required (Fig. 11).
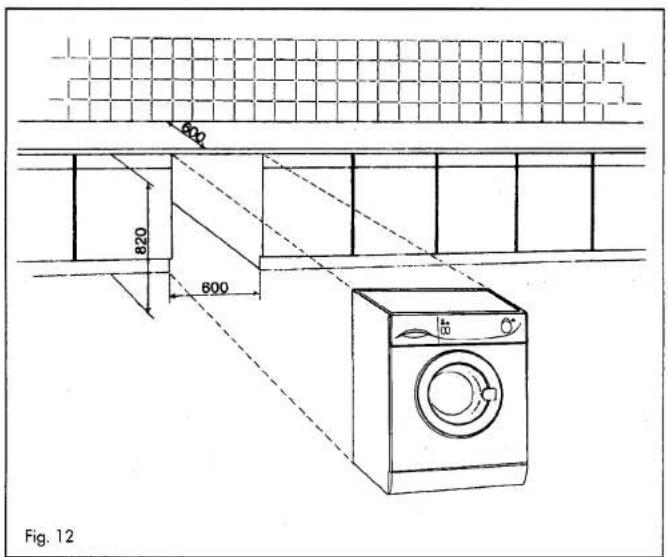
If the washing machine is sited under a work surface or between units check the dimensions given in (Fig. 12).
Make sure that the pipes at the rear are not distorted when fitting otherwise the machine may malfunction.
Information
Manual description
In order to help you understand this manual we have included in the back of the book some illustrations. Which should be related to when reading the text.
Rating plate (Fig. 5)
This plate is fixed on the door of the appliance. The plate shows the supply details of the appliance and must be consulted before connecting to the electricity supply.
Electrical connections
These should be carried out by qualified competent persons. The appliance should only be used on the voltage shown on the rating plate.
This washing machine complies with the provisions of the directive 87 / 308 / EEC of the European Community concerning radio interference.
Unpacking and unblocking
Unpacking
Remove the transport wrapping and polystyrene protection pieces.
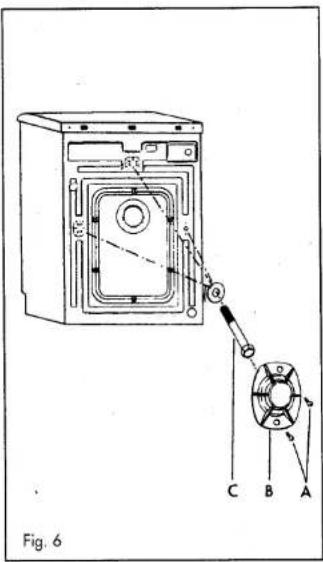
Unblocking (Fig. 6)
IMPORTANT: The transit bolts must be removed before using your washing machine.
1/ Unscrew the screws (A) which hold the plates (B) to the back of the machine
2/ Unscrew the blocking bolts (C) and remove them.
3/ Cover the holes with the plates (B).
4/ Keep the blocking bolts in case you transport your machine at a future date.
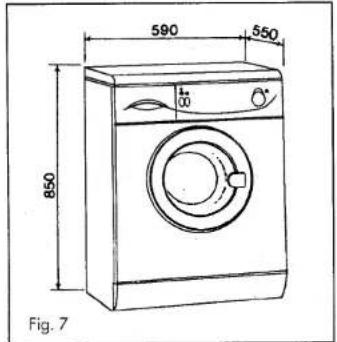
Dimensions
Before finally installing your washing machine consult (Fig. 7) in which the measurements of the appliance are given.
Connection to the mains water supply
This appliance has 2 water inlets, one for cold water and another for hot water.
The hot water inlet hose, which has a red mark on it, must be connected to water inlet also has a marked in red.
You will find the water inlet hoses inside the washing machine drum
When connecting the appliance to the mains water supply, proceed as follows:
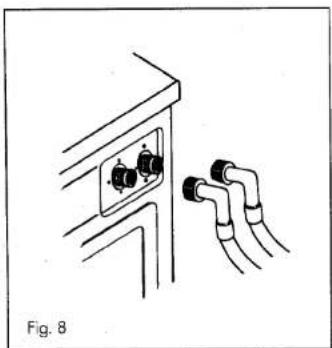
1- Connect the angled ends of the hoses to the threaded electrovalve inlets located on the back of the appliance (Figure 8).
2- Connect the other end of the pipes to water taps which have a 3/4" thread. Once this has been done, tighten the nuts (Figure 9).
IMPORTANT:
It is essential that both water inlets always are connected, regardless of the wash programme you select.
Connecting the drain pipe
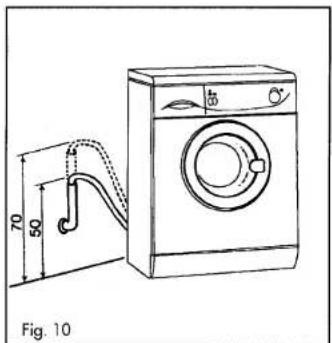
Place the hooked end of the drain pipe into a stand pipe of 32 mm. (1 1/4") minimum diameter. The stand pipe should be between 50 and 70 cm. above floor level and never more than 90 cm. Avoid folds and distortion in the drain pipe and make sure that the hooked end is well fitted into the stand pipe to avoid any risk of the pipe falling out.
Recommended max. load size: 2 Kg.
Wool: 1 Kg
Delicate Wash programmes: Synthetic, mixed delicate fabrics, etc.
| PROGRAMME SETTING | PROGRAMME DESCRIPTION | MAX. TEMP. | DETERGENT DISPENSION COMPARTMENTS | CASE LABEL SYMBOL | FABRIC TYPE | Approximate Duration |
| 7 | Normal wash, rinses with automatic absorption of fabric conditioners and final spin. | 50^ | For normally soiled garments made of white fabrics like nylon, polyester or mixed cotton. | |||
| 8 | Normal wash, rinses with automatic absorption of fabric conditioners and final spin. | 40^ | For normally soiled garments of coloured fabrics like nylon, polyester or mixed cotton. Mixed wool fabrics | |||
| 9 | Gentle wash, rinses with automatic absorption of additives and final spin. | 40^ | For woollen garments with the "Machine Washable" "Does not scratch" label. | |||
| 10 | Rinses with automatic absorption of additives and final spin. | Fabric conditioner treatment for garments made of delicate fabrics. | ||||
| 11 | Drawing and gentle spin. | Spin drying of garments made of delicate fabrics |
| 12 | Draining without spin. |
Cleaning your Washing Machine before use
It is advisable to clean the inside of your washing machine before using it for the first time, in order to get rid of any lubricants or water left over from manufacturing. To do this you should:
- Put a measure of low suds detergent into the COMPARTMENT of the detergent dispenser.
- Select WASH PROGRAMME «2» (90° without prewash) with the Programme Selector control knob.
- Start the washing machine.
- Wait until the PROGRAMME finishes
Starting your machine
When starting your washing machine, carefully follow all the steps explained below:
- Check that the washing machine is plugged in and that the electrical supply is turned on.
- Turn on the water TAPS or open the stopcock.
- Put the clothes into the DRUM.
- Close the LOADING DOOR properly.
- Put the required amount of detergent into the DETERGENT DISPENSER
- Select the PROGRAMME you require with the PROGRAMME SELECTOR control knob.
- Select any special functions you require by pressing required buttons.
- Press the STOP/START button.
The «ON» light will come on. The wash programme selected will now begin.
End of Programme
When the programme selector control knob reaches the STOP POSITION, this means that the programme has finished
DO NOT OPEN THE DOOR OF YOUR WASHING MACHINE UNTIL THE DOOR SAFETY DEVICE IS DEACTIVATED. (Approximately 2 minutes)
Press the STOP/START button.
Practical advic for a better wash
Please read these pages carefully, as they will help you to get the best results from your machine and to maintain it properly.
Sorting the Clothes
Sort the different articles of clothing according to:
- COLOUR
- SOILING
- DELICATE FABRICS
Colour
- Before putting the clothes into the machine, sort the clothes according to the type of fabric and depth of colour.
- Wash whites separately from coloureds.
- If your coloureds are new, it is best to wash them them separately the first few times to prevent dye transfer/loss.
Soiling
- Sort the clothes according to soiling. Give special treatment to those which are very dirty or have got difficult stains.
Washing machine installation instructions
- Treat very dirty areas, like collars and cuffs beforehand.
- Wash clothes that are only slightly dirty in short programmes. In this way, you will save energy as well as getting excellent results.
- Wash normal dirty clothes in a normal wash programme.
- Wash very dirty clothes in a Long Programme with a Prewash.
Delicate fabrics
Certain clothes, either because of their fabrics or the way they are made, may be sensitive to the wash action of your machine. When washing them it is best to use DELICATE PROGRAMMES.
- You can wash woollen garments in the SPECIAL WOOL PROGRAMME. Make sure, first of all, that your woollen garments are machine washable.
Care Label Symbols
These symbols are normally found on the care labels in the necks or side seams of your clothes. They indicate:
- Maximum WASH temperature.
- Type of wash they can withstand
-
Products with which they can or cannot be washed.
-
Correct method of drying.
- Correct ironing temperature and method.
Care label symbols
30
For washing at 30°C
40
For washing at 40°C non fast coloureds
60
For washing at 60°C fast coloureds
90
For washing at 90°C Resistant fabrics.
[NO TEXT]
Do not wash at home.
40
Handwash only do not machine wash
40
Wool washing - two bars indicates minimum washing conditions - specifically for machine washable wool items.
|||
Drip drying
[Figure]
Hang dry.
-
Flat dry.
△
For bleaching
CI
For bleaching
[Non-Text]
Do not bleach.
O
For dry clearing
⊗
Do not dry clean.
□
For tumble drying
[NO TEXT]
Do not tumble dry.
O
For dry cleaning and special treatments.
F
For dry cleaning. Use only mineral solvents: benzine, white spirit, etc.
P
For dry cleaning. Perchlorethylene may be used in addition to the previous solvents.
A
For dry cleaning. All normal solvents can be used.
[Figure]
Cool iron.
[Figure]
Warm iron.
...
Hot iron.
2
Do not iron at home.
[NO TEXT]
Wool
Treating stains
On many occasions, due to the type, and characteristics of some stains, you may not be able to get the results you would like from the wash. Below is a guide to the special treatments you can apply to these stains before putting the clothes into your washing machine.
Water soluble stains
Treat these stains, even if they are stubborn, with concentrated detergent or washing soap.
Stains not soluble in water
Treat these stains with a proprietary stain removal product.
Difficult stains
Felt tip pen and biro: rub these stains with a piece of blotting-paper and iron at the correct temperature for the material. If necessary, repeat the operation.
Resin, grease and skin-care cream: treat these stains with a solvent-based stain remover and then wash.
Tar: rub these stains with butter and set to one side for a while, then wash.
Blood, milk and egg: soak in cold water and then wash with biological detergent at a temperature of 50^ to 60^ , provided the fabric is suitable for these temperatures.
Fruit, coffee and wine: wash with biological detergent.
If you come up against a stain which is not washable or particularly stubborn, ask for specialist advice. In any case, NEVER USE CHEMICAL PRODUCTS IN THIS WASHING MACHINE.
Practical advice on the wash load
- Whenever possible, it is best to wash with a full load, as this will reduce water and electricity consumption considerably.
- If you have to wash very dirty clothes or very absorbent items (towels, bathroom linen, etc.), it is advisable to reduce the maximum load given.
- Whenever possible, we recommend that ycu wash items of different sizes in the same wash programmes, as this helps the wash action and benefits the distribution of clothes in the drum during spin drying. It also means that the machine operates more quietly.
General hints on washing
- When you wash garments which require different wash temperatures, always select the lowest temperature.
- Generally speaking, whiteners should only be used to wash resistant white fabrics such as cotton, linen, etc.
- Wash garments made of synthetic, mixed and delicate fibres in Delicate Programmes to avoid creasing which will be difficult to iron out.
- It is best to finish Delicate programmes with a short spin. This will increase the efficiency of the rinses and mean that the clothes are well spun at the correct speed.
Troubleshooting guide
If you have a problem with your washing machine, you may be able to solve the problem by consulting the following guide.
If the guide does not offer a solution to the problem, unplug your washing machine and call your nearest AUTHORISED SERVICE CENTRE. Your washing machine contains no fuses or similar components which you can change. NEVER tamper with your washing machine.
If your washing machine does not start check these possible causes
- There is no electricity supply
- Your washing machine is not plugged in
- A mains fuse in the plug has blown
- Your washing machine door is not properly shut.
- The STOP/START button has not been pressed.
Your washing machine is not taking in water
Possible causes
- The mains water supply has been cut off.
- The water inlet taps are turned off
- The hose filters are blocked.
- The pipes are blocked or bent
Your washing machine does not empty or spin
Possible causes
- The water outlet pipe is blocked or bent.
Your washing machine vibrates or makes a lot of noise
- The INTERNAL FIXING SCREWS have not been removed. (Consult the Installation Manual).
- The washing machine has not been properly levelled.
A heavy item has been put in the drum to wash e.g. a bedspread and this has cased an inbalanced load in the drum.
Important
Some models (high spin speeds) have a spin safety system which stops the spin function from working if the clothes are not properly distributed in such a way that they could cause excessive vibrations. If your clothes should come out very wet, spin dry them again ensuring that they are evenly distributed in the drum.
- Creda Answer Centre 08701 54 64 74
- Installation and user instruction book
- Washing Machine
- W0801W - W1001W - W1002W
- Service Cover
- THANK YOU FOR CHOOSING CREDA...
- CREDA - your GUARANTEE...
- CREDA CARE - HIGH QUALITY AFTER SALES SERVICE LEVELS
- INSTRUCTION
- AND
- MAINTENANCE
- BOOKLET
- Contents
- Getting to know your Washing Machine
- IMPORTANT
- Preliminary Warnings
- Installation
- Technical specifications table
- Description of your Washing Machine. See page 16. Fig. 1 and 2.
- Using the Selector Controls
- Programme Selector Control
- Wash Phase Display
- Stop/Start Button
- Additional Function Buttons
- No Spin
- Spin Selector
- Creasecare
- Loading the Machine
- Opening the door
- Loading the drum
- Adding detergent and additives
- Detergent
- Detergent Guide
- Selecting the Wash Programme
- Programme Tables
- Connecting the electricity
- Positioning and levelling
- Information
- Manual description
- Rating plate (Fig. 5)
- Electrical connections
- Unpacking and unblocking
- Unpacking
- Unblocking (Fig. 6)
- Dimensions
- Connection to the mains water supply
- IMPORTANT:
- Connecting the drain pipe
- Cleaning your Washing Machine before use
- Starting your machine
- End of Programme
- Practical advic for a better wash
- Sorting the Clothes
- Colour
- Soiling
- Washing machine installation instructions
- Delicate fabrics
- Care Label Symbols
- Treating stains
- Water soluble stains
- Stains not soluble in water
- Difficult stains
- Practical advice on the wash load
- General hints on washing
- Troubleshooting guide
- If your washing machine does not start check these possible causes
- Your washing machine is not taking in water
- Your washing machine does not empty or spin
- Your washing machine vibrates or makes a lot of noise
Brand : Creda
Model : W1002W
Category : Washing machine