CRWM722 - Washing machine Creda - Free user manual and instructions
Find the device manual for free CRWM722 Creda in PDF.


| Type | Freestanding washing machine |
| Brand | Creda |
| Model | CRWM722 |
| Capacity | 7 kg |
| Maximum Spin Speed | 1200 rpm |
| Energy Class | A+++ |
| Washing Class | A |
| Spin Noise Level | 76 dB |
| Wash Noise Level | 56 dB |
| Annual Energy Consumption | 190 kWh |
| Annual Water Consumption | 10000 L |
| Dimensions (H x W x D) | 85 x 60 x 52 cm |
| Weight | 65 kg |
| Power Supply | 220-240 V, 50 Hz |
| Programs | Cotton, Synthetics, Delicates, Quick 30', Eco 40-60, Wool, Rinse & Spin, Drain |
| Special Features | Delay start, Child lock, Half load detection, Self-cleaning drum |
| Installation | Transport bolts must be removed before use |
| Cleaning | Clean detergent drawer, filter, and drum periodically |
| Spare Parts | Hoses, PCBs, drums, door locks available |
| Repairability Index | 7.5 / 10 |
Frequently Asked Questions - CRWM722 Creda
User questions about CRWM722 Creda
0 question about this device. Answer the ones you know or ask your own.
Ask a new question about this device
Download the instructions for your Washing machine in PDF format for free! Find your manual CRWM722 - Creda and take your electronic device back in hand. On this page are published all the documents necessary for the use of your device. CRWM722 by Creda.
USER MANUAL CRWM722 Creda
natural_image
Front view of a Creda Inverter washing machine with black circular vent and digital display (no visible text or symbols on the device itself)MODEL/S
CRWM722W
OVERVIEW
Thank you for purchasing this product.
We aim to ensure that you optimally and efficiently use this product. All of our products are produced to the highest quality in our modern facilities under environmentally friendly conditions.
We recommend that you read your instruction manually carefully and keep it permanently as a reference point should any problems occur.
NOTE: This instruction manual is suitable for multiple models within the Washing machine range, some features may not be relevant to your model.
Our appliances are intended for domestic use only and should not be used in a commercial setting.
The figures in the Instruction manual are schematic and may vary from the product you own.
Features marked with * are optional.
CONTENTS
Safety Information 4
- General Safety 4
- Permitted Use 4
• Installation Safety 5
• Installation Safety 7
Introduction of your Appliance 8
Specifications 8
Accessories 8
Control Panel Functions 9
Installation 14
- Unpacking Your Appliance 14
- Carrying Your Appliance 14
- Removing Transport Bolts 15
- Location of the Appliance + Set In Installation 16
• Levelling the Appliance 17
• Connecting the Water Inlet Hose 18 - Connecting the Drain Hose 19
Preparing For First Use 21
How to Use Your Appliance 24
Troubleshooting 27
Maintenance & Care 30
Product Fiche 33
Disposal of the Appliance 37
SAFETY INFORMATION
Please read the Instruction manual carefully before operating the appliance.
GENERAL SAFETY
Very young children (0-3 years) should be kept away from the washing machine.
Young children (3-8 years) should be kept away from the washing machine unless continuously supervised.
Children from 8 years old and above and persons with reduced physical, sensory or mental capabilities or lack of experience and knowledge can use this washer only if they are supervised or have been given instructions on safe use and understand the hazards involved.
Children must not play with the washing machine.
Cleaning and user maintenance must not be carried out by children without supervision. Keep all laundry aids (including detergent, bleach, fabric softener, etc.) Out of the reach of children.
PERMITTED USE
CAUTION: The washing machine is not intended to be operated by means of an external switching device, such as a timer, or separate remote controlled system.
This washer is intended to be used in household and similar applications such as: staff kitchen areas in shops, offices and other working environments; farm houses; by clients in hotels, motels, bed & breakfast and other residential environments.
DO NOT load the washer above the maximum capacity (kg of dry cloth) indicated in the program table.
This washer is not for professional use.
DO NOT use the washer outdoors.
DO NOT use any solvents (e.g. turpentine, benzene), detergents containing solvents, scouring powder, glass or general purpose cleaner, or flammable fluids; do not machine wash fabric that have been treated with solvents or flammable liquids.
SAFETY INFORMATION
DO NOT machine wash fibreglass materials (such as curtains and windows coverings that use fibreglass materials). Small particles may remain in the washer and stick to fabrics in subsequent wash loads causing skin irritation.
Fabric softeners, or similar products, should be used as specified by the fabric softener instructions.
REMOVE all objects from packets such as lighters and matches.
Make sure there is no water in the drum before opening the door.
NEVER wash the carpet in the washer.
Keep pets away from the washer.
Exercise caution when pumping out hot detergent solution.
DO NOT fill water during washing cycle manually.
Please close the loading door correctly, if it is difficult to close it, please check if the laundry is caught in the door.
Water may reach very high temperatures during the wash cycle.
DO NOT reach into the washer if the wash drum is moving.
DO NOT tamper with the controls.
NEVER open the door forcibly or use it as a step.
DO NOT allow anyone to climb, lean or hang on any part of the washer including any protruding components such as the appliance door or a pullout shelf.
INSTALLATION SAFETY
The washer must be handled and installed by two or more persons. Use protective gloves to unpack and install - risk of cuts.
The washing machine must be installed and operated in a room with the drain.
Installation, including water supply (if any) and electrical connections and repairs must be carried out by a qualified technician.
Keep children away from the installation site.
SAFETY INFORMATION
After unpacking the washer, make sure that it has not been damaged during transport. In the event of problems, contact the dealer or your nearest After-Sales Service.
Once installed, packaging waste (plastic, Styrofoam parts) must be stored out of reach of children due to risk of suffocation.
The washer must be disconnected from the power supply before any installation operation.
During installation, make sure the washer does not damage the power cable.
Only activate the washer when the installation has been completed.
DO NOT install the washer where it may be exposed to extreme conditions, such as: poor ventilation, temperatures below 5°C or above 35°C.
DO NOT expose the washer in the place with causticity or explosibility gas.(e.g. dust, steam and gas, etc.)
DO NOT install the washer in a bathroom or a room very wet.
The washer should not be installed in an outdoor environment, not even where the area is sheltered.
When installing the washer make sure that the four feet are stable and resting on the floor, adjusting them as required, check using a spirit level.
The washer must not be installed behind a lockable door, a sliding door or a door with a hinge on the opposite side to that of the washer, in such way that the washer door is restricted.
After installation of the washer, wait a few hours before starting it so that acclimates to the environmental conditions of the room.
Make sure that the ventilation openings in the base of the washer (if available on your model) are not obstructed by a carpet or other material.
When moving, do not lift the washer by the knobs or detergent drawer, without lifting it by the worktop or top lid; during transport, never rest the door on the trolley.
SAFETY INFORMATION
The washer is fitted with transport bolts to prevent any possible damage to the interior during transport. Before using the machine, it is imperative that the transport bolts are removed. After their removal, cover the openings with the 4 enclosed plastic caps.
Connect the water inlet hose(s) to the water supply in accordance with the regulations of your local water company.
The supply water pressure must be in the 0.03-1.0 MPa range.
Use only the new water inlet hose(s) supplied with the washer to connect the washer to water supply. The old water inlet hose(s) should not be reused.
ELECTRICAL SAFETY
It MUST be possible to disconnect the washer from the power supply by unplugging it if plug is accessible, or by a multi-pole switch installed upstream of the socket in accordance with the wiring rules and the washer must be earthed in conformity with national electrical safety standards. When the washer is installed, the mains socket must be within easy reach.
When heating, the maximum current of the washer is 10A, so please make sure that the power supply system (voltage, current and the cable) is applicable to the load of the applied appliance.
In order to ensure your safety, you must plug the cable into a socket which connected to earth. And please check your socket to make sure that it is connected with reliable earth correctly.
DO NOT use extension leads, multiple sockets or adapters.
DO NOT operate this washer when you are wet or barefoot.
DO NOT operate this washer if it has a damaged power cable or plug, if it is not working properly, or if it has been damaged or dropped. If damaged it must be replaced with an identical one by the manufacturer, its service agent or similarly qualified persons in order to avoid a hazard.
Disconnect the power cord by grasping the plug, not the cord.
INTRODUCTION OF YOUR APPLIANCE
NOTE: The appliance figures below are only provided for illustration purposes.
Figure 1
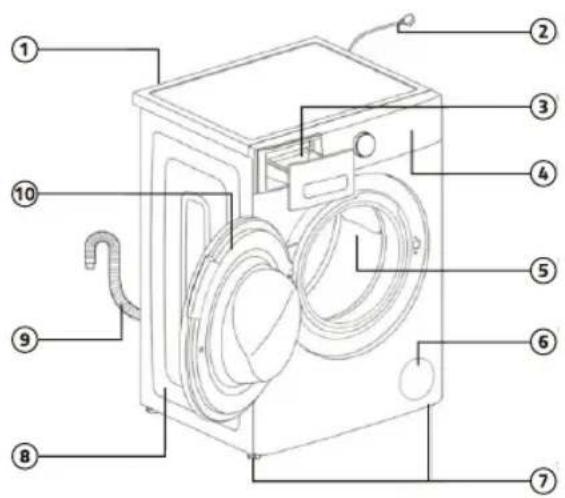
Figure One
- Water Inlet
- Power Cord & Plug
- Detergent Drawer
- Control Panel
- Drum
- Drain Filter Cover
- Adjustable Feet
- Cabinet
- Drain Hose
- Door
ACCESSORIES
NOTE: The accessories below are included with the appliance.
 | Instruction Manual |
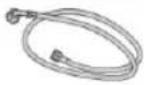 | Water Inlet Hose |
 | Wrench |
 | Cover Caps |
SPECIFICATIONS
| MODEL | CRWM722W |
| Capacity | 7kg |
| Rated Voltage | 220-240V |
| Rated Frequency | 50Hz |
| Rated Power | 2000W |
| Max dB | 76 |
| Spin Speed | 1200rpm |
| Water Pressure | 0.03-1.0 Mpa |
| IP Rating | IPX4 |
| Net Weight | 50Kg |
| Dimensions | H:847 x W:600 x D: 465mm |
CONTROL PANEL FUNCTIONS
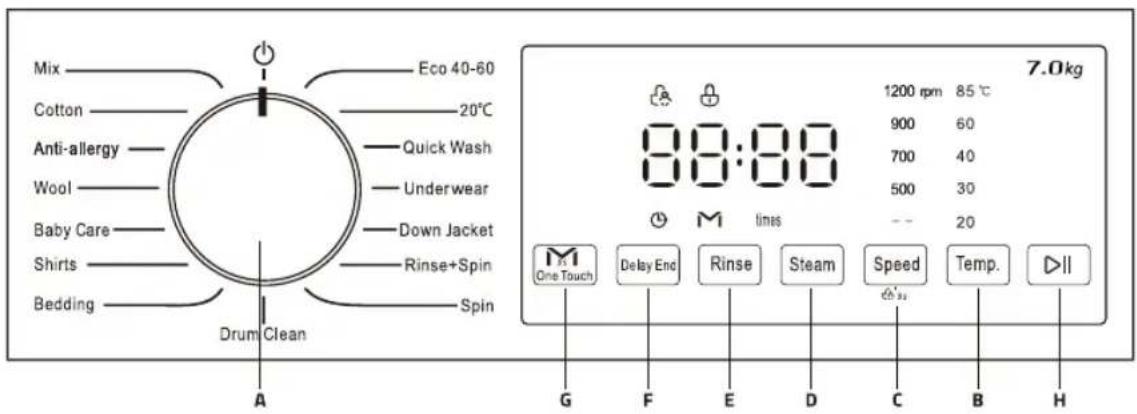
A. Wash Cycle Selector:
Turn the linear mark on the knob to the desired setting, once selected start the cycle, return the linear mark until the power button symbol ⏻ to switch off the appliance.
B. Temperature Button:
Press the button to change the temperature of the water for the current cycle, the selected temp will illuminate on the display.
C. Speed Button: Press the button to change the spin speed of the current cycle, the selected cycle will illuminate on the display.
NOTE: Whilst the cycle is running if you wish to activate the child lock function ⬤, press & hold the speed button for 3 seconds.
Cancelling the Buzzer: Press and hold the speed button & the one touch button at the same time for at least 3 seconds, this will cancel the buzzer for the active cycle.
D. Steam Button: Press to set the steam wash cycle.
E. Rinse Button: Press to change the rinse count for the current cycle.
F. Delay end Button: Press the delay end button ⏻ to set the wash cycle end time.
G. One Touch Button: Press the one touch button M to activate.
H. Start/Pause Button: Long press the start/pause button ▷ll to start the wash cycle. Once the cycle has started long press the start/pause button ▷ll again to pause the cycle. If you wish to resume a cycle you have paused, simply long press the start/pause button ▷ll again.
NOTE: If the door lock indicator is not illuminated you may open the door and add or remove items of laundry.
NOTE: Please see the next page for more detail on the wash cycles & functions.
CONTROL PANEL FUNCTIONS
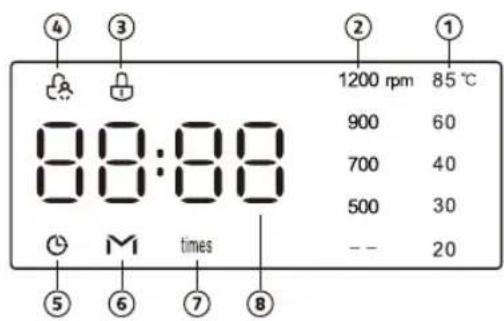
1. TEMPERATURE :
When a program is selected, the default temperature value of this program will appear on the display (illuminated).
NOTE: you can change the temperature value by pressing the temp button. If all of the temperature values are off, it means the appliance is only using cold water.
2. SPINNING SPEED:
When a program is selected, the default spinning speed value of this program will appear on the display (illuminated).
NOTE: you can change the spinning speed value by pressing the speed button. If all of the spinning speed values are off, it indicates that the appliance has done it's final drain process in the current program.
3. DOOR LOCK: 🔊
The lit symbol indicates that the door is locked, to prevent damage wait until the symbol turns off before opening the door.
NOTE: To open the door whilst a cycle is in progress, press the start/pause button and wait for the door lock symbol to turn off.
4. CHILD LOCK: 📋
The lit symbol indicates the child lock function is activated, the control panel is locked (apart from the OFF position on the control panel).
5. DELAY END: Ⓛ
The lit symbol indicates the delay end function is activated. The countdown to the end of the selected cycle will appear on the digital display.
6. ONE TOUCH: M
The lit symbol indicates the one touch wash program is selected. There are three ways to set the one touch wash program.
7. RINSE COUNT: times
When the symbol is lit, you can select the rinse count, the selected rinse count will appear on the digital display.
8. DIGITAL DISPLAY:
| 1 | Wash cycle remaining time | 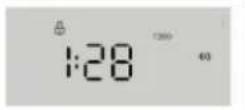 |
| 2 | Delay end time | 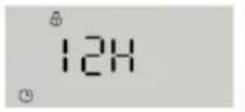 |
| 3 | Rinse count | 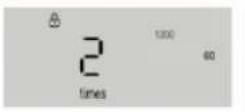 |
| 4 | Fault code | 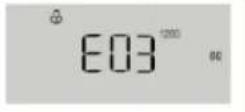 |
FUNCTIONS
VARIOUS ONE TOUCH CYCLES
One touch wash cycle can intelligently detect the weight of laundry and match different washing time and temperature to realize intelligent washing.
"Auto" is displayed in the detection stage after the cycle is started, and the one touch wash cycle can be entered by the following three methods.
- When the washer is off, press and hold the one-touch button for at least 3 seconds, the washer will run the m-smart wash cycle directly, with one-touch indicator light M illuminated.
- When the washer is on, press and hold one-touch button for at least 3 seconds, the washer will run the one-touch wash cycle directly, with one-touch indicator M light illuminated.
- When the washer is on, short press the one-touch button, the one-touch indicator light M illuminated, and then press the start/pause Dll button, the washer runs the one-touch wash cycle.
SPECIAL WASH CYCLES
BABY CARE:
A cycle designed for dirt typical of children's garments in that it effectively removes any traces of residual detergent.
DOWN JACKET:
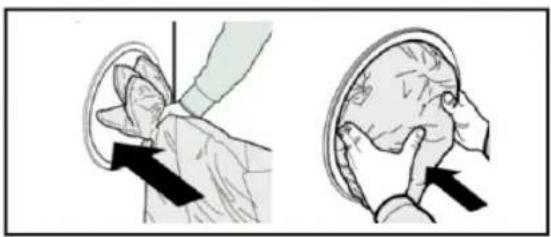
A cycle to wash single downs (the weight of which should not exceed 2.0kg), cushions or clothes padded with goose down such as puffa jacket, use this special wash cycle. We recommend that down are placed in the drum with their edges folded inwards (see figure) and that no more than 3/4 of the total volume of the drum is used. To achieve the best results, we recommend that a liquid detergent is used and placed inside the detergent dispenser drawer.
Figure 2
natural_image
Illustration showing two stages of a medical procedure on fetal head, with arrows indicating direction (no text or symbols present)Wool:
A cycle designed for wool fabrics.
- Before washing, please confirm that the clothes have the washing label of "machine washable".
- After the procedure is completed, please take out the clothes quickly, shape and dry them to avoid deformation caused by being placed in the drum for too long.
- To prevent clothes from being damaged, the water temperature should not exceed 40^ C.
- For best results please use special detergent for wool and do not exceed 1.0 kg of laundry.
FUNCTIONS
DELAY END

Press delay end button to set the program end (delay end) time in one hour increments to a maximum of 24 (hours). After selecting the desired washing program but before pressing the start/pause ▷□ button, press the delay end ⏻ button until the desired time is displayed, e.g.. 8h.
NOTE: The cycle duration is included in the set Delay end time.
EXAMPLE: Here is an example of a 1hr: 30 min cycle time and an 8h Delay end time. 8h is displayed and count down (approximately 6 h: 30 min) until the washing cycle begins (at 1hr: 30 min) then the cycle duration 1: 30 is displayed and began. Total time approximately 8 hours.
NOTE: Delay End function cannot be set some wash cycle.
NOTE: The end time of the wash cycle may be different from the actual reservation time depending on the water supply pressure, drainage, clothing type, water temperature and other conditions.
IMPORTANT: Turn the wash cycle selector knob to reset the wash cycle.
CHILD LOCK:

- Setting the Child lock function can avoid children's mis-operation and external interference to the washing procedure.
- During operation, long press the SPEED button for 3 seconds to set or cancel the Child lock function.
- After the Child lock function is set, the indicator light is illuminated, the door cannot be opened, the control panel is locked and all buttons on control panel do not respond. You can turn off the machine by turn the wash cycle selector knob.
- After the child lock function is set. When the machine is turned on again, the machine directly run the program before turning off the machine.
STEAM:
A cycle designed for cotton clothes that are not easy to fade.
- Steam treatment can reduce the wrinkle of clothes, make the clothes reach the ideal humidity level, reach the most relaxed state, and make ironing easier.
- Steam treatment can get rid of the peculiar smell on clothes.
FUNCTIONS
Press and hold the SPEED button and ONE TOUCH M button together at the same time for at least 3 seconds, you can turn off the buzzer that sounds during the washing cycle running.
Do the same operation as you did for cancelling. The buzzer setting is activated after one beep.
ADDING CLOTHES DURING AN ACTIVE CYCLE:
When the program is running, long press the START/PAUSE ▷□ button to pause the machine, open the door and add clothes. After the operation is completed, close the door, long press the START/PAUSE ▷□ button again, and the machine continues to run.
NOTE: If the water level or water temperature in the drum is too high, the door lock indicator light 🔒, is illuminated, the door cannot be opened and the midway clothes filling function cannot be used.
LOAD BALANCING SYSTEM:
The washer has an automatic detection system for eccentric load. In the process of spinning, if the clothes are unevenly distributed, the washer will level and adjust the clothes until the clothes are evenly distributed before spinning. If the clothes cannot be evenly distributed within the specified time, the washer will not spin to avoid severe vibration of the machine. At this time, you need to check whether the clothes are knotted or entangled, and select the "Spin" program after reorganizing the clothes. When washing less clothes, such as a pair of jeans, a sweater, a bath towel, etc. The machine may not complete the spinning process due to balance protection. Please wash the large and small clothes together as much as possible to make the clothes easier to release evenly and complete the spinning process smoothly.
NOTE: Due to the different types and materials of the laundry, the automatic adjustment and balance system of the washer may level and adjust the clothes for many times to prolong the spinning time. This is a normal phenomenon, not a machine failure.
INSTALLATION
UNPACKING YOUR APPLIANCE
- Remove the washer from its packaging.
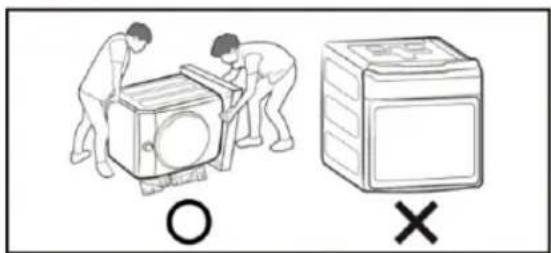
- To remove the cushion bottom of the packing materials, do not tip the washer over on its front side. When you lay the washer down to remove the carton base, protect the side of the washer and lay it down carefully (See figure below).
NOTE: Never lay your washer on its back or front.
Figure 3
natural_image
Illustration of two people handling a washing machine and a washing machine, both marked with an 'O' and a cross symbol (no text or labels)WARNING: Packing materials can be dangerous to children, keep all packing material (plastic bags, polystyrene, etc) out of reach of children and dispose accordingly.
CARRYING YOUR APPLIANCE
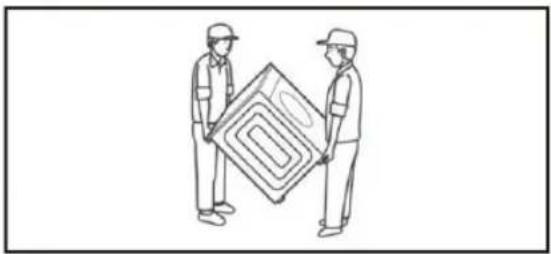
- Tilt the washer backward.
- One person stands behind the washer and holds the protruding part of the top plate, while the other person holds the bottom of the washer by the front panel. (See figure below)
CAUTION: never lift the appliance by yourself.
Figure 4
natural_image
Two workers in hard hats holding a large mechanical component (no text or symbols visible)NOTE: To prevent personal injury or strain, wear protective gloves whenever lifting or carrying your appliance.
NOTE: When moving your appliance, do not allow the front of the appliance to make contact the trolley frame as this may damage the appliance.
INSTALLATION
REMOVING THE TRANSPORT BOLTS
The washer is secured for transport with transport bolts. Transport bolts that are not removed can damage the drum during operation of the washer, the washer will vibrate, and it will be much noisier during spin cycles if the transport bolts are not removed before use. Be sure to remove all 4 transport bolts completely before first use.
Keep the transport bolts. If a pedestal was purchased with the washer, it must be installed first, prior to removing the transport bolts. Please consult the pedestal installation instructions.
In order to prevent transport damage during later transport, be sure to re-install the bolts before transport.
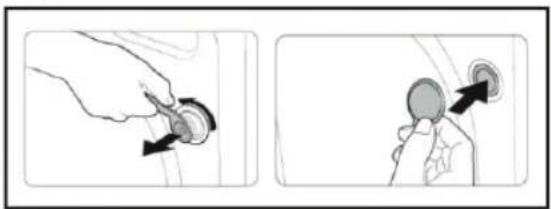
- Undo the four transport bolts A by the wrench (supplied) and remove them.
-
Remove the four spacers B. They will fall to the floor when you tip the machine.
-
Insert the four cover caps C which will find in the plastic bag containing the accessories.
Figure 5
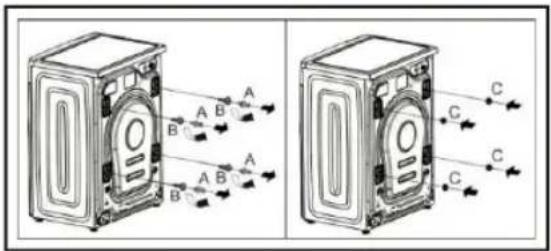
Figure 6
natural_image
Illustration showing two steps of a hand holding a circular object, with arrows indicating direction (no text or symbols present)NOTE: If you need to move the appliance again, reinstall the transport bolts and secure the power cord to the back of the appliance.
INSTALLATION
LOCATION OF THE APPLIANCE
DO NOT install the appliance in a damp area or an area that could be exposed to rain.
Always choose an area that is level and stable.
DO NOT install directly in sunlight, as the appliance may overheat or warp.
DO NOT install in an area where temperatures may reach 0°C.
SET-IN INSTALLATION
When Installing the appliance make sure there is sufficient access to the Plug & Socket.
When installing into closed space always have enough space for ventilation. (See figure below)
Figure 7
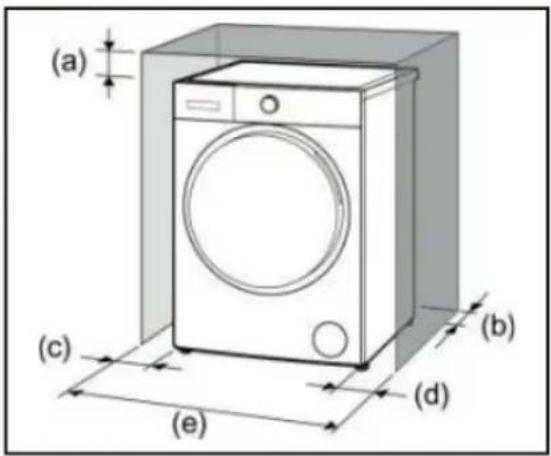
A. 3 ~cm or more above.
B. 5cm or more behind.
C. 2cm or more left side.
D. 2cm or more right side.
E. 64cm or more in front of the appliance.
INSTALLATION
LEVELLING THE APPLIANCE
The washer uses high spin speeds to remove water at the end of the wash cycle
It is important that the washer is level and that the washer feet press with equal pressure against the floor.
This will help assure the quietest, most vibration-free use of the washer.
- Install the washer on a level and solid surfaces.
- If the floor is uneven (or out of level) adjust the washer feet as required to level the washer. Do not place anything under the washer feet to help level the washer.
-
Extend the washer feet no more than is necessary. The more the feet are extended, the more vibration the washer will experience. Start with the washer feet turned all the way in and adjust each foot as necessary.
-
Use a spirit level to check the top of the washer to make sure it is level side to side and front to rear.
- Press down on each corner of the washer top to make sure the washer doesn't "wobble". There should be no "give" or movement. All the washer feet should press equally against the floor. This is just as important as the washer being level to prevent vibration.
- When the washer is level and does not wobble, lock the washer feet in place by tightening the locknuts against the washer bottom. Be sure to do this without changing the height of the foot (hold the foot while tightening the locknut).
INSTALLATION
ADJUSTING THE FEET
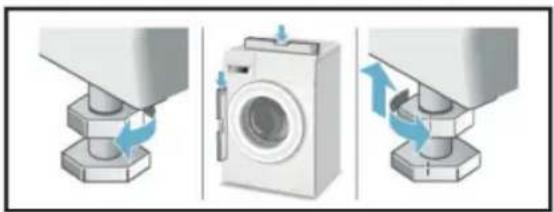
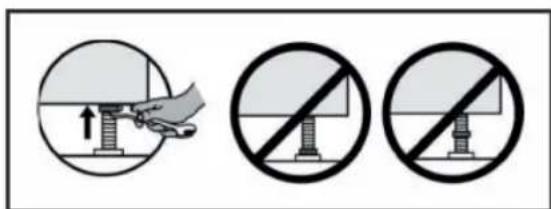
- After determining which the washer feet need to be extended, have someone lift up on the washer slightly to take pressure off the foot to be adjusted.
- Turn the washer foot to extend it downward as far as necessary to raise the corner of the washer the correct amount to level the washer.
- When the height of the foot is correct, use the wrench to tighten the locknut against the washer bottom. The locknut should be tighten against the bottom of the washer to lock the foot in place.
Figure 8
natural_image
Three-step diagram showing a washing machine being adjusted for a bolt, with blue arrows indicating the motion (no text or symbols present)Figure 9
CONNECTING THE WATER INLET HOSE
- Connect one end of the water inlet hose to a cold water tap and tighten by hand (see figure ten). Before performing the connection, run the water freely until it is perfectly clear.
Figure 10
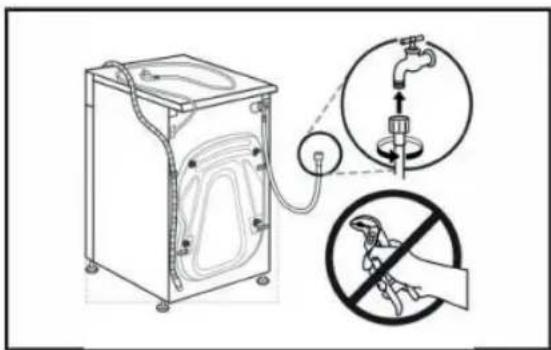
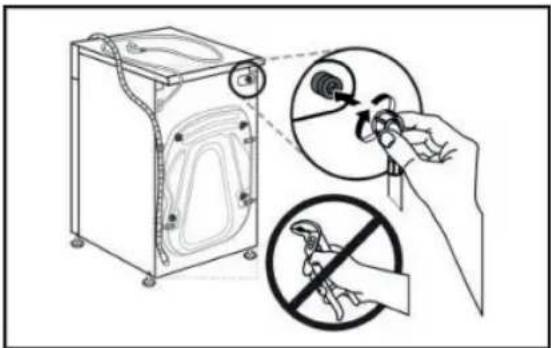
- Connect the other end of the water inlet hose to the water inlet valve on the rear of the appliance and tighten by hand.
Figure 11
INSTALLATION
- Turn on the tap slowly and make sure there are no leaks.
DO NOT twist, squash, modify or cut the hose.
Tighten the end of the hose firmly by hand.
The supply water pressure must be in the 0.03-1.0MPa range.
If the water pressure exceeds this value, please fit a pressure reducing valve.
If the hose is not long enough, contact a specialized shop or an authorized technician.
NEVER use second-hand water inlet hose. Use the water inlet hose supplied with the appliance.
CONNECTING THE DRAIN HOSE
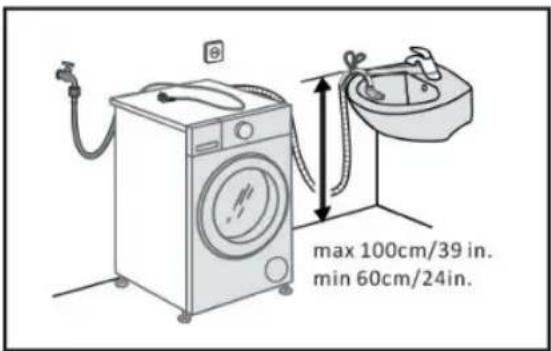
The height difference between the floor and drainage point must be a: min. 60cm(24 in) and a max of. 100cm(39 in).
Figure 12
DRAINAGE OPTIONS
STANDPIPE
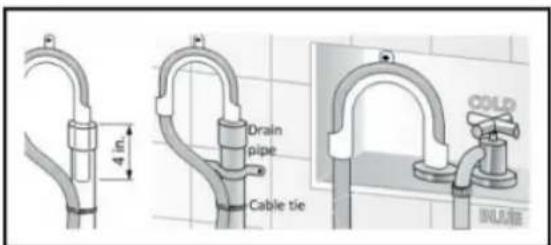
Attach the drain hose to the elbow (not supplied, available from our Customer Service Department). Position the elbow on the drain hose 4" from end of the hose as shown. Insert this section of the drain hose into the drain pipe. Secure the elbow and hose with a nylon tie strap or the equivalent to keep the hose from coming out of the drain pipe during use.
Figure 13
INSTALLATION
SINK SIPHON
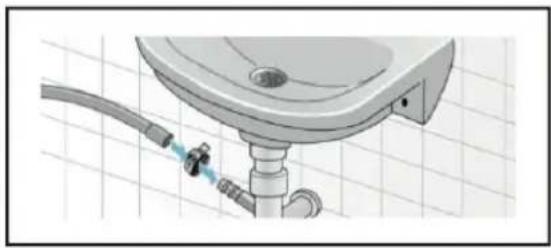
Secure the drain hose to the sink siphon using a 00.9-1.6 in. (20-44mm) hose clip. (Not supplied)
Before connecting the drain hose ensure that any blanks or removable ends have been taken off the spigot.
Figure 14
natural_image
Diagram of a kitchen sink with pipe and valve, no text or symbols presentWASH BASIN
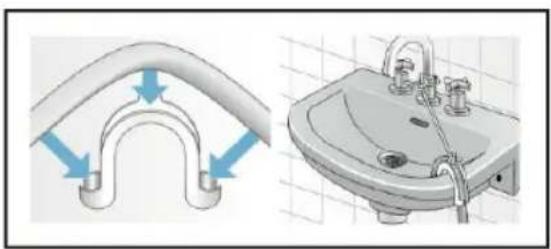
NOTE: Make sure there's no stopper in the sink drain, also make sure the drain is free flowing and not partially clogged.
IMPORTANT: The end of the drain hose must be touching the discharge water.
Attach the drain hose securely to the wash basin.
DO NOT twist, pull out or bend the drain hose.
We advise against the use of hose extensions; in case of absolute need, the extension must have the same diameter as the original hose and must not exceed 150cms in length.
Ensure that if the drain hose is pushed into a standpipe, that the end does not go down more than 15cms (6 inches).
Figure 15
natural_image
Illustration of a curved pipe fitting with blue arrows indicating direction, alongside a close-up of a sink with water and a handle (no text or symbols)PREPARING FOR FIRST USE
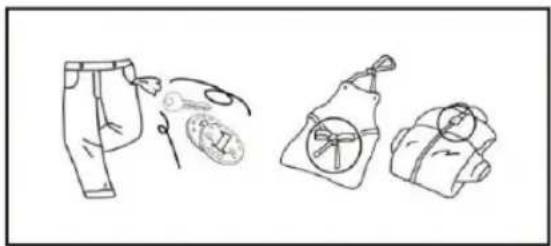
NOTE: Damage to the appliance or laundry can be cause by foreign objects (e.g. coins, paper-clips, needles & nails) please check when you load the appliance.
- Remove any loose items or metal objects from the laundry, making sure you check pockets & cuffs, close zips and button up items. (see figure below).
Figure 16
natural_image
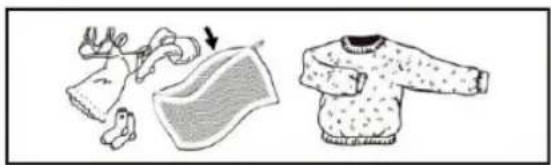
Line drawings of three different clothing items: jeans, a tire, and a bag (no text or symbols)- Use a net bag or pillow case to wash smaller items such as tights, socks and lace. Some items are best turned inside out before washing.
NOTE: Make sure that wire-cup bras are in a pillow case which can be securely closed with a zip or button. If the wire works itself out of the cup it may fall through the holes of the drum and cause extensive damage.
Figure 17
natural_image
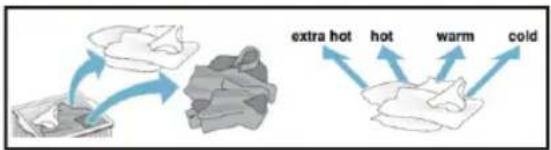
Illustration of two clothing items: a jacket with a net and a sweater with polka-dot pattern (no text or symbols)NOTE: Laundry should be sorted according to colour, degree of soiling and recommended wash temperature.
Figure 18
flowchart
graph TD
    A["Material"] --> B{Hot}
    B --> C["Product"]
    C --> D["Hot"]
    C --> E["Warm"]
    C --> F["Cold"]
    style A fill:#f9f,stroke:#333
    style B fill:#ccf,stroke:#333
    style C fill:#cfc,stroke:#333
    style D fill:#fcc,stroke:#333
    style E fill:#cff,stroke:#333
    style F fill:#ffc,stroke:#333
Items of clothing can become discoloured.
NEVER wash new multi-coloured items together with other items.
Wash white items separately from coloured items. Otherwise, white items may tend to become grey.
LIGHT SOILING
No visible soiling or stains, but may have absorbed some odour.
NORMAL SOILING
Visible soiling and/or a few light stains. This could include clothing such as T-shirts, shirts, or blouses that have been sweated in or worn several times.
HEAVY SOILING
Visible soiling and stains. This could include kitchen towels, fabric napkins, baby bibs, children's outer clothing or football jerseys and shirts stained with grass or dirt. It could also include working clothes such as overalls and jeans and other clothing worn for outside work and activities.
PREPARING FOR FIRST USE
The symbols on the label of your garments will help you in choose the suitable wash program.
 Wash Type Wash Type |  Machine Wash Normal/Cotton Machine Wash Normal/Cotton |  Machine Wash Permanent Press Machine Wash Permanent Press |  Machine Wash Delicate/ Gentle Machine Wash Delicate/ Gentle |  Hand Wash Only Hand Wash Only |  -Do Not Wash -Do Not Wash |  -Do Not Wring -Do Not Wring |
 Wash Temp Wash Temp |  Water Temp 30°C Water Temp 30°C |  Water Temp 40°C Water Temp 40°C |  Water Temp 50°C Water Temp 50°C |  Water Temp 60°C Water Temp 60°C |  Water Temp 70°C Water Temp 70°C |  Water Temp 95°C Water Temp 95°C |
| 30Water Temp 30°C | 40Water Temp 40°C | 50Water Temp 50°C | 60Water Temp 60°C | 70Water Temp 70°C | 95Water Temp 95°C | |
 Bleach Bleach |  Any Bleach Any Bleach | [WASH]Non-Chlorine Bleach |  Chlorine Bleach Chlorine Bleach |  Do Not Bleach Do Not Bleach | ||
 Tumble Dry Tumble Dry |  Normal/Heavy Duty Cotton Normal/Heavy Duty Cotton |  Permanent Press/Wrinkle Resistant Permanent Press/Wrinkle Resistant |  Delicate/Gentle Delicate/Gentle |  Do Not Tumble Dry Do Not Tumble Dry | ||
 Tumble dryer Temp Tumble dryer Temp |  High Heat High Heat |  Medium Heat Medium Heat |  Low Heat Low Heat |  No Heat No Heat | ||
 Dry Type Dry Type |  Hang To Dry Hang To Dry |  Drip Dry Drip Dry |  Dry Flat Dry Flat |  Dry In The Shade Dry In The Shade | ||
 Iron Iron |  High Heat High Heat |  Medium Heat Medium Heat |  Low Heat Low Heat |  Do Not Iron Do Not Iron | ||
 Dry Clean Dry Clean |  Any Solvent Any Solvent |  Perchloroethylene Solvent Perchloroethylene Solvent |  Petroleum Solvent Petroleum Solvent |  Do Not Dry Clean Do Not Dry Clean | ||
PREPARING FOR FIRST USE
Use this table of wash cycles if you're unsure which function is best for your laundry.
| Wash Cycle | Temp °C (Max) | Max Load (Kg) | Description | Kind of Detergent | ||
| Detergents | Softener | |||||
| Universal | Special | |||||
| Mix | 60 | 7 | For blended fabrics, e.g. cotton, linen and synthetic fibres. | L/P | --- | O |
| Cotton | 60 | 7 | For daily items of cotton, linen and cotton blends. | L/P | --- | O |
| Anti-allergy | 85 | 3 | For clothes that need to remove mites and allergens. | L/P | --- | O |
| Wool | 40 | 1 | For machine washable wool and wool blend clothes. | --- | L/P | O |
| Baby Care | 85 | 5 | A cycle designed for dirt typical of children's garments in that it effectively removes any traces of residual detergent. | L/P | L | O |
| Shirts | 60 | 3 | For shirts and women's blouses. | L/P | L | O |
| Bedding | 60 | 6 | For large items such as blankets, curtains and bedspreads. | L/P | --- | O |
| Eco 40-60 | 40 | 7 | Energy efficiency test program. | L/P | --- | O |
| 20°C | 30 | 2 | For small amount of clothes that are easy to fade. | L/P | --- | O |
| Quick Wash | 40 | 1 | For small amount or lightly soiled garments. | L/P | --- | O |
| Underwear | 60 | 5 | For underwear. | L/P | L | O |
| Down Jacket | 40 | 2 | For down jacket which can be washed by machine. | --- | L/P | O |
| Rinse & Spin | --- | 7 | Combines a rinse and spin for loads requiring an additional rinse cycle. Also use for loads that require rinse only. | --- | --- | O |
| Spin | --- | 7 | This cycle uses a spin to shorten drying times for heavy fabrics or special-care items washed by hand. | --- | --- | --- |
| Drum Clean | 85 | --- | Clean the drum by removing dirt and bacteria from the drum. Make sure the drum is empty. | --- | --- | --- |
| One-Touch | 40 | 5 | Special cycle which can be started simply by pressing the ONE-TOUCH button. | L/P | --- | O |
L = Liquid Detergent P = Powder Detergent O = Optional --- = No If using liquid detergent, it is recommended that you do not use the time delay function.
Please follow the dosage displayed on the detergent packaging.
HOW TO USE YOUR APPLIANCE
IMPORTANT: Your new washer was tested before leaving the factory. This process involves running various wash cycles.
As a result, a small amount of water may remain in the tub and drainage system. Run a Drum Clean cycle with no laundry to clean the system before your first load of laundry. First add 1 to 2 tablespoons of detergent to the chamber I.
Then run the Drum Clean 🙏 cycle. Wait for the cycle to finish.
1. LOAD LAUNDRY:
Open the door and load the laundry. Load the articles one at a time loosely into the drum, without overfilling. Observe the load sizes given in the "Table of wash cycle", Overloading the machine will result in unsatisfactory washing results and creased laundry.
2. CLOSE DOOR:
Make sure that no laundry gets stuck between door glass and rubber seal. Close the door so that you can hear it click shut.
3. OPEN WATER TAP:
Make sure that the washing machine is connected to the water mains. Open the water tap.
4. SET THE DESIRED PROGRAM:
Select the required program with wash cycle selector knob. The duration of the wash cycle is shown on the display. The washing machine automatically displays the default temperature and spin speed settings possible for the selected program. Adjust the temperature and/or spin speed setting if needed with the relative buttons.
4a. CHANGE TEMPERATURE:
Press the temp. Button to progressively lower the temperature setting until cold wash has been set (all temperature value indicator light go out on the display). Pressing the button again sets the highest possible setting.
4b. CHANGE SPIN SPEED:
press the speed button to progressively decrease the spinning speed until the spin cycle is turned off (all spinning speed value indicator light go out on the display). Pressing the button again sets the highest possible setting.
4c. SELECT OPTIONS:
Press the button to select the option; the respective option indicator on the display illuminates. Press the button again to cancel the option; the respective option indicator extinguishes.
HOW TO USE YOUR APPLIANCE
NOTE: If the selected option is incompatible with the program set, the incompatibility will be signalled by a buzzer and the corresponding indicator light will flash.
NOTE: If the selected option is incompatible with another previously set option, only the most recent selection will remain active.
5. ADD DETERGENT:
Pull out the detergent dispenser and add detergent (and additives/softener) into the relative compartments (see figure below).
Figure 19
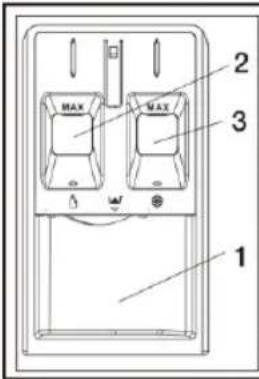
Compartment 1: Powder Detergent
Compartment 2: Liquid Detergent
Compartment 3: Additives (Softener)
NOTE: Do not exceed Max fill line.
5a. ALWAYS observe the dosing recommendations on the detergent packaging as there are many benefits.
5b. It optimizes the cleaning result.
5c. It avoids irritating residues of surplus detergent in your laundry.
5d. It saves money by avoiding waste of surplus detergent.
5e. It protects the washer by avoiding calcification of components.
5f. It respects the environment by avoiding unnecessary environmental burden.
- DELAYING THE END OF A PROGRAM: to set a program to end at a later time, see the section "control panel / delay end".
7. START PROGRAM:
Press the START/PAUSE ▷□ button. The relative indicator lamp illuminates, the door locks and the DOOR LOCK 📋 indicator lights up.
7a. To avoid overflow, do not open the detergent dispenser during a running program anymore.
7b. The remaining program duration can vary. Factors like unbalance in the wash load, or foam formation, can have an effect on the program duration.
HOW TO USE YOUR APPLIANCE
8. CHANGING THE SETTINGS OF A RUNNING PROGRAM:
You can still change the settings while a program is running. The changes will be applied, provided the respective program phase has no finished yet.
8a. Press START/PAUSE ▷ll button put the running program on pause.
8b. Change your settings.
8c. Press START/PAUSE ▷II button again to continue the program.
8d. If you have changed the program, do not add detergent for the new program.
8e. To prevent that a running program is changed by accident (for instance by children), use the Child lock function.
9. PAUSING A RUNNING PROGRAM AND OPENING THE DOOR:
Press START/PAUSE ▷II button to pause a running program.
9a. Provided water level or temperature is not too high, the DOOR LOCK 📁 indicator light turns off. You can open the door, for example to add more laundry, or to remove laundry which was loaded by mistake.
9b. Press START/PAUSE ▷II button again to proceed with the program.
10. CANCELLING A RUNNING PROGRAM:
Turn the wash cycle selector knob to OFF position) until the washer stops.
10a. If the water level and temperature are low enough, the door unlocks may be opened.
10b. The door remains locked if there is water in the drum. To unlock the door, switch the washer on, select the Spin program and turn the spin option off by pressing the SPEED button to set the spin cycle is turned off (all spinning speed value indicator light go out on the display).
10c. Press START/PAUSE ▷II button to running Spin program. The water is emptied and the door unlocks at the end of the program.
11. SWITCHING OFF YOUR APPLIANCE: At the end of the cycle, the message "End" is shown on the display.
11a. The door can only be opened when the symbol DOOR LOCK 📋 indicator turns off.
11b. Check that the DOOR LOCK 📋 indicator is off, then open the door and take out the laundry.
11c. Turn the wash cycle selector knob to OFF position to switch the washer off.
NOTE: Leave the door ajar to let the interior of the washer to dry.
TROUBLESHOOTING
NOTE: Please review the troubleshooting section before consulting a service agent.
| Problem | Possible Cause / Solutions |
| The machine does not switch on | · The appliance is not plugged into the socket fully, or not enough to make contact.· There is not power to the socket, or the fuse has blown in the mains plug. |
| The wash cycle does not start | · The door is not closed properly.· The on/off button has not been pressed.· The start/pause ▷ll button has not been pressed.· The water tap has not been turned on to allow water to flow into washer.· A delayed start has been set. |
| The machine does not fill with water or "E02" in the display | · The water inlet hose is kinked.· The water inlet hose is not connected to the water supply.· The water pressure is too low.· The water tap has not been turned on to allow water to flow into the machine.· There is no water supply to the house.· The inlet valve filter is blocked.· The start/pause ▷ll button has not been pressed. |
| The machine continuously fills with water and continually drains away or Water left in the drum or Stuck on wash | · The top of the drain hose is too low - it must be fitted at a height between 65 and 100 cm from the floor (see "installation").· The drain hose is connected incorrectly to the sink trap allowing water to run into the machine, the drain hose must be positioned higher than the bottom of the sink to prevent water flowing down the drain hose.· The end of the drain hose has been pushed too far down the standpipe, the "u" bracket should be fitted 100mm from the end of the drain hose. |
| The machine does not drain or spin or "E03" in the display | · The pump filter is blocked.· The drain hose is kinked (see "installation").· New installation - the blanking cap or spigot has not been removed if connected under a sink.· The drain hose or sink trap is blocked. |
| The machine does not spin | · The spin cycle is turned off (all spinning speed value indicator light go out on the display). |
TROUBLESHOOTING
| Problem | Possible Cause / Solutions |
| The program takes too long | ·Program times will vary due to water pressure, the incoming water temperature and if the wash load goes out of balance. This will increase the program times accordingly (see "the machine wont spin properly" next page). |
| The machine vibrates a lot during the spin cycle | ·The feet have not been adjusted, enabling the machine to rock. ·New installation - either the transit bolts including the plastic spacer, or the polystyrene packaging have not been removed when installing the machine. ·The washer is trapped between cabinets and/or walls. ·The load is in a slight out of balance condition and the washer is spinning, but at a lower speed. |
| ONE TOUCH wash cycle does not activate | ·After switching on the washer a cycle other than one touch wash cycle was activated. Switch the machine off and press the one touch button. |
| The machine is noisy | ·There will always be some motor, pump and drum noise during spin. |
| The machine wont spin properly | ·Out of balance detected when attempting to go into a spin cycle - if this happens the washer will continue to try to repeat the distribution of the load required before the machine will go into higher spin speeds - this will increase the program time accordingly. This is a safety feature to prevent damage. Out of balance can be caused by washing a single heavy item. |
| The machine leaks from the dispenser | ·The dispenser drawer is blocked with detergent and requires cleaning. ·The water pressure is too high and requires turning down - turn down the tap on the water supply pipe slightly and try again. ·The washer is tilting forwards - it must be level when in its final position. |
| The machine smells | ·The washer requires a service wash. Run a "drum clean" wash cycle with detergent and no laundry. |
| The machine door cannot be opened. | ·The door will not open until the door lock indicator light goes out shortly after the program has finished. |
| The water level is too low when the machine is washing | ·The water level is correct if it can be seen at the bottom of the door |
| There is too much foam | ·The detergent is not suitable for machine washing ·Too much detergent was used - less detergent is required in soft water. |
TROUBLESHOOTING
NOTE: In case of the following faults, the fault state will be detected by the microcomputer system, with the buzzer sounds issued and the following fault codes display:
| Fault Codes | Fault Type | Possible Cause / Solutions |
| E02 | No inlet water | · Check whether the faucet is turned on? Whether the water supply is cut off? Whether the water inlet hose and the filter of the water inlet valve are blocked? and whether the water inlet hose of the washing machine is frozen? In such case, please contact the service center for repair. |
| E03 | Abnormal water drainage | · Clean the pump filter.· Check whether the drain hose is bent, twisted or blocked? If the fault still exists, please contact the service center for repair. |
| U4 | Door lock malfunction | · Close the door again, and then press the start/pause ▷|| button to restart the program. If the fault still exists, please contact the service center for repair. |
| H | The temperature in the drum is high | · Press the start/pause ▷|| button to suspend the washing machine operation and wait for several minutes. When the temperature in the drum drops to a safe range and the fault code on the display is removed, press the start/pause ▷|| button to continue the rest of the program . |
| EXX | Other faults | · Turn the washing cycle selector knob to the “OFF” position to turn off the power supply, unplug the power cord, and contact the service center for repair as soon as possible .. |
NOTE: be sure to check the fault cause and eliminate the fault before pressing the start/pause ▷|| button again. If the fault code is removed, the washer will continue to run, and if the fault code still exists, please unplug the power cord and call our customer service center for help as soon as possible.
IMPORTANT: You will be charged for a service call for problems caused by incorrect installation.
MAINTENANCE
NOTE: Your appliance is designed to give you years of service. Observe the following instructions to maintain and protect your appliance and keep it in top operating condition.
WARNING: To avoid risk of electric shock always disconnect the washer from the power outlet prior to cleaning.
Turn off the water tap after every wash cycle. This will limit wear on the hydraulic system inside the washer and help to prevent leaks.
CLEANING THE APPLIANCES EXTERIOR:
To avoid risk of explosion never clean the washer with flammable solvents.
- Use hot soapy water or a mild (non-abrasive) cleaning agent.
- Rub dry with a soft towel.
- Remove residue immediately.
- Do not use high pressure spray.
DESCALING THE APPLIANCE:
Provided that you use correct amounts of detergent with you wash loads, descaling is not necessary. If descaling the washer drum does become necessary, please follow the descaling product manufacturer's instructions. Small amounts of descaling agent can be used to remove white spots on the washer drum caused by lime or mineral deposits or small amounts of rust caused by metal objects left in the drum.
NOTE: Descaling agents contain acids which may attack parts of the washer and may discolour the laundry.
NOTE: Always leave the porthole door ajar in order to prevent unpleasant odours from forming.
CLEANING THE DRUM:
Metallic debris left in the drum can product rust spots on the drum. Never use steel wool to try to remove these. Use a chlorine-free cleaning agent and follow the manufacturer's instructions.
CHECKING THE WATER INLET HOSE:
Check the water inlet hose at least once a year. If there are any cracks, it should be replaced immediately, during the wash cycle, water pressure is very strong and a cracked water inlet hose could easily spilt open.
NEVER use a second-hand water inlet hose.
CLEANING THE DETERGENT DISPENSER:
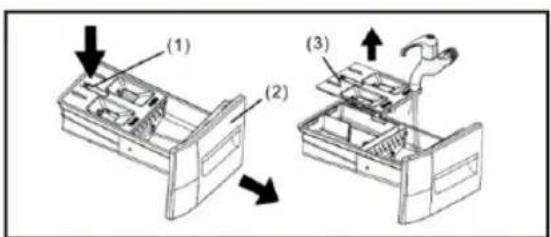
If there is a buildup of residual detergent or additives, or if the softener compartment is not rinsed out well enough, it may be helpful to clean the dispenser. (see figure below)
Figure 20
MAINTENANCE
- Open the detergent dispenser tray fully. Press down on the drawer catch (1) and pull the tray (2) from the washer housing.
- Remove the liquid detergent cover (3) by grasping it and pulling it upwards from the detergent dispenser tray.
- Clean the liquid detergent cover and the detergent dispenser tray by holding it under running water. Lightly wipe away any remaining detergent residue.
- Attach the liquid detergent cover and slide the detergent dispenser tray back in place and close the tray securely.
NOTE: Do not operate the appliance without the detergent dispenser tray in place. Always keep the tray completely closed.
CLEANING THE MESH FILTER:
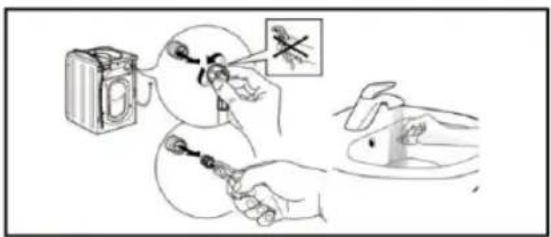
- Close water tap and unscrew the water inlet hose.
- Clean the mesh filter at the hose's end carefully with a fine brush.
Figure 21
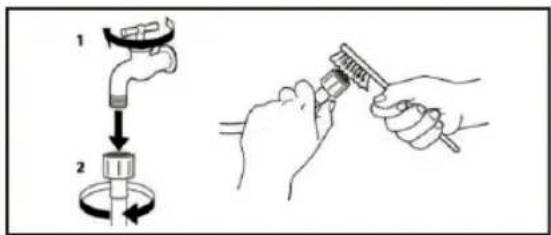
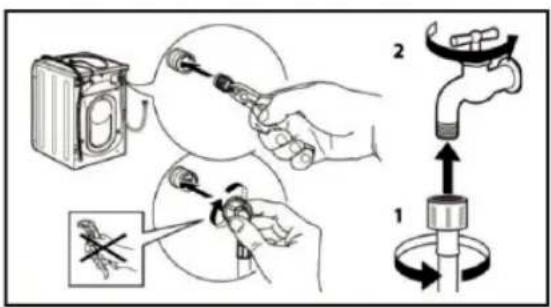
- Now unscrew the inlet hose on the back of the washer by hand. Pull out the mesh filter from the valve on the back of the washer with pliers and carefully clean it.
Figure 22
natural_image
Illustration of a person using a handheld device to interact with a camera and a hand holding a pen, no text or symbols present.- Insert the mesh filter again. Connect the inlet hose to the water tap and washer again. Do not use a tool to connect the inlet hose. Open the water tap and check that all connections are tight.
Figure 23
MAINTENANCE
CLEANING THE DRAIN PUMP:
It may be necessary to clean the drain pump if the appliance fails to drain.
The washer pump can become blocked by loose debris (a good reason to check the drum and remove any visible debris after each load). Fabrics that give off large amounts of fluff may also cause blockage.
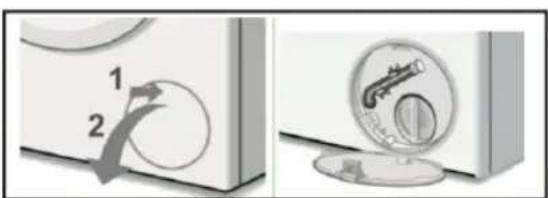
To access the washer drain pump, the service cover must first be opened (see steps below). With the service cover opened, proceed as follows:
-
If the washer has not been drained, try to drain it now. Turn the wash cycle selector knob to the Spin cycle, press the SPEED button to set the spin cycle is turned off (all spinning speed value indicator light go out on the display), then press the Start/Pause ▷ll button. Wait a few moments to let the cycle drain the water from the drum. If the pump is totally blocked, the water will be unable to drain and the cycle will end.
-
Shut off the tap so that no more water flows in and has to be drained. Switch the appliance off. Unplug the power plug.
-
Open the drain filter cover.
Figure 24
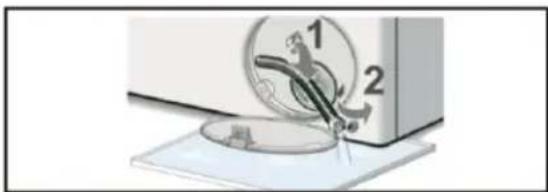
- Use the pull-out drain hose located in the pump access opening to drain the remaining water into a suitable container (20 litres). Pull the sealing cap from the hose and lay the hose over the side of the container and allow the water to finish draining from the drum. When finished, replace the sealing cap into the end of the hose and restore the hose to its storage location.
Figure 25
natural_image
Illustration of a sewing machine with a sewing machine and a sewing machine, showing mechanical components (no text or symbols)- Turn the pump cover to remove it. A small amount of residual water may flow out when the cover is removed. Clean the interior of the pump housing, removing any debris or foreign objects. Check to be sure the impeller where at the back of the pump housing can now turn freely. Replace the pump cover by screwing tightly into position. Handle must be vertically.
Figure 26
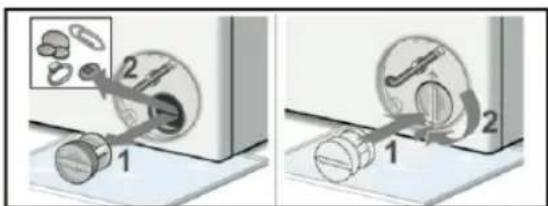
- Close the drain filter cover.
PRODUCT FICHE
(a) Suppliers name or trade mark: Creda
(b) Suppliers mode identifier: CRWM722W
| Parameter | Value | Parameter | Value | ||
| Rated capacity (b) (kg) | 7,0 | Dimensions in cm (a),(c) | Height | 85 | |
| Width | 60 | ||||
| Depth | 52 | ||||
| Energy efficiency index (b)(EEIw) | 52,0 | Energy efficiency class (b) | A(d) | ||
| Washing efficiency index (b) | 1,031 | Rinsing effectiveness(g/kg) (b) | 5,0 | ||
| Energy consumption in kWh per cycle, based on the eco 40-60 programme at a combination of full and partial loads. Actual energy consumption will depend on how the appliance is used. | 0,44843 | Water consumption in litre per cycle, based on the eco 40-60 programme at a combination of full and partial loads. Actual water consumption will depend on how the appliance is used and on the hardness of the water. | |||
| Maximum temperature inside the treated textile (b) (°C) | Rated capacity | 35 | Weighted remaining moisture content (b) (%) | 69,0 | |
| Half | 30 | ||||
| Quarter | 25 | ||||
| Spin speed (b) (rpm) | Rated capacity | 1200 | Spin-drying efficiency class (b) | D(d) | |
| Half | 1200 | ||||
| Quarter | 1200 | ||||
| Programme duration (b) (h:min) | Rated capacity | 3:28 | Type | free-standing | |
| Half | 2:41 | ||||
| Quarter | 2:41 | ||||
| Airborne acoustical noise emissions in the spinning phase (b)(dB(A) re 1 pW) | 76 | Airborne acoustical noise emission class (b) (spinning phase) | B(d) | ||
| Off-mode (W) (if applicable) | 0,50 | Standby mode (W) (if applicable) | — — | ||
| Delay start (W) (if applicable) | 4,00 | Networked standby (W) (if applicable) | — — | ||
| Minimum duration of the guarantee offered by the supplier (a),(c): 6months | |||||
| This product has been designed to release silver ions during the washing cycle | NO | ||||
| Additional information(a),(c): Weblink to the supplier's website, where the information in point 9 of Annex II to Commission Regulation (EU) 2019/2023 (1)(b) is found:(a) this item shall not be considered relevant for the purposes of Article 2(6) of Regulation (EU)2017/1369.(b) for the eco 40-60 programme.(c) changes to this item shall not be considered relevant for the purposes of paragraph 4 of Article 4 of Regulation (EU) 2017/1369.(d) if the product database automatically generates the definitive content of this cell, the supplier shall not enter these data. | |||||
| (1)Commissions Regulation (EU) 2019/2023 of 1 October 2019 laying down ecodesign requirements for household washing machines and household washer-dryers pursuant to Directive 2009/125/EC of the European Parliament and of the Council, amending Commission Regulation (EU) No 1275/2008 and repealing Commission Regulation (EU) No 1015/2010(see page 285 of this Official Journal). | |||||
PRODUCT FICHE
Entry method for new standard energy efficiency (EN60456:2016 + FprAA:2020)
Eco 40-60, (Parameters are not adjusted by default)
| 7kg BLDC | 20 °C | Cotton | Wool | Quick wash |
| Rated capacity / kg | 2 | 7 | 1 | 1 |
| Program duration (h:min) | 0:39 | 0:57 | 0:50 | 0:15 |
| Energy consumption (Kwh/cycle) | 0.24 | 1.25 | 0.20 | 0.10 |
| Water consumption (L/cycle) | 65 | 80 | 70 | 40 |
| Max temperature / °C | 30 | 55 | 35 | 35 |
| RMC | 75% | 70% | 85% | 75% |
| Spinning speed / rpm | 700 | 900 | 500 | 700 |
PRODUCT FICHE
- That the Eco 40-60 program is able to clean normally soiled cotton laundry declared to be washable at 40^ or 60^ , together in the same cycle, and that this program is used to assess the compliance with the EU eco-design legislation;
- That the most efficient programs in terms of energy consumption are generally those that perform at lower temperatures and long duration;
- That noise and remaining moisture content are influenced by the spinning speed: the higher the spinning speed in the spinning phase, the higher the noise and the lower the remaining moisture content;
● The values given for programs other than the Eco40-60 program and the wash and dry cycle are indicative only.
| PARAMETER | UNIT | VALUE |
| Rated capacity for the eco 40-60 programme, at 0,5 kg intervals (c) | kg | 7,0 |
| Energy consumption of the eco 40-60 programme at rated capacity ( E_w,full ) | kWh/cycle | 0,675 |
| Energy consumption of the eco 40-60 programme at half rated capacity ( E_w,1/2 ) | kWh/cycle | 0,380 |
| Energy consumption of the eco 40-60 programme at quarter rated capacity ( E_w,1/4 ) | kWh/cycle | 0,195 |
| Weighted energy consumption of the eco 40-60 programme ( E_w ) | kWh/cycle | 0,448 |
| Standard energy consumption of the eco 40-60 programme ( SCE_w ) | kWh/cycle | 0,862 |
| Energy Efficiency Index ( EEI_w ) | — | 52 |
| Water consumption of the eco 40-60 programme at rated capacity ( W_w,full ) | L/cycle | 55,0 |
| Water consumption of the eco 40-60 programme at half rated capacity ( W_w,1/2 ) | L/cycle | 40,0 |
| Water consumption of the eco 40-60 programme at quarter rated capacity ( W_w,1/4 ) | L/cycle | 30,0 |
| Weighted water consumption ( W_w ) | L/cycle | 43 |
| Washing efficiency index of the eco 40-60 programme at rated capacity ( I_w ) | — | 1,031 |
| Washing efficiency index of the eco 40-60 programme at half rated capacity ( I_w ) | — | 1,031 |
| Washing efficiency index of the eco 40-60 programme at quarter rated capacity ( I_w ) | — | 1,031 |
| Rinsing effectiveness of the eco 40-60 programme at rated capacity ( I_R ) | g/kg | 5,0 |
| Rinsing effectiveness of the eco 40-60 programme at half rated capacity ( I_R ) | g/kg | 5,0 |
| Rinsing effectiveness of the eco 40-60 programme at quarter rated capacity ( I_R ) | g/kg | 5,0 |
| Programme duration of the eco 40-60 programme at rated capacity ( t_w ) | h:min | 3:28 |
| Programme duration of the eco 40-60 programme at half rated capacity ( t_w ) | h:min | 2:41 |
| Programme duration of the eco 40-60 programme at quarter rated capacity ( t_w ) | h:min | 2:41 |
| Temperature reached for minimum 5 min inside the load during the eco 40-60 programme at rated capacity (T) | °C | 35 |
| Temperature reached for minimum 5 min inside the load during the eco 40-60 programme at half rated capacity (T) | °C | 30 |
| Temperature reached for minimum 5 min inside the load during the eco 40-60 programme at quarter rated capacity (T) | °C | 25 |
| Spin speed in the spinning phase of the eco 40-60 programme at rated capacity (S) | rpm | 1200 |
| Spin speed in the spinning phase of the eco 40-60 programme at half rated capacity (S) | rpm | 1200 |
| Spin speed in the spinning phase of the eco 40-60 programme at quarter rated capacity (S) | rpm | 1200 |
| Weighted remaining moisture content (D) | % | 69,0 |
| Airborne acoustical noise emissions during eco 40-60 programme (spinning phase) | dB(A)re 1 Pw | 76 |
| Power consumption in 'off mode' ( P_c ) (if applicable) | W | 0,50 |
| Power consumption in 'standby mode' ( P_sm ) (if applicable) | W | — — |
| Does 'standby mode' include the display of information? | — | No |
| Power consumption in 'standby mode' ( P_sm ) in condition of networked standby (if applicable) | W | — — |
| Power consumption in 'delay start' ( P_ch ) (if applicable) | W | 4,00 |
NOTES
NOTES
NOTES
Creda
HOME APPLIANCES
Thank you!
We hope you enjoy your appliance for many years...
HELP & GUIDANCE
We're here to help you to get the best out of your Appliance. Should you require any guidance please visit our website.
www.creda.co.uk
If you still require further assistance, call one of our experts on 01759 487836.
YOUR CREDA GUARANTEE
This product is guaranteed for 3 years from the date of original purchase. Any defect that arises due to faulty materials or workmanship will be repaired free of charge (or if applicable the product will be replaced or the purchase will be refunded) Where possible during this period by the dealer you purchased the appliance from.
Activate your guarantee now by calling us on 01759 487836.
- OVERVIEW
- CONTENTS
- Safety Information 4
- Introduction of your Appliance 8
- Specifications 8
- Accessories 8
- Control Panel Functions 9
- Installation 14
- Preparing For First Use 21
- How to Use Your Appliance 24
- Troubleshooting 27
- Maintenance & Care 30
- Product Fiche 33
- Disposal of the Appliance 37
- SAFETY INFORMATION
- GENERAL SAFETY
- PERMITTED USE
- INSTALLATION SAFETY
- ELECTRICAL SAFETY
- INTRODUCTION OF YOUR APPLIANCE
- Figure One
- ACCESSORIES
- CONTROL PANEL FUNCTIONS
- Wash Cycle Selector:
- Temperature Button:
- TEMPERATURE :
- SPINNING SPEED:
- DOOR LOCK: 🔊
- CHILD LOCK: 📋
- DELAY END: Ⓛ
- ONE TOUCH: M
- RINSE COUNT: times
- DIGITAL DISPLAY:
- FUNCTIONS
- VARIOUS ONE TOUCH CYCLES
- SPECIAL WASH CYCLES
- BABY CARE:
- DOWN JACKET:
- Wool:
- DELAY END
- CHILD LOCK:
- STEAM:
- ADDING CLOTHES DURING AN ACTIVE CYCLE:
- LOAD BALANCING SYSTEM:
- INSTALLATION
- UNPACKING YOUR APPLIANCE
- CARRYING YOUR APPLIANCE
- REMOVING THE TRANSPORT BOLTS
- LOCATION OF THE APPLIANCE
- SET-IN INSTALLATION
- LEVELLING THE APPLIANCE
- ADJUSTING THE FEET
- CONNECTING THE WATER INLET HOSE
- CONNECTING THE DRAIN HOSE
- DRAINAGE OPTIONS
- STANDPIPE
- SINK SIPHON
- WASH BASIN
- PREPARING FOR FIRST USE
- LIGHT SOILING
- NORMAL SOILING
- HEAVY SOILING
- HOW TO USE YOUR APPLIANCE
- LOAD LAUNDRY:
- CLOSE DOOR:
- OPEN WATER TAP:
- SET THE DESIRED PROGRAM:
- 4a. CHANGE TEMPERATURE:
- 4b. CHANGE SPIN SPEED:
- 4c. SELECT OPTIONS:
- ADD DETERGENT:
- START PROGRAM:
- CHANGING THE SETTINGS OF A RUNNING PROGRAM:
- PAUSING A RUNNING PROGRAM AND OPENING THE DOOR:
- CANCELLING A RUNNING PROGRAM:
- SWITCHING OFF YOUR APPLIANCE: At the end of the cycle, the message "End" is shown on the display.
- TROUBLESHOOTING
- MAINTENANCE
- CLEANING THE APPLIANCES EXTERIOR:
- DESCALING THE APPLIANCE:
- CLEANING THE DRUM:
- CHECKING THE WATER INLET HOSE:
- CLEANING THE DETERGENT DISPENSER:
- CLEANING THE MESH FILTER:
- CLEANING THE DRAIN PUMP:
- PRODUCT FICHE
- NOTES
- Creda
- HOME APPLIANCES
- Thank you!
- HELP & GUIDANCE
- www.creda.co.uk
- YOUR CREDA GUARANTEE
Brand : Creda
Model : CRWM722
Category : Washing machine