47303 - Washing machine Creda - Free user manual and instructions
Find the device manual for free 47303 Creda in PDF.


| Product Type | Integrated Washer/Dryer |
| Brand | Creda |
| Model | 47303 |
| Capacity (Wash Only) | 4.5 kg (10 lbs) dry weight |
| Capacity (Wash & Dry) | 3.2 kg (7 lbs) dry weight |
| Drying Capacity (Cottons) | Optimum 2.3 kg (5 lbs); max 3.2 kg (7 lbs) |
| Spin Speed | 1150 rpm (fast) / 600 rpm (slow selectable) |
| Drying Time Range | 0 to 90 minutes with cool tumble period |
| Water Supply | Hot and cold simultaneous; pressure 0.3 - 10 bar |
| Electrical Supply | 220-240 V, 13 A fuse, must be earthed |
| Power Cord | 1.25 mm² cross-section cable |
| Dimensions (Height) | Approx. 850 mm (adjustable with feet spacers) |
| Height Range with Feet | 824 mm (small bracket) to 900 mm (large bracket) |
| Door Hinge | Reversible (left or right hand opening) |
| Programmes | Auto Prewash, 95, 60, 50, 40, Rinse & Spin, Spin only, Dry only |
| Option Switches | Half Load, Crease Care, Slow Spin, Fast Wash |
| Drum Material | Not specified (stainless steel typical) |
| Noise Level | Not specified (typical for era) |
| Energy Efficiency | Automatic energy saving feature during drying |
| Safety Features | Door interlock, child safety warning, transit bolts removal required |
| Care & Cleaning | Clean door seal, detergent drawer, cabinet; run empty rinse cycle periodically |
| Installation | Built-in modular kitchen; requires slides and plumbing; demister sheet under worktop |
| Optional Extras | Cold water adaptor, drain hose extension kit |
| Weight | Not specified (approx. 70-80 kg typical) |
Frequently Asked Questions - 47303 Creda
User questions about 47303 Creda
0 question about this device. Answer the ones you know or ask your own.
Ask a new question about this device
Download the instructions for your Washing machine in PDF format for free! Find your manual 47303 - Creda and take your electronic device back in hand. On this page are published all the documents necessary for the use of your device. 47303 by Creda.
USER MANUAL 47303 Creda
Users Instruction Book for:
Integrated Washer / Dryer
Models 27303/27304/47303/47304
You must read these instructions prior to using the appliance and retain them for future reference.
Ref. No. 4730 00078
INSTALLATION INSTRUCTIONS
The door on your integrated Washer/Dryer can be hinged for either hand opening, but the hinge screws are supplied in the left hand side fixing holes. If you require opposite hand opening it is necessary to carefully remove the four white plastic hole plugs, (these can then be used to fill the holes on the other side). The hinge tapping plate holes are then exposed enabling you to mount the door on this side.
The magnetic catch faceplate is fitted to the decor panel using the 2 Pozi-Pan head screws supplied in the polythene bag.
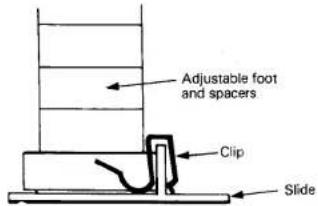
When the Washing machine is in position, the two metal clips supplied should be located just in front of the front feet, to lock the machine firmly in place.
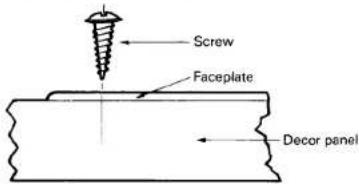
NOTE: It is a good idea to use a bradawl to pierce small holes prior to fixing.
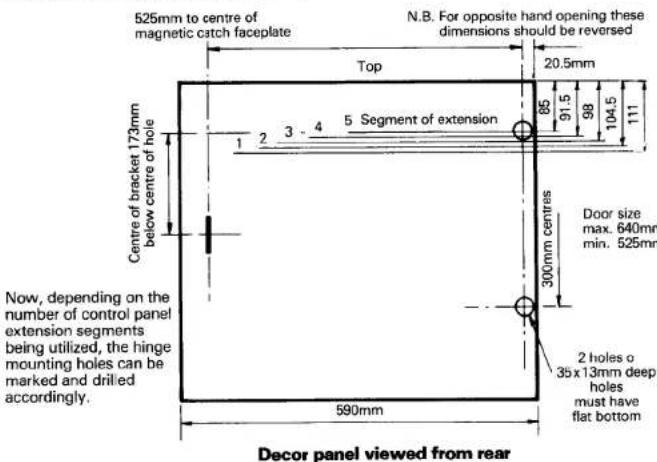
Place hinges into the drilled holes in the decor panel, ensuring that the pivoting arm is fully open and hanging slightly over the edge of the panel. Ensure that the hinge is square with the edge of the decor panel and fix in position using the 4 countersunk screws supplied.
Your decor panel should now have 2 hinges and a magnetic catch faceplate mounted securely on it. Present the decor panel to the front panel and fix, using the 4 threaded screws supplied, adjusting the sliding portion of the hinge as necessary.
INSTALLATION INSTRUCTIONS
CONTENTS
| Know Your Machine | 3 |
| Controls | 4/5 |
| Detergent Dispenser | 5 |
| Tumble Drying | 6 |
| Using the Tumble Dryer | 7 |
| To Carry Out a Simple Wash/Dry | 8 |
| Variations on a Simple Wash/Dry | 9 |
| Detergents, Conditioners, Water Hardness | 10/11 |
| Wash Codes Programme Guide | 12/13 |
| Stain Removal | 14 |
| Regular Checks | 15 |
| Something Wrong With Your Machine | 16/17 |
| Care and Cleaning | 17 |
| Optional Extras | 18 |
| Unpacking Instructions | 20 |
| Electrical Requirements | 21 |
| Installation Instructions | 22-24/26-29 |
| Checking Water Pressures | 25 |
For details of spares, service and guarantee, see separate service leaflet
INTEGRATED WASHER/DRYER
This instruction book applies to the following models:
Washer/Dryer 27303 47303 Brown
Washer/Dryer 27304 47304 White
Now that you are the owner of an Automatic Washer/Dryer, it is important that you read this book carefully. This book will tell you how to get the best from your new Washer/Dryer and ensure that you always obtain the cleanest, freshest wash and/or dry possible. You must read it through carefully before your first wash and/or dry.
IMPORTANT
TO PROTECT YOUR NEW WASHER/DRYER DURING TRANSIT SEVERAL INTERNAL COMPONENTS HAVE BEEN SECURED WITH TRANSIT PACKING. THIS PACKING MUST BE REMOVED BEFORE USING THE MACHINE.
NEVER REMOVE THE REAR PANEL WHILST THE MACHINE IS PLUGGED INTO THE ELECTRICITY SUPPLY.
AS WITH ANY ELECTRICAL PRODUCT, CHILDREN MUST NOT BE ALLOWED TO PLAY WITH OR OTHERWISE INTERFERE WITH THE WASHER/DRYER.
CAUTIONARY NOTE - CHILDREN: A CHILD COULD CLIMB INTO AN UNATTENDED WASHING MACHINE. WHEN THE MACHINE IS NOT IN USE REMOVE THE PLUG, SWITCH OFF AT THE WALL SOCKET AND CLOSE THE DOOR.
INSTALLATION INSTRUCTIONS
Adjustable feet; fitting and adjustment
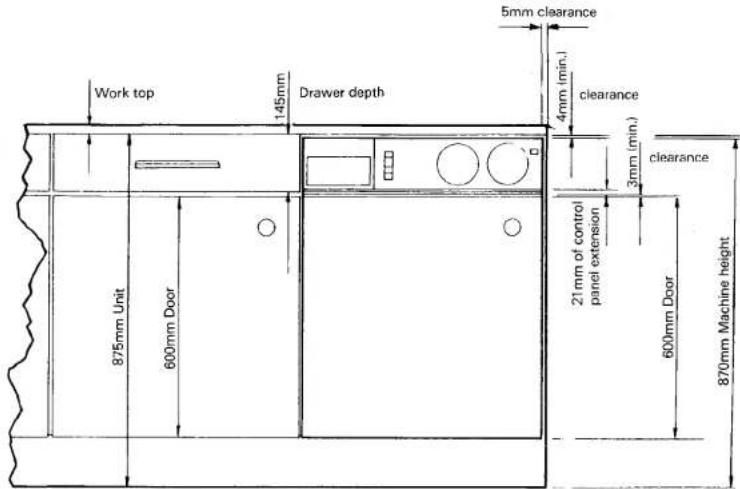
By obtaining the height to the underside of the kitchen work surface, it is possible to calculate the approximate height of foot required.
Example
Assuming height to underside of work surface -875mm 1
Height of Washer/Dryer with no adjustment - 850mm
Allowing 5mm clearance at top of machine -855mm
Allowing 2mm for depth of slides -857mm 2 If we take 2 from 1 we find that the approximate height adjustment necessary is 18mm, which we can obtain by fitting a 10mm, 5mm and 3mm foot spacer washer to each foot.
Levelling
The machine can now be lifted onto the slides and manoeuvred into position. At this stage any unevenness in the floor will be apparent, so adjustment can be made to both the machine height and level to suit the surrounding kitchen furniture.
Important
Good levelling is essential for the correct working of the machine. Washing machines and Washer/Dryers are subject to vibrations when operating, so care should be taken to ensure that no part of the machine is in contact with the surrounding cabinet.
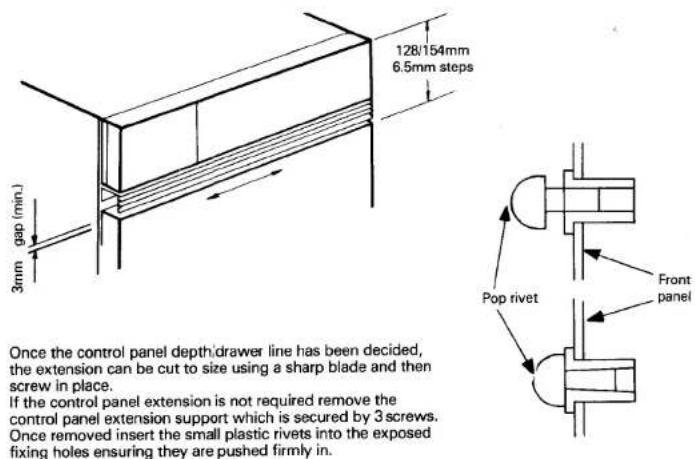
With the machine set at a suitable height, it is possible using the depth of control panel required, and the decor panel/kitchen plinth height to accurately position the hinge mounting holes. The illustration below shows a typical built-in configuration.
INSTALLATION INSTRUCTIONS
This washer/dryer is
designed to fit and build into modular kitchen
furniture with a housing
cavity no smaller than that shown in the
that shown in the diagram below. This
cavity provides clearance for the flexible inlet and
for the flexible inlet and outlet hoses fitted, but
not for rigid pipework and
taps. Services therefore must be contained in an
must be contained in an adjacent unit, (under the
sink unit for example) with suitable holes drilled in the
suitable holes drilled in the dividing partition. The machine,
the control panel and the decor door panel are all height adjustable so that they can align with
all height adjustable so that they can align with the drawer and plinth lines in adjacent cabinets
Location and fixing of slides
Your integrated Washer/Dryer is installed on
two runners or slides which must be rigidly fixed to the floor. This makes installation and
use of the various adjustment features much easier.
Procedure
Position the template supplied in the intended space between kitchen units, ensuring that the Washer/Dryer door will come flush with those of the kitchen units.
Mark the hole centres and drill holes suitable for the type of fixing selected. (This will depend on the floor construction, i.e. Concrete, Brick, Wood etc.). Note that the fixing hole in the slide is intended for a No.10 screw (max.).
The fixing holes in the slides are slotted to allow some fine adjustment to be made to ensure that the slides run parallel to one another.
Demister Sheet
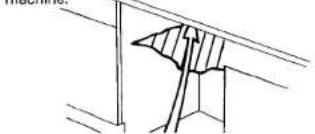
Before the machine is fitted, the adhesive backed demister sheet must be positioned under the work surface, immediately above the machine.
natural_image
Simple line drawing of a roof structure with diagonal bracing and a curved panel (no text or symbols)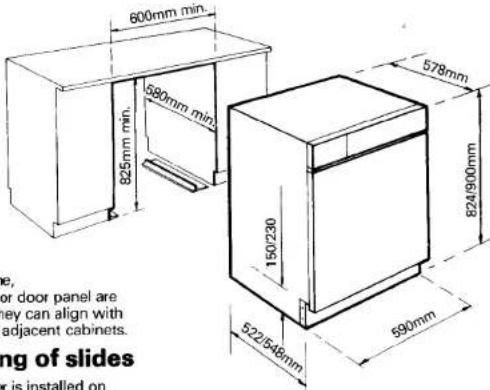
Fitting the foot mounting brackets
To fit the adjustable foot mounting brackets to the base of your Washer/Dryer, it is necessary to carefully tilt and support the machine. Each bracket should be fitted individually, in the following manner:
Small foot brackets 824-850mm
Large foot brackets 850-900mm
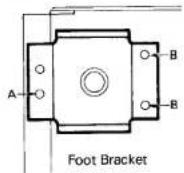
Remove the screw that passes through the base and side panel (screw A) and then position the foot mounting bracket using this hole and the two opposite. Fix the bracket using screw A into its original hole, and use two more from those supplied in the polythene bag for the holes of positions B.
KNOW YOUR MACHINE
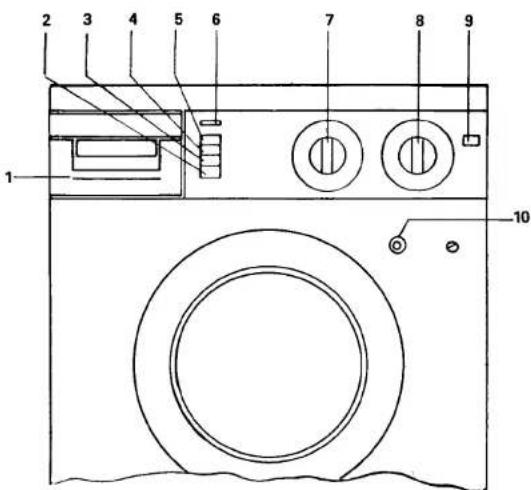
Washer/Dryer
1 Detergent Dispenser
2 Fast Wash Switch
3 Slow Spin Switch
4 Crease Care Switch
5 Half Load Switch
6 Power Indicator Light
7 Drying Time Selector
8 Programme Selector
9 Power Switch
10 Door Opening Button
CONTROLS
Power Switch
To switch the machine on, press IN the power switch firmly.
Power Indicator Light
This light will glow when the machine is switched on i.e., the power switch is pressed in and the machine is connected to the electricity supply at the wall socket.
NOTE: THE DOOR CAN ONLY BE OPENED WHEN THE POWER IS SWITCHED ON.
Door
Push the door opening button to open door. The door can only be opened when all the following conditions are met: —
- The power is switched On, i.e. the indicator light is On.
- The machine is stopped, i.e. the programme selector is pushed in and the drum is stationary.
- The water level is below the door window. If the above conditions are met, the door may be opened at any time in the wash or drying cycle, should you wish to add further items during the wash or to determine how dry the load is during drying.
If the door is opened during wash, care should be taken as the water may be hot.
When opening the door during a drying period always select a cool tumble period for a few minutes first (see page 6).
Programme Selector
The selector is marked with the following symbols:
Auto Prewash
95 Wash Programme
Long Spin
Short Spin
Off/High Heat Dry (Cottons)
Off/Gentle Heat Dry (Synthetics)
The selector is divided into two sections marked for programmes 95, 60 and 40; for programmes 50, 40.
The numbered washes are to the Home Laundering Consultative Council (HLCC) specifications.
The selector also includes an Auto Prewash programme and can be set for Rinse and Spin, Spin only and Dry only programmes.
To start any wash, wash/dry or dry only programme the power switch must be pressed in and the programme selector knob must be pulled fully out.
The selector must only be turned clockwise and must not be turned when pulled out.
Programmes 95, 60 and 40 will finish in the stop/dry position marked ✦ and programmes 80 and 40 will finish in the stop/dry position marked ✦.
Drying Time Selector
Your machine is fully automatic. On completion of all wash programmes the washing will be automatically tumble dried if a time has been selected on the Drying Time Selector.
The selector is marked between 0 and 90 minutes and includes a period of cool tumble at the end of the drying cycle.
The selector may be turned clockwise or anticlockwise between the 0 and 90 minute positions, but you must NEVER ATTEMPT TO MOVE THE TIMER EITHER
CLOCKWISE THROUGH THE 90 MINUTE POSITION OR BACK ANTI-CLOCKWISE THROUGH THE 0 POSITION AS THIS MAY CAUSE DAMAGE TO THE TIMER.
This selector does not pull out like the programme selector. To start any programme even when just drying, it is only necessary to pull out the programme selector.
Option Switches
The option switches allow you to vary the content of the wash programme. They do not affect drying.
To select an option press the switch IN
To cancel an option press the switch OUT
Half Load Switch
The most economical way to use the machine is to wash full loads of garments to get the most efficient use of water, powder and electricity. When washing small loads the half load switch can be used and less detergent may be used. When selected the half load switch reduces the quantity of water used for both washing and rinsing. The switch should only be used for small loads and must never be used with Programme as Woollens require full water quantities.
CHECKING WATER PRESSURES
Operating water pressures
Minimum: 27 kilonewtons per square metre (4p.s.i.)
Maximum: 979 kilonewtons per square metre (142p.s.i.)
You should check that your water pressures are satisfactory by carrying out the following tests.
Cold water
With the taps full on check the time it takes for the machine to fill.
- Close the door.
- Pull out the detergent drawer 2 to 3 inches.
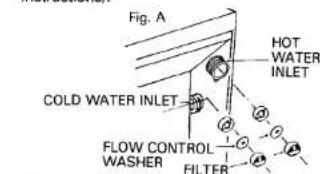
- Select Auto Prewash programme. Pull out the Programme Selector knob to start the machine filling. Measure the time it takes from pulling the Programme Selector until the water stops flowing into the detergent drawer. This time should not exceed 4 minutes. If the time exceeds 4 minutes, then the water flow is insufficient and the flow control washer must be removed from the cold water inlet. (See Fig.A). Before doing this empty the machine by following points 4 to 6 below.
- Push the Programme Selector Knob in to stop machine.
- Turn the Programme Selector to the final spin position. Pull out the Programme Selector and allow the machine to empty
- Push in Programme Selector to stop machine when empty.
Hot water
- Close the door and Pull out detergent drawer 2-3 inches.
- Set the Programme Selector Dial to Programme ^55 . Switch off the cold water valve so that it is hot fill only.
- Pull out the Programme Selector Knob to start the machine filling. Measure the time it takes from pulling out the Programme Selector until the water stops flowing. This time should be between 2 and 5 minutes. If the time exceeds 5 minutes then the water flow is insufficient and the flow control washer must be removed from the hot water inlet. (See Fig. A).
- Push the Programme Selector Knob in to stop machine.
-
Turn the Programme Selector to the final spin position. Pull out the Programme Selector and allow the machine to empty.
-
Push in Programme Selector to stop machine when empty.
Points to watch
- Avoid kinks in the filling and drain hoses — support hoses if necessary.
- When fitting the filling hose ensure the rubber sealing washers are correctly in position. See Fig.11, do not overtighten connectors.
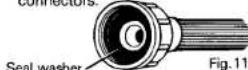
Seal washer
- Ensure that the plumbing which is installed meets the requirements of the local authority.
To remove flow control washer
- Turn the power off and turn the taps off.
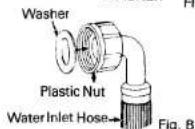
- Remove the appropriate water hose from the rear of the machine by unscrewing the plastic retaining nut (see Fig. B).
- Remove the filter and the flow control washer from the water inlet. If the filter is tightly held in the valve, use pliers (see Fig. A).
- Replace the filter taking care that it is pushed fully home and properly seated into the valve.
- Refit the filler hose ensuring that the seal washer is securely fitted inside the plastic nut (see Fig. B) and then repeat the water filling test. Do not overtighten (see Installation Instructions).
INSTALLATION INSTRUCTIONS
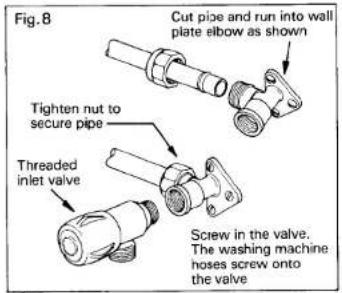
a. Fitting a threaded inlet valve
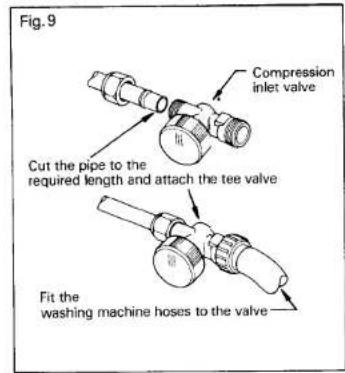
b. Fitting a compression inlet valve
Fitting the drain hose
Discharge into a standpipe
The top of the standpipe should be approximately 660mm (26") from the ground. The dimensions from the floor to the underneath of the bend in the drain hose, must be between 570-670mm (22½"-26½"). See Fig. 10.
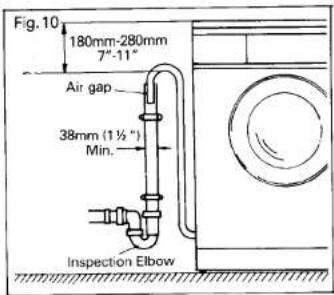
The take-off pipe from the trap must be capable of taking 6 gallons/24 litres per minute flow. The minimum diameter of the standpipe must be 3.81cm (112 " ) and there must be an air gap around the Washer/Dryer drain hose when fitting into the standpipe.
Note: It is very important for you to turn Off your Washer/Dryer taps when the machine is not in use.
Note: All flexible hose connections to be secured with 'Jubilee clips'.
CONTROLS
Crease Care Switch
When selected the machine will stop with the clothes immersed and suspended in the final rinse water. This is essential when washing delicate or synthetic articles if they are going to be left in the drum for a long time after the wash programme is completed and a drying time has not been selected in order to prevent the garments becoming heavily creased.
To start the machine again for the finishing spin and tumble dry if selected, simply press out the switch. The pump will start followed by the drum revolving to distribute the clothing for spin.
Crease care should not be used on 40.
Slow Spin Switch
When selected it reduces the final spin speed from 1150rpm to 600rpm. Unless selected, the machine will always spin at the faster spin speed.
It should always be used on programme 46 or permanent creasing may result. On programme 60 and 90 it should be used if you do not intend to tumble dry and you wish to minimise creasing.
Fast Wash Switch
When selected it shortens the programme time. This is particularly useful where time is important and the garments are only lightly soiled.
The results obtained using this option may not be up to the standard of normal full wash programmes.
It has no effect on Auto Prewash and Spin only programmes.
DETERGENT DISPENSER
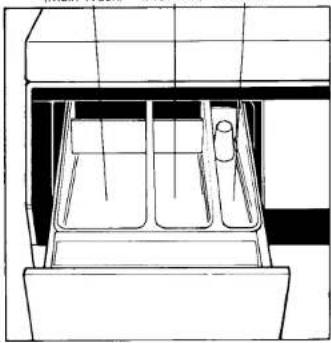
The dispenser has three compartments, two for detergent and one for fabric conditioner.
Detergent Detergent Fabric Main Wash) (Prewash) Conditioner
natural_image
Technical line drawing of a mechanical assembly or device with internal components (no text or symbols)NOTE: When fabric conditioner is added, the compartment must not be overfilled. To avoid clogging, detergent must not be allowed to get into the fabric conditioner compartment. Do not pull out the drawer when the machine is filling.
TUMBLE DRYING
Introduction
A tumble dryer gently tumbles the wet clothes in a current of warm air after they have been spun. Moisture is evaporated until the clothes are quite dry, much like what takes place outdoors in a fresh breeze on a fine sunny day, in a clean fresh atmosphere. But a good tumble dryer can dc much more than this.
A good tumble dryer reduces unwanted creases as it dries, creases that may have been put in during spinning.
Many fabrics used in the manufacture of clothing and household textiles tend to undergo some changes of size when laundered. This size change is cue to relaxation of the fibres, which have been stretched during spinning and weaving, and which tend to return to their unstretched state when immersed in water. These fibres normally stretch again in use, and even hanging wet on a line stretches the material to some extent. Tumble drying does not put any tension on the fabric as line drying does, and the difference may therefore appear more noticeable when the garments are dry.
During drying the moisture evaporated out of the clothes is condensed out of the circulating air using cold water from the mains. The water is then pumped away to drain.
Cautionary Notes
Flammable Substances:
The machine will only tumble dry articles that have been well washed in water and detergent and well rinsed and spun. Never dry articles that are contaminated with flammable
substances such as:
Petrol, Oil, Paint
Cleaning Solvents, Wax
Hair Lacquer, Creams
Cooking Fat or Oil.
For the same reason you must not tumble dry
Rubber, Foam Rubber, Plastic, Plastic
Foam
Nappy Pants and Liners
Polythene and Paper
Any garments that have been dry
cleaned.
Wool
Woollen articles should not be dried in the dryer unless they are labelled with the 'May be tumble dried' symbol. If in any doubt do not
tumble dry wool. Unlike other materials, the mechanism of wool shrinkage is irreversible, i.e. it will not stretch back to its original size and shape.
Maximum Loads — Dry Weights
The maximum load for tumble drying varies according to the type of material. Your Creda Washer/Dryer will dry an unsurpassed 3.2kg (7 lbs) dry load cottons, however, Creda recommend that the optimum load for cottons taking into consideration drying time and creasing is 2.3kg (5 lbs). You must follow the recommendations given in the Drying Chart. When the machine has come to rest after the final spin, any excess of clothes must be removed and the remainder re-distributed to enable them to tumble freely. If necessary the clothes must also be sorted according to fabrics indicated in the drying chart. DO NOT OVERLOAD.
Cool Tumble Period
Before clothes stop tumbling the heater will automatically switch off and the clothes will continue to tumble for up to 10 minutes in cool air. This cool tumble period is essential for all fabrics — to reduce the temperature of the load and to reduce creasing.
Always use the cool cycle to cool the load down before removing garments from the drum. Never switch the machine off leaving a hot load in the drum.
What can be Tumble Dried
The following symbols may be found on the care labels of garments: —

indicates article may be tumble dried

indicates article must not be tumble dried.
Notes:
Never tumble dry dripping wet garments, always spin them first.
Large very bulky items such as continental quilts and pillows should not be dried as it is essential that the load can tumble so that the air can pass through to dry items.
Articles that contain safety pins, hair grips, metal fastenings or stiffening (e.g. bra wires) that may become detached should not be placed in laundry appliances. If they tumble free they could interfere with mechanical or electrical parts of your washer/dryer.
INSTALLATION INSTRUCTIONS
Connecting the inlet hoses to the water supply
Permanent plumbing
Various methods exist but a tap which completely shuts off the water supply must be incorporated for these two reasons:—(a) So that the water can be turned off when the machine is not in use.
(b) If it is necessary to move the machine for servicing.
Where necessary consult your plumber to ensure correct water outlets are available. It is recommended that 15mm copper tube is used in conjunction with suitable fittings. Alternative fittings for larger copper pipe are available, if you have iron or lead pipes it is advisable to contact a reputable plumber. Basic methods of permanent plumbing are shown below.
Method 1
If the water pipes are within reach of your machine hoses we recommend you use one of the following suggestions.
Fitting a slip-fitting tee valve
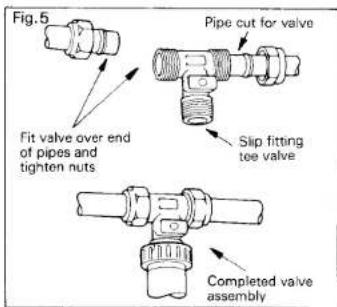
Valve Reference Numbers
Fig.5
- Nevamatic 1073A
- Oracstar PK 24 (cold)
- Oracstar PK 25 (hot)
Fitting a self cutting valve
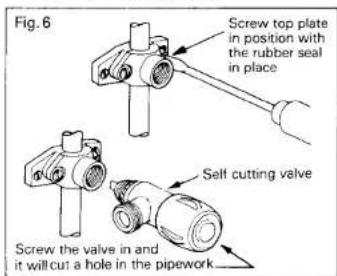
Valve Reference Numbers
Fig.6
-
Opella DIY3
-
Oracstar PK5
-
Oracstar PK14
-
Tapimatic T.S15
Method 2
If the water pipes are out of reach, you will need to fit an equal tee and branch pipe to both hot and cold pipes.
Fitting a branch pipe
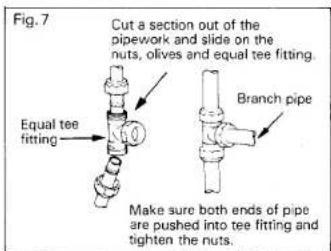
After fitting the branch pipe, you must now fit a valve to the end of each pipe. We recommend you use one of the following valves.
(a) Threaded inlet valve. Fig.8.
(b) Compression inlet valve. Fig.9.
INSTALLATION INSTRUCTIONS
We recommend that you have your Washer/Dryer plumbed in and that the installation is carried out by an experienced plumber.
Location of the appliance
The appliance should be located on a flat solid surface, i.e. brick, concrete, tiles, this is to ensure its stability in use, a wooden suspended floor may not be suitable.
Water supply
Your Washer/Dryer is designed for use with hot and cold water simultaneously.
Your water supply pressure must be as follows: Minimum: 0.3 bar (4 p.s.i.) Maximum: 10 bar (145 p.s.i.)
Hot water supply
Ideally the hot water supply should be about 60°C. Most household water supply systems are suitable for use with your Washer/Dryer including multiple outlet instantaneous electric and gas heaters, but the machine must not be worked off single outlet instantaneous electric or gas water heaters.
Cold water supply
Cold water from the mains is your likely choice of cold supply. Cold water from a cistern or tank may not give you a high enough pressure if you live in a flat or bungalow, or if you have your machine installed upstairs.
How to measure your water pressure
Measure the vertical distance (head) in metres from the bottom of the cold water cistern (probably in the roof space) to where you want your machine to be.
Divide by 10 to get the pressure in bars, or multiply by 1.4 for pounds per square inch p.s.i.
Plumbing
The regulations of the local Water Supply Authority must be adhered to.
The ideal arrangement is to have the hot and cold hoses permanently connected to pipes specially plumbed in for your Washer/Dryer. An accessible stop cock approved by the United Kingdom water fitting scheme must be fitted to each pipe and the hoses securely fitted to the ends of the pipes by 14 in. B.S.P. connectors. When connected this way, you must turn Off the stop cock when your wash/tumble dry is completed, and On before you start your wash/tumble dry.
Fitting the inlet hoses
Supplied with the machine are two high pressure water hoses. It is essential that only these high pressure hoses are used for connecting the machine to the water supply. The inlet hoses are supplied with screwed couplings attached.
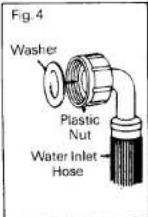
The angled couplings are for attaching the hoses to the machine inlet valves. The nuts must be tightened securely. Do not overtighten. Ensure that the 4 rubber seal washers supplied are fitted securely in both ends of the two inlet hoses. (See Fig.4).
The red hose connector is fitted to the hot water inlet. The blue hose connector is fitted to the cold water inlet.
If you require longer inlet hoses, these can be obtained from a reputable plumbers merchants.
When fitting a
machine to a water
system that has not been used for some time, to a new system or after plumbing alterations, the water system must be thoroughly flushed before connecting the machine. If this is not done, loose particles may prevent the water valves from shutting off properly, which may result in flooding.
Once the hoses have been fitted, turn the water supply on for a few minutes and check for leaks at the hose connections.
Your machine may be used either to automatically tumble dry after a wash cycle or to tumble dry only.
The cold water supply to your machine must be turned on before you use the tumble dryer.
As a general guide the Drying Chart gives recommended information for various materials.
Before Tumbling
Please Read the Cautionary Notes.
It is very important to follow carefully each garment manufacturer's washing and drying instruction, as given on the Care Label attached to the garment.
Fabric Conditioner added to the final rinse will give even more softness to all fabrics and is invaluable for reducing the static electricity which causes easy-care fabrics to cling and attract dirt.
Making up Loads
Clothes should be sorted into loads of similar fabrics before drying. Cotton which needs ironing can be dried to a suitable dampness. Towels and other cotton items which do not need ironing can be fully dried and these will be ready to wear or store as soon as they are taken from the dryer.
Heavy fabrics should be dried separately from lightweight fabrics.
Loose belts, apron strings etc. should be tied and zip fasteners fully closed before being placed in the washer/dryer.
Energy Control
Your washer/dryer has an automatic energy saving feature which reduces the amount of heat supplied to the clothes once they are dry. This reduces the wastage of electricity when drying times are set too long.
Selecting the Drying
Programme
If you do not rinse and spin before drying you will need to select the correct heat setting on the Programme Selector. Two settings are available, one for natural fabrics and one for synthetics. These are identified as follows:
Full Heat Drying — Cotton Fabrics Programme Numbers 96, 60 & 40
Gentle Heat Drying — Synthetic Fabrics Programme Numbers 60 & 40
Selecting Drying Times
This will depend on the size of the load, the type of fabric and the wetness of the load. It is therefore not possible to give an exact drying time but experience will quickly enable you to set the appropriate time for fully drying or damp drying to your requirements.
If you are not sure how long a load will take to dry, see page 13 under 'Tumble Drying'. As a general guide the Drying Chart gives recommended information for various materials.
Drying Chart
| Fabric | Type of Load | Recommended Max. Load | Prog. Selector Setting |
| Cottons and linens | Variety of items varying in sizes. Ideally not all towels and sheets | 2.3kg5lbs | |
| All towels. For heavy bath towels – reduce the load | 1.8kg4lbs | ||
| Polyestericotton and Terylene cotton | Bed linen and/or shirts | 1.8kg4lbs | |
| Synthetic fibres, Cremplans, Orilon, Acilian, Coutelle etc. | Variety of items, nightwear pumpers, socks, cardigans | 1.8kg4lbs | |
| Synthetic fibres, nylon, Color, etc. | Variety of lightweight items, bed linen, nightwear, shers | 1.8kg4lbs |
TO CARRY OUT A SIMPLE WASH
e.g. Coloured Cotton 60 or

1) Ensure that your 13 amp plug from the machine is plugged in and power is switched on at the main socket. Make sure that the power is switched On (Power Indicator Light On).
2) Sort the clothes into batches and select items marked 60 or 2/ always ensure that pockets are emptied and it is advisable to loosely tie apron and pyjama strings and do up zips. Badly soiled or stained clothes should be specially treated before the washing section of the cycle.
3) On this programme the drum of your machine will take up to a maximum load of 4.5kg (10lbs) dry weight, if you intend just to wash. If you intend to wash and dry automatically do not exceed 3.2kg (7lbs) dry weight. Push the door opening button to open the door, and load the machine. Clothes should be placed into the drum separately. Then close the door.
4) If your water is of average hardness and you are washing a full load of clothes, add two cupfuls of detergent to the main wash compartment in the detergent dispenser. To do this pull the dispenser drawer out as far as possible and add the detergent. Then add fabric conditioner, in line with the instructions given on the bottle, to the fabric conditioner compartment of the dispenser. Ensure that the dispenser drawer is fully closed as otherwise leaks will occur. Only detergent suitable for front loading automatic machines should be used.
5) Ensure all option switches are off (Out).
6) Set the Programme Selector to Position by turning clockwise only. Similarly set the position of the Drying Time Selector to the required drying time by turning between the 0 and 90 minutes positions only. Should a drying period not be required, ensure that the Drying Time Selector is set to the 0 position. See page 13 under tumble crying for a guide to what drying time is required.
7) Pull the Programme Selector fully out to start the programme. The machine will now commence the wash cycle. After completion of the wash cycle if no drying time has been set the machine will stop with the Programme Selector in position ✉. Push in the Programme Selector and the clothes may be removed. If a drying time has been selected, then drying will automatically commence. After completion of the drying cycle which will end with a period of tumbling in cool air, the machine will stop with the Drying Time Selector at 0.
8) Press the Programme Selector in and push the door opening button to open the door. After removing the clothes, press out the power switch, switch off the electricity at the wall switch and turn off the water taps.
9) After completing your initial wash and dry you can now proceed to successfully follow any of the other main wash or dry programmes with complete confidence and knowledge of your machine.
Please Note
For Programmes 35, 60 and 40 the machine fills hot and cold simultaneously during the final rinse. This is to relax the fibres and thereby reduce the drying time.
ELECTRICAL REQUIREMENTS
WARNING — THIS APPLIANCE MUST BE EARTHED.
REFER TO RATING PLATE FOR VOLTAGE.
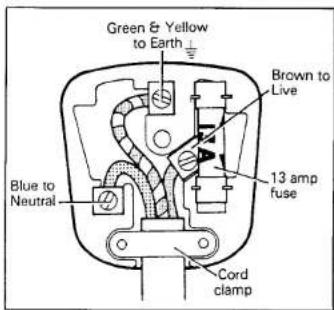
The flexible mains lead must be correctly connected as below to a 3 pin plug of not less than 13 amp capacity. If a BS.1363 fused plug is used it must be fitted with a 13amp fuse which is approved to B.S.1362.
We recommend the use of good quality plugs and wall sockets that can be switched off when the machine is not in use.
IMPORTANT: The wires in the mains lead fitted to this appliance are coloured in accordance with the following code:
As the colours of the wires in the mains lead of this appliance may not correspond with the coloured markings identifying the terminals in your plug, proceed as follows:—
The wire which is coloured green and yellow must be connected to the terminal in the plug which is marked with the letter E or by the earth symbol or coloured green or green and yellow. The wire which is coloured blue must be connected to the terminal which is marked with the letter N or coloured black or blue. The wire which is coloured brown must be connected to the terminal which is marked with the letter L or coloured red or brown.
When wiring the plug, ensure that all strands of wire are securely retained in each terminal. Do not forget to tighten the mains lead clamp on the plug. If your electricity supply point has only two pin socket outlets, or if you are in
doubt, consult a qualified electrician.
Should the mains lead ever require replacement, it is essential that this operation be carried out by a qualified electrician and should only be replaced with a cable of the same size i.e. 1.25mm ^2 .
Note: Socket outlets are not permitted in bathrooms, neither should any provision be made for connecting moveable electrical appliances. No stationary appliance is to be installed within reach of a person using bath or shower.
This appliance conforms to B.S. 800: 1988 and EEC directive 87/308 regarding suppression of radio and television interference.
UNPACKING INSTRUCTIONS
We recommend that all levelling and height adjustment of the machine described later in these instructions is carried out before the internal transit brackets are removed.
ON NO ACCOUNT SHOULD THE MACHINE BE CONNECTED TO THE ELECTRICITY SUPPLY AND PUT INTO OPERATION UNTIL THE INTERNAL TRANSIT BRACKETS HAVE BEEN REMOVED AND THE BACK PANEL REPLACED.
IN ORDER TO REMOVE TRANSIT BRACKETS PROCEED AS FOLLOWS:—
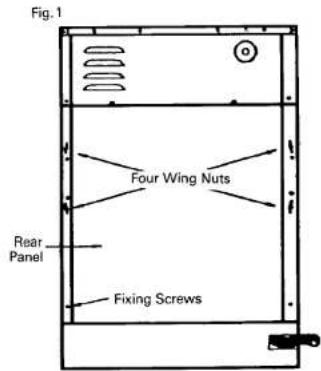
- Remove all six fixing screws, securing the rear panel (see Fig. 1).
- Unscrew the four wing nuts from the rear panel (see Fig.1).
- Remove the rear panel by pulling outwards from the bottom edge to clear studs.
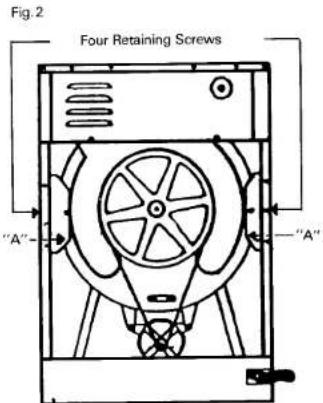
- Remove the four retaining screws from the transit brackets (see Fig. 2).
- Remove the two transit brackets marked 'A' from the machine (see Fig.2). Moving the two tub unit slightly to the left or right will help when removing the brackets.
- Replace the rear panel using the six fixing screws, making sure there are no wires trapped between the rear panel and side panels.
- Retain transit brackets, screws and wing nuts for future use.
VARIATIONS ON A SIMPLE WASH/DRY
Washing
Auto Prewash

Prewash is available automatically with Programme 5 . If you have heavily-soiled items to wash and wish to prewash, first merely select position on the programme selector. The machine will give a low temperature prewash and then automatically go on to the main wash programme without any further input from you.
If you require a prewash for other than main wash programme 1, first select the prewash position P . At the end of the prewash cycle after the machine has pumped out the prewash water but before it has filled for the main wash, press in the Programme Selector, then move it on to the required programme. Care must be taken to ensure that the machine is not allowed to proceed into mainwash. Finally, pull the Programme Selector out. The machine will carry on washing.
Note: Items soiled with oil, fat, greases (i.e. vaseline) or metallic compounds should always be given a prewash before the main wash as such deposits can cause deterioration of the door seal.
Using the Machine to Rinse and Spin
The type of rinsing and spinning can be varied according to the position selected. For hard-wearing materials the rinse section following programmes 67, 68 should be selected, for delicate materials the rinse section following programme 50 will give optimum results. The machine will automatically go into spin after the rinsing cycle is complete. Fast or slow spin may be selected using the Slow Spin Switch (see page 5). Tumble drying will then proceed automatically if a timed period has been selected on the Drying Time Selector.
Using the Machine to Spin Only
Select either of the spin positions marked on the Programme Selector.
Short spin should be selected for delicate materials.
© Long spin for other materials.
Tumble drying will then proceed automatically if a timed period has been set on the Drying Time Selector.
Rhythm Spin
When Long Spin is selected the cycle includes a number of progressively faster spins with reverse tumbling in between and followed by a long full speed spin. This will ensure that after spin your clothes are lying loosely in the drum and ready for drying.
Drying
Using the Machine to Dry Only The cold water supply to your machine must be turned on before you use the tumble dryer. (And off again after use).
Where you have not been able to dry a full load of washing, or where you wish to dry certain articles washed by hand, it may be necessary to select a drying cycle independently.
If you are not sure how long a load will take to dry, set the Drying Time Selector to the 90 minute position. Set the Programme Selector to the correct drying programme (see page 7) and pull it fully out. The machine will start to tumble dry. Part way through the cycle, press in the Programme Selector. The machine will stop tumbling. Move the Drying Time Selector to the cool tumble period. Pull the Programme Selector out and allow the machine to run for a few minutes. This will cool the load in the dryer. Finally press in the Programme Selector and door opening button. Check whether the load or part of it is dry.
If you select short drying times, the load may not be dry and it may be necessary to re-set the selector. This method will prolong drying times due to the repeated inclusion of the cooling down period and the subsequent re-heating of the load when the dryer is re-set. You will quickly find how long different loads take to dry.
Also refer to page 7 'Using the Tumble Dryer'.
DETERGENTS
Washing Powder
Use a low lather powder for front loading automatic machines. This type of powder is specially made to suit front loading automatic washer/dryers and can be used in hard or soft water. Ordinary powders produce so much lather that clothes will not tumble freely or be properly washed and you may even get lather overflow.
Use enough powder. To get your clothes clean it is essential that enough powder is used in the machine.
The correct amount will depend on a number of things — the hardness of the water, the size of load and the amount of soiling present. As a guide we suggest you follow the table below and adjust the amounts in the light of your personal experience. You may find it helps to use a cup for measuring the right amount at first. (Do not use a water softener additive in the machine itself).
How much to use in your machine
| Programmes using the Prewash | Programmes not using the Prewash | |||
| Prewash | Main wash | Total | ||
| HARD WATER | ||||
| Full load or heavy soiling | 1 cup | 2 cups | 3 cups | 2 cups |
| Small load or light soiling | 1 cup | 1 cup | 2 cups | 1 12 cups |
| SOFT WATER | ||||
| Full load or heavy soiling | 1 cup | 1 cup | 2 cups | 1 12 cups |
| Small load or light soiling | 12 cup | 12 cup | 1 cup | 12 cup |
One cup holds approximately 100 grams.
Liquid Detergents
Liquid detergents may be used in this appliance. The dosage required is recommended on the relevant manufacturers products. Do not use liquid detergents if a pre-wash programme is required.
CONDITIONERS
A fabric conditioner is strongly recommended. When added it will give a fresh softness to your washing and eliminate the problem of static cling from synthetics.
Fabric conditioner and washing powder can be put in the dispenser at the same time. Add fabric conditioner, in line with the instructions given on the bottle, to the fabric conditioner compartment of the dispenser at the beginning of every wash and your machine will automatically add it to the final rinse.
The use of fabric conditioner in your washer/dryer will also be beneficial in the drying process. Not only will the problem of static be eliminated but your clothes will be softer.
WATER HARDNESS
The tabulation opposite (page 11) shows the water hardness throughout the country. In some areas water hardness is variable.
There is an accepted standard of measure for classifying the relative hardness of any water.
| Key | |
| Soft | S |
| Moderately Soft | MS |
| Slightly Hard | SH |
| Moderately Hard | MH |
| Hard | H |
| Very Hard | VH |
OPTIONAL EXTRAS
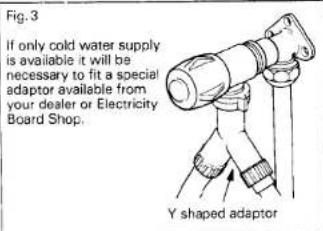
If only a cold water supply is available, you will need a special adaptor. This is available as an optional extra.
Also available is a drain hose extension kit for applications where it is not possible to move the house plumbing closer to the machine.
These can be obtained from your local retailer or Creda Limited, Spares and Service Division, CredaCare Building, Creda Works, Blythe Bridge, Stoke-on-Trent ST11 9LN.
Telephone: 0782 388300.
WATER HARDNESS
| Area | Authority | Water Hardness | Area | Authority | Water Hardness |
| Argyll | Scotland | S | Loch Lomond | Scotland | S |
| Ashborne | Severn-Trent | MS-H | Loch Turret | Scotland | S |
| Avon and Dorset | Wessex | H | London-Metropolitan | Thames | MH-VH |
| Ayrshire | Scotland | S | Lune Valley | North West | S-SH |
| Birmingham | Severn-Trent | S-VH | Macclesfield | North West | MS-H |
| Bolton | North West | S | Makerfield | North West | S-MH |
| Bournemouth | Wessex | H | Manchester | North West | S |
| Bristol | Wessex | H-VH | Mersey Valley | North West | S-VH |
| Cambridge | Anglia | SH-H | Montgomery | Severn-Trent | S-MH |
| Carlisle | North West | MS | Newcastle & Gateshead | Northumbrian | MH |
| Cheshire-Mid | North West | MS-H | Nottingham | Severn-Trent | MS-MH |
| Chester | North West | SH-H | Northumberland & Tyne | Northumbrian | SH |
| Chiltern | Thames | VH | Nuneaton | Severn-Trent | SH-VH |
| Clyde-Lower | Scotland | S | Pennine-West | North West | S-MS |
| Coine Valley | North West | H-VH | Plymouth | South West | S-SH |
| Corby & District | North West | H | Preston & District | North West | S |
| Cumbria South | North West | S-MH | Rickmansworth & | ||
| Cumbria West | North West | S | Uxbridge Valley | Thames | H-VH |
| Derbyshire-North | Severn-Trent | S-H | Salop | Severn-Trent | H |
| Derbyshire-South | Severn-Trent | MH | Scilly Isles | — | MH |
| Derwent Valley | Severn-Trent | S | Scotland-Mid | Scotland | S-MH |
| East Anglia | Anglia | H-VH | Scotland-North | Scotland | S-VH |
| Eastbourne | Southern | SH-VH | Scotland-North East | Scotland | S |
| Eden | North West | S-MH | Scotland-South East | Scotland | S-H |
| Essex | Anglia | S-VH | Scotland-South West | Scotland | S-MH |
| Exeter | South West | S-H | Sherwood | Severn-Trent | MH-VH |
| Fife & Kinross | Scotland | S-VH | Somerset | Wessex | S-VH |
| Folkestone & District | Southern | S-VH | Stafford | Severn-Trent | H-VH |
| Fyde | North West | S-SH | Staffordshire-South | Severn-Trent | H-VH |
| Gloucester | Severn-Trent & Thames | MH-Vh | St. Helens | North West | SH |
| Stockport | North West | S | |||
| Guernsey | — | SH | Sunderland & | ||
| Hampshire Central | Southern | H | South Shields | Northumbrian | MS-VH |
| Hampshire North | Southern | H | Surrey East | Thames | MS |
| Hampshire West | Southern | H | Surrey North | Thames | H-VH |
| Hartlepool | Northumbrian | H-VH | Sussex | Southern | H |
| Inverness-shire | Scotland | S-MH | Sussex East | Southern | MS |
| Ireland Eastern | — | S-H | Sussex Mid | Southern | S-H |
| Ireland Northern | — | MS | Sussex North West | Southern | MS-VH |
| Ireland Southern | — | S-VH | Sutton District | Thames | SH |
| Ireland Western | — | MS | Tees | Northumbrian | S-MS |
| Isle of Wight | — | SH-H | Tendring Hundred | Anglia | H |
| Jersey | — | MH | Truro | South West | S-SH |
| Kent | Southern | H | Vales | Thames | MS-VH |
| Kent East | Southern | H | Warwickshire | Severn-Trent | MH-VH |
| Kent Mid | Southern | SH-VH | Wear | Northumbrian | S |
| Kent West | Southern | MS-H | Wiltshire | Thames | H |
| Lakes & Lune | North West | S | Wolverhampton | Severn-Trent | SH-VH |
| Lambourne | Thames | SH-VH | Worcestershire-North | Severn-Trent | S-VH |
| Lanarkshire | North West | S-VH | Worcestershire-South | Severn-Trent | MS-H |
| Lancashire | North West | S-VH | Wrexham & East | ||
| Lee Valley | Thames | VH | Denbighshire | Welsh | SH |
| Leicester | Severn-Trent | MH-VH | York | Yorkshire | H |
| Liverpool | North West | S-SH | Yorkshire North | Yorkshire | S-VH |
Reproduced by Kind Permission of Lever Bros. Ltd.
INTERNATIONAL TEXTILE CARE LABEL CODES
| Care Label/Programme | Fabric and Soiling | Maximum Load | Select Programme Position | |
| NEW | OLD | |||
| Cotton and Linen. White or colour-fast to boiling. Heavy soil. | 4.5kg 10lbs | |||
| Cotton and Linen. White or colour-fast to boiling. Normal soil. | 4.5kg 10lbs | |||
| Cotton and Linen. White or colour-fast to boiling. Light soil. | 4.5kg 10lbs | |||
| Cotton and Linen. White or colour-fast to boiling. Very light soil. | 4.5kg 10lbs | |||
| Cotton and Linen. Colour-fast at 60°C. Heavy soil. | 4.5kg 10lbs | |||
| Cotton and Linen. Colour-fast at 60°C. Normal soil. | 4.5kg 10lbs | |||
| Nylon and Polyester/Cotton — White. | 2kg 4 12 lbs | |||
| Nylon and Polyester/Cotton — Coloured. | 2kg 4 12 lbs | |||
| Cotton and Linen. Colour-fast at 40°C. but nct at 60°C. Heavy soil. | 4.5kg 10lbs | |||
| Cotton and Linen. Colour-fast at 40°C. but nct at 60°C. Normal soil. | 4.5kg 10lbs | |||
| Delicate synthetics, Acrylics, Man-made fibre blankets. | 2kg 4 12 lbs | |||
| Woolens (labelled Machine Washable) and Wool Mixtures. | 2kg 4 12 lbs | |||
| Silk, Printed Acetate. Colours not fast at 40°C. | 2kg 4 12 lbs | |||
| Rinsing and Spinning + | Any machine-washable fabric requiring rinsing and spinning only. | Dependent on materials | Any rinse position | |
| Spinning only | Any machine-washable fabric requiring spinning only. | Spin position | ||
† See section on page 9 for full description.
SOMETHING WRONG WITH YOUR MACHINE
In the Event of a Power cut/Failure
If you have a power failure and you wish to remove the clothes from the machine, carry out the following: —
-
Switch off the electricity supply at the socket and remove the plug.
-
Drain the machine, if water can be seen in the door window, by lowering the outlet hose into a bucket or bowl. Take care, as the water could be very hot and may fill more than one bowl. To stop the flow just raise the drain hose. You can completely empty the machine of water in this way.
- Remove the small plastic button at the top right hand side of washing machine front panel by turning through a quarter turn with a medium-sized screwdriver. The button has a cord attached which when pulled upwards will allow the door to be opened. When the clothes have been removed, replace the button.
The machine must not be operated with this button removed.
If you have been through the above and your machine still is not working properly you should call your nearest Service office. Please refer to separate leaflet.
CARE & CLEANING
After use of the appliance: —
(a) With the power On, open the door. Clean and dry the rubber door seal and porthole, close the door.
(b) Press the Power button to switch the machine Off. The supply at the socket and the water taps, must be turned Off.
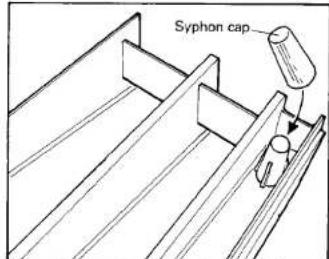
(c) Occasionally remove the detergent dispenser drawer from the detergent box by pulling out sharply beyond the stop. Clean powder and fabric conditioner deposits from the drawer and from inside the box. Remove the syphon cap from the drawer and wash in clean water. Replace the syphon ensuring that it is fitted correctly. Replace the drawer. To overcome the initial resistance, the front face of the drawer should be struck with the palm of the hand.
(d) Wipe the cabinet with a clean damp cloth. A cleaner may be used but should not contain any abrasive that could damage the paintwork or plastic mouldings.
Occasionally select a rinse and spin programme with the drum empty. This will wash away any remaining fluff and ensures that this is not redeposited on the wash load. This is particularly important if you regularly dry fluffy loads, e.g. nappies, towels, etc.
SOMETHING WRONG WITH YOUR MACHINE
Before calling out a Service engineer have a quick look through the following fault finding list — it could save a lot of time and trouble.
| SYMPTOMS | POSSIBLE CURE |
| It won't start | Is it switched on or the mains? Is there a fuse in the plug and, if so, has it blown? Are all the wires in the plug correctly secure? Has the power switch been pressed in? Is the Programme Selector fully pulled out? Has the washing programme been set? Has the drying cycle selector been set? Is the door properly shut? |
| It doesn't fill | Are the taps and stop cocks turned on? Are the water inlet hoses kinked? Have you switche the machine on? |
| It's slow to fill | Check that the water pressure is correct and that the water fitters are clean. (See page 25). Are water taps in use elsewhere in the house? |
| It won't empty | Is the drain hose kinked? |
| It takes a long time to heat up | Your own hot water supply may not be hot enough so that it takes the machine longer to heat the water to the wash starting temperature. Check fill hose connections, they may be the wrong way round. |
| Drum keeps on stopping and starting | It should do, as this is the normal washing and drying action. |
| Suds are overflowing | You could be using the wrong type of powder or too much. To remove the suits, push in the Programme Selector. Advance it to the rinse section and pull it out, to turn the machine back on. Allow the rinse cycle to finish. |
| Machine stops at end of final rinse | Is the 'Crease Cars' switch selected? |
| Door will not open | Check that-1. The power is switched On and the Programme Selector is pushed in.2. The machine is stopped drum stationary.3. The water level is below the door window. |
| SYMPTOMS | POSSIBLE CURE |
| It makes a noise when it spins | Some noise is unavoidable with all machines. However, it helps if the machine is standing on a flat surface and not touching anything. If persistent, check that transit packing has been removed properly. (See Installation Sheet). |
| Machine continually emptying | This is probably as a result of the end of the outlet hose being less than 46cm/18 ins. from the floor. |
| Water is leaking out | Are the hot and cold water inlet hose connections to the machine tight enough and are the seal washers in position?Is the detergent dispenser drawer fully closed?Is the outlet from the detergent dispenser blocked? |
| It takes longer than normal to dry | Have you selected the correct time on the drying selector?Have you selected the correct drying programme (see page 7). Are there too many garments in the drum?Have you forgotten to turn the cold water supply on for drying cycle?Have you selected the Slow Spin switch? |
| The clothes came out wet | Have you selected the wrong programme for the type of fabric (see Programme Guidel).Have you neglected to select a drying position?Have you selected a cool tumble position only?Have you dried too many garments in weight?Have you forgotten to turn the cold water supply on for drying cycle?Have you selected the Slow Spin switch? |
| Fabric Conditioner Syphoning Prematurely | Is the quantity of conditioner being used correct?Is the drawer being 'slammed' shut? - if so, a wave effect occurs and the Fabric Conditioner: may operate the syphon.Is the drawer pushed fully home? - even if the drawer is only opened momentarily during filling, premature syphoning may occur.Is the machine leaning backwards, if so the syphon may operate.If premature syphoning does occur on your washing machine, this can be drastically reduced by using concentrated fabric conditioner rather than the normal. |
The Control Settings on your machine correspond with the International Textile Care Label numbers, which give the correct wash programme for the various fabrics. Selection of the wash programme is therefore simple and straight forward. Look for the wash code numbers on the garment and select the same number on the Programme Selector. Where there are no numbers on garments, the following guide will help you select the right programme.
| Select Half Load | Select Crease Care | Select Slow Spin | Select Fast Wash | Tumble Drying | |
| Maximum Load | Recommended Time (Mins.) | ||||
| Optional | Optional | No | No | 3.2kg 7lbsOptimum 2.3kg 5lbs | 60-90 ★40-60 ★ |
| Optional | Optional | No | No | 3.2kg 7lbsOptimum 2.3kg 5lbs | 60-90 ★40-60 ★ |
| Optional | Optional | No | Yes | 3.2kg 7lbsOptimum 2.3kg 5lbs | 60-90 ★40-60 ★ |
| Optional | Optional | No | Yes | 3.2kg 7lbsOptimum 2.3kg 5lbs | 60-90 ★40-60 ★ |
| Optional | Optional | No | No | 3.2kg 7lbsOptimum 2.3kg 5lbs | 60-90 ★40-60 ★ |
| Optional | Optional | No | Yes | 3.2kg 7lbsOptimum 2.3kg 5 lbs | 60-90 ★40-60 ★ |
| Optional | Optional | Optional | No | 2.0kg 4.5lbs | 45-70 |
| Optional | Optional | Optional | No | 2.0kg 4.5lbs | 45-70 |
| Optional | Optional | No | No | 3.2kg 7lbsOptimum 2.3kg 5bs | 60-90 ★40-60 ★ |
| Optional | Optional | No | Yes | 3.2kg 7lbsOptimum 2.3kg 5bs | 60-90 ★40-60 ★ |
| Optional | Optional | Yes | No | 2.0kg 4.5lbs | 45-70 |
| No | No | No | No | Woollen articles should not be dried in the dryer unless they are labelled with the "May be tumble dried" symbol. if in any doubt do not tumble dry wool. | |
| No | Optional | Yes | No | These articles should not be dried in the dryer unless they are labelled "May be tumble dried". | |
| Optional | Optional | Optional | — | Dependent upon materials | |
| — | No | Optional | — | ||
★ The time given is for cotton sheeting. For other heavier cotton and linen materials such as towelling jeans and nappies, longer drying times will be required.
*See section on page 5 for full description.
STAIN REMOVAL
1) Always treat as soon as possible. Rinse in cold water or warm solution before washing.
2) Never rub a stain, "pinch out" as much as you can, using a clean cloth or paper tissue.
3) Some stains need special treatment (see below).
4) Absorbent pad method.
With solvents work from outside towards centre of stain, holding an absorbent pad underneath the cloth behind the stain.
5) Do not use Amyl Acetate on acetate or triacetate.
6) Test for colour fastness before removing stain.
NEVER TUMBLE DRY ANY ARTICLE ON WHICH SOLVENTS HAVE BEEN USED WITHOUT FIRST WASHING AND RINSING THOROUGHLY.
Note:
Take great care with poisonous chemicals and flammable liquids.
Only use solvents in a well ventilated place.
Keep chemicals, flammable liquids and solvents out of reach of children and pets.
WARNING
Whilst this guide is reproduced to assist
you, it is important that all items marked
are used only as per manufacturers recommendation. Never mix any chemical products.
Stubborn Stain Guide
| Carbon paper | Methylated Spirits | Absorbent pad method | ||
| Chewing gum | Methylated Spirits | Absorbent pad method | Or rub with ice and pick off by hand | |
| Glue | Cold Water or Amyl Acetate | Wash in cold solution for soluble glues | Waterproof glue should be treated with Amyl Acetate using absorbent pad method | |
| Grass | Methylated Spirits | Sponge with methylated spirits | ||
| Grease Oil | Proprietary grease solvent | Absorbent pad method | ||
| Irk (biru, felt tip) | Methylated Spirits | Absorbent pad method | ||
| Lipstick and face creams | Proprietary solvent | Absorbent pad method | ||
| Mildew/white cottons and linens | Chlorine bleach | Soak white cottons and linens in 1 part bleach in 100 parts water | Coloureds cannot be treated except for regular washing | |
| Mildew (all other white fabric) | Hydrogen peroxide | Soak other white fabrics in 1 part hydrogen peroxide 20 vol. to 4 parts water | Rinse well. There is no safe home treatment for coloureds but regular washing will reduce marks | |
| Nail varnish | Amyl Acetate | Absorbent pad method | ||
| Paint: Emulsion | Water | Sponge immediately with cold water | Dried stairs are permanent | |
| Paint: Oil | Turpentine or Amy Acetate | Absorbent pad method | ||
| Perspiration | Hydrogen peroxide | Rinse immediately in cold water and wash. If stain remains soak in 1 part hydrogen peroxide 20 vol. 4 parts water and wash | Colour removed by perspiration cannot be restored | |
| Rustilion mould (for all fabric) | Lemon juice | Soak stains in lemon juice and iron under damp cloth. Repeat if necessary | ||
| Rustilion mould (for white cottons and linens) | Oxalic acid (very poisonous) | Use 3⁄4 teaspoon of oxalic acid in 1⁄2 pint of hot water | ||
| Shoe polish | Glycine and proprietary solvent | Lubricate with glycanins and use solvent with absorbent pad method | ||
| Tar | Proprietary solvent | Scrape off surplus, soften with butter and wipe off, apply solvent and wash immediately |
REGULAR CHECKS
It is essential that you use and look after your washer/dryer in accordance with the instructions in this book.
As with any major appliance, there are certain aspects which require regular attention. Without such attention, it is possible that there may be a premature requirement for servicing. Listed below are a number of such key areas which in your own interest you should check regularly.
Before calling out a service engineer, ensure that the checks below and on page 17 have been carried out. Should the service engineer find nothing wrong with the machine, we regret that we will have to charge for the service call.
Key Regular Check Items
1. Water Leaks
1.1. From Back of Machine
— Are the inlet hoses securely tightened? (see Page 22).
— Is the flow control washer fitted inside the filter? (see Page 25).
— Is the outlet hose correctly and securely positioned?
1.2. From Front of Machine
— Check that there is no dirt or lint trapped between the lip of the rubber door seal and the door glass.
- Check that the detergent dispenser is not prevented from closing tightly due to a build-up of detergent. Remove and clean (see Page 17).
2. Insufficient Inlet Flow Rates
- Check that the hot and cold water pressures are satisfactory. Check that the filters in the inlet valves are not blocked, and if necessary remove the flow control washer which will reduce the time to fill. (See Page 25).
3. Machine Vibrating
— Check that the transit brackets have been removed (see Installation Instructions).
— Check that the machine is level.
4. Option Switches
— Check after use that all the option switches are in the Off position i.e. out.
- INSTALLATION INSTRUCTIONS
- INTEGRATED WASHER/DRYER
- IMPORTANT
- Adjustable feet; fitting and adjustment
- Example
- Levelling
- Location and fixing of slides
- Procedure
- Demister Sheet
- Fitting the foot mounting brackets
- Small foot brackets 824-850mm
- Large foot brackets 850-900mm
- KNOW YOUR MACHINE
- Washer/Dryer
- CONTROLS
- Power Switch
- Power Indicator Light
- NOTE: THE DOOR CAN ONLY BE OPENED WHEN THE POWER IS SWITCHED ON.
- Door
- If the door is opened during wash, care should be taken as the water may be hot.
- Programme Selector
- To start any wash, wash/dry or dry only programme the power switch must be pressed in and the programme selector knob must be pulled fully out.
- Drying Time Selector
- CLOCKWISE THROUGH THE 90 MINUTE POSITION OR BACK ANTI-CLOCKWISE THROUGH THE 0 POSITION AS THIS MAY CAUSE DAMAGE TO THE TIMER.
- Option Switches
- Half Load Switch
- CHECKING WATER PRESSURES
- Operating water pressures
- Cold water
- Hot water
- Points to watch
- To remove flow control washer
- Fitting the drain hose
- Discharge into a standpipe
- Crease Care Switch
- Slow Spin Switch
- Fast Wash Switch
- DETERGENT DISPENSER
- TUMBLE DRYING
- Introduction
- Cautionary Notes
- Flammable Substances:
- Wool
- Maximum Loads — Dry Weights
- Cool Tumble Period
- What can be Tumble Dried
- Notes:
- Connecting the inlet hoses to the water supply
- Permanent plumbing
- Method 1
- Fig.5
- Fig.6
- Method 2
- Location of the appliance
- Water supply
- Hot water supply
- Cold water supply
- How to measure your water pressure
- Plumbing
- Fitting the inlet hoses
- When fitting a
- machine to a water
- Before Tumbling
- Please Read the Cautionary Notes.
- Making up Loads
- Energy Control
- Selecting the Drying
- Programme
- Selecting Drying Times
- TO CARRY OUT A SIMPLE WASH
- e.g. Coloured Cotton 60 or
- Please Note
- ELECTRICAL REQUIREMENTS
- WARNING — THIS APPLIANCE MUST BE EARTHED.
- doubt, consult a qualified electrician.
- UNPACKING INSTRUCTIONS
- VARIATIONS ON A SIMPLE WASH/DRY
- Washing
- Auto Prewash
- Using the Machine to Rinse and Spin
- Using the Machine to Spin Only
- Rhythm Spin
- Drying
- DETERGENTS
- Washing Powder
- Liquid Detergents
- CONDITIONERS
- WATER HARDNESS
- OPTIONAL EXTRAS
- INTERNATIONAL TEXTILE CARE LABEL CODES
- SOMETHING WRONG WITH YOUR MACHINE
- In the Event of a Power cut/Failure
- CARE & CLEANING
- STAIN REMOVAL
- NEVER TUMBLE DRY ANY ARTICLE ON WHICH SOLVENTS HAVE BEEN USED WITHOUT FIRST WASHING AND RINSING THOROUGHLY.
- Note:
- WARNING
- REGULAR CHECKS
- Key Regular Check Items
- Water Leaks
- From Back of Machine
- From Front of Machine
- Insufficient Inlet Flow Rates
- Machine Vibrating
- Option Switches
Brand : Creda
Model : 47303
Category : Washing machine