
W850 - Washing machine PROLINE - Free user manual and instructions
Find the device manual for free W850 PROLINE in PDF.


| Product Type | Freestanding Washing Machine |
| Brand | Proline |
| Model | W850 |
| Capacity | 7 kg |
| Maximum Spin Speed | 1200 rpm |
| Energy Efficiency Class | A++ |
| Height | 85 cm |
| Width | 59.5 cm |
| Depth | 54 cm |
| Weight | 68 kg |
| Voltage | 220-240 V |
| Water Consumption per Cycle | 50 L |
| Noise Level (Wash/Spin) | 56 dB / 76 dB |
| Number of Programs | 15 |
| Programs Included | Cotton, Synthetics, Delicates, Wool, Quick 15', Eco, Rinse & Spin, Spin Only, Drum Clean |
| Features | Delay Start (1-24h), Child Lock, Anti-Unbalance, Foam Control |
| Display Type | LED with Cycle Status |
| Drum Material | Stainless Steel |
| Maintenance | Clean Pump Filter Monthly, Descaling every 3 months |
| Safety | AquaStop Anti-Flood System, Overheat Protection |
| Spare Parts Availability | Control Board, Door Seal, Pump, Belt, Heating Element, Shock Absorbers |
| Type of Installation | Freestanding, Requires Water Inlet and Drain Hose |
Frequently Asked Questions - W850 PROLINE
User questions about W850 PROLINE
0 question about this device. Answer the ones you know or ask your own.
Ask a new question about this device
Download the instructions for your Washing machine in PDF format for free! Find your manual W850 - PROLINE and take your electronic device back in hand. On this page are published all the documents necessary for the use of your device. W850 by PROLINE.
USER MANUAL W850 PROLINE
Operating Instructions
natural_image
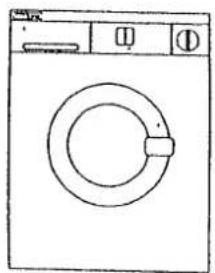
Line drawing of a washing machine with front panel and side control buttons (no text or symbols)Washing Machine W 850 - W 1000
Contents
Specifications....1
Installation....2
Electrical connection
How to remove the shipping rods
How to install your machine
Filling hoses - Drain hose
Controls 4
Detergent dispenser
1/2 Load button
On/Off button
Indicator light
Programme selector control
How to Use your Washing Machine ....5
Sorting the Washload
Loading the drum
Using detergents, softeners & additives
Selecting a programme
Start-up
Stop
Some Useful Hints on Clothes Care ...8
Woollens
The treatment of stains
Labels
Drying
Programme Guide ....10
The programme
Maintenance....11
1
Before you call for Service....12
Do's and Don'ts 13
We are pleased to learn that you have chosen a model from the Proline range.
This booklet will teach you how to install and operate your machine, and give you some useful hints – this will help you to obtain the best wash results.
Read this booklet carefully as it covers basic information for safety of installation, operation and maintenance.
You'll find a list of checks to be performed before operating your machine for the first time.
Follow all directions carefully and you will see that your machine is very easy to operate and offers up to date features.
Take care of this booklet and refer to it when necessary.
Specifications
For proper installation and safe operation, please take into account the machine specifications – which are listed on the technical data plate situated on the rear of your machine along with its identification code.
Specification
Electrical Connections
The washing machine must only be used from a 240 volt AC supply. The machine must be fused by either a 13 amp fuse in the plug or a 15 amp fuse in the supply.
Important
The wires in the mains lead on this appliance are coloured in accordance with the following code (fig. 1).
Green and Yellow .... Earth Blue .... Neutral Brown .... Live
As these colours may not correspond with the markings identifying the terminals in your plug, proceed as follows:
The green and yellow wire must be connected to the terminal in the plug which is marked with the letter "E" or with the earth symbol or coloured green or green and yellow.
The blue wire must be connected to the terminal marked "N" or coloured black.
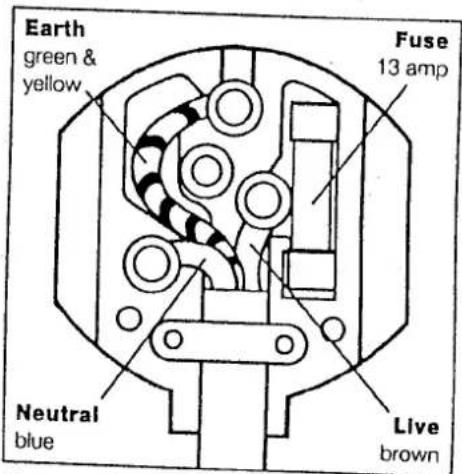
Figure 1
The brown wire must be connected to the terminal marked "L" or coloured red.
Warning
This appliance must be earthed
The appliance complies to MD 89/336 (EEC Regulation 82/499) covering radio interference If the plug that is fitted to your appliance is not suitable for your socket outlet, it must be cut off and the appropriate plug fitted.
The cut off plug should be disposed of to prevent the hazard of electric shocks, in case it should be plugged into a 13 amp socket in another part of your home.
If the plug fitted is the moulded on type, the fuse cover must be refitted when changing the fuse using a 13 amp ASTA approved fuse to BS 1362. In the event of losing the fuse cover, the plug must not be used until a replacement fuse cover has been obtained and fitted. A new fuse cover can be obtained from your nearest electrical dealer. The colour of 'the correct replacement fuse cover is that of the coloured marks or inserts in the base of the plug.
The manufacturer declines any liability should this safety measure not be observed.
Caution - Do not connect the plug to the mains until the transit rods have been removed.
Installation
How to remove Transit Rods
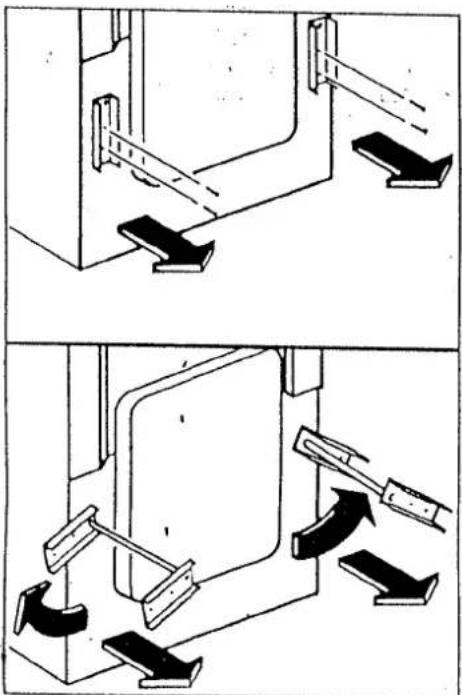
- With the aid of a spanner or screwdriver, remove the four screws, (two for each rod), from the machine rear (fig. 2).
- Turn the rods approximately 45^ outwards and withdraw them from the machine (fig. 2).
- Refit the screws into the four holes and push fit the plastic closures, supplied with the machine, into the holes from which the rods have been removed from.
We recommend you keep the transit rods as they must be used if the machine has to be transported.
Positioning and Levelling
To keep vibration, noise and movement to a minimum, it is essential that the machine is absolutely level. Check this with the aid of a spirit level when the machine is in its permanent operating position.
Any adjustments needed can be made by raising or lowering the two adjustable feet at the front of the machine – you merely screw them up or down (fig. 3).
Important Note: Dispose of polyethylene wrapping to avoid the risk that children may be suffocated.
natural_image
Technical diagram showing two mechanical assembly steps with arrows indicating motion (no text or symbols)Figure 2
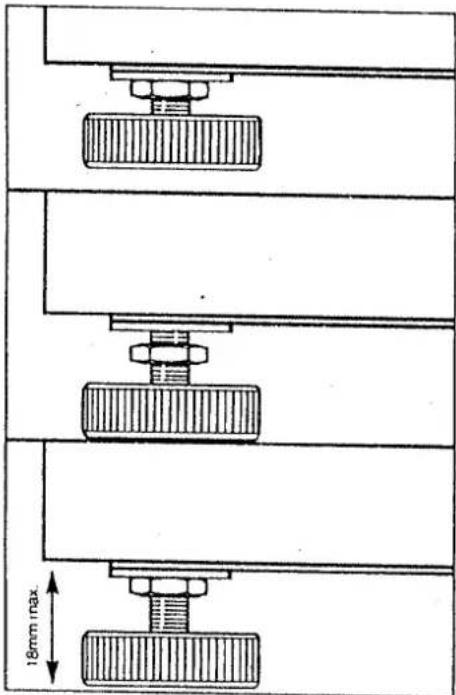
Figure 3
Filling Hoses
- Before connecting the hoses, insert the sealing washers supplied, into the hose coupling (Fig. 4).
- When attaching the hoses, ensure correct connection to hot and cold water supplies as indicated in Fig. 4 below, and on the machine.
- The following water pressure values will ensure proper operation of the machine:
Water pressure minimum N/cm² 5 - 0.5 bar
Water pressure maximum N/cm² 100 10 bar
Do not install your machine in places where the temperature might drop below 0°C.
Drain Hose
The drain hose must be either connected to a plumbed outlet or hooked securely over the edge of the sink. If hooked over the edge of the sink, it is important that the sink is kept clear of all items that will prevent the water from draining away (e.g. dishcloths, etc).
If a plumbed outlet is used, the pipe should be at least 1.5", (4 cm), inside diameter, also it should be between 20", (51 cm), and 34", (86 cm), above floor level (fig 5).
Finally, make sure that, with the machine in position, the drain hose is not obstructed, blocked or bent so sharply that water cannot flow freely.
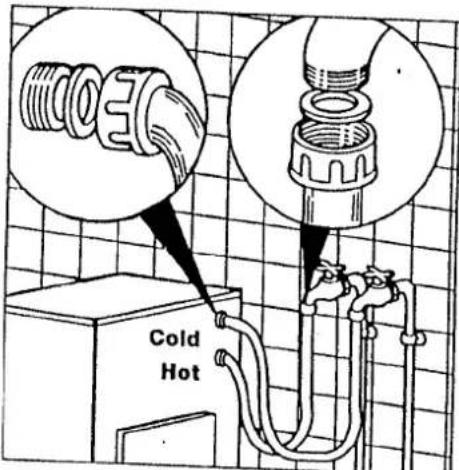
Figure 4
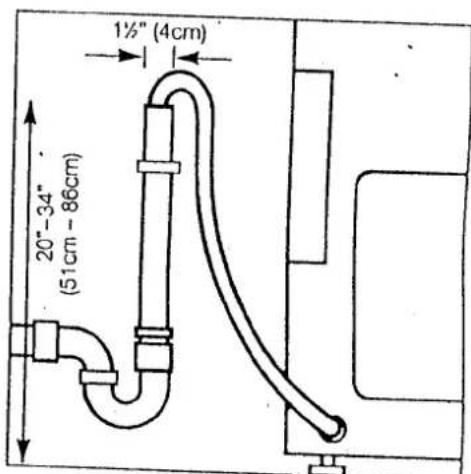
Figure 5
Controls
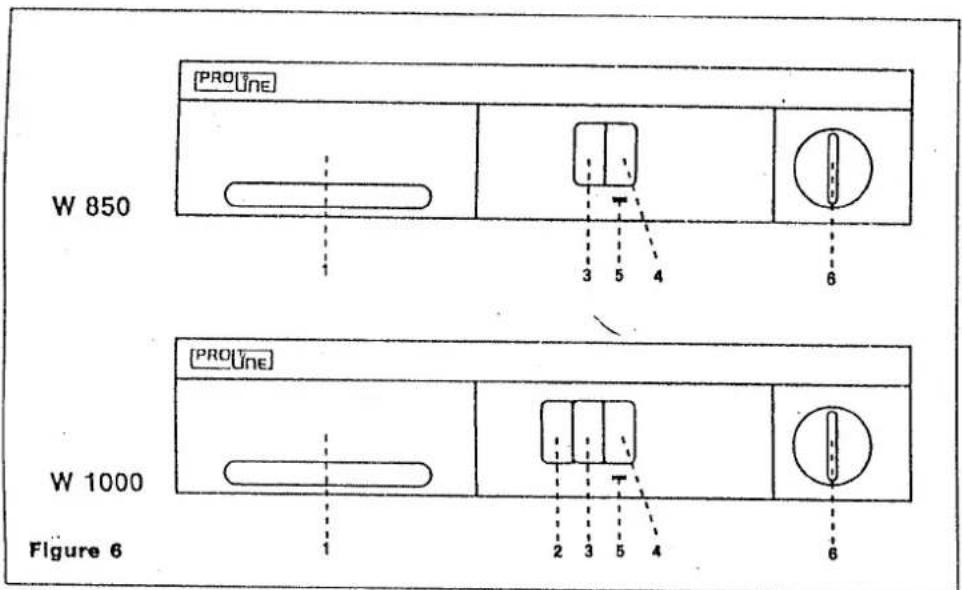
1. Detergent Dispenser
A programme guide is printed on the front of the detergent dispenser in words and international symbols.
For detergent type and amount, please see the "How to use your Washing Machine" section.
2. Spin select button
By depressing this button, the final spin speed will be reduced to approximately 1/2 speed during vigorous programmes.
Do not press this button whilst the machine is spinning, to avoid the risk of damaging the motor.
1
3. Half load button
Designed for small loads (about 3.5 kg of white cottons or 1kg of delicates). By depressing this button, the amount of water is reduced during washing and rinsing, thus saving electricity, detergent and water. A smaller quantity of detergent should be used than with a normal wash.
This feature cannot be used for the "Pure New Wool" programme.
4. "ON/OFF" Button
Press the ON/OFF button in to start the programme. After a few seconds, the door will lock mechanically and a light will come on to indicate that the machine is working. To stop the machine, press this button again.
5. Indicator Light
Mains indicator light indicates that the machine is on, ("ON/OFF" switch is depressed).
6. Programme Selector control
This is used to select the programmes described in the "Programme Guide"
Always turn in a clockwise direction. Do not turn the control whilst the machine is operating, to avoid the risk of damage to the machine.
How to Use your Washing Machine
A. Sorting the Washload
Sort the clothes according to the type of fabric, colour fastness and degree of soiling.
If you do not have sufficient items from one fabric category for a full load, then some fabrics may be mixed, e.g. cottons and polycottons. However, always use the lower temperature programme if the recommendations for the two fabrics are different.
Check the wash care garment label which will indicate the correct wash programme to be used. The wash care symbol should have a number in a wash tub and a recommended wash temperature which should correspond to the symbols printed on the machine detergent dispenser and programme guide.
It is, however, advisable that white cotton and linen should be washed at a high temperature every third or fourth wash to maintain the colour.
If you cannot make up a full load of cotton and linen, the half load button can be selected.
For the best washing results, never overload the machine. As a guide, the following maximum weights are recommended, (dry weights):
| Cotton Fabrics | 4.5kg | (10lb) |
| Synthetics | 2.0kg | (4.5lb) |
| Machine Washable Woollens | 1.0kg | (2lb) |
B. Loading the Drum
Each article should be shaken and loaded into the drum separately and alternated between large and small items. Ensure all pockets are emptied, buttons and zips are fastened, avoid washing frayed or torn articles.
Any stained articles should be pre-treated before washing. (Please see treatment of stains).
C. Using Detergent, Softeners & Additives
(Steps to be performed when the machine is switched off).
Always use a low lather automatic washing machine detergent. Special detergent should be used for woollens. To obtain the best results, use the recommended detergent amounts which take into account average washing conditions.
Detergent amounts should match the size of the load and the degree of soiling.
For special cases, the following criteria should be adopted:
a. Increase the recommended detergent quantity if the articles are very soiled and the water is very hard.
b. Reduce the recommended detergent quantity if the articles are slightly soiled, washing cycles very short, (e.g., for synthetics), water very soft or softening agents are used.
c. Reduce the quantity of detergent by 25% whenever the half load button is depressed.
Conditioners or additives such as bleach can be added if required, taking care to follow the manufacturer's instructions. The level of the liquid inside the Conditioner and Additives compartments "C" and "D" should not exceed the maximum mark level. If liquids are very thick, dilute them with water before pouring them into the compartment.
Put detergent and additives into the compartments, (fig. 7), as recommended in the "Programme Guide":
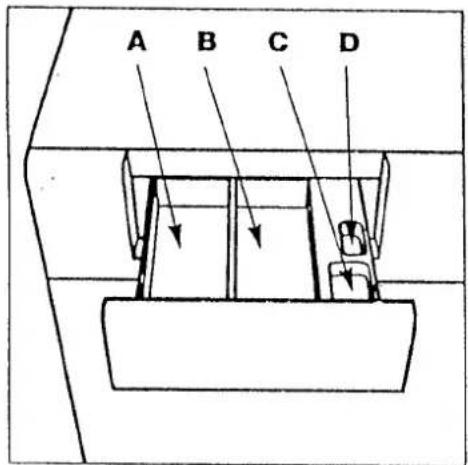
Figure 7
Compartment "A": Pre-wash (powder)
Compartment "B": Wash (powder)
Compartment "C": Softener or Conditioners (liquid)
Compartment "D": Additives (liquid)
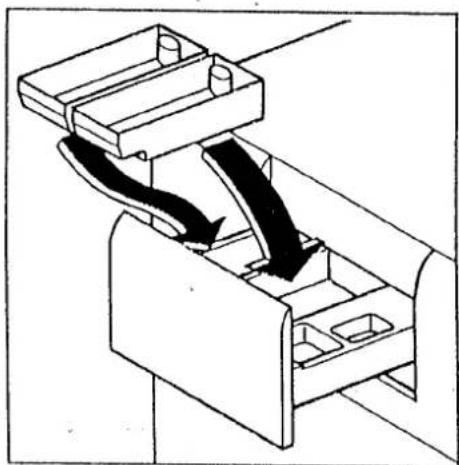
Liquid Detergents
Special liquid adaptors are available as an optional extra for use with liquid detergents. Pour the detergents into compartments "A" and "B", (fig. 8), as below.
natural_image
Mechanical assembly diagram showing two connected components with directional arrows indicating motion (no text or symbols)Figure 8
D. Selecting a Programme
Always select a programme which best suits the load you are about to wash.
As a guide, if a garment has a label with a number one in the wash tub, the garment could be washed on programme 1, (with pre-wash), or programme 2, depending on whether the article is lightly or heavily soiled. Where garments have no labels, choose an appropriate programme for the fabric and, if you are in any doubt, always choose a gentle wash programme to avoid clothes damage.
Care should always be taken with coloured garments unless they are specifically labelled colour fast, non-colour fast garments should be hand washed separately or washed on the non-fast coloured programme.
Refer to the programme guide for further assistance and turn the programme selector to the programme number suggested.
Do not move the knob while the washing cycle is in progress. If necessary, switch off the machine before attempting to move the control.
Always turn the Programme Selector control clockwise.
Should your washing machine stop for any reason, (for instance, power failure), during the final spinning phase, switch off the machine and select the spin programme.
To select the Half Load option, press the button mentioned in the "Controls" section.
E. To start the machine
- Open the water taps.
- Connect the plug to the socket.
- Check that the drain hose is arranged in a proper manner.
- Turn the programme selector control to the desired wash programme.
- Press the ON/OFF button and the machine will carry out the pre-selected programme.
After a few seconds, the mains indicator will light. An electromechanical interlock will prevent the door from opening whilst the machine is working.
F. To Stop the Machine
At the end of the cycle, the Programme Selector Control will finish in the STOP position. To open the door at the end of the cycle or at any time, act as follows:
- Switch the machine off by depressing the "ON/OFF" button.
- After about two minutes, the door safety interlock will release.
- Pull the handle to open the door.
Do not attempt to open the door with water still in the drum.
Caution! The temperature of the Door Glass Bowl might exceed 60°C.
Some useful hints on Clothes Care
Woollens
The machine has a wool programme, specially designed and certificated for woollens marked "PURE NEW WOOL", or by the label "Unshrinkable Machine Washable". All other woollens should be cold washed.
The Treatment of Stains
Some stains will not be removed in the wash. It is wise to treat them before laundering. Treat stains promptly. Many stains can be loosened by soaking the article in cold water. Most common organic or food stains will be removed by the action of your machine.
Some stains need to be specially treated with a solvent before washing. If you are not sure whether the material will withstand the solvent, we recommend you:
• Firstly treat an inconspicuous part of the material with the stain remover.
• After treatment, rinse the article with plenty of cold water.
The following information will help you to remove specific stains.
Ink and Ballpoint Pen
Sponge with methylated spirit or 90° spirit.
Tar
Spread the stain with fresh butter, wait for a while, then sponge with oil of turpentine. Alternatively, sponge with a household cleaning fluid then rinse promptly using the recommended programme.
Candle Wax
Scrape off wax then place the affected part between two pieces of clean absorbent pad and hot iron it. Sponge with turpentine or methylated spirits.
Chewing Gum
Hold an ice cube against the gum until it can be crumbled away.
Iron Rust
Delicate or synthetic clothes: apply lemon juice or hydrogen peroxide for 15 minutes, then rinse. Other fabrics: soak the items in a water and bleaching solution. In both cases, before attempting to remove the stain check that the fabric will not fade.
Mildew
White cottons and linen: rinse in a solution of bleach, vinegar and water in the following proportions: one part of liquid bleach, five parts of water, one teaspoon of vinegar then rinse promptly using the recommended programme.
Other white delicate fabrics: apply 10 volume hydrogen peroxide then wash promptly
Lipstick
Wool or cotton fabrics: sponge with ether.
Silk
Sponge with trichloroethylene.
Nail Enamel
Lay the item over a clean absorbent pad with the stain facing the pad, and wet with nail varnish solvent until the stain has gone.
Grass
Sponge with methylated spirit.
Warning - Having eliminated the stains, wash the clothes before having them machined dried.
Keep all chemicals out of the reach of children.
Drying
Avoid drying woollens, silk, embroideries and articles which do not stand rubbing. To obtain the best drying results, allow for
free circulation of air within the laundry. To this purpose, check that the laundry is properly arranged at the end of the washing programme. If tangled, rearrange it.
Wash Label Guide
Labels
Many articles have labels giving washing instructions. A brief description of the most common symbols is given in the adjacent table.
| Wash | |
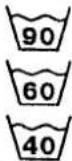 | 90°, 60° and 40° wash (max) |
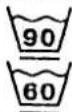 | gentile tumbling and spin rinsing by progressively dropping temperature |
 | gentile tumbling, normal wash, gentle spin |
 | very gentle tumbling, normal wash, gentle spin |
 | wool wash (broken bar) |
 | hand wash |
 | unwashable |
Bleaching

bleachable

unbleachable
Ironing

hot
selling

warm
selling

cool
selling

do not iron
Solvents

all
solvents

all solvents except for tri-chloroethylene

pelrol
nd R113
only

dry
cleaning
not admitted
Drying after Washing
tumble-dryer

high temperature

low temperature (60°C max)

not to be
machine dried
Programme Guide
| Internal Symbol | Prog. No. | Description of Symbol | Wash Temp°C | Detergent Compartment | |||
| A | B | C | D | ||||
| 1 | Whites with pre-washPre-wash at 40° Vigorous washat 95°, Four rinses, optionalsoftening, perfuming, spin.For robust fabrics (cotton, linen,etc.), heavily soiled. | 90 | ● | ● | ● | ● | |
| 2 | WhitesVigorous wash at 95°, four rinses, optional softening,perfuming, spin. For robust fabrics (cotton, linen,etc.),normally soiled. | 90 | ● | ● | ● | ||
| 3 | Fast ColouredaVigorous wash at 60°, four rinses, optional softening, spin.For robust fabrics (cotton, linen,etc.), normally soiled. | 60 | ● | ● | |||
| 4 | Non-fast ColouredaNormal wash in cool water,optional softening, four rinses,spin. For robust fabrics (cotton,linen, etc.), lightly soiled. | 40 | ● | ● | |||
| 5 | Cold WashNormal wash in cool water,optional softening, four rinses,spin. For robust fabrics (cotton,linen, etc.), lightly soiled. | 30 | ● | ● | |||
| 6 | Cotton RinseFour rinses, optional softening,optional perfuming, final spin. | 30 | ● | ● | |||
| 7 | Short RinseThree rinses, optional softening,final spin. | 30 | ● | ● | |||
| 8 | Special TreatmentsAdd softener, final spin. | 30 | ● | ||||
| 9 | Full SpinFinal spin only. | - | |||||
| Internal Symbol | Prog. No. | Description of Symbol | Wash Temp °C | Detergent Compartment | ||
| A | B | C | ||||
| 10 | Delicates Delicates 60" wash, three rinses, optional softening, short final spin. For delicate fabrics (nylon, polyester). | 60 | • | • | ||
| 11 | Minimum Iron Gentler 50" wash, three rinses, optional softening, short final spin. For coloureds in nylon, polyester or mixed cotton. | 50 | • | • | ||
| 12 | Mixed Wash Short normal wash at an automatically set temperature, optional softening, three rinses, final short spin. Suitable for moderately dirty items. | 40 | • | • | ||
| 13 | Delicate Rinse Three rinses, optional softening, final short spin. | 30 | • | • | ||
| 14 | Short Rinse Two rinses, optional softening, final short spin. | 30 | • | |||
| 15 | Special Treatments Add softener, final spin. | 30 | • | |||
| 16 | Delicates Spin Final spin only for delicate fabrics. | |||||
| 17 | Woollens Gentle wash, 3 rinses, optional softening, short final spin. For woolens, silk. It is advisable not to wash more than 1kg of woolens marked "machine washable". | 40 | • | • | ||
| 18 | Rinse/Spin Rinse with softener added, short final spin. | 30 | • | |||
The Programme
Use this Programme Guide to help you to chose the right programme.
To reduce wash times and costs and improve fabric life, select low temperature programmes as far as is possible according to type of fabric.
Synthetics, either mixed or delicate, must be washed on delicate programmes. No more than 3 kg of delicate articles or 1 kg of wool or silk should be washed.
Maintenance
All maintenance operations are to be made after disconnecting the plug from the electrical socket.
General Care
After each wash programme, the machine door should be left ajar for approximately 1½ hours to allow fresh air to circulate through the drum.
The glass door dome and rubber door seal should be wiped over to remove excess water.
The cabinet should be cleaned using a soft cloth with a mild liquid cleaner and warm water. Periodically, apply a wax based car or furniture polish to maintain the paint finish. Plastic surfaces can be cleaned with a non-abrasive cream household cleaner. Never use abrasive cleaners as they will damage the painted and plastic surfaces.
Cleaning and Removing the Detergent Dispenser
Wipe out the dispenser after each wash. If detergent deposits build up in the dispenser, it should be removed and cleaned under running water.
To remove the dispenser drawer completely, simply withdraw fully and press the base upwards and pull clear of the dispenser. Replace in reverse order.
Before you call for Service
If your machine is not working efficiently, before you call for service it is advisable to check for the following:
If the Machine Does not Operate, check that:
The plug is connected.
The door is properly closed.
The ON/OFF button is depressed.
• The programme selector control is not set at STOP position.
• The home electric fuse or R C C B has hot tripped out.
If the Machine Does Not Drain, make sure that:
• The drain hose is not kinked or bent and is at a proper level (Fig. 5).
If the Machine Does Not Fill with Water check that:
• The taps are turned on.
• The filling hoses are not kinked.
If the machine vibrates or is noisy, make sure that:
It is stable. If it is not level, this problem is addressed under "Installation section".
• Nothing has fallen between the wall and the machine.
• The transit rods have been removed.
If the appliance still does not operate please contact your nearest Comet Service Centre. A number can be obtained from the Yellow Pages, or by ringing one of the following Hotline Numbers:
Scotland 0345 506070.
Rest of UK 081 466 4066
Do's and Don'ts
DO make sure machine stands level.
DO make sure transit rods are removed.
DO make sure your sink outlet is not blocked.
DO make sure that the end of the drain hose is above the level of water in the sink during emptying. If your sink is shallow or slow in emptying, hook the drain hose around one of the taps. This is important as, otherwise, water may syphon back into the machine.
DO make quite certain that you only use a low lather washing powder in your machine.
DO make sure the door and dispenser drawer are fully closed and that the door has latched securely, before starting your wash.
DO make sure that, before opening the door, the machine is empty of water and that the programme is completed.
DO turn off the machine after all your washing is finished.
DO turn off both water taps fully when your machine is not in use.
DO ensure that small articles of clothing are pushed to the rear of the drum when loading or place all small items, socks, tights, etc., in a pillow case or net bag before placing in the drum. This keeps them together and avoids loss.
DO empty pockets before washing clothes to avoid damage to your wash or machine.
DON'T allow the drain hose to kink as this could stop the machine from emptying.
DON'T leave wash powder in the dispenser for any length of time. It may form lumps which will be difficult to dissolve and you will not get a good clean wash when you use your machine.
DON'T forget that the machine has a safety door lock – refer to the section "How to Use your Washing Machine", Section F.
DON'T place any clothes which have been treated with dry cleaning fluids, sprays or inflammable liquids such as petrol in the machine, for any reason until they have been thoroughly dried in the open air.

Alpha OB 1072
36438028202
T.C. 1935
- Operating Instructions
- Contents
- We are pleased to learn that you have chosen a model from the Proline range.
- Take care of this booklet and refer to it when necessary.
- Specifications
- Specification
- Electrical Connections
- Important
- Warning
- Installation
- How to remove Transit Rods
- Positioning and Levelling
- Filling Hoses
- Drain Hose
- Controls
- Detergent Dispenser
- Spin select button
- Half load button
- "ON/OFF" Button
- Indicator Light
- Programme Selector control
- How to Use your Washing Machine
- Sorting the Washload
- Loading the Drum
- Using Detergent, Softeners & Additives
- Liquid Detergents
- Selecting a Programme
- To start the machine
- To Stop the Machine
- Some useful hints on Clothes Care
- Woollens
- The Treatment of Stains
- Ink and Ballpoint Pen
- Tar
- Candle Wax
- Chewing Gum
- Iron Rust
- Mildew
- Lipstick
- Silk
- Nail Enamel
- Grass
- Drying
- Labels
- Bleaching
- Ironing
- Solvents
- Drying after Washing
- Programme Guide
- The Programme
- Maintenance
- All maintenance operations are to be made after disconnecting the plug from the electrical socket.
- General Care
- Cleaning and Removing the Detergent Dispenser
- Before you call for Service
- If the Machine Does not Operate, check that:
- If the Machine Does Not Drain, make sure that:
- If the Machine Does Not Fill with Water check that:
- If the machine vibrates or is noisy, make sure that:
- Do's and Don'ts
Brand : PROLINE
Model : W850
Category : Washing machine