
Icewing 5 Pro - Composant de refroidissement pour ordinateur DeepCool - Free user manual and instructions
Find the device manual for free Icewing 5 Pro DeepCool in PDF.


| Product Type | CPU Air Cooler |
| Compatible Socket | LGA1700, LGA1200, LGA115x, AM5, AM4 |
| Dimensions (without fan) | 130 x 132 x 159 mm |
| Weight (without fan) | 680 g |
| Fan Dimensions | 120 x 120 x 25 mm |
| Fan Speed | 500 - 1850 RPM ±10% |
| Airflow | 68.9 CFM |
| Noise Level | ≤ 28.0 dBA |
| Bearing Type | Hydro Bearing |
| Rated Voltage | 12 V DC |
| Rated Current | 0.15 A |
| Power Consumption (fan) | 1.8 W |
| Maximum TDP Support | 200 W |
| Heatsink Material | Aluminum fins, copper heat pipes |
| Number of Heat Pipes | 5 |
| Heat Pipe Diameter | 6 mm |
| Base Material | Copper, nickel plated |
| Color | Black |
| LED Lighting | None |
| Warranty | 2 years |
Frequently Asked Questions - Icewing 5 Pro DeepCool
User questions about Icewing 5 Pro DeepCool
0 question about this device. Answer the ones you know or ask your own.
Ask a new question about this device
Download the instructions for your Composant de refroidissement pour ordinateur in PDF format for free! Find your manual Icewing 5 Pro - DeepCool and take your electronic device back in hand. On this page are published all the documents necessary for the use of your device. Icewing 5 Pro by DeepCool.
USER MANUAL Icewing 5 Pro DeepCool
This installation guide is applicable for all ICEWING 5 and KILLER WHALE series.
- All specifications subject to change without notice.
- Under no condition shall Deepcool be liable for any indirect, incidental or consequential damages arising from any defect or error in this manual or product.
- Please ask for professional help if you are not sure of safe installation.
- Installation manual in other languages is available on our website: www.deepcoolglobal.com.
警告声明:
natural_image
Technical line drawing of a computer fan with cooling fins and heatsink (no text or symbols)ICEWING 5 冰翼5
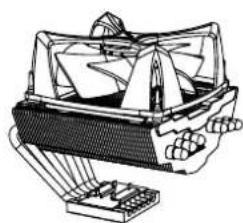
natural_image
Technical line drawing of a mechanical device with no visible text or symbolsKILLER WHALE 黑虎鲸
产品示意图
PRODUCT SCHEMATIC DRAWING
COMPONENTS LIST 零部件说明
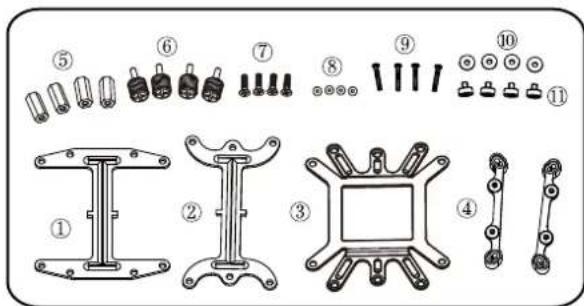
1) Retention Plate(Intel) 工型扣具UI 1PC
2) Retention Plate(AMD) 工型扣具UA 1PC
3) Back Plate 背板 1PC
4) LGA1366/1156 Retention Bracket 1366/1156转接架 2PCS
5) Hex-head Nut 六角螺母 4PCS
6) Thumb Screw 螺丝A 4PCS
7) Flat Screw 十字螺钉 4PCS
8) Washer 垫片A 4PCS
9) Panhead Screw 长十字螺钉 4PCS
10) Insulating Washer 绝缘胶垫 4PCS
11) LGA1366/1156 Rivet Nut 背铆钉 4PCS
INTEL LGA775 Installation 安装步骤
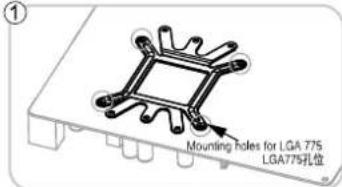
Put the back plate onto the back of the motherboard and insert the flat screws through the LGA775 mounting holes.
如图所示,放好背板,将十字螺丝穿过背板对应的LGA77S孔位。
natural_image
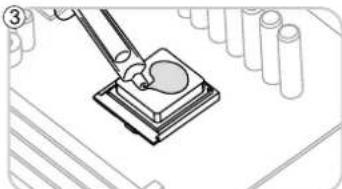
Diagram of a mechanical assembly with a tool interacting with a component, surrounded by test tubes (no text or symbols)Evenly apply a thin layer of thermal grease onto the processor.
将导热膏均匀涂在CPU表面。
natural_image
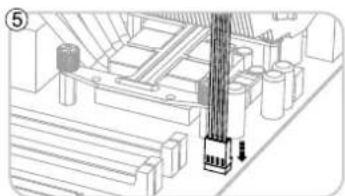
Technical line drawing of a mechanical assembly with no visible text or symbolsFinish the installation by connecting the fan cable to the motherboard.
将风扇插头插在主板相应位置,确认无误后完成安装
natural_image
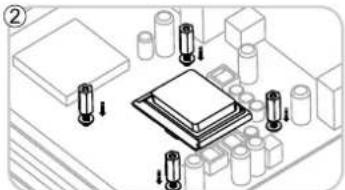
Isometric diagram of a microchip mounted on a circuit board with multiple cylindrical components (no text or symbols)Slip the washers on the flat screws protruding out of the motherboard, and thread the hex-head nuts on the screws to secure the back plate.
将垫片A装置穿过主板的十字螺钉上,然后用六角螺母锁紧背板。
natural_image
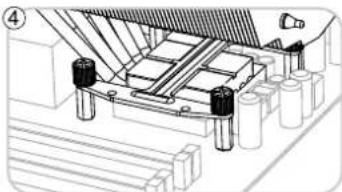
Technical line drawing of a mechanical assembly with no visible text or symbolsPut the heatsink onto the processor, and put the retention plate(Intel) across the heatsink base, then secure the heatsink by threading the thumb screws into the hex-head nuts.
将散热器放在CPU上,注意底部与CPU表面完全解除,然后放入工型扣具UI,使其LGA775孔位与六角螺母对齐,将螺母A穿过工型扣具,锁入六角螺母,用手拧紧。
AMD AM3/AM2+/AM2 Installation 安装步骤
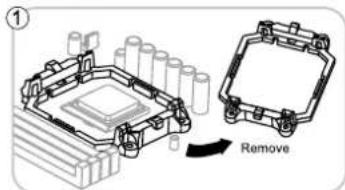
Remove the original retention frame from the motherboard.
将主板上原有塑胶框拆除。
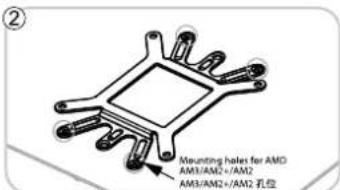
Put the back plate onto the back of the motherboard, insert the flat screws through the AM3/AM2+/AM2 mounting holes as circled.
如图所示,放好背板,将十字螺钉穿过背板对应的AM3/AM2+/AM2孔位。
natural_image
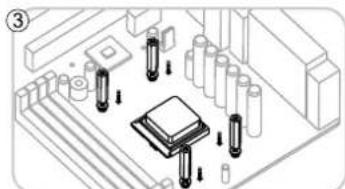
Isometric technical diagram of a microchip mounted on a circuit board with multiple pins and components (no text or symbols)Slip the washers on the flat screws protruding out of the motherboard, and thread the hex-head nuts on the screws to secure the back plate.
将垫片A装置穿过主板的十字螺钉上,然后用六角螺母锁紧背板。
natural_image
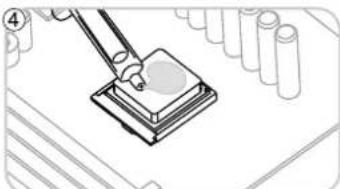
Illustration of a pipette dispensing liquid onto a sample block, with test tubes in the background (no text or symbols)Evenly apply a thin layer of thermal grease onto the processor.
将导热蓄均匀涂在CPU表面。
natural_image
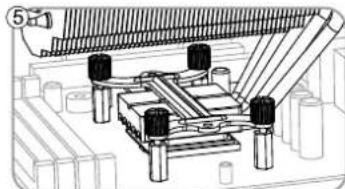
Technical diagram of a mechanical assembly with multiple components and mounting holes (no visible text or labels)Put the heatsink onto the processor, and put the retention plate(AMD) across the heatsink base, then secure the heatsink by threading the thumb screws into the hex-head nuts.
将散热器放在CPU上,注意底部与CPU表面完全接触,然后放入工型扣具UA,使其AM3/AM2+/AM2孔位与六角螺母对其,将螺母A穿过工型扣具,锁入六角螺母,用手拧紧。
natural_image
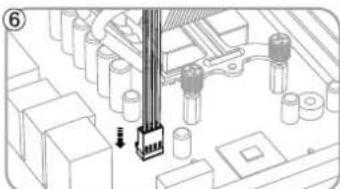
Diagram of a mechanical assembly with gears and a central component (no text or symbols)Finish the installation by connecting the fan cable to the motherboard.
将风扇插头插在主板相应位置,确认无误后完成安装。
INTEL LGA1366/1156 Installation 安装步骤
flowchart
graph TD
    A["绝缘胶垫<br>Including Washer"] --> B["警告钉<br>LEA/364/T154 Sheet"]
    B --> C["接头组件"]
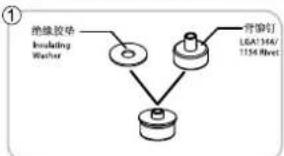
Peel off the film of insulating washer from one side and stick it onto the LGA1366/1156 rivets.
撕开绝缘胶垫一面胶纸,贴纸背铆钉上面
natural_image
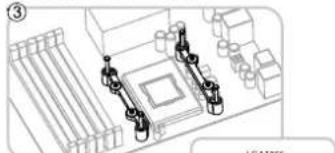
Technical line drawing of a mechanical assembly with no visible text or symbolsFasten the LGA1366/1156 retention brackets onto the motherboard by threading panhead screws into the LGA1366/1156 rivets.
natural_image
Technical diagram of a mechanical or electrical component with no visible text, numbers, or symbols.Put the heatsink onto the processor, and put the retention plate(Intel) across the heatsink base. 将散热器放在CPU上,注意底部与CPU表面完全接触,然后放入工型扣具UI,使其箭头所指孔位对准转接架键钉。
natural_image
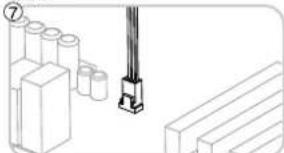
Technical line drawing of a mechanical assembly with numbered components (no text or symbols)Finish the installation by connecting the fan cable to the motherboard. 将风扇插头插在主板相应位置,确认无误后完成安装。
natural_image
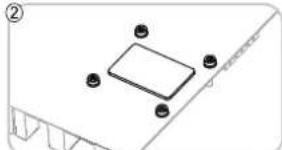
Diagram of a rectangular electronic component with four pins, placed on a base with no visible text or symbols.Peel off the other film of insulation washers, stick them onto the back of the motherboard. 撕开绝缘胶垫另一面胶纸,将背铆钉对准主板孔位放置,压紧。
natural_image
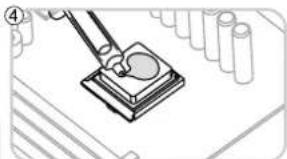
Diagram of a mechanical assembly with a tool interacting with a component (no text or symbols visible)Evenly apply a thin layer of thermal grease onto the processor. 将导热膏均匀涂在CPU表面。
natural_image
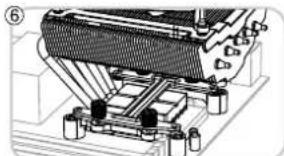
Mechanical assembly diagram showing a heat exchanger or cooling unit with cooling fins and cooling elements (no text or labels visible)Secure the heatsink by threading the thumb screws into the retention bracket. 用螺丝A穿过工型扣具对用孔位,锁入转接架铆钉,用手拧紧。
AMD K8 Installation 安装步骤
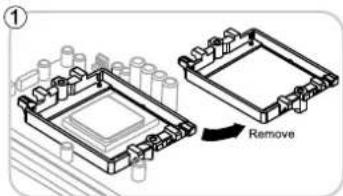
Remove the original retention frame from the motherboard.
将主板上原有塑胶框拆除。
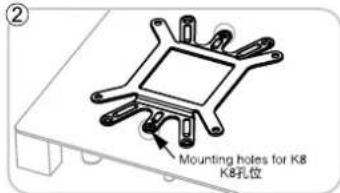
Put the back plate onto the back of the motherboard, insert the flat screws through the AM3/AM2+/AM2 mounting holes as circled.
如图所示,放好背板,将十字螺钉穿过背板对应的AM3/AM2+/AM2孔位。
natural_image
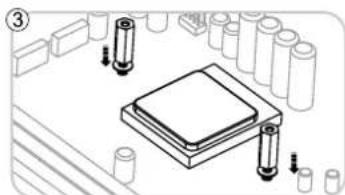
Diagram of a microchip assembly with cylindrical components and mounting holes (no text or labels)Slip the washers on the flat screws protruding out of the motherboard, and thread the hex-head nuts on the screws to secure the back plate.
将垫片A装在穿过主板的十字螺钉上,然后用六角螺母锁紧背板。
natural_image
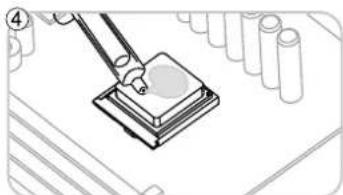
Illustration of a sewing machine needle stitching a layered block (no text or symbols)Evenly apply a thin layer of thermal grease onto the processor.
将导热膏均匀涂在CPU表面。
natural_image
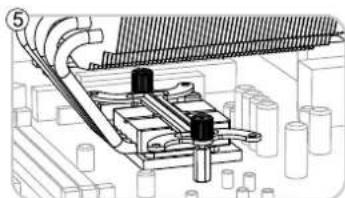
Technical diagram of a mechanical assembly with no visible text or symbolsPut the heatsink onto the processor, and put the retention plate(AMD) across the heatsink base, then secure the heatsink by threading the thumb screws into the hex-head nuts.
将散热器放在CPU上,注意底部与CPU表面完全解除。然后放入工型扣具UA,使其KB孔位与六角螺母对其,将螺丝A穿过工型扣具,锁入六角螺母,用手拧紧。
natural_image
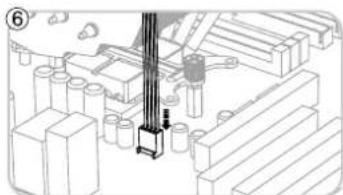
Technical diagram of a mechanical assembly with no visible text or symbolsFinish the installation by connecting the fan cable to the motherboard.
将风扇插头插在主板相应位置,确认无误后完成安装。
Brand : DeepCool
Model : Icewing 5 Pro
Category : Composant de refroidissement pour ordinateur