
TS8.4PND - Gps TELE System - Free user manual and instructions
Find the device manual for free TS8.4PND TELE System in PDF.


| Product Type | GPS Navigator |
| Brand | TELE System |
| Model | TS8.4PND |
| Screen Size | 8.4 inches |
| Dimensions (approx.) | 220 x 140 x 20 mm |
| Weight (approx.) | 350 g |
| Display Type | TFT LCD touchscreen |
| Battery Type | Rechargeable Lithium-ion |
| Battery Life | 4-6 hours depending on usage |
| Power Supply | 5V DC via USB cable |
| GPS Chipset | High-sensitivity (e.g., MediaTek) |
| Preloaded Maps | Yes, Europe region |
| Main Functions | GPS navigation, route planning, POI search, speed camera alerts |
| Internal Memory | 4 GB (approx.) |
| Memory Expansion | MicroSD card slot (up to 32 GB) |
| Connectivity | USB mini, Bluetooth (estimated) |
| Audio | Built-in speaker for voice guidance |
| Care Instructions | Wipe with a soft, dry cloth; avoid liquids and abrasives |
| Safety | Use only provided charger; do not disassemble; keep away from extreme temperatures |
| Spare Parts & Repairability | Contact TELE System or authorized service centers for parts and repairs |
| General Information | User manual available online at notice-facile.com |
Frequently Asked Questions - TS8.4PND TELE System
User questions about TS8.4PND TELE System
0 question about this device. Answer the ones you know or ask your own.
Ask a new question about this device
Download the instructions for your Gps in PDF format for free! Find your manual TS8.4PND - TELE System and take your electronic device back in hand. On this page are published all the documents necessary for the use of your device. TS8.4PND by TELE System.
USER MANUAL TS8.4PND TELE System
- RESET
- Connessione modulo antenna esterna GPS
- Pennino Touch Screen
- Altoparlanti
ATTENZIONE!
natural_image
Line drawing of a cylindrical device with a textured internal structure and a small circular component at the bottom (no text or symbols)
natural_image
Close-up of hands holding a black plastic clip device (no visible text or symbols)natural_image
Close-up of a hand inserting a black plastic clip into a car's grille (no visible text or symbols)natural_image
Close-up of hands installing or adjusting a black car air vent (no visible text or symbols)natural_image
Close-up of a hand adjusting a black plastic clip on a car airfoil (no visible text or symbols)natural_image
Close-up of hands installing or adjusting a black mechanical component on a blue surface (no visible text or symbols)natural_image
Close-up of a hand adjusting a black mechanical component, labeled Fig. and F), with no visible text or symbols on the device itself.natural_image
Interior view of a car dashboard and infotainment unit (no visible text or symbols)natural_image
Close-up of hands holding a black plastic component, no visible text or symbolsnatural_image
Close-up of a mechanical component with blue lighting, no visible text or symbolsnatural_image
Close-up of a hand holding a black plastic component with a small inset showing internal structure (no visible text or symbols)natural_image
Close-up of a hand adjusting a black car grille (no visible text or symbols)Dear customer, thank you for choosing this TELE System product.
If you would like to be informed of the latest updates, news and special offers available for your portable navigator TS 8.4 PND, register now at:
www.telesystem.it
SUMMARY:
Summary:
Safety regulations .... 1
Installation....4
Key and connections....4
Connection of the PND to the PC.... 11
Use of the PND 12
Start up 13
Destination.... 13
Favourites....20
Settings.... 22
Navigation mode....25
Navigation....25
Planning an itinerary 27
Optional features.... 29
Speed camera warning 29
Frequently asked questions 31
SAFETY REGULATIONS
Please read the following safety regulations for this product very carefully in order to ensure safe use of the appliance and personal safety.
VARIOUS
- The manufacturer can not be held responsible for any damages to property and/or people resulting from improper use of the TS 8.5 PND or from lack of attention paid to warnings and notes inserted in the technical documentation.
- The use of the navigator implies that the content of this manual has been accepted and observed.
- The manufacturer can not be held responsible for any violations of traffic regulations related to the use of the product.
- The map making data contained in the navigator could lead to discrepancies with actual itineraries, due to constant changes to the make up of streets. Some areas are characterised, for various reasons, by a larger map representation than others.
INSTALLATION
• Install the device when the vehicle is stopped and in safe conditions.
- Install the device so that it does not obstruct the drivers' vision and so that it can not cause any danger in the case of an accident.
- Check that the device does not interfere with airbags or other vehicle safety devices.
- Make sure that the device is firmly attached to the car support before starting the journey.
- TELESystem doesn't answer to any damages in any vehicle coming from installation or uninstallation of the car support.
WHILE DRIVING
- The driver of the vehicle is responsible for the correct use of the TS 8.4 PND
- The user must ignore the instructions given by the TS 8.4 PND if they are not compliant with traffic regulations.
- Do not listen solely to the vocal directions. These could be incorrect or badly timed. Always consider the directions given as advice and respect the road signs.
- Satellite navigators provide a simple aid to driving and navigation. Correct driving and choice of the best route are always the responsibility of the vehicle driver.
- While driving it is possible to receive vocal information such as: "Keep to the right" or "Turn right after 300 metres"; these indications come from map data which at times may not be pertinent with the actual street on which you are travelling. Pay particular attention to roundabouts or large intersections; vocal indications may not always be simple.
TELE System
- Do not distract yourself while driving to consult the navigator if this could put yourself or others in danger.
- Pull over to a stop as soon as possible to consult the navigator.
- Only carry out manual operations on the navigator when the vehicle is stopped.
- With optimal signal reception the precision of the GPS position has a guaranteed range of around 15 metres.
POWER CAR CABLE
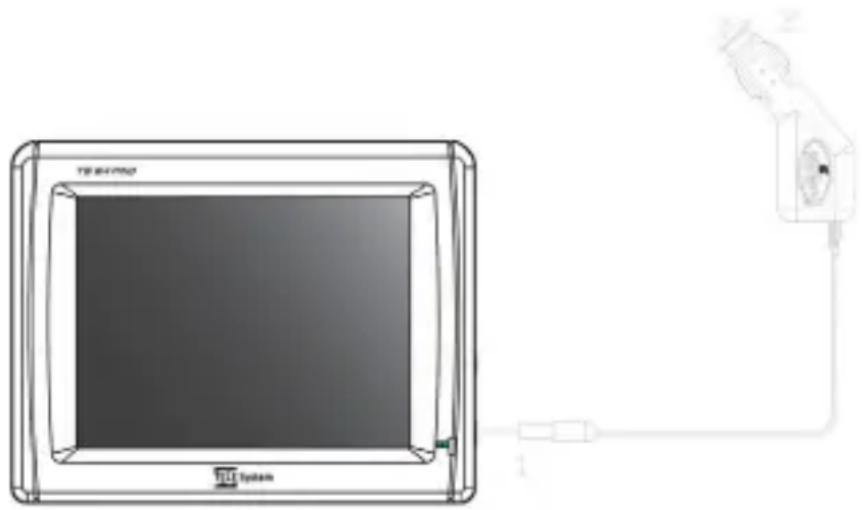
- Before installing the device check the power car cable to make sure it is suitable for use, paying particular attention to the area where it enters the power socket and to where it enters the device. If the cable is damaged do not connect the device and replace the cable.
natural_image
Diagram of a TV system with a cable and plug, no text or symbols present- If the cable is damaged, carefully disconnect the device from the power car supply and refer to a specialised person at the centre for assistance.
LIQUIDS
- Keep the navigator far from any liquids.
- The device must not be installed in areas where it could come into contact with sprays or splashes of liquid or in areas with high levels of humidity where condensation could occur.
- If the navigator should accidentally come into contact with liquids, immediately remove the power cable. DO NOT TOUCH the navigator until it has been disconnected.
CLEANING
- Remove from the power supply before cleaning.
- Use a soft, dry cloth to clean the outside of the navigator. Avoid use of chemical products or solvents
WARNING!
- Keep the device out of the reach of children.
- Plastic bags can be dangerous. To avoid suffocation keep the bags out of reach of children.
- If the device is used in very high temperatures an internal protection mechanism may activate causing the navigator to automatically turn itself off. This mechanism is necessary for the users' safety and to safeguard the batteries contained in the device.
- Do not dispose of the product in unauthorised places as this could cause damage to the environment and to human health. Proper disposal assists in the recycling of the components/materials contained in the product. Disposal of the product in unauthorised places is punishable according to Italian legislation no. 22/1997.
- The manufacturer has set up a WEEE recovery system for the product using separate collection and treatment systems with production plants that meet all current regulations

- Once the product can no longer be used it must be taken to a recycling centre which is authorised to handle electrical waste, as this can not be mixed with general waste. It is also possible to return the used product to its distributor or to return the no longer useable product when buying a new product of the same type.
WARNING!
TELE System Srl communicates, that eventual software or hardware modifies to improve the product, it should highlight some slight differences between this own User manual and the own product.
INSTALLATION Key and connections
Frontal

- Touch Screen
- Led indicator charging battery
Back

Back
- RESET
- GPS external antenna input
- Touch Screen Pen
- Speakers
WARNING!
Using the Reset key it will be erased all the costumer settings and recharged the factory setting.

- SD slot
- USB socket
- Power plugin
- Plug in jack audio earphone
- Plug in power car adapter
Battery Charging
At the first turning the device couldn't be completely charged, it's necessary, however, to recharge the battery before the use of the PND.
Charge the battery to connect the navigator with the AC car Adapter or with the USB cable plugged in to the running PC.
WARNING!
To extend the life of the battery he advises not to load it to high temperature (the device is endowed with an inside protection against the excessive temperatures however).
It is not necessary to unload completely the battery before doing the recharge.
To use with car adapter and to protect the PND from the possible sovratensionis during the auto's starting, we recommend to connect the cable when the engine has already turned on.
TELE System
Use of the PND in Auto
Installation of the air mount vent support (NEW)
TELESystem is pleased to show you a new installation support for your new navigator TS8.4 PND. Such support allows you a safe and comfortable drive, with full view on your windshield. Besides it can avoid damages on your car, because isn't so visible by thieves. In succession, we will show you the easy procedure for mounting it.
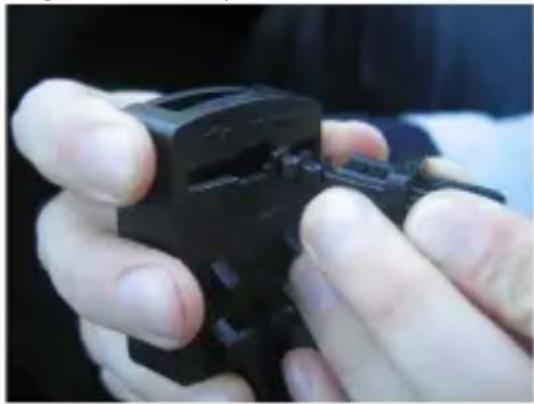
Fig. A)
natural_image
Close-up of hands holding a black mechanical device (no visible text or symbols)Remove the mobile rear hooks, shifting inwards. Then position them at will. We always advice to use the last step
Fig. B)

natural_image
Close-up of a hand holding a black plastic clip attached to a car's grille (no visible text or symbols)Proceed at the insertion as the picture shows, choosing the air vent on the left or on the right of the driver.
F i g .

natural_image
Close-up of hands installing or adjusting a black plastic component on a car intake hood (no visible text or symbols)Push carefully on the superior tab of the chosen air vent
C )

natural_image
Close-up of a hand adjusting a black plastic clip on a car's air vent (no visible text or symbols)Continue to push until the click of both hooks is heard

natural_image
Close-up of hands installing or adjusting a black mechanical component on a blue surface (no visible text or symbols)Shift properly the mobile superior clamps for a better balance
natural_image
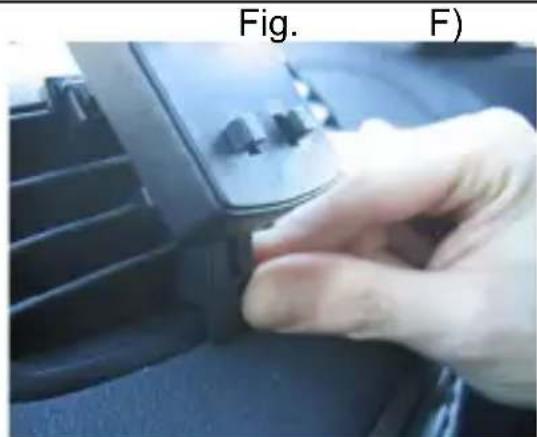
Close-up of a hand pressing a button on a car dashboard (no visible text or symbols)Position properly the mobile inferior lever for a better balance and ergonomics

natural_image
Interior view of a car dashboard with visible seats and a mounted device (no text or symbols)Clasp your navigator TS8.4 PND with the suitable holds of the cover
G )
Now you are ready to enjoy safely your TS8.4 PND. Have a nice trip!
WARNING!
The device had been deeply tested and again used in a normal drive. Anyway we advice to close or limit the cold/hot air from the chosen air vent.
Now we are going into the disinstallation of the support. Keep in mind, we advice to perform this operation only when it is necessary.
TELE System
Fig. H)

natural_image
Close-up of hands holding a black plastic component, no visible text or symbolsAfter have removed your TS8.4 PND, push a hook inwards of the base
Fig. 1)

natural_image
Close-up of a mechanical component with blue lighting, no visible text or symbolsRemove the hook from the base of the support and repeat the operation as fig. H) for the other hook
Fig. L)
natural_image
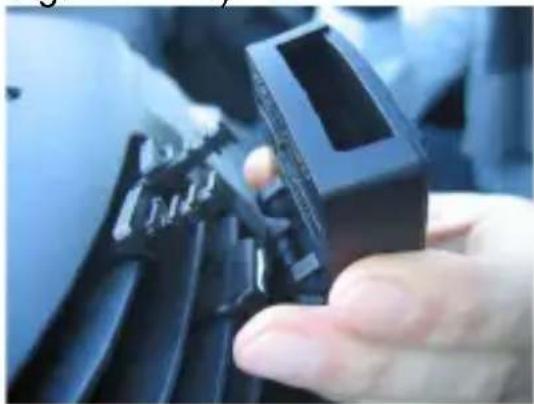
Close-up of a hand holding a black mechanical component, no visible text or symbolsRemove totally the base of the support
Fig. M)
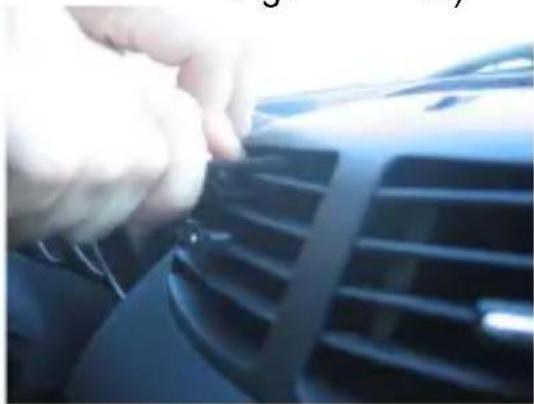
natural_image
Close-up of a hand adjusting a car grille with a black plastic grille (no visible text or symbols)Remove both the hooks from the air vent of your vehicle
Position the GPS antenna, for a best receipt of the signal GPS, parallel to the ground.
WARNING!
IF THE WINDSHIELD IS SCREENED, THE DEVICE COULDN'T LOCK THE GPS SIGNAL, IN THAT CASE WE RECOMMEND TO USE AN EXTERNAL GPS ANTENNA.
Connection of the PND to the PC
It is possible to connect directly the PND to your PC through the USB. To recognize the PND by the PC, it is necessary that in your PC is installed Microsoft® ActiceSync® that it allows the synchronization among the PC and the on Window Mobile based devices as your PND. Once connected PND, it will view as Mobile Device in My Computer and the SD card will view as the folder SDMMC. Save the files only in this folder.
Do not change the content of other folders displayed into Mobile Device to avoid damage into the SD Card and the device breakdown.
It is advisable to make the updates via a simple SD card reader. Insert the SD in the slot of the reader and download in only the TELE System updates (www.telesystem.it). In this way the update is fast and guaranteed. In the end, push the button RESET to make effective the update.
Use of the PND
Getting started
At the first switching turn the switch on ON, after few seconds it'll appear the presentation's screen followed a screen of the OSD language's choice. In case of block or answered not correct of the device, to effect a RESET. Once read and accept the conditions of use of the device it will be accessed the main Menu.
If it didn't have to start the navigation application: verify that the inserted SD card contains the correct files (eventually format the SD and reload the correct files); moreover if it didn't owe the audio to be present, verify the level of battery, if this had to be low, reload the battery and restart the PND.
While the navigation, a icon with the battery level appears on the up-right corner of the display.
WARNING! While you are using the navigator you remove and re-insert the SD card, a proper function of the navigator is not guaranteed anymore. In case, please press RESET button.
START UP
Turn on the device and position facing upwards, establish the first satellite connection. We advise you to attach the device to the car window screen using the provided support.
The satellite GPS search could take a few minutes when the device is activated for the first time or if the device is switched on again in a different area to that in which it was switched off.
- Turn the unit on and touch NAVI or NAVIGATION on the first screen.
- If the device has the option of choosing other languages you will be asked to make a selection.
After loading the application a screen will appear showing the safety regulations. Read these regulations carefully. It will then be possible to choose to not see the regulations again.
It will come visualized the menù of navigation.

Destination
This section allows the user of the PND to plan the destination of the itinerary or possible desired tappe.
Address
The address search allows to individualize an address through the immission of information on the desired destination (as the street, the country or the city). It will be therefore possible to select one of the results visualized in a list and to use the address for different purposes, for instance to individualize the destination on a map, to plan the itinerary and for the navigation.
TELE System
- On the screen to select the icon of the menu. It will visualize the Address window:
- Introduce the appropriate data to individualize the desired address.

Search mode
The personal navigation system offers a practical and interactive search function with automated spelling to avoid spelling mistakes. The user can only press certain buttons which will lead to a search result. All other buttons are inactive.
- Enter the first character.
Some keys on the keyboard will be deactivated, it will only be possible to use active keys:
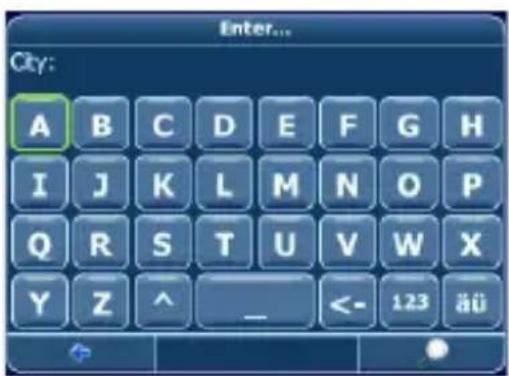
- Enter the second character.
On the basis of the choice made some keys will be deactivated.
- Continue to enter characters until the search is limited to a single result.
OR
- Press the search icon A list of results will appear.

- Choose the desired option from the list.
To pass from alphabetic to numeric mode press 123 or ABC. pass from upper case to lower case letters ^.
If at any time you want to delete a character, press the return key <- on the screen. To enter a space, press _.
Setting a county
- To select the required country press Country.
- Choose the country from the list.
The Country box will show the name of the chosen country.
Entering a post code
Post codes can be entered instead of city names.
• To enter a post code, press POST CODE.
The database does not contain post codes for all locations.
- Enter the post code of the required place or city.
- Press the search icon (magnifying glass).
A list of results will appear.
- Choose the required place or city from the list.
The address window will appear. The fields County and Post code will be filled in with the selected country and post code.
It is also possible to enter a post code of up to 7 figures. In this case it is not necessary to enter the street name.
City search
• To select a desired city press City.
- Search for the city following the procedure outlined above.
A list of results will appear.
- Select the required place or city from the list.
The address screen will appear again and the City field will be filled in with the name of the selected place or city.
Street search
• To enter the street name, select Street.
TELE System
- Search for the street following the procedure outlined above.
A list of results will appear.
- Choose the desired street from the list.
Note: do not enter the word “Street” but enter just one word which appears in the street name. For example: Via S. Benedetto → enter “Benedetto” and start the search.
The Address, screen will appear again complete with the selected data.
It is also possible to enter the house number, however, some house numbers may not be available
After having limited the search to a single address, it is possible to start the navigation process.
- Press the icon

The navigation map will show the address. It is therefore possible to choose to be directed to that address, to use it for the planning of an itinerary and so on.
- Press Navigate for planning an itinerary in base to the specified place
- Press Via to use the place for the itinerary.
- Press Save to save the place among the Blockmarks.
- Press On Map to visualize the place on the map.
Search and selection of points of interest
The POI Search allows the user to quickly identify points of interest present in the area, such as service stations and restaurants, chosen from a database of millions of points of interest situated in the area or other locations.
- On the navigation menu select Destination.
• Select Search POI .
A menu containing the various categories for points of interest will appear on the screen:
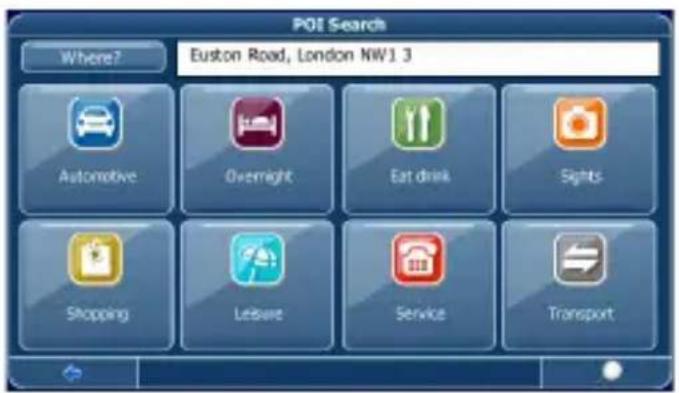
In the field Where? situated aloft on the screen, the place is visualized from which will set out the search. The place can be select:
- Press Address to plan the place through the address
- Press Favourites to plan the place among those saved among the Boolmarks.
- Press GPS position to plan the actual position as place for the search.
Selection of a point of interest
- Select the required category.
A menu showing the sub categories will appear.
- Select one of the sub categories.
A list of points of interests will appear. Simply touch the screen to select a point of interest.
- Press Navigate for planning an itinerary in base to the specified place
- Press Via to use the place for the itinerary.
- Press Save to save the place among the Boolmarks.
Detailed search within a category
- Once a category has been selected, rather than choosing an option present in the list it is possible to carry out a more detailed search: press the search icon. This takes you to the search mode which uses a Filter.
TELE System
- Enter a search word (of at least three characters) in the search window and activate the search by pressing the corresponding icon (the arrow on the right).
For example: If you are searching for a museum, write "MUS" in the search window..
A list of results will appear. Simply touch the location to select.
Map
Use of the map
The map is the principal component of the personal navigation system. Default settings will centre the map on the navigators' current position so long as a GPS connection is available. The map can be explored, obtaining information on the various locations viewed, which can also be chosen both for the itinerary and navigation.

Pressing Map, it will be entered to the map in visualisation/selection (v/s), where it is possible to explore the map freely without having it centered on the navigators' actual position.
Use a finger or specialised pen (for touch screen) to explore the map. The current position will be identified by a cursor.
To zoom in or out of the picture press the + or - icon. The zoom cursor will appear which can be used to zoom gradually in or out.
The compass icon (in the bottom left hand corner) allows the user to control the orientation of the map.
• To return to t/n mode, press the

• To exit the programme press

Select the wanted point on the map and press the icon , it will be possible to manage the point underlined by the cursor for the navigation:
- Press Navigate for planning an itinerary in base to the specified place
- Press Via to use the place for the itinerary.
- Press Save to save the place among the Favourites.
- Press Search to search points of interest (POI)
- Press Map option to modify the map settings.
Recent
Pressing Recent a containing list will be visualized the visited or recently looked destinations. On the screen it will be visualized the list of the recent objects.
Use the scroll bar to scroll through the list. Simply touch the screen to choose an option, so it will be possible:
- Press Navigate for planning an itinerary in base to the specified place
- Press Via to use the place for the itinerary.
- Press Save to save the place among the Blockmarks.
- Press On Map to visualize the place on the map.
Favourites
It's possible to set and to manage the favourite destinations, choosing between the home address, the work address, a list of bookmarks or the recently visited places.

Bookmarks
The list of Bookmarks contains the saved destination as Bookmarks. This means that it isn't necessary to carry out a new search for those destinations.
- Press Bookmarks.
On the display it will appear the list of bookmarks:
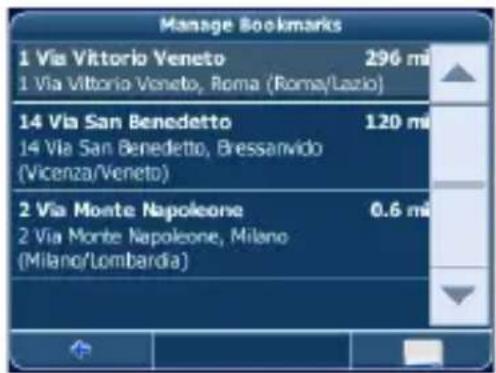
Use the scroll bar to scroll through the list. Simply touch the screen to choose an option, so it will be possible:
- Press Navigate for planning an itinerary in base to the specified place.
- Press Via to use the place for the itinerary.
- Press Sort to sort the list
- Press On Map to visualize the place on the map.
-
Press Delete selected to delete the selected item from the Bookmarks
-
Press Edit selected to rename the item
- Press Delete all to delete the whole list of bookmarks.
Recent
The list Recent contains the recently visited destinations. This means that it isn't necessary to carry out a new search for those destinations.
- Press Recent.
On the display it will appear the Manage Recent. Use the scroll bar to scroll through the list. Simply touch the screen to choose an option, so it will be possible:
- Press Navigate for planning an itinerary in base to the specified place.
- Press Via to use the place for the itinerary.
- Press Sort to sort the list
- Press On Map to visualize the place on the map.
- Press Delete selected to delete the selected item from the Bookmarks
- Press Edit selected to rename the item
- Press Delete all to delete the whole list of bookmarks.
Trips
Pressing the icon Trips 📄 Trips, on the display the saved itineraries will be appear.
Presets
This function allows to save the personal address (as Home or Work) to be able to manage and to organize itineraries in rapid way. If any address has not been planned, it will be asked for to perform this operation. It is possible to choose performing the search of an address, through the actual GPS position or selecting a recently visited place. Once planned, for instance Home, acting on the icon, it will be possible:
- Press Navigate for planning an itinerary in base to the specified place.
- Press Edit selected to rename the item
- Press Delete selected to delete the selected item from the manage Recent
- Press On Map to visualize the place on the map.
- Press Via to use the place for the itinerary.
- Press Delete all to delete the both pesonal addresses.
Settings
The personal navigation device can be set up according to the users needs. During navigation it is possible to choose to use or avoid toll roads or ferries or to select the desired method of transport (fast or slow car, motorbike, by foot and so on). It is also possible to change the various viewing modes, for example 2D or 3D, day or night view, complexity of the map and so on.
Select Settings, it will appear on the screen:

General options
Select General options to modify the general settings of the PND A window containing the various options will appear:
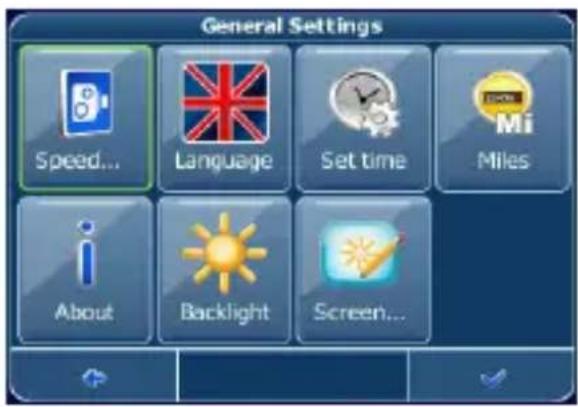
It is possible active/disactive the SpeedCam function, select the Time zone and set Distance Units (miles/km).
The time is set automatically by GPS signal.
Select Language to set the PND's used language. Once selected the language, it could be chosen the genre (male or female).
Besides it is possible to check the Version sw, to set the Light of the display and the Calibration of the touch.
Map settings
Choose Map settings to change the map options.
A window containing the various map options will appear:
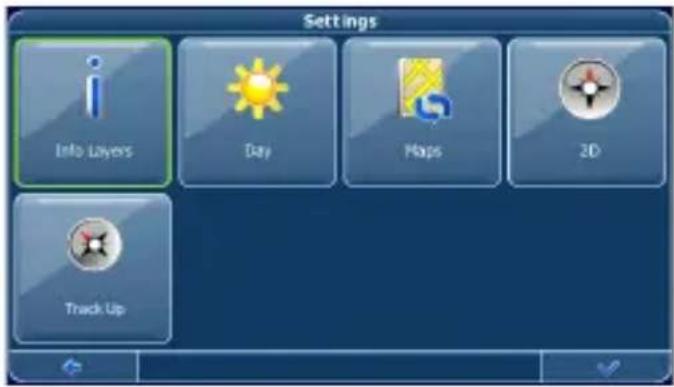
To choose the type of elements to visualize on the map to select Info Layers:
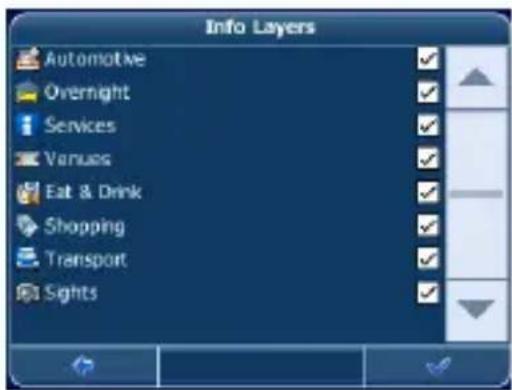
To view certain categories on the map select the corresponding box. Deselect those boxes corresponding to categories that don't need to be viewed on the map.
To switch from Night to Day view and viceversa, press the corresponding icon. If Automatic is selected, night/day view will be activated depending on the current time.
Choose Maps to select a map. If the memory card holds maps for other regions or cities touch the name of the desired region (for example, Iberia). A list of
TELE System
available maps will appear. To choose the desired region simply touch the name on the list.
Press the corresponding icon to switch from 2D view to 3D view and vice versa.
Select Track up to optimise the orientation of the map during navigation. Choose North Up to keep the orientation of the map towards North.
Press the confirm icon √ to apply the settings, or Press the arrow icon to return to the previous screen.
Itinerary options
Select Route Options to change the itinerary options. A window containing the various itinerary options will appear:
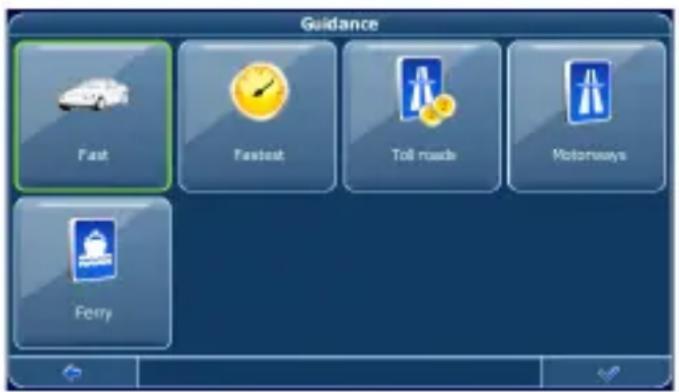
Simply touch the icons to switch from one mode to another. These will be activated and the active settings will be clear for the driver to see.
It is possible to choose between the following options: method of transport (fast or slow car, motorbike, by foot and so on), the quickest or shortest route, to use or avoid toll roads, motorways and ferries.
WARNING!
For example, the London Congestion Zone, in the center of the city, is considered a toll road as it is subjected to taxation. So if the user chooses to avoid tolled roads they will not be directed to this area. However, no warning will be issued if the user accidentally enters such an area.
After having chosen the desired options, press confirm to return to the main menu.
Methods of transport: overview
Fast: for fast driving. If this option is selected, the itinerary will favour motorways.
Slow: for slow driving. If this option is selected, motorways will be avoided in the itinerary.
Bike: cycling paths are preferred and the user can not select motorways as bikes are not permitted to travel on these roads.
Motorbike: if applicable, restrictions regarding motorbikes are taken into consideration.
Scooter: if applicable, restrictions regarding scooters are taken into consideration.
Bus: if applicable, restrictions regarding buses are taken into consideration.
Pedestrian: itineraries for pedestrians are provided including complete access to one way streets and pedestrian zones, if present.
Volume
To choose Volume to set the volume of the vocal cammands and eventually to exclude it.
Navigation mode
In t/n mode, the map will follow the current position of the navigator (GPS position), showing information on the geographic position, and speed etc.:
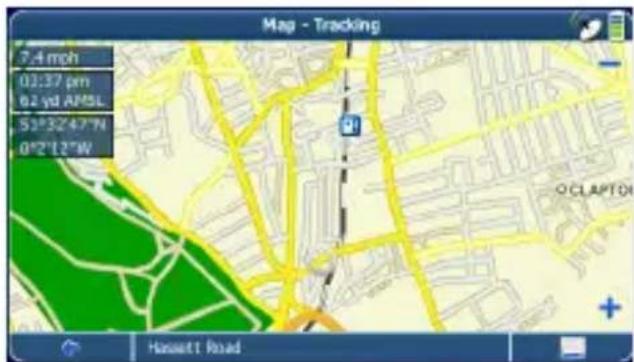
Navigation
The exceptional navigation functions of the smart2go™ allow the user to get from A to B using the shortest and quickest route, also providing vocal commands and 3D vision. This section will describe the navigation function.
Select a location either on the map or by using Destination, then press Navigate in the relative menu.
The location will be shown on the navigation map and the device will calculate the itinerary.
Navigation screen
The itinerary will be shown in blue on the navigation screen. The red arrow indicates the direction of the following manoeuvre, while the pointers indicate the
TELE System
current position. When there is a turn or any other type of manoeuvre a vocal command will be issued at the appropriate time. The direction of traffic on one way streets is indicated with a red arrow.
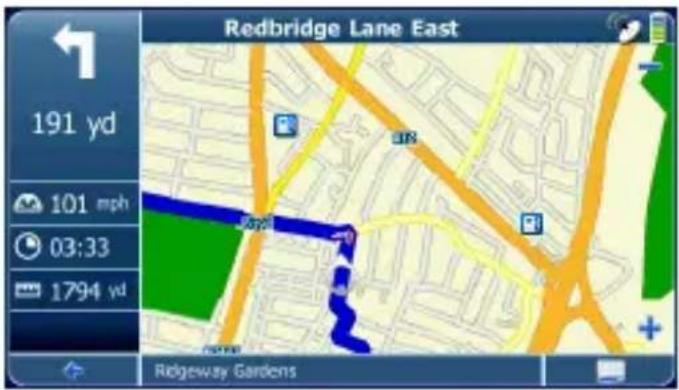
It is also possible to explore the map during navigation. This allows the user to select a new destination if they wish to change the itinerary. Navigation is not interrupted and vocal commands will still be issued. To follow the new itinerary on the screen, press the return icon.
Select the icon and you could view the navigation options:
Alternative route
This option allows the user to stop the itinerary created based on a specific distance (for example 0.5 km) and to use an alternative itinerary. Simply touch the icon which indicates the desired distance. A new itinerary will be created and the previous itinerary will be cancelled.
Waylist
Allows the user to view crossings along the route.
Save
Allows the user to save the current position among the favourites.
Volume
Press Volume to modify the volume of the vocal commands.
Search
Allows the user to reset their route by selecting a point of interest (POI), for example a service station.
- Press Map settings to change the map options.
- Press Route options to modify the driving settings.
- Press General options to modify the PND settings
All information such as Options, Favourites, and recently visited places is memorised on the memory card and not on the device.
Planning an itinerary
This section describes the functions of itinerary planning. This function allows the user to plan their route before leaving, setting up different stages along the journey
Select a location either on the map or by using Destination, then press Via on the relative menu.
A Destination list will appear:

The location will be added to the Destination List.
■ To add another stage, press the + icon.
The Select stage screen will appear. It is possible to select a stage such as home/work address or place of work, a favourite, point of interest, a recent destination, look for an address or identify a destination on the map.

After having added stages (by using the + icon) and being returned to the Destination List, it is possible to select various options:
■ The + icon allows the user to select more stages.
- To change the order of the stages, select a stage, then use the scroll bar to move through the list.
- The bin icon allows the user to delete a selected stage
After having chosen the itinerary it is possible to select various options. To view these options, press the menu icon (on the bottom left hand corner of the screen).

- Press Start navi to activate the navigation system. The display will show the navigation map.
• Simulate allows the user to simulate the planned itinerary. - Routing allows the user to elaborate on an itinerary. The Route summary screen will appear. Touch one of the Route summary options to delete the selected item.
- Save as allows the user to save and to rename the path.
OPTIONAL FEATURES
Speed camera warning
The speed camera warning function allows the user to identify and view the speed cameras situated on the route.
The main menu will appear.
- On the f screen select Options.
- Choose General options.
- Press Speed camera icon to activate the function.
A warning will be issued if there are speed cameras on the route. Two warnings will be issued for each speed camera. Each warning is represented by a “beep” sound and a message shown on the screen showing the type of speed camera and distance.
WARNING!
The device may not have this function preinstalled. In this case it can be downloaded from the site www.telesystem.it.
WARNING!
The database is compiled using data coming from the network and user indications. TELE System can therefore not be held responsible for the accuracy and completeness of this data, the activation/deactivation of this service is the sole responsibility of the client.
FREQUENTLY ASKED QUESTIONS
I can't find an address
Make sure that the address has been entered correctly. If you are not sure how to write the address correctly, simply enter the part of the address of which you are sure (for example “Rom”, “Pietr” for Piazza San Pietro, Rome). Then explore the list of results and look for the address. Also make sure that the city name is correct. Sometimes the original postal address is different from the one you are looking for. In this case, look for a known address in the same area and explore the map.
The speaker doesn't work
The device, when the level of the battery is low, enters "saving" mode automatically and it deactivate the speaker. Reload the battery
The PC doesn't recognize the PND
To recognize the PND by the PC, it is necessary that in your PC is installed Microsoft® ActiceSync® that it allows the synchronization among the PC and the on Window Mobile based devices as your PND.
I have problems receiving a constant GPS signal
If there are problems relating to satellite GPS signal reception (it is possible to view the number of satellites from which the navigator can receive signals in the bottom left hand area of the main menu), make sure that you are outside and that the GPS antenna is facing upwards. Some models also support another active external antenna (in this case consult the relevant manual).
We remember, besides, that if the windschield of the auto is screened, the device can have difficulty to look the GPS signal, in this case we recommend the use of a external GPSantenna.
Suddenly, fatal error appears on display. The user experience is no longer allowed.
This occasional case is triggered by operative system Windows CE. No other cases are present. In case, please push the RESET button and recover the right working
TELE System
Where can I get technical support?
In case of breakages contact the retailer or manufacturer at the number provided on the last page of this manual.
Where can I get software updates?
Please, for information regarding software updates visit our site www.telesystem.it
Copyright and licensing notes
Copyright for the manual: © gate5 AG, 2007. All rights reserved.
Some software parts are protected by copyright © 1996-2002 The FreeType
Project (www.freetype.org). All rights reserved.
Product code 28040015 Navigator GPS TS 8.4 PND Italy Product code 28040018 Navigator GPS TS 8.4 PND West Europe
TELE System states that these products meet the basic requirements of the European directives 2004/108/EC(EMC) and 2006/95/EC(LVD):
EMC:
EN55022: 1998+A1:2000+A2:2003
EN61000-3-2: 2000
EN61000-3-3: 1995+A1:2001
EN55024: 1998+A1:2001+A2:2003
EN61000-6-3: 2001+A11
EN61000-6-1: 2001
LVD:
EN 60950-1: 2001+ A11:2004
EN 60065: 2002
Bressanvido, 18 ^th December 2007
Flavio De Poli
General Management


ITALY
TELE System Electronic
Via S. Benedetto, 14 Q/M
36050 Bressanvido (VI)
Internet: www.telesystem.it



- ATTENZIONE!
- SUMMARY:
- SAFETY REGULATIONS
- VARIOUS
- INSTALLATION
- WHILE DRIVING
- TELE System
- POWER CAR CABLE
- LIQUIDS
- CLEANING
- WARNING!
- INSTALLATION Key and connections
- Back
- Battery Charging
- Use of the PND in Auto
- Connection of the PND to the PC
- Use of the PND
- Getting started
- START UP
- Destination
- Address
- Search mode
- OR
- Setting a county
- Entering a post code
- City search
- Street search
- Search and selection of points of interest
- Selection of a point of interest
- Detailed search within a category
- Map
- Use of the map
- Recent
- Favourites
- Bookmarks
- Trips
- Presets
- Settings
- General options
- Map settings
- Itinerary options
- Methods of transport: overview
- Volume
- Navigation mode
- Navigation
- Navigation screen
- Alternative route
- Waylist
- Save
- Search
- Planning an itinerary
- OPTIONAL FEATURES
- Speed camera warning
- FREQUENTLY ASKED QUESTIONS
- I can't find an address
- The speaker doesn't work
- The PC doesn't recognize the PND
- I have problems receiving a constant GPS signal
- Suddenly, fatal error appears on display. The user experience is no longer allowed.
- Product code 28040015 Navigator GPS TS 8.4 PND Italy Product code 28040018 Navigator GPS TS 8.4 PND West Europe
- EMC:
- LVD:
- ITALY
Brand : TELE System
Model : TS8.4PND
Category : Gps