
C232B - Radio GPX - Free user manual and instructions
Find the device manual for free C232B GPX in PDF.


| Type of Product | Clock Radio with AM/FM |
| Brand | GPX |
| Model | C232B |
| Frequency Range | AM 520-1710 kHz, FM 88-108 MHz |
| Power Supply | AC adapter (included) or 2 x AAA batteries (backup, not included) |
| Battery Backup | Yes, for short power outages only |
| Display | LED digital display |
| Alarm | Dual alarm (Alarm 1 and Alarm 2) with radio or buzzer |
| Snooze | Yes, 9 minutes delay |
| Sleep Timer | Adjustable 10-90 minutes or off |
| Radio Presets | Yes, up to 10 (via Clock/Mem button) |
| Antenna | FM: external wire antenna; AM: built-in ferrite |
| Dimensions | Approx. 6.5 x 3.5 x 2.5 inches |
| Weight | Approx. 1.0 lb |
| Color | Black (typical) |
| Certifications | FCC Part 15 compliant |
| Cleaning | Unplug, wipe with dry cloth; do not use liquids |
| Safety | No user-serviceable parts; refer to qualified technician for repairs |
Frequently Asked Questions - C232B GPX
User questions about C232B GPX
0 question about this device. Answer the ones you know or ask your own.
Ask a new question about this device
Download the instructions for your Radio in PDF format for free! Find your manual C232B - GPX and take your electronic device back in hand. On this page are published all the documents necessary for the use of your device. C232B by GPX.
USER MANUAL C232B GPX
Warning: Changes or modifications to this unit not expressly approved by the party responsible for compliance could void the user's authority to operate the equipment.
NOTE: This equipment has been tested and found to comply with the limits for a Class B digital device, pursuant to Part 15 of the FCC Rules. These limits are designed to provide reasonable protection against harmful interference in a residential installation. This equipment generates, uses, and can radiate radio frequency energy and, if not installed and used in accordance with the instructions, may cause harmful interference to radio communications. However, there is no guarantee that interference will not occur in a particular installation. If this equipment does cause harmful interference to radio or television reception, which can be determined by turning the equipment off and on, the user is encouraged to try to correct the interference by one or more of the following measures:
• Reorient or relocate the receiving antenna.
- Increase the separation between the equipment and receiver.
- Connect the equipment into an outlet on a circuit different from that to which the receiver is connected.
- Consult the dealer or an experienced radio/TV technician for help.
Introduction and Setup
Power
Plug the included AC/DC power adapter into the DC POWER INPUT on the dock and an AC power outlet to power the dock.

natural_image
Simple line drawing of a device connected to an electrical outlet (no text or symbols)Battery Backup
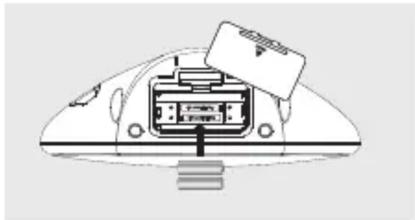
The battery backup is intended for short power outages only. The clock radio's primary functions cannot run off of the battery backup alone.
Requires 2, AAA-size, batteries (not included)
natural_image
Diagram of a computer mouse with an internal connector and a paper label (no text or symbols present)

Clock and Sleep Timer Alarm
Setting the Clock
- If in radio mode, press and hold the Source/AI Off button to turn the unit off.
- Press and hold the Clock/Mem button until the display begins to blink, then release the button.
- Press the Hour button to adjust the hour.
The PM indicator will light when the hour is set in the PM. - Press the Min button to adjust the minute.
- Press the Clock/Mem button to finish setting the time.
Setting the Sleep Timer
- Follow the instructions for v.
- Press the Snooze/Sleep button repeatedly to set the sleep timer (90, 80, 70, 60, 50, 40, 30, 20, 10 min or OFF).
- Once the set sleep time has expired the clock radio will automatically power off.
Radio
Setting the Alarm
- If in radio mode, press the Source/AI Off button to turn the unit off.
- Press and hold the AI1 or AI2 button until the display begins to blink, then release the button.
- Press the Hour button to adjust the hour.
The PM indicator will light when the hour is set in the PM. - Press the Min button to adjust the minute.
The Alarm 1 or Alarm 2 indicator will come on. - Press the AI1 or AI2 buttons repeatedly to switch between Radio and Buzzer.
If the alarm is set to Radio, use the Vol+/- buttons to adjust the volume of the alarm. - Once the set alarm time is reached, the alarm will sound.
To set the other alarm, follow the above steps and choose the alarm not currently set.
Cancelling the Alarm
- Follow the instructions for Setting the Alarm.
- Press the AI1 or AI2 buttons repeatedly until the indicator is no longer lit.
Snooze and Alarm Reset
After the alarm sounds:
Press the Snooze/Sleep button to delay the alarm for an additional 9 minutes.
OR
Press the Source/AI Off button to turn the alarm off until the set alarm time is reached again.
Tuning the AM or FM Radio
- Press the Source/Al Off button to turn the clock radio on.
- Press the Source/Al Off button again to switch between the AM and FM radio mode.
- Press the Tun+ and Tun-buttons to adjust the radio to the desired frequency.
- Press and hold the Tun+ and Tun- buttons to search for the next available frequency.
- Press the Vol+/- buttons to adjust the volume.
- Press and hold the Source/AI Off to turn the radio off.
Saving a Station as a Preset
- Follow the instructions for Tuning the AM or FM Radio.
- Tune to the desired station.
- Press and hold the Clock/Mem button to save the current radio station as a preset.
Tuning to a Preset Radio Station
- Follow the instructions for Tuning the Radio and Saving a Station as a Preset.
- Press the Clock/Mem button to cycle through preset radio stations.
Radio Reception
Adjust the position of the FM Antenna to improve FM radio reception.
An AM antenna is built into the clock radio. To improve AM radio reception, adjust the position of the clock radio.

International Support
To download this User's Guide in English, Spanish, or French, or to get answers to frequently asked questions, visit the support section at:
www.gpx.com
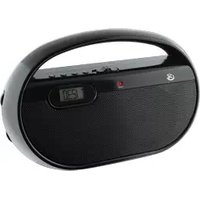
Brand : GPX
Model : C232B
Category : Radio