
Complete Control MX-4000 - Remote control URC - Free user manual and instructions
Find the device manual for free Complete Control MX-4000 URC in PDF.


| Type de produit | Remote control |
| Marque | URC |
| Modèle | Complete Control MX-4000 |
| Dimensions | 8.27 x 4.41 x 1.28 inches (210 x 112 x 33 mm) |
| Poids | 11.5 oz (326 g) with battery |
| Batterie | Lithium Polymer 3.7V 4500mAh rechargeable |
| Alimentation | 5.0V 2.0A via USB-C or charging cradle |
| Affichage | 5.0" TFT-LCD (720x1280), 16.7M colors, capacitive touch |
| Microprocesseur | ARM Cortex-A32 Quad-core 1.5GHz |
| Mémoire | 2GB DDR4 RAM, 8GB eMMC |
| Connectivité sans fil | Wi-Fi 802.11 b/g/n/ac (2.4 GHz), RF (100 ft), IR (50 ft) |
| Assistant vocal | Amazon Alexa intégré (push-to-talk) |
| Nombre de dispositifs supportés | Jusqu'à 255 |
| Nombre de pages | Jusqu'à 255 par dispositif |
| Macro | Jusqu'à 255 étapes par macro |
| Capteur | Capteur de préhension (pickup sensor) |
| Haut-parleur | Mono 1.5W |
| Port de charge | USB-C (direct ou via socle) |
| Température de fonctionnement | 0 à 50 °C |
| Entretien et nettoyage | Nettoyer avec un chiffon doux et sec. Ne pas utiliser de liquides ou nettoyants abrasifs. |
| Sécurité | Conforme FCC Part 15 Classe B. Ne pas démonter la batterie. Éviter l'immersion. |
| Pièces détachées / réparabilité | Batterie remplaçable, socle de charge, adaptateur secteur, câble USB-C disponibles. Configuration par intégrateur certifié. |
| Informations générales | Programmable via logiciel Complete Control Editor. Garantie limitée : voir site URC. |
Frequently Asked Questions - Complete Control MX-4000 URC
User questions about Complete Control MX-4000 URC
0 question about this device. Answer the ones you know or ask your own.
Ask a new question about this device
Download the instructions for your Remote control in PDF format for free! Find your manual Complete Control MX-4000 - URC and take your electronic device back in hand. On this page are published all the documents necessary for the use of your device. Complete Control MX-4000 by URC.
USER MANUAL Complete Control MX-4000 URC
MX-4000 Owner's Manual
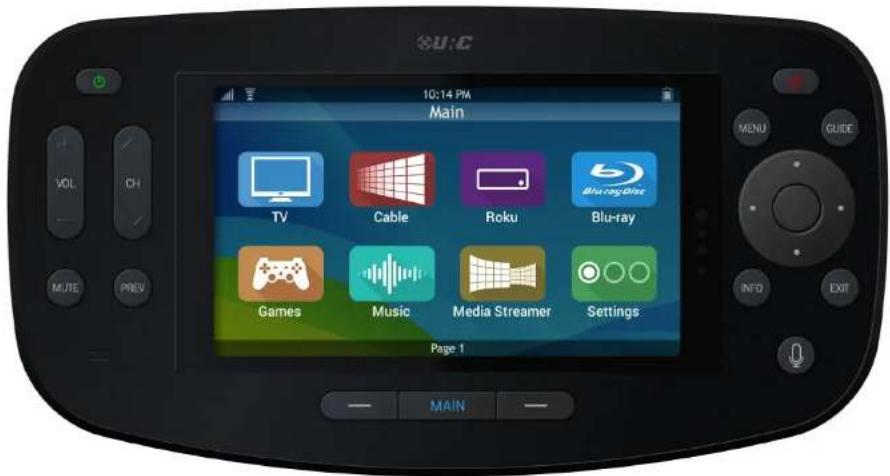
MX-4000
Owner's Manual

Complete Control
MX-4000
Owner's Manual
Introducing the MX-4000
Thank you for purchasing URC's MX-4000 touchscreen remote control. Its easy and intuitive use will help simplify your life while adding control of more things than you thought are possible.
Online Support:
Visit the URC Home Page for product information, owner's manuals, and support contact information.
Contact Support:
For questions or assistance, please contact your custom integrator/programmer.
My Installer/Programmer

Technical Support
Toll Free: 800-904-0800
Main: 914-835-4484
techsupport@urc-automation.com
Hours: 9:00 am - 5:00 pm ESTM-F
Table of Contents
| Features & Benefits | 1 |
| Parts | 2 |
| Connecting the Battery Pack | 3 |
| Using the Charging Cradle | 3 |
| Using the MX-4000 | 4 |
| Using Voice Control | 6 |
| Displaying the Setup Menu | 7 |
| WiFi Setup | 8 |
| Voice Assistant | 14 |
| Sleep Timers | 32 |
| Event Timers | 33 |
| Date & Time | 34 |
| Power | 35 |
| Brightness | 36 |
| Button Beep | 37 |
| Pickup | 38 |
| System | 39 |
| Factory Default | 40 |
| Specifications | 41 |
| Limited Warranty Statement | 42 |
Complete Control
MX-4000 Owner's Manual
Features & Benefits
- IR/RF Device Control: The MX-4000 can directly control every IR device in your home. You can also use RF to control devices located in different rooms by integrating an MRF base station.
- Quick Connect Wi-Fi: When woken up, the remote connects to the wireless network (2.4 GHz) for control via a Voice Assistant.
- Voice Assistant Ready: Enable the built-in Amazon Alexa service to send commands verbally from the remote by pushing the press-to-talk microphone button.
- User Interface Customization: Each Main Menu button can be customized for activities, such as watching TV or listening to the radio. These activities can contain multiple commands (macros) which enable a single button press to turn the needed devices ON or OFF.
- Complete Control PC Editor: The MX-4000 is programmed using advanced configuration software called Complete Control. To fully automate an audio/video system, the programmer must have a detailed knowledge of each component and how the system connects and operates.

Complete Control
MX-4000 Owner's Manual
Parts
• MX-4000 Wi-Fi Remote Control
• Li-ion Rechargeable Battery
- Charging Cradle
- Power Adapter
- USB Type C-Cable
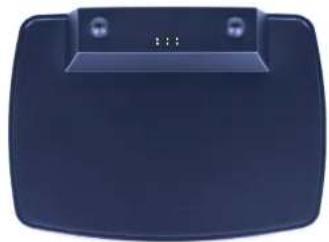
MX-4000 Charging Cradle

natural_image
Blue rectangular electronic device with two small circular buttons on top (no visible text or symbols)
Rechargeable Battery


Power Adapter
USB Type C Cable
Complete Control
MX-4000 Owner's Manual
Connecting the Battery Pack
A battery is included in the box when shipped from the factory. Press the spring lock down to unlock and remove the cover. Place the battery into the battery compartment, making sure to align the contacts on the battery with the contacts within the MX-4000's battery compartment. The battery snaps into place when aligned properly. Replace the battery cover.
Using the Charging Cradle
Plug the USB power adapter into a power outlet and the USB-C cable into the rear of the charging cradle. Gently place the MX-4000 into the cradle, so that the remote automatically aligns itself to the contacts on the charging cradle. The status light immediately illuminates.
It is possible to connect the USB-C cable directly into the bottom of the MX-4000.
There are three (3) status light conditions:
- Red: Indicates that the remote's battery is charging
- Blue: Indicates that the remote's battery is off the charging dock
- White: Indicates that the remote's battery is fully charged

natural_image
Back view of a black electronic device with ventilation grilles and a small internal component (no visible text or symbols)

natural_image
Blue plastic clipboard with a small display on top (no visible text or symbols)Complete Control
MX-4000 Owner's Manual
Using the MX-4000
The Main Menu pages display activities and/or devices. Press the Main Button to access the Main Menu. Larger systems may have more than one (1) page. Press the Page buttons on either side of the Main button to view additional Main Menu pages.
Although the MX-4000 is programmed with custom layouts and devices, there are persistent buttons that maintain a steady function:
A. Power On/Off: With a single press of either button, the Complete Control system turns the device On (Left) or Off (Right).
B. Capacitive Touch Screen: The specific function of each button is linked to the screen icon associated to the LCD screen. These buttons are used to select activities, devices, functions, navigate and more. Speak with your custom integrator for more details.
C. Page Left/Right: These buttons are used to navigate through the various Main Menu and Device/Activity Menu pages.
D. Main: By default, this button returns the user to the previous menu.
E. Vol+, Vol-, & Mute: Used to increase, decrease, or toggle the mute status of the active audio device's volume level.
F. CH+, CH-, & Prev: CH+ & CH- are used to change a Cable/SAT channel up or down. The Prev button returns to the device's previous channel or can be used to return the user to a previous menu.
G. Microphone: Select this button to interact with the programmed voice service assistant. When pressed, the microphone activates and listens to your verbal commands. The microphone is shut off when the button is no longer pressed.

Complete Control
MX-4000 Owner's Manual
Using the MX-4000 (cont'd)
H. Navigation Keys: Comprised of up, down, left, and right. These buttons are used to navigate through the menus and/or device screens.
I. Select: Center button of navigation keys, used to confirm selections displayed on a viewing device.
J. Menu: Displays the on-screen menu of the active device.
K. Guide: Displays the channel guide for the device's on-screen display.
L. Info: Displays channel information for the device's on-screen display.
M. Exit: Closes out any open menus or guides on the display or returns to the previous menu.

Complete Control
MX-4000 Owner's Manual
Using Voice Control
The MX-4000 has the capability of using Amazon Alexa Voice Assistant to control activities and devices programmed within the Alexa system.
For instructions on how to enable the Alexa Voice service, refer to page 14.
The MX-4000 preserves your privacy with a push-to-talk button on the remote control. This means the Alexa Service is only listening when you want it too.
Issuing Voice Commands
Voice Commands can be issued easily and intuitively with the pus to-talk button.
This button removes the need to say "Alexa...".
Press-n-hold the button and say phrases such as...
- "Set living room temperature to 72 degrees."
- "Turn on patio lights."
- "Turn off kitchen lights."
• "And many more..."
The MX-4000 does not support the following Amazon Alexa features:
• Audio Playback via Amazon Music, Audible, or other music services.
- Alexa Drop-In, calls, or video calls
• Graphical feedback from Alexa

Complete Control
MX-4000 Owner's Manual
Displaying the Setup Menu
The Setup Menu allows users to configure or change certain behaviors and features of the MX-4000.
Enter the Setup Menu by pressing and holding the Main and Select (see image at the right) buttons for greater than five (5) seconds.

The Setup Menu times out after sixty (60) seconds and returns the MX-4000 to the system's Main Menu.
Use the touchscreen to access the Setup Menu options.
To return to a previous page press the left page button (at the left of Main Menu). Press the Main or Exit button to return the remote to the Main Menu.

• Wi-Fi
• Voice Assistant
- Sleep Timers
• Event Timers
- Date & Time
• Power
- Brightness
• Sound
- Pickup
- System
- Factory Default

Complete Control
MX-4000 Owner's Manual
WiFi Settings Menu
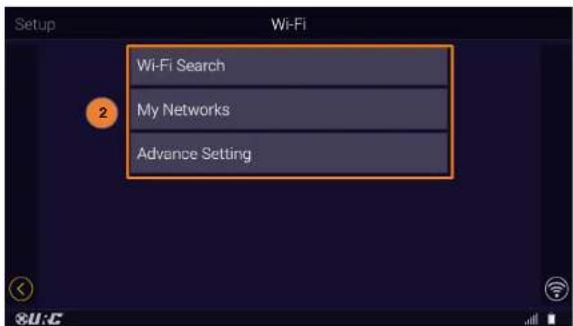
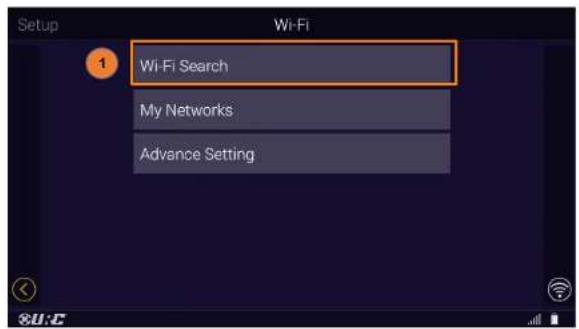
The Wi-Fi Settings menu is used to connect the MX-4000 to the user's preferred local area network settings once connected. Follow these instructions to configure the Wi-Fi for the MX-4000:
- From the Setup Menu, select Wi-Fi.
-
The Wi-Fi menu has three options:
-
Wi-Fi Search
• My Networks - Advanced Settings

Complete Control
MX-4000 Owner's Manual
WiFi Settings Menu (cont'd)
Wi-Fi Search
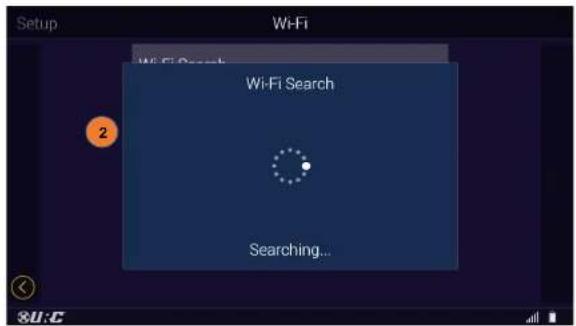
The Wi-Fi Search opens the Searching of Networks notification and then lists the available network connections:
- Select Wi-Fi Search from the Wi-fi menu.
- The Wi-Fi Search notification will pop-up while the MX-400 searches for available networks.
Complete Control
MX-4000 Owner's Manual
WiFi Settings Menu (cont'd)
Wi-Fi Search (cont'd)
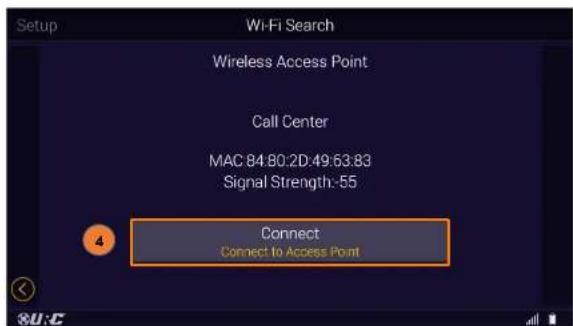
- A completed Wi-Fi search will display:
A. The name, signal strength and Wi-Fi channel number of each discovered Wi-Fi network signal.
- Shows the signal strength, a lock indicating that network requires a password and a green check indicating that it is the assigned network.
- Shows the signal strength and a lock indicating the network requires a password.
-
Shows the signal strength, a lock indicating that network requires a password and arrows indicating that WPS is available.
B. Along the right sight of the menu page, there will be a List Scroll Indicator which reflects the relative position of the list items displayed in the UI as a fraction of the total list size. The Indicator will change positions as the user navigates along the list to reflect the position of the on-screen list items relative to the entire list.
C. As the extreme right side of the list screen are the Up and Down arrows that allow the user to navigate the list. -
Select your preferred access point from Step 3 and select Connect.

Complete Control
MX-4000 Owner's Manual
WiFi Settings Menu (cont'd)
Wi-Fi Search (cont'd)
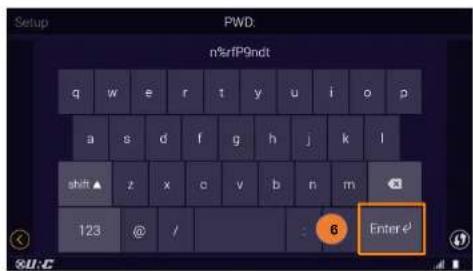
- Select Password.
- Key in the password using the onscreen keyboard and select Enter.
- Select ☑ accept the password that was entered.


Complete Control
MX-4000 Owner's Manual
WiFi Settings Menu (cont'd)
My Networks
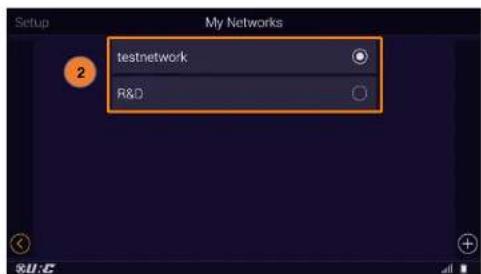
The My Networks menu displays a list of SSID's that have been added to the MX-4000 using the Wireless Search or the Add Other methods.
To select an available SSID added to the MX-4000:
- Select My Networks from the Wi-fi menu.
- Use the radio buttons to select the desired network.
-
You will be giving four options:
-
Connect - forces a connection to the selected access point and closes the access point options notification.
- Delete - removes the selected access point from the preferred list and closes the access point options notification.
- Move Up - allows the user to move the indicated network access point up one space on the My Networks List.
- Move Down - allows the user to move the indicated network access point down one space on the My Networks List.


Complete Control
MX-4000 Owner's Manual
WiFi Settings Menu (cont'd)
Advanced Settings
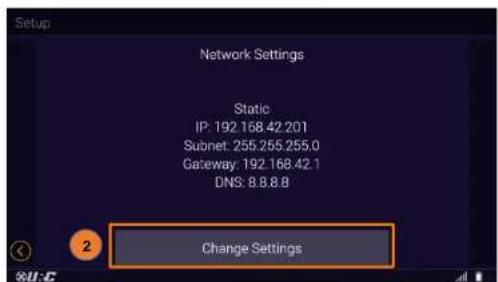
The Advanced Settings shows the MX-4000's current network settings.
To view the MX-4000's current network settings:
- Select Advanced Setting from the Wi-fi menu.
- The network setting are now displayed, select on Change Settings to make changes.
- The lpv4 Setup page gives you the option to choose DHCP or Static. Choosing Static will require you to enter the IP Address, Subnet Mask, Gateway and DNS.


Complete Control
MX-4000 Owner's Manual
Voice Assistant Setup
This option allows you to integrate your Amazon Alexa Voice Assistant and Comcast Xfinity voice module with the MX-4000.
Amazon Alexa Voice Assistant setup
Follow these instructions to enable the Alexa Voice Assistant service.
Once enabled, use the push-to-talk button to issue vocal commands to the Alexa system:
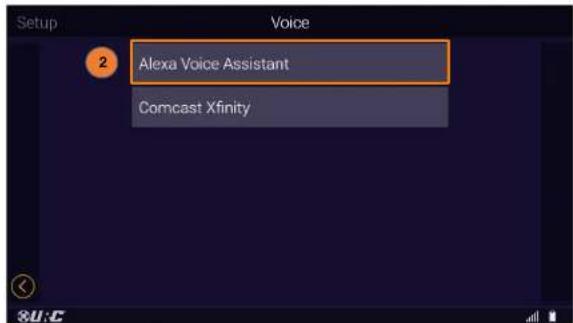
- From the Settings Menu, select Voice Assistant.
- Select Alexa Voice Assistant.

Complete Control
MX-4000 Owner's Manual
Voice Assistant Setup (cont'd)
Amazon Alexa Voice Assistant setup (cont'd)
Voice Assistant Settings
After setup, the Voice Assistant menu offers a few features to customize how the remote interacts with Alexa.
- Login: Selecting Login will begin the Alexa login and authentication sequence.
- Logout: Selecting Logout removes Alexa integration from the remote. The Mic button no longer functions with Alexa until it has been configured again.
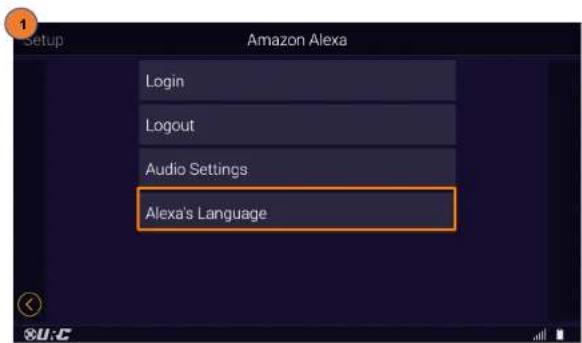
• Audio Settings: Allows for Voice Volume and the Audio Cue levels to be adjusted. - Alexa's Language: Allows for Alexa's language/accent to be set to one of a variety of options.

Complete Control
MX-4000 Owner's Manual
Voice Assistant Setup (cont'd)
Amazon Alexa Voice Assistant setup (cont'd)
Voice Assistant Settings
After setup, the Voice Assistant menu offers a few features to customize how the remote interacts with Alexa.
Login
- Selecting Login will begin the Alexa login and authentication sequence.
- Select Get Started to proceed with the login and authentication process. Selecting Go Back will take you to the Alexa Voice Assistant Menu.


Complete Control
MX-4000 Owner's Manual
Voice Assistant Setup (cont'd)
Amazon Alexa Voice Assistant setup (cont'd)
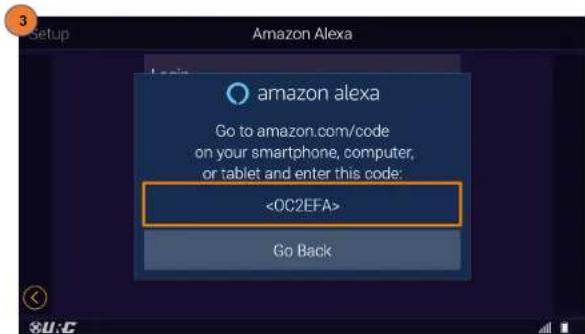
- You will now be prompted with a code to enter on your smartphone, computer or tablet at amazon.com/code.
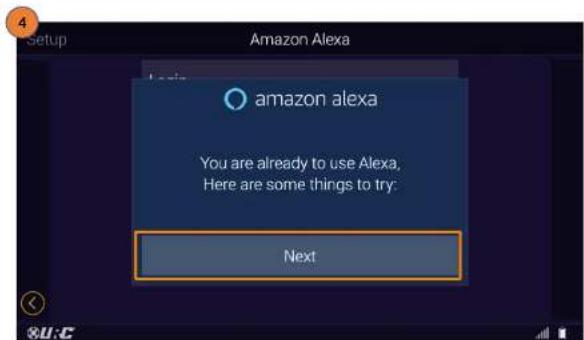
- Select Next when you are asked if you are ready to use Alexa and to try some things.
Complete Control
MX-4000 Owner's Manual
Voice Assistant Setup (cont'd)
Amazon Alexa Voice Assistant setup (cont'd)
- Follow the on screen instructions and select Next when done.
- Select Done to complete the login and authentication process.


Complete Control
MX-4000 Owner's Manual
Voice Assistant Setup (cont'd)
Amazon Alexa Voice Assistant setup (cont'd)
Voice Assistant Settings
After setup, the Voice Assistant menu offers a few features to customize how the remote interacts with Alexa.
Logout
- Selecting Logout removes Alexa integration from the remote. The Mic button no longer functions with Alexa until it has been configured again.
- Select Yes or No when prompted if you're sure if you want to logout of the Alexa voice service.


Complete Control
MX-4000 Owner's Manual
Voice Assistant Setup (cont'd)
Amazon Alexa Voice Assistant setup (cont'd)
Voice Assistant Settings
After setup, the Voice Assistance menu offers a few features to customize how the remote interacts with Alexa.
Audio Settings
-
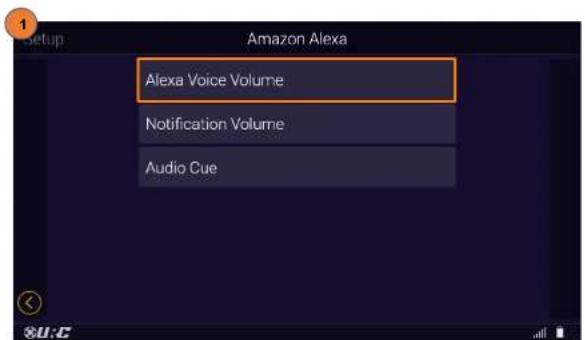
Selecting Audio Settings allows for Voice Volume, Notification Volume and the Audio Cue levels to be adjusted.
-
The Audio Settings menu give the following options:
- Alexa Voice Volume: Selecting Alexa Voice Volume allows the user to set the the volume level of the Alexa voice output.
- Notification Volume: Selecting Notification Volume allows the user to set the volume level for Amazon Alexa notifications through the URC system.
- Audio Cue: Using the Audio Cue option enables the Alexa audio tone that occurs when the microphone button is pressed on the URC client device.


Complete Control
MX-4000 Owner's Manual
Voice Assistant Setup (cont'd)
Amazon Alexa Voice Assistant setup (cont'd)
Audio Settings (cont'd)
- Selecting Alexa Voice Volume allows the user to set the the volume level of the Alexa voice output.
- Use the Minus ⊖ and Plus ⊕ signs to decrease or increase the Alexa Voice Volume.
Once the volume has been adjusted, press the Save button. Pressing Cancel reverts the device to the last saved setting.

Complete Control
MX-4000 Owner's Manual
Voice Assistant Setup (cont'd)
Amazon Alexa Voice Assistant setup (cont'd)
Audio Settings (cont'd)
- Selecting Notification Volume allows the user to set the volume level for Amazon Alexa notifications through the URC system.
- Use the Minus ⊙ and Plus ⊕ signs to decrease or increase the Notification Volume.
Once the volume has been adjusted, press the Save button.
Pressing Cancel®reverts the device to the last saved setting.


Complete Control
MX-4000 Owner's Manual
Voice Assistant Setup (cont'd)
Amazon Alexa Voice Assistant setup (cont'd)
Audio Settings (cont'd)
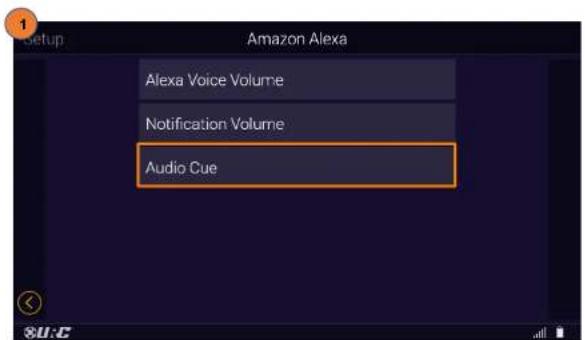
- Selecting the Audio Cue option enables the Alexa audio tone that occurs when the microphone button is pressed on the URC client device.
- Use the Toggle ☐ to turn the option OFF or ON to be prompted with an audio cue when Alexa is listening. Pressing Cancel ⬆verts the device to the last saved setting.

Complete Control
MX-4000 Owner's Manual
Voice Assistant Setup (cont'd)
Amazon Alexa Voice Assistant setup (cont'd)
Alexa's Language
- Selecting Alexa's Language will give you a list of the available languages which can be used with Alexa.
- Use the O, radio buttons to choose your desired Alexa Language. The open bullet is an available language, the filled bullet is the selected language. Select an available language to set it as the current language
Using the up and down arrows and the scroll bar gives the ability to scroll through the list of languages.
Once your language has been chosen, press the Save button √
Pressing Cancel reverts the device to the last saved setting.

Complete Control
MX-4000 Owner's Manual
Voice Assistant Setup (cont'd)
This option allows you to integrate your Amazon Alexa Voice Assistant and Comcast Xfinity voice module with the MX-4000.
Comcast Xfinity setup
Follow these instructions to enable the Comcast Xfinity voice module.
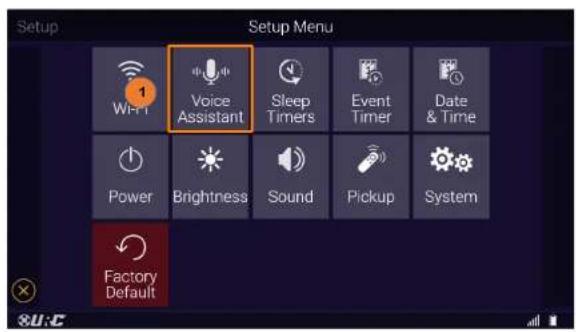
- From the Settings Menu, select Voice Assistant.
- Select Comcast Xfinity.

Complete Control
MX-4000 Owner's Manual
Voice Assistant Setup (cont'd)
Comcast Xfinity setup
Voice Module
After setup, the voice module menu offers a few features to customize how the remote interacts with Comcast Xfinity.
- Enter IP Address to Connect: Selecting this item will open the Comcast Enter IP Notification screen.
- Disconnect: Selecting Disconnect will open the Comcast Disconnect Notification screen.
- Choose Devices: Allows for Voice Volume and the Audio Cue levels to be adjusted.

Complete Control
MX-4000 Owner's Manual
Voice Assistant Setup (cont'd)
Comcast Xfinity setup
- Select Enter IP Address to Connect to open the Comcast Enter IP Notification screen.
- You will prompted that a Comcast box must be enabled for IP control in order for the Xfinity voice feature to work. Select Next.


Complete Control
MX-4000 Owner's Manual
Voice Assistant Setup (cont'd)
Comcast Xfinity setup (cont'd)
- Use the numerical keypad to enter the IP Address of the Comcast Xfinity cable box and then select Enter.
![Setup IP Address: 192.168.123.194 1 2 3 4 5 6 7 8 9 0 #^[ ] abc space Enter](/content/2026/05/958663/images/3787c62bb83e5ae7ed96a69f76897897fe7d1323a163d6e2d0acb43fd619d29f.jpg)
Complete Control
MX-4000 Owner's Manual
Voice Assistant Setup (cont'd)
Comcast Xfinity setup (cont'd)
- Select Disconnect to disconnect the usage of this device from using the Xfinity Voice module.
- On the Disconnect screen, you will be asked if Are you sure you want disconnect the Xfinity voice service? Select Yes or No to disconnect or stay connected.


Complete Control
MX-4000 Owner's Manual
Voice Assistant Setup (cont'd)
Comcast Xfinity setup (cont'd)
- Select Choose Devices to pick the devices on your remote that you want Xfinity voice to activate when pressing the mic button.
- Select Next to view a list of devices.


Complete Control
MX-4000 Owner's Manual
Voice Assistant Setup (cont'd)
Comcast Xfinity setup (cont'd)
- Use the ☑ and □ check boxes to add or remove devices for Xfinity voice control.
Using the up-and down arrows and scroll bar gives the ability to scroll through the list of devices.
More than 1 device can be selected on this list
Once the devices have been chosen, press the Save button.
Pressing Cancel reverts the device to the last saved setting.

Complete Control
MX-4000 Owner's Manual
Sleep Timers
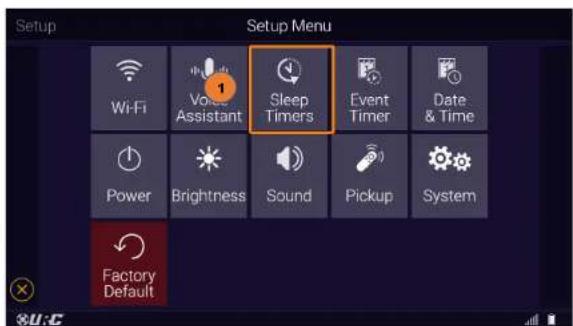
The Sleep Timers settings are used to manage when the LCD screen will turn off while the MX-4000 is running on battery power and is charging on the cradle.
- From the Setup Menu, select Sleep Timers.
- Use the < and > buttons to decrease or increase the sleep timer when the MX-4000 is running on battery power (off, 10sec, 15sec, 20sec, 30sec or 1min) and is charging on the cradle (off, 15sec, 30sec, 1min, 2min or 3min).
Once the times have been adjusted, press the Save button. Pressing Cancel reverts the device to the last saved setting.

Complete Control
MX-4000 Owner's Manual
Event Timer
The Event Timer settings are used to enable and disable Event Timers programmed within the Complete Control system
- From the Setup Menu, select Event Timer.
- Use the ☑ and □ check boxes to enable or disable the Event Timers.
Using the up-and down arrows gives the ability to scroll through the list of event timers.
Once the times have been adjusted, press the Save button.
Pressing Cancel reverts the device to the last saved setting.


Complete Control
MX-4000 Owner's Manual
Date & Time
The remote's date and time settings have been set by your certified custom integrator. If needed, the date and time settings can be manually changed here.
If the system's date and time are adjusted, the MX-4000 adopts the new date and time globally.
If the advanced system controller is reset, it defaults to the program's default location using the Internet. If Internet is not present, the date and time must be entered manually from a URC interface such as the MX-4000.
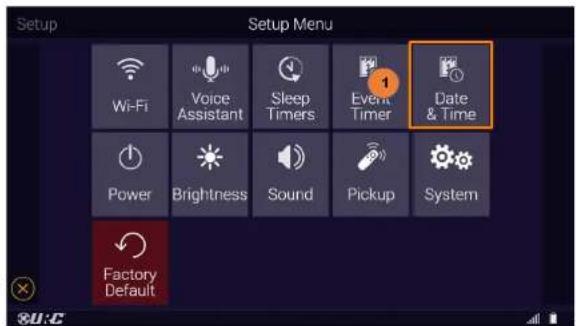
- From the Setup Menu, select Date & Time.
- Select the Date, Time, Hour format and Time Zone to manually adjust these settings.
Once adjustments have been made, press the Save button. Pressing Cancel reverts the device to the last saved setting.

Complete Control
MX-4000 Owner's Manual
Power
Displays the remote's remaining battery level. Adjust when the "Low Battery" warning screen appears.
- From the Setup Menu, select Power.
- View the amount of Batter Power Remaining and adjust the Low Battery Warning level to 10%, 20%, 30%, 40% or 50%. Once the power has been adjusted, press the Save button. Pressing Cancel reverts the device to the last saved setting.


Complete Control
MX-4000 Owner's Manual
Brightness
Adjust the screen and button brightness by pressing Plus and Minus symbols to increase or decrease the brightness level.
- From the Setup Menu, select Brightness.
- Use the Minus and Plus signs to decrease or increase the Screen and/or Button Lights.
Once the brightness has been adjusted, press the Save button
Pressing Cancel reverts the device to the last saved setting.

CANCEL

Complete Control
MX-4000 Owner's Manual
Sound (Button Beep)
Adjust the button "beep" of the remote. Press the Plus and Minus symbols to increase or decrease the volume level.
- From the Setup Menu, select Sound.
- Use the Minus and Plus signs to decrease or increase the Beep Level Volume.
Once the sound has been adjusted, press the Save button. Pressing Cancel reverts the device to the last saved setting.

CANCEL

Complete Control
MX-4000 Owner's Manual
Pickup
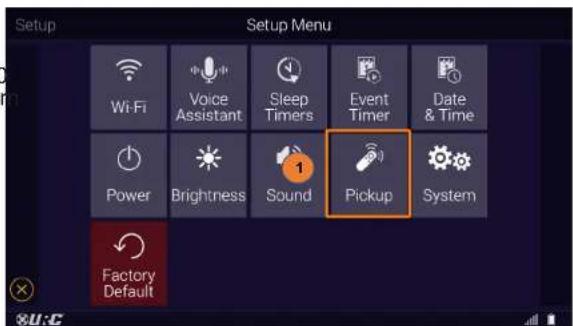
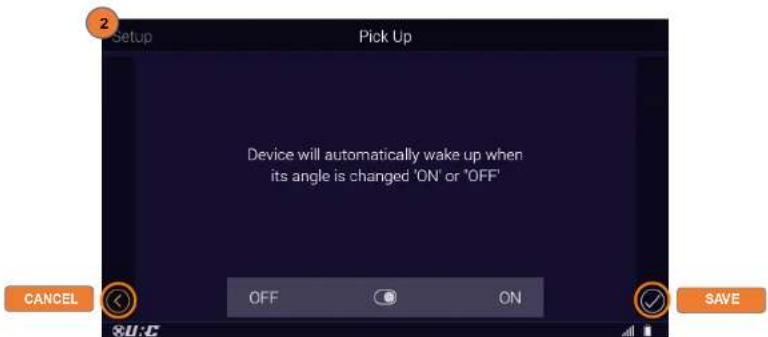
Turn on or off the remote's pickup sensor. When enabled, the MX-4000 turns on when the remote is picked up. Select Yes (turn on) or No (turn off).
- From the Setup Menu, select Pickup.
- Use the Toggle ⬤ to turn the option OFF or ON to wake up when picked up.
Once your option is made, press the Save button.
Pressing Cancel reverts the device to the last saved setting.
Complete Control
MX-4000 Owner's Manual
System
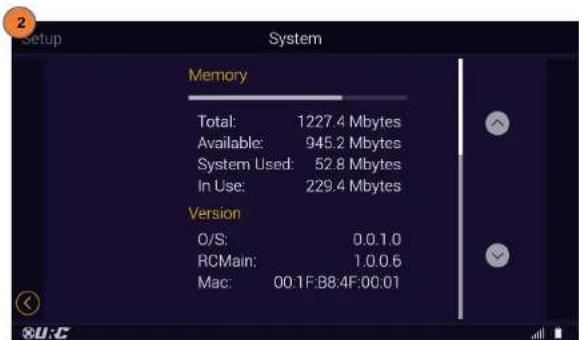
Displays information about the remote's operating system, memory, etc. Pressing the Exit button exits to the remote's System Menu.
- From the Setup Menu, select System.
- Pressing the Exit@utton exits to the device's System Menu.

Complete Control
MX-4000 Owner's Manual
Factory Default
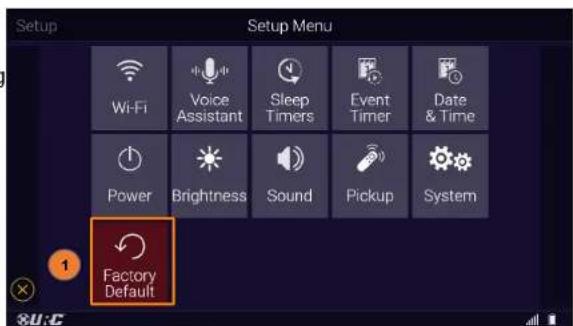
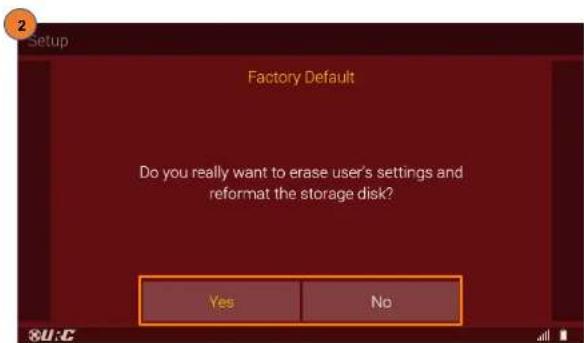
Resets the memory of the MX-4000 to the factory settings. All existing programming is erased. The device requires reconfiguration by your certified URC integrator.
WARNING! Only use this button when instructed by URC's Technical Support team.
- From the Setup Menu, select Factory Default (For 5 Seconds).
- Select Yes or No when prompted "Do you really want o erase user's settings and reformat the storage disk?"
Complete Control
MX-4000 Owner's Manual
Specifications
These are the technical specifications for the MX-4000:
Microprocessor: ARM Cortex-A32 Core 1.5GHz x 4
RAM: 8MB eMMC, DDR4 2GB
LCD: 5.0" TFT-LCD (720 x 1280), 16.7M colors
Touch Window: Capacitive Touch
Sound: Mono 1.5W
Sensors: Pickup sensor
Devices: Supports up to 255 devices
Usage Pages: Supports up to 255 pages on each device
Macro Capability: Up to 255 steps
IR Learn Range: 1\~3inch
IR Range (Line of Sight via Infrared): up to 50 feet, depending on the environment
RF Range (Radio Frequency): up to 100 feet, depending on the enviro
Wi-Fi: IEEE 802.11 b/g/n/ac
Battery: Lithium Polymer, 3.7V, 4500mAh
Battery Charging Time: 4 Hours
Power: 5.0V 2.0A
Operating Temp: 0\~50 °C (non-condensing)
Size: 8.27in X 4.41in X 1.28in
Product Weight: 11.5oz (with battery loaded)
Warning!
The manufacturer is not responsible for any Radio or TV interference caused by unauthorized modifications to this equipment.
Changes or modifications not expressly approved by the manufacturer could void the user's authority to operate the equipment.
Limited Warranty Statement
https://www.urc-automation.com/legal/warranty-statement/
End User Agreement
The terms and conditions of the End User Agreement available at https://www.urc-automation.com/legal/end-user-agreement/ shall apply.
Federal Communication Commission Interference Statement
This equipment has been tested and found to comply with the limits for Class B digital device, pursuant to part 15 of the FCC Rules. These limits are designed to provide reasonable protection against harmful interference in a residential installation.
This equipment generates, uses and can radiate radio frequency energy and, if not installed and used in accordance with the instructions, may cause harmful interference to radio communications. However, there is no guarantee that interference will not occur in a particular installation. If this equipment does cause harmful interference to radio or television reception, which can be determined by turning the equipment off and on, the user is encouraged to try to correct the interference by one more of the following measures:
- Reorient or relocate the receiving antenna.
- Increase the separation between the equipment and receiver.
- Connect the equipment into an outlet on a circuit different from that to which the receiver is connected.
- Consult the dealer or an experienced radio/TV technician for help.
Complete Control
MX-4000
Owner's Manual

GUMI UNIVERSITY
EMC CENTER

Page 1 of 46
EVALUATION REPORT
for Certification
Applicant : Ohnung Electronics Co., Ltd.
181 Gongdan-dong, Gumi-Si.
Gyroungsangbuk-Do, South Korea
Attn: Mr. Hak-Ki Kim / General Manager
CAR Designation Number: KR0033
RESPONSIBLE PARTY : Ohung Electronics Co., Ltd.
ADDRESS
: #181 Gongdan-dong, Gumi-Si, Gyeongsangbuk-Do, South Korea
CONTACT PERSON
: Mr. Hak-Ki Kim / General Manager
Rule Part(s)
Test Method
Equipment Class
EUT Type
Type of Authority
Model Name
: FCC Part 15 Subpart C-Intentional Radiator § 15.247
: RF Remote Controller
: Certification
:MX-1400
This equipment has been shown to be in compliance with the applicable technical standards as indicated in the measurement report and was tested in accordance with the measurement procedures specified in ANSI C63.10 (2013)
I attest to the accuracy of data. All measurements reported herein were performed by me or were made under my supervision and are correct to the vest of my knowledge and belief. I assume full responsibility for the completeness of these measurements and vouch for the qualifications of all persons taking them.
Tested by.
Reviewed by,

Jong-Wook Park / Senior Engineer
GUMI UNIVERSITY EMC CENTER

Hyun Kim / Technical Manager
GUMI UNIVERSITY EMC CENTER
GETEC-QP-16-008 [Rev.01]
EMC CENTER
Regulatory Information to the User
- CE conformity Notice Products with "CE" marking comply EMC Directive 2014/30/EU issued by the commission of the European Community.
- EMC Directive
- Emission
- Immunity
- Power
• Declaration of Conformity
"Hereby, Universal Remote Control Inc. declares that this MX-4000 is in compliance with the Essential requirements."
Importer & Manufacturer
- Importer:
Universal Remote Control, Inc.
500 Mamaroneck Ave
Harrison, NY 10528
- Manufacturer:
OHSUNG ELECTRONICS CO., LTD.
181 Gongdan-Dong, Gumi, Gyeongbuk Republic of Korea
Rechargeable Lithium Polymer Battery Precautions & Information
- If you will not be using your remote control for an extended period of time, please remove the battery.
- Do not attempt to disassemble, alter, or apply heat to the battery.
- Use care to avoid dropping the battery or subjecting it to severe impact that could damage it.
• The battery should not be immersed in water. - Risk of explosion if the battery is replaced by an incorrect type.
- Dispose of used batteries according to the instructions.
• Lithium Polymer batteries are recyclable. For information on local drop-off site, please visit www.rbrc.com or call toll free 1-800-822-8837.
- Complete Control
- Introducing the MX-4000
- Online Support:
- Contact Support:
- Technical Support
- Features & Benefits
- Parts
- Connecting the Battery Pack
- Using the Charging Cradle
- Using the MX-4000
- Using the MX-4000 (cont'd)
- Using Voice Control
- Issuing Voice Commands
- Displaying the Setup Menu
- WiFi Settings Menu
- WiFi Settings Menu (cont'd)
- Wi-Fi Search
- Wi-Fi Search (cont'd)
- My Networks
- Advanced Settings
- Voice Assistant Setup
- Amazon Alexa Voice Assistant setup
- Voice Assistant Setup (cont'd)
- Amazon Alexa Voice Assistant setup (cont'd)
- Login
- Logout
- Audio Settings
- Audio Settings (cont'd)
- Alexa's Language
- Comcast Xfinity setup
- Comcast Xfinity setup (cont'd)
- Sleep Timers
- Event Timer
- Date & Time
- Power
- Brightness
- Sound (Button Beep)
- Pickup
- System
- Factory Default
- Specifications
- Warning!
- Limited Warranty Statement
- End User Agreement
- Federal Communication Commission Interference Statement
- EVALUATION REPORT
- Gongdan-dong, Gumi-Si.
- Regulatory Information to the User
- Importer & Manufacturer
- Gongdan-Dong, Gumi, Gyeongbuk Republic of Korea
- Rechargeable Lithium Polymer Battery Precautions & Information
Brand : URC
Model : Complete Control MX-4000
Category : Remote control